Web Client UI Framework Blogs
With this blog we want to start a series of blogs introducing How-To Guides and further information on the Web Client UI Framework, which is mainly used by SAP CRM. They are valid for release SAP CRM 7.0 if not stated differently. It will most often be a short blog with a link to a PDF document. We hope that one or the other topic will help you in your daily project work and of course any feedback is very much welcome.
So please feel free to regularly check for new blogs focused on the topic Web Client UI Framework.
Skins and CSS with SAP CRM 7.0
(Almost) every company nowadays has its own corporate identity. A fancy logo known to its customers, specific colors or color schemes are used e.g. for inter- and intranets to make customers and employees feel at home, to raise certain emotions, to facilitate exploration of content and the finding of certain information.
If you now decide for any external tool that should support you in doing your business even better, support your customers and employees to achieve their goals much easier, of course you do not want this tool to visually stick out of your corporate identity, it should look and feel like an integral part of your company, your daily life, your work, your fun. And what is quite often overlooked, an intelligent visual design supports the understanding of functionality, makes it easier to work with a tool, if e.g. the more important parts are visualized more prominent while less important parts are positioned in border areas only.
Even though SAP CRM offers with the new Web Client User Interface - from the very beginning - flexible possibilities to adapt the look and feel of the software, we do not see yet too many projects really making extensive use of these possibilities. There could be different reasons for this:
- Of course in tough IT projects very often other goals are higher prioritized, first of all the solution has to work - the focus is on efficiency and effectiveness that should be risen by the solution. But also quite often you see users reluctantly using new tools, they simply don't like them... and exactly in this area 'skinning' is a topic that can help you make a perfect first impression to users, as we all know "The eye must be pleased as well".
- Maybe it is still too unknown how easy and flexible SAP CRM skins can be adapted to whatever you require.
This blog is meant to provide some background on the topic SKINNING with SAP CRM.
What does SAP CRM offer regarding the visual design?
As you might know - SAP CRM 2007 (and higher) release offers in standard 5 different skins. Some of them follow a specific goal - like the HIGH CONTRAST skin for visually impaired people or the Signature Design skin to have one common look and feel across SAP software for the future - while others should simply provide you with an idea of what is possible only via changing the skin, without touching any business functionality, without writing any CRM code line..
To achieve this SAP CRM uses standard Cascading Style Sheets. Cascading Style Sheets (CSS) is a styles heet language used to describe the presentation of a document written in a markup language. The CSS specifications are maintained by the World Wide Web Consortium (W3C).
Further details regarding which style sheets are used in SAP CRM skins, how they relate to each other, how and what you have to adapt to achieve certain changes, all this is explained in the a linked How-To Guide that provides all the basics to jumpstart you in the area of skinning SAP CRM.
Changing the SAP CRM logo in the top left corner of the screen
In addition as small intro in that topic here is one of the main use cases everyone will come across in a customer project. Already in presales demos this is one of the most requested small changes to make a user/customer feel at home in a software. Normally in every project this is adapted to show the corporate logo of the customer using the software, so here some insights on what you can do to exchange SAP CRM logo with any other logo.
You have to do the following steps:
Create a copy of the standard SAP skin that best matches your target skin (there is an own section on how to do this in the How-To Guide)
In the copied skin: (a) modify the logo file or (b) modify the CSS files to point to the image file of your logo
(If necessary) adjust the height of the header area to fit the new logo
Following variant (a) using the Skin Workbench you can drill into the folders of a skin and find the LOGO.PNG file in the corresponding folder LSHAPE.
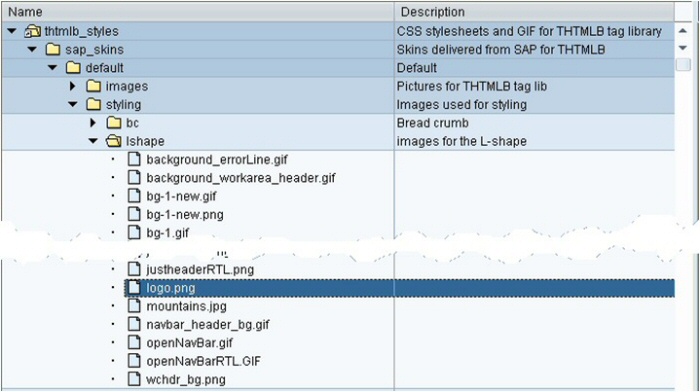
Simply replace the logo.png with a new logo.png file containing the target picture. If the target picture does not have the same size as the original SAP picture and if you do not want to resize it to fit into the standard space, you can also adapt the height of the header area. To do that, go to IMG customizing (transaction spro), Customer Relationship Management -> UI Framework -> Technical Role Definition -> Define Layout Profile. Select the layout profile corresponding to your role (e.g. Default) and click on Details. Set the header height in pixels in the corresponding field.


Alternatively you can also leave the SAP logo image file unchanged, upload a different image file in addition and modify the CSS file instead to point the logo class to your own logo image file.
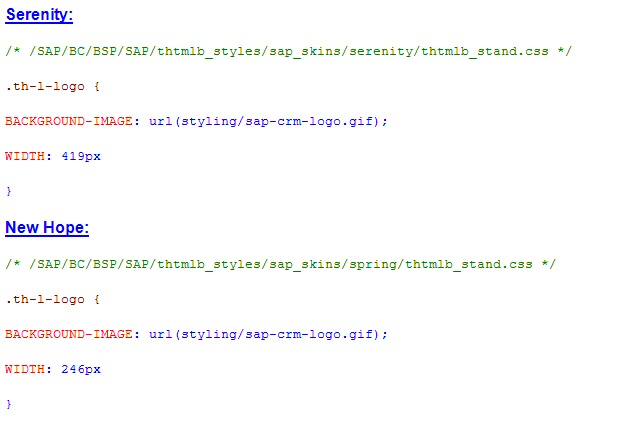
Below is the information about CSS file that contains the logo class, the definition of that class and the path of the logo file for each skin.


We hope you find this information valuable and please provide feedback focused on the general topic CRM Skinning to help us improve such supporting documents.
Best Regards
Ingo
