
- SAP Community
- Products and Technology
- Enterprise Resource Planning
- ERP Blogs by Members
- LSMW for Functional Consultants in simple step-by-...
Enterprise Resource Planning Blogs by Members
Gain new perspectives and knowledge about enterprise resource planning in blog posts from community members. Share your own comments and ERP insights today!
Turn on suggestions
Auto-suggest helps you quickly narrow down your search results by suggesting possible matches as you type.
Showing results for
former_member18
Active Contributor
Options
- Subscribe to RSS Feed
- Mark as New
- Mark as Read
- Bookmark
- Subscribe
- Printer Friendly Page
- Report Inappropriate Content
09-10-2013
9:40 AM
Legacy System Migration Workbench (LSMW) is handy tool for data uploads. In most of the big projects there is a separate development / data migration team is available. However, at times, it would be responsibility of the functional consultant to load the data such as vendor master, customer master and asset master etc. It would be real handy for a functional consultant to know LSMW (at least recording method) and it would help them to successfully complete the task. Hope this document would help many of our functional consultants, as I am seeing number of questions around LSMW. The simple rule is: Follow this document and practice is for number of times possible, then you will become master.
Go to Transaction Code "LSMW" and follow the following steps:

Give some Unique name for Project, Subproject and Object. Click Create (Shift+F1). Now execute or press CTRL+F8.

Give the description for Project, Sub Project and Object and say OK. Now execute or press CTRL+F8.

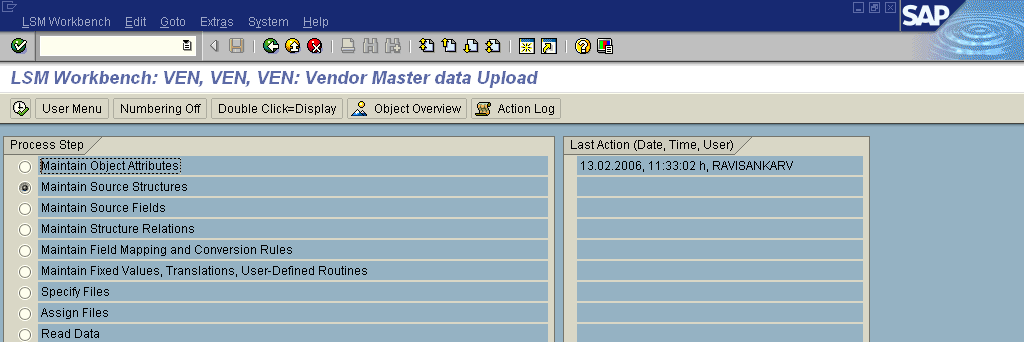
Select Maintain Object Attributes and Execute (CTRL+F8)

Click Display / Change (it will make you to change). Select the Radio Button Batch Input Recording. Now click on “Goto” –
Recordings Overview. Click on Create Recording (Ctrl+F1).

Click OK

Give Required Transaction Code (In this case it is FK01)

Create Vendor or Make changes for Entering Withholding tax details in the Vendor.

Press Enter
 C
C
Press Enter

Click on Save Button.

Recording is saved now. Click on “Default All” Button.

Click
Ctrl+Y, a + will come. With this, you can drag and copy whatever you want. In case if any field is appearing twice you
need to change the field name by double clicking on that. Otherwise, your uploading will get failed.
Copy
the fileds to an excel file.
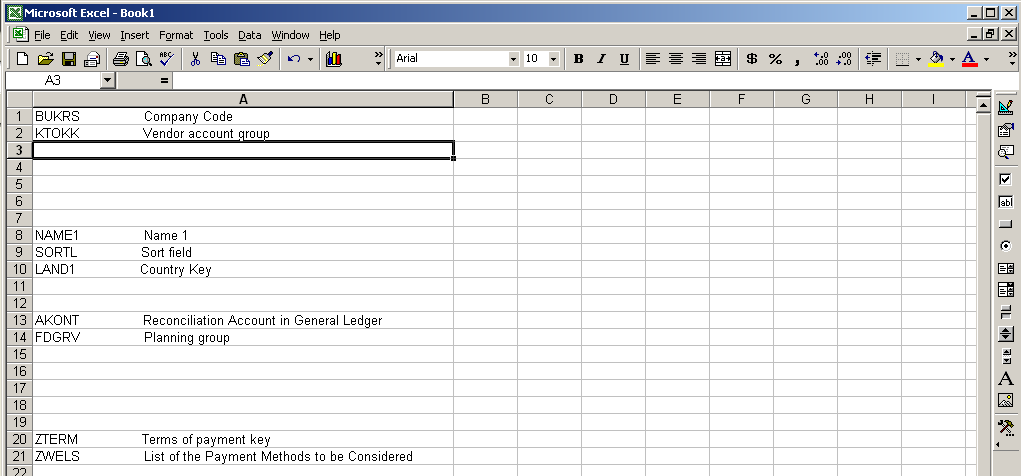
Remove the Blank Rows.

Now the field name and descriptions are in one Column. I.e., “A”. You need to
segregate that. To do that, select Column “A” and Select in Excel “Data” – Text
to Column as shown in the following graph.

Now Select the fixed with and say “Next”.

Select Fixed Width and click next.

Keep columns wherever you want by clicking.
Now say Next and then again say “Finish”. Now all fields and texts are divided into two Columns.

Now copy the fields and texts as shown in the Sheet1 (Ctrl+C)
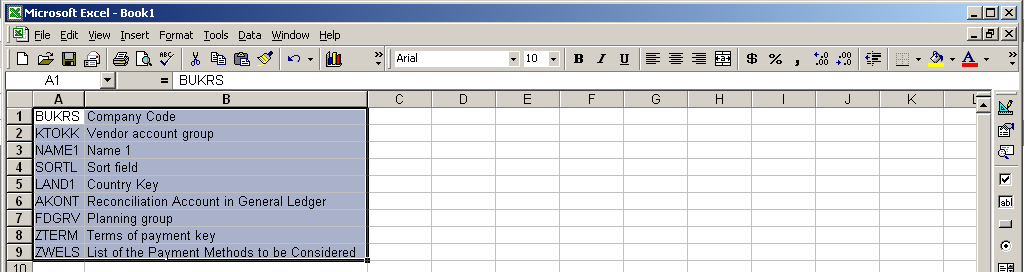
Go
to Sheet2
Keep
the cursor in the Sheet 2 (A1) and then
Edit,
Paste
Special
Check
in Transpose as shown below and say OK.
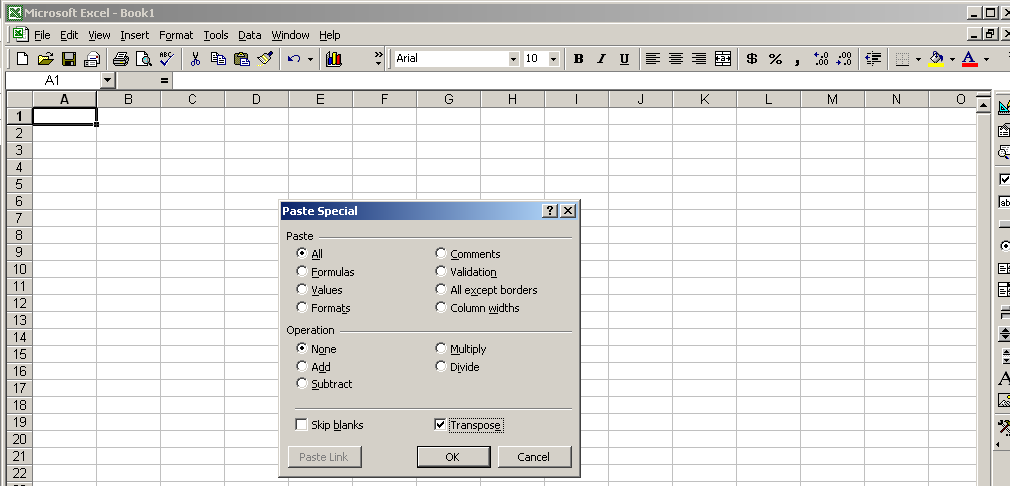
Now all your rows will become your columns as shown in the blow Screen.

Now
fill the required details exactly as shown below. You should note that you have
to enter ‘0001 for payment method instead of 0001, since if you straight enter
0001 it will become 1, therefore you must ensure whenever it is starting with
“0” should be preceded with ‘.

Now
select the whole sheet2.
Remove
all grids.
No colors should be there in the sheet.
No letter should be typed in different colors. All are in normal color only.
Keep the columns to “LEFT” Margin.
Now,
Format
=> Cells => Number => General as shown in the following screenshot.

Now say OK.
Now copy the whole Sheet2 and paste it in the Sheet3. Then
delete the header rows as shown below:

Save
this file to your Hard Disk with a simple name. In this case I saved as Vendor.
Now
go to “SAVE AS” in Excel, and
Save
as Text (Tab Delimited) as shown in the above screen shot.

Click on OK button as shown below.

Click on "YES" button as shown below.

Now, Click on "NO" button as shown below.

Press F3 or Click on Back Button.

Now, Click on "YES" to save.

You will reach the below screen.
Again, press F3 or click on back Button.

Click
F4 in the Recording Button, your structure will be populated. In this case it
is “VENDRECO”.
Now click on Save on Ctrl+S to save your recording.
After saving your recording click Back button or press Ctrl+F3 to go back.

Now you will observe that few steps have been disappeared. Only few steps are left
out. This is because of the recording mode that you have been selected. Ideally
there should not be any Idoc related steps should be visible.
Now Step1 is being completed and the system automatically takes you to second step.
Now press CTRL+F8 or Executed.
Click on Display / Change Button or press Ctrl+F1

Now create a Structure by clicking “Create Structure” or Ctrl+F4.
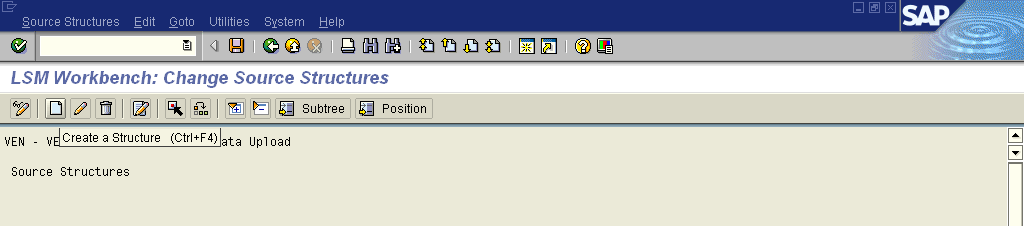
Give Source Structure Name and Description

Your Source Structure Name and Description is shown. Click on Save button

Now Press F3 or Click back button to go back.
Now the second step is completed and system automatically takes you to third step.
Click CTRL+F8 or Press Execute Button, which will take to maintain source fields.

Click on Display / change as shown above OR press Ctrl+F1.

Now press on Table Maintenance as shown above by keeping your cursor on the Source
Structure (in blue color in the above screen shot).
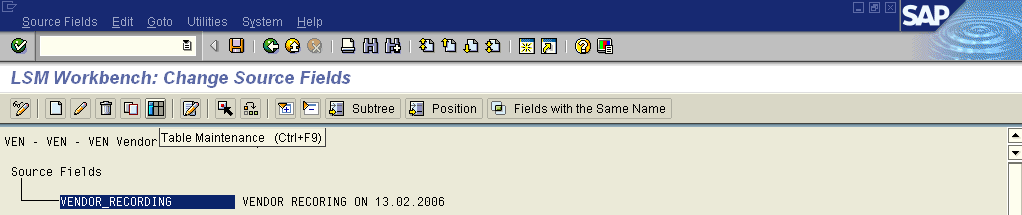
Copy those Fields from Sheet1 and copy it here. (from your excel file)

In case if your fields are came twice in recording, none of the field should be
similar. As already advised that change the field names to different field
names. Whatever, field names that you have changed in the structure should also
appear here. Meaning that in case these fields does not map with your changed
fields in your Structure, uploading will fail.

Enter the Field Type as “C” – Characteristic and Length as 60. If you know the length
enter the exact length. If you do not enter the maximum length 60. You should
not enter the length less than the actual length of the field.
Say “Save”.

Press "Enter". Save the results and Press
F3 or Click on back button to go back.

Now Click Save in this screen and again press F3 to go back.

Now system will automatically takes you to fourth screen.
Click CTRL+F8 or Click on Execute Button.

Select the Structure and click on Display / change button or press Ctrl+F1

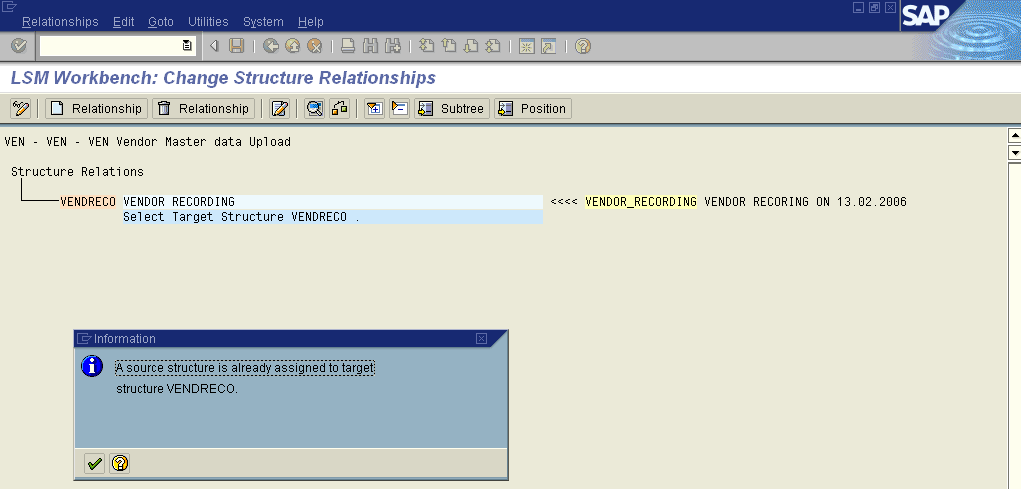
Click on Relationship (Ctrl+F4)

Though
it is customary step, you should go to this step. And say OK for the message
that the system has issued. “A source structure is already assigned to target
structure VENDRECO”.
Now press Save and PressF3 or Click on back button to go back.
It will take you to the next screen automatically.
Press CTRL+F8 or Click on Execute Button.

In the above screen, select the structure and then click display / change or (Ctrl+F1).
Again Select the Structure,

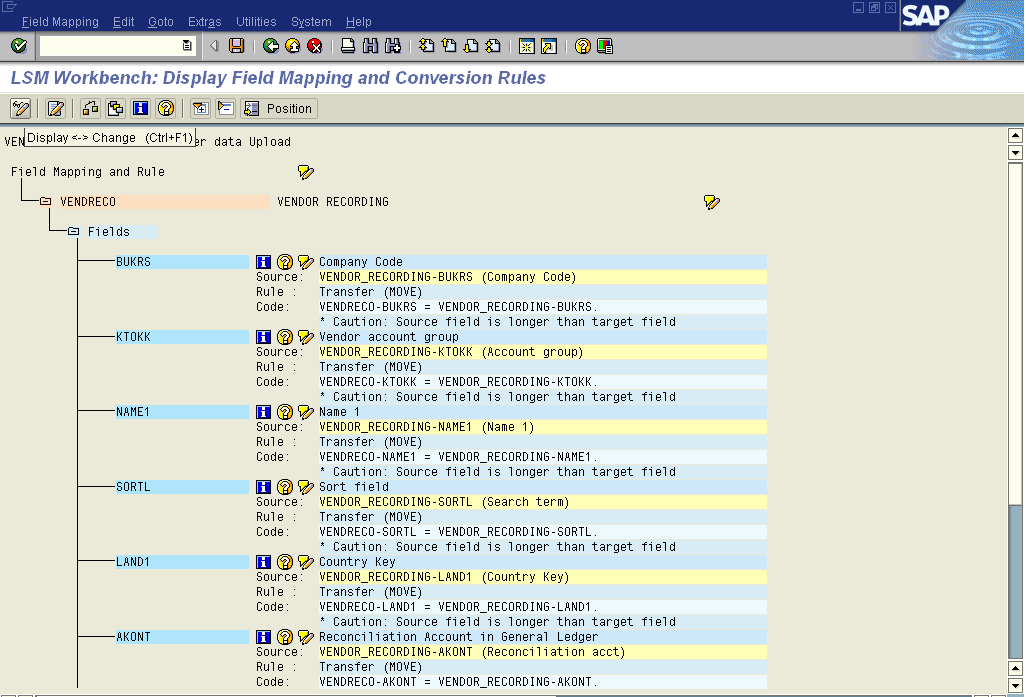
Go select the auto filed mapping as showing above in the above screen shot.

Say “OK” with this 50 number screen. Do not make any changes.

Keep on Pressing “Accept Proposal” for all the proposal as shown above.

Your entire field mapping should appear as above. Each field should have four rows as above.
Once it is being completed the system issues a statement that “Auto Field Mapping is completed”
Click Save (Ctrl+S) and go back (F3).

Nothing to do with “Maintain Field Values, Transactions, User Defined Routines”

Now Go to “Specify Files” Screen Manually and press “Ctrl+F8” or Execute Button.

Select the first row and click on Display / change Button.

Now Click on Add Entry “Ctrl+F2” as shown above.

Select the “TEXT (Tab Delimited)” file that you have already created and say Open.


Your file has come and Enter some relevant “Name”
Select “Tabulator” Radio Button and say OK.

Now Save (Ctrl+S) and press F3 or Back Button to go back.

Now the system will take you to next step i.e., “Assign Files”. Press Ctrl+F8 or
press Execute Button.

Select Source Structure (as shown in blue colour above) and press Display / Change
Button (Ctrl+F1).

Click on Assignment (Ctrl+F2)
Though it is a customary step, you need to visit this step compulsory. The system will
issue a message stating that “A file has already been assigned to source
structure “VENDOR_RECORDING”. Say Ok.
Click on Save (Ctrl+S) and Press F3 or click on back button.

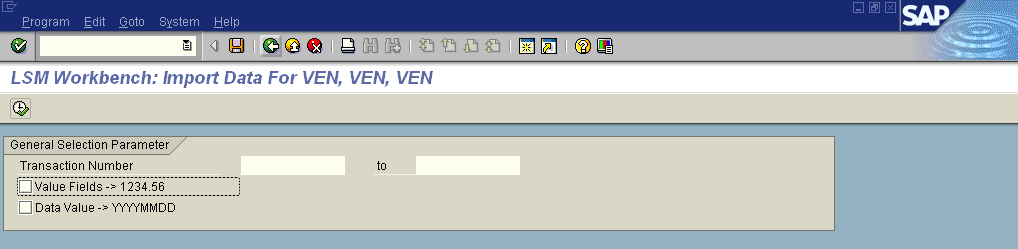
The system will take you to next step i.e., “Read Data”. Click on Execute or Press Ctrl+F8.

Remove the Checks for
Value
Fields -> 1234.56
Date
Value -> YYYYMMDD as shown above. There should not be any check in the above
two check boxes.
Now
Click on Execute (F8)
The system will tell that total 8 records are being read.
Now Click on Back Button or press F3 TWICE, which will take you to initial screen.

Now the system takes you to next step “Display Read Data”
Click on Execute or Press Ctrl+F8.

Here you give the number of lines in your text file and say OK.

Click on Any one row and see whether the fields in SAP and columns in your Text File
are matching.

Once you are satisfied that everything is matching and going fine, press F3 or Click
on Back button TWICE, which will take you to initial screen.

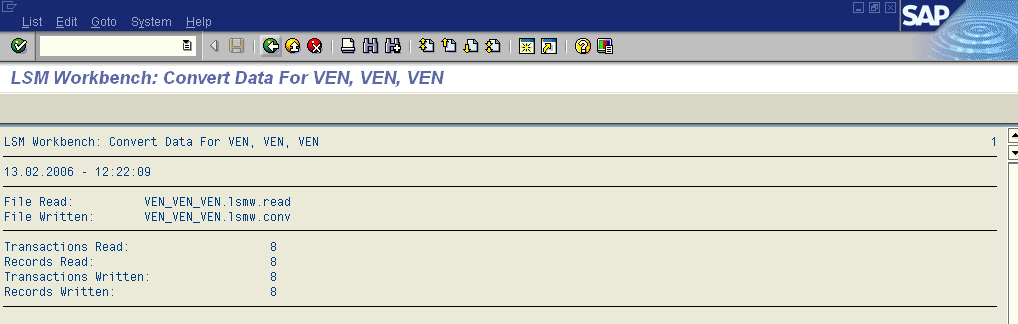
Now you are automatically in “Convert Data” Screen.
PressCtrl+F8 or Click on Execute Button.

Just press F8 or Execute Button.

The following screen will appear. See the screen and press Back Button (F3) twice,
which will take you to initial screen.
Now the system will automatically takes you to “Display Converted Data”.
Press Ctrl+F8 or Click on Execute Button.

Enter the number of lines From 1 to 8 in this case, to see how it is showing in
Converted Data and Say Ok. (Click on Rite Tick).

Click on any one of the converted data line and see how the data is going.
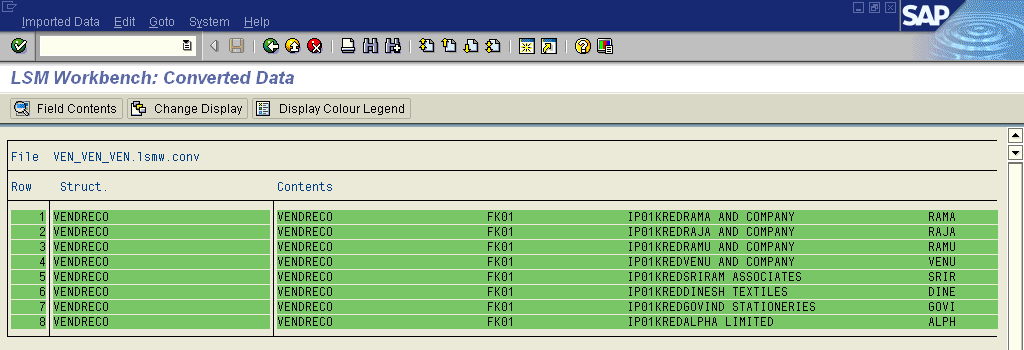
If you are satisfied that everything is going fine, then Click on Go back button
(F3) TWICE, which will take you to initial screen.

You will be automatically taken to “Create Batch Input Session”.
Click Ctrl+F8 or press “Execute” Button.

Select "Keep Batch input Folder(s)?
Just Click on Execute Button (F8).
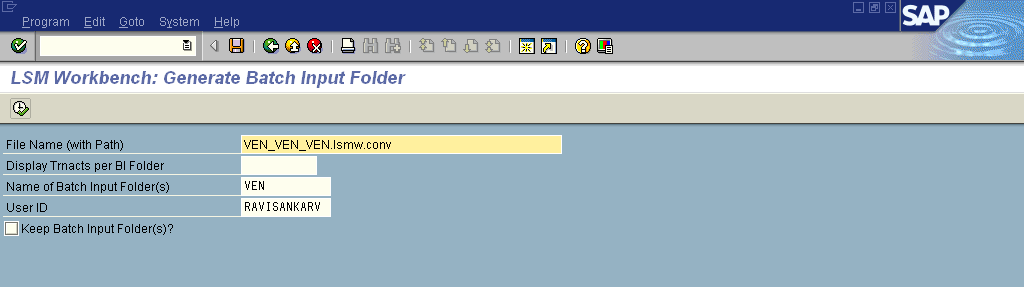
One Batch input session will be created. The system will state that “1 batch input
folder with 8 transactions created” will be issued. Say OK. (Click Right),
which will take you to initial screen.

Click Ctrl+F8 or Press on Execute Button.

Now you are in SM35 Screen. Select the line that is being created to upload and
press Execute (F8) button as shown above.

Select “Background” Radio Button.
Check in:
Extended log
Expert Mode
Dynpro Standard Size
As shown above and the click on “Process” button.

See the log and click on Line, if there are any problems in your log.
Click on back button (F3) to come out of the session FOUR TIME, which will take you
to Easy Access Screen.

Go to Report
“S_ALR_87012086”
Now You are Viewing the vendor records that you are uploaded. You can also follow
the same steps for Change also.

Please let me know if you have any doubts.
- SAP Managed Tags:
- SAP ERP,
- FIN (Finance)
294 Comments
- « Previous
- Next »
You must be a registered user to add a comment. If you've already registered, sign in. Otherwise, register and sign in.
Labels in this area
-
"mm02"
1 -
A_PurchaseOrderItem additional fields
1 -
ABAP
1 -
ABAP Extensibility
1 -
ACCOSTRATE
1 -
ACDOCP
1 -
Adding your country in SPRO - Project Administration
1 -
Advance Return Management
1 -
AI and RPA in SAP Upgrades
1 -
Approval Workflows
1 -
Ariba
1 -
ARM
1 -
ASN
1 -
Asset Management
1 -
Associations in CDS Views
1 -
auditlog
1 -
Authorization
1 -
Availability date
1 -
Azure Center for SAP Solutions
1 -
AzureSentinel
2 -
Bank
1 -
BAPI_SALESORDER_CREATEFROMDAT2
1 -
BRF+
1 -
BRFPLUS
1 -
Bundled Cloud Services
1 -
business participation
1 -
Business Processes
1 -
CAPM
1 -
Carbon
1 -
Cental Finance
1 -
CFIN
1 -
CFIN Document Splitting
1 -
Cloud ALM
1 -
Cloud Integration
1 -
condition contract management
1 -
Connection - The default connection string cannot be used.
1 -
Custom Table Creation
1 -
Customer Screen in Production Order
1 -
Customizing
1 -
Data Quality Management
1 -
Date required
1 -
Decisions
1 -
desafios4hana
1 -
Developing with SAP Integration Suite
1 -
Direct Outbound Delivery
1 -
DMOVE2S4
1 -
EAM
1 -
EDI
3 -
EDI 850
1 -
EDI 856
1 -
edocument
1 -
EHS Product Structure
1 -
Emergency Access Management
1 -
Energy
1 -
EPC
1 -
Financial Operations
1 -
Find
1 -
FINSSKF
1 -
Fiori
1 -
Flexible Workflow
1 -
Gas
1 -
Gen AI enabled SAP Upgrades
1 -
General
1 -
generate_xlsx_file
1 -
Getting Started
1 -
HomogeneousDMO
1 -
How to add new Fields in the Selection Screen Parameter in FBL1H Tcode
1 -
IDOC
2 -
Integration
1 -
Learning Content
2 -
Ledger Combinations in SAP
1 -
LogicApps
2 -
low touchproject
1 -
Maintenance
1 -
management
1 -
Material creation
1 -
Material Management
1 -
MD04
1 -
MD61
1 -
methodology
1 -
Microsoft
2 -
MicrosoftSentinel
2 -
Migration
1 -
mm purchasing
1 -
MRP
1 -
MS Teams
2 -
MT940
1 -
Newcomer
1 -
Notifications
1 -
Oil
1 -
open connectors
1 -
Order Change Log
1 -
ORDERS
2 -
OSS Note 390635
1 -
outbound delivery
1 -
outsourcing
1 -
PCE
1 -
Permit to Work
1 -
PIR Consumption Mode
1 -
PIR's
1 -
PIRs
1 -
PIRs Consumption
1 -
PIRs Reduction
1 -
Plan Independent Requirement
1 -
POSTMAN
1 -
Premium Plus
1 -
pricing
1 -
Primavera P6
1 -
Process Excellence
1 -
Process Management
1 -
Process Order Change Log
1 -
Process purchase requisitions
1 -
Product Information
1 -
Production Order Change Log
1 -
purchase order
1 -
Purchase requisition
1 -
Purchasing Lead Time
1 -
Redwood for SAP Job execution Setup
1 -
RISE with SAP
1 -
RisewithSAP
1 -
Rizing
1 -
S4 Cost Center Planning
1 -
S4 HANA
1 -
S4HANA
3 -
S4HANACloud audit
1 -
Sales and Distribution
1 -
Sales Commission
1 -
sales order
1 -
SAP
2 -
SAP Best Practices
1 -
SAP Build
1 -
SAP Build apps
1 -
SAP CI
1 -
SAP Cloud ALM
1 -
SAP CPI
1 -
SAP Data Quality Management
1 -
SAP ERP
1 -
SAP Maintenance resource scheduling
2 -
SAP Note 390635
1 -
SAP S4HANA
2 -
SAP S4HANA Cloud private edition
1 -
SAP Upgrade Automation
1 -
SAP WCM
1 -
SAP Work Clearance Management
1 -
Schedule Agreement
1 -
SDM
1 -
security
2 -
Settlement Management
1 -
soar
2 -
Sourcing and Procurement
1 -
SSIS
1 -
SU01
1 -
SUM2.0SP17
1 -
SUMDMO
1 -
Teams
2 -
Time Management
1 -
User Administration
1 -
User Participation
1 -
Utilities
1 -
va01
1 -
vendor
1 -
vl01n
1 -
vl02n
1 -
WCM
1 -
X12 850
1 -
xlsx_file_abap
1 -
YTD|MTD|QTD in CDs views using Date Function
1
- « Previous
- Next »
Related Content
- Building Low Code Extensions with Key User Extensibility in SAP S/4HANA and SAP Build in Enterprise Resource Planning Blogs by SAP
- Innovate Faster: The Power Duo of SAP Activate and Scaled Agile Framework (SAFe) in Enterprise Resource Planning Blogs by SAP
- Advanced WIP reporting in S/4HANA Cloud Public Edition in Enterprise Resource Planning Blogs by SAP
- Register now: SAP S/4HANA Cloud, Public Cloud – Partner Certification Academies in Enterprise Resource Planning Blogs by SAP
- Insights on Columnar store for SAP Functional Consultants in Enterprise Resource Planning Blogs by Members
Top kudoed authors
| User | Count |
|---|---|
| 4 | |
| 3 | |
| 3 | |
| 3 | |
| 2 | |
| 2 | |
| 2 | |
| 2 | |
| 2 | |
| 2 |