
- SAP Community
- Products and Technology
- Enterprise Resource Planning
- ERP Blogs by SAP
- A Do-It-Yourself at Home Guide: How to Connect a N...
Enterprise Resource Planning Blogs by SAP
Get insights and updates about cloud ERP and RISE with SAP, SAP S/4HANA and SAP S/4HANA Cloud, and more enterprise management capabilities with SAP blog posts.
Turn on suggestions
Auto-suggest helps you quickly narrow down your search results by suggesting possible matches as you type.
Showing results for
Product and Topic Expert
Options
- Subscribe to RSS Feed
- Mark as New
- Mark as Read
- Bookmark
- Subscribe
- Printer Friendly Page
- Report Inappropriate Content
04-02-2019
10:21 PM
Update 3 April 2019 (already!): I got advice that SDK for JavaScript has just been announced (great news!). I did not use it for my app because it was not available for me as I was writing my code. I will look at it at some point later and potentially update my code based on the SDK.
In this blog, I will walk you through how I built a Node.js app that connects with a backend SAP S/4HANA on-premise system I have deployed onto GCP (I used an 1809 system). The connection is secured via Cloud Connector also installed on GCP on the side of my S/4HANA on-premise system.
Below are screen shots of my app.


It is meant to be a customer self-service portal site. As a customer, you log on to the website, and can see a list of billing documents as a self service. Technically, the list of billing documents is retrieved from a backend SAP S/4HANA system with using a OData service via Cloud Connector.
The whole app works as illustrated in the drawing below. It’s simplified, but you will see a gist of what is involved here.

If you want to examine the code I deployed, it’s available in my repo on GitLab.
Briefly, my app has the following characteristics:
Here is stuff that you need to have for this tutorial:
You do not need SAP GUI for this. In fact, you can build the whole app without touching S/4HANA.
I will focus on the operating system (OS) most of us in the corporate environment is familiar with: Windows.
I am pretty sure Mac and Linux would work – what I do here is not really Windows specific.
I once naively believed Powershell is nicer UI for cmd; I think I am gravely mistaken. They don’t behave the same way. I am not knowledgeable enough to tell you what exactly are different. For this blog, I used cmd within Visual Studio Code. I recommend cmd to people who just want to get the outcome. Having said this, my Windows environment is very cluttered with different flavours of Linux emulators, etc. so you may have no problem using Powershell and cmd interchangeably.
If you have ready access to an S/4HANA on-premise system, then, great! You can use it.
I used a system from SAP Cloud Appliance Library (CAL), which essentially offers a bunch of virtual machines that you can deploy onto an infrastructure service, such as Google Cloud Platform, Amazon Web Services, and Microsoft Azure. I have a step-by-step tutorial blog on how to deploy a solution on GCP. For this blog, I deployed SAP S/4HANA 1809 Fully-Activated Appliance.
Once you have got your instance of S/4HANA 1809 fully-activated appliance running, let’s try one thing. Get an external IP of your S/4HANA system from the CAL console. In my case, all the external IPs started with 35; whereas all the internal ones started with 10.
Open a browser in your home PC connected to the Internet. And go to:
You would get a pop-up window to enter user and password. Use S4H_MM and Welcome1 (or any pre-configured user for the CAL instance; you can find them in the Getting Started documentation). After a few seconds or so (or a little longer, if this is the first time for the instance), you should get a response like this below.
The default configuration of the fully-activated appliance is so generous that you can access the S/4HANA system deployed onto GCP from within your home PC with using just an external IP address.
I just wanted to ensure that my S/4HANA instance is up and running, and OData services are ready to be used.
Obviously, this does not go through a secure tunnel that Cloud Connector would provide. The system can be accessed through a single pair of user name and password (i.e. basic authentication).
It would be difficult to convince your IT executives, enterprise architects, security experts, etc. to use this way of accessing an ERP system that your organisation relies on for many things.
Let’s place Cloud Connector to put secure access to your S/4HANA on-premise system.
Cloud Connector is described as this below in SAP's online documentation:
Getting Started of fully-activated appliances on CAL mentions that Cloud Connector is already installed and available via port 8443. I used to be able to use this without installing an additional Cloud Connector. This was somehow not working when I activated a new instance around mid March 2019 – I had terminated my old instance to save money…
So watch out the space; you may not need to install an additional Cloud Connector on your CAL instance. If this is the case, you don’t even need to use RDP to remotely access Windows. You could access Cloud Connector via your browser at home, with https://<external IP of your S/4HANA>:8443.
For now, an easy solution is to install a new one. Or someone may be able to tell us how to easily “start” the one already installed in the CAL instance…
In our case, we will be accessing Windows on our GCP via RDP. Go to your instance in the CAL console, and find a “Connect” link.


You will be asked to provide a password. This is the one you generated when you created your instance in the screen below.
Now you should be on the Windows desktop in your remote server, which should look like this below.

This is where you will be installing Cloud Connector.
For actual steps, there is an excellent step-by-step tutorial from my SAP colleague, jens.haley, on how to install Cloud Connector (in fact, I will be relying on him in other parts, too – thank you for your excellent tutorials). Another SAP colleague, matthieu.pelatancovers the same steps in Part 1 of his also great blog series.
For our remote Windows server, the prerequisite is fine, and we know it’s a Windows system; you can skip Steps 1 and 2.
In Step 3, there is a dialog where you can choose the port to be used for your Cloud Connector. The default is 8443. I chose 8444. This is just because there should already be a Cloud Connector running in the CAL instance using that port. I do not know how it was not working as at the time of my writing this. I chose a different port just in case there should be any conflict.
One thing that may trip you in the installation wizard is the step where you specify the directory of JVM.

It is correct; you can verify this using the “where” command in Command Prompt like below.
You can skip Step 5, which is indicated as optional.
I also skipped Step 6, which might be important for a productive or sensitive environment. Mine was for hobby purposes with a very ephemeral CAL instance, so I saved some time.
For setting up Cloud Connector with your Cloud Platform subaccount, we will rely on Jens Haley again. Here is a link to his tutorial.
If you use http://, then you might see something like this below.
In a real situation, you would probably use a host name. In my case, I used an internal IP address as it was. Also don’t forget to tick the “Check Internal Host” checkbox.
In my early iterations, I used an external IP address, and it worked fine. But I guess that would be against the purpose of Cloud Connector. It should be internally connecting with S/4HANA, and is a secure link to SCP in the Internet.

At the end, the configuration should look something like this below.

You can click on one of the buttons in the Actions column to see the “Reachable” green box appear.
Setting these up is one thing; understanding what they do and how you can piece them together and get them to work in your application is a different thing altogether.
In this section, I will focus on practical matters of how you can set these up. See the next section and the source code of my app to examine how the different pieces can work together.
To get my app to work, I am indebted to many online documentation, tutorials, and sample code. I sincerely thank the creators of their excellent work and spirit to share it to the wider community. I have a list of all these resources in a summary section blow. I also refer to specific tutorials where I found them directly relevant for me to progress with my app construction.
You will need to create four different things in the CF environment of SCP
I provided links to online documentation for each element above; you don’t need to read any of it for now.
I have listed tutorials that helped me immensely in a dedicated section below. However, they present to you two different ways to create service instances, which might be confusing for a first-timer. One is via command prompt via CLI; the other is via graphical interface on your browser. Both are valid, and will have the identical end result. Choose the one that you feel comfortable.
Don’t worry. Defining these is a one-time activity, and if you feel you made a mistake, you can go back to where you started, delete what you did previously, and create new ones – e.g. to change names, etc.
The way I did is a combination. I largely followed the “hello world” tutorial on SAP online help, and the ones by Mattheiu and Jens – defining a destination, and other service instances manually on the browser. In the dialog steps, you can skip “optional” ones. I used my source code and CLI tool to “push” my app and let the machine to bind my apps to the service instances. Jens’s tutorial shows a manual way to zip up your application, and manually upload it to the CF environment. I find using CLI much simpler and trouble free.
If you feel more comfortable with command prompt, follow the blog by mariatrinidad.martinezgea. She extensively uses CLI command to define services instances. I tried these, too, and worked perfectly. Her blog is about connecting SCP with SAP B1 and ByDesign. The part on how you define a destination and service instances is applicable to S/4HANA – for SCP, in the end, these are all HTTP connection.
So... as a summary, I did the following:
Installing CLI is easy and painless. Installation binary and instruction are available at:
https://tiny.cc/s4sdk-setup or this: https://github.com/cloudfoundry/cli#downloads.

For Windows, there is some known issues.
I use Command Prompt (cmd) instead of PowerShell , and had no issues.

Simply unzip the .zip archive file; you will get cf_installer.exe. Execute the installer. Choose the default installation options and location.

Note that destinations are defined at a different level than the other “instances of services”.
(To complicate things for a beginner, it seems you can define a destination specific to an instance of destination service, but you can forget this for now).
The URL needs to be identical with the one you set in your Cloud Connector (previous section). Remember this?

Note the Authentication field, and user/password…
S4H_MM is a dialog user with SAP_ALL authorization. Not ideal for security. But this would probably work as a proof of concept, or even for a development environment (if you at least replaced the user with a system or service user).
Perhaps this excellent blog (the last installment of blog series by matthieu.pelatan) will help me or someone to configure principal propagation – beyond my current knowledge and DIY capacity.
After you defined your destination, move down to your “dev” space. That’s where you find the Services and Service Marketplace to define instances of destination service, and other services.
Note that all the service instances have “None” in the Referencing Applications. If you have done differently, you might already have “bound” (bind) some apps. This is fine. You can manually bind apps to service instances in this web interface, or you can also do this in a file in the source of your app you upload. In the case of latter, the system will automatically bind your apps to service instances as instructed in the source code file – you will see it in my source code of the Node.js app.
My app depends on SAP’s Application Router for user authentication and routing users to my app.
If you are not familiar with it, I suggest that you do the following tutorials to get the feel for it.
The source files of the app at the completion of the Jens’s tutorial are in my repo on GitLab (in the branch named approuter).
As a result of this, you should see an XML output of an OData service (see the image below). Notice that it is identical with the output you saw in Step 1. A visible difference is in the URL.
In Step 1, the HTTP call you made via browser went directly to your S/4HANA system.
This time, your HTTP calls go through the Cloud Connector that you installed in Step 2 to be a link between SCP and your S/4HANA system. The Application Router deals with the UAA service, destination service, and connectivity service to connect with the backend S/4HANA system via the Cloud Connector.
You can confirm that HTTP calls are actually going through Cloud Connector by looking at the Monitor tool in its console (image below) – in our case, https://localhost.8444 on the Windows OS on your GCP that you access via RDP.

The structure of my application is simple. It has two component apps: diy-app and diy-approuter, and two configuration files on the root: manifest.yml and xs-security.json. The structure and configuration files are all based on tutorials – I’ll refer to specific ones in a minute.
Let’s talk about the following three key parts:
diy-approuter and xs-security.json are essentially identical with when I completed Jens’s Application Router tutorial (the approuter branch of my GibLab repo).
Having said that, you would notice two differences.
These are totally unnecessary. You can keep how diy-approuter is configured in the tutorial (as is the approuter branch). In the tutorial, you don’t have a start.js (in fact, no .js filies!). Application Router can be started by directly specifying approuter.js within the node_module/@sap folder. What I was doing is to start an application router via JavaScript code. This is documented in Application Routers documentation in the node_module folder if you install it via npm install.
This is essentially the way two apps are “linked” as explained the Hello World tutorial on SAP Online Help.
diy-approuter and diy-app are two different applications on their own in SCP. They have different URLs:
Here is my understanding of how this “linking” is relevant here – If I am mistaken, please correct me. Now… I bound my uaa service (diy-s4hana-uaa) with diy-app in manifest.yml. This means it needs user authentication to SCP. The app itself does not have this capability to handle this. In addition, for diy-app to be able to use other services such as destination and connectivity, it needs to have access to JWT token from uaa.
By these configurations below via manifest.yml and diy-approuter’s xs-app.json,
You also notice that I removed routes that let diy-approuter access S/4HANA’s OData services directly.
diy-app is constructed as a Node.js app with using Express.js. As you can see, start.js implements Express.js to deal with HTTP requests. It is the main application code that serves as the “backend” of the diy-app web application.
Let’s look at the two key parts of start.js:
This part is a copy of the code you see in the Hello World tutorial on SAP Online Help
My understanding (based on some testing), it is Passport.js with the support of the @Sap components that attach user information and uaa JWT to the HTTP request.
User information is attached to req.user – this is used in my app.get(‘/test’) function.
User’s JWT is attached to req.authInfo, and is required in the key component ConnectSCC.js. We will look at it now.
Most of my efforts went into making of ConnectSCC.js. It is the one that deals with what’s needed for diy-app deployed on the CF environment of SCP to interact with Cloud Connector.
The key is, once understood, simple. You need to construct the HTTP header correctly, as required by SCP to connect to Cloud Connector with proxy host. I will let the source code explain.
ConnectSCC.js has two heritages:
My ConnectSCC.js is essentially a fork of scc-connector. You can see that the basic ways of handling Express.js middleware and axios are the same.
I could not get Bert’s original scc-connector working. I enhanced it with some elements I borrowed from Ralpth's code. His code handles destination services well. This way, you can also handle basic authentication to the S/4HANA on-premise system, which scc-connector does not.
Note that ConnectSCC.js uses asyn/await statements, which are relatively new in JavaScript. You might need to instruct SCP CF to use a relatively new version of Node.js to run the code – otherwise, you might get a syntax error when you push your code. See my package.json to see how I how did this. (documentation in Cloud Foundry here)
End users will be looking at HTML5 web pages. The rest of my code is for internal workings that end users don’t see. There are two web pages: one is under /diy-approuter/web, and the other under /diy-app/web. The one under approuter is meant to be the landing page after user authentication. The one under app is a web app that lists bills for logon customer user. The bills are retrieved from S/4HANA system via an OData service.
To make the web sites look more “realistic”, I used the Parallax Template that is freely available on Materialize starter page. The landing page is almost an unchanged copy of the template.
The billing document list is fetched via the JavaScript code and API in the backend part of the app.
I tried to use plain JavaScript as much as possible when I wrote the billing document web app. I directly wrote the JavaScript code in the index.html in the <script> tag. No external module is used. The one you see in landing page’s index.html is for materialize to add some eyecandy to the UI.
You can see that my code is not particularly "cool" — it is rather crude, using brute force to do some stuff. But readable, I hope. If you are a good JavaScript developer, I am sure you can easily improve it.
See the Cloud Connector's monitor that your HTTP call for billing document OData service actually goes through it 🙂

This blog and my app were long coming. I nearly gave up, because I just could not get some stuff working. I am happy that I persevered.
Along the way, I looked at many tutorials and blogs. I have noted them above when they are relevant in specific parts of the app. Huge thanks to all the authors; without them, I could not have built this app. Some programming components were either direct copy or modified versions from these other resources.
As at the time of writing this, however, none of these presented a whole picture to me. I hope that you will benefit from what I have done.
Other posts from my DIY S/4HANA blog series:
Introduction
In this blog, I will walk you through how I built a Node.js app that connects with a backend SAP S/4HANA on-premise system I have deployed onto GCP (I used an 1809 system). The connection is secured via Cloud Connector also installed on GCP on the side of my S/4HANA on-premise system.
Below are screen shots of my app.
It is meant to be a customer self-service portal site. As a customer, you log on to the website, and can see a list of billing documents as a self service. Technically, the list of billing documents is retrieved from a backend SAP S/4HANA system with using a OData service via Cloud Connector.
The whole app works as illustrated in the drawing below. It’s simplified, but you will see a gist of what is involved here.
If you want to examine the code I deployed, it’s available in my repo on GitLab.
Briefly, my app has the following characteristics:
- The web pages are written in HTML, CSS, and JavaScript; the look & feel uses Materialize (Parallax Template)
- A backend API service is written in JavaScript with Express (and other Node.js modules)
- The backend API service handles connection (authentication, etc.) and OData calls to Cloud Connector and ultimately to the backend S/4HANA system
- Both the web pages and the service are deployed as a single Node.js app onto SAP Cloud Platform (SCP) for the Cloud Foundry (CF) environment
- The Node.js app is integrated with Application Router in SCP CF for authentication (UAA)
What We Will Cover in This Blog
- Step 0. Prerequisite – What You Need to Have
- Step 1. SAP S/4HANA On-Premise
- Step 2. Cloud Connector
- Step 3. SAP Cloud Platform for the Cloud Foundry Environment: Destination, Destination Service, Connectivity Service, UAA Service
- Step 4. Application Router
- Step 5. Putting All Together with a Node.js App
- Other Related Tutorials and Blogs
- About My DIY S/4HANA Blog Series
Step 0. What You Need to Have
Here is stuff that you need to have for this tutorial:
- SAP S/4HANA on-premise system that you can play with
If you don’t have one, try CAL deployed onto GCP, AWS, or Azure. I used 1809 on GCP, the one I did in my previous blog - SAP Cloud Platform for the Cloud Foundry environment
I used a trial account - Good web browser (e.g. Chrome and Firefox)
- Node.js
- Good text editor. (optional. I use Visual Studio Code
- Git (optional)
SAP GUI?
You do not need SAP GUI for this. In fact, you can build the whole app without touching S/4HANA.
Windows
I will focus on the operating system (OS) most of us in the corporate environment is familiar with: Windows.
I am pretty sure Mac and Linux would work – what I do here is not really Windows specific.
Note on cmd on Windows
I once naively believed Powershell is nicer UI for cmd; I think I am gravely mistaken. They don’t behave the same way. I am not knowledgeable enough to tell you what exactly are different. For this blog, I used cmd within Visual Studio Code. I recommend cmd to people who just want to get the outcome. Having said this, my Windows environment is very cluttered with different flavours of Linux emulators, etc. so you may have no problem using Powershell and cmd interchangeably.
Step 1. SAP S/4HANA On-Premise
If you have ready access to an S/4HANA on-premise system, then, great! You can use it.
I used a system from SAP Cloud Appliance Library (CAL), which essentially offers a bunch of virtual machines that you can deploy onto an infrastructure service, such as Google Cloud Platform, Amazon Web Services, and Microsoft Azure. I have a step-by-step tutorial blog on how to deploy a solution on GCP. For this blog, I deployed SAP S/4HANA 1809 Fully-Activated Appliance.
Once you have got your instance of S/4HANA 1809 fully-activated appliance running, let’s try one thing. Get an external IP of your S/4HANA system from the CAL console. In my case, all the external IPs started with 35; whereas all the internal ones started with 10.
 See a series of external and internal IP addresses on bottom right of the screen? Grab the one for S/4HANA system.
Open a browser in your home PC connected to the Internet. And go to:
http://<External IP address>:50000/sap/opu/odata/sap/CB_CUSTOMER_SRV/You would get a pop-up window to enter user and password. Use S4H_MM and Welcome1 (or any pre-configured user for the CAL instance; you can find them in the Getting Started documentation). After a few seconds or so (or a little longer, if this is the first time for the instance), you should get a response like this below.
 Yes. It’s an output from an OData service from your S/4HANA 1809 system.
The default configuration of the fully-activated appliance is so generous that you can access the S/4HANA system deployed onto GCP from within your home PC with using just an external IP address.
I just wanted to ensure that my S/4HANA instance is up and running, and OData services are ready to be used.
Obviously, this does not go through a secure tunnel that Cloud Connector would provide. The system can be accessed through a single pair of user name and password (i.e. basic authentication).
It would be difficult to convince your IT executives, enterprise architects, security experts, etc. to use this way of accessing an ERP system that your organisation relies on for many things.
Let’s place Cloud Connector to put secure access to your S/4HANA on-premise system.
Step 2. Cloud Connector
Cloud Connector is described as this below in SAP's online documentation:
The Cloud Connector
serves as a link between SAP Cloud Platform applications and on-premise systems
Getting Started of fully-activated appliances on CAL mentions that Cloud Connector is already installed and available via port 8443. I used to be able to use this without installing an additional Cloud Connector. This was somehow not working when I activated a new instance around mid March 2019 – I had terminated my old instance to save money…
So watch out the space; you may not need to install an additional Cloud Connector on your CAL instance. If this is the case, you don’t even need to use RDP to remotely access Windows. You could access Cloud Connector via your browser at home, with https://<external IP of your S/4HANA>:8443.
 Like this, from your home PC; see the URL?
For now, an easy solution is to install a new one. Or someone may be able to tell us how to easily “start” the one already installed in the CAL instance…
Installing Cloud Connector
In our case, we will be accessing Windows on our GCP via RDP. Go to your instance in the CAL console, and find a “Connect” link.
You will be asked to provide a password. This is the one you generated when you created your instance in the screen below.
 Remember this?
Now you should be on the Windows desktop in your remote server, which should look like this below.
This is where you will be installing Cloud Connector.
For actual steps, there is an excellent step-by-step tutorial from my SAP colleague, jens.haley, on how to install Cloud Connector (in fact, I will be relying on him in other parts, too – thank you for your excellent tutorials). Another SAP colleague, matthieu.pelatancovers the same steps in Part 1 of his also great blog series.
For our remote Windows server, the prerequisite is fine, and we know it’s a Windows system; you can skip Steps 1 and 2.
In Step 3, there is a dialog where you can choose the port to be used for your Cloud Connector. The default is 8443. I chose 8444. This is just because there should already be a Cloud Connector running in the CAL instance using that port. I do not know how it was not working as at the time of my writing this. I chose a different port just in case there should be any conflict.
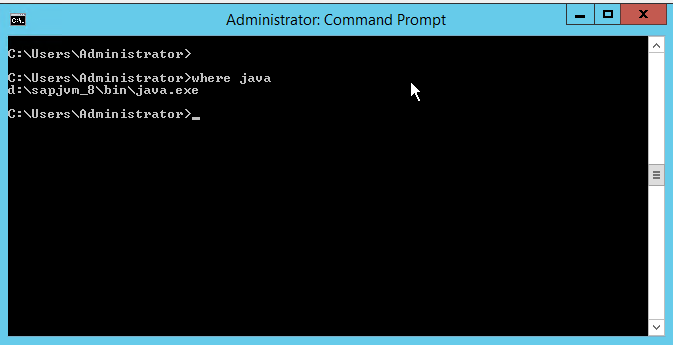
One thing that may trip you in the installation wizard is the step where you specify the directory of JVM.
It is correct; you can verify this using the “where” command in Command Prompt like below.
You can skip Step 5, which is indicated as optional.
I also skipped Step 6, which might be important for a productive or sensitive environment. Mine was for hobby purposes with a very ephemeral CAL instance, so I saved some time.
Set Up
For setting up Cloud Connector with your Cloud Platform subaccount, we will rely on Jens Haley again. Here is a link to his tutorial.
1. Make sure to use https:// to access Cloud Connector.
If you use http://, then you might see something like this below.

It's not broken. You have use https://
2. Make sure to use the internal IP address (or host name) for your S/4HANA system, and tick the checkbox – Check Internal Host
In a real situation, you would probably use a host name. In my case, I used an internal IP address as it was. Also don’t forget to tick the “Check Internal Host” checkbox.
In my early iterations, I used an external IP address, and it worked fine. But I guess that would be against the purpose of Cloud Connector. It should be internally connecting with S/4HANA, and is a secure link to SCP in the Internet.
At the end, the configuration should look something like this below.
You can click on one of the buttons in the Actions column to see the “Reachable” green box appear.
Step 3. SAP Cloud Platform for the Cloud Foundry Environment: Destination, Destination Service, Connectivity Service, UAA Service
Setting these up is one thing; understanding what they do and how you can piece them together and get them to work in your application is a different thing altogether.
In this section, I will focus on practical matters of how you can set these up. See the next section and the source code of my app to examine how the different pieces can work together.
To get my app to work, I am indebted to many online documentation, tutorials, and sample code. I sincerely thank the creators of their excellent work and spirit to share it to the wider community. I have a list of all these resources in a summary section blow. I also refer to specific tutorials where I found them directly relevant for me to progress with my app construction.
You will need to create four different things in the CF environment of SCP
- Destination (type On-Premise)
- Destination Service Instance (note that it is different to Destination!), and this is how you can consume a destination service)
- Connectivity Service Instance and this is how you can consume a connectivity service
- XSUAA Service Instance; this online documentation only shows CLI usage; it is possible to create one from SCP cockpit via browser, as shown in some tutorials)
I provided links to online documentation for each element above; you don’t need to read any of it for now.
I have listed tutorials that helped me immensely in a dedicated section below. However, they present to you two different ways to create service instances, which might be confusing for a first-timer. One is via command prompt via CLI; the other is via graphical interface on your browser. Both are valid, and will have the identical end result. Choose the one that you feel comfortable.
Don’t worry. Defining these is a one-time activity, and if you feel you made a mistake, you can go back to where you started, delete what you did previously, and create new ones – e.g. to change names, etc.
The way I did is a combination. I largely followed the “hello world” tutorial on SAP online help, and the ones by Mattheiu and Jens – defining a destination, and other service instances manually on the browser. In the dialog steps, you can skip “optional” ones. I used my source code and CLI tool to “push” my app and let the machine to bind my apps to the service instances. Jens’s tutorial shows a manual way to zip up your application, and manually upload it to the CF environment. I find using CLI much simpler and trouble free.
If you feel more comfortable with command prompt, follow the blog by mariatrinidad.martinezgea. She extensively uses CLI command to define services instances. I tried these, too, and worked perfectly. Her blog is about connecting SCP with SAP B1 and ByDesign. The part on how you define a destination and service instances is applicable to S/4HANA – for SCP, in the end, these are all HTTP connection.
So... as a summary, I did the following:
- Manually define your destination in your subaccount
- Manually define services instances (destination service, connectivity service, and UAA service) in your space, skipping binding and other optional steps
- Use CLI to upload your app – this automatically binds your apps to service instances
CLI
Installing CLI is easy and painless. Installation binary and instruction are available at:
https://tiny.cc/s4sdk-setup or this: https://github.com/cloudfoundry/cli#downloads.
For Windows, there is some known issues.
I use Command Prompt (cmd) instead of PowerShell , and had no issues.
Simply unzip the .zip archive file; you will get cf_installer.exe. Execute the installer. Choose the default installation options and location.
To confirm you have successfully installed it, go to command prompt, and type “cf”; you should see something like this. Done!
Destination
Note that destinations are defined at a different level than the other “instances of services”.
(To complicate things for a beginner, it seems you can define a destination specific to an instance of destination service, but you can forget this for now).
The URL needs to be identical with the one you set in your Cloud Connector (previous section). Remember this?
Note the Authentication field, and user/password…
S4H_MM is a dialog user with SAP_ALL authorization. Not ideal for security. But this would probably work as a proof of concept, or even for a development environment (if you at least replaced the user with a system or service user).
Perhaps this excellent blog (the last installment of blog series by matthieu.pelatan) will help me or someone to configure principal propagation – beyond my current knowledge and DIY capacity.
Instances of Destination Service, Connectivity Service, and UAA Service
After you defined your destination, move down to your “dev” space. That’s where you find the Services and Service Marketplace to define instances of destination service, and other services.

The end result should look like this.
Note that all the service instances have “None” in the Referencing Applications. If you have done differently, you might already have “bound” (bind) some apps. This is fine. You can manually bind apps to service instances in this web interface, or you can also do this in a file in the source of your app you upload. In the case of latter, the system will automatically bind your apps to service instances as instructed in the source code file – you will see it in my source code of the Node.js app.

After your apps are bound, the Referencing Applications column will show their names
Step 4. Application Router
My app depends on SAP’s Application Router for user authentication and routing users to my app.
If you are not familiar with it, I suggest that you do the following tutorials to get the feel for it.
- Hello World tutorial on SAP Online Help
I only did up to Step 2 on authentication of users. Step 3 is about authorization with the scope concept; my app does not implement this. Perhaps this is a candidate for the next step - Jens Haley’s excellent tutorial on consuming an OData service from an on-premise ABAP system via Clo...
The source files of the app at the completion of the Jens’s tutorial are in my repo on GitLab (in the branch named approuter).
As a result of this, you should see an XML output of an OData service (see the image below). Notice that it is identical with the output you saw in Step 1. A visible difference is in the URL.
In Step 1, the HTTP call you made via browser went directly to your S/4HANA system.
This time, your HTTP calls go through the Cloud Connector that you installed in Step 2 to be a link between SCP and your S/4HANA system. The Application Router deals with the UAA service, destination service, and connectivity service to connect with the backend S/4HANA system via the Cloud Connector.

See URL: Application Router
You can confirm that HTTP calls are actually going through Cloud Connector by looking at the Monitor tool in its console (image below) – in our case, https://localhost.8444 on the Windows OS on your GCP that you access via RDP.
Step 5. Node.js App
Overview of App
The structure of my application is simple. It has two component apps: diy-app and diy-approuter, and two configuration files on the root: manifest.yml and xs-security.json. The structure and configuration files are all based on tutorials – I’ll refer to specific ones in a minute.
Let’s talk about the following three key parts:
- diy-approuter
- diy-app
- HTML5 web pages with JavaScript and CSS
diy-approuter
diy-approuter and xs-security.json are essentially identical with when I completed Jens’s Application Router tutorial (the approuter branch of my GibLab repo).
Having said that, you would notice two differences.
start.js. and start scripts in package.json
These are totally unnecessary. You can keep how diy-approuter is configured in the tutorial (as is the approuter branch). In the tutorial, you don’t have a start.js (in fact, no .js filies!). Application Router can be started by directly specifying approuter.js within the node_module/@sap folder. What I was doing is to start an application router via JavaScript code. This is documented in Application Routers documentation in the node_module folder if you install it via npm install.
Route definition for diy-app in manifest.yml and routes
This is essentially the way two apps are “linked” as explained the Hello World tutorial on SAP Online Help.
diy-approuter and diy-app are two different applications on their own in SCP. They have different URLs:
Here is my understanding of how this “linking” is relevant here – If I am mistaken, please correct me. Now… I bound my uaa service (diy-s4hana-uaa) with diy-app in manifest.yml. This means it needs user authentication to SCP. The app itself does not have this capability to handle this. In addition, for diy-app to be able to use other services such as destination and connectivity, it needs to have access to JWT token from uaa.
By these configurations below via manifest.yml and diy-approuter’s xs-app.json,
- You can access diy-app via http://diy-app.cfapps.eu10.hana.ondemand.com/app/ (somehow with my configuration, you need to have the “/” at the end — my lack of knowledge in regex, I guess)
- diy-approuter forwards xsuaa JWT token to diy-app after the user authenticates to SCP
You also notice that I removed routes that let diy-approuter access S/4HANA’s OData services directly.
manifest.yml env:
destinations: >
[
{
"name":"diy-app",
"url":"https://diy-app.cfapps.eu10.hana.ondemand.com/",
"forwardAuthToken": true
}
]
/approuter/xs-app.json{
"routes": [
{
"source": "^/app",
"target": "/",
"destination": "diy-app"
},
{
"source": "^/(.*)",
"localDir": "web/"
}
]
}
diy-app
diy-app is constructed as a Node.js app with using Express.js. As you can see, start.js implements Express.js to deal with HTTP requests. It is the main application code that serves as the “backend” of the diy-app web application.
Let’s look at the two key parts of start.js:
- SAP npm components to deal with user authentication (JWT, and XSUAA)
- ConnectSCC.js that deals with interactions among diy-app, SCP, and Cloud Connector
JWT, UAA, User Authentication
This part is a copy of the code you see in the Hello World tutorial on SAP Online Help
const passport = require('passport')

const xsenv = require('@sap/xsenv')

const JWTStrategy = require('@sap/xssec').JWTStrategy

const services = xsenv.getServices({ uaa: 'diy-s4hana-uaa' })


passport.use(new JWTStrategy(services.uaa))


app.use(passport.initialize())

app.use(passport.authenticate('JWT', { session: false }))
My understanding (based on some testing), it is Passport.js with the support of the @Sap components that attach user information and uaa JWT to the HTTP request.
User information is attached to req.user – this is used in my app.get(‘/test’) function.
User’s JWT is attached to req.authInfo, and is required in the key component ConnectSCC.js. We will look at it now.
Interactions among diy-app, SCP, and Cloud Connector
Most of my efforts went into making of ConnectSCC.js. It is the one that deals with what’s needed for diy-app deployed on the CF environment of SCP to interact with Cloud Connector.
The key is, once understood, simple. You need to construct the HTTP header correctly, as required by SCP to connect to Cloud Connector with proxy host. I will let the source code explain.
ConnectSCC.js has two heritages:
- b.deterd2 npm package, scc-connector: https://github.com/bertdeterd/scc-connector
- ralph tutorial/sample code where it handles destination services (Destination.js and Utils.js)This is introduced by mariatrinidad.martinezgea in her blog
My ConnectSCC.js is essentially a fork of scc-connector. You can see that the basic ways of handling Express.js middleware and axios are the same.
I could not get Bert’s original scc-connector working. I enhanced it with some elements I borrowed from Ralpth's code. His code handles destination services well. This way, you can also handle basic authentication to the S/4HANA on-premise system, which scc-connector does not.
Note that ConnectSCC.js uses asyn/await statements, which are relatively new in JavaScript. You might need to instruct SCP CF to use a relatively new version of Node.js to run the code – otherwise, you might get a syntax error when you push your code. See my package.json to see how I how did this. (documentation in Cloud Foundry here)
/diy-app/package.json "engines": {
"node": "^10.15.0"
}
HTML5 Web Pages with JavaScript and CSS
End users will be looking at HTML5 web pages. The rest of my code is for internal workings that end users don’t see. There are two web pages: one is under /diy-approuter/web, and the other under /diy-app/web. The one under approuter is meant to be the landing page after user authentication. The one under app is a web app that lists bills for logon customer user. The bills are retrieved from S/4HANA system via an OData service.
To make the web sites look more “realistic”, I used the Parallax Template that is freely available on Materialize starter page. The landing page is almost an unchanged copy of the template.
The billing document list is fetched via the JavaScript code and API in the backend part of the app.
I tried to use plain JavaScript as much as possible when I wrote the billing document web app. I directly wrote the JavaScript code in the index.html in the <script> tag. No external module is used. The one you see in landing page’s index.html is for materialize to add some eyecandy to the UI.
You can see that my code is not particularly "cool" — it is rather crude, using brute force to do some stuff. But readable, I hope. If you are a good JavaScript developer, I am sure you can easily improve it.
See the Cloud Connector's monitor that your HTTP call for billing document OData service actually goes through it 🙂
Other Related Documentation, Tutorials and Blogs
This blog and my app were long coming. I nearly gave up, because I just could not get some stuff working. I am happy that I persevered.
Along the way, I looked at many tutorials and blogs. I have noted them above when they are relevant in specific parts of the app. Huge thanks to all the authors; without them, I could not have built this app. Some programming components were either direct copy or modified versions from these other resources.
As at the time of writing this, however, none of these presented a whole picture to me. I hope that you will benefit from what I have done.
- Hello World tutorial on SAP Online Help I did only up to authentication; skipped the last step to implement authorization
- matthieu.pelatanexcellent tutorial series. His application is written in Java
- b.deterd2 npm package, scc-connector
- mariatrinidad.martinezgea blog on connecting SCP with SAP Business One and SAP Business ByDesign
- ralph code, especially where it handles destination services (Destination.js and Utils.js)
- jens.haley step-by-step tutorialon how to install Cloud Connector
- jens.haley tutorial on consuming an OData service from an on-premise ABAP system via Cloud Connector
This tutorial was published towards the end of February 2019; I found it some weeks later in March. It revived my project. Without it, I would not have finished my app, and would not be writing this blog. I believe I have taken his tutorial one step further, adding layers of a Node.js-based backend that serves a service, and a JavaScript-based web app to consume that service. - SAP S/4HANA 1809 Fully-Activated Appliance by joerg.wolf
About my DIY S/4HANA Blog Series
This tutorial blog series is aimed at anyone who wants to play with an SAP S/4HANA on-premise system from your Windows PC at home.
Other posts from my DIY S/4HANA blog series:
- A Do-It-Yourself Step-by-Step Guide: How to Set Up Your On-Premise System of SAP S/4HANA 1709 at Hom...
You can use this guide for 1809, which I did for this - A Do-It-Yourself Step-by-Step Guide: How to Set Up Your On-Premise System of SAP S/4HANA 1709 at Hom...
Labels:
32 Comments
You must be a registered user to add a comment. If you've already registered, sign in. Otherwise, register and sign in.
Labels in this area
-
Artificial Intelligence (AI)
1 -
Business Trends
363 -
Business Trends
29 -
Customer COE Basics and Fundamentals
1 -
Digital Transformation with Cloud ERP (DT)
1 -
Event Information
461 -
Event Information
27 -
Expert Insights
114 -
Expert Insights
177 -
General
1 -
Governance and Organization
1 -
Introduction
1 -
Life at SAP
415 -
Life at SAP
2 -
Product Updates
4,682 -
Product Updates
261 -
Roadmap and Strategy
1 -
Technology Updates
1,500 -
Technology Updates
96
Related Content
- S4H OnPrem 2022 Initial SP - Assign Handling Unit to Outbound Delivery by BAPI in Enterprise Resource Planning Q&A
- Integrating/Converting FINSTA IDocs in SAP Public Cloud in Enterprise Resource Planning Q&A
- Integration of SAP Service and Asset Manager(SSAM) with SAP FSM to support S/4HANA Service Processes in Enterprise Resource Planning Blogs by SAP
- SAP S/4HANA Cloud Public Edition 财务-成本会计常见热点问题汇总FAQ in Enterprise Resource Planning Blogs by SAP
- Message No. CTE_HCM_EMPLOYEE000 in Enterprise Resource Planning Q&A
Top kudoed authors
| User | Count |
|---|---|
| 14 | |
| 6 | |
| 6 | |
| 4 | |
| 4 | |
| 3 | |
| 3 | |
| 3 | |
| 3 | |
| 3 |