
- SAP Community
- Products and Technology
- Enterprise Resource Planning
- ERP Blogs by SAP
- Part 1: Migrate your Data – Migration Cockpit (SAP...
Enterprise Resource Planning Blogs by SAP
Get insights and updates about cloud ERP and RISE with SAP, SAP S/4HANA and SAP S/4HANA Cloud, and more enterprise management capabilities with SAP blog posts.
Turn on suggestions
Auto-suggest helps you quickly narrow down your search results by suggesting possible matches as you type.
Showing results for
Advisor
Options
- Subscribe to RSS Feed
- Mark as New
- Mark as Read
- Bookmark
- Subscribe
- Printer Friendly Page
- Report Inappropriate Content
03-10-2021
11:43 AM
One frequently asked question regarding the SAP S/4HANA migration cockpit’s migration approach “Migrate Data Using Staging Tables” is how do I load data into the staging tables?
This blog series will provide a few options for populating these staging tables with data.
This first blog post will give an overview of the SAP S/4HANA migration cockpit, focusing on the migration approach “Transfer Data Using Staging Tables”. The next blog posts will provide step-by-step examples on how to load data into the staging tables using SAP Data Services, then SAP HANA smart data integration (SDI), and finally SAP HANA Studio – Data from File option.
First, let’s have a short introduction and overview of the functionality, features, and key benefits of the S/4HANA migration cockpit.
The SAP S/4HANA migration cockpit is a tool designed for customers who have just installed SAP S/4HANA (new implementation scenarios) and want to transfer their business data from SAP or non-SAP software systems. The SAP S/4HANA migration cockpit has become an essential tool for SAP S/4HANA data migration, supporting customers during the transition to SAP S/4HANA. It is part of both SAP S/4HANA and SAP S/4HANA Cloud and can be launched using the “Migrate Your Data” app in the Fiori Launchpad (Data Migration Launchpad) or using transaction LTMC (to be retired by SAP S/4HANA 2021). With the migration cockpit, you can migrate your master data and transactional data to SAP S/4HANA. It uses migration objects to identify and transfer the relevant data and, facilitates the migration process by providing predefined migration content and mapping. The SAP S/4HANA migration cockpit is SAP’s recommended approach for the migration of business data to SAP S/4HANA (on-premise) and SAP S/4HANA Cloud.
The most important functions and features of the migration cockpit are outlined below, as well as its key benefits.
From SAP S/4HANA 2020 and SAP S/4HANA Cloud 2008, the SAP S/4HANA migration cockpit has the following migration approaches:
For the migration approach “Migrate Data Using Staging Tables” (Migrate your Data – Migration Cockpit App), available from SAP S/4HANA 2020 and SAP S/4HANA Cloud 2008, a new Fiori UI was introduced. Now, the file migration approach is embedded in the Staging tables approach. This means that template files are provided for every migration object and, you can use these templates to fill the staging tables with data. Alternatively, you can fill the staging tables by using your preferred tools (for example SAP Data Services). The SAP S/4HANA migration cockpit creates staging tables for the migration objects that are relevant for your project and migrates data from these staging tables to the target SAP S/4HANA system.
Below are the motivations, benefits, and technology regarding the combined approach of the staging tables:
Before you create a migration project, we recommend that you review the following documentation which contains information about required roles, SAP Best Practices Explorer, installation activities (On-Premise only) and, set-up instructions (Cloud only):
On-Premise:
Cloud:
For SAP S/4HANA:
For SAP S/4HANA Cloud:
Note: For both, SAP S/4HANA and SAP S/4HANA Cloud the corresponding role for each migration object is also required. For example, role SAP_BR_CASH_MANAGER for the Bank migration object.
For more information about migration object-specific required roles see:
For SAP S/4HANA:
For SAP S/4HANA Cloud:
For the latest information on Migrate Data Using Staging Tables see:
From SAP S/4HANA Cloud 2008 and SAP S/4HANA 2020 the process for migrating data to SAP S/4HANA using staging tables is as follows:
1. Access the SAP S/4HANA migration cockpit by choosing the Migrate Your Data - Migration Cockpit app in the Fiori Launchpad in your SAP S/4HANA system.
Note: For SAP S/4HANA (on-premise) you must select the migration approach “Migrate Data Using Staging Tables” when you create a new project.
2. Create a migration project and select the migration objects that are relevant to your project.
Migration objects are delivered by SAP and they describe how to migrate data from the source system to the SAP S/4HANA system. That means these migration objects contain information about which tables are needed and the relationships between the tables for migrating the data.
You can find a list of the available migration objects and a release comparison of migration object templates under the followings links:
For SAP S/4HANA (On-Premise):
For SAP S/4HANA Cloud (Cloud):
2.1 Enter the general data for your migration project
When you create a migration project, you must specify a location for the staging tables by selecting one of the following options: Local SAP S/4HANA Database Schema or Remote SAP HANA DB Schema.
If you use the option Local SAP S/4HANA Database Schema, the SAP S/4HANA migration cockpit will generate the staging tables in the local ABAP schema of the SAP S/4HANA system. You can use this option if you only want to use XML template files to fill the Staging Tables with data.
If you use the option Remote SAP HANA Database Schema, you must specify the relevant connection to a remote SAP HANA system. For this option, you can either use an ETL tool (for example SDI, SAP Data Services, ADP, etc.) or fill the data directly on the SAP HANA database. The SAP S/4HANA migration cockpit will generate the staging tables in the remote SAP HANA DB Schema. A prerequisite for selecting this option is to have a valid database connection (for more information refer to KBA 2733253).
Note: Typically, you first create a project in a test system which is a copy of the production SAP S/4HANA system. For each new test transfer, you create a new migration project that includes any corrections or modifications identified in the previous test. When you are finally ready to migrate your data to the production SAP S/4HANA system, you can create a project in the production system.
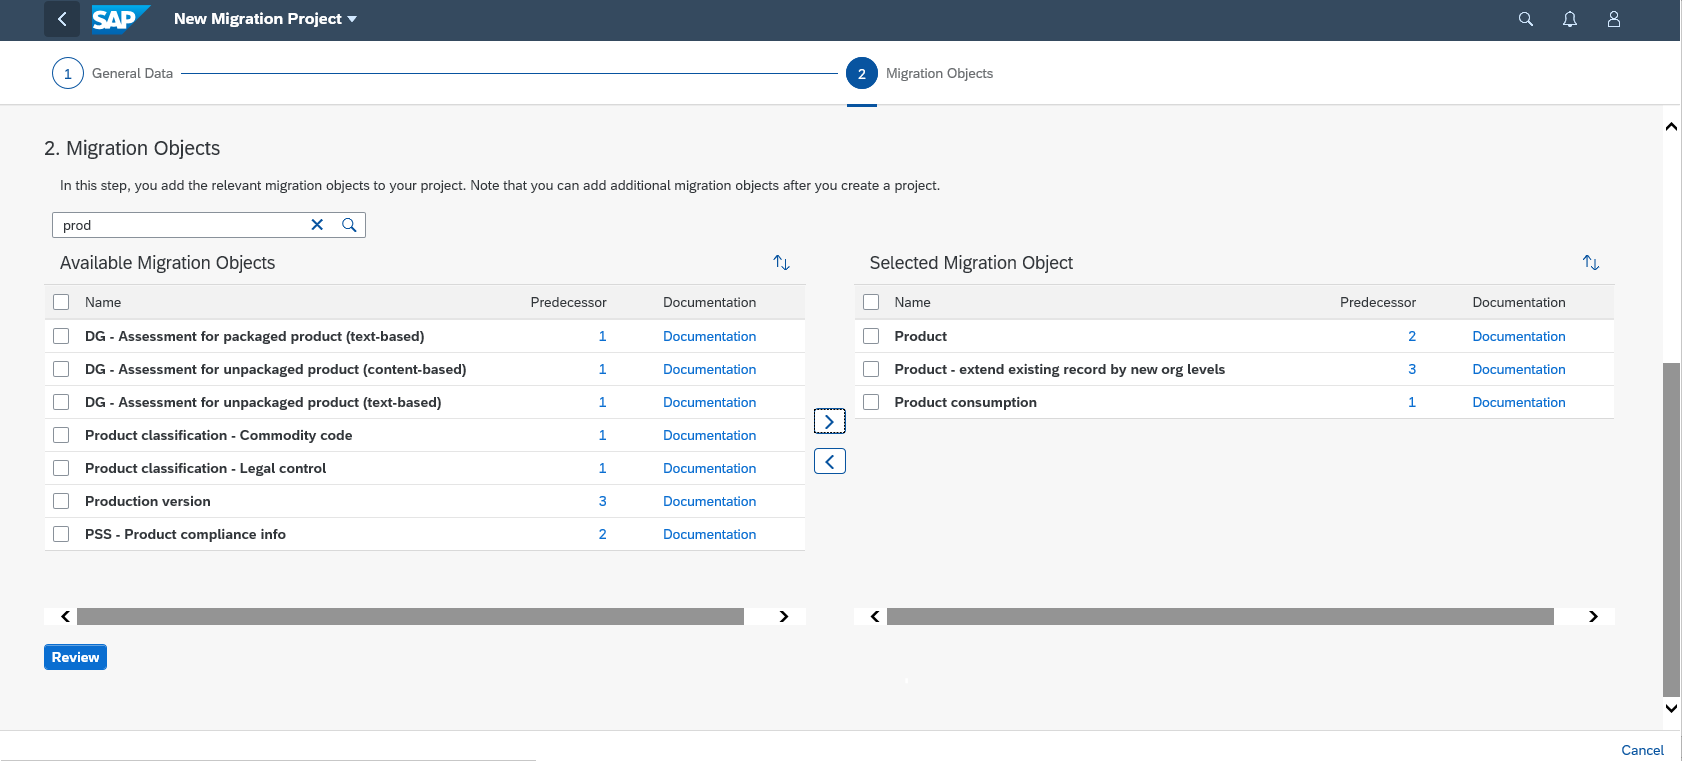
2.2 From the list of “Available Migration Objects” select the relevant migration objects for your migration project and click the button to transfer these to the list of “Selected Migration Object”.
Note: You can select one or more migration objects.
2.3 To continue with the next step click on “Review”
2.4 Confirm the data selection by choosing the button “Create Project”.
Your migration project is created, and you can open this from the list of migration projects.
3. Transfer data to the staging tables.
On the migration project screen, you can trigger all the steps that are required to transfer the data for each migration object to the target SAP S/4HANA system. In addition, you can quickly access additional information and tasks.
Staging tables are automatically created for each migration object in the project. You must decide how to fill these staging tables with data. From SAP S/4HANA 2020 and SAP S/4HANA Cloud 2008, it is possible to fill the staging tables using XML template files provided for every migration object. Alternatively, to fill the staging tables for the Remote SAP HANA Database Schema, you can either use an ETL tool or fill the data directly on the SAP HANA database.
If you use XML template files to populate the staging tables with data, you must download first the template file for the migration object(s) you need and then enter in the file the data to be migrated.
3.1 Download the template files(s) for the desired migration objects.
On the “Migration Project” screen you can select one or more migration objects and then click on the button “Download Template”.

The system will create a Zip file with the selected templates.
You can unzip the XML files you need in your local directory.
3.2 Enter the data to be migrated in the XML template file
Enter the desired legacy data (manually) in generated XML file template for the selected migration object.
Important notes:
General recommendations for filling the XML template:
3.3 Upload the completed XML file.
To do this, you select the option “Upload File” in the drop-down menu for the corresponding migration object. You can drag and drop the files to upload or use the Upload button. The validation gets scheduled for the uploaded file. The system will automatically transfer the contents of the file to the staging tables.
3.4 You can view the relevant messages for the file by choosing Show Messages.
To view the file content of a migration object, you can choose the file name.
Note: When you transfer data from a file to the staging tables, duplicate key errors (i.e. instances in the table with the same key field) might occur. If such errors occur, the status of the file will change to Transfer of Data to Staging Tables Failed. You can view the relevant messages for the file by choosing Show Messages. For more details on handling duplicate key errors see: Handling Duplicate Key Errors - SAP Help Portal
Occasionally, it's necessary to synchronize staging tables with migration objects when for example there are changes in the default view of the migration project or in the active view of the migration object or in the migration object content. To solve the issue with an altered status of the staging tables (i.e. Table has the status Adjustment Required), you must synchronize the tables before you can use them for data transfer.
If the staging tables are located in a remote SAP HANA schema, you can populate the staging tables with data by using your preferred tools (for example SAP Data Services). In this case, information such as the technical names of the staging tables as well as the data types and lengths of the fields will be required. For the option Remote SAP HANA Database Schema, you must specify the relevant connection to a remote SAP HANA system and the SAP S/4HANA migration cockpit will generate the staging tables there. Here, you can fill the staging tables with data either using the SAP HANA Studio and SQL Insert statement or the option Import – Data from File. Also, you can fill these tables using SAP tools such as SAP Data Services, SAP HANA smart data integration or other third-party tools.
As mentioned before, staging tables are automatically created for the migration object. For each source structure of a migration object, a separate staging table will be generated in the SAP HANA database schema (for example for the migration object G/L account, four different staging tables are created which correspond to the four structures for G/L account: S_GENERAL, S_COMPANY, S_SKA1_TEXT, S_KEYWORDS, that are currently available for this migration object).
For the Remote SAP HANA Database Schema option, you can populate these staging tables using SAP or third-party ETL tools.
The next blog posts of these blog series will show you step by step three methods for populating the staging tables using Smart Data Integration (SDI), SAP Data Services, and SAP HANA Studio.
Once you have populated the staging tables with data, you can see more details on the records for each migration object instance on the “Migration Object Instances” screen.
Furthermore, you can view the metadata information (such as data type and length) for all tables of a migration object by choosing the button Download Metadata.
The system will create a .txt file that contains the structure of the tables. For each field, you can view information such as the length and data type. You can use this information, for example, to easily copy data to any export scripts that you might use to populate the staging tables with data.
Additionally, you can view the table definition in the SAP HANA Studio. To do this, on the Systems tab, expand the folder Catalog and locate the relevant schema. Expand the schema and expand the folder Tables. Select the staging table and choose “Open Definition” from the context menu.
Fields that are marked as NOT NULL or with an * (Asterix) in the data definition must contain a value. This means they need to be populated with data taking into consideration the leading zeros, default values, and correctness of the values of some data types (for example, DATE, DECIMAL, TIME, and so on).
You can find more information about default values and leading zeros in SAP KBA 2733253 and the SAP Help Portal: SAP Help Portal: SAP HANA SQL and System Views Reference for SAP HANA Platform → SQL Reference → Data Types.
If the available migration objects do not meet your requirements, you can enhance or modify migration objects using the Migration Object Modeler. The SAP S/4HANA migration object modeler is part of the SAP S/4HANA migration cockpit, and it is designed to integrate custom objects and enhancements.
Note that the Migration Object Modeler is only available for the on-premise and single tenant editions of SAP S/4HANA. You can access the SAP S/4HANA migration object modeler by using transaction LTMOM.
For more information about the SAP S/4HANA migration object modeler, refer to the following resources:
3.5 Job Management – Improving Performance
You can improve the performance of the data migration by adjusting the maximum number of the data transfer jobs for a project or for a migration object.
On the Migration Object Details screen, there is the field Max. Data Transfer Jobs. Data transfer jobs are responsible for transferring the data in the staging tables to the target SAP S/4HANA system. In order to transfer data to the target SAP S/4HANA system, the system divides the content of the staging tables into portions, which are transferred by the data transfer jobs. The default number of data transfer jobs is 1. Take into account that increasing the number of data transfer jobs may not have any effect (depending on the amount of data across all the staging tables of a migration object).
Consider increasing the number of data transfer jobs in the following circumstances:
For more details see:
3.5.1 On the Migration Project screen, use the button Job Management to adjust job settings.
3.5.2 On the Job Management screen, adjust the maximum number of background jobs that are used for your project. You can also adjust the maximum number of jobs to be used for each migration object.
For more details on how to populate the staging tables using ETL tools, you can see the next blog posts of these blog series. These blogs will show you step by step three methods for populating the staging tables using SDI, SAP Data Services, and SAP HANA Studio.
4. Prepare the staging tables for each migration object so that they can be used to transfer data to SAP S/4HANA.
The staging tables for each migration object need to be prepared before they can be used to transfer data to SAP S/4HANA.
In the Action column, you can trigger an action for a migration object. The system proposes the next action to be performed. After having uploaded an XML file, the system proposes the next action, in this case, “Prepare”.
4.1 Select the action “Prepare” For the relevant migration object.
The system will prepare the staging tables so that they can be used to transfer data to SAP S/4HANA.
Note: You must repeat this process every time new data is added to the staging tables.
4.2 To monitor the status of the preparation step, choose Monitoring
5. Process any open mapping tasks for each migration object.
There are mapping tasks associated with migration objects that must be processed before the migration can proceed. Some examples of mapping tasks include Value Mapping tasks (to specify target values for corresponding source values) and Fixed Value tasks (to set default values for target fields).
On the Migration Project screen, in the Mapping Tasks column, you can view the number of open and completed tasks for each migration object.
5.1 Select the relevant migration object and choose the action Mapping Tasks.
Alternatively, you can display all mapping tasks for a project by choosing the Mapping Tasks button located in the top-right screen area.
If a migration object has open tasks, you can click the relevant entry in the Mapping Tasks column and the system will display the Mapping Tasks screen.
On the Mapping Tasks screen, you can specify the value mappings and transform values from the source system to the target system. Here, you can view all the mapping tasks, maintain the value mapping and confirm the values.
5.2 Select the desired mapping task
Note: The system displays the mapping tasks in a list. Open mapping tasks have the status To be Confirmed. Confirmed mapping tasks have the status “Confirmed”.
You need to process the task by entering the relevant target values and confirming these target values. You can then set the status of the task to Confirmed. Once all mapping tasks for a migration object have the status Confirmed, you can proceed with the simulation or migration process for the migration object.
5.3 For the desired source (default) value(s), enter the corresponding target (customizing) value(s) and click “Confirm”.
Note: You can confirm one or more mapping values by selecting the relevant values and then choosing the Confirm button beside the Search field.
Also, you can search for specific target values using the Search option.
In addition, on the Mapping Tasks screen, you can download empty templates using the button "Download Mapping Templates".

You can also download and upload mapping values using the buttons "Download Values" and "Upload Values" correspondingly.
Note: It is not possible to change or delete the mapping values in the SAP S/4HANA migration cockpit. You need to download the values and upload them back to the SAP S/4HANA migration cockpit. This way you can:
For more details see KBA 3003068 Migrate Your Data – Staging Tables: Inserting and deleting entries for mapping tasks.
6. Optional: Simulate the migration (transfer of data to the target SAP S/4HANA system).
Once you have prepared the staging tables and processed all mapping tasks for a migration object, you can simulate the transfer of data to the target SAP S/4HANA system. During the simulation, no data will be written to the target SAP S/4HANA, nevertheless, you can view all error or warning messages that would occur during an actual data transfer. Consequently, you will be able to correct these errors before executing the migration.
Note: When you simulate the migration for the first time, additional mapping tasks may appear. You need to process these mapping tasks and repeat the simulation before you can proceed with the migration.
6.1 On the Migration Project screen, select the relevant migration object and choose the action Simulate.
The system simulates the migration for all migration object instances in the staging tables for the migration object. You can view the results of the simulation on the Migration Messages screen.
On the Migration Object Instances screen, you can view all messages related to one migration object.
You can also export the messages by using the Export option.
7. Migrate the data for the migration object to the target SAP S/4HANA system.
Once you have prepared the staging tables and processed all open tasks for a migration object, you can transfer data to the target SAP S/4HANA system.
Note: It is recommended to simulate the migration before migrating the data.
7.1 On the Migration Project screen, select the relevant migration object and choose the action Migrate.
The system will migrate the migration object instances in the staging tables for the migration object.
Note: Any instances that have already been migrated will not be migrated again.
8. Optional: Create and use correction files to correct any errors that may have occurred during the migration.
If errors occur during the migration, you can use a correction file to correct the errors. A correction file contains all the migration object instances in the staging tables that have the status Error. You can adjust the correction file to resolve the errors, upload the file, and then migrate the instances to the target system.
Note: You can also create a correction file from the Migration Project screen by selecting the relevant migration object and choosing the action Create Correction File.
The system displays the Select Source dialog.
8.2 In the Select Source dialog, select the relevant files and choose Create Correction File.
8.3 Go to the Monitoring screen and select the relevant migration object.
When the status of the activity Generate Correction File changes to Finished, the system displays a Download File link.
8.3 Click the Download File link and save the file.
For more information about migrating data to SAP S/4HANA using staging tables, refer to the documentation on the SAP Help Portal. For more information on Transferring Data to SAP S/4HANA Using Staging Tables you can check the following SAP Help Portal Links:
https://help.sap.com/viewer/29193bf0ebdd4583930b2176cb993268/latest/en-US/d5feccf64c9a41b2b95c908268...
https://help.sap.com/viewer/9961ea9091534d44a01ab44024b174d9/latest/en-US/1df405e3332d4de999af648845...
Coming back to the question stated at the beginning of this blog:
The staging tables can be populated using XML template files, or manually using ABAP or with the SAP HANA Studio or, by using ETL tools from a third party or from SAP (for example SAP Data Services, SAP HANA smart data integration (SDI)).
If you use the option Local SAP S/4HANA Database Schema, the SAP S/4HANA migration cockpit will generate the staging tables in the local ABAP schema of the SAP S/4HANA system. You can use this option if you only want to use XML template files to fill the Staging Tables with data.
If you use the option Remote SAP HANA Database Schema, you must specify the relevant connection to a remote SAP HANA system. For this option, you can either use an ETL tool (for example SDI, SAP Data Services, ADP, etc.) or fill the data directly on the SAP HANA database.
In the image below, you can see some possible solutions to fill the staging tables.
Note: It is important also to consider the following major recent Innovation for the staging tables approach of the SAP S/4HANA migration cockpit, available from 1809 FPS0:
In this blog series, we will focus only on the following ETL tools from SAP to load data into the staging tables of the SAP S/4HANA migration cockpit:
The second blog post will focus on how to load data to the staging tables using SAP Data Services.
The third blog post will focus on Using SAP HANA Smart Data Integration (SDI) to load data to the staging tables
The fourth blog post will focus on Using SAP HANA Studio (Data from file option) to load data to the staging tables
————————————————————————————————————————————-
SAP help portal:
– On-Premise:
– Cloud:
SAP Communities:
Training Materials & Videos:
Blog posts (SAP S/4HANA migration cockpit)
Other relevant blog posts:
Relevant SAP Notes/KBAs:
Newsletters:
Other Useful Links:
— Transitioning to SAP S/4HANA Links and Information:
This blog series will provide a few options for populating these staging tables with data.
This first blog post will give an overview of the SAP S/4HANA migration cockpit, focusing on the migration approach “Transfer Data Using Staging Tables”. The next blog posts will provide step-by-step examples on how to load data into the staging tables using SAP Data Services, then SAP HANA smart data integration (SDI), and finally SAP HANA Studio – Data from File option.
First, let’s have a short introduction and overview of the functionality, features, and key benefits of the S/4HANA migration cockpit.
The SAP S/4HANA migration cockpit is a tool designed for customers who have just installed SAP S/4HANA (new implementation scenarios) and want to transfer their business data from SAP or non-SAP software systems. The SAP S/4HANA migration cockpit has become an essential tool for SAP S/4HANA data migration, supporting customers during the transition to SAP S/4HANA. It is part of both SAP S/4HANA and SAP S/4HANA Cloud and can be launched using the “Migrate Your Data” app in the Fiori Launchpad (Data Migration Launchpad) or using transaction LTMC (to be retired by SAP S/4HANA 2021). With the migration cockpit, you can migrate your master data and transactional data to SAP S/4HANA. It uses migration objects to identify and transfer the relevant data and, facilitates the migration process by providing predefined migration content and mapping. The SAP S/4HANA migration cockpit is SAP’s recommended approach for the migration of business data to SAP S/4HANA (on-premise) and SAP S/4HANA Cloud.
The most important functions and features of the migration cockpit are outlined below, as well as its key benefits.
Key Features:
- Create migration projects to migrate data, and to monitor the status of the migration.
- Select the migration objects that are relevant for your migration scenario (the app uses migration objects to identify and transfer the relevant data).
- Process any mapping tasks for the migration objects.
- Simulate the migration before migrating your data to SAP S/4HANA and monitor the status of the simulation process.
- Migrate your data to SAP S/4HANA and monitor the status of the migration.
Key Benefits:
- Preconfigured content and mapping for each migration object, for example, Bank, Customer, Cost center, Material, and so on.
- Predefined template files and staging tables for each migration object.
- Automated mapping between the template and target structure.
- Migration programs are automatically generated – no programming required.
- Available for SAP S/4HANA and SAP S/4HANA Cloud, included in these licenses.
Migration Approaches:
From SAP S/4HANA 2020 and SAP S/4HANA Cloud 2008, the SAP S/4HANA migration cockpit has the following migration approaches:
- Migrate Data Using Staging Tables (SAP S/4HANA and SAP S/4HANA Cloud)
- Migrate Data Directly from SAP System (new with SAP S/4HANA 1909, only for On-Premise)
For the migration approach “Migrate Data Using Staging Tables” (Migrate your Data – Migration Cockpit App), available from SAP S/4HANA 2020 and SAP S/4HANA Cloud 2008, a new Fiori UI was introduced. Now, the file migration approach is embedded in the Staging tables approach. This means that template files are provided for every migration object and, you can use these templates to fill the staging tables with data. Alternatively, you can fill the staging tables by using your preferred tools (for example SAP Data Services). The SAP S/4HANA migration cockpit creates staging tables for the migration objects that are relevant for your project and migrates data from these staging tables to the target SAP S/4HANA system.
Below are the motivations, benefits, and technology regarding the combined approach of the staging tables:
Technology
- Staging tables: created in the schema of the SAP HANA database
- Separate staging table for each source structure of a migration object
Benefits
- Improved user experience
- Combine file and staging possibilities in one approach (= one project)
- Easier way to populate staging tables
- Instance-based status tracking and messages
- Improved capability of downloading & uploading mapping values
- Staging tables will be created in the schema of the SAP HANA database depending on the selected database connection
- A separate staging table will be generated for each source structure of a migration object (for example Customer),
- Staging tables can be filled by customers using predefined XML template files or using extraction tools (ETL) from SAP or from a third party.
- State-of-the-art user experience with Fiori UI
- Faster UI response time
- Processing of multiple objects at once possible
- Progress tracking during simulation/migration
System Setup for SAP S/4HANA (on-premise)

System Setup SAP S/4HANA Local Database Schema

System Setup SAP S/4HANA Remote Database Schema
System Setup for SAP S/4HANA Cloud

System Setup SAP S/4HANA Cloud Local Database Schema
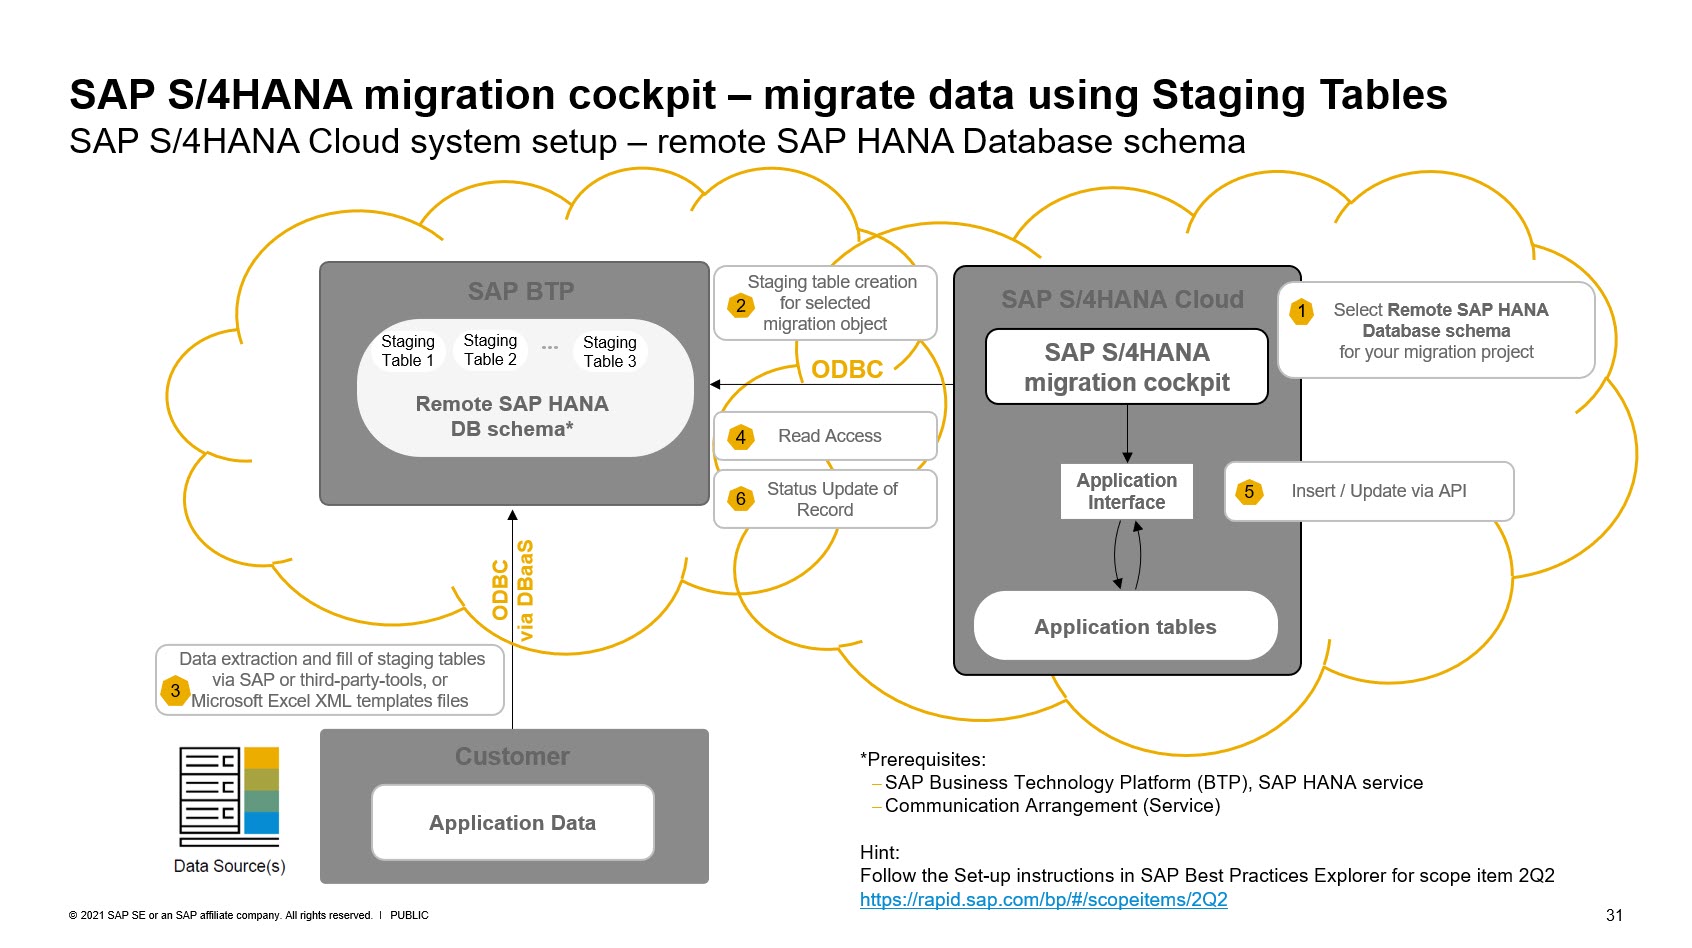
System Setup SAP S/4HANA Remote Database Schema
General Procedure for Transferring Data to SAP S/4HANA Using Staging Tables
Prerequisites, Required Roles, Installation/Setup Activities
Before you create a migration project, we recommend that you review the following documentation which contains information about required roles, SAP Best Practices Explorer, installation activities (On-Premise only) and, set-up instructions (Cloud only):
- SAP Best Practices Explorer (On-Premise/Cloud) – Data Migration to SAP S/4HANA from Staging (2Q2)
- 2733253 – FAQ for SAP S/4HANA migration cockpit – Transfer option: Transfer data from staging tables
On-Premise:
- Installation Guide for S/4HANA (On-Premise only) available under https://help.sap.com/viewer/p/SAP_S4HANA_ON-PREMISE → <Filter-Version> Product Documentation → Installation Guide → 7. Installation Follow-Up Activities
Cloud:
- Setting Up Data Migration to SAP S/4HANA from Staging (2Q2)
- Test script Data Migration to SAP S/4HANA from Staging (2Q2) (Information about Technical and business roles, manual configuration, preliminary steps), available under https://rapid.sap.com/bp/scopeitems/2Q2 → Test script
- SAP Help Portal – SAP S/4HANA Cloud
Required Roles
For SAP S/4HANA:
- To transfer data using the SAP S/4HANA migration cockpit, a user with the role SAP_CA_DMC_MC_USERis required in the SAP S/4HANA system. This user must also have the role SAP_BR_CONFIG_EXPERT_DATA_MIG for the front-end server.
- To use the SAP S/4HANA migration object modeler (transaction LTMOM), role SAP_CA_DMC_MC_DEVELOPERis required in the SAP S/4HANA system.
For SAP S/4HANA Cloud:
- SAP_BR_CONFIG_EXPERT_DATA_MIG
Note: For both, SAP S/4HANA and SAP S/4HANA Cloud the corresponding role for each migration object is also required. For example, role SAP_BR_CASH_MANAGER for the Bank migration object.
For more information about migration object-specific required roles see:
For SAP S/4HANA:
- Available Migration Objects (http://help.sap.com/S4_OP_MO) → <Migration Object> → Section: Roles and Authorizations
For SAP S/4HANA Cloud:
- Available Migration Objects (http://help.sap.com/S4_CE_MO) → <Migration Object> → Business Role(s) or Section: Post-Processing → Business Role
For the latest information on Migrate Data Using Staging Tables see:
- On-premise: SAP S/4HANA - Migrate Data Using Staging Tables - SAP Help Portal
- Cloud: SAP S/4HANA Cloud - Migrate Data Using Staging Tables - SAP Help Portal
The Migration Process

The Migration Process
From SAP S/4HANA Cloud 2008 and SAP S/4HANA 2020 the process for migrating data to SAP S/4HANA using staging tables is as follows:
1. Access the SAP S/4HANA migration cockpit by choosing the Migrate Your Data - Migration Cockpit app in the Fiori Launchpad in your SAP S/4HANA system.
Migrate Your Data - Migration Cockpit
Note: For SAP S/4HANA (on-premise) you must select the migration approach “Migrate Data Using Staging Tables” when you create a new project.
![]()

2. Create a migration project and select the migration objects that are relevant to your project.
Migration objects are delivered by SAP and they describe how to migrate data from the source system to the SAP S/4HANA system. That means these migration objects contain information about which tables are needed and the relationships between the tables for migrating the data.
You can find a list of the available migration objects and a release comparison of migration object templates under the followings links:
For SAP S/4HANA (On-Premise):
For SAP S/4HANA Cloud (Cloud):
2.1 Enter the general data for your migration project
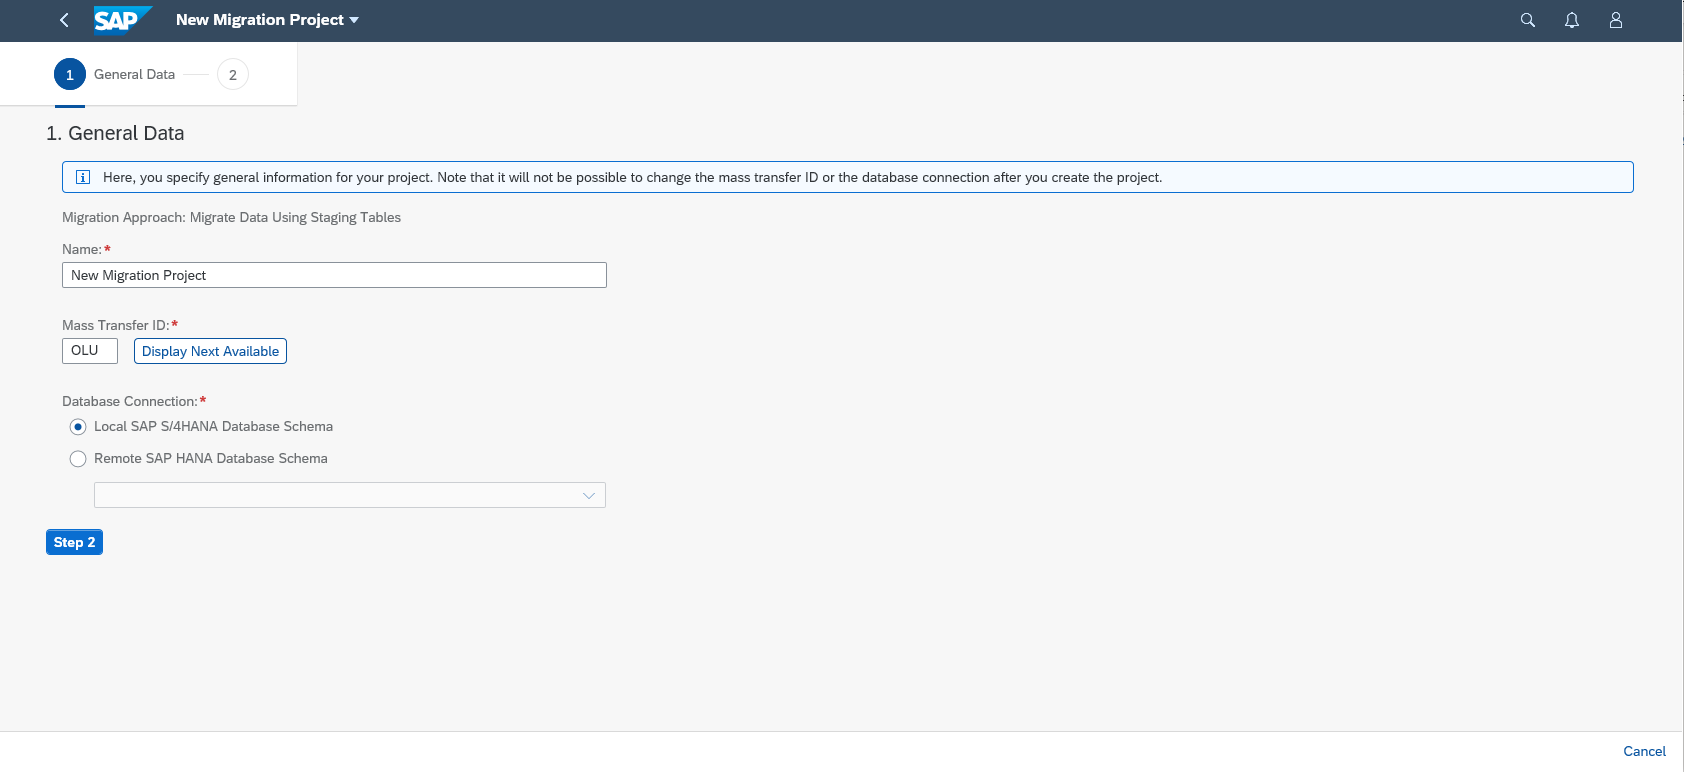
When you create a migration project, you must specify a location for the staging tables by selecting one of the following options: Local SAP S/4HANA Database Schema or Remote SAP HANA DB Schema.
If you use the option Local SAP S/4HANA Database Schema, the SAP S/4HANA migration cockpit will generate the staging tables in the local ABAP schema of the SAP S/4HANA system. You can use this option if you only want to use XML template files to fill the Staging Tables with data.
If you use the option Remote SAP HANA Database Schema, you must specify the relevant connection to a remote SAP HANA system. For this option, you can either use an ETL tool (for example SDI, SAP Data Services, ADP, etc.) or fill the data directly on the SAP HANA database. The SAP S/4HANA migration cockpit will generate the staging tables in the remote SAP HANA DB Schema. A prerequisite for selecting this option is to have a valid database connection (for more information refer to KBA 2733253).
Note: Typically, you first create a project in a test system which is a copy of the production SAP S/4HANA system. For each new test transfer, you create a new migration project that includes any corrections or modifications identified in the previous test. When you are finally ready to migrate your data to the production SAP S/4HANA system, you can create a project in the production system.
2.2 From the list of “Available Migration Objects” select the relevant migration objects for your migration project and click the button to transfer these to the list of “Selected Migration Object”.
Note: You can select one or more migration objects.

2.3 To continue with the next step click on “Review”
![]()
2.4 Confirm the data selection by choosing the button “Create Project”.

Your migration project is created, and you can open this from the list of migration projects.
3. Transfer data to the staging tables.
On the migration project screen, you can trigger all the steps that are required to transfer the data for each migration object to the target SAP S/4HANA system. In addition, you can quickly access additional information and tasks.


Action - Drop-down button
Staging tables are automatically created for each migration object in the project. You must decide how to fill these staging tables with data. From SAP S/4HANA 2020 and SAP S/4HANA Cloud 2008, it is possible to fill the staging tables using XML template files provided for every migration object. Alternatively, to fill the staging tables for the Remote SAP HANA Database Schema, you can either use an ETL tool or fill the data directly on the SAP HANA database.
If you use XML template files to populate the staging tables with data, you must download first the template file for the migration object(s) you need and then enter in the file the data to be migrated.
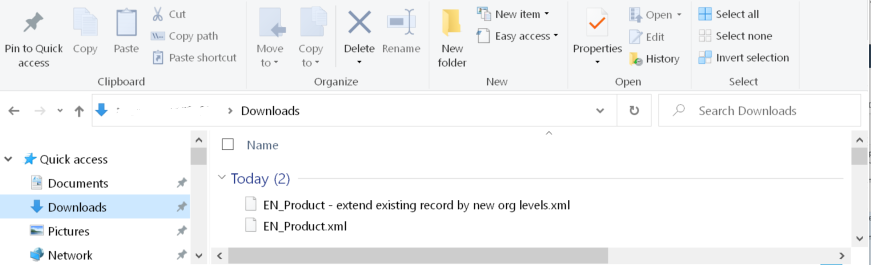
3.1 Download the template files(s) for the desired migration objects.
On the “Migration Project” screen you can select one or more migration objects and then click on the button “Download Template”.

The system will create a Zip file with the selected templates.

You can unzip the XML files you need in your local directory.
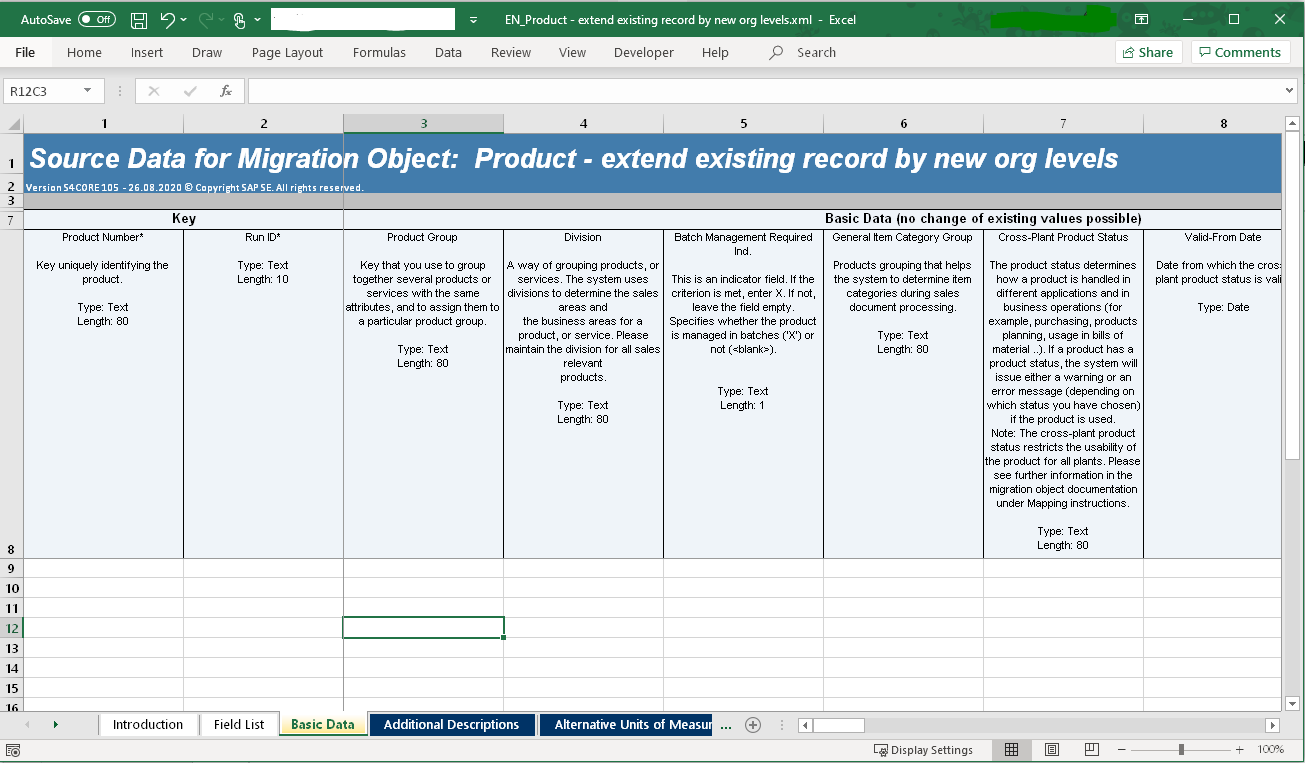
3.2 Enter the data to be migrated in the XML template file
Enter the desired legacy data (manually) in generated XML file template for the selected migration object.
Important notes:
- You can check the introduction worksheet (in the XML template file) for information about how to fill the template correctly.
- When filling the XML template file, consider the size limits. For more details about increasing file size limits for SAP S/4HANA and using zip files for SAP S/4HANA Cloud and SAP S/4HANA, see 2719524 - SAP S/4HANA Migration Cockpit: XML template size limits
- See some general recommendations on filling and working with the XML template in the following blog: SAP S/4HANA Migration Cockpit – Working with the Excel Template | SAP Blogs
General recommendations for filling the XML template:
- Read the introduction Worksheet and check the field list before you start filling the template
- Unhide and read the tooltips (line 😎
- Copy and paste values only using the following options:
- Paste option then Values (V) - within XML file
- Paste special and then choose Text - from somewhere else
- Paste option then keep text only - from notepad/text editor

Field List - Bank migration object
3.3 Upload the completed XML file.
To do this, you select the option “Upload File” in the drop-down menu for the corresponding migration object. You can drag and drop the files to upload or use the Upload button. The validation gets scheduled for the uploaded file. The system will automatically transfer the contents of the file to the staging tables.

3.4 You can view the relevant messages for the file by choosing Show Messages.
To view the file content of a migration object, you can choose the file name.
Note: When you transfer data from a file to the staging tables, duplicate key errors (i.e. instances in the table with the same key field) might occur. If such errors occur, the status of the file will change to Transfer of Data to Staging Tables Failed. You can view the relevant messages for the file by choosing Show Messages. For more details on handling duplicate key errors see: Handling Duplicate Key Errors - SAP Help Portal
Occasionally, it's necessary to synchronize staging tables with migration objects when for example there are changes in the default view of the migration project or in the active view of the migration object or in the migration object content. To solve the issue with an altered status of the staging tables (i.e. Table has the status Adjustment Required), you must synchronize the tables before you can use them for data transfer.
- You can synchronize the staging tables of a migration object, using the button Adjust Structure on the Migration Object Tables screen.
If the staging tables are located in a remote SAP HANA schema, you can populate the staging tables with data by using your preferred tools (for example SAP Data Services). In this case, information such as the technical names of the staging tables as well as the data types and lengths of the fields will be required. For the option Remote SAP HANA Database Schema, you must specify the relevant connection to a remote SAP HANA system and the SAP S/4HANA migration cockpit will generate the staging tables there. Here, you can fill the staging tables with data either using the SAP HANA Studio and SQL Insert statement or the option Import – Data from File. Also, you can fill these tables using SAP tools such as SAP Data Services, SAP HANA smart data integration or other third-party tools.
As mentioned before, staging tables are automatically created for the migration object. For each source structure of a migration object, a separate staging table will be generated in the SAP HANA database schema (for example for the migration object G/L account, four different staging tables are created which correspond to the four structures for G/L account: S_GENERAL, S_COMPANY, S_SKA1_TEXT, S_KEYWORDS, that are currently available for this migration object).
For the Remote SAP HANA Database Schema option, you can populate these staging tables using SAP or third-party ETL tools.
The next blog posts of these blog series will show you step by step three methods for populating the staging tables using Smart Data Integration (SDI), SAP Data Services, and SAP HANA Studio.
Once you have populated the staging tables with data, you can see more details on the records for each migration object instance on the “Migration Object Instances” screen.

Furthermore, you can view the metadata information (such as data type and length) for all tables of a migration object by choosing the button Download Metadata.
The system will create a .txt file that contains the structure of the tables. For each field, you can view information such as the length and data type. You can use this information, for example, to easily copy data to any export scripts that you might use to populate the staging tables with data.
Additionally, you can view the table definition in the SAP HANA Studio. To do this, on the Systems tab, expand the folder Catalog and locate the relevant schema. Expand the schema and expand the folder Tables. Select the staging table and choose “Open Definition” from the context menu.
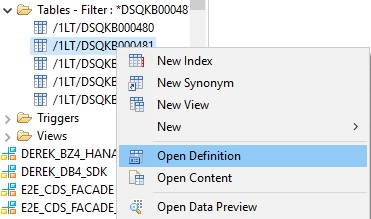
Fields that are marked as NOT NULL or with an * (Asterix) in the data definition must contain a value. This means they need to be populated with data taking into consideration the leading zeros, default values, and correctness of the values of some data types (for example, DATE, DECIMAL, TIME, and so on).

You can find more information about default values and leading zeros in SAP KBA 2733253 and the SAP Help Portal: SAP Help Portal: SAP HANA SQL and System Views Reference for SAP HANA Platform → SQL Reference → Data Types.
If the available migration objects do not meet your requirements, you can enhance or modify migration objects using the Migration Object Modeler. The SAP S/4HANA migration object modeler is part of the SAP S/4HANA migration cockpit, and it is designed to integrate custom objects and enhancements.
Note that the Migration Object Modeler is only available for the on-premise and single tenant editions of SAP S/4HANA. You can access the SAP S/4HANA migration object modeler by using transaction LTMOM.
For more information about the SAP S/4HANA migration object modeler, refer to the following resources:
- SAP S/4HANA Migration Object Modeler – SAP Help Portal
- User Guide: SAP S/4HANA Migration Cockpit – Creating a New Migration Object with the Migration Objec...
- 2576565 - SAP S/4HANA Data Migration - On Premise
- Training Material – SAP S/4HANA Migration Cockpit - Migration Object Modeler - Files/Staging Tables
- SAP S/4HANA Migration Cockpit - Deep Dive LTMOM for File/Staging
3.5 Job Management – Improving Performance
You can improve the performance of the data migration by adjusting the maximum number of the data transfer jobs for a project or for a migration object.
On the Migration Object Details screen, there is the field Max. Data Transfer Jobs. Data transfer jobs are responsible for transferring the data in the staging tables to the target SAP S/4HANA system. In order to transfer data to the target SAP S/4HANA system, the system divides the content of the staging tables into portions, which are transferred by the data transfer jobs. The default number of data transfer jobs is 1. Take into account that increasing the number of data transfer jobs may not have any effect (depending on the amount of data across all the staging tables of a migration object).
Consider increasing the number of data transfer jobs in the following circumstances:
- You have a lot of data to transfer.
- The migration object is a quite complex object (for example, it has multiple staging tables)
- Using one job results in an unacceptable data transfer time.
For more details see:
- Migrate your Data - Migration Cockpit - Job Management - SAP S/4HANA
- Migrate your Data - Migration Cockpit - Job Management - SAP S/4HANA Cloud
- 2878945 - Migration Cockpit: Parallelization of XML file loads
- 3066336 - Modifying Data Transfer Jobs to improve the data transfer performance of the SAP S/4HANA M...
- 3065607 - Performance tips & tricks for SAP S/4HANA Migration Cockpit: Migrate Data Using Staging Ta...
3.5.1 On the Migration Project screen, use the button Job Management to adjust job settings.

3.5.2 On the Job Management screen, adjust the maximum number of background jobs that are used for your project. You can also adjust the maximum number of jobs to be used for each migration object.

For more details on how to populate the staging tables using ETL tools, you can see the next blog posts of these blog series. These blogs will show you step by step three methods for populating the staging tables using SDI, SAP Data Services, and SAP HANA Studio.
4. Prepare the staging tables for each migration object so that they can be used to transfer data to SAP S/4HANA.
The staging tables for each migration object need to be prepared before they can be used to transfer data to SAP S/4HANA.
In the Action column, you can trigger an action for a migration object. The system proposes the next action to be performed. After having uploaded an XML file, the system proposes the next action, in this case, “Prepare”.
4.1 Select the action “Prepare” For the relevant migration object.
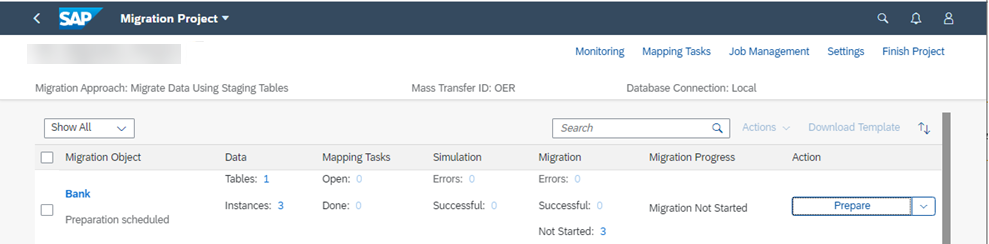
The system will prepare the staging tables so that they can be used to transfer data to SAP S/4HANA.
Note: You must repeat this process every time new data is added to the staging tables.
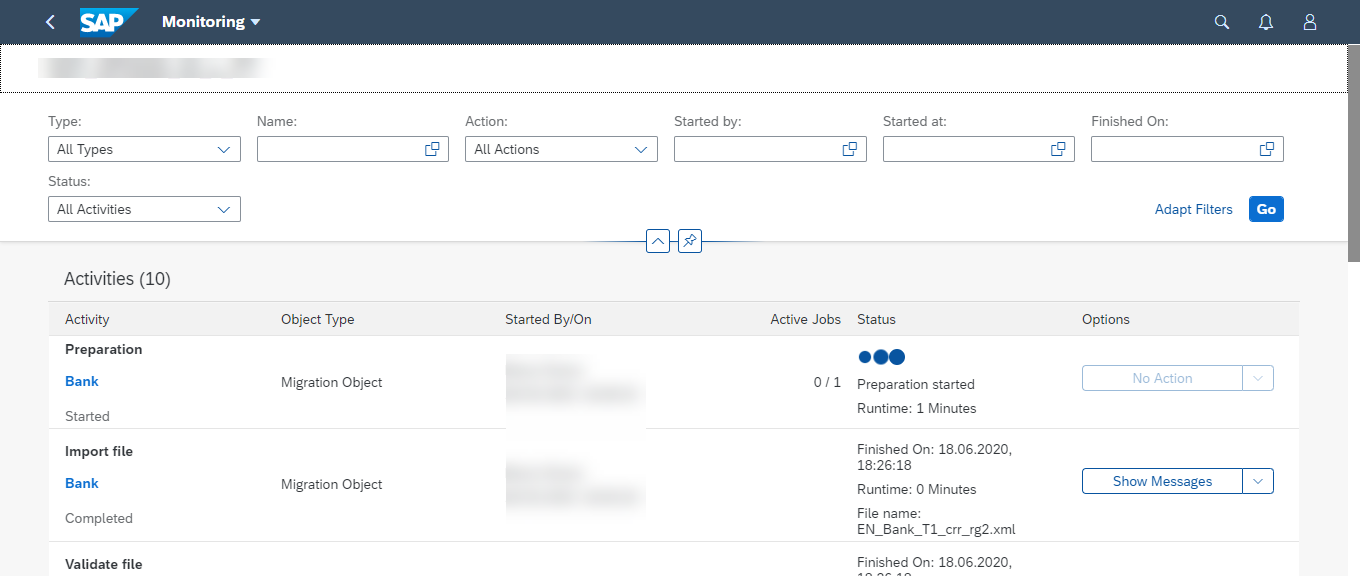
4.2 To monitor the status of the preparation step, choose Monitoring
5. Process any open mapping tasks for each migration object.
There are mapping tasks associated with migration objects that must be processed before the migration can proceed. Some examples of mapping tasks include Value Mapping tasks (to specify target values for corresponding source values) and Fixed Value tasks (to set default values for target fields).
On the Migration Project screen, in the Mapping Tasks column, you can view the number of open and completed tasks for each migration object.
5.1 Select the relevant migration object and choose the action Mapping Tasks.

Alternatively, you can display all mapping tasks for a project by choosing the Mapping Tasks button located in the top-right screen area.
If a migration object has open tasks, you can click the relevant entry in the Mapping Tasks column and the system will display the Mapping Tasks screen.
On the Mapping Tasks screen, you can specify the value mappings and transform values from the source system to the target system. Here, you can view all the mapping tasks, maintain the value mapping and confirm the values.
5.2 Select the desired mapping task

Note: The system displays the mapping tasks in a list. Open mapping tasks have the status To be Confirmed. Confirmed mapping tasks have the status “Confirmed”.
You need to process the task by entering the relevant target values and confirming these target values. You can then set the status of the task to Confirmed. Once all mapping tasks for a migration object have the status Confirmed, you can proceed with the simulation or migration process for the migration object.
5.3 For the desired source (default) value(s), enter the corresponding target (customizing) value(s) and click “Confirm”.

Note: You can confirm one or more mapping values by selecting the relevant values and then choosing the Confirm button beside the Search field.
Also, you can search for specific target values using the Search option.
![]()
In addition, on the Mapping Tasks screen, you can download empty templates using the button "Download Mapping Templates".
You can also download and upload mapping values using the buttons "Download Values" and "Upload Values" correspondingly.


![]()

Note: It is not possible to change or delete the mapping values in the SAP S/4HANA migration cockpit. You need to download the values and upload them back to the SAP S/4HANA migration cockpit. This way you can:
- Confirm values automatically
- Replace existing values or modify values/add values


For more details see KBA 3003068 Migrate Your Data – Staging Tables: Inserting and deleting entries for mapping tasks.
6. Optional: Simulate the migration (transfer of data to the target SAP S/4HANA system).
Once you have prepared the staging tables and processed all mapping tasks for a migration object, you can simulate the transfer of data to the target SAP S/4HANA system. During the simulation, no data will be written to the target SAP S/4HANA, nevertheless, you can view all error or warning messages that would occur during an actual data transfer. Consequently, you will be able to correct these errors before executing the migration.
Note: When you simulate the migration for the first time, additional mapping tasks may appear. You need to process these mapping tasks and repeat the simulation before you can proceed with the migration.
6.1 On the Migration Project screen, select the relevant migration object and choose the action Simulate.

The system simulates the migration for all migration object instances in the staging tables for the migration object. You can view the results of the simulation on the Migration Messages screen.
On the Migration Object Instances screen, you can view all messages related to one migration object.

You can also export the messages by using the Export option.

7. Migrate the data for the migration object to the target SAP S/4HANA system.
Once you have prepared the staging tables and processed all open tasks for a migration object, you can transfer data to the target SAP S/4HANA system.
Note: It is recommended to simulate the migration before migrating the data.
7.1 On the Migration Project screen, select the relevant migration object and choose the action Migrate.
![]()

The system will migrate the migration object instances in the staging tables for the migration object.
Note: Any instances that have already been migrated will not be migrated again.
8. Optional: Create and use correction files to correct any errors that may have occurred during the migration.
If errors occur during the migration, you can use a correction file to correct the errors. A correction file contains all the migration object instances in the staging tables that have the status Error. You can adjust the correction file to resolve the errors, upload the file, and then migrate the instances to the target system.
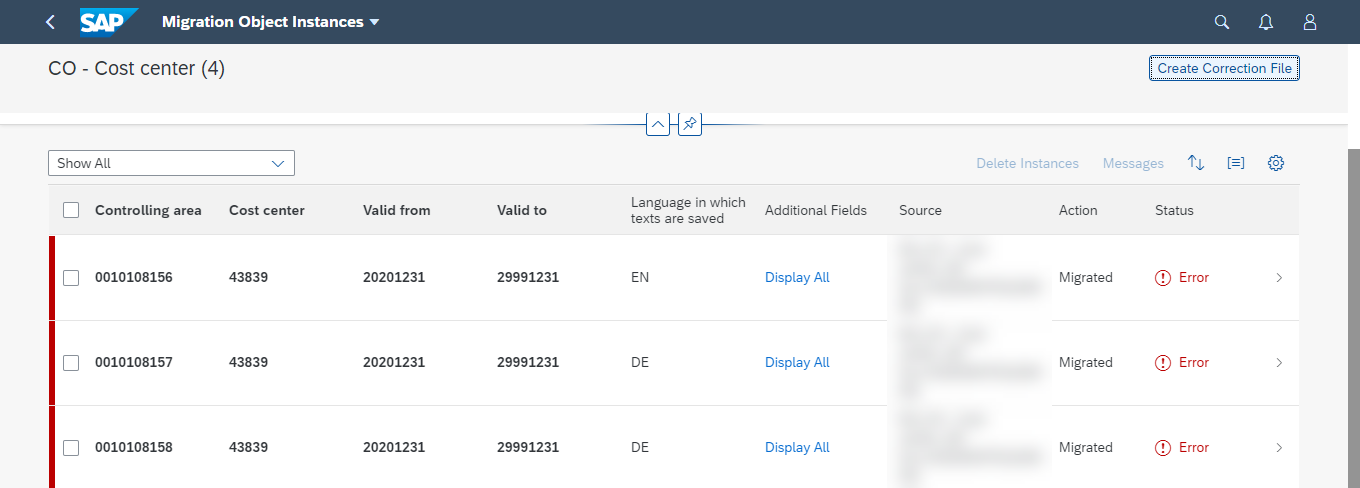
8.1 On the Migration Object Instances screen, choose the button Create Correction File.
![]()
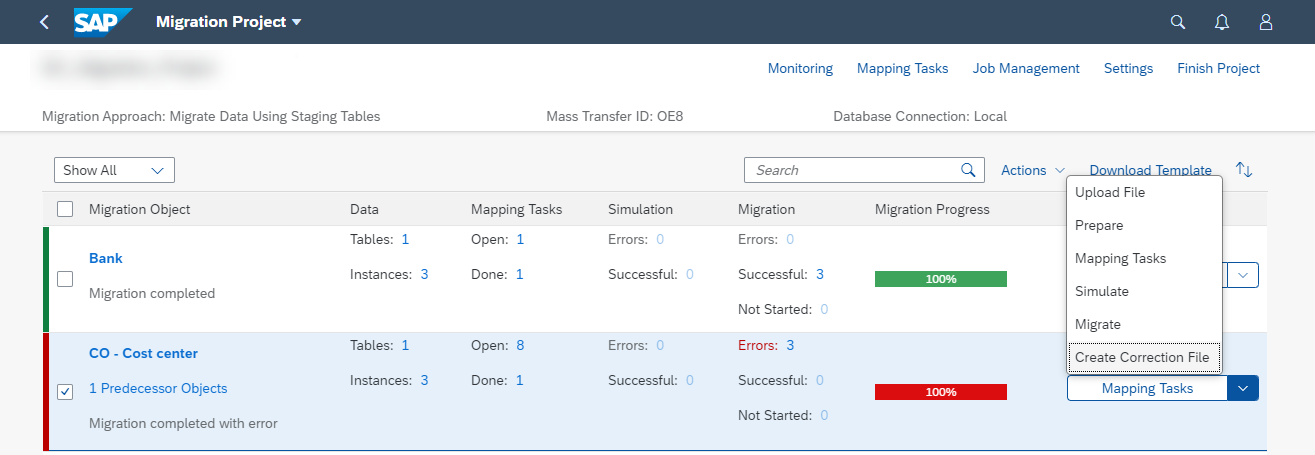
Note: You can also create a correction file from the Migration Project screen by selecting the relevant migration object and choosing the action Create Correction File.
The system displays the Select Source dialog.
8.2 In the Select Source dialog, select the relevant files and choose Create Correction File.
![]()
8.3 Go to the Monitoring screen and select the relevant migration object.
When the status of the activity Generate Correction File changes to Finished, the system displays a Download File link.
8.3 Click the Download File link and save the file.
![]()
For more information about migrating data to SAP S/4HANA using staging tables, refer to the documentation on the SAP Help Portal. For more information on Transferring Data to SAP S/4HANA Using Staging Tables you can check the following SAP Help Portal Links:
- For On-Premise
https://help.sap.com/viewer/29193bf0ebdd4583930b2176cb993268/latest/en-US/d5feccf64c9a41b2b95c908268...
- For Cloud
https://help.sap.com/viewer/9961ea9091534d44a01ab44024b174d9/latest/en-US/1df405e3332d4de999af648845...
Coming back to the question stated at the beginning of this blog:
How do we fill the staging tables of the Migrate your Data – Migration Cockpit?
The staging tables can be populated using XML template files, or manually using ABAP or with the SAP HANA Studio or, by using ETL tools from a third party or from SAP (for example SAP Data Services, SAP HANA smart data integration (SDI)).
If you use the option Local SAP S/4HANA Database Schema, the SAP S/4HANA migration cockpit will generate the staging tables in the local ABAP schema of the SAP S/4HANA system. You can use this option if you only want to use XML template files to fill the Staging Tables with data.
If you use the option Remote SAP HANA Database Schema, you must specify the relevant connection to a remote SAP HANA system. For this option, you can either use an ETL tool (for example SDI, SAP Data Services, ADP, etc.) or fill the data directly on the SAP HANA database.
In the image below, you can see some possible solutions to fill the staging tables.

Note: It is important also to consider the following major recent Innovation for the staging tables approach of the SAP S/4HANA migration cockpit, available from 1809 FPS0:
- Mapping table for staging table names – From 1809 FPS0 there is now a mapping table ‘/1LT/DS_MAPPING‘, which is provided in the same schema where the staging tables are generated. This table stores mapping information about the migration object, the source structure, and the staging table name. You can use this table to determine the staging table names after you copy a project from a quality system to a production system and then use these names in your scripts or applications that populate the staging tables with data.
In this blog series, we will focus only on the following ETL tools from SAP to load data into the staging tables of the SAP S/4HANA migration cockpit:
The second blog post will focus on how to load data to the staging tables using SAP Data Services.
The third blog post will focus on Using SAP HANA Smart Data Integration (SDI) to load data to the staging tables
The fourth blog post will focus on Using SAP HANA Studio (Data from file option) to load data to the staging tables
————————————————————————————————————————————-
SAP S/4HANA Migration Cockpit (On-Premise & Cloud) References, Blog Posts, and Useful Links
SAP help portal:
– On-Premise:
- Data Migration – SAP S/4HANA Migration Cockpit (Landing page S/4 HANA migration cockpit)
- SAP S/4HANA Migration Cockpit - Migrate your Data to SAP S/4HANA (Slide Deck presentation, on-premise)
- SAP S/4HANA Migration Cockpit migrations objects for the On-premise – Enterprise – Available Migrati...
- SAP S/4HANA – Release Comparison of Migration Object Templates
- SAP S/4HANA Migration Cockpit - Deep Dive LTMOM for File/Staging
- SAP S/4 HANA (on-premise)
- Transferring Data to SAP S/4HANA Using Staging Tables
- FAQs - SAP S/4HANA migration cockpit for SAP S/4HANA 2021
- FAQs - SAP S/4HANA Migration Cockpit for SAP S/4HANA 2020
- FAQs - SAP S/4HANA Migration Cockpit for SAP S/4HANA 1909
– Cloud:
- Data Migration – SAP S/4HANA Cloud (Landing page S/4 HANA migration cockpit (Cloud))
- SAP S/4HANA Migration Cockpit - Migrate Your Data to SAP S/4HANA Cloud (Slide Deck presentation, Cloud)
- Migration Objects for SAP S/4HANA Cloud – Available Migration Objects
- SAP S/4HANA Cloud – Release Comparison of Migration Object Templates
- SAP S/4 HANA Cloud
- Transferring Data to SAP S/4HANA Using Staging Tables
- FAQs - SAP S/4HANA Migration Cockpit (New Fiori UI) for SAP S/4HANA Cloud 2008
SAP Communities:
Training Materials & Videos:
- Intro Video: SAP S/4HANA Migration Cockpit – Migrate your Data
- Open SAP course Data Migration to SAP S/4HANA
- Video: SAP HANA Academy – Migration Cockpit
- Video: SAP HANA Academy – Migration Object Modeler
- Training Material – SAP S/4HANA Migration Cockpit
- Training Material – SAP S/4HANA Migration Cockpit - Overview - SAP Help Portal
- Tutorials - SAP S/4HANA Data Migration (SAP S/4HANA on-premise 2020). Note: SAP Learning Hub User is required to access these tutorials
SAP S/4HANA Migration Cockpit – Create your Test System - Fully Activated Appliance
Blog posts (SAP S/4HANA migration cockpit)
- Starter Blog Post for SAP S/4HANA migration cockpit
- SAP S/4HANA migration cockpit – tips & tricks
- SAP S/4HANA migration cockpit – Creating and using synonyms for renaming staging tables
SAP S/4HANA migration cockpit – New Fiori App in CE2008
Other relevant blog posts:
- Implementing SDI with SAP HANA Cloud… concept and approach
- Set up real-time replication tasks with the SAP Web IDE and SAP Smart Data Integration
Relevant SAP Notes/KBAs:
- 2537549 – Collective SAP Note and FAQ for SAP S/4HANA Migration Cockpit (On-Premise)
- 2538700 – Collective SAP Note and FAQ for SAP S/4HANA Migration Cockpit (Cloud)
- 2733253 – FAQ for SAP S/4HANA migration cockpit – Transfer option: Transfer data from staging tables
- 2608495 – SAP S/4HANA Migration Cockpit: Errors using staging functionality w/ pre-delivered data migration objects in on-premise release 1709 FPS1
- 2596411 – SLT / NZDT / S4HANA Migration Cockpit (DMIS2011 SP11-SP15; DMIS2018; S/4HANA 1610, 1709 & 1809) – Note Analyzer
- 2587257 – S/4HANA 1709 FPS01 – Migration – Corrections for Migration Cockpit – Staging Scenario
- 2596400 – Migration objects available in the Migration Cockpit
- 2778320 - SAP Release Comparison for SAP S/4HANA (on premise) Data Migration content
- 2778319 - SAP Release Comparison for SAP S/4HANA Cloud Data Migration content
- 3066336 - Modifying Data Transfer Jobs to improve the data transfer performance of the SAP S/4HANA M...
- 3065607 - Performance tips & tricks for SAP S/4HANA Migration Cockpit: Migrate Data Using Staging Ta...
- 3104790 - Modifiable Systems and Transport Concept, SAP S/4HANA Migration Cockpit - Migrate Data Usi...
Newsletters:
- SAP S/4HANA Migration Cockpit – Development Newsletter
- SAP S/4HANA Data Migration Content Development Newsletter
- Sign up - SAP S/4HANA Migration Cockpit Newsletter
Other Useful Links:
- SAP S/4HANA Migration Cockpit – Migrate your Data to SAP S/4HANA
- Migrate Your Data to SAP S/4HANA® Quickly, Safely and Cost-Effectively
- SAP Best Practices Explorer
- Data Migration to SAP S/4HANA from File (BH5)
- Data Migration to SAP S/4HANA from Staging (2Q2)
- SAP Activate Roadmap Viewer
- Mapping Your Journey to SAP S/4HANA® A Practical Guide for Senior IT Leadership
- SAP Data Services
- SAP HANA Smart Data Integration (SDI) and SAP HANA Smart Data Quality
- SAP HANA Service for SAP BTP Getting Started Guide - Smart Data Integration
— Transitioning to SAP S/4HANA Links and Information:
- SAP S/4HANA Product Information
- Join the SAP S/4HANA® Movement
- Homepage – Data Management and Landscape Transformation Services (DMLT)
- SAPPI Success Stories
- DMLT Solution Brief
- SAP DMLT Global Customer Engagement Team – Contact email for business inquiries: mailto:sap_dmlt_gce@sap.com
Labels:
18 Comments
You must be a registered user to add a comment. If you've already registered, sign in. Otherwise, register and sign in.
Labels in this area
-
Artificial Intelligence (AI)
1 -
Business Trends
363 -
Business Trends
27 -
Customer COE Basics and Fundamentals
1 -
Digital Transformation with Cloud ERP (DT)
1 -
Event Information
461 -
Event Information
26 -
Expert Insights
114 -
Expert Insights
170 -
General
1 -
Governance and Organization
1 -
Introduction
1 -
Life at SAP
415 -
Life at SAP
2 -
Product Updates
4,684 -
Product Updates
242 -
Roadmap and Strategy
1 -
Technology Updates
1,501 -
Technology Updates
90
Related Content
- Adding Custom Fields to Migration Objects in SAP S/4HANA Cloud Public Edition in Enterprise Resource Planning Blogs by SAP
- Migrating data from SAP ECC to SAP S4/HANA with the migration cockpit in Enterprise Resource Planning Blogs by Members
- Migration cockpit - different approach shown for same project in same system different client in Enterprise Resource Planning Q&A
- Edit a migration template in Enterprise Resource Planning Q&A
- The Substitute of MM50 in SAP S/4HANA Cloud Public Edition in Enterprise Resource Planning Blogs by SAP
Top kudoed authors
| User | Count |
|---|---|
| 22 | |
| 6 | |
| 5 | |
| 4 | |
| 4 | |
| 4 | |
| 3 | |
| 3 | |
| 3 | |
| 2 |