


- SAP Community
- Products and Technology
- Human Capital Management
- HCM Blogs by Members
- Complete Guide to configure Pay Statement (Direct)...
Human Capital Management Blogs by Members
Gain valuable knowledge and tips on SAP SuccessFactors HCM suite and human capital management market from member blog posts. Share your insights with a post of your own.
Turn on suggestions
Auto-suggest helps you quickly narrow down your search results by suggesting possible matches as you type.
Showing results for
thatsmebabar
Explorer
Options
- Subscribe to RSS Feed
- Mark as New
- Mark as Read
- Bookmark
- Subscribe
- Printer Friendly Page
- Report Inappropriate Content
05-04-2022
6:22 AM
Introduction
The article is intended to cover all areas which will enable Pay Statement (Direct) in Employee central (Employee Profile), in SuccessFactors Mobile (Payroll), and in the Latest Home Page via Quick Action card View Pay Statement (pay history link).
Please bear the long list of steps, and have patience to follow all the steps. The Pay statement direct when compared to Pay Statement (Arrow based) is much user-friendly and is displayed with pay date, gross, and payout amount. In addition, you can enable custom key figures to be displayed
Preview
NOTE: All Screenshots in the blog are taken from internal partner system.
Employee Profile:
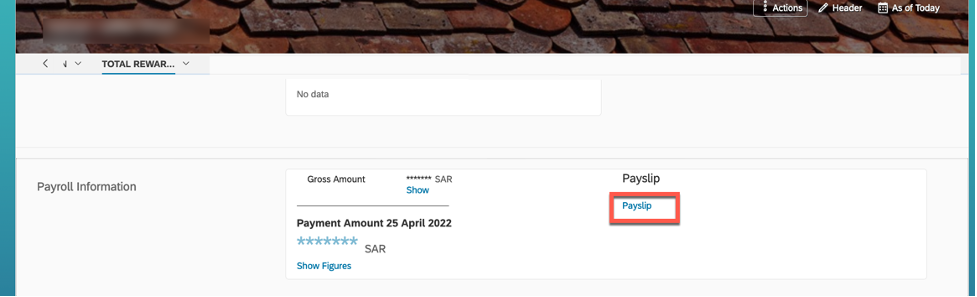

Latest Home Page View Pay statement quick action card
Configuration – Let’s get in details
The configuration has to be done in both the Employee central (EC) and Employee Central Payroll (ECP). I have tagged system as (EC) and (ECP) in the below steps;
The custom pay Statement in tcode HRFORMS is activated as per the country grouping. (ECP)
The feature HRFOR in tcode PE03 is customized with the name of the custom HRFORMS (ECP)

Maintain Payroll System Configuration and (EC)
Search Manage Data and select Payroll System Configuration or choose “Create New”

Add a new portlet with any name like Pay Slip, and click on “Details” and select “Direct Pay Statement” from field Service, and save.

Configure People Profile to Payroll Information block (EC)

Payroll Unified Configuration (EC)
Refer procedure here
Permission role for Administrators, refer here and for employee role refer here
Single Sign-on setup SAML 2.0 using report RP_HRSFEC_SAML_CONFIG to automate the SAML 2.0 Configuration. (ECP)
Open Tcode SE38 and enter program name RP_HRSFEC_SAML_CONFIG, and enter the below information in the selection screen;
Host Address: URL of the Employee Central Data center
Company Instance: Company ID of EC instance(Development, Preview or Production)

Upon execution, the report will generate the below URLS;

Sign on to provisioning and select your company ID. (EC)
Assertion Consumer Service and Logout URL are used to configure the consumer service settings for the company ID.
- Under Service Provider Settings, choose Authorized SP Assertion Consumer Service Settings.
- Enter the URLs for the Assertion Consumer Service and Logout URL fields, as illustrated in the following image.

- Sign on to Employee Central Payroll and go to transaction SICF
- Choose F8
- Activate the following services from tcode SICF:
- /default_host/sap/public/bc/sec/saml2
- /default_host/sap/public/bc/sec/cdc_ext_service
Enable Secure Communication by going to transaction SICF_SESSIONS and verify that Security Session Management is enabled.
The integration setup for Pay Statement (Direct) which involves configuration of OAUTH 2.0 (ECP)
Make sure that SAP System Aliases “LOCAL” is maintained
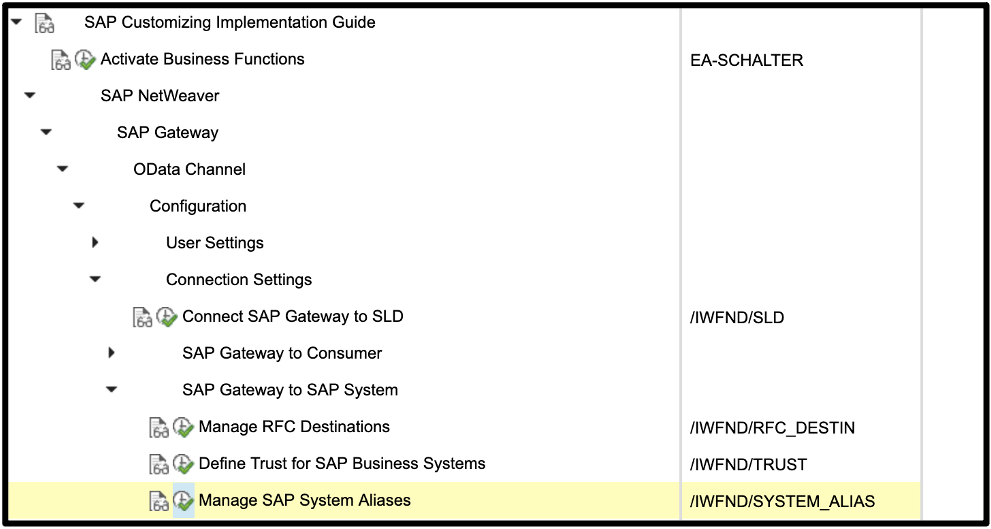
Activate and Maintain Services in the below SPRO Path (ECP)

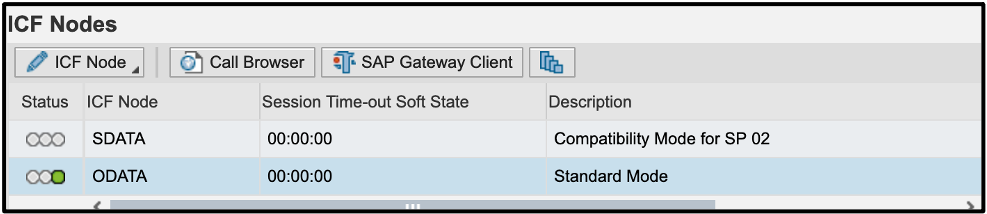
Activate ICF Node by clicking on the ICF Node icon (ECP);

Post activation the Status column should be green;
Make sure all the below services have System Aliases LOCAL added
HRSFEC_ECP_INFO_SRV - Payroll system Information.
HRSFEC_INFOTYPE_SRV - Infotype Existence
HRSFEC_PAY_OVERVIEW_SRV - Direct Pay Statement.

Click on Add System Alias

- Click on “New Entries”
- Type LOCAL in the “SAP System Alias” field and press enter to auto-fill the remaining fields.
- Save your entries.

Open tcode SICF and activate the below services, (ECP)
HRSFEC_ECP_INFO_SRV - Payroll system Information.
HRSFEC_INFOTYPE_SRV - Infotype Existence
HRSFEC_PAY_OVERVIEW_SRV - Direct Pay Statement.
Enter “HRSFEC_ECP_INFO_SRV” in service name field and click on execute;

Right click on the service name, and click on “Activate Service”, do the same for other services.

SuccessFactors X509 certificate generation (EC)
Goto Admin center, company setting and click on “Security Center” or from Search field

Click on X509 Certificates

Add new certificate by clicking the Add button

Enter the below details;

The Certificate after saving, should now be downloaded by clicking on the Download button; The certificate would be in .crt extension.

Configuring OAuth Identity Provider (ECP)
Pre-requisite SAML 2 configurations should be auto generated refer STEP 7
Configure service provider and identity provider in Employee Central Payroll as one of multiple steps, to be able to use OAuth 2.0.
Procedure
- Start the transaction SAML2 in the corresponding tenant.
- Switch to the Trusted Providers tab and select OAuth 2.0 Identity Providers. To create the Identity Provider,
choose Add Manually . and provide the X509 file downloaded from the previous step.
- In the SAML 2.0 Configuration window, enter a Name and choose Next.
- Choose Browse, next to the Primary Signing Certificate field and upload the file that you downloaded.
Creating OAuth X505 Keys.
- Choose Finish.
- Choose Edit in the main configuration screen.
- In the details section of your newly created Identity Provider, choose Add. In the Supported NameID Formats window, select Unspecified and chooseOK.
- In the details section of NameID Format Unspecified, select Assertion Subject NameID as User ID Source and Logon Alias as User ID Mapping Mode.
- Save your entries and choose Enable

Creating Service Users in Employee Central Payroll (ECP)
Create a service user in Employee Central Payroll as one of multiple steps, to be able to use OAuth 2.0.
Procedure
- Go to transaction SU01 and create following service users:
EC_ADM_OAUTH
EC_ESS_OAUTH
- In the Maintain Users screen, provide a Last Name on the Address
- On the Logon Data tab under User Type, select System and provide a password.

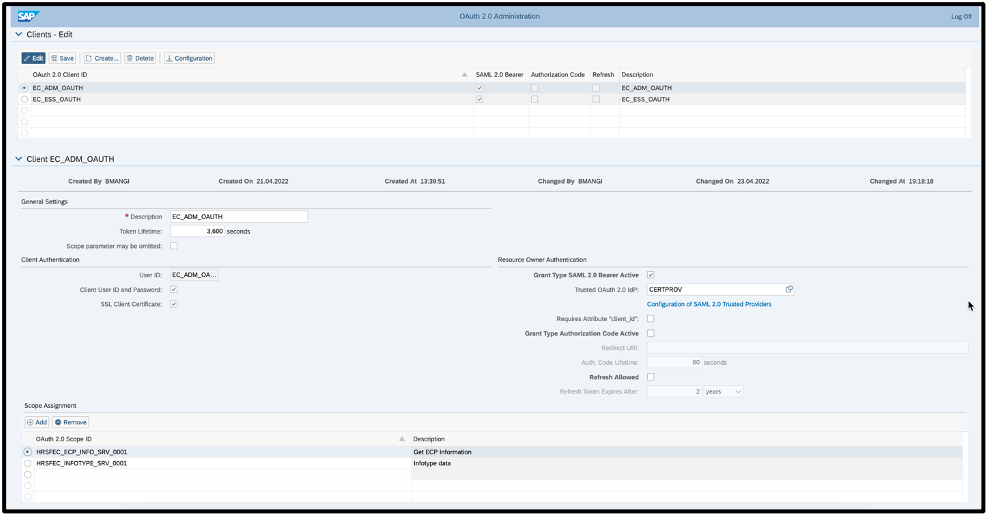
15. Registering OAuth Client (ECP)
- Go to transaction SOAUTH2.
- In the OAuth 2.0 Administration screen, choose Create and for each of the following client IDs follow the steps described.
- EC_ADM_OAUTH
- EC_ESS_OAUTH
- In the Create OAuth 2.0 Client window, select a OAuth 2.0 Client ID, provide a Description and choose Next.
- In the Client Authentication step, ensure SSL Client Certificate is checked and choose Next.
- In the Resource Owner Authentication step, ensure Grant Type SAML 2.0 Bearer Active is checked. In the Trusted OAuth 2.0 IdP field, choose the identity provider you already created in the Configuring OAuth Identity Provider section and choose Next.
- In the Scope Assignment step, add a OAuth 2.0 Scope ID, according to your client ID and choose Next:
| Client ID | OAuth 2.0 Scope ID |
| EC_ADM_OAUTH | HRSFEC_ECP_INFO_SRV_0001 (for Payroll System Information) |
| HRSFEC_INFOTYPE_SRV_0001 (for Infotype Existence) | |
| EC_ESS_OAUTH | HRSFEC_PAY_OVERVIEW_SRV_0001 (for Pay Statement) |
| HRSFEC_PAYCTRL_REC_SRV_0001 (for Payroll Control Record Information) |
3. Review your entries in the Summary step and choose Finish to save your entries.
Configuring Outbound OAuth (EC)
Go to Admin Center Security Center and select the OAuth Configurations tab.
Select Add and enter following information:
| Field Name | User Entry |
| Configuration Name | Create two separate configurations for ecp and ecp_ess. ( case sensitive, DON’T enter the name in capital letters) |
| OAuth Type | Select OAuth 2.0 with SAML Flow. |
Client ID | For configuration name, ecp provide EC_ADM_OAUTH as Client ID. ○ For configuration name, ecp_ess provide EC_ESS_OAUTH as Client ID. |
Client Secret | Provide the password for EC_ADM_OAUTH or EC_ESS_OAUTH respectively. |
| Token URL | Provide the URL of your Employee Central Payroll system. Example https://myXXXXXX.payroll.ondemand.com |
Token Method | Select POST |
Audience | Enter the Provider Name from the Local Provider, which you’ve created as a prerequisite in the Getting SuccessFactors HCM Suite IDP ready for SAML 2.0 section.
|
Issuer | Enter the Identity Provider name, that you created in the Configuring OAuth Identity Provider section.
|
Subject Name ID | Leave this field blank. |
Subject Name ID Format | Select Unspecified. |
X509 Keys | Enter the X509 key you already created from the dropdown. |


- When you’re finished, save your data.
Assign the roles for all ESS user. (ECP)
The below standard roles should be copied, generated and activated. This activity can be done in transaction code PFCG, ask basis team member for help;
ESS Users should have the below roles;
- SAP_CLOUD_ESS_OAUTH
- SAP_CLOUD_EMPLOYEE_ESS_PAYSLIP
Payroll Administrator
- SAP_CLOUD_ADMIN_OAUTH
- SAP_CLOUD_MANAGER_ESS_PAYSLIP
Note : The role assignment can be done through program HRSFEC_ESS_USER_UPDATE. The above roles complied in composite role, and assigned in the variant for the user creation program.
Conclusion
The pay statement (direct) can now be tested by “Proxy Now” functionality in Employee central. Please note the authorization role for the proxy user should have the above roles.
Lastly, I would like to share a very important Knowledge Base Article (KBA): 2900830
which will help you with any frequent errors faced while deploying the solution.
Please share your thoughts in the comments below, and feel free to ask for any clarifications!
19 Comments
You must be a registered user to add a comment. If you've already registered, sign in. Otherwise, register and sign in.
Labels in this area
-
1H 2024 Product Release
5 -
2H 2023 Product Release
1 -
Absences-Only Time Recording in SAP SuccessFactors
1 -
ACCRUAL TRANSFER
1 -
Advanced Workflow
1 -
AI
1 -
AI & Skills Ontology
1 -
Alerts for National ID Information portlet: Full step-by-step guide
1 -
Alerts for Payment Information: Full step-by-step guide
1 -
Anonymization
1 -
API and Integration
1 -
Auto Delegation on the Leave Request (Time Off) Screen
1 -
BTP
1 -
Business Rules
2 -
Calibrating with Performance Form Data
1 -
Canvas Report
1 -
Career Development
1 -
Certificate-Based Authentication
1 -
Cloud Identity Services
1 -
Cloud Platform Integration
1 -
Common Super Domain
1 -
Compensation
1 -
Compensation Information Management
1 -
Compensation Management
1 -
compliance
2 -
Content
1 -
Conversational AI
2 -
CSD
1 -
Custom Data Collection
1 -
Custom event
1 -
custom portlet
1 -
Data & Analytics
1 -
Data Integration
1 -
Dayforce
1 -
deep link
1 -
deeplink
1 -
Delimiting Pay Components
1 -
Deprecation
1 -
EC Payroll
1 -
Employee Central
1 -
Employee Central Global Benefits
1 -
Employee Central Integration (Inc. EC APIs)
1 -
Employee Central Payroll
2 -
employee profile
2 -
Employee Rehires
2 -
external terminal
1 -
external time events
1 -
Generative AI
2 -
Getting Started
1 -
Global Benefits
1 -
Goals
1 -
Guidelines
1 -
h12024
1 -
H2 2023
1 -
HCM
1 -
HR
2 -
HR Data Management
1 -
HR Transformation
1 -
ilx
1 -
Incentive Management Setup (Configuration)
1 -
Integration Center
3 -
Integration Monitoring
1 -
Integration Suite
1 -
Intelligent Services
1 -
internal mobility
1 -
Introduction
1 -
Learning
3 -
LMS
2 -
LXP
1 -
Managing Pay Scale Progression based on Age (or) Service Period
1 -
Massively MDF attachments download
1 -
Mentoring
1 -
Metadata Framework
1 -
Middleware Solutions
1 -
OCN
1 -
ODATA
1 -
OData APIs
2 -
ONB USA Compliance
1 -
Onboarding
2 -
Opportunity Marketplace
1 -
Pay Component Management
1 -
PCE
1 -
Performance & Goals
1 -
Performance Form
1 -
Performance Forms
1 -
Platform
1 -
portlet
1 -
POSTMAN
1 -
Predictive AI
2 -
Rating the Skills in Performance Form
1 -
Recruiting
1 -
recurring payments
1 -
RISE PCE
1 -
Role Based Permissions (RBP)
2 -
S4 HANA On-Premise
1 -
SAP Build CodeJam
1 -
SAP Build Marketplace
1 -
SAP CPI (Cloud Platform Integration)
1 -
SAP HCM
1 -
SAP HCM (Human Capital Management)
3 -
SAP HCM ECC
1 -
SAP HR Solutions
2 -
SAP Integrations
1 -
SAP release
1 -
SAP successfactors
6 -
SAP SuccessFactors OData API
2 -
SAP Workzone
1 -
SAP-PAYROLL
1 -
self-service migration
1 -
sftp
1 -
SFTP scenario
1 -
Skills
1 -
Skills Management
1 -
sso deeplink
1 -
Stories in People Analytics
3 -
Story Report
1 -
SuccessFactors
3 -
SuccessFactors Employee central home page customization.
1 -
SuccessFactors Onboarding
1 -
successfactors onboarding i9
1 -
SuccessFactors Platform
1 -
Table Report
1 -
talent
1 -
Talent Intelligence Hub
2 -
talentintelligencehub
1 -
talents
1 -
Tax
1 -
Tax Integration
1 -
TIH
1 -
Time Accounts
1 -
Time Management implementation links
1 -
Workflows
1 -
XML Rules
1
- « Previous
- Next »
Related Content
- DCPS by some other attribute other than country? Eg State (for US) or Legal Entity of the role in Human Capital Management Q&A
- First Half 2024 Release: What's New in SAP SuccessFactors Employee Central Payroll in Human Capital Management Blogs by SAP
- Add a new role employee to the already created BP with any other role like vendor or customer. in Human Capital Management Q&A
- Time Management links compilation in Human Capital Management Blogs by Members
- Get to know what’s new for SAP SuccessFactors Learning with 1H2024 release in Human Capital Management Blogs by SAP
Top kudoed authors
| User | Count |
|---|---|
| 8 | |
| 3 | |
| 2 | |
| 2 | |
| 2 | |
| 1 | |
| 1 | |
| 1 | |
| 1 | |
| 1 |