
- SAP Community
- Products and Technology
- Product Lifecycle Management
- PLM Blogs by SAP
- SAP Digital Manufacturing Cloud | Process Extensio...
Product Lifecycle Management Blogs by SAP
Dive into product lifecycle management news, learn about digitalizing PLM for the digital supply chain, and stay informed with product updates from SAP.
Turn on suggestions
Auto-suggest helps you quickly narrow down your search results by suggesting possible matches as you type.
Showing results for
Product and Topic Expert
Options
- Subscribe to RSS Feed
- Mark as New
- Mark as Read
- Bookmark
- Subscribe
- Printer Friendly Page
- Report Inappropriate Content
07-22-2022
8:02 PM
In this blog post, I would like to introduce a frequently-used extension capability of SAP Digital Manufacturing Cloud – Process Extension. As each industry has its own processes and terminology, SAP Digital Manufacturing Cloud contains lots of production processes designed for the manufacturing industry. Basically, the idea of these processes is to define some automatic actions during the production. If we can extend them appropriately, it may help the factory and its processes become more intelligent. Also, the integration with SAP Workflow Management will add capabilities like approval flow into these automatic processes to better support real-life cases.
After reading through this blog post, you will get to know:
Before start, let’s take a look at some business concepts to get familiar with this product.
The Plant is a specific area where we manufacture a product. Typically in SAP solutions, we define the Plant as one building, or in this case a collection of smaller buildings like front offices, canteens and shop floors that reside on the same campus, as one Plant.
The shop floor is where we will further subdivide the Plant into smaller organizational units. Within the shop floor, we can distribute work centers that represent different manufacturing lines. For example, if we are in an automotive plant, we may assign different shop floors to be responsible for the manufacturing of different product lines of its brand. Inside the shop floor, there will be several work centers responsible for different production steps for manufacturing a car.
There are another two important factors inside the work center, resource and operation. Resource in SAP Digital Manufacturing Cloud can be considered as machine the operator takes control of. An organized order of different operations will form the routing to manufacture a specific product. Also, the floor stock will store not only the raw material but also the production part to help customers make suitable manufacturing plans based on the situation of their warehouse.
In SAP Digital Manufacturing Cloud, the production operation dashboard or the POD, is the primary interface between the production operator and the database containing the manufacturing data. Production operators usually collect data or check work instructions in this POD.
In our scenario, we assume that the production operator is currently working on a specific operation activity FA-PROGRAM. The operator is asked to perform two data collections such as software version and check sum in a POD. If the data collection is logged appropriately, it will be forwarded to a test phase. Before the product can be actually sent for a final test, the production supervisor needs to go through an approval flow to confirm its buyoff i.e. final confirm its qualification.
In workflow management app, the production supervisor will receive some manufacturing data like SFC or Resource in his/her inbox. Once it is confirmed, the status of this operation activity will automatically change to FINISHED and the entire production process will be moved on to the next step.
After getting a general idea about the business scenario from a user perspective, let’s take a closer look at how it can be realized in practice.
PART I - Build a Production Process to Create Workflow Instances
In this part, we start to build our first cloud process to automatically create the workflow instances. These applications in SAP Digital Manufacturing Cloud will be used:
Step1: Create a Web Server for a Service
In the Manage Web Servers app, we can create a digital twin of the physical web server we want to visit, e.g. Workflow Service API. It configures where we can reach out the service. Also, authentication is needed for consuming this API so that we need to configure the destination in our SAP Business Technology Platform tenant.
Step2: Register a Service from SAP API Business Hub
In the Manage Service Registry app, we can add a new service by defining how to consume the workflow service with proper requests. Once the service is registered, it will be ready for consumption.
Step3: Design a Production Process
In the Design Production Processes app, we can define the entire cloud process that allows us to consume the registered workflow service to create instances. See from previous step, we need to prepare some essential parameters – definitionId (Workflow Instance Id) and context (Manufacturing data to be sent).
We can click create to add a new cloud process and name it DMC_Extension. After that, we will be guided to the welcome page of the production process designer. At the left-hand side, we will see some buttons. By clicking these buttons, we can create different types of production processes, use components or services to build the process, and add some users to do co-innovations. At the right-hand side, a deploy button is shown. By clicking it, the production process designer will help us automatically save all the efforts. After the deployment, we can have an optional test.
Step4: Create a Business Rule
In the Manage Automatic Triggers app, we can define the conditions when the cloud process should be triggered by creating a business rule.
PART II - Build a Workflow Project in SAP Business Application Studio
In this part, we are going to build a workflow project in SAP Business Application Studio. First, a workflow project template can be created with the lovely Yeoman generator. Second, design the business process with components and configure parameters. Finally, deploy the MTA project into Cloud Foundry environment.
Step1: Generate a Workflow Project Template
To generate a workflow project template, we can refer to this well-written blog.
Step2: Design Business Process
In the workflow module, give the workflow a name and its id (same as what we defined in InDefinition parameter), e.g. dmctoflow. The entire approval process should be: send the manufacturing information to production supervisor for approval and then send back the parameters to call another internal cloud process in SAP Digital Manufacturing Cloud.
Step3: Deploy to Cloud Foundry Environment
Deploy it to the cloud foundry environment for next-step validation.
PART III - Validate in DMC POD and Workflow Management App
To validate the result, we have one thing left to prepare – data collection group. In the Manage Data Collection app, we can add a data collection group called ECU-PROGRAMMING.
Since everything is well-prepared, let’s move on to the POD to have a test. In this scenario, we have prepared an order ORD_FORKLIFT_INIT03 in the plant EIT02. According to the planned operation order, the manufacturing process will be in the FA-TEST step after the operation activity FA-PROGRAM. Once we finish the data collection step for the specific operation activity, some manufacturing information will be forwarded into production supervisor’s inbox for approval. After approval, the status of FA-PROGRAM will become finished.
Find more information about this product through
In this blog post, we learned how to build a process extension of SAP Digital Manufacturing Cloud and its business scenario. By integrating with workflow management, approval flows can be added to enhance real-life business cases. Anyway, thanks for your time to join in this development journey. Look forward to your feedback and thoughts in comment field. Hope all of us will benefit from this journey and keep innovating! 🙂
After reading through this blog post, you will get to know:
- Business concepts in SAP Digital Manufacturing Cloud
- Business scenario for Process Extension
- Architecture overview for the scenario
- Hands-on procedure to implement
Business Concept
Before start, let’s take a look at some business concepts to get familiar with this product.

Business Concepts of SAP Digital Manufacturing Cloud
The Plant is a specific area where we manufacture a product. Typically in SAP solutions, we define the Plant as one building, or in this case a collection of smaller buildings like front offices, canteens and shop floors that reside on the same campus, as one Plant.
The shop floor is where we will further subdivide the Plant into smaller organizational units. Within the shop floor, we can distribute work centers that represent different manufacturing lines. For example, if we are in an automotive plant, we may assign different shop floors to be responsible for the manufacturing of different product lines of its brand. Inside the shop floor, there will be several work centers responsible for different production steps for manufacturing a car.
There are another two important factors inside the work center, resource and operation. Resource in SAP Digital Manufacturing Cloud can be considered as machine the operator takes control of. An organized order of different operations will form the routing to manufacture a specific product. Also, the floor stock will store not only the raw material but also the production part to help customers make suitable manufacturing plans based on the situation of their warehouse.
Business Scenario

User Experience
In SAP Digital Manufacturing Cloud, the production operation dashboard or the POD, is the primary interface between the production operator and the database containing the manufacturing data. Production operators usually collect data or check work instructions in this POD.
In our scenario, we assume that the production operator is currently working on a specific operation activity FA-PROGRAM. The operator is asked to perform two data collections such as software version and check sum in a POD. If the data collection is logged appropriately, it will be forwarded to a test phase. Before the product can be actually sent for a final test, the production supervisor needs to go through an approval flow to confirm its buyoff i.e. final confirm its qualification.
In workflow management app, the production supervisor will receive some manufacturing data like SFC or Resource in his/her inbox. Once it is confirmed, the status of this operation activity will automatically change to FINISHED and the entire production process will be moved on to the next step.
Architecture Overview

Diagram for the Business Scenario
Development Journey
After getting a general idea about the business scenario from a user perspective, let’s take a closer look at how it can be realized in practice.
PART I - Build a Production Process to Create Workflow Instances
In this part, we start to build our first cloud process to automatically create the workflow instances. These applications in SAP Digital Manufacturing Cloud will be used:
- Manage Web Servers
- Manage Service Registry
- Design Production Processes
- Manage Automatic Triggers
Step1: Create a Web Server for a Service
In the Manage Web Servers app, we can create a digital twin of the physical web server we want to visit, e.g. Workflow Service API. It configures where we can reach out the service. Also, authentication is needed for consuming this API so that we need to configure the destination in our SAP Business Technology Platform tenant.
- On the top right menu bar, click search icon to search for Manage Web Servers app.

- Within the app, click create to create a new web server.
- Give the web server a name, e.g. DMC_To_Workflow
- Choose the server type to be Cloud services
- Input the correct production URL for workflow service API as Host URL based on your region, e.g. https://api.workflow-sap.cfapps.<your region>.hana.ondemand.com/workflow-service/rest

- In the list, find the web server called DMC_Cloud – Server for SAP Digital Manufacturing Cloud Services.
- Click create in Connections tab and choose DMC_To_Workflow to build connection so that workflow service can be smoothly consumed by SAP Digital Manufacturing Cloud.

- Create Destination in SAP Business Technology Platform tenant.
- Find the service key in workflow instance
- Copy and paste information in the service key to corresponding data field

- Give the destination a name, e.g. Workflow
- Copy the workflow service URL same as previous step, e.g. https://api.workflow-sap.cfapps.<your region>.hana.ondemand.com/workflow-service/rest
- Choose the authentication type to be OAuth2ClientCredentials
- Fill in the Client ID and Client Secret with information found in the service key
- For the Token Service URL, copy the url found in service key uaa part and extend it with /oauth/token, e.g. https://<subaccount subdomain>.authentication.<your region>.hana.ondemand.com/oauth/token

- Add the destination into the web server.
- Back to the Manage Web Servers app, choose the web server we created, e.g. DMC_To_Workflow
- In the Destinations tab, click add to choose the destination we configured in our SAP Business Technology Platform tenant, e.g. Workflow

Step2: Register a Service from SAP API Business Hub
In the Manage Service Registry app, we can add a new service by defining how to consume the workflow service with proper requests. Once the service is registered, it will be ready for consumption.
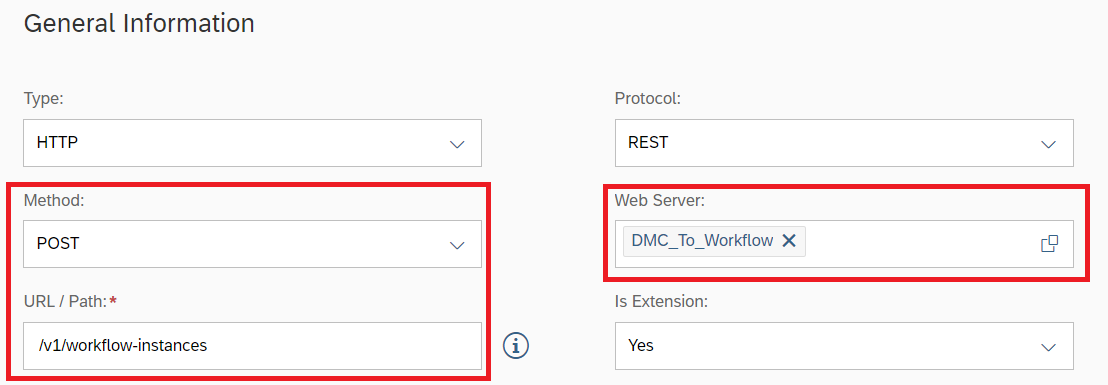
- Input the name of Service Name, e.g. Create_Workflow_Instance
- In General Information tab
- Choose the Method to be POST
- Choose the web server we created, e.g. DMC_To_Workflow
- For the URL/Path, input /v1/workflow-instances
- In Request Body tab
- Turn on the Request Body button
- Choose Required to be Yes
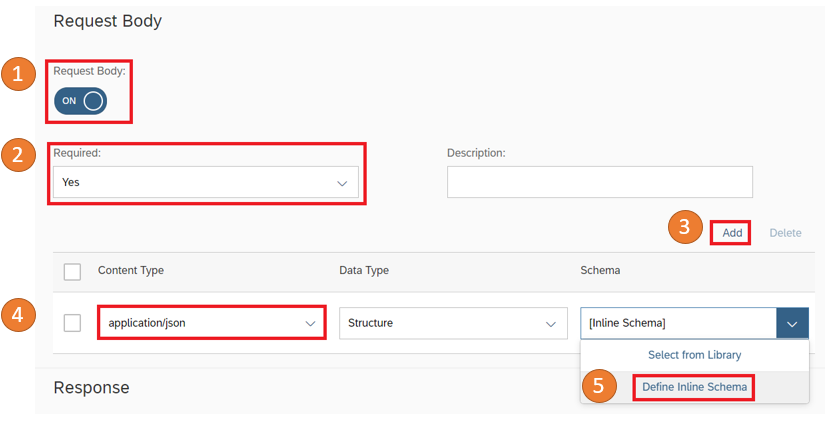
- Click add to create the inline schema for the request body

Step3: Design a Production Process
In the Design Production Processes app, we can define the entire cloud process that allows us to consume the registered workflow service to create instances. See from previous step, we need to prepare some essential parameters – definitionId (Workflow Instance Id) and context (Manufacturing data to be sent).
We can click create to add a new cloud process and name it DMC_Extension. After that, we will be guided to the welcome page of the production process designer. At the left-hand side, we will see some buttons. By clicking these buttons, we can create different types of production processes, use components or services to build the process, and add some users to do co-innovations. At the right-hand side, a deploy button is shown. By clicking it, the production process designer will help us automatically save all the efforts. After the deployment, we can have an optional test.

Welcome Page of Production Process Designer
- Create a Cloud Process.
- Choose the cloud process on the left-hand side and give it a name, e.g. DMC_Workflow_Instances
- Choose the Runtime Type to be Cloud
- Add components to Canvas.
For our task, we need four components to construct the entire cloud process. We can drag and drop components from the left-hand side toolbar and configure input/output parameters.

- Process Variables
Parameter Name
Parameter Value
Data Type
InApprover
<your email to log on workflow management app>
String
InDefinition
dmctoflow
String
- Start
Input Parameter Name
Data Type
InOperation
String
InResource
String
InSFC
String
- Script Task
Input Parameter Name
Input Parameter Value
Data Type
Approver
‘InApprover’
String
Operation
‘InOperation’
String
Resource
‘InResource’
String
SFC
‘InSFC’
String
Output Parameter Name
Data Type
context
Structure / WorkflowRequest
Insert Script
$output.context =  {

"sfc": $input.SFC,

"operation": $input.Operation,

"resource": $input.Resource,

"approver": $input.Approver

};
- Create_Workflow_Instance
Input Parameter Name
Input Parameter Value
Data Type
context
‘ScriptTask#context’
Structure / context
definitionId
‘InDefinition’
String
Output Parameter Name
Data Type
httpResponse
String
- End
The core idea of this step is that we package all the relevant manufacturing information(Operation, Resource, and SFC), approver information(Approver), and workflow instance information(definitionId) together.
Since we have already finished the design of the production process, it is time to publish it into service registry for a usage. Click the three-point icon in the header field, and click edit header. Then, turn on the button Publish to Service Registry to activate.
Step4: Create a Business Rule
In the Manage Automatic Triggers app, we can define the conditions when the cloud process should be triggered by creating a business rule.
- Switch to Business Rule tab and click create to generate a new business rule.
- Create a business rule.
- Input the name of Rule, e.g. DC_Trigger_Workflow
- In general settings,
- Choose the trigger type to be Event
- Choose the event type to be SFC Data Collected
- As for conditions in our case,
- Let the plant equals to your own plant, e.g. EIT02
- Select a parameter dcGroup.dcGroup, and let it to be your custom data collection group e.g. ECU_PROGRAMMING (In case you do not have such data collection group, you can refer to PART III to create.)
- For action item,
- Choose the action item to be the production process service we have registered in previous step, e.g. P_DMC_Extension_DMC_Workflow_Instances
- Configure the input parameter
Input Parameter Name
Expression
InOperation
‘operation.operation’
InResource
‘resource’
InSFC
‘sfcs’
PART II - Build a Workflow Project in SAP Business Application Studio
In this part, we are going to build a workflow project in SAP Business Application Studio. First, a workflow project template can be created with the lovely Yeoman generator. Second, design the business process with components and configure parameters. Finally, deploy the MTA project into Cloud Foundry environment.
Step1: Generate a Workflow Project Template
To generate a workflow project template, we can refer to this well-written blog.
Step2: Design Business Process
In the workflow module, give the workflow a name and its id (same as what we defined in InDefinition parameter), e.g. dmctoflow. The entire approval process should be: send the manufacturing information to production supervisor for approval and then send back the parameters to call another internal cloud process in SAP Digital Manufacturing Cloud.

- StartEvent1
- UserTask1
- Give the user task a name, e.g. Approve Buy-Off
- In Details tab, add the approver information in Users data field, e.g. ${context.approver}
- In User Interface tab, choose the type to be form, create a form called ApproveBuyOff, and configure the exposure field for the manufacturing information

- In the Form editor, switch from ‘Fields’ to ‘Decisions’ and add a new decision called ‘Approve’

- ScriptTask1
- Give the script task a name, e.g. Prepare Send-back Parameter
- Select the Script File created in /scripts folder, e.g. PrepareInputParam.js
// read from existing workflow context

var sfc = $.context.sfc;

var resource = $.context.resource;

var operation = $.context.operation;


// create new node 'inputparam'

var inputparam = {

        SFC: sfc,

        Resource: resource,

        Operation: operation

};


$.context.inputparam = inputparam;
- ServiceTask1
Before configuring for this service task, first we need to go back to SAP Digital Manufacturing Cloud to build another cloud process – receive send-back information from workflow management and complete the SFC automatically.
We may build it within the production process DMC_Extension. In production process designer of DMC_Extension, click Edit in the top right corner and then save it as new version. Click the plus (+) icon to create a new cloud process.

For this cloud process, three components are needed and configuration of parameters are listed. Give the cloud process a name, e.g. DMC_Complete_SFC

- Process Variables
Parameter Name
Input Parameter Value
Data Type
InPlant
EIT02 <Your own plant>
String
- Start
Input Parameter Name
Data Type
Operation
String
Resource
String
SFC
String
- Complete SFCs
Input Parameter Name
Input Parameter Value
Data Type
operation
‘Operation’
String
plant
‘InPlant’
String
resource
‘Resource’
String
sfcs
['SFC']
StringArray
- End
- Process Variables
Now, deploy and publish it to a service registry for the workflow project to consume.
Second, a destination should be added in our SAP Business Technology Platform tenant for the workflow project to consume the internal service offered by SAP Digital Manufacturing Cloud.
- Give the destination a name, e.g. DMC_Destination
- For URL, copy the URL of SAP Digital Manufacturing Cloud web server e.g. https://api.test.<region>.dmc.cloud.sap
- Choose the authentication type to be OAuth2ClientCredentials
- Fill in the Client ID and Client Secret with information found in the service key
- For the Token Service URL, copy the url found in service key uaa part and extend it with /oauth/token, e.g. https://<subaccount subdomain>.authentication.<your region>.hana.ondemand.com/oauth/token
We are ready for the configuration of the service task. In the Details tab,
- Set the Destination to be what we added just now, e.g. DMC_Destination
- Choose a service from others
- Fill in the path (We can find the value in Manage Service Registry app, search for P_DMC_Extension_DMC_Complete_SFC, and check the URL/Path data field)
- Choose the HTTP Method to be POST
- Define the Request Variable to be ${context.inputparam}
- EndEvent
Step3: Deploy to Cloud Foundry Environment
Deploy it to the cloud foundry environment for next-step validation.
- Right click the mta.yaml file to build MTA project, and you will find an mtar file exists in the folder mta_archives
- Right click the mtar file, and click deploy MTA Archive.
- We will be guided through a user interface to sign in to the cloud foundry environment with our credentials.
PART III - Validate in DMC POD and Workflow Management App
To validate the result, we have one thing left to prepare – data collection group. In the Manage Data Collection app, we can add a data collection group called ECU-PROGRAMMING.
- Give the data collection group a name, e.g. ECU-PROGRAMMING
- Define its version, e.g. ERP001
- Change its status to Releasable
- Turn on the current version and allow multiple collection button
- Add two parameters
- SOFTWARE_REV
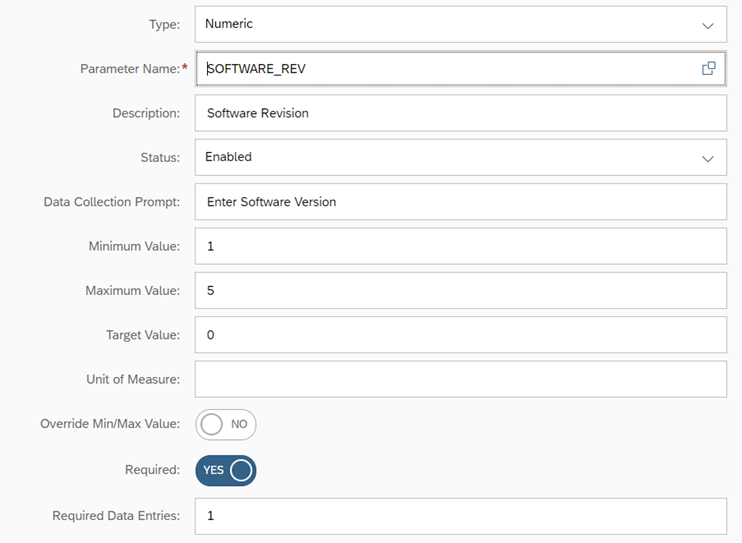
- CHECKSUM

- SOFTWARE_REV
- Assign it to the operation activity FA-PROGRAM
Since everything is well-prepared, let’s move on to the POD to have a test. In this scenario, we have prepared an order ORD_FORKLIFT_INIT03 in the plant EIT02. According to the planned operation order, the manufacturing process will be in the FA-TEST step after the operation activity FA-PROGRAM. Once we finish the data collection step for the specific operation activity, some manufacturing information will be forwarded into production supervisor’s inbox for approval. After approval, the status of FA-PROGRAM will become finished.
- In a Work Center POD, choose the Work Center to be WC-FASSY and the resource to be ECU-PROG-1. Click Go and we can find several items appear in the worklist.

- Choose the line with order ORD_FORKLIFT_INIT03 and operation activity FA-PROGRAM.
- Switch to the data collection tab and perform data collections.

- Open the workflow management app, we will find the relevant information has shown in the inbox waiting for approval.
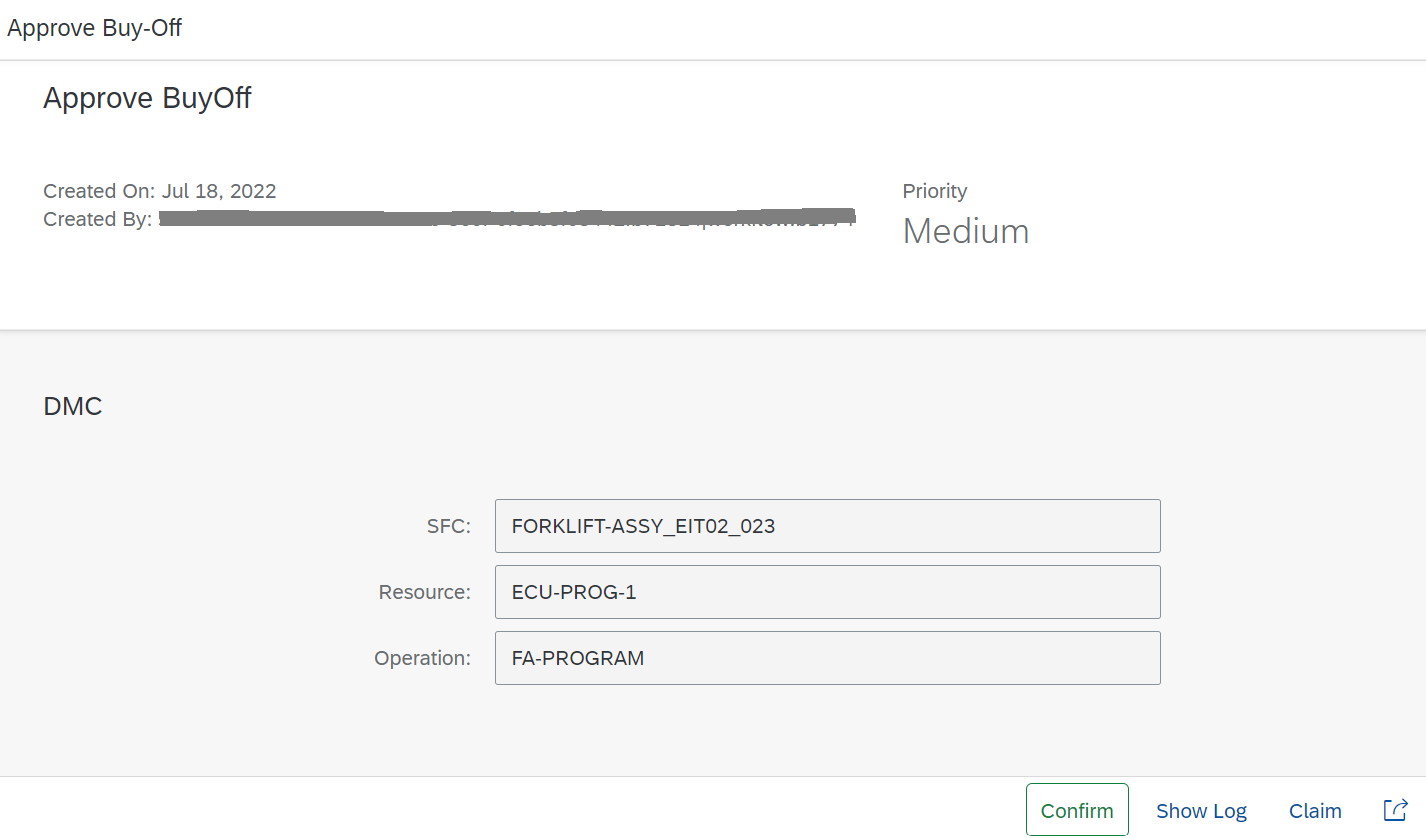
- After confirming, we can go back to the POD to see the status of the operation activity FA-PROGRAM.

Useful Links
Find more information about this product through
- Solutions for digital manufacturing
- Blogs for SAP Digital Manufacturing Cloud
- Q&A for SAP Digital Manufacturing Cloud
Summary
In this blog post, we learned how to build a process extension of SAP Digital Manufacturing Cloud and its business scenario. By integrating with workflow management, approval flows can be added to enhance real-life business cases. Anyway, thanks for your time to join in this development journey. Look forward to your feedback and thoughts in comment field. Hope all of us will benefit from this journey and keep innovating! 🙂
- SAP Managed Tags:
- SAP Business Application Studio,
- SAP Workflow Management,
- SAP Digital Manufacturing
Labels:
3 Comments
You must be a registered user to add a comment. If you've already registered, sign in. Otherwise, register and sign in.
Labels in this area
Related Content
- Display the 5 Last Indicator Values in Line Monitor POD within SAP Digital Manufacturing in Product Lifecycle Management Blogs by SAP
- Top SAP PLM Sessions You Cannot Miss at SAP Sapphire Orlando 2024! in Product Lifecycle Management Blogs by SAP
- How to use Digital Manufacturing MDOs within PPD Example: Where-Used Report with Follow-up Actions in Product Lifecycle Management Blogs by SAP
- Meet PLM experts from SAP at Hannover Messe 2024 in Product Lifecycle Management Blogs by SAP
- Implementation journey of SAP ECTR at OSG EX-CELL-O Coldforming Technologies in Product Lifecycle Management Blogs by SAP
Top kudoed authors
| User | Count |
|---|---|
| 5 | |
| 3 | |
| 2 | |
| 2 | |
| 1 | |
| 1 |