
- SAP Community
- Products and Technology
- Technology
- Technology Blogs by SAP
- Blog series on Define Compliance Reports : Create ...
Technology Blogs by SAP
Learn how to extend and personalize SAP applications. Follow the SAP technology blog for insights into SAP BTP, ABAP, SAP Analytics Cloud, SAP HANA, and more.
Turn on suggestions
Auto-suggest helps you quickly narrow down your search results by suggesting possible matches as you type.
Showing results for
former_member75
Explorer
Options
- Subscribe to RSS Feed
- Mark as New
- Mark as Read
- Bookmark
- Subscribe
- Printer Friendly Page
- Report Inappropriate Content
06-15-2021
6:55 PM
This blog post is a part of the multi-part series of blogs on the Define Compliance Reports application. In the set of blog posts, we cover the end-to-end process of creation and interconnection of various artifacts required for reporting compliance via SAP Document and Reporting Compliance – Statutory Reporting (Formerly ACR). In this blog post, we will cover how to create a “report definition” from scratch.
In the compliance reporting process, you may need to create new report definitions to adhere to the reporting requirements specified by authorities or to address organization-specific requirements over and above those specified by the authorities. Creation of a Report Definition in ACR is essentially a seven-step process: assign parameters, queries, schema, document, correspondence definitions, and so on.
Let us take the example of one of the most common compliance reports, Value Added Tax(VAT) report here to showcase the steps in detail. We’ll build a generic VAT report which would provide output in ALV format. The output provided would consist of:
Selection Parameters:
The report requires the following selection parameters to generate the required output:
Let us look at the individual steps in detail.
In the compliance reporting process, you may need to create new report definitions to adhere to the reporting requirements specified by authorities or to address organization-specific requirements over and above those specified by the authorities. Creation of a Report Definition in ACR is essentially a seven-step process: assign parameters, queries, schema, document, correspondence definitions, and so on.
The Define Compliance Reports app provides you with an intuitive wizard that takes you through the following steps required for creating report definitions.

Let us take the example of one of the most common compliance reports, Value Added Tax(VAT) report here to showcase the steps in detail. We’ll build a generic VAT report which would provide output in ALV format. The output provided would consist of:
- Summary: Displays the total input tax, total output tax, total non-deductible tax, and the net tax payable for the reporting period.
- Output VAT Summary: Displays the output VAT at a transaction, tax code, and tax rate level.
- Output VAT Detail: Displays details of the output VAT at a document level.
- Input VAT Summary: Displays the input VAT at a company code, transaction, tax code, and tax rate level.
- Input VAT Detail: Displays details of the input VAT at a document level.
- Balances Per Company Code: Displays a tax summary at the company code, transaction key, tax code, and tax rate level.
- Box Level Amount Summary: Displays details of tax boxes, tax box type (B-Base/T-Tax), and amount.
Selection Parameters:
The report requires the following selection parameters to generate the required output:
- Company Code - The company code is an organizational unit within financial accounting. Typically, VAT reporting is done at the company code level.
- Reporting Date – Beginning and end date of the relevant reporting period. (monthly, quarterly as per the legal requirement).
- Include Deferred Tax - Deferred tax refers to either a positive (asset) or negative (liability) entry on a company's balance sheet regarding tax owed or overpaid due to temporary differences. With deferred tax, once the invoice is paid, the deferred tax is transferred to a target tax code by a program. It is normally only the target tax that can be processed in the taxes on sales/purchases report. Select Yes if you want the report output to include details of documents posted with deferred taxes. By default, the value of this selection parameter is No.
- Include MOSS Tax - VAT MOSS tax codes are not reported in the advance return for tax on sales/purchases but in the Mini One-Stop Shop procedure. These tax codes can also be selected here for reconciliation purposes. When this indicator is set, tax reporting line items with a MOSS tax code are also selected and processed. Select Yes if you want the report output to include details of documents posted with MOSS tax codes. By default, the value of this selection parameter is No.
Let us look at the individual steps in detail.
- Open Define Compliance Reports Application and Click on ‘Add’ to create a new report definition.


- Enhanced Mode: Choose Enhanced mode to create a report definition with the full capabilities and features. This is the recommended option to create new reports.
- Classic Mode: If you want to generate a legal report with limited ACR functionalities using an existing ABAP report, you can choose this option. In a Cloud environment, reports with classic mode are not supported.
In case you want to extend an SAP delivered a standard report, you can choose the check box. We’ll cover Report Extensibility in detail in a subsequent blog in this series.
In our scenario, we will create a report from scratch with ‘Enhanced Mode’ providing the capabilities and features of ACR.


Parameters:
You can specify the name of the parameters that appear on the selection screen while executing a report run in the Run Compliance Reports app. You can set the parameter properties such as
- Optional
- Hidden
- Multiple Selection
- Read-only
To add parameters, perform the following steps:
A. In the Parameters section, choose the Add pushbutton. B. Enter the parameter name. Note that, while adding organizational units as selection screen parameters, use the exact organizational unit IDs as parameter names.
C. Select the data element. Data Element defines an elementary data type or reference type from the SAP Data Dictionary. You can associate the report parameters with predefined metadata elements available in the SAP system.


D. Specify search help and search help parameters. Search helps are objects that you can use to assign input help (F4 Help) to the screen fields. You can select from the pre-defined search help objects to enable input help (F4 Help) for the parameters on the selection screen. E. Set the other properties for parameter, such as, multiple selection, optional, read-only, and hidden as per the reporting requirements.For our VAT report: Company code and Reporting Date are mandatory parameters. Include Deferred Tax and Include MOSS Tax are optional parameters.
 F. Choose OK.
Queries:
Queries help you to fetch data when you generate compliance documents in the Run Compliance Reports app. You can create your own queries that can be assigned to elements as data sources during mapping.
For our VAT report, we need queries to provide Input tax summary and detail, Output Tax Summary and detail, Box Level Summary, and balances per company code
Analytics with Queries:
Analytics allows business users to perform slice and dice and provide data insights. You can create queries with analytical CDS Views and then assign them to legal documents for analytics
.You can choose one of the following query source types to create queries.
- CDS Views
- Class method
- BRFplus
- ABAP DDIC
- BEX Query
- HANA views
More details on query source types can be found here.
Here I have added steps to add a query for the Input tax summary. Similarly, you can add other queries as well.
To start creating a new query, follow the steps mentioned below:
A. In the Query section, choose the Add
B.Enter a name for the Query in the Query ID field and choose Continue
C. Select the Data Source Type as CDS View
D. select the CDS View in the Data Source Name


You can now see the parameters (if relevant) and filters defined for the data source.
NOTE: Only released cds views are available for customer consumption.


E.Select the Analytics Indicator. This indicator is used to decide how queries should be created for embedded analytics (analyze data). (Optional). Various options for Analytics Indicator can be found here.
F. In the Parameters section, you can:
- Specify the source type and value for a fiel
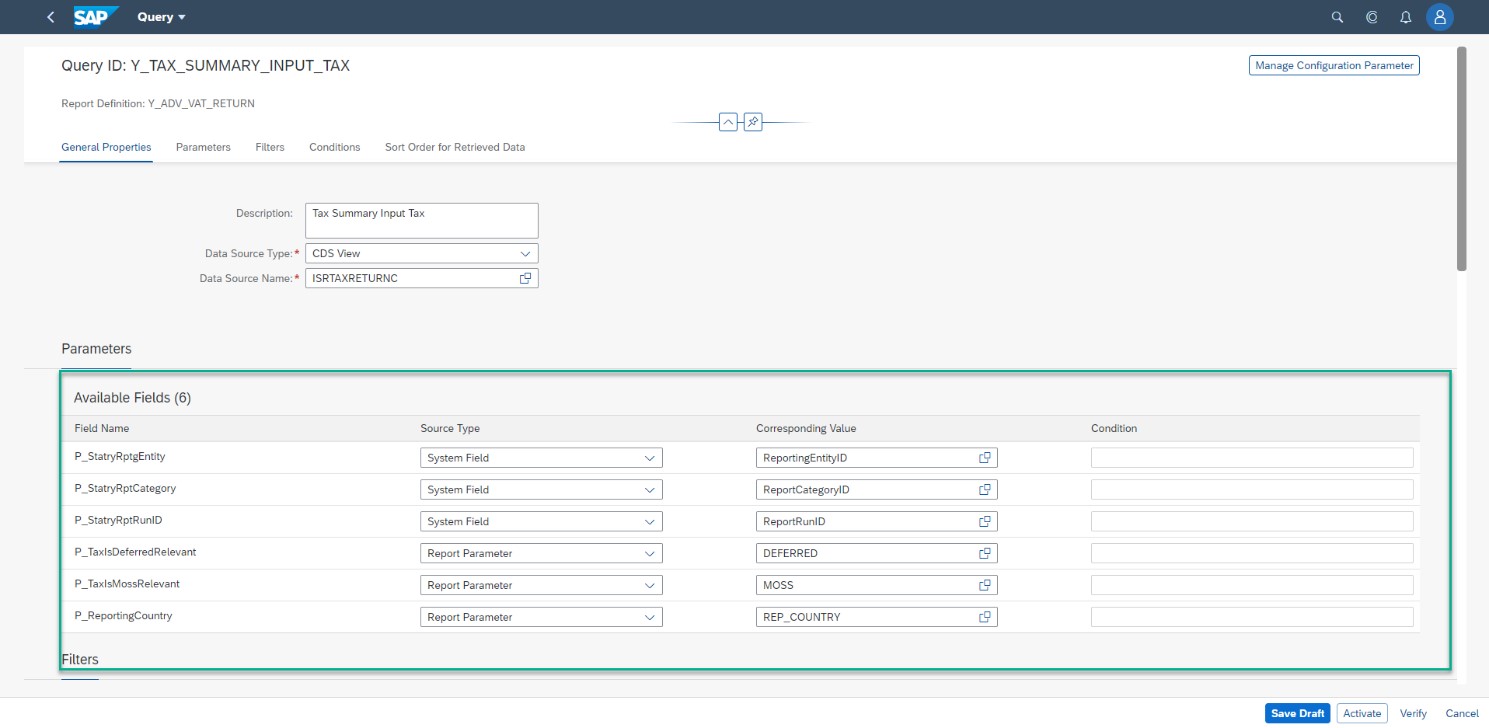
- If the source type is assigned as a Query Column, you can assign an existing condition to it, or create a new condition in the section Conditions. (Optional)
G. In the Filters section, you can
- You can set filter conditions for the list of available fields.

- Toggle Filter switch for to enter filters values for given field


- You can set any number of include or exclude conditions to regulate the results of the query.


You can follow the same steps to define filter conditions for other fields.
- You can set filter conditions for the list of available fields.
H. In the Conditions section, you can define conditions to get unique records from the query dataset (Optional).
- Choose the plus '+' icon.
- In the Add Condition dialog box, specify the condition ID.
- In the right panel, you can define conditions for the data set columns.
I. In the Sort Order for Rows section, you can select columns that are used for sorting the data set. You can set the sort order as ascending or descending. You can also move the columns up and down.
J. Save the changes.
 You can follow the same steps to create queries for output tax summary and BOX Level Summary.
Note: Query filters are applied while fetching data from the source whereas query conditions are applied after data has been fetched.
Document Definition:
You can create document definitions for the legal documents that should get generated during the compliance reporting process.
Creating document definition involves 3 steps
4.1 Define Document Properties
You can add a new document either by providing a schema, or a query. You can add new documents in one of the following formats - XML, TXT, ALV, XBRL*(*limited scope), JSON, or PDF
To add new documents, perform the following steps:
A. In the Document section, choose the Add pushbutton
B. Choose the option Add with Schema/Query, provide Document ID, and select Continue

C.In the General Properties tab, do the following
a. Select output format of the document
 In this example, we create a document with ALV Format

b. Enter the document description.
c. Choose the option, Schema or Query.
In our example report, we will create a new schema from ABAP DDIC structure to define elements and attributes in the document.
More details on creating schema are explained in section 4.
d. To set a name for the generated document, select the file name and enter the required value.
e.Select the Code Page

f. Configure the document as an optional or a mandatory document.
If you specify a document as optional here, you can choose to remove it from getting generated in the Run Compliance Reports app. By default, the document is mandatory and will get generated in the Run Compliance Reports app.
g. You can configure your output documents to be viewed in a user-friendly and consistent format by using the Visualization Mode option.In the Visualization Mode field, set the value as follows:
- Blank: This is the default option that disables the preview in the Run Compliance Reports
- Read Only: This enables the preview in theRun Compliance Reports app.
- Editable: This enables the preview in the Run Compliance Reports app and you can edit the field values using this option. You can enable field visibility and manual adjustment using this option.

4.2 Creating Schema Definition
Step by step detail to create a schema from scratch is available here.
4.3 Perform Mapping
Mapping is the process of assigning data sources to the target elements defined in the schema. You can use sources such as literals, parameters from reporting entity configuration, query column, system fields, or report parameters. The app provides you the flexibility to define your own queries and manage conditions as well.
To perform mapping, do the following:
A. Select Mapping tab in document screen
 The mapping view is pre-populated with the elements and attributes details of the schema.
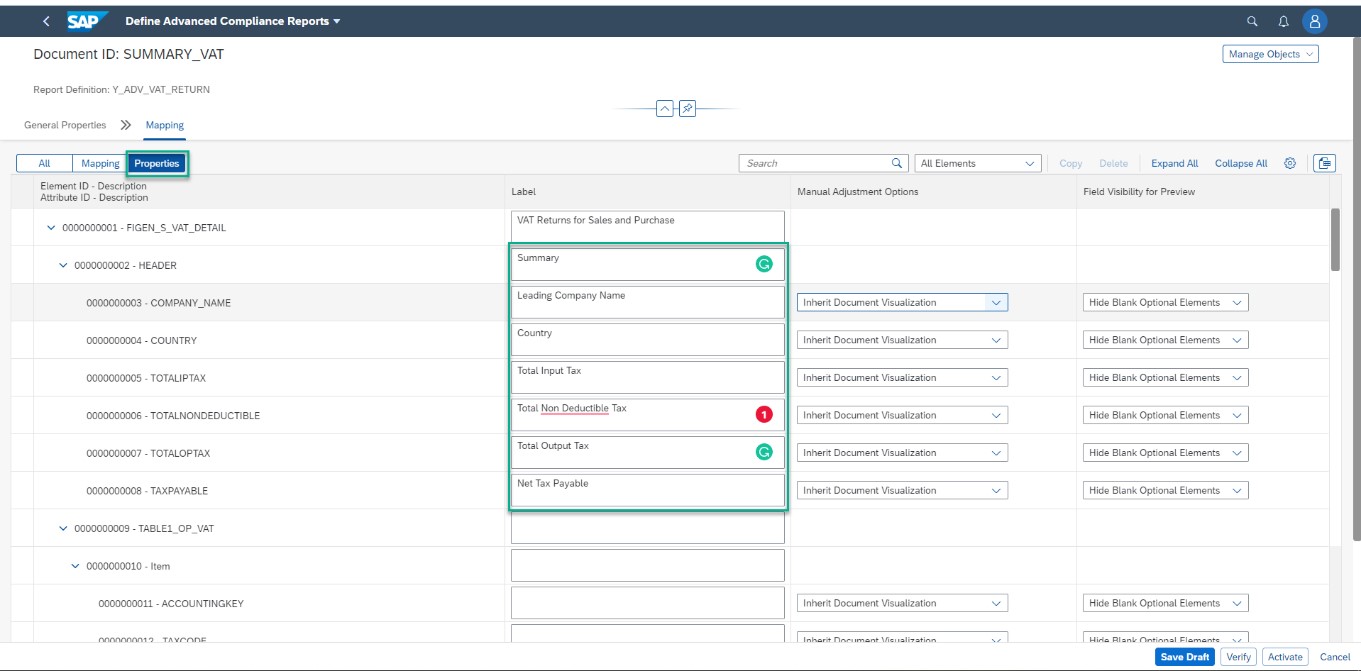
B. In the Label field, you can specify labels for elements or attributes. The specified labels appear for the elements or attributes in the preview mode in the Run Compliance Reports app.
C.In the Loop Queryfield, select a loop query if the element is repeatable and should contain different values for each line of a query result dataset.

D.he elements or attributes of elements can be mapped to any of the available datasources


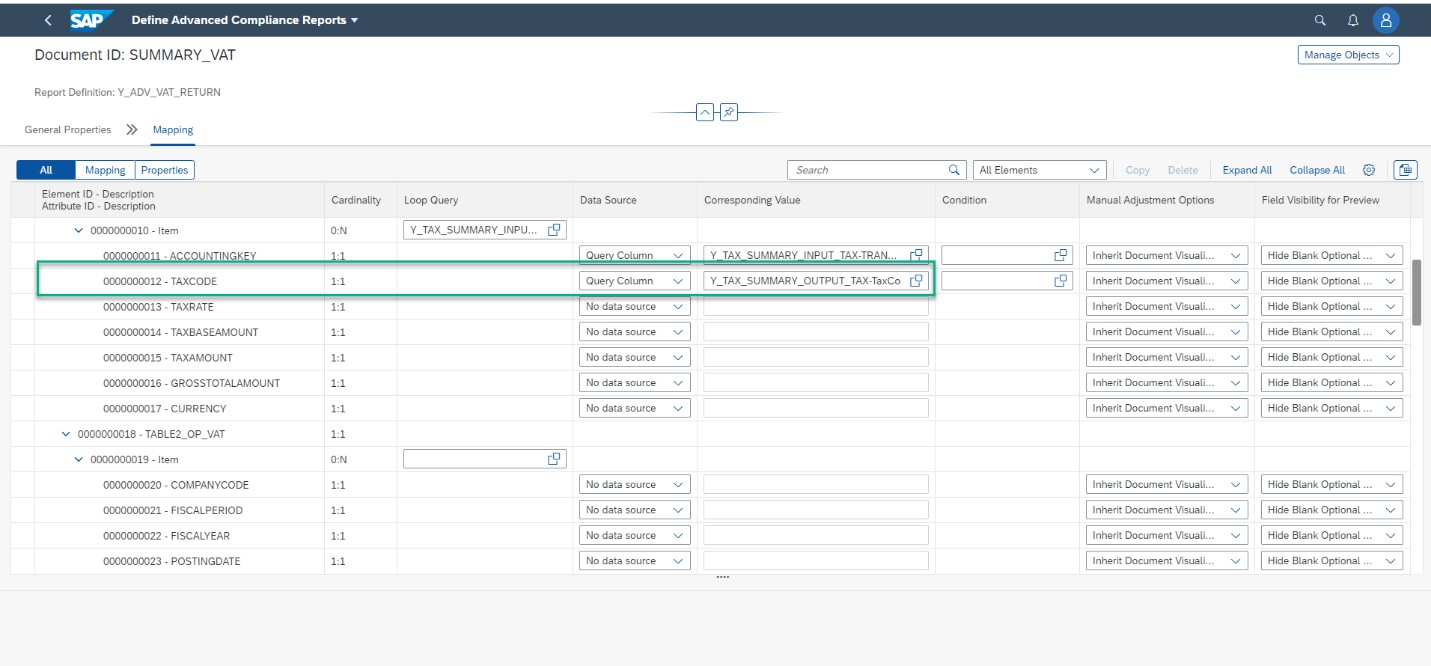
Similarly, map all elements and attributes with required data sources.
G. The Manual Adjustment Options column is enabled in Mapping only when the visualization mode is set as Editable. In the Manual Adjustment Options field, choose one of the following options:
- Read Only: You will not be able to edit the element in the manual adjustment mode.
- Inherit Document Visualization: The element inherits the visualization mode settings of the document. For example, if the visualization mode setting of the document is read-only, the element will be read-only in the manual adjustment mode.
- Editable if Data Source or Value is Blank: The element will editable in the manual adjustment mode if the data source is not specified or if the data source provides a blank value.
In our example, we set manual adjustment with Inherit Document Visualization.
H. The Field Visibility for Previewcolumn is enabled in Mapping only when the visualization mode is set as Read-Only or Editable. In the Field Visibility for Preview field, choose one of the following options:
- Show Always: It always displays the element or attribute in the preview.
- Hide Blank Optional Elements: If an optional element or attribute value is blank, it does not display in the preview.
- Hide Always: It always hides the element or attribute in the preview.

I. In the Delimiter field, specify a delimiter for your TXT files. You can specify any character, or the following control characters as delimiters: \n for newline, \t for tab, \s for space, and \r for carriage return.
J. Save the document mapping.

Correspondence Definition (Optional)
Based on the compliance reporting requirements of the country, you may be required to submit tax details to the respective business partners through the business partner correspondence documents. To generate the relevant correspondence documents, you can create the correspondence definitions in the Define Compliance Reports app.
To create a correspondence document definition, perform the following steps:
A. In the Correspondence Definition section, choose the Add push button.
B. In the Correspondence ID field, enter an identifier for the business partner correspondence document.
C. In the Form Template field, select the template of the PDF form to be shared with business partners. A form template is created based on the format provided by the legal authorities of the country.
D. In the Query ID field, select a pre-defined query as the data source for the correspondence document.
E. In the Output Type field, select a pre-defined output type. An output type typically represents a business document of a single application and defines the output parameters for that document. SAP pre-delivers a set of output types for existing applications. Each application object type can have one or more output types assigned to it.
For example, if you have a sales document as an application object type, possible output types might be a debit memo request, a sales contract, or a customer return.
F. Choose OK.
For VAT Reports no correspondence document required to be generated hence we will not create a correspondence definition for our example report.- Event HandlerTo adhere to the compliance reporting requirements, you may need to introduce report-specific checks as part of the report flow, such as validation of selection screen parameters, checks before file generation, and so on.You can subscribe to the pre-defined events and customize the behavior of the report definition.The available events are:
0001
Validation of selection screen parameter
0002
Checks during the generation process
0003
Defaulting of the report parameter value
0004
Checks before file generation
0005
The event is called before the generation process is started.
0006
Additional Authorization Check for Compliance Documents
0007
Event for Custom formatter
0008
Set properties for selection screen parameter.
0009
Event is called before execution of the action.
0010
Perform operations after getting a communication response.
0011
Document log modification
0012
Query filter for analytics
0013
Event before element generation
0014
Display text before submission status update
0015
Report Run Log Modification
In our example, we wanted to have default values of parameters “Include Deferred Tax” and “Include MOSS Tax”. Hence, we create an implementation class by adding interface IF_SRF_EVENT_REP_PAR_DEF_VAL and subscribe with event 0003.
A. In the Event Handler Section, choose Add.
B. Select Event ID as 003, choose Implementation class, and choose OK.
Reported Items Log
The system keeps track of the documents considered for reporting under a specific reporting task. This tracking helps to analyze and audit these documents if required. The tracking also ensures consistency between the data considered for generation and the data considered for analytics.
You can specify the table name that stores the documents considered for reporting under a specific reporting task. You also specify the query that is used to retrieve the documents considered for reporting under a specific reporting task.
A. In the Reported Items Log section, choose Add
B. Select Table Name, Query ID, and Choose OK
Verify Report Definition:
Chose ‘Verify’ to ensure that the report definition does not contain any error- Activate Report Definition
With this blog post, you have learned how to create a new report definition from scratch. In the subsequent blog posts of this series, we would look at how this report definition can be linked to a report category and subsequently be used for reporting via the Run Compliance Reports application of SAP S/4HANA for advanced compliance reporting.
If you have any questions/queries, you can post them here.
- SAP Managed Tags:
- FIN Globalization Services,
- SAP Document and Reporting Compliance
Labels:
8 Comments
You must be a registered user to add a comment. If you've already registered, sign in. Otherwise, register and sign in.
Labels in this area
-
ABAP CDS Views - CDC (Change Data Capture)
2 -
AI
1 -
Analyze Workload Data
1 -
BTP
1 -
Business and IT Integration
2 -
Business application stu
1 -
Business Technology Platform
1 -
Business Trends
1,658 -
Business Trends
118 -
CAP
1 -
cf
1 -
Cloud Foundry
1 -
Confluent
1 -
Customer COE Basics and Fundamentals
1 -
Customer COE Latest and Greatest
3 -
Customer Data Browser app
1 -
Data Analysis Tool
1 -
data migration
1 -
data transfer
1 -
Datasphere
2 -
Event Information
1,400 -
Event Information
76 -
Expert
1 -
Expert Insights
177 -
Expert Insights
361 -
General
1 -
Google cloud
1 -
Google Next'24
1 -
GraphQL
1 -
Kafka
1 -
Life at SAP
780 -
Life at SAP
15 -
Migrate your Data App
1 -
MTA
1 -
Network Performance Analysis
1 -
NodeJS
1 -
PDF
1 -
POC
1 -
Product Updates
4,574 -
Product Updates
400 -
Replication Flow
1 -
REST API
1 -
RisewithSAP
1 -
SAP BTP
1 -
SAP BTP Cloud Foundry
1 -
SAP Cloud ALM
1 -
SAP Cloud Application Programming Model
1 -
SAP Datasphere
2 -
SAP S4HANA Cloud
1 -
SAP S4HANA Migration Cockpit
1 -
Technology Updates
6,871 -
Technology Updates
495 -
Workload Fluctuations
1
Related Content
- Use Cases of Generative AI in SAP Cloud ALM in Technology Blogs by Members
- Kyndryl Shines a Spotlight on Master Data at 2024 Sapphire Orlando in Technology Blogs by SAP
- SAP Cloud ALM: Requirements Management on Steroids in Technology Blogs by SAP
- Currency Translation in SAP Datasphere in Technology Blogs by Members
- SAP Datasphere + SAP S/4HANA: Your Guide to Seamless Data Integration in Technology Blogs by SAP
Top kudoed authors
| User | Count |
|---|---|
| 13 | |
| 7 | |
| 7 | |
| 7 | |
| 6 | |
| 6 | |
| 6 | |
| 6 | |
| 6 | |
| 5 |