

- SAP Community
- Products and Technology
- Technology
- Technology Blogs by SAP
- Calling a SAP Business Technology Platform REST AP...
Technology Blogs by SAP
Learn how to extend and personalize SAP applications. Follow the SAP technology blog for insights into SAP BTP, ABAP, SAP Analytics Cloud, SAP HANA, and more.
Turn on suggestions
Auto-suggest helps you quickly narrow down your search results by suggesting possible matches as you type.
Showing results for
former_member73
Explorer
Options
- Subscribe to RSS Feed
- Mark as New
- Mark as Read
- Bookmark
- Subscribe
- Printer Friendly Page
- Report Inappropriate Content
11-09-2021
1:11 PM
In this blog post I will show you how to receive data from the SAP Business Technology Platform REST API (Cloud Management Tool - Feature Set B) in the environment of the SAP Business Application Studio. Therefore, I will create a SAPUI5 application, describe the steps to call the REST API correctly and show you how to display the received data in a simple SAPUI5 TableView.
To perform the following steps, you need to know how to use the APIs provided for SAP Business Technology Platform. For further information please have a look into following materials:
Blog: Introducing Cloud Management Tools – CLI and APIs for SAP Cloud Platform (PART 2)
SAP Help Portal: Cloud Management Tools — Feature Set Overview
SAP Help Portal: Account Administration Using APIs
API Business Hub: Core Services for SAP BTP
This blog post will focus on receiving and displaying cost and usage data. Therefore, I will use the Resource Consumption service which provides REST APIs to help generating reports based on the resource and cost consumption within your accounts. In detail I will send a GET request to receive all monthly cost and usage data for all Subaccounts in the timeframe: January 2021 - September 2021.
GET [...]/reports/v1/monthlySubaccountsCost?fromDate=202101&toDate=202109
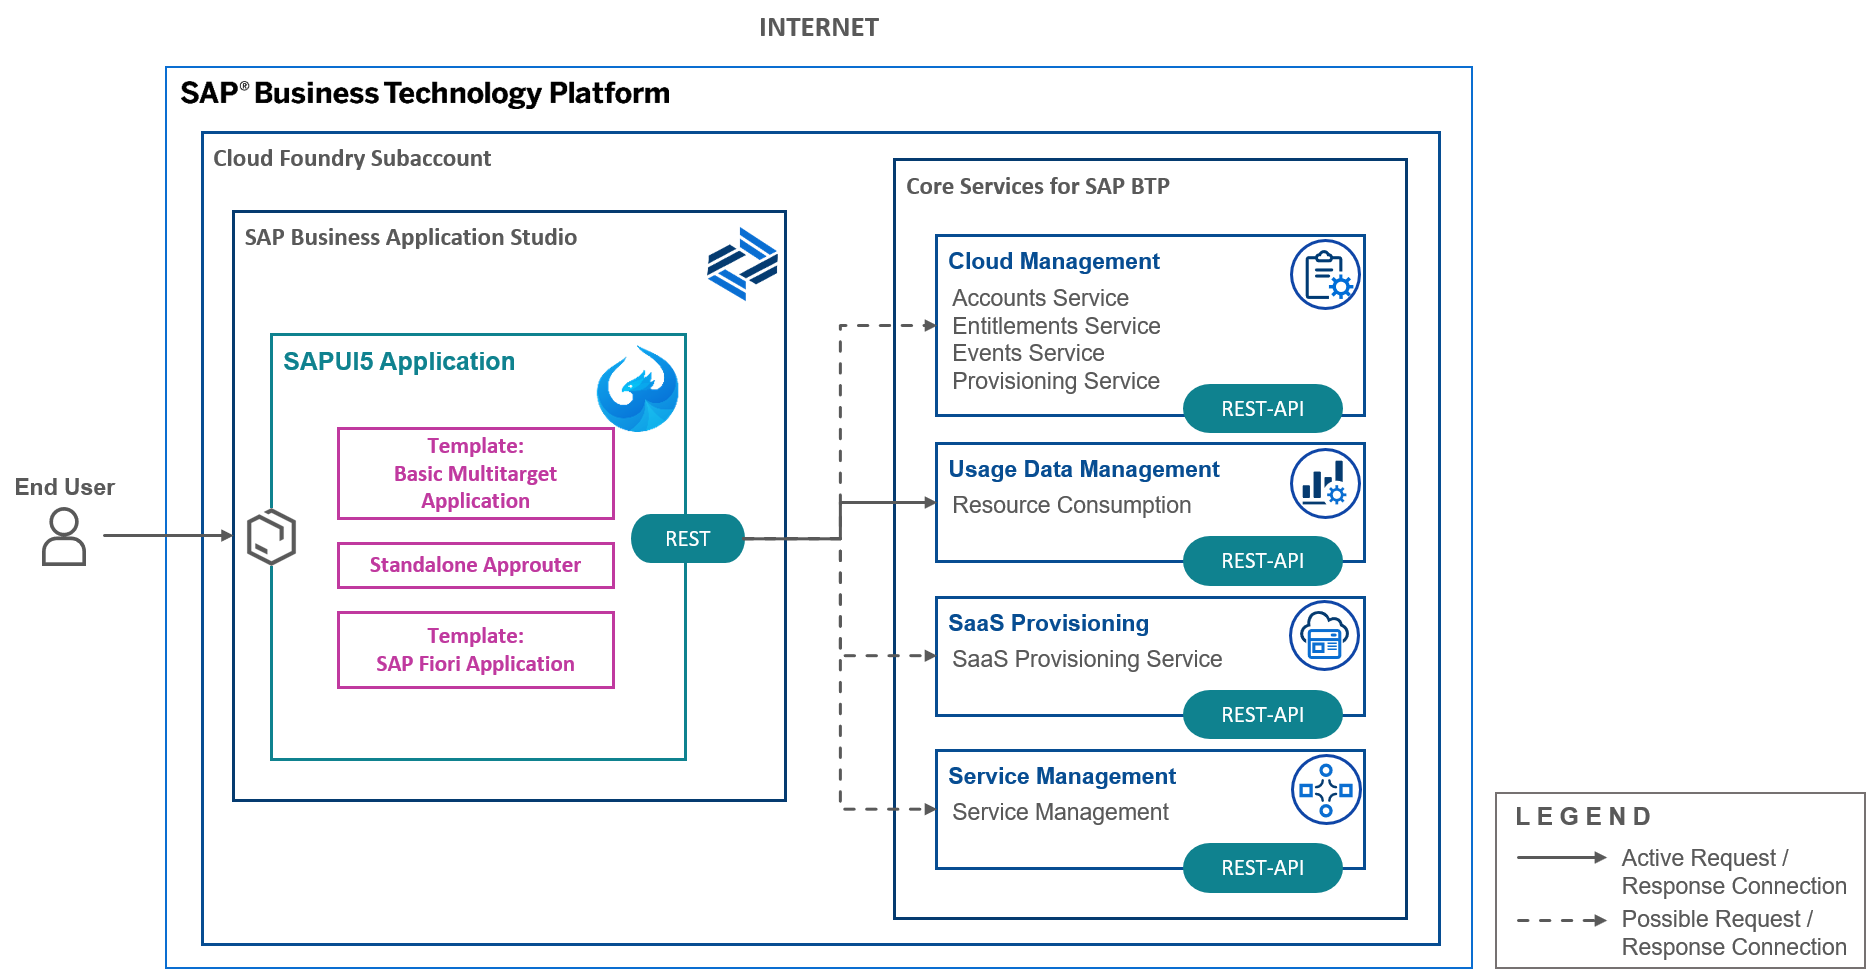
An architecture of the application we will create in this blog can be found below. There you can see how the overall configuration of the application looks like in the SAP Business Application Studio and which services are available in connection with the SAP Business Technology Platform REST APIs. As I mentioned before, in this blog post I will focus on receiving data from the Resource Consumption service, but as you can see in the architecture, it is also possible to connect to other REST APIs provided for SAP Business Technology Platform.
For more information, please have a look into the API Business Hub.
In the end the finished app should be looking something like this:
If you have ensured that all the prerequisites are in place you can begin to develop the app and connect to the REST API. In the next section I will describe how to set up the SAPUI5 app by using already existing templates in SAP Business Application Studio.
It can take some time until your project was created successfully. A message toast indicates that the creation of all files is finished.
Now the app should be set up completely and the folder structure should look similar to the structure seen in this screenshot:
In the next section I will show you which code snippets you have to add to the corresponding files to receive the data from the REST API.
Tipp: To beautify your code and therefore getting a better overview, please have a look into following blog: SAP Business Application Studio – How to beautify xml and javascript code
In the following screenshot I have marked the files which will be adjusted in the next steps.
Change the source (src) to following:
Add the following code snippet into the “sap.app” section:
First you need to add a comma after "ach": "ach" and secondly you can paste following code snippet below that:
The result should look like this:
Add the following code snippet into the “models” section:
First you need to add a comma after the second closing curly bracket and secondly you can paste the following code snippet below that:
The result should look like this:
Delete the automatically generated first two routes:
Add the following code snippet as a new route to the file:
The result should look like this:
Add the following code snippet into the "modules --> requires" section:
The result should look like this:
CAUTION: The line inserts must be according to the code snippet to prevent errors. Be aware that the “udm-resource” is red underlined until the next code snippet is added to the “resources” section (see next step).
Add the following code snippet into the "resources" section:
The result should look like this:
CAUTION: The line inserts must be according to the code snippet to prevent errors.
Now all files are adjusted correctly, and it is possible to receive the data from the API. In the next step I will describe how to display the data from the “Subaccount Cost” API in a simple TableView.
To display the data in a TableView we need to change the files marked in the following screenshot.
Tipp: To beautify your code and therefore getting a better overview, please have a look into following blog: SAP Business Application Studio – How to beautify xml and javascript code
Change the title of the app in the file “i18n.properties” (for e.g., the name of the Global Account of which you are receiving and displaying the data). This step is optional, but it improves the clarity of the app.
Replace the “content” item with following code snippet:
The result should look like this:
Paste the following code snippet into the “onInit” function:
The result should look like this:
Now all the components for the UI are defined and you are ready to build, deploy and start the app.
Do a right click on the “mta.yaml” file and select the option “Build MTA Project“.
After successfully building the mta project a new folder “mta_archives” with a “.mtar” file is created.
Do a right click on the “.mtar” file and select the option “Deploy MTA Archive” to start the deployment.
It can be necessary to provide your Cloud Foundry endpoint, your SAP credentials and the organization and the space where you want to deploy your app!
The information “Process Finished” indicates that the deployment was successful (this can take some moments).
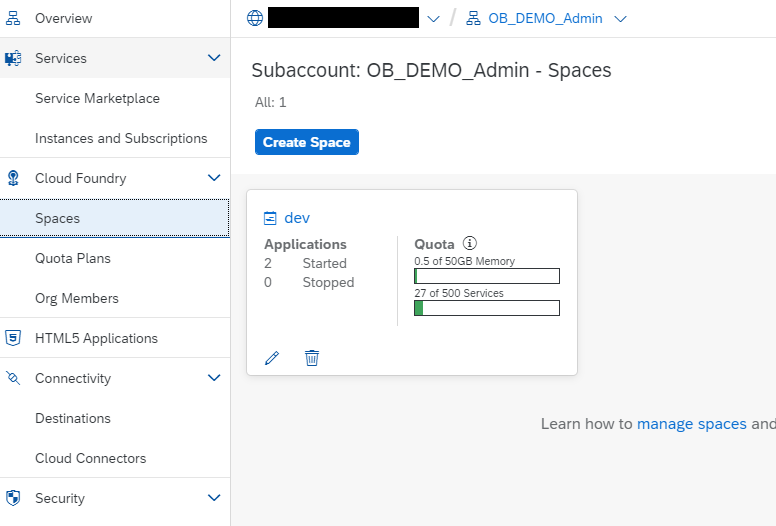
Enter your cockpit and navigate to the section “Spaces” under “Cloud Foundry”. Here you get an overview over the spaces you have created. Select the space, where you have deployed your app.
In the space you see all your deployed apps. Select the app you have just created.
After you have entered the overview page of your deployed app, first you need to make sure if the app is already started. The badge in the left corner will show you this information. If the badge is green and the text “started” can be seen, everything works fine. Otherwise please click on the button “start” to start the application manually.
To enter the app you have to select the provided URL in the "Application Routes" section.
Now everything should work fine and you should see the data from the “Subaccount Cost” API in the constructed table.
A short recap, what have we achieved?
With the described steps in this blog post we are able to create a SAPUI5 application from a template in SAP Business Application Studio, with some code adaption we can connect a SAP Business Technology REST API to the app and display the received data in a TableView, we manage to build and deploy the developed app and in the end we can see the data after starting the finished app from the SAP Business Technology Platform cockpit.
To perform the following steps, you need to know how to use the APIs provided for SAP Business Technology Platform. For further information please have a look into following materials:
Blog: Introducing Cloud Management Tools – CLI and APIs for SAP Cloud Platform (PART 2)
SAP Help Portal: Cloud Management Tools — Feature Set Overview
SAP Help Portal: Account Administration Using APIs
API Business Hub: Core Services for SAP BTP
This blog post will focus on receiving and displaying cost and usage data. Therefore, I will use the Resource Consumption service which provides REST APIs to help generating reports based on the resource and cost consumption within your accounts. In detail I will send a GET request to receive all monthly cost and usage data for all Subaccounts in the timeframe: January 2021 - September 2021.
GET [...]/reports/v1/monthlySubaccountsCost?fromDate=202101&toDate=202109
An architecture of the application we will create in this blog can be found below. There you can see how the overall configuration of the application looks like in the SAP Business Application Studio and which services are available in connection with the SAP Business Technology Platform REST APIs. As I mentioned before, in this blog post I will focus on receiving data from the Resource Consumption service, but as you can see in the architecture, it is also possible to connect to other REST APIs provided for SAP Business Technology Platform.
For more information, please have a look into the API Business Hub.
In the end the finished app should be looking something like this:

Prerequisites
- You have already created a Subaccount in a Global Account (ensure you are using Cloud Management Tools - Feature Set B) - Also possible for Trial accounts.
- You have enabled Cloud Foundry Environment in the Subaccount.
- You have created a Cloud Foundry Space.
- You have entitled SAP Business Application Studio service and subscribed to it.
- You have created a Dev Space for SAP Fiori inside the SAP Business Application Studio.
- You have entered the created Dev Space.
If you have ensured that all the prerequisites are in place you can begin to develop the app and connect to the REST API. In the next section I will describe how to set up the SAPUI5 app by using already existing templates in SAP Business Application Studio.
Creating a SAPUI5 application from a template
- From the “Welcome” page navigate to “Start from template”
- Create a “Basic Multitarget Application”
- Select the tile “Basic Multitarget Application”
- Find a project name
- Select button “Finish”
- After the app was created successfully find the “mta.yaml” file
- Do a right click on the “mta.yaml” file and select “Create MTA Module from Template”
- Create an “Approuter Configuration”
- Select the tile “Approuter Configuration”
- Choose the HTML5 Application Runtime “Standalone Approuter”
- CAUTION: Please pay attention to select the correct approuter. The described steps will not work with the “Managed Approuter”!
- Select “Yes” to decide that you want to add an authentication and that you plan to add an UI
- Click “Next”
- Wait until the approuter is created successfully
- From the “Welcome” page navigate to “Start from template”
- Create a “SAP Fiori application”
- Select the tile “SAP Fiori application”
- Select Application Type “SAPUI5 freestyle”
- Choose Floorplan “SAPUI5 Application” and click “Next”
- Select Data Source “None”
- Find a view name
- Find a project name, an application title and an application namespace
- Choose as folder path the folder of your created "Basic Multitarget Application"
- Select “Yes” as deployment configuration
- Keep the default selection of the radio buttons for “FLP configuration” (No) and “Advanced options” (No) and click “Next”
- Choose “Cloud Foundry” as target
- Select Destination “None” and click “Finish”
It can take some time until your project was created successfully. A message toast indicates that the creation of all files is finished.
![]()
Now the app should be set up completely and the folder structure should look similar to the structure seen in this screenshot:

In the next section I will show you which code snippets you have to add to the corresponding files to receive the data from the REST API.
Tipp: To beautify your code and therefore getting a better overview, please have a look into following blog: SAP Business Application Studio – How to beautify xml and javascript code
Calling the REST API in the SAPUI5 application
In the following screenshot I have marked the files which will be adjusted in the next steps.

Change file “index.html”
Change the source (src) to following:

src=https://sapui5.hana.ondemand.com/resources/sap-ui-core.jsChange file “manifest.json”
Add the following code snippet into the “sap.app” section:

First you need to add a comma after "ach": "ach" and secondly you can paste following code snippet below that:
"dataSources": {

    "mainService": {

        "uri": "reporting/reports/v1/monthlySubaccountsCost?fromDate=202101&toDate=202109",

        "type": "JSON"

            }

        }
The result should look like this:

Add the following code snippet into the “models” section:

First you need to add a comma after the second closing curly bracket and secondly you can paste the following code snippet below that:
"reporting": {

       "type": "sap.ui.model.json.JSONModel",

       "dataSource": "mainService",

       "settings": {

           "defaultBindingMode": "TwoWay",

           "defaultCountMode": "Inline",

           "refreshAfterChange": false

          }

       }
The result should look like this:
Change file “xs-app.json”
Delete the automatically generated first two routes:

Add the following code snippet as a new route to the file:
{

      "source": "^/reporting/(.*)$",

      "target": "$1",

      "service": "com.sap.cloud.udm",

      "endpoint":"reporting",

      "csrfProtection": false,

      "authenticationType": "xsuaa"

},
The result should look like this:

Change file “mta.yaml”
Add the following code snippet into the "modules --> requires" section:
- name: udm-resource

    parameters:

     config:

      udm-config-key: "isAppRouter"
The result should look like this:

CAUTION: The line inserts must be according to the code snippet to prevent errors. Be aware that the “udm-resource” is red underlined until the next code snippet is added to the “resources” section (see next step).
Add the following code snippet into the "resources" section:
- name: udm-resource

  type: org.cloudfoundry.managed-service

  parameters:

    service: uas

    service-plan: reporting-ga-admin
The result should look like this:

CAUTION: The line inserts must be according to the code snippet to prevent errors.
Now all files are adjusted correctly, and it is possible to receive the data from the API. In the next step I will describe how to display the data from the “Subaccount Cost” API in a simple TableView.
Displaying the received data in a simple UI
To display the data in a TableView we need to change the files marked in the following screenshot.

Tipp: To beautify your code and therefore getting a better overview, please have a look into following blog: SAP Business Application Studio – How to beautify xml and javascript code
Change the title of the app (Optional)
Change the title of the app in the file “i18n.properties” (for e.g., the name of the Global Account of which you are receiving and displaying the data). This step is optional, but it improves the clarity of the app.
Add a table to your view file - “<ViewName>.view.xml”
Replace the “content” item with following code snippet:

<content>

<Table id="table1" items="{path: 'DataModel>/content'}" class="sapUiSizeCompact">

<columns>

<Column>

<Label text="Subaccount"/>

</Column>

<Column>

<Label text="Date"/>

</Column>

<Column>

<Label text="Service"/>

</Column>

<Column>

<Label text="Usage"/>

</Column>

<Column>

<Label text="Metric"/>

</Column>

<Column>

<Label text="Cost"/>

</Column>

<Column>

<Label text="Currency"/>

</Column>

</columns>

<ColumnListItem>

<Text text="{DataModel>subaccountName}"/>

<Text text="{DataModel>reportYearMonth}"/>

<Text text="{DataModel>serviceName}"/>

<Text text="{DataModel>usage}"/>

<Text text="{DataModel>metricName}"/>

<Text text="{DataModel>cost}"/>

<Text text="{DataModel>currency}"/>

</ColumnListItem>

</Table>

</content>
The result should look like this:

Add functions to your controller file - “<ControllerName>.controller.json”
Paste the following code snippet into the “onInit” function:
var dataModel = this.getOwnerComponent().getModel("reporting");

this.getView().setModel(dataModel, "DataModel");
The result should look like this:

Now all the components for the UI are defined and you are ready to build, deploy and start the app.
Building and deploying the app
Building the app
Do a right click on the “mta.yaml” file and select the option “Build MTA Project“.
Deploying the app
After successfully building the mta project a new folder “mta_archives” with a “.mtar” file is created.

Do a right click on the “.mtar” file and select the option “Deploy MTA Archive” to start the deployment.
It can be necessary to provide your Cloud Foundry endpoint, your SAP credentials and the organization and the space where you want to deploy your app!
The information “Process Finished” indicates that the deployment was successful (this can take some moments).
Starting the app in the SAP Business Technology Platform Cockpit
Enter your cockpit and navigate to the section “Spaces” under “Cloud Foundry”. Here you get an overview over the spaces you have created. Select the space, where you have deployed your app.
In the space you see all your deployed apps. Select the app you have just created.

After you have entered the overview page of your deployed app, first you need to make sure if the app is already started. The badge in the left corner will show you this information. If the badge is green and the text “started” can be seen, everything works fine. Otherwise please click on the button “start” to start the application manually.
To enter the app you have to select the provided URL in the "Application Routes" section.

Now everything should work fine and you should see the data from the “Subaccount Cost” API in the constructed table.

Conclusion
A short recap, what have we achieved?
With the described steps in this blog post we are able to create a SAPUI5 application from a template in SAP Business Application Studio, with some code adaption we can connect a SAP Business Technology REST API to the app and display the received data in a TableView, we manage to build and deploy the developed app and in the end we can see the data after starting the finished app from the SAP Business Technology Platform cockpit.
- SAP Managed Tags:
- SAP Business Application Studio,
- SAPUI5,
- SAP Business Technology Platform
Labels:
14 Comments
You must be a registered user to add a comment. If you've already registered, sign in. Otherwise, register and sign in.
Labels in this area
-
ABAP CDS Views - CDC (Change Data Capture)
2 -
AI
1 -
Analyze Workload Data
1 -
BTP
1 -
Business and IT Integration
2 -
Business application stu
1 -
Business Technology Platform
1 -
Business Trends
1,658 -
Business Trends
103 -
CAP
1 -
cf
1 -
Cloud Foundry
1 -
Confluent
1 -
Customer COE Basics and Fundamentals
1 -
Customer COE Latest and Greatest
3 -
Customer Data Browser app
1 -
Data Analysis Tool
1 -
data migration
1 -
data transfer
1 -
Datasphere
2 -
Event Information
1,400 -
Event Information
69 -
Expert
1 -
Expert Insights
177 -
Expert Insights
322 -
General
1 -
Google cloud
1 -
Google Next'24
1 -
GraphQL
1 -
Kafka
1 -
Life at SAP
780 -
Life at SAP
13 -
Migrate your Data App
1 -
MTA
1 -
Network Performance Analysis
1 -
NodeJS
1 -
PDF
1 -
POC
1 -
Product Updates
4,576 -
Product Updates
368 -
Replication Flow
1 -
REST API
1 -
RisewithSAP
1 -
SAP BTP
1 -
SAP BTP Cloud Foundry
1 -
SAP Cloud ALM
1 -
SAP Cloud Application Programming Model
1 -
SAP Datasphere
2 -
SAP S4HANA Cloud
1 -
SAP S4HANA Migration Cockpit
1 -
Technology Updates
6,873 -
Technology Updates
454 -
Workload Fluctuations
1
Related Content
- On the lookout with SAP BTP Core services. Cis patrol. in Technology Blogs by SAP
- Why html_repo_runtime is added in the resources section of mta.yml file? in Technology Q&A
- EML action - passing all fields of a selected row (List Report) in Technology Q&A
- revamped SAP First Guidance Collection in Technology Blogs by Members
- Sap Build Andriod app displays black screen after logging in in Technology Q&A
Top kudoed authors
| User | Count |
|---|---|
| 24 | |
| 9 | |
| 8 | |
| 7 | |
| 7 | |
| 6 | |
| 6 | |
| 6 | |
| 6 | |
| 6 |