
- SAP Community
- Products and Technology
- Technology
- Technology Blogs by SAP
- Cloud Integration: Call iFlow | Basic Authenticati...
Technology Blogs by SAP
Learn how to extend and personalize SAP applications. Follow the SAP technology blog for insights into SAP BTP, ABAP, SAP Analytics Cloud, SAP HANA, and more.
Turn on suggestions
Auto-suggest helps you quickly narrow down your search results by suggesting possible matches as you type.
Showing results for
Product and Topic Expert
Options
- Subscribe to RSS Feed
- Mark as New
- Mark as Read
- Bookmark
- Subscribe
- Printer Friendly Page
- Report Inappropriate Content
09-22-2023
10:05 AM
SAP Cloud Integration (aka CPI) allows to call an integration flow via HTTP request from an external system (HTTP Sender adapter).
The iFlow endpoints are protected with OAuth, however, however, CPI supports Basic Authentication as well.
In this blog post, we learn how to set up a scenario where users from an external Identity Provider, like Microsoft Azure Acticve Directory, should be able to call an iFlow with their own user credentials.
Technologies covered:
SAP Business Technology Platform (BTP), Cloud Foundry
SAP Cloud Integration (CPI)
Identity Authentication Service (IAS)
XSUAA
OAuth / OIDC
Microsoft Azure Active Directory (AAD)
0.1. Prerequisites
0.2. Preparation
0.2.1. AAD: Create Tenant, Group, User
0.2.2. CPI: Create Role and iFlow
0.3. Introduction:
1. Configure Trust: IAS - AAD
1.1. AAD: Create OAuth Client for IAS
1.2. IAS: Create and Configure Identity Provider
2. Configure Trust: BTP - IAS
2.1. BTP: Configure Trust between BTP and IAS
2.2. IAS: Forward Authentication to AAD
3. Configure Authorization in BTP
4. Run the scenario
5. Optional: Certificate-based Trust between IAS and AAD
6. Optional: Troubleshooting
7. Optional: Call AAD directly
8. Optional: Existing Scenarios
9. Optional: Conditional Authentication
Appendix: Sample Application Code
This blog post focuses on configuring AAD, IAS, BTP to enable the Basic-Authentication-Scenario for iFlows.
So let's only briefly go through 2 preparation steps in AAD and in CPI.
To test the scenario, it makes sense to create a new tenant in AAD.
Create Tenant
Login to azure portal at https://portal.azure.com with admin user.
Go to Azure Active Directory (or Entra ID, new name).
Press "Manage Tenants" -> Create
🔸Type Entry ID
🔸Configuration of your choice, e.g. ifloworg and iflowba (basic auth)
After creation, switch to the new tenant by pressing your avatar in the upper right corner, then "Switch Directory".
Create Group
In our scenario, we need a user group, for authorizing the user at the iFlow endpoint.
We go back to AAD home, then choose "Groups" on the left navigation pane, then "Create".
🔸Type: Security
🔸Name: IflowScenarioGroup
After creation, we take a note of the Group ID (object id), as we will need it later.
Create User and add to Group
Now we create our technical user for testing.
AAD tenant home -> Users -> New user -> Create new user
🔸Name: franz
🔸Next: Properties: can enter some properties for future testing the identity flow.
🔸Next: Assignments: add the user to the newly created group
🔸Review: Take a note of the full principal name (franz@iflowba.onmicrosoft.com) and the generated initial password.
Change Initial Password
Testing experience with this new user would be disappointing, because tests would always fail for unknown reason (we test technical flow without user interaction).
The unknown reason would be the requirement of changing initial password.
As such, we have to do it now.
With a different browser, we login at https://microsoft365.com and enter our new user / initial password (good that we stored the info in our scratchpad...)
We change the password and log off.
We create a very simple iFlow that can be called via GET request from browser, with basic authentication, and returns some info that is suitable for proving that the scenario is working.
The iFlow should be protected by a user role.
Create User Role
We login to our CPI tenant and go to Monitor Artifacts -> Manage Security -> User Roles
We “Add” a role with name "RoleForFranz".
BTW, I recommend this little chapter for understanding Roles in BTP.
Create iFlow
We create an integration flow with "HTTPS sender adapter" and Groovy Script step.
When we call the endpoint from browser, we’ll receive the response as computed by the script.
The configuration of the HTTPS adapter:
🔸 Address
set to /franz
🔸 Authorization
Set to "User Role"
🔸 User Role
We press the “Select” button and choose "RoleForFranz"
🔸 CSRF
Checkbox disabled.
The Groovy script step:
We use the script to access the authorization header and read the incoming JWT token.
We parse and decode and fill the message body with it.
Like that, we'll be able to read the content of the JWT token in the browser, when we test the scenario.
The full script can be copied from the appendix.
An iFlow with HTTPS Sender adapter can be called via HTTP.
It is protected with OAuth, so we need to fetch a JWT token, then send it when calling the endpoint.
To fetch the JWT token, we need the credentials (in service key), these are clientid and secret.
CPI supports calling an iFlow endpoint with basic authentication, by sending the clientid and secret.
In addition, CPI supports basic authentication with name / password of a real user.
A real user is required whenever we need a user context for dealing with user data (e.g. from a backend connected to the iFlow).
Real user?!?!?! 😮
Of course, it is not recommended sending real user / pwd via basic auth.
Basic Authentication is useful mostly for prototyping or test scenarios.
A nice advantage is that you can invoke the endpoint of an iFlow with a browser, which will display a user-credentials popup and we can just enter user credentials and do not need to fetch a jwt token.
However, this does not mean that the iFlow can be configured to use Basic Auth as alternative to OAuth.
The iFlow is always protected with OAuth.
So how does it work?
The CPI runtime does the OAuth flow for us, under the hood.
If we send a Basic Authentication request this means that the request contains a header as follows:
name: "Authorization"
value: "Basic" ➕ <blank> ➕ <Base64-encoded username/password>
Whenever CPI receives such a request, it will itself fetch a JWT token, via OAuth flow “Resource Owner Password Credentials”.
To do so, CPI extracts the user and the password from the basic auth request.
CPI itself calls the XSUAA associated with the subaccount, for fetching the JWT token.
That’s the same what we would have done for fetching a token.
Good.
Ummm - good... but with limitations.
It works fine for users that are maintained in the SAP-internal Identity Provider which comes with every BTP subaccount, the “SAP ID Service”:
And what about IAS?
Sure, in productive scenarios, users are not maintained in the “SAP ID Service”, but in an Identity Provider like IAS.
The IAS is then configured as trusted Identity Provider in the BTP subaccount.
In such cases, when the users login to an application in this subaccount, they first get a selection screen where they have to decide which Identity Provider to use for login.
If the wrong IdP is selected, then obviously the user/pwd is rejected, because unknown.
Oh-Oh 😟
Yes, this is a hurdle:
When CPI runtime does the flow programmatically, then it cannot choose the right IdP.
CPI doesn’t know the IdP.
Solution?
The central subaccount-XSUAA has the knowledge of a defauld IdP.
To fix the problem, we can change the default IDP of the subaccount.
Side-Effects?
This doesn’t break user-facing scenarios, the selection screen will be always displayed.
However, changing the default can break existing programmatic scenarios, test setups where password credentials are used already.
What’s next?
Now that we’ve solved the issue about enabling IAS-users to call an iFlow with Basc Authentication, we can go one step further:
What about users of any other external corporate Identity Provider?
For instance, Microsoft Azure Active Directory, or Okta, etc
The IAS has a built-in feature for supporting such scenarios:
IAS can act as “proxy”.
In such a scenario, IAS remains connected to the BTP-subaccount and forwards authentication requests to the external IdP.
This means that an application in BTP can be accessed by users that are maintained in AAD.
With other words:
We deploy an application to BTP, the app has no clue who will use it.
Franz (an Azure AD-user) opens the app and the app shows the IDP-selection screen, where the “SAP ID Service” and the “IAS” is displayed.
Franz chooses IAS.
Now the user-credentials screen of AAD is displayed and Franz can enter his credentials of his AAD account.
And it works.
Great!
The IAS acted as dummy proxy and the AAD processed the authentication.
Anything next?
Nothing else, this is our scenario.
Forgot everything
Let’s repeat: 3 possible scenarios of user calling iFlow:
🔹Subaccount-User calls iFlow
🔹IAS-user calls iFlow
🔹AAD-user calls iFlow
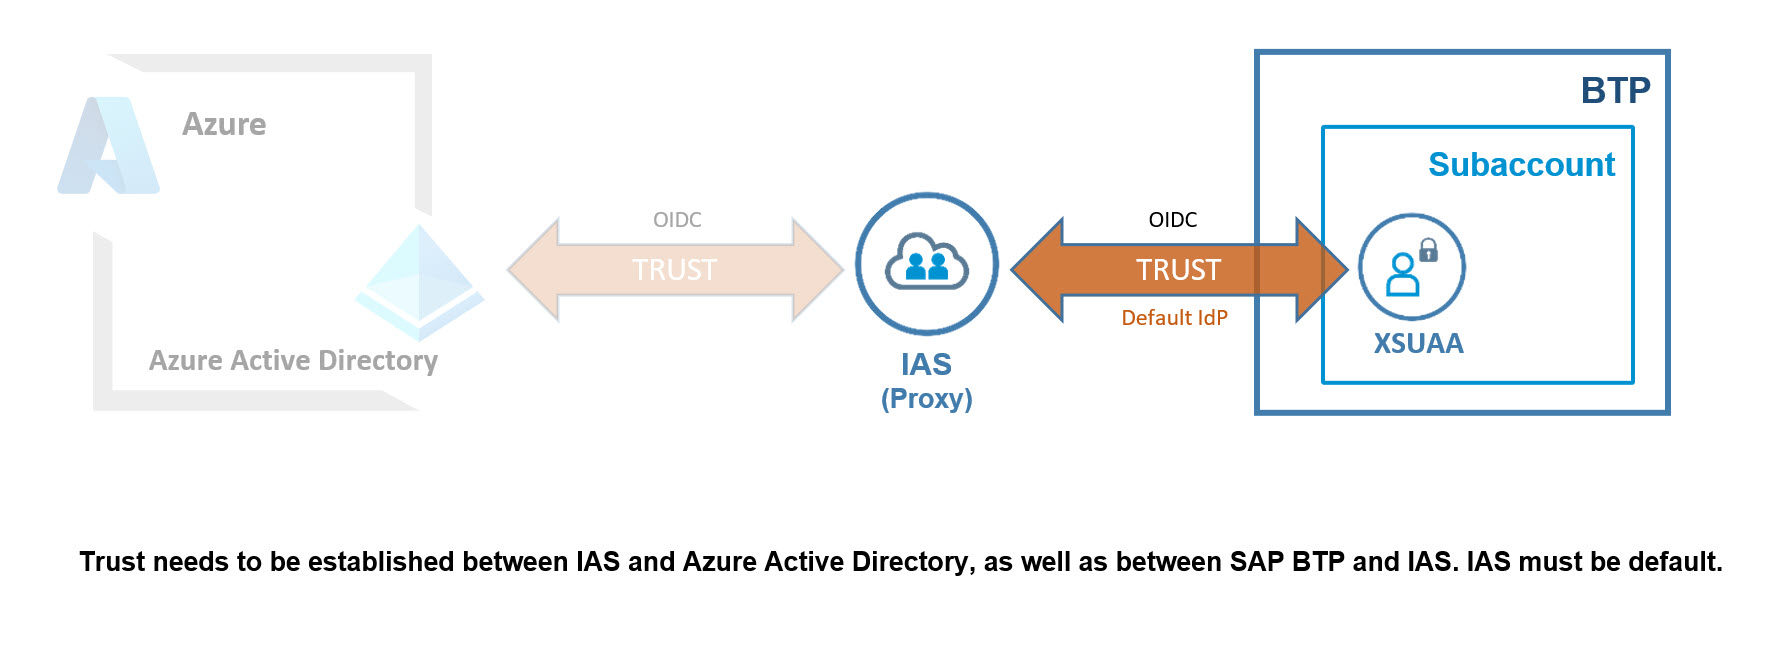
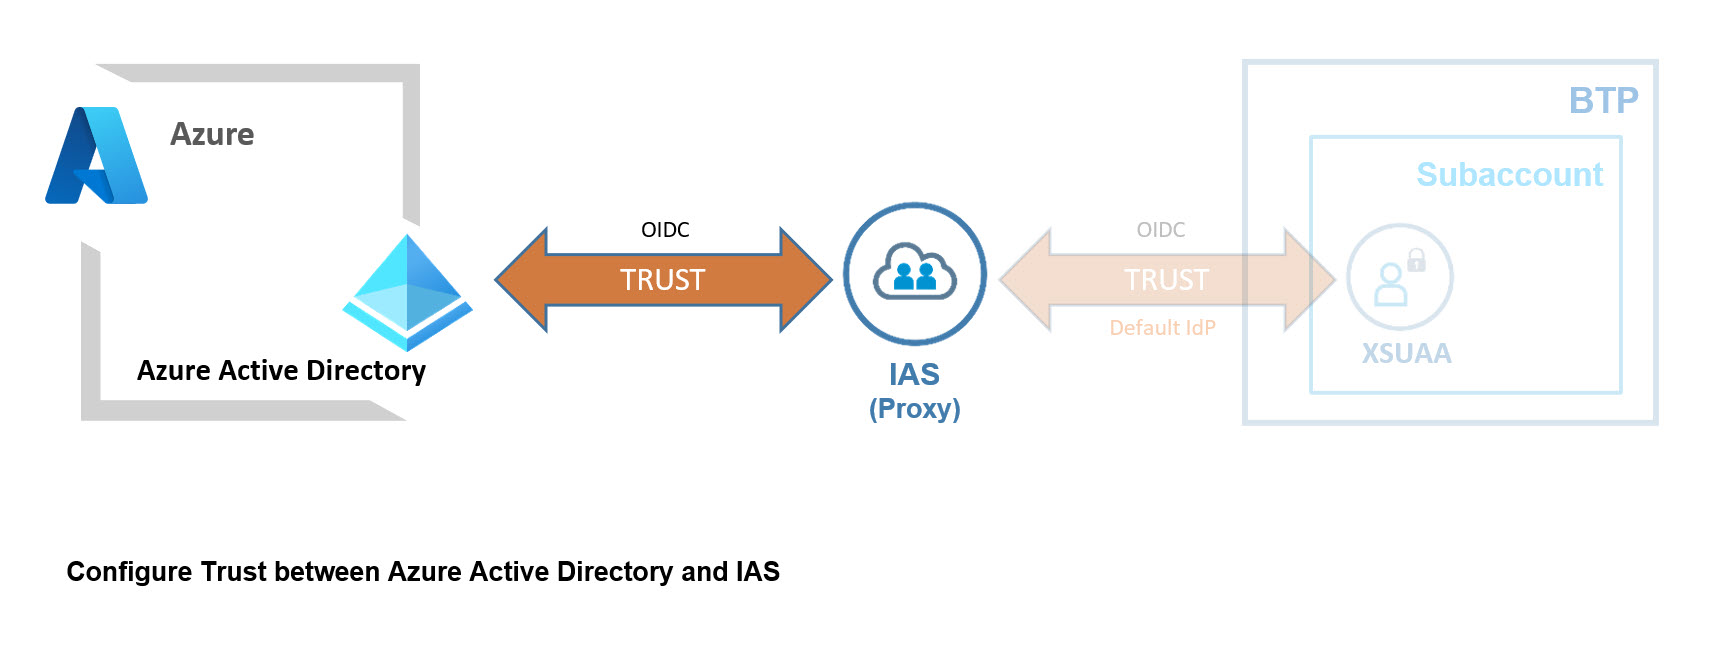
How is the proxy setup realized?
Basically, we need to configure trust between AAD and IAS and BTP.
However, there are 2 important things to note:
🔹Trust must be based on OIDC.
🔹IAS must be flagged as “default IdP”
More about OIDC support in IAS.
Below chapters will go through the configurations in detail.
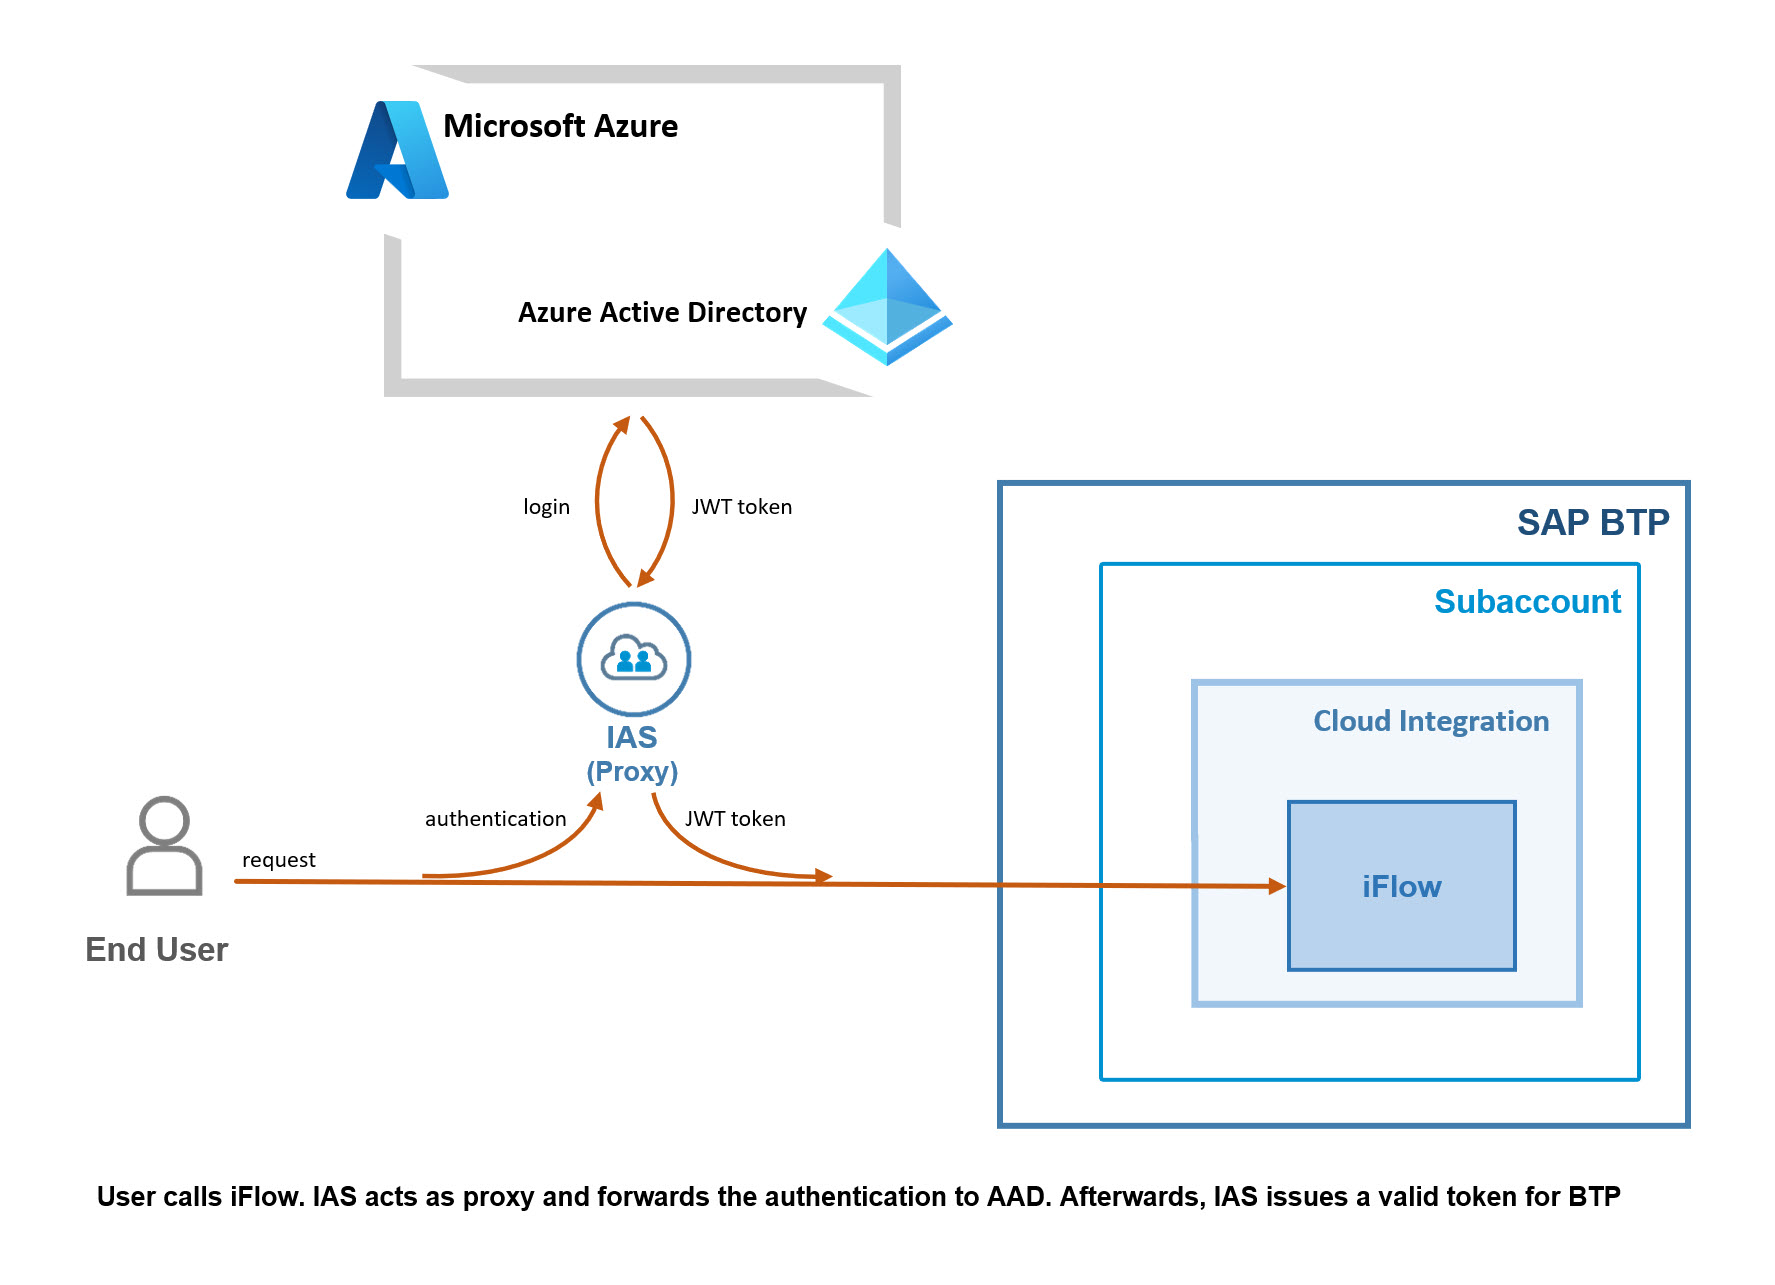
How does the flow look?
Let’s accompany the flow in detail:
The end user Franz initializes the request flow by opening the iFlow-URL in a browser.
In the selection screen (if BTP has more than one IdP), Franz chooses the IAS.
This IAS is configured to act as proxy (always forward, no conditions).
IAS forwards the authentication-request to the configured corporate IdP
In our example, we’re using Azure Active Directory.
As such, the login screen of AAD is displayed.
Franz enters his AAD-credentials.
As a result, AAD issues a token which is sent back to IAS.
IAS trusts AAD, so in turn, it issues a token, which is sent to BTP.
In BTP subaccount, the XSUAA is the central Authorization server.
XSUAA trusts IAS, so in turn, it issues a token which is sent to CPI.
CPI validates the token and checks if the required role (scope) is available.
Then access to iFlow is granted.
What about the “Password Credentials”??
Good observation. 👍
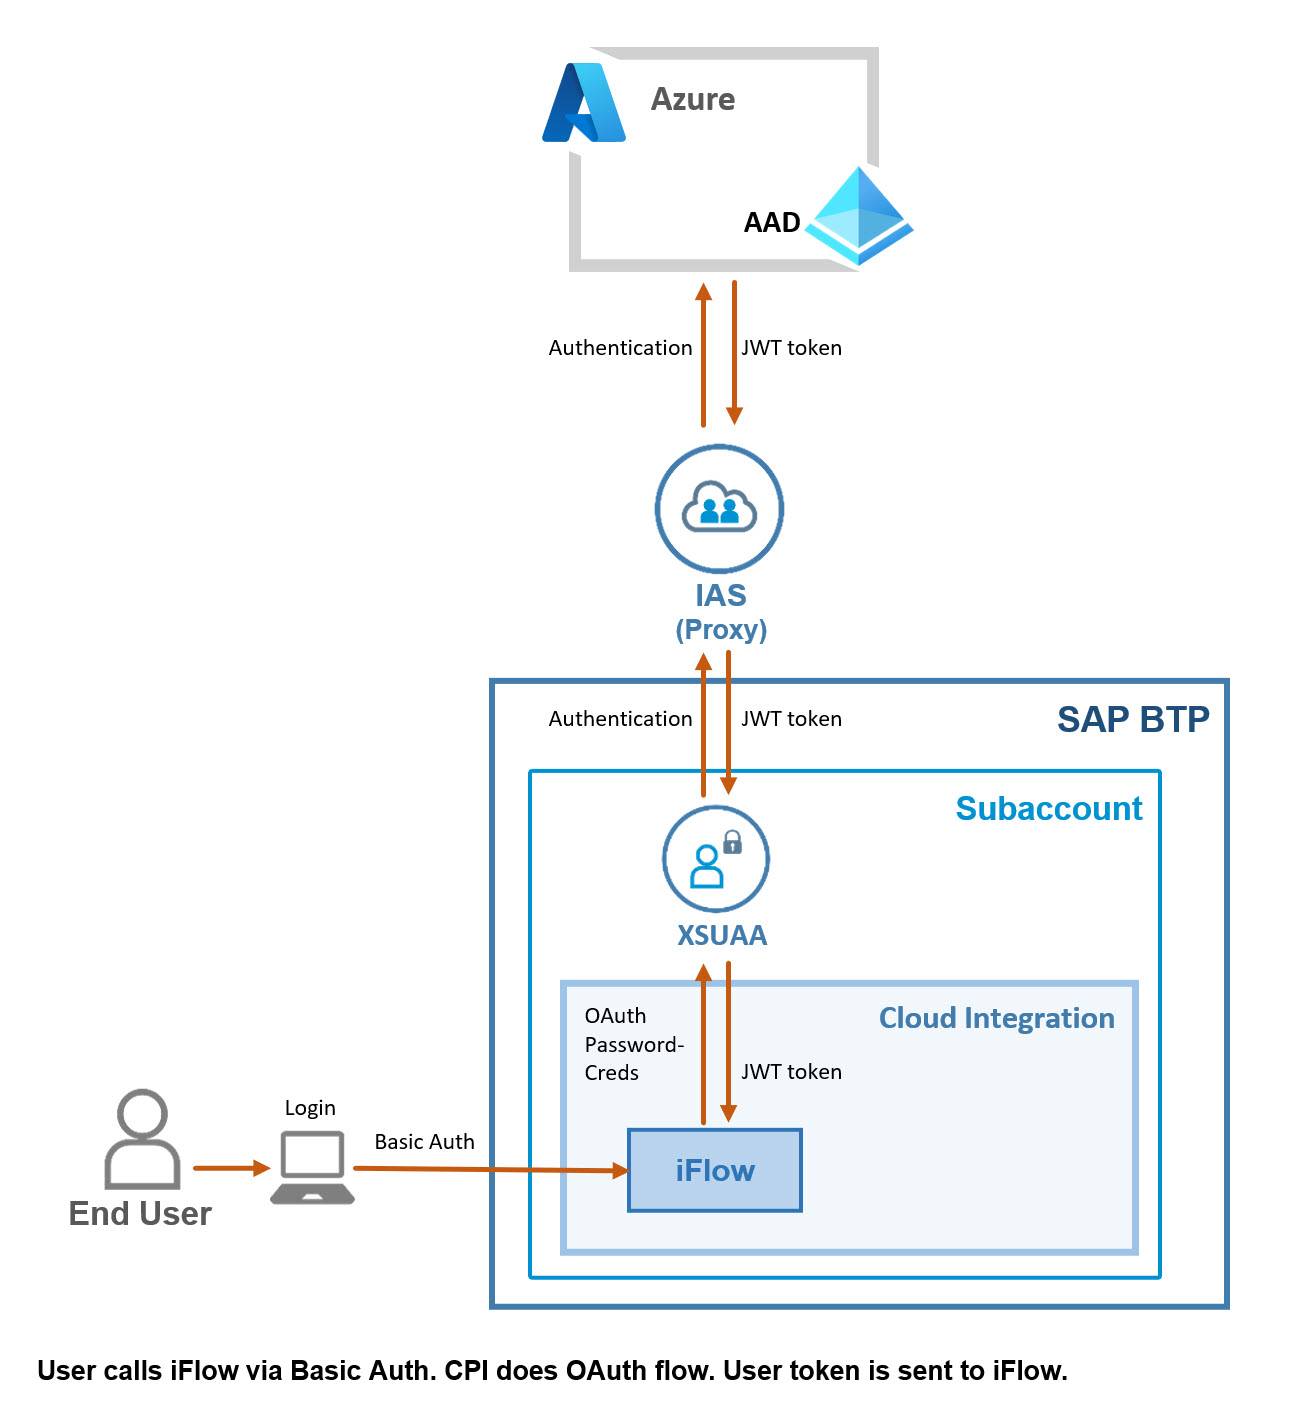
Above description is simplified and ignores the special CPI-support for basic authentication.
So let’s paint another diagram, showing the real flow:
Above diagram shows the flow which is executed under the hood:
Franz sends a GET-request to the iFlow and provides his credentials via basic authentication.
The CPI runtime extracts user/password and sends a token-request to the token-endpoint of the subaccount-XSUAA.
XSUAA delegates the authentication to the default IdP which is IAS.
IAS supports this OAuth-flow only if it is trusted via OIDC (using "Establish Trust" button).
IAS acts as proxy and forwards the authentication request to AAD.
. . . and so on . . . as described above.
Even more diagrams?
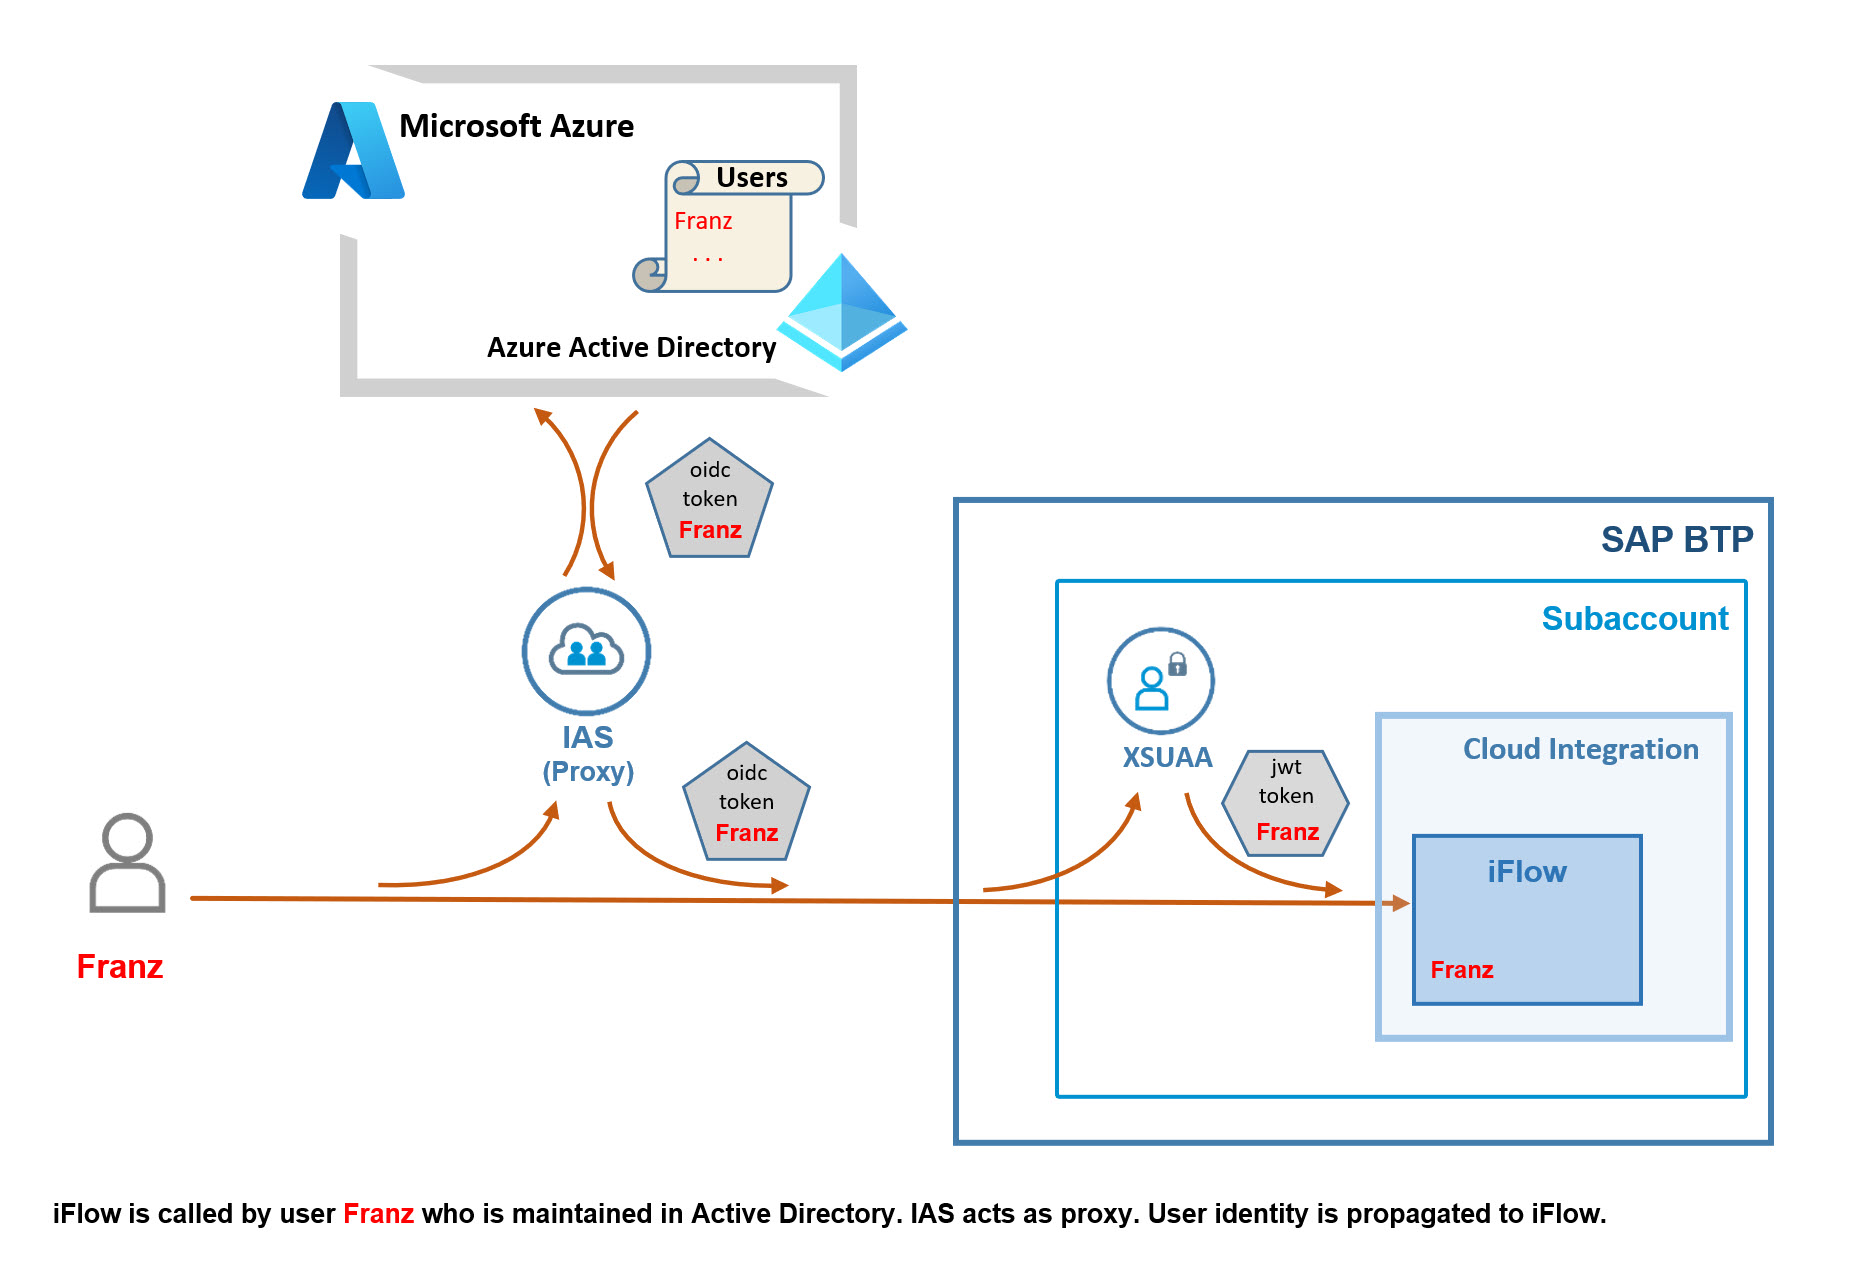
Below diagram is meant to illustrate the flow of the user-information, simplified:
We open a browser, invoke the iFlow endpoint and the browser displays a user-credentials-popup.
OK, so here we enter the user/pwd of Franz, who is an AAD-user – and AAD authenticates the user.
AAD issues a JWT-token which is used to exchange user-information in an OIDC-based Single-Sign-On scenario.
So I call it OIDC token (format is JWT, nevertheless).
It contains information about Franz, his famous name and mail and citiy, and so on (the semantic of an id_token, rather than access_token, in an SSO scenario).
And it contains also the info about assigned groups.
This is important.
IAS trusts the AAD, so it issues an own OIDC-token which is like a copy and carries all the info about Franz.
And also the info about groups.
Still important.
This token arrives at the XSUAA of our subaccount and XSUAA issues the “normal” JWT token that still contains the Franz-info.
And also the info about scopes.
Scopes? This is new.
Yes, and it is so important, that we should dedicate another diagram for it.
The authorization handling.
How does authorization work?
An important question, because we know that the iFlow endpoint is protected and requires a user role.
The requirement is solved with group assignment and role collection mapping.
Let’s discuss it in detail.
AAD
In AAD, we create a group with name FranzFriends and we add the user Franz to that group.
When AAD issues the OIDC-token, it will contain the info about Franz assignment to the FranzFriends group.
More concrete: it contains the ID of the group, but that’s OK.
IAS
In IAS we don’t have to do anything.
IAS issues an OIDC token which contains the same group information which it received.
BTP
Here we have the iFlow endpoint which requires a certain role, e.g. RoleForFranz.
This role has been created beforehand in CPI.
After role creation in CPI, the role has been generated in BTP under the hood (convenience).
As such, it can be assigned to a role collection.
So we create a Role Collection and assign the RoleForFranz.
The most relevant setting is configured here:
The role collection is mapped to the group FranzFriends (actually, we have to use the group ID).
BTP doesn’t know anything about AAD, so we choose the IAS (proxy) as origin for the group.
XSUAA
When XSUAA receives the OIDC token with the group id, it adds the (mapped) role collection and the assigned role (which wraps a scope) to the issued token.
CPI
When the iFlow receives the JWT token, it verifies that the required scope is available and allows access to the iFlow.
Done.
That’s how it works.
Summary
AAD: Create OAuth client
IAS: Create IdP using those credentials
BTP: Establish Trust with IAS and set IAS as default IdP
IAS: set AAD as default for authentication of BTP-subaccount.
CPI: Create User Role and protect the iFlow with it.
BTP: Create Role Collection and add CPI-role.
What’s next?
So now it is time to get our hands dirty and go through the configurations step by step.
The iFlow which we created in the preparation chapter is already impatiently waiting to be called.
We remember the above diagram which shows the trust relationship between AAD and IAS and BTP.
In this chapter we’re going to configure the trust between AAD and IAS, the left part:
To configure the trust, we need to do a few configurations at AAD and IAS.
Basically, at AAD, we create an OAuth client. To be used by IAS.
At IAS, we create an IdP which uses the credentials of this OAuth client.
So let’s start with AAD.
What is an OAuth client?
The OAuth spec defines an interaction between these 4 entities:
Resource Server
Contains data, like the photo of Franz
Resource Owner
Users like Franz, i.e. someone who carefully controls the usage of his photo.
OAuth Client
A web app that calls the Resource Server to display info and photos of users like Franz.
Authorization Server
The entity that knows users (can authenticate) and clients (gives credentials to registered clients), and manages authorization and issues JWT tokens to clients (keeps Franz password secret)
In the language of Azure AD:
We have to create an App Registration.
In the OAuth-speech:
We create an OAuth Client and register it at the Authorization Server.
Using the credentials of this registered OAuth client, a web app can fetch a JWT token from the Auth Server, on behalf of a user (Resource Owner).
This bearer token contains info about use and authorization and is used by the web app to access a Resource on the Resource Server.
In a mixed cacophonic talk:
In AAD, creating an app registration creates an OAuth client and registers it at AAD.
As such, the IAS (web app) can fetch a token from AAD, with user-login of e.g. Franz.
IAS uses this token is used to access information about the user Franz, for authentication.
I only understand English ☹️
With my simple words:
▶️ let's do it.
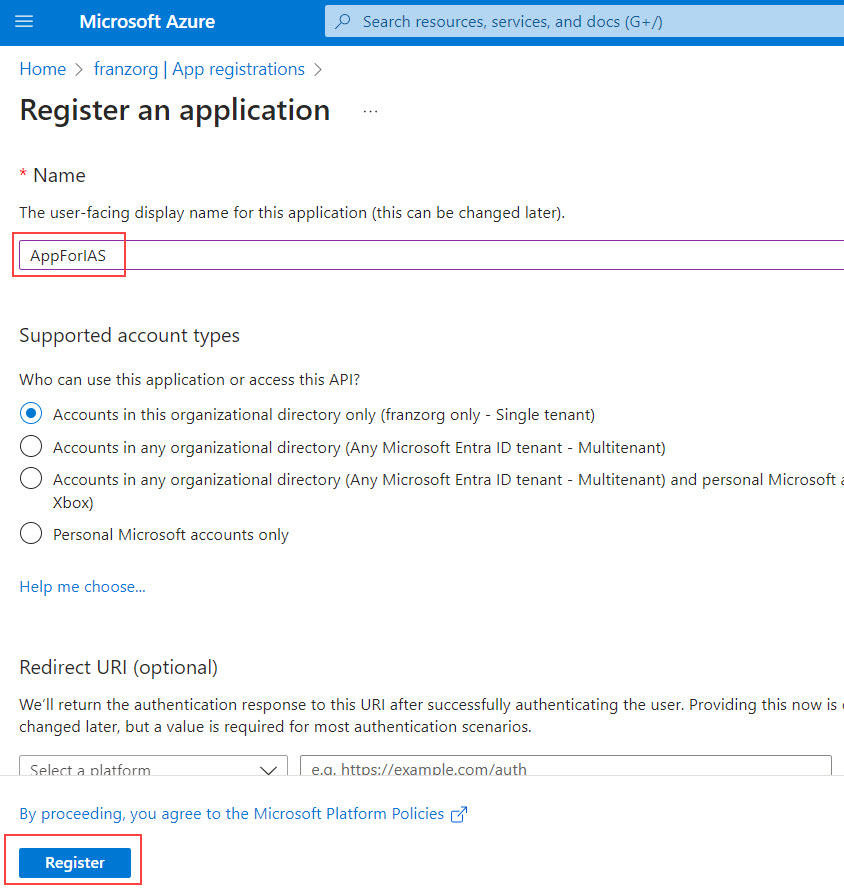
1.1.1. Create App registration
We go to Azure Portal -> Azure Active Directory -> App registrations
Press “New registration”.
🔸Name
Here we enter a name of our choice, e.g. AppForIAS
🔸Supported Account Types
We leave the default: Single tenant.
We ignore the rest and press “Register” to create the new App registration.
After creation, we can view the details on the overview.
At this point, we can already take a note of the client id.
Furthermore, we take a note of the discovery endpoint.
To do so, we click on “Endpoints” and copy the value of “OpenID Connect metadata document”.
The URL has the structure
login.microsoftonline.com/<tenantID>/.well-known/openid-configuration
At this point, we have an empty thus useless app registration.
Next steps are to make it useful.
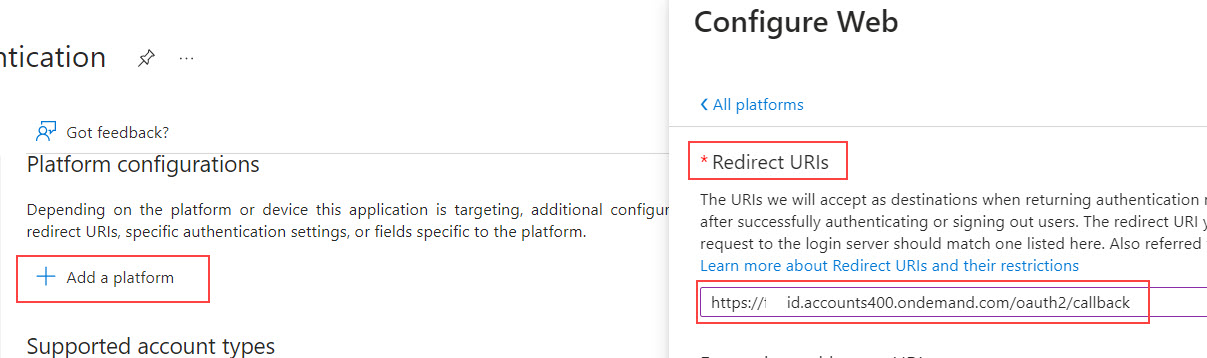
1.1.2. Configure App registration: Redirect URIs
Now we configure the Redirect URIs.
This is required because the IAS and AAD talk with each other via the OAuth flow called Authorization Code.
When this OAuth client is used to request a JWT token, then the Authorization Code flow is processed.
This requires that the AAD sends a “code” to the redirect URL of the client application.
This client application (called Relying Party in SSO scenarios) is represented by IAS, so IAS has to provide the redirect URL.
And I can promise you: it does.
The safe way of getting the exact redirect URI is to copy it from IAS, as described in section 1.2.2. below.
We can come back here after doing so.
For now, I just tell your the URL, because I know it.
How?
I'm good...
Hint
In my example, the Redirect URL looks like this:
https://ias.accounts400.ondemand.com/oauth2/callback
Note the 400
In your case it might look rather like this (replace "ias")
https://ias.accounts.ondemand.com/oauth2/callback
Ah, no 400
I suggest to add both redirect URIs, no prob, both are safe.
How to add?
Press "Authentication", then "Add a platform" and choose “Web”.
Then paste the first URL from above.
Confirm by pressing “Configure”.
Then press "Add URI" and add the second URI.
Press "Save".
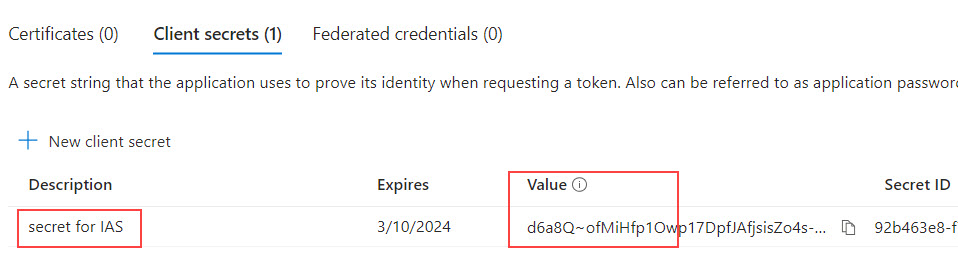
1.1.3. Configure App registration: Create Secret
We cannot use the OAuth client without credentials.
So we create the client secret now.
In the screen of our created App registration, we click on
Certificates & secrets -> New client secret
We enter any description and press “Add”.
Then we take a note of the value of the secret.
With these 3 notes we can configure the trust at IAS.
Note:
In the optional chapter 5 we can learn how to use certificate instead of client secret
1.1.4. Configure App registration: Token Config
Next step is to configure the token that is issued by AAD.
We can configure to add lot of user-info to the token, but we skip it for today.
What we really must have in the token: the group.
As described above, without group info, we won’t be able to get the required role for calling the iFlow.
We click on Token configuration and Add groups claim.
We choose the “Security groups” (or “All groups”) and press “Add”.
We're almost done.
1.1.5. Configure App registration: Permissions
Next step is required for technical user scenario – which is our scenario.
What is the background?
The OAuth framework is designed to establish a flow where a web application doesn’t have to maintain user credentials.
Instead the web app calls the authorization server in order to get access to a resource.
The web app is used by an end user (mostly Franz).
So the authorization server asks the user to login – then the authorization server will reply to the web app that it is ok.
If the requested resource is further protected and requires e.g. a viewPhotos-role, then the authorization server has to grant the role (scope) to the web app.
Now Franz might be surprised that the web app displays his selfies (note that Franz gets angry very easily...).
Therefore, to avoid angry users, the authorization server asks the user for permisison (“consent”), before granting the viewPhotos-role to the web app.
In our technical scenario, we don’t want this popup, because we don't have user interaction.
We have 2 options:
1. Login once with the AAD app registration, using browser, and confirm the popup (can be done with the validate-function in IAS, see below).,
Afterwards, the AAD will store the consent.
2. Let the admin centrally do the consent.
Afterwards, no user-consent is required at all.
In our scenario, option 2 is preferred.
While our new app registration is still selected, we click on API permissions and then on “Grant admin consent for <yourorg>”
That’s it for the AAD configuration.
Bye.
Next step:
While we're still configuring Trust between IAS and AAD, we're now going to connect IAS to AAD via the generated OAuth client.
1.2.1. Create Identity Provider
We don't really create an IdP, but we create an entry in IAS, that maintains configurations for external corporate IdPs, like AAD.
We open our IAS Admin Console at
https://ias.accounts400.ondemand.com/admin/#/idPProxies
or navigate via Identity Providers -> Corporate Identity Providers
and press “Create”.
🔸Name
We enter a name like e.g. “AAD_OIDC”.
🔸Type
We select “OpenID Connect Compliant”.
🔸Copy
This is meant for those users who already have a SAML-based AAD IdP in place.
What if...?
Yes, OIDC is probably more advanced than SAML and the scenario which we’re trying in this blog post works only for OIDC-based trust.
So yes, if you already have a SAML-based IdP configured, you should still continue following this tutorial.
Thank you.
At this point we've added an empty IdP proxy entry, which is useless if we don't configure it.
In the next section we'll need the 3 notes which we took in the previous chapter.
1.2.2. Configure Identity Provider
While the new identity provider is selected in the left pane, we click on “Open ID Connect Configuration”.
In the “Discovery URL” field, we paste the URL of the “OpenID Connect metadata document” which we stored in chapter 1.1.1.
It looks similar like this:
https://login.microsoftonline.com/111/v2.0/.well-known/openid-configuration
After pressing “Load”, the metadata is read from the URL and the values are filled in the page.
Any info that is required to connect to the AAD via OAuth/OIDC is available from that document.
Really everything?
No no, the credentials are missing.
Fortunately, we took a note in chapter 1.1.1.
So now we can fill the client id (also called “Application ID”) and the client secret in the page.
Note:
If you forgot to take a note of the secret and can't see it anymore: don't worry, just delete it and create a new one.
We can “Save” already.
Really?
Yes, better now, so we don’t forget to save.
Then we come back to this page as it contains 2 interesting buttons.
▶️ First interesting button: OIDC Callback URL
Optional: Verify Redirect URI in Azure.
When pressing this button, we copy the “Redirect URL” into our clipboard.
This is useful, because we intended to verify it in AAD.
Oh, I had forgotten already...
Fortunately, we have this blog post...
OK, we press this button.
Pressed.
Now go to Azure portal -> AAD -> App registrations -> AppForIAS -> Authentication
Check Web -> Redirect URIs
The URL in our clipboard must be contained in the list.
Good that we haven’t forgotten to review the redirect URL in the AAD.
Good...that we have tutorial😇
Because otherwise the next step would be less fun…
▶️ Second interesting button: Validate
Back at IAS
Back at “OpenID Connect Configuration” screen
The “Validate” button is already waiting for us.
Interesting functionality:
When we press the “Validate” button, the IAS will do something on his own
– but with our help.
The IAS will try to login to AAD, via OAuth flow “Authorization Code”.
As we know, this is an interactive user-centric process and it requires a redirect URL.
Good that we configured it in AAD…
So now we press “Validate”, and the confirm the popup.
We need to “pick an account”:
We can use any account, our admin user - or the new Franz, we created in the prep.
(take a look at the scratchpad for user/pwd)
So we press on "User another account"
Enter user as franz@iflowba.onmicrosoft.com and pwd and sign in
At this point we would be asked for User Consent - but we already did configure the admin consent.
So now the IAS is logging in to AAD on behalf of our user.
A token is fetched.
And?
Then the validation result is presented and hopefully it is mostly green.
Under “Step 2” -> Raw Response we can see the OIDC response which contains access_token and id_token.
We should make sure that the “groups” claim is available, otherwise we can forget about this scenario.
The group id which we have stored in our scratchpad should appear here, as the screenshot shows.
Now that the communication between AAD and IAS is working as expected, we can take care of properly configuring the communication between BTP and IAS.
In this chapter we're focusing on the right part of the diagram:
The good news here: Creating trust is done automatically with one button-click.
Afterwards, just few configuration settings required, such as setting IAS as default.
The bad news: currently, this has to be done via REST call.
As mentioned earlier, prerequisite for connecting an IAS to our BTP-subaccount:
We not only need to have access to an IAS tenant – but this tenant has to be assigned to our Global account.
Otherwise, it doesn't appear in the wizard below.
There's no manual way of establishing Trust based on OIDC.
The manual way of exchanging metadata works for SAML, but not OIDC - and we need OIDC for this scenario to work.
So if your IAS tenant doesn't appear in below list, you would have to open a support ticket.
2.1.1. Create Trust Configuration in BTP
Again, we're not really creating an IdP - but we're configuring Trust to an existing IdP for our subaccount, thus creating an IdP-entry in the list of trusted IdPs.
In our BTP Cockpit, we go to Subaccount -> Security -> Trust Configuration
Press on “Establish Trust”
In the course of the wizard, we can enter some names that will later appear in the Trust-Configuration-List and in the logon page, when application users (like Franz) open an application.
As a result, we’ve created a new “Identity Provider for Applications”, which means that it is used by “business users” or “end users”, means those users who access the apps that we deploy to BTP.
Who are we?
We are admins and developers, we access the “Platform” (for which a Platform-IdP can be configured as well)
The screenshot shows as well that it is not possible to configure a second IAS (via OIDC).
Also we should pay attention to the "Origin Key", by which the IdP is identified (we’ll need it below).
To edit more settings, we can click on the new Custom Identity Provider.
The setting “Available for User Logon” should be set to “Yes”.
Note:
Such trust configuration can be easily deleted after testing, or some names can be configured after definition.
Also, an existing trusted IdP can be temporarily disabled.
Or it can be marked as not available for user login.
Note:
Before deleting a Trust Configuration, make sure that it is not marked as default.
See next section.
Docu can be found here.
2.1.2. Configure Identity Provider: set IAS as default IdP
As mentioned in the introduction, the IAS needs to be configured as default IdP.
Reason (repeat):
When we call the iFlow with basic authentication, the CPI runtime performs the OAuth flow “password credentials” under the hood.
To fetch a JWT token, the XSUAA-tokenendpoint is used.
No user interaction.
No selection screen is presented to a user, where the user can choose the right IdP for authentication.
And if there's no selection, then the default is always used.
As a consequence, we have to make sure that the desired IdP is configured as default.
The desired IdP is our newly trusted IAS.
So that's what we need to do in this section 2.1.2.
Unfortunately, in september 2023, the “Trust Configuration” UI doesn’t offer functionality to maintain the default IdP (might come later, then this section is obsolete and replaced with a button click).
So we need to use the REST API which is offered by XSUAA.
The REST call will show the security settings.
The settings contain a property which contains the default IdP.
This is what we have to change.
Docu can be found here.
And here’s the reference blog post with a step-by-step description by kumar.amar.
The reference for the Trust Configuration API can be found here (not really needed) and this is the API which we need to change the security settings of a subaccount-XSUAA.
Can we start?
Detailed description: Amars blog post
List of linux commands: appendix2
VS Code REST plugin: appendix3
Short description: here
🔹1. Create instance of XSUAA service with service plan "apiaccess"
.cf cs xsuaa apiaccess apiXsuaa
🔹2. Create service key
.cf csk apiXsuaa sk
🔹3. View service key
.cf service-key apiXsuaa sk
Take a note of these properties:
.url
.clientid
.clientsecret
.apiurl
🔹4. Fetch JWT token
.GET https://<value_of_url>/oauth/token?grant_type=client_credentials
.Authorization: Basic
.user: <value_of_clientid>
.pwd: <value_of_clientsecret>
From the response, copy the value of the json-property access_token
🔹5. Optional: Call API to view security settings
.GET https://<value_of_apiurl>/sap/rest/authorization/v2/securitySettings
.Authorization: Bearer<blank><value_of_access_token>
In the response, there’s a top-level property called defaultIdp
The current value should be sap.default
We need to change it to sap.custom
🔹6. Call API to change the default
.PATCH https://<value_of_apiurl>/sap/rest/authorization/v2/securitySettings
.Content-Type: application/json
.Authorization: Bearer<blank><value_of_access_token>
.Request body: {"defaultIdp":"sap.custom"}
🔹7. Optional: Verify
After successful result we can repeat step 5 and view the changed setting
.GET https://<value_of_apiurl>/sap/rest/authorization/v2/securitySettings
.Authorization: Bearer<blank><value_of_access_token>
Result:
Note:
Whenever we like, we can switch back by sending a PATCH request with value
{"defaultIdp": "sap.default"}
What happened under the hood?
In BTP:
We’ve created an entry (and set as default) in the list of trusted Identity Providers.
Details can be seen via the following REST call:
.GET https://<value_of_apiurl>/sap/rest/identity-providers
.Authorization: Bearer<blank><same_access_token_as_before>
Result: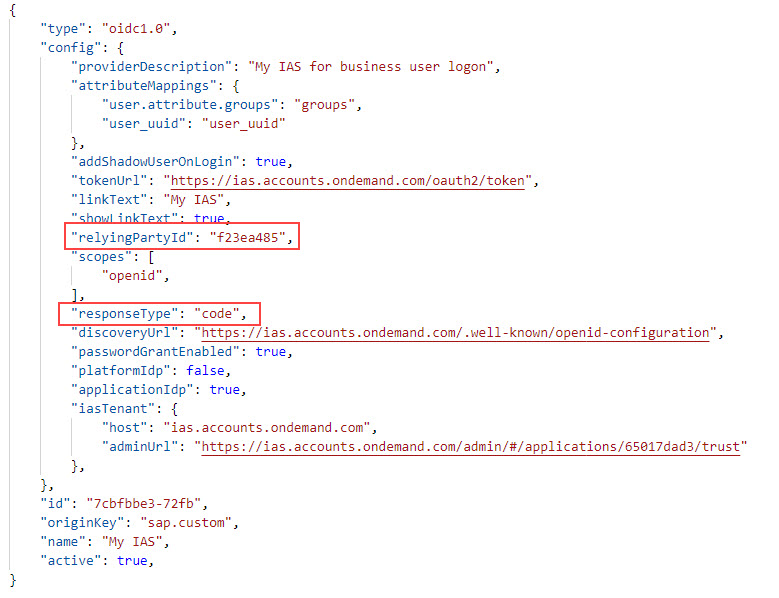
The above json document is shortened for better overview.
We can see all configuration details and the metadata URL.
We can see that the token Url is different from the one that is used by XSUAA.
We can see that authorization code is used
We can see the relying Party Id, which is nothing else but the clientid.
What client?
Oh.
Yes, true.
The communication between BTP (XSUAA) and IAS is based on OIDC, which means that an OAuth flow is executed.
To do so, an OAuth client must have been generated in IAS (same as we manually did in AAD).
Let's check it
To view the generated OAuth client, we go to IAS.
The URL can be taken from above snippet:
In my example
https://ias.accounts.ondemand.com/admin/#/applications/65017dad3
But let’s navigate:
IAS->Applications & Resources -> Applications
Find the newly generated application which has the name:
"XSUAA_Subaccount"
Where “Subaccount” represents our subaccount name.
This is the OAuth client that was generated during “Establish Trust”.
We may compare with AAD:
In IAS it is listed as “Application”, while in AAD it was called “App registration”.
In fact, an "application" represents an OAuth client that is registered at IAS, the "Authorization Server".
It is time for one more diagram:
It shows the configurations for the trust relationship between IAS and BTP.
The previous section was dedicated to the right side (BTP).
Now let’s have a look at the left side, the generated OAuth client for the subaccount.
2.2.1. Optional: View OAuth Client Configuration
We click on “XSUAA_<Subaccount>” to view some configurations.
Optional: OpenID Connect config
We click on Trust->Single Sign-On -> OpenID Connect Configuration, just for curiosity.
We can see that the Redirect URL has been automatically inserted and points to the XSUAA-tenant of the subaccount:
Nothing to do here.
Optional: Subject Name Identifier
We click on Trust->Single Sign-On -> Subject Name Identifier, just to ensure that "Email" is selected as per default.
Nothing to do.
Optional: Assertion Attributes
We click on Trust->Single Sign-On -> Assertion Attributes
Nothing to do.
Even more: these settings are completely ignored in our OIDC-based scenario.
The IAS acts as proxy and doesn't care about attributes.
It just forwards.
Means, it creates a new token, but completely based on the received token
Optional: Client Authentication
We click on Trust->Application APIs -> Client Authentication
Just to see that a "client ID" and a "Secret" have been generated automatically:
We can see that in fact, the "client ID" is the same as the "relyingPartyId" which was returned by the API call.
2.2.2. Mandatory. IAS: set AAD as target for Authentication
Coming to the interesting section:
IAS -> Applications
XSUAA_<Subaccount> -> Trust -> Conditional Authentication -> Conditional Authentication
Here we decide what to do with authentication requests.
The normal path would be:
BTP application requires user login
BTP (subaccount) is connected to IAS.
IAS acts as Identity Provider.
Thus: when a user accesses the BTP application, then the IAS is asked to authenticate the user.
Means that the user must be maintained in the IAS.
Which is obvious, if IAS is used as Identity Provider.
But…….
In our scenario, we want to maintain the users in AAD and we want IAS to act as proxy.
Yesss.
So now it is time to set IAS as proxy and AAD as IdP.
In the section “Default Authenticating Identity Provider” we choose the AAD IdP which we defined in chapter 1.2.1
Then press “Save”
That's all?
Yes, that's it already.
OK, but what have we done?
Our setting has the consequence that ALL authenticating users are forwarded to AAD.
This implies that users which are maintained in IAS cannot login to BTP applications of this subaccount.
Only AAD users can login to BTP apps deployed to this subaccount.
This is not flexible, but more simple and ok for our scenario.
See docu.
But what if...
But if you want to use multiple Identity Providers and IAS itself too, then this would be truly conditional authentication.
And...
And it is optional for this tutorial.
The documentation can be found at this path:
IAS-> Operation Guide -> Configuring Applications -> Authenticating IdP -> Choose Default
Little summary
We’re done with configuring trust between AAD-IAS-BTP
In AAD we created an OAuth client
In IAS we created an IdP for AAD
In BTP we configured trust for IAS
In IAS we set AAD for authentication
During the course of this tutorial we've been jumping around, between BTP, AAD, IAS, CPI.
Now it is time to go to BTP cockpit again.
After establishing trust and configuring IAS as proxy, we’re already enabled to deploy an application to BTP, and the app could be accessed by AAD users.-
There’s only one little step missing:
Authorization
Tedious, again and again tedious...😒
Yes, every application is protected with OAuth and requires a scope.
Question
How to get the scope into the JWT token, if user is maintained in AAD❓
Answer:
Role Collection Mapping 📢
Yeah 💰
That was easy
It works even for users of AAD?
Yes.
Through IAS.
Some explanation?
In BTP, an XSUAA-based application is protected with OAuth and it defines and requires a “scope”.
Example could be a “ReadCustomerPrivateNumber-Scope”
Scopes are wrapped by roles.
CPI does that automatically, when we create a “User Role” in the dashboard.
(see my little chapter about roles.)
In the BTP cockpit, an admin can add multiple roles into a “Role Collection”.
Such a role collection can be assigned to users.
Such that these users are allowed to access the BTP-app and display customer private numbers, for instance.
However, it might be too much effort to assign thousands of single users.
Therefore, we can define generic assignment:
e.g. all users who belong to a certain user group, should get this role collection.
This is called “Role Collection Mapping”
What about AAD?
Usually, when a new user is created in a corporate identity provider, then it is also added to one or more user groups.
This allows to assign a role to a user who is not known to BTP (XSUAA).
So we can look at the diagram again, to illustrate above explanation:
How to do it step-by-step?
In BTP cockpit, we go to Security -> Role Collections
Create a new role collection with any name.
Press "Edit".
We add the role which we created in the preparation.
In the “User Groups” section, we select the trusted IAS from the drop down.
In the "Name" field, we enter the ID of the AAD group (we can find it in our scratchpad).
Save.
Can this be correct?
It looks strange:
We select the IAS, but enter a group which does not exist in IAS.
It exists in AAD.
However, it looks less strange if we think about the flow:
Upon user logon, AAD issues an id token which contains the user info and the assigned groups (because we configured it).
In our scenario, the groups info contains the group id, as generated in AAD.
IAS receives the token and issues a new one, which contains the same groups-info.
So that’s why we can enter the user group as if it would exist in IAS.
IAS is a transparent proxy.
Another view?
To view all role collection mappings of our trusted IAS, we can go to
Security -> Trust Configuration -> click IAS -> Role Collection Mappings
For what purpose?
The interesting learning here is:
Actually, the role collection mapping is nothing than a special attribute mapping.
We’re done with all configurations and can now run the scenario.
Finally!!!
Running the scenario is nothing than calling our iFlow in a browser.
The interesting thing is of course that we can use an AAD-user.
In my example, the iFlow endpoint URL looks like this:
https://subdomain.it-rt.cfapps.eu12.hana.ondemand.com/http/franz
After running it in the browser (client certificate disabled), we get a user-credentials popup.
We enter user and password of the user which we’ve created or configured in the preparation.
As a result, we get the message body which we composed in the iFlow in preparation.
We're happy that it is a success-response and we can also see the decoded content of the JWT token that was finally received in CPI.
We know it was a looong journey...🐪
What's so special about browser that we need such a long blog?
The point is not from where we call the endpoint.
The point is that we do basic auth with Franz.
Alternatively, we could deploy a simple app to Azure and call the endpoint from that app.
But it makes no difference, because at the end it will be the same basic-auth-request.
The above description of using clientid / clientsecret for configuring the trust between IAS and AAD seems more intuitive and common, for better understanding.
To configure trust with a certificate, we proceed as described below:
5.1. IAS: Get the IAS-Certificate
First of all, we need to get a hold of the IAS-certificate, containing the public key.
In IAS, we go to
Applications&Resources -> Tenant Settings -> Single Sign-On -> OpenID Connect Configuration
At “Signing Certificates”, we can see the active certificate by pressing the spectacles button:
We copy the content of the certificate into our clipboard
We create a file with any name, e.g. ias.crt
(can be any file extension, but this one is included in filter of upload dialog below)
We paste the clipboard content into it.
Save.
We can see that the certificate contains the public key of our IAS.
We can see the host name of our IAS in the CN attribute (Common Name) of the Subject DN (distinguished name).
5.2. AAD: Create App registration
At Azure Active Directory / Entra ID, we create an App registration, as explained above.
Then go to “Certificates & Secrets” -> Certificates -> Upload
We choose our ias.crt and upload it
(note that the prefix/suffix are not required here)
5.3. IAS: Create IDP
When creating an Identity Provider in IAS, as described above, we choose “Private key JWT” and enter the “Application (client) ID from the Azure App registration overview.
Then we can press “Validate” and see that it works fine.
If the basic authentication flow via CPI doesn’t work and an error with status 401 is displayed, we have hard time to find the problem.
* One reason could be that the test user in AAD has not yet changed the initial password.
* One more possible reason:
It might be required for the test-user to provide the consent against the AAD-app-registration.
To provide consent, access to the app must be requested in an interactive way.
The easiest workaround would be to use the “validate” functionality with the test user.
In IAS go to
Identity Providers -> Corporate IdPs -> AAD_OIDC -> Open ID Connect Config -> Validate
Then use the account of the test user for login
* Everything seems fine but CPI doesn't allow, throws 403
For troubleshooting, it would make sense to introspect the JWT token that is arriving at CPI, to see if the aud and scope claims are properly set. As we cannot hook in CPI, the only chance is to simulate what CPI is doing: send a token-request to XSUAA, with "password" credentials flow, to fetch a JWT token, then decode it (e.g. at www.jwt.io) and check if it contains the CPI-User-Role as scope.
* After changes:
It might be helpful to redeploy the iFlow, in order to delete the cache.
View Troubleshooting Logs in IAS
The IAS provides a useful feature for troubleshooting which allows us to view the (relevant) info of OIDC tokens.
We can e.g. see if the info about group assignment is contained in the token that was sent from AAD to IAS.
Troubleshooting logs can be accessed from the admin landing page -> Monitoring & Reporting -> Troubleshooting Logs
Or the direct link:
https://ias.accounts400.ondemand.com/admin/#/troubleshootingLogs
To view existing log entries we adapt the filter:
- Change Severity to INFO
- Adapt date if necessary
press Go
To further refine the result list:
- we type “issueJwt” in the Search field
press Enter
It might be necessary to adapt the time box, as the JWT token is issued only at first request
We're interested i n2 actions:
issueJwtToken
receiveJwtToken
Once we have an entry, we can click on “Log Details”.
Explanation:
🔸objectType
The type is not an oauth-client, but openIdClient, sounds logical.
🔸objectId
is the client id of our identity service instance. With other words, it is the client id of the “application” entry in IAS
🔸workflow
OIDC is used for authentication and it adds a few security relevant steps during login.
🔸userIdentifier
is the user_uuid.
🔸grant_type
As we know, OIDC relies on OAuth as authorization framework and the OAuth flow used during login is the well-know “Authorization Code” flow which is also used by XSUAA-based logins.
🔸serviceProvider
is the guid of the instance of identity service. With other words, it is the second name of the “application” entry in the IAS.
For the sake of curiosity:
If we want to manually fetch a JWT token from AAD, we can do an almost normal token request.
Only one special parameter is required: scope
Example 1: fetch access token
The value must be: <clientID>, followed by /. and the word default
The token endpoint can be easily found at the overview page of the App registration:
Here we can click on “Endpoints” on the top of the page, then copy the value of the field “OAuth 2.0 token endpoint (v2)”
So the request would look similar like this:
POST https://login.microsoftonline.com/fc3ab758/oauth2/v2.0/token
Headers:
'Content-Type': 'application/x-www-form-urlencoded'
Authorization: Basic clientid:secret
Body: grant_type=password&response_type=token&client_id=aaa&username=franz&password=123&scope=aaa/.default
Curl example:
The result is a JSON string containing the access token:
Example 2: fetch OIDC token
We fire the same request, containing real user name and password.
The difference is that this time we send the scope openid, indicating that we want OIDC token as response:
The result contains an access token but also an id token:
Both tokens can be decoded to view the claims, as usual.
The above described scenario works only if Trust with AAD (or other Identity Provider) is configured via OIDC.
For existing scenarios that are based on SAML, the following approach can be considered:
Instead of doing hard break and switch from SAML to OIDC, we can follow a 2-step approach:
🔹1. Create a second Identity Provider in IAS and choose OIDC as protocol.
🔹2. Go to “Applications” and switch the configured IdP at “Conditional Authentication”
This is described in the documentation.
As mentioned above, we configured IAS as proxy and we specified that ALL requests should be forwarded to AAD for authentication.
This was done in the IAS-screen "Conditional Authentication" although it is not really "conditional", because we don't specify any conditions.
However, conditions can be specified via "rules"
If we want to use multiple Identity Providers and IAS itself too, then we can define authentication rules.
This is what we would call truly conditional authentication.
Such that e.g. IAS users can be authenticated by IAS and AAD-users are forwarded to AAD for login, etc
See docu.
See vinayak.adkoli essential blog post.
In this tutorial we’ve learned how to configure AAD, IAS and BTP for enabling a scenario where an iFlow is called via Basic Authentication with user from AAD.
So we can for instance send a GET request with a browser and enter username and password of a real user who is maintained in AAD.
The CPI runtime converts the basic auth request to OAuth flow “Password Credentials”, which is sent to the XSUAA token endpoint.
XSUAA delegates authentication to the connected IAS which in turn acts as proxy and forwards the authentication to AAD.
In this scenario, IAS acts as proxy and delegates authentication to AAD
Important to know that the trust between IAS and AAD must be based on OIDC.
We’ve learned that IAS must be configured as defaultIdP, otherwise the OAuth flow would not be delegated to IAS.
We’ve added the user to a group, in AAD, such that this group can be configured in BTP to a role collection which allows to add a role to the AAD-user.
AS such, finally, the iFlow, which is protected with that role, can be successfully invoked.
Happy End.

The basic configuration steps:
1. Trust: IAS-AAD
AAD: Create OAuth Client for IAS
add groups claim
IAS: Create IDP based on OIDC
Enter clientid/secret and discovery URL from AAD
copy redirect url, then enter in AAD (type "web")
2. Trust: BTP-IAS
BTP: Establish Trust
IAS: Configure AAD in "Conditional Authentication" for generated XSUAA_app
XSUAA: set IAS as defaultIdp
Create instance of xsuaa with plan apiaccess, then create service key
Fetch JWT token
Send PATCH request to
<apiurl>/sap/rest/authorization/v2/securitySettings
Body: {"defaultIdp": "sap.custom"}
for reverting: {"defaultIdp": "sap.default"}
3. Authorization config in BTP
Create role collection with iFlow-Role
Role collection mapping: choose IAS and enter group-ID of AAD-group
SAP Help Portal
CPI:
Basic Authentication for Inbound Scenario
SAP Cloud Identity Services - Identity Authentication:
Entry in Discovery Center
IAS Landing Page
IAS User Management
IAS: View Troubleshooting Logs, to view OIDC tokens
IAS: logging OICD tokens
IAS: getting a tenant
Establish trust
IAS: Corporate Identity Providers
Configure IdP, view the redirect URL
Configure IAS as proxy
OIDC support in IAS.
Blog Posts
marko.sommerpopular blog posts: here and there.
vinayak.adkoli essential blog post
kumar.amar famous blog post
My blog post about XSUAA user attributes.
Blog about user roles and attributes and accessing JWT in script
Security Glossary Blog
Other
Azure AAD main entry
Useful Azure CLI commands
How OpenID Connect works
Spec for OIDC
JWT specification: rfc7519
IANA JWT Claims.
Cloud Foundry UAA docu: introspect token
Cloud Foundry CLI Installation guide
This script can be used for Visual Studio Code with installed REST client plugin.
Copy script into a file with file extension .http
The iFlow endpoints are protected with OAuth, however, however, CPI supports Basic Authentication as well.
In this blog post, we learn how to set up a scenario where users from an external Identity Provider, like Microsoft Azure Acticve Directory, should be able to call an iFlow with their own user credentials.
Technologies covered:
SAP Business Technology Platform (BTP), Cloud Foundry
SAP Cloud Integration (CPI)
Identity Authentication Service (IAS)
XSUAA
OAuth / OIDC
Microsoft Azure Active Directory (AAD)
Quicklinks:
Quick Guide
Sample Code
This blog post is dedicated to Franz
Content
0.1. Prerequisites
0.2. Preparation
0.2.1. AAD: Create Tenant, Group, User
0.2.2. CPI: Create Role and iFlow
0.3. Introduction:
1. Configure Trust: IAS - AAD
1.1. AAD: Create OAuth Client for IAS
1.2. IAS: Create and Configure Identity Provider
2. Configure Trust: BTP - IAS
2.1. BTP: Configure Trust between BTP and IAS
2.2. IAS: Forward Authentication to AAD
3. Configure Authorization in BTP
4. Run the scenario
5. Optional: Certificate-based Trust between IAS and AAD
6. Optional: Troubleshooting
7. Optional: Call AAD directly
8. Optional: Existing Scenarios
9. Optional: Conditional Authentication
Appendix: Sample Application Code
0.1. Prerequisites
- Access to BTP and admin permissions in subaccount
- Access to Microsoft Azure and admin permission for Azure Active Directory.
Can use free trial.
However, this tutorial should also be applicable for any other Identity Provider that supports OIDC. - Access to a Cloud Integration tenant.
- Access to IAS tenant
This IAS must be assigned to the BTP Global account
0.2. Preparation
This blog post focuses on configuring AAD, IAS, BTP to enable the Basic-Authentication-Scenario for iFlows.
So let's only briefly go through 2 preparation steps in AAD and in CPI.
0.2.1. AAD: Create Tenant, User Group and User
To test the scenario, it makes sense to create a new tenant in AAD.
Create Tenant
Login to azure portal at https://portal.azure.com with admin user.
Go to Azure Active Directory (or Entra ID, new name).
Press "Manage Tenants" -> Create
🔸Type Entry ID
🔸Configuration of your choice, e.g. ifloworg and iflowba (basic auth)
After creation, switch to the new tenant by pressing your avatar in the upper right corner, then "Switch Directory".
Create Group
In our scenario, we need a user group, for authorizing the user at the iFlow endpoint.
We go back to AAD home, then choose "Groups" on the left navigation pane, then "Create".
🔸Type: Security
🔸Name: IflowScenarioGroup
After creation, we take a note of the Group ID (object id), as we will need it later.

Create User and add to Group
Now we create our technical user for testing.
AAD tenant home -> Users -> New user -> Create new user
🔸Name: franz
🔸Next: Properties: can enter some properties for future testing the identity flow.
🔸Next: Assignments: add the user to the newly created group
🔸Review: Take a note of the full principal name (franz@iflowba.onmicrosoft.com) and the generated initial password.
Change Initial Password
Testing experience with this new user would be disappointing, because tests would always fail for unknown reason (we test technical flow without user interaction).
The unknown reason would be the requirement of changing initial password.
As such, we have to do it now.
With a different browser, we login at https://microsoft365.com and enter our new user / initial password (good that we stored the info in our scratchpad...)
We change the password and log off.
0.2.2. CPI: Create User Role and iFLow
We create a very simple iFlow that can be called via GET request from browser, with basic authentication, and returns some info that is suitable for proving that the scenario is working.
The iFlow should be protected by a user role.
Create User Role
We login to our CPI tenant and go to Monitor Artifacts -> Manage Security -> User Roles
We “Add” a role with name "RoleForFranz".
BTW, I recommend this little chapter for understanding Roles in BTP.
Create iFlow
We create an integration flow with "HTTPS sender adapter" and Groovy Script step.
When we call the endpoint from browser, we’ll receive the response as computed by the script.

The configuration of the HTTPS adapter:
🔸 Address
set to /franz
🔸 Authorization
Set to "User Role"
🔸 User Role
We press the “Select” button and choose "RoleForFranz"
🔸 CSRF
Checkbox disabled.
The Groovy script step:
We use the script to access the authorization header and read the incoming JWT token.
We parse and decode and fill the message body with it.
Like that, we'll be able to read the content of the JWT token in the browser, when we test the scenario.
The full script can be copied from the appendix.
0.3. Introduction
An iFlow with HTTPS Sender adapter can be called via HTTP.
It is protected with OAuth, so we need to fetch a JWT token, then send it when calling the endpoint.
To fetch the JWT token, we need the credentials (in service key), these are clientid and secret.
CPI supports calling an iFlow endpoint with basic authentication, by sending the clientid and secret.
In addition, CPI supports basic authentication with name / password of a real user.
A real user is required whenever we need a user context for dealing with user data (e.g. from a backend connected to the iFlow).
Real user?!?!?! 😮
Of course, it is not recommended sending real user / pwd via basic auth.
Basic Authentication is useful mostly for prototyping or test scenarios.
A nice advantage is that you can invoke the endpoint of an iFlow with a browser, which will display a user-credentials popup and we can just enter user credentials and do not need to fetch a jwt token.
However, this does not mean that the iFlow can be configured to use Basic Auth as alternative to OAuth.
The iFlow is always protected with OAuth.
So how does it work?
The CPI runtime does the OAuth flow for us, under the hood.
If we send a Basic Authentication request this means that the request contains a header as follows:
name: "Authorization"
value: "Basic" ➕ <blank> ➕ <Base64-encoded username/password>

Whenever CPI receives such a request, it will itself fetch a JWT token, via OAuth flow “Resource Owner Password Credentials”.
To do so, CPI extracts the user and the password from the basic auth request.
CPI itself calls the XSUAA associated with the subaccount, for fetching the JWT token.
That’s the same what we would have done for fetching a token.
Good.
Ummm - good... but with limitations.
It works fine for users that are maintained in the SAP-internal Identity Provider which comes with every BTP subaccount, the “SAP ID Service”:

And what about IAS?
Sure, in productive scenarios, users are not maintained in the “SAP ID Service”, but in an Identity Provider like IAS.
The IAS is then configured as trusted Identity Provider in the BTP subaccount.
In such cases, when the users login to an application in this subaccount, they first get a selection screen where they have to decide which Identity Provider to use for login.
If the wrong IdP is selected, then obviously the user/pwd is rejected, because unknown.
Oh-Oh 😟
Yes, this is a hurdle:
When CPI runtime does the flow programmatically, then it cannot choose the right IdP.
CPI doesn’t know the IdP.
Solution?
The central subaccount-XSUAA has the knowledge of a defauld IdP.
To fix the problem, we can change the default IDP of the subaccount.
Side-Effects?
This doesn’t break user-facing scenarios, the selection screen will be always displayed.
However, changing the default can break existing programmatic scenarios, test setups where password credentials are used already.
What’s next?
Now that we’ve solved the issue about enabling IAS-users to call an iFlow with Basc Authentication, we can go one step further:
What about users of any other external corporate Identity Provider?
For instance, Microsoft Azure Active Directory, or Okta, etc
The IAS has a built-in feature for supporting such scenarios:
IAS can act as “proxy”.
In such a scenario, IAS remains connected to the BTP-subaccount and forwards authentication requests to the external IdP.
This means that an application in BTP can be accessed by users that are maintained in AAD.
With other words:
We deploy an application to BTP, the app has no clue who will use it.
Franz (an Azure AD-user) opens the app and the app shows the IDP-selection screen, where the “SAP ID Service” and the “IAS” is displayed.
Franz chooses IAS.
Now the user-credentials screen of AAD is displayed and Franz can enter his credentials of his AAD account.
And it works.
Great!
The IAS acted as dummy proxy and the AAD processed the authentication.
Anything next?
Nothing else, this is our scenario.
Forgot everything
Let’s repeat: 3 possible scenarios of user calling iFlow:
🔹Subaccount-User calls iFlow
🔹IAS-user calls iFlow
🔹AAD-user calls iFlow
How is the proxy setup realized?
Basically, we need to configure trust between AAD and IAS and BTP.
However, there are 2 important things to note:
🔹Trust must be based on OIDC.
🔹IAS must be flagged as “default IdP”
More about OIDC support in IAS.

Below chapters will go through the configurations in detail.
How does the flow look?
Let’s accompany the flow in detail:
The end user Franz initializes the request flow by opening the iFlow-URL in a browser.
In the selection screen (if BTP has more than one IdP), Franz chooses the IAS.
This IAS is configured to act as proxy (always forward, no conditions).
IAS forwards the authentication-request to the configured corporate IdP
In our example, we’re using Azure Active Directory.
As such, the login screen of AAD is displayed.
Franz enters his AAD-credentials.
As a result, AAD issues a token which is sent back to IAS.
IAS trusts AAD, so in turn, it issues a token, which is sent to BTP.
In BTP subaccount, the XSUAA is the central Authorization server.
XSUAA trusts IAS, so in turn, it issues a token which is sent to CPI.
CPI validates the token and checks if the required role (scope) is available.
Then access to iFlow is granted.

What about the “Password Credentials”??
Good observation. 👍
Above description is simplified and ignores the special CPI-support for basic authentication.
So let’s paint another diagram, showing the real flow:
Above diagram shows the flow which is executed under the hood:
Franz sends a GET-request to the iFlow and provides his credentials via basic authentication.
The CPI runtime extracts user/password and sends a token-request to the token-endpoint of the subaccount-XSUAA.
XSUAA delegates the authentication to the default IdP which is IAS.
IAS supports this OAuth-flow only if it is trusted via OIDC (using "Establish Trust" button).
IAS acts as proxy and forwards the authentication request to AAD.
. . . and so on . . . as described above.
Even more diagrams?
Below diagram is meant to illustrate the flow of the user-information, simplified:
We open a browser, invoke the iFlow endpoint and the browser displays a user-credentials-popup.
OK, so here we enter the user/pwd of Franz, who is an AAD-user – and AAD authenticates the user.
AAD issues a JWT-token which is used to exchange user-information in an OIDC-based Single-Sign-On scenario.
So I call it OIDC token (format is JWT, nevertheless).
It contains information about Franz, his famous name and mail and citiy, and so on (the semantic of an id_token, rather than access_token, in an SSO scenario).
And it contains also the info about assigned groups.
This is important.
IAS trusts the AAD, so it issues an own OIDC-token which is like a copy and carries all the info about Franz.
And also the info about groups.
Still important.
This token arrives at the XSUAA of our subaccount and XSUAA issues the “normal” JWT token that still contains the Franz-info.
And also the info about scopes.
Scopes? This is new.
Yes, and it is so important, that we should dedicate another diagram for it.
The authorization handling.
How does authorization work?
An important question, because we know that the iFlow endpoint is protected and requires a user role.
The requirement is solved with group assignment and role collection mapping.

Let’s discuss it in detail.
AAD
In AAD, we create a group with name FranzFriends and we add the user Franz to that group.
When AAD issues the OIDC-token, it will contain the info about Franz assignment to the FranzFriends group.
More concrete: it contains the ID of the group, but that’s OK.
IAS
In IAS we don’t have to do anything.
IAS issues an OIDC token which contains the same group information which it received.
BTP
Here we have the iFlow endpoint which requires a certain role, e.g. RoleForFranz.
This role has been created beforehand in CPI.
After role creation in CPI, the role has been generated in BTP under the hood (convenience).
As such, it can be assigned to a role collection.
So we create a Role Collection and assign the RoleForFranz.
The most relevant setting is configured here:
The role collection is mapped to the group FranzFriends (actually, we have to use the group ID).
BTP doesn’t know anything about AAD, so we choose the IAS (proxy) as origin for the group.
XSUAA
When XSUAA receives the OIDC token with the group id, it adds the (mapped) role collection and the assigned role (which wraps a scope) to the issued token.
CPI
When the iFlow receives the JWT token, it verifies that the required scope is available and allows access to the iFlow.
Done.
That’s how it works.
Summary
AAD: Create OAuth client
IAS: Create IdP using those credentials
BTP: Establish Trust with IAS and set IAS as default IdP
IAS: set AAD as default for authentication of BTP-subaccount.
CPI: Create User Role and protect the iFlow with it.
BTP: Create Role Collection and add CPI-role.
What’s next?
So now it is time to get our hands dirty and go through the configurations step by step.
The iFlow which we created in the preparation chapter is already impatiently waiting to be called.
1. Configure Trust: IAS-AAD
We remember the above diagram which shows the trust relationship between AAD and IAS and BTP.
In this chapter we’re going to configure the trust between AAD and IAS, the left part:
To configure the trust, we need to do a few configurations at AAD and IAS.
Basically, at AAD, we create an OAuth client. To be used by IAS.
At IAS, we create an IdP which uses the credentials of this OAuth client.
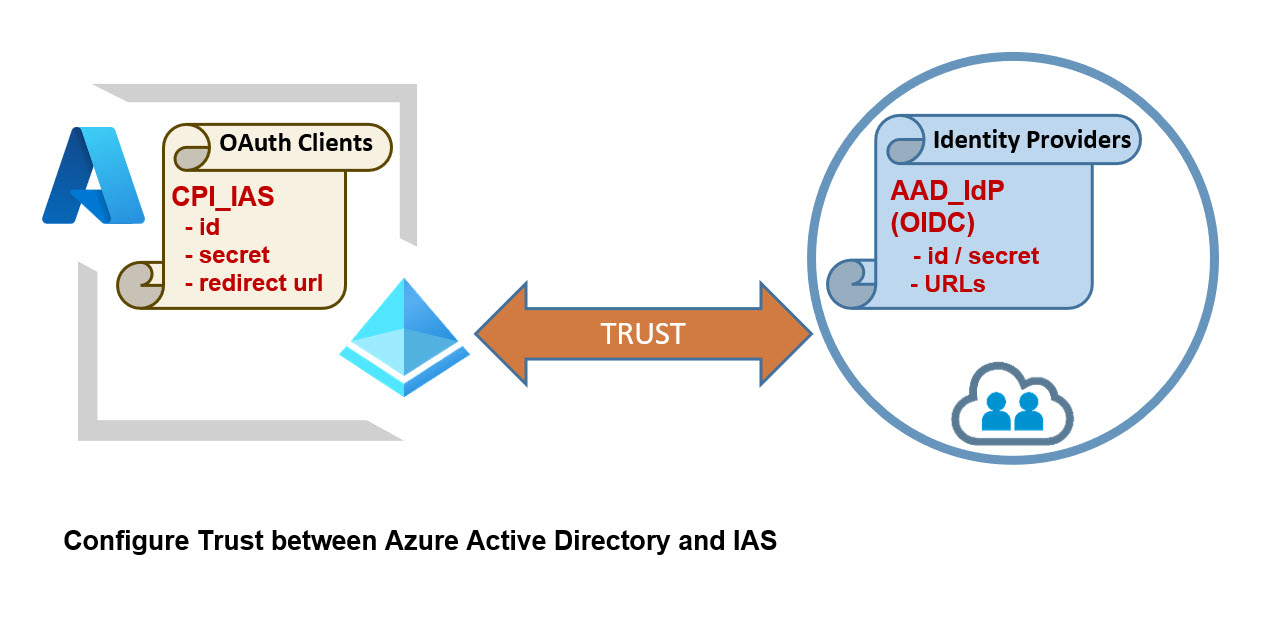 The diagram shows the basic configs:
🔹AAD: the OAuth client with its clientid/secret.
🔹IAS: clientiid/secret are configured in the new Identity Provider.
So let’s start with AAD.
1.1. AAD: Create OAuth Client for IAS
What is an OAuth client?
The OAuth spec defines an interaction between these 4 entities:
Resource Server
Contains data, like the photo of Franz
Resource Owner
Users like Franz, i.e. someone who carefully controls the usage of his photo.
OAuth Client
A web app that calls the Resource Server to display info and photos of users like Franz.
Authorization Server
The entity that knows users (can authenticate) and clients (gives credentials to registered clients), and manages authorization and issues JWT tokens to clients (keeps Franz password secret)
In the language of Azure AD:
We have to create an App Registration.
In the OAuth-speech:
We create an OAuth Client and register it at the Authorization Server.
Using the credentials of this registered OAuth client, a web app can fetch a JWT token from the Auth Server, on behalf of a user (Resource Owner).
This bearer token contains info about use and authorization and is used by the web app to access a Resource on the Resource Server.
In a mixed cacophonic talk:
In AAD, creating an app registration creates an OAuth client and registers it at AAD.
As such, the IAS (web app) can fetch a token from AAD, with user-login of e.g. Franz.
IAS uses this token is used to access information about the user Franz, for authentication.
I only understand English ☹️
With my simple words:
▶️ let's do it.
1.1.1. Create App registration
We go to Azure Portal -> Azure Active Directory -> App registrations
Press “New registration”.
🔸Name
Here we enter a name of our choice, e.g. AppForIAS
🔸Supported Account Types
We leave the default: Single tenant.
We ignore the rest and press “Register” to create the new App registration.
After creation, we can view the details on the overview.

At this point, we can already take a note of the client id.
Furthermore, we take a note of the discovery endpoint.
To do so, we click on “Endpoints” and copy the value of “OpenID Connect metadata document”.
The URL has the structure
login.microsoftonline.com/<tenantID>/.well-known/openid-configuration
At this point, we have an empty thus useless app registration.
Next steps are to make it useful.
1.1.2. Configure App registration: Redirect URIs
Now we configure the Redirect URIs.
This is required because the IAS and AAD talk with each other via the OAuth flow called Authorization Code.
When this OAuth client is used to request a JWT token, then the Authorization Code flow is processed.
This requires that the AAD sends a “code” to the redirect URL of the client application.
This client application (called Relying Party in SSO scenarios) is represented by IAS, so IAS has to provide the redirect URL.
And I can promise you: it does.
The safe way of getting the exact redirect URI is to copy it from IAS, as described in section 1.2.2. below.
We can come back here after doing so.
For now, I just tell your the URL, because I know it.
How?
I'm good...
Hint
In my example, the Redirect URL looks like this:
https://ias.accounts400.ondemand.com/oauth2/callback
Note the 400
In your case it might look rather like this (replace "ias")
https://ias.accounts.ondemand.com/oauth2/callback
Ah, no 400
I suggest to add both redirect URIs, no prob, both are safe.
How to add?
Press "Authentication", then "Add a platform" and choose “Web”.
Then paste the first URL from above.
Confirm by pressing “Configure”.
Then press "Add URI" and add the second URI.
Press "Save".
1.1.3. Configure App registration: Create Secret
We cannot use the OAuth client without credentials.
So we create the client secret now.
In the screen of our created App registration, we click on
Certificates & secrets -> New client secret
We enter any description and press “Add”.
Then we take a note of the value of the secret.
With these 3 notes we can configure the trust at IAS.
Note:
In the optional chapter 5 we can learn how to use certificate instead of client secret
1.1.4. Configure App registration: Token Config
Next step is to configure the token that is issued by AAD.
We can configure to add lot of user-info to the token, but we skip it for today.
What we really must have in the token: the group.
As described above, without group info, we won’t be able to get the required role for calling the iFlow.
We click on Token configuration and Add groups claim.
We choose the “Security groups” (or “All groups”) and press “Add”.

We're almost done.
1.1.5. Configure App registration: Permissions
Next step is required for technical user scenario – which is our scenario.
What is the background?
The OAuth framework is designed to establish a flow where a web application doesn’t have to maintain user credentials.
Instead the web app calls the authorization server in order to get access to a resource.
The web app is used by an end user (mostly Franz).
So the authorization server asks the user to login – then the authorization server will reply to the web app that it is ok.
If the requested resource is further protected and requires e.g. a viewPhotos-role, then the authorization server has to grant the role (scope) to the web app.
Now Franz might be surprised that the web app displays his selfies (note that Franz gets angry very easily...).
Therefore, to avoid angry users, the authorization server asks the user for permisison (“consent”), before granting the viewPhotos-role to the web app.
In our technical scenario, we don’t want this popup, because we don't have user interaction.
We have 2 options:
1. Login once with the AAD app registration, using browser, and confirm the popup (can be done with the validate-function in IAS, see below).,
Afterwards, the AAD will store the consent.
2. Let the admin centrally do the consent.
Afterwards, no user-consent is required at all.
In our scenario, option 2 is preferred.
While our new app registration is still selected, we click on API permissions and then on “Grant admin consent for <yourorg>”

That’s it for the AAD configuration.
Bye.
1.2. IAS: Create and Configure Identity Provider
Next step:
While we're still configuring Trust between IAS and AAD, we're now going to connect IAS to AAD via the generated OAuth client.
1.2.1. Create Identity Provider
We don't really create an IdP, but we create an entry in IAS, that maintains configurations for external corporate IdPs, like AAD.
We open our IAS Admin Console at
https://ias.accounts400.ondemand.com/admin/#/idPProxies
or navigate via Identity Providers -> Corporate Identity Providers
and press “Create”.
🔸Name
We enter a name like e.g. “AAD_OIDC”.
🔸Type
We select “OpenID Connect Compliant”.
🔸Copy
This is meant for those users who already have a SAML-based AAD IdP in place.
What if...?
Yes, OIDC is probably more advanced than SAML and the scenario which we’re trying in this blog post works only for OIDC-based trust.
So yes, if you already have a SAML-based IdP configured, you should still continue following this tutorial.
Thank you.

At this point we've added an empty IdP proxy entry, which is useless if we don't configure it.
In the next section we'll need the 3 notes which we took in the previous chapter.
1.2.2. Configure Identity Provider
While the new identity provider is selected in the left pane, we click on “Open ID Connect Configuration”.
In the “Discovery URL” field, we paste the URL of the “OpenID Connect metadata document” which we stored in chapter 1.1.1.
It looks similar like this:
https://login.microsoftonline.com/111/v2.0/.well-known/openid-configuration
After pressing “Load”, the metadata is read from the URL and the values are filled in the page.
Any info that is required to connect to the AAD via OAuth/OIDC is available from that document.
Really everything?
No no, the credentials are missing.
Fortunately, we took a note in chapter 1.1.1.
So now we can fill the client id (also called “Application ID”) and the client secret in the page.

Note:
If you forgot to take a note of the secret and can't see it anymore: don't worry, just delete it and create a new one.
We can “Save” already.
Really?
Yes, better now, so we don’t forget to save.
Then we come back to this page as it contains 2 interesting buttons.
▶️ First interesting button: OIDC Callback URL
Optional: Verify Redirect URI in Azure.
When pressing this button, we copy the “Redirect URL” into our clipboard.
This is useful, because we intended to verify it in AAD.
Oh, I had forgotten already...
Fortunately, we have this blog post...
OK, we press this button.
Pressed.
Now go to Azure portal -> AAD -> App registrations -> AppForIAS -> Authentication
Check Web -> Redirect URIs
The URL in our clipboard must be contained in the list.
Good that we haven’t forgotten to review the redirect URL in the AAD.
Good...that we have tutorial😇
Because otherwise the next step would be less fun…
▶️ Second interesting button: Validate
Back at IAS
Back at “OpenID Connect Configuration” screen
The “Validate” button is already waiting for us.
Interesting functionality:
When we press the “Validate” button, the IAS will do something on his own
– but with our help.
The IAS will try to login to AAD, via OAuth flow “Authorization Code”.
As we know, this is an interactive user-centric process and it requires a redirect URL.
Good that we configured it in AAD…
So now we press “Validate”, and the confirm the popup.
We need to “pick an account”:
We can use any account, our admin user - or the new Franz, we created in the prep.
(take a look at the scratchpad for user/pwd)
So we press on "User another account"
Enter user as franz@iflowba.onmicrosoft.com and pwd and sign in
At this point we would be asked for User Consent - but we already did configure the admin consent.
So now the IAS is logging in to AAD on behalf of our user.
A token is fetched.
And?
Then the validation result is presented and hopefully it is mostly green.
Under “Step 2” -> Raw Response we can see the OIDC response which contains access_token and id_token.

We should make sure that the “groups” claim is available, otherwise we can forget about this scenario.
The group id which we have stored in our scratchpad should appear here, as the screenshot shows.
2. Configure Trust: BTP-IAS
Now that the communication between AAD and IAS is working as expected, we can take care of properly configuring the communication between BTP and IAS.
In this chapter we're focusing on the right part of the diagram:
The good news here: Creating trust is done automatically with one button-click.
Afterwards, just few configuration settings required, such as setting IAS as default.
The bad news: currently, this has to be done via REST call.
2.1. BTP: Configure Trust between BTP and IAS
As mentioned earlier, prerequisite for connecting an IAS to our BTP-subaccount:
We not only need to have access to an IAS tenant – but this tenant has to be assigned to our Global account.
Otherwise, it doesn't appear in the wizard below.
There's no manual way of establishing Trust based on OIDC.
The manual way of exchanging metadata works for SAML, but not OIDC - and we need OIDC for this scenario to work.
So if your IAS tenant doesn't appear in below list, you would have to open a support ticket.
2.1.1. Create Trust Configuration in BTP
Again, we're not really creating an IdP - but we're configuring Trust to an existing IdP for our subaccount, thus creating an IdP-entry in the list of trusted IdPs.
In our BTP Cockpit, we go to Subaccount -> Security -> Trust Configuration
Press on “Establish Trust”

In the course of the wizard, we can enter some names that will later appear in the Trust-Configuration-List and in the logon page, when application users (like Franz) open an application.
As a result, we’ve created a new “Identity Provider for Applications”, which means that it is used by “business users” or “end users”, means those users who access the apps that we deploy to BTP.
Who are we?
We are admins and developers, we access the “Platform” (for which a Platform-IdP can be configured as well)

The screenshot shows as well that it is not possible to configure a second IAS (via OIDC).
Also we should pay attention to the "Origin Key", by which the IdP is identified (we’ll need it below).
To edit more settings, we can click on the new Custom Identity Provider.
The setting “Available for User Logon” should be set to “Yes”.

Note:
Such trust configuration can be easily deleted after testing, or some names can be configured after definition.
Also, an existing trusted IdP can be temporarily disabled.
Or it can be marked as not available for user login.
Note:
Before deleting a Trust Configuration, make sure that it is not marked as default.
See next section.
Docu can be found here.
2.1.2. Configure Identity Provider: set IAS as default IdP
As mentioned in the introduction, the IAS needs to be configured as default IdP.
Reason (repeat):
When we call the iFlow with basic authentication, the CPI runtime performs the OAuth flow “password credentials” under the hood.
To fetch a JWT token, the XSUAA-tokenendpoint is used.
No user interaction.
No selection screen is presented to a user, where the user can choose the right IdP for authentication.
And if there's no selection, then the default is always used.
As a consequence, we have to make sure that the desired IdP is configured as default.
The desired IdP is our newly trusted IAS.
So that's what we need to do in this section 2.1.2.
Unfortunately, in september 2023, the “Trust Configuration” UI doesn’t offer functionality to maintain the default IdP (might come later, then this section is obsolete and replaced with a button click).
So we need to use the REST API which is offered by XSUAA.
The REST call will show the security settings.
The settings contain a property which contains the default IdP.
This is what we have to change.
Docu can be found here.
And here’s the reference blog post with a step-by-step description by kumar.amar.
The reference for the Trust Configuration API can be found here (not really needed) and this is the API which we need to change the security settings of a subaccount-XSUAA.
Can we start?
Detailed description: Amars blog post
List of linux commands: appendix2
VS Code REST plugin: appendix3
Short description: here
🔹1. Create instance of XSUAA service with service plan "apiaccess"
.cf cs xsuaa apiaccess apiXsuaa
🔹2. Create service key
.cf csk apiXsuaa sk
🔹3. View service key
.cf service-key apiXsuaa sk
Take a note of these properties:
.url
.clientid
.clientsecret
.apiurl
🔹4. Fetch JWT token
.GET https://<value_of_url>/oauth/token?grant_type=client_credentials
.Authorization: Basic
.user: <value_of_clientid>
.pwd: <value_of_clientsecret>
From the response, copy the value of the json-property access_token
🔹5. Optional: Call API to view security settings
.GET https://<value_of_apiurl>/sap/rest/authorization/v2/securitySettings
.Authorization: Bearer<blank><value_of_access_token>
In the response, there’s a top-level property called defaultIdp
The current value should be sap.default
We need to change it to sap.custom
🔹6. Call API to change the default
.PATCH https://<value_of_apiurl>/sap/rest/authorization/v2/securitySettings
.Content-Type: application/json
.Authorization: Bearer<blank><value_of_access_token>
.Request body: {"defaultIdp":"sap.custom"}
🔹7. Optional: Verify
After successful result we can repeat step 5 and view the changed setting
.GET https://<value_of_apiurl>/sap/rest/authorization/v2/securitySettings
.Authorization: Bearer<blank><value_of_access_token>
Result:

Note:
Whenever we like, we can switch back by sending a PATCH request with value
{"defaultIdp": "sap.default"}
What happened under the hood?
In BTP:
We’ve created an entry (and set as default) in the list of trusted Identity Providers.
Details can be seen via the following REST call:
.GET https://<value_of_apiurl>/sap/rest/identity-providers
.Authorization: Bearer<blank><same_access_token_as_before>
Result:
The above json document is shortened for better overview.
We can see all configuration details and the metadata URL.
We can see that the token Url is different from the one that is used by XSUAA.
We can see that authorization code is used
We can see the relying Party Id, which is nothing else but the clientid.
What client?
Oh.
Yes, true.
The communication between BTP (XSUAA) and IAS is based on OIDC, which means that an OAuth flow is executed.
To do so, an OAuth client must have been generated in IAS (same as we manually did in AAD).
Let's check it
2.2. IAS: Forward Authentication to AAD
To view the generated OAuth client, we go to IAS.
The URL can be taken from above snippet:
In my example
https://ias.accounts.ondemand.com/admin/#/applications/65017dad3
But let’s navigate:
IAS->Applications & Resources -> Applications
Find the newly generated application which has the name:
"XSUAA_Subaccount"
Where “Subaccount” represents our subaccount name.
This is the OAuth client that was generated during “Establish Trust”.
We may compare with AAD:
In IAS it is listed as “Application”, while in AAD it was called “App registration”.
In fact, an "application" represents an OAuth client that is registered at IAS, the "Authorization Server".
It is time for one more diagram:

It shows the configurations for the trust relationship between IAS and BTP.
The previous section was dedicated to the right side (BTP).
Now let’s have a look at the left side, the generated OAuth client for the subaccount.
2.2.1. Optional: View OAuth Client Configuration
We click on “XSUAA_<Subaccount>” to view some configurations.
Optional: OpenID Connect config
We click on Trust->Single Sign-On -> OpenID Connect Configuration, just for curiosity.
We can see that the Redirect URL has been automatically inserted and points to the XSUAA-tenant of the subaccount:

Nothing to do here.
Optional: Subject Name Identifier
We click on Trust->Single Sign-On -> Subject Name Identifier, just to ensure that "Email" is selected as per default.
Nothing to do.
Optional: Assertion Attributes
We click on Trust->Single Sign-On -> Assertion Attributes
Nothing to do.
Even more: these settings are completely ignored in our OIDC-based scenario.
The IAS acts as proxy and doesn't care about attributes.
It just forwards.
Means, it creates a new token, but completely based on the received token
Optional: Client Authentication
We click on Trust->Application APIs -> Client Authentication
Just to see that a "client ID" and a "Secret" have been generated automatically:

We can see that in fact, the "client ID" is the same as the "relyingPartyId" which was returned by the API call.
2.2.2. Mandatory. IAS: set AAD as target for Authentication
Coming to the interesting section:
IAS -> Applications
XSUAA_<Subaccount> -> Trust -> Conditional Authentication -> Conditional Authentication
Here we decide what to do with authentication requests.
The normal path would be:
BTP application requires user login
BTP (subaccount) is connected to IAS.
IAS acts as Identity Provider.
Thus: when a user accesses the BTP application, then the IAS is asked to authenticate the user.
Means that the user must be maintained in the IAS.
Which is obvious, if IAS is used as Identity Provider.
But…….
In our scenario, we want to maintain the users in AAD and we want IAS to act as proxy.
Yesss.
So now it is time to set IAS as proxy and AAD as IdP.
In the section “Default Authenticating Identity Provider” we choose the AAD IdP which we defined in chapter 1.2.1
Then press “Save”

That's all?
Yes, that's it already.
OK, but what have we done?
Our setting has the consequence that ALL authenticating users are forwarded to AAD.
This implies that users which are maintained in IAS cannot login to BTP applications of this subaccount.
Only AAD users can login to BTP apps deployed to this subaccount.
This is not flexible, but more simple and ok for our scenario.
See docu.
But what if...
But if you want to use multiple Identity Providers and IAS itself too, then this would be truly conditional authentication.
And...
And it is optional for this tutorial.
The documentation can be found at this path:
IAS-> Operation Guide -> Configuring Applications -> Authenticating IdP -> Choose Default
Little summary
We’re done with configuring trust between AAD-IAS-BTP
In AAD we created an OAuth client
In IAS we created an IdP for AAD
In BTP we configured trust for IAS
In IAS we set AAD for authentication
3. Configure Authorization
During the course of this tutorial we've been jumping around, between BTP, AAD, IAS, CPI.
Now it is time to go to BTP cockpit again.
After establishing trust and configuring IAS as proxy, we’re already enabled to deploy an application to BTP, and the app could be accessed by AAD users.-
There’s only one little step missing:
Authorization
Tedious, again and again tedious...😒
Yes, every application is protected with OAuth and requires a scope.
Question
How to get the scope into the JWT token, if user is maintained in AAD❓
Answer:
Role Collection Mapping 📢
Yeah 💰
That was easy
It works even for users of AAD?
Yes.
Through IAS.
Some explanation?
In BTP, an XSUAA-based application is protected with OAuth and it defines and requires a “scope”.
Example could be a “ReadCustomerPrivateNumber-Scope”
Scopes are wrapped by roles.
CPI does that automatically, when we create a “User Role” in the dashboard.
(see my little chapter about roles.)
In the BTP cockpit, an admin can add multiple roles into a “Role Collection”.
Such a role collection can be assigned to users.
Such that these users are allowed to access the BTP-app and display customer private numbers, for instance.
However, it might be too much effort to assign thousands of single users.
Therefore, we can define generic assignment:
e.g. all users who belong to a certain user group, should get this role collection.
This is called “Role Collection Mapping”
What about AAD?
Usually, when a new user is created in a corporate identity provider, then it is also added to one or more user groups.
This allows to assign a role to a user who is not known to BTP (XSUAA).
So we can look at the diagram again, to illustrate above explanation:

How to do it step-by-step?
In BTP cockpit, we go to Security -> Role Collections
Create a new role collection with any name.
Press "Edit".
We add the role which we created in the preparation.
In the “User Groups” section, we select the trusted IAS from the drop down.
In the "Name" field, we enter the ID of the AAD group (we can find it in our scratchpad).
Save.

Can this be correct?
It looks strange:
We select the IAS, but enter a group which does not exist in IAS.
It exists in AAD.
However, it looks less strange if we think about the flow:
Upon user logon, AAD issues an id token which contains the user info and the assigned groups (because we configured it).
In our scenario, the groups info contains the group id, as generated in AAD.
IAS receives the token and issues a new one, which contains the same groups-info.
So that’s why we can enter the user group as if it would exist in IAS.
IAS is a transparent proxy.
Another view?
To view all role collection mappings of our trusted IAS, we can go to
Security -> Trust Configuration -> click IAS -> Role Collection Mappings
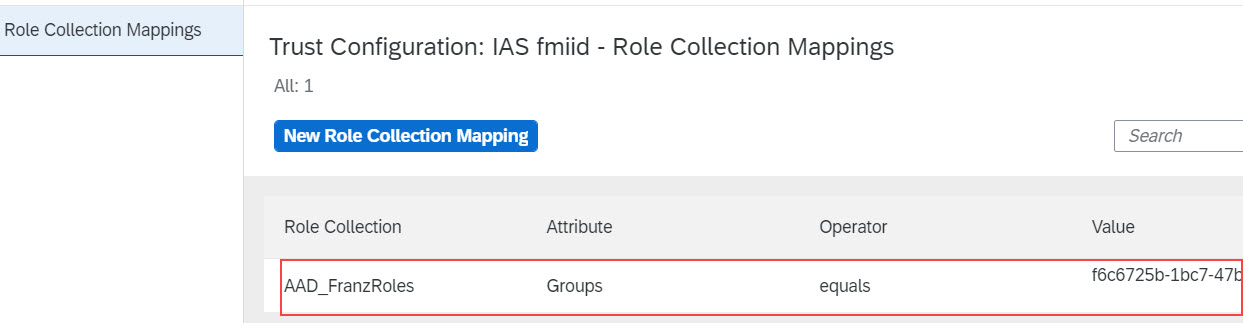
For what purpose?
The interesting learning here is:
Actually, the role collection mapping is nothing than a special attribute mapping.
4. Run Scenario
We’re done with all configurations and can now run the scenario.
Finally!!!
Running the scenario is nothing than calling our iFlow in a browser.
The interesting thing is of course that we can use an AAD-user.
In my example, the iFlow endpoint URL looks like this:
https://subdomain.it-rt.cfapps.eu12.hana.ondemand.com/http/franz
After running it in the browser (client certificate disabled), we get a user-credentials popup.
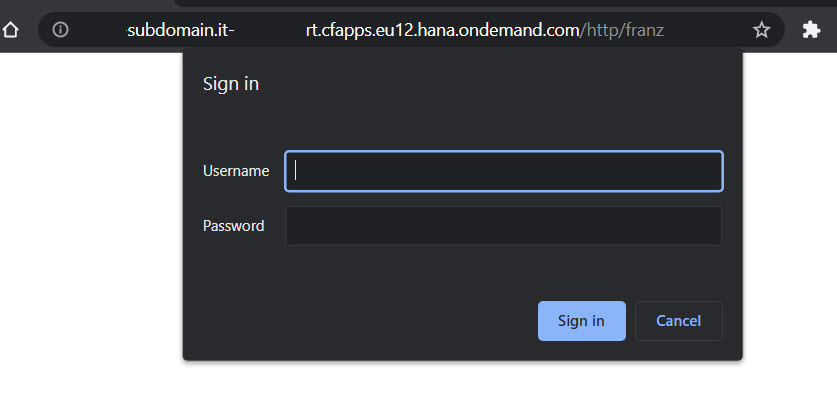
We enter user and password of the user which we’ve created or configured in the preparation.

As a result, we get the message body which we composed in the iFlow in preparation.
We're happy that it is a success-response and we can also see the decoded content of the JWT token that was finally received in CPI.
We know it was a looong journey...🐪
What's so special about browser that we need such a long blog?
The point is not from where we call the endpoint.
The point is that we do basic auth with Franz.
Alternatively, we could deploy a simple app to Azure and call the endpoint from that app.
But it makes no difference, because at the end it will be the same basic-auth-request.
5. Optional: Certificate-based Trust between IAS and AAD
The above description of using clientid / clientsecret for configuring the trust between IAS and AAD seems more intuitive and common, for better understanding.
To configure trust with a certificate, we proceed as described below:
5.1. IAS: Get the IAS-Certificate
First of all, we need to get a hold of the IAS-certificate, containing the public key.
In IAS, we go to
Applications&Resources -> Tenant Settings -> Single Sign-On -> OpenID Connect Configuration
At “Signing Certificates”, we can see the active certificate by pressing the spectacles button:

We copy the content of the certificate into our clipboard
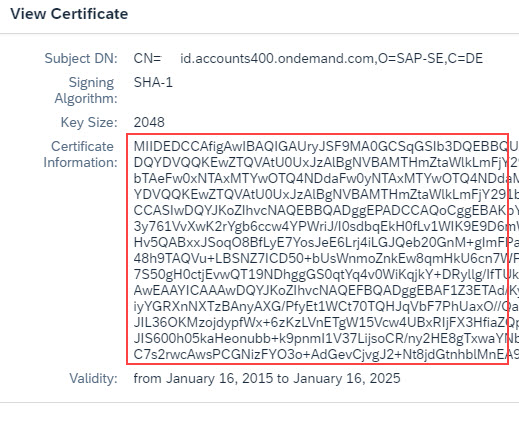
We create a file with any name, e.g. ias.crt
(can be any file extension, but this one is included in filter of upload dialog below)
We paste the clipboard content into it.
Save.
We can also view the content of this certificate, either with any online certificate-decoder tool, or with OpenSSL.
However, it might need to add -----BEGIN CERTIFICATE----- then <Enter> at the beginning and <Enter>-----END CERTIFICATE----- at the end, to make it work:
-----BEGIN CERTIFICATE-----

MIIDEDCCAfigAwIBAQIGAUryJSF9MA0GCSqGSIb3DQEBBQUAMEcxCzAJBgNVBAYTAkRFMQ8wDQYDVQQKEwZTQVAtU0UxJzAlBgNVBAMTHmbg+TtJNhsCtSykr0kroDgveGknuC7s2rwcAwsPCGNizFYO3o+AdGevCjvgJ2+Nt8jdGtnhblMnEA9lEDVZr61zMDmcYMnlryk=

-----END CERTIFICATE-----
The result would look like this:

We can see that the certificate contains the public key of our IAS.
We can see the host name of our IAS in the CN attribute (Common Name) of the Subject DN (distinguished name).
5.2. AAD: Create App registration
At Azure Active Directory / Entra ID, we create an App registration, as explained above.
Then go to “Certificates & Secrets” -> Certificates -> Upload
We choose our ias.crt and upload it
(note that the prefix/suffix are not required here)

5.3. IAS: Create IDP
When creating an Identity Provider in IAS, as described above, we choose “Private key JWT” and enter the “Application (client) ID from the Azure App registration overview.
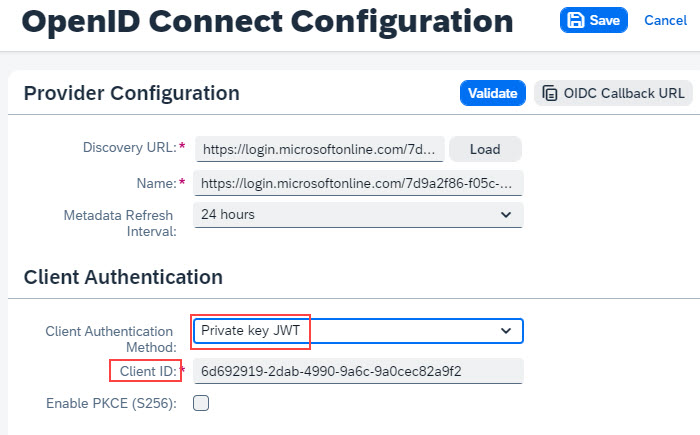
Then we can press “Validate” and see that it works fine.
6. Optional: Troubleshooting
If the basic authentication flow via CPI doesn’t work and an error with status 401 is displayed, we have hard time to find the problem.
* One reason could be that the test user in AAD has not yet changed the initial password.
* One more possible reason:
It might be required for the test-user to provide the consent against the AAD-app-registration.
To provide consent, access to the app must be requested in an interactive way.
The easiest workaround would be to use the “validate” functionality with the test user.
In IAS go to
Identity Providers -> Corporate IdPs -> AAD_OIDC -> Open ID Connect Config -> Validate
Then use the account of the test user for login
* Everything seems fine but CPI doesn't allow, throws 403
For troubleshooting, it would make sense to introspect the JWT token that is arriving at CPI, to see if the aud and scope claims are properly set. As we cannot hook in CPI, the only chance is to simulate what CPI is doing: send a token-request to XSUAA, with "password" credentials flow, to fetch a JWT token, then decode it (e.g. at www.jwt.io) and check if it contains the CPI-User-Role as scope.
* After changes:
It might be helpful to redeploy the iFlow, in order to delete the cache.
View Troubleshooting Logs in IAS
The IAS provides a useful feature for troubleshooting which allows us to view the (relevant) info of OIDC tokens.
We can e.g. see if the info about group assignment is contained in the token that was sent from AAD to IAS.
Troubleshooting logs can be accessed from the admin landing page -> Monitoring & Reporting -> Troubleshooting Logs
Or the direct link:
https://ias.accounts400.ondemand.com/admin/#/troubleshootingLogs
To view existing log entries we adapt the filter:
- Change Severity to INFO
- Adapt date if necessary
press Go
To further refine the result list:
- we type “issueJwt” in the Search field
press Enter
It might be necessary to adapt the time box, as the JWT token is issued only at first request

We're interested i n2 actions:
issueJwtToken
receiveJwtToken
Once we have an entry, we can click on “Log Details”.
Explanation:
🔸objectType
The type is not an oauth-client, but openIdClient, sounds logical.
🔸objectId
is the client id of our identity service instance. With other words, it is the client id of the “application” entry in IAS
🔸workflow
OIDC is used for authentication and it adds a few security relevant steps during login.
🔸userIdentifier
is the user_uuid.
🔸grant_type
As we know, OIDC relies on OAuth as authorization framework and the OAuth flow used during login is the well-know “Authorization Code” flow which is also used by XSUAA-based logins.
🔸serviceProvider
is the guid of the instance of identity service. With other words, it is the second name of the “application” entry in the IAS.
7. Optional: Call AAD directly for OAuth Flow
For the sake of curiosity:
If we want to manually fetch a JWT token from AAD, we can do an almost normal token request.
Only one special parameter is required: scope
Example 1: fetch access token
The value must be: <clientID>, followed by /. and the word default
The token endpoint can be easily found at the overview page of the App registration:
Here we can click on “Endpoints” on the top of the page, then copy the value of the field “OAuth 2.0 token endpoint (v2)”
So the request would look similar like this:
POST https://login.microsoftonline.com/fc3ab758/oauth2/v2.0/token
Headers:
'Content-Type': 'application/x-www-form-urlencoded'
Authorization: Basic clientid:secret
Body: grant_type=password&response_type=token&client_id=aaa&username=franz&password=123&scope=aaa/.default
Curl example:
curl -X POST --url https://login.microsoftonline.com/fc3ab758/oauth2/v2.0/token -d 'grant_type=password&username=franz&password=123&scope=aaa/.default&client_id=aaa&client_secret=yyy'The result is a JSON string containing the access token:
{

  "token_type":"Bearer",

  "scope":"01c587bb/User.Read 01c587bb/.default",

  "expires_in":4167,

  "ext_expires_in":4167,

  "access_token":"eyJ0eXAiOiJKV1QiLCJhbGciOiJSUzI1N...lWm"

}
Example 2: fetch OIDC token
We fire the same request, containing real user name and password.
The difference is that this time we send the scope openid, indicating that we want OIDC token as response:
curl -X POST --url https://login.microsoftonline.com/7d9a2f86/oauth2/v2.0/token -d 'grant_type=password&username=franz&password=123&scope=openid&client_id=aaa&client_secret=222'
The result contains an access token but also an id token:
{

  "token_type":"Bearer",

  "scope":"openid profile email 00000003/User.Read",

  "expires_in":5130,

  "ext_expires_in":5130,

  "access_token":"eyJ0eXAiOi...Md1lw",

  "id_token":"eyJ0eXAiOi...vFm0g"

}
Both tokens can be decoded to view the claims, as usual.
8. Optional: Existing Scenarios
The above described scenario works only if Trust with AAD (or other Identity Provider) is configured via OIDC.
For existing scenarios that are based on SAML, the following approach can be considered:
Instead of doing hard break and switch from SAML to OIDC, we can follow a 2-step approach:
🔹1. Create a second Identity Provider in IAS and choose OIDC as protocol.
🔹2. Go to “Applications” and switch the configured IdP at “Conditional Authentication”
This is described in the documentation.
9. Optional: Conditional Authentication
As mentioned above, we configured IAS as proxy and we specified that ALL requests should be forwarded to AAD for authentication.
This was done in the IAS-screen "Conditional Authentication" although it is not really "conditional", because we don't specify any conditions.
However, conditions can be specified via "rules"
If we want to use multiple Identity Providers and IAS itself too, then we can define authentication rules.
This is what we would call truly conditional authentication.
Such that e.g. IAS users can be authenticated by IAS and AAD-users are forwarded to AAD for login, etc
See docu.

See vinayak.adkoli essential blog post.
Summary
In this tutorial we’ve learned how to configure AAD, IAS and BTP for enabling a scenario where an iFlow is called via Basic Authentication with user from AAD.
So we can for instance send a GET request with a browser and enter username and password of a real user who is maintained in AAD.
The CPI runtime converts the basic auth request to OAuth flow “Password Credentials”, which is sent to the XSUAA token endpoint.
XSUAA delegates authentication to the connected IAS which in turn acts as proxy and forwards the authentication to AAD.
In this scenario, IAS acts as proxy and delegates authentication to AAD
Important to know that the trust between IAS and AAD must be based on OIDC.
We’ve learned that IAS must be configured as defaultIdP, otherwise the OAuth flow would not be delegated to IAS.
We’ve added the user to a group, in AAD, such that this group can be configured in BTP to a role collection which allows to add a role to the AAD-user.
AS such, finally, the iFlow, which is protected with that role, can be successfully invoked.
Happy End.
Key Takeaways
The basic configuration steps:
1. Trust: IAS-AAD
AAD: Create OAuth Client for IAS
add groups claim
IAS: Create IDP based on OIDC
Enter clientid/secret and discovery URL from AAD
copy redirect url, then enter in AAD (type "web")
2. Trust: BTP-IAS
BTP: Establish Trust
IAS: Configure AAD in "Conditional Authentication" for generated XSUAA_app
XSUAA: set IAS as defaultIdp
Create instance of xsuaa with plan apiaccess, then create service key
Fetch JWT token
Send PATCH request to
<apiurl>/sap/rest/authorization/v2/securitySettings
Body: {"defaultIdp": "sap.custom"}
for reverting: {"defaultIdp": "sap.default"}
3. Authorization config in BTP
Create role collection with iFlow-Role
Role collection mapping: choose IAS and enter group-ID of AAD-group
Links
SAP Help Portal
CPI:
Basic Authentication for Inbound Scenario
SAP Cloud Identity Services - Identity Authentication:
Entry in Discovery Center
IAS Landing Page
IAS User Management
IAS: View Troubleshooting Logs, to view OIDC tokens
IAS: logging OICD tokens
IAS: getting a tenant
Establish trust
IAS: Corporate Identity Providers
Configure IdP, view the redirect URL
Configure IAS as proxy
OIDC support in IAS.
Authorization and Trust Management Service
Docu XSUAA REST APIs
API-reference: Trust Configuration
API-reference: Security Settings of XSUAA tenant
Blog Posts
marko.sommerpopular blog posts: here and there.
vinayak.adkoli essential blog post
kumar.amar famous blog post
My blog post about XSUAA user attributes.
Blog about user roles and attributes and accessing JWT in script
Security Glossary Blog
Other
Azure AAD main entry
Useful Azure CLI commands
How OpenID Connect works
Spec for OIDC
JWT specification: rfc7519
IANA JWT Claims.
Cloud Foundry UAA docu: introspect token
Cloud Foundry CLI Installation guide
Appendix 1: Sample Groovy Script
import com.sap.gateway.ip.core.customdev.util.Message;

import groovy.json.*

import com.sap.it.rt.scc.connectivity.security.IToken


def Message processData(Message message) {


    //get auth object from property

    IToken authObject = message.getProperties().get("SAP_AuthHeaderValue");

    String serializedToken = authObject.serializeToken() // returns: {"USER_TOKEN":null,"APP_TOKEN":"ey...J


    // parse the auth object to get the JWT token

    def jsonSlurper = new JsonSlurper();

    def authObjectJson = jsonSlurper.parseText(serializedToken)

    String appToken = authObjectJson.APP_TOKEN;

    String[] parts = appToken.split("\\.");


    // decode the Base64-encoded token

    byte[] tokenDecodedBytes = Base64.getDecoder().decode(parts[1]); // the payload

    String tokenDecoded = new String(tokenDecodedBytes)


    // parse the JWT token

    def jwtToken = jsonSlurper.parseText(tokenDecoded)


    // access the claims of the token

    String email = jwtToken.email;


    message.setBody("iFlow called by " + email + " - with this JWT token: " + tokenDecoded)

    return message ;

}
Appendix 2: Linux commands for altering defaultIdP
# 1. Create instance of XSUAA service with service plan apiaccess

cf cs xsuaa apiaccess apiXsuaa


# 2. Create service key

cf csk apiXsuaa sk


# 3. View service key

cf service-key apiXsuaa sk


# 4. Store the relevant properties apiurl, url, clientid, clientsecret, to be used in next steps

SK=$( cf service-key apiXsuaa sk | tail  -n +3)

CLIENTID=$(echo ${SK} | jq -r .clientid)

SECRET=$(echo ${SK} | jq -r .clientsecret)

URL=$(echo ${SK} | jq -r .url)/oauth/token

API=$(echo ${SK} | jq -r .apiurl)


# 5. Fetch JWT token

TOKEN=$(curl -X POST --url ${URL} -d 'grant_type=client_credentials&client_id='${CLIENTID}'&client_secret='${SECRET} | jq -r '.access_token')


# 6. Optionally: Call API to view security settings, property defaultIdP, current value should be sap.default

curl -H 'Accept: application/json' -H "Authorization: Bearer ${TOKEN}" ${API}/sap/rest/authorization/v2/securitySettings | jq -r '.defaultIdp'


# 7. Call API to change the property defaultIdp to sap.custom

curl -X PATCH --url ${API}/sap/rest/authorization/v2/securitySettings -H 'Content-Type: application/json' -H "Authorization: Bearer ${TOKEN}" -d '{"defaultIdp":"sap.custom"}'


# 8. Optionally: Verify. Repeat step 5 to view the updated value of defaultIdp which should be sap.custom now

curl -H 'Accept: application/json' -H "Authorization: Bearer ${TOKEN}" ${API}/sap/rest/authorization/v2/securitySettings | jq -r '.defaultIdp'
Appendix 3: Script for REST Client
This script can be used for Visual Studio Code with installed REST client plugin.
Copy script into a file with file extension .http
###

# 1. fetch JWT token

# @name fetchToken

POST https://subdomain.authentication.eu12.hana.ondemand.com/oauth/token?grant_type=client_credentials

Content-Type: application/x-www-form-urlencoded


client_id=111&client_secret=aaa&grant_type=client_credentials


#store the result in variable

@access_token = {{fetchToken.response.body.$.access_token}}


###

# 2. view security settings, to view current default idp

# @name viewDefaultIDP


GET https://api.authentication.eu12.hana.ondemand.com/sap/rest/authorization/v2/securitySettings

Authorization: Bearer {{access_token}}


#store the result in variable, to view via mouse hover

@defaultIDP = {{viewDefaultIDP.response.body.$.defaultIdp}}


###

# 3. change the default IdP, send PATCH request with possible values:

#{"defaultIdp":"sap.custom"}

#{"defaultIdp":"sap.default"}

PATCH https://api.authentication.yyy.hana.ondemand.com/sap/rest/authorization/v2/securitySettings

Content-Type: application/json

Authorization: Bearer {{access_token}}


{"defaultIdp":"sap.default"}


###

# verify the result

# @name verifyDefaultIDP

GET https://api.authentication.eu12.hana.ondemand.com/sap/rest/authorization/v2/securitySettings

Authorization: Bearer {{access_token}}


#store the result in variable, to view via mouse hover

@verified = {{verifyDefaultIDP.response.body.$.defaultIdp}}
Labels:
7 Comments
You must be a registered user to add a comment. If you've already registered, sign in. Otherwise, register and sign in.
Labels in this area
-
ABAP CDS Views - CDC (Change Data Capture)
2 -
AI
1 -
Analyze Workload Data
1 -
BTP
1 -
Business and IT Integration
2 -
Business application stu
1 -
Business Technology Platform
1 -
Business Trends
1,658 -
Business Trends
107 -
CAP
1 -
cf
1 -
Cloud Foundry
1 -
Confluent
1 -
Customer COE Basics and Fundamentals
1 -
Customer COE Latest and Greatest
3 -
Customer Data Browser app
1 -
Data Analysis Tool
1 -
data migration
1 -
data transfer
1 -
Datasphere
2 -
Event Information
1,400 -
Event Information
72 -
Expert
1 -
Expert Insights
177 -
Expert Insights
340 -
General
1 -
Google cloud
1 -
Google Next'24
1 -
GraphQL
1 -
Kafka
1 -
Life at SAP
780 -
Life at SAP
14 -
Migrate your Data App
1 -
MTA
1 -
Network Performance Analysis
1 -
NodeJS
1 -
PDF
1 -
POC
1 -
Product Updates
4,575 -
Product Updates
384 -
Replication Flow
1 -
REST API
1 -
RisewithSAP
1 -
SAP BTP
1 -
SAP BTP Cloud Foundry
1 -
SAP Cloud ALM
1 -
SAP Cloud Application Programming Model
1 -
SAP Datasphere
2 -
SAP S4HANA Cloud
1 -
SAP S4HANA Migration Cockpit
1 -
Technology Updates
6,872 -
Technology Updates
472 -
Workload Fluctuations
1
Related Content
- How to Install SAP Cloud Connector on a Mac M2 chipset in Technology Q&A
- How to Install SAP Cloud Connector on a Mac M2 Processor in Technology Q&A
- Import Data Connection to SAP S/4HANA in SAP Analytics Cloud : Technical Configuration in Technology Blogs by Members
- Enabling SAML Single Sign-On for SAP S/4 HANA and SAP BTP Apps using the same SAP IDP in Technology Blogs by SAP
- How to build SOAP service in SAP Cloud Integration, Part 2 in Technology Blogs by Members
Top kudoed authors
| User | Count |
|---|---|
| 17 | |
| 14 | |
| 13 | |
| 10 | |
| 9 | |
| 7 | |
| 7 | |
| 6 | |
| 6 | |
| 6 |