
- SAP Community
- Products and Technology
- Technology
- Technology Blogs by SAP
- Cloud Integration: How to call iFlow from IAS-base...
Technology Blogs by SAP
Learn how to extend and personalize SAP applications. Follow the SAP technology blog for insights into SAP BTP, ABAP, SAP Analytics Cloud, SAP HANA, and more.
Turn on suggestions
Auto-suggest helps you quickly narrow down your search results by suggesting possible matches as you type.
Showing results for
Product and Topic Expert
Options
- Subscribe to RSS Feed
- Mark as New
- Mark as Read
- Bookmark
- Subscribe
- Printer Friendly Page
- Report Inappropriate Content
07-07-2023
1:17 PM
SAP Cloud Integration (aka CPI) allows to call an integration flow via HTTP request from an external system (HTTP Sender adapter).
In this tutorial we create an app in Cloud Foundry that is protected via IAS and calls an iFlow.
Since the iFlow is protected via XSUAA, it requires some special blog post to learn how this scenario can be realized.
Alternatively, if you're not on IAS, try this blog post: call iFlow from XSUAA-based app
Alternatively, if you're looking for outbound scenario, see here.
Technologies covered:
SAP Business Technology Platform (BTP), Cloud Foundry
SAP Cloud Integration (CPI)
Identity Authentication Service (IAS)
XSUAA
Node.js
0.1. Prerequisites
0.2. Preparation
0.3. Introduction:
1. CPI: Create Roles and iFlow
2. IAS: Create User and Group
3. BTP: Configure Trust and Role Collection
4. DEV: Create Frontend Application
5. Run
6. Optional: Troubleshooting
7. Optional: Access User Info in Script
8. Clean Up
Appendix: Sample Application Code
In the course of the tutorial we're going to create a node app, so we need a project folder on file system.
In my example, the structure looks as follows:
The full file content can be found in the appendix.
In SAP BTP Cloud Foundry environment, we’re creating an application and we’re using IAS / OIDC to protect it.
Means, we aren’t using XSUAA to protect it.
Why not?
Because IAS and OIDC is more complex and more safe and more powerful and new and hyped, etc.
Our app is a frontend application that uses Approuter to handle user-login.
The JWT token that is issued on user-login, is forwarded to our application endpoint.
This token is not compatible with those that are issued or required by XSUAA.
As such, we cannot use it to call a REST endpoint that is protected with XSUAA.
That’s a pity
However, in our application setup, we need to send a request from our app to an endpoint in CPI.
CPI uses XSUAA to protect the exposed endpoints.
That's a problem
Yes.
Bad news
But there's a good news:
Although this doesn’t work out-of-the-box, there’s a way to achieve it.
Is it shown in this tutorial?
Siure.
Below diagram shows the high-level scenario:
We can see the 2 basic components: the frontend app (node.js) and the iflow.
The frontend app is protected with OIDC, it is bound to an instance of Identity service.
The frontend app needs to call the iFlow endpoint, but that is protected with OAuth, via XSUAA.
The Subaccount has a trust relationship to a tenant of Identity Authentication Service (IAS).
End user calls the frontend app and is authenticated against the IAS.
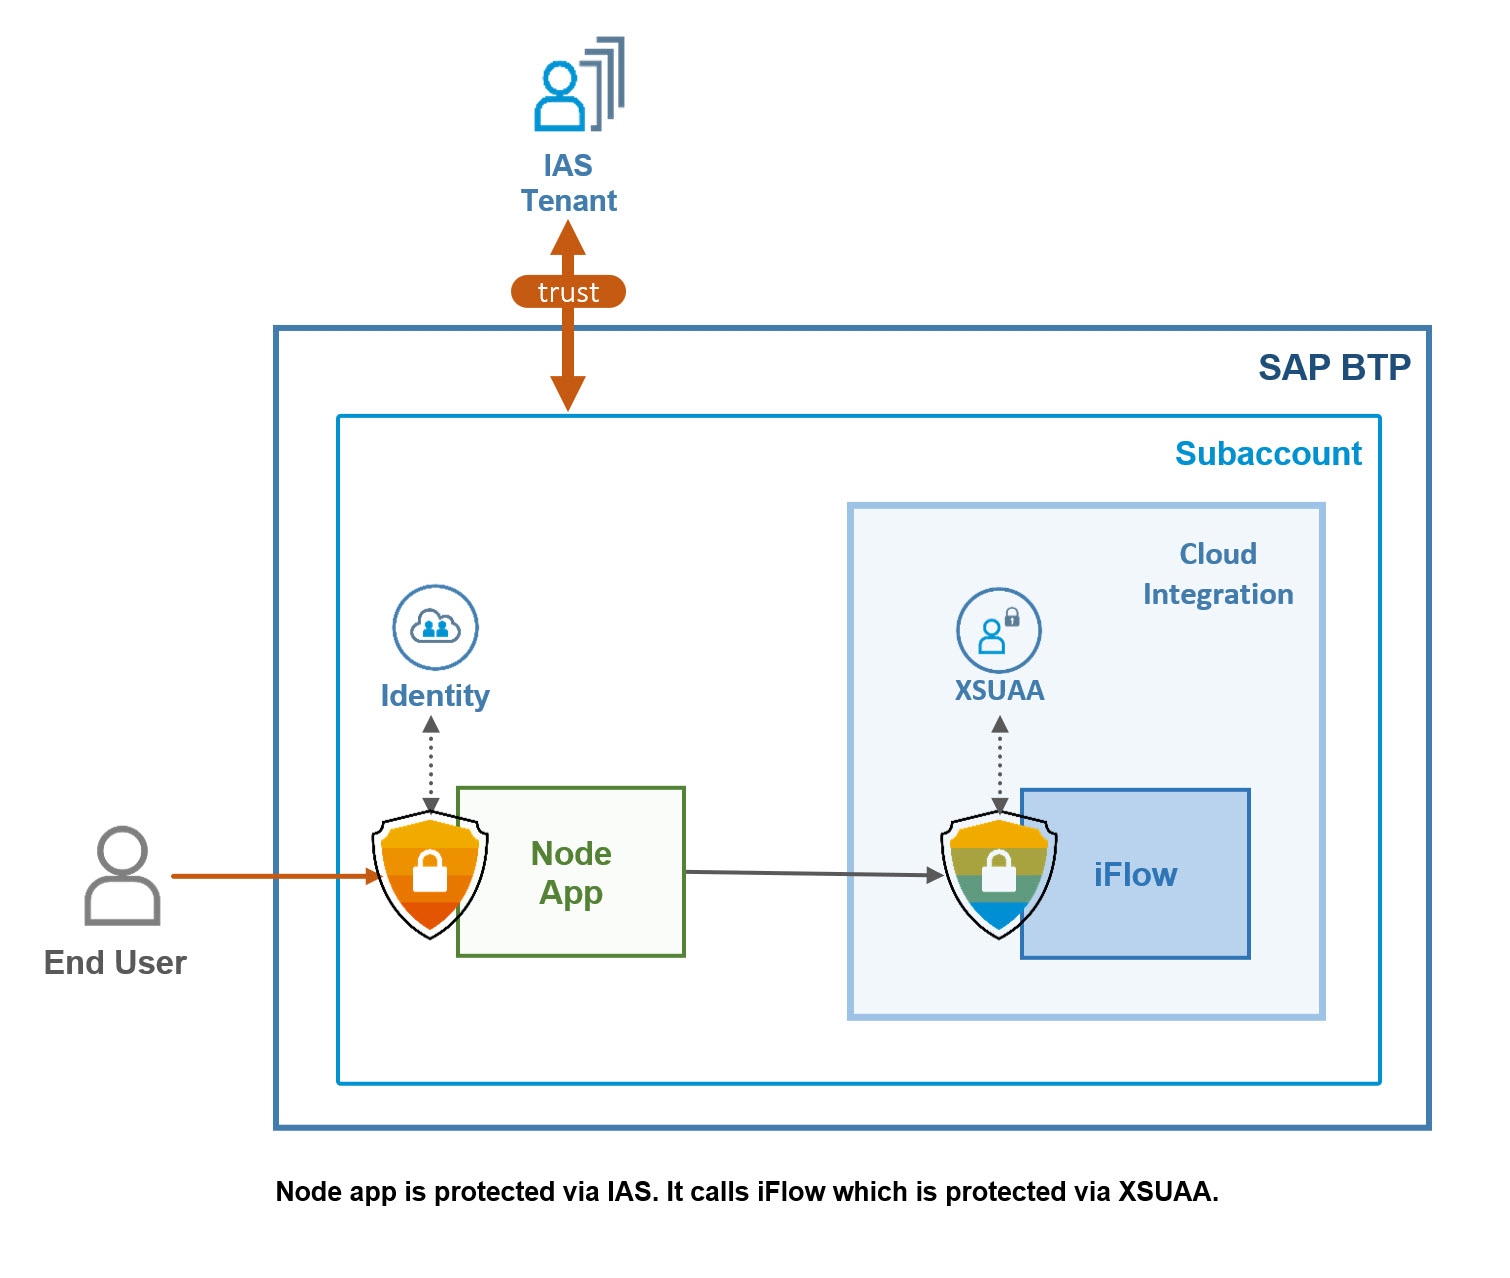
The second diagram shows a few more details: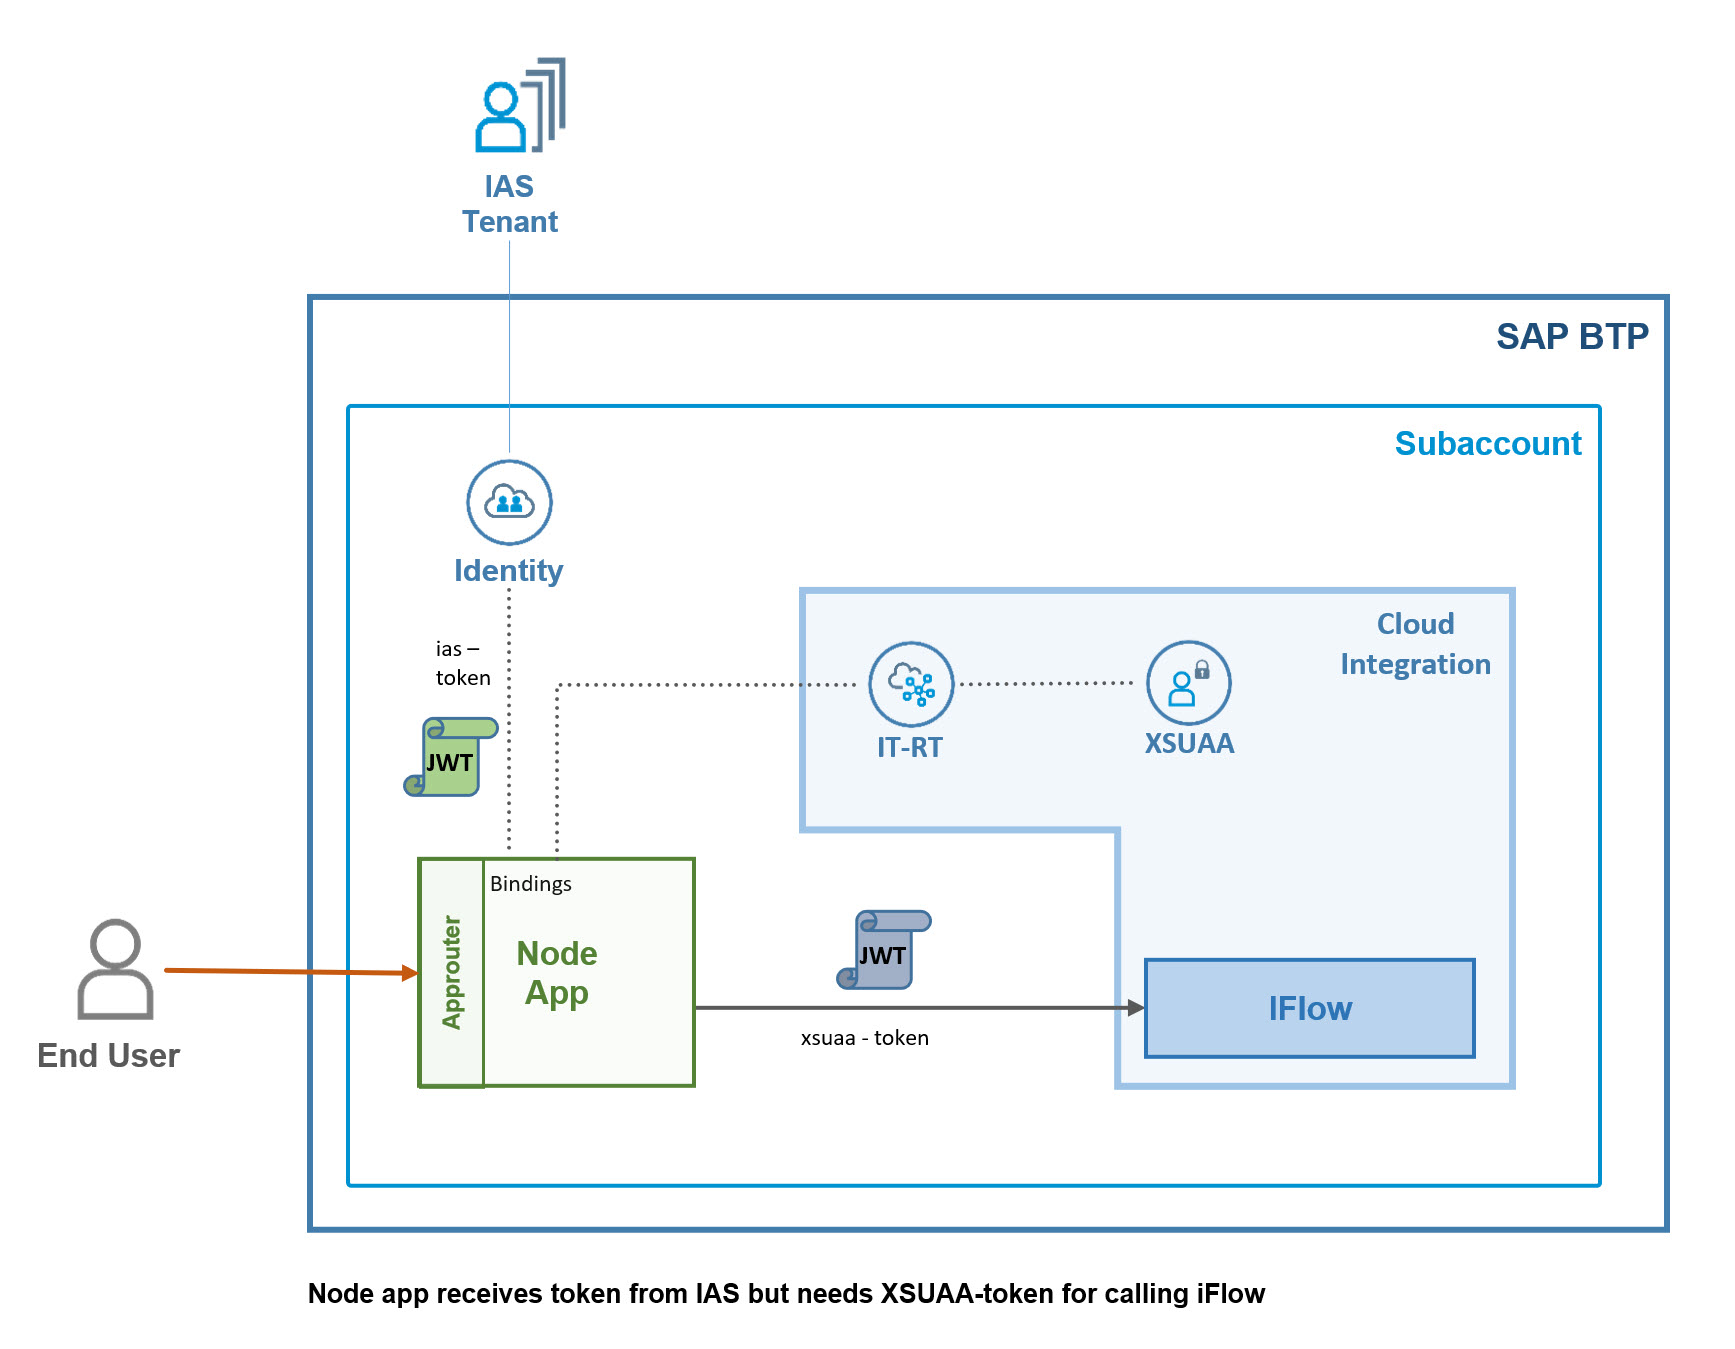
The node app has binding to identity service instance to protect its endpoint.
The user login is handled by Approuter, the IAS-token is sent to the node app.
Note: "IAS-token" is not an official term, just using to distinguish.
The node app has another binding to cpi-runtime service, so it can get credentials to call the iFlow endpoint, with a token issued by XSUAA.
The identity service acts as a proxy to the IAS-tenant.
What is the challenge?
After user logs in to our frontend app, a JWT token is issued by IAS.
We cannot use this token for calling the iFlow, as it requires a JWT token issued by XSUAA.
Usually in such scenarios, we would do token exchange.
What is token exchange?
We have a user-centric frontend app. The app wants to call a protected service in BTP.
To do so, the jwt-bearer grant type can be used to fetch a token.
An existing user-token is sent to XSUAA and a new token is returned which can be used to call the backend service.
The advantage: the user information is preserved
See my blog series to learn more about it.
In our example, token exchange allows to propagate the user-identity to any backend that can be connected to the iFlow.
That’s why we don’t use client-credentials grant type for calling the iFlow.
However: a token can only be exchanged if it is accepted by the target.
And the IAS-token wouldn’t be accepted by the XSUAA-protected iFlow endpoint.
What isthe solution?
The solution is easy.
There’s a built-in mechanism to support exactly our scenario:
When creating an instance of identity service, we can add the property
xsuaa-cross-consumption and set it to true.
As a consequence, the IAS will issue a JWT token that contains a second entry in the audience claim.
This has the effect that the token exchange will be successful.
We’ll have a closer look during our tutorial.
What is the "audience"?
The "audience" is a property which is contained in the JWT token, called the aud claim.
As we know, OAuth is a framework to describe how authorization info can be accessed on behalf of a user.
We have a resource that should be accessed by a client app.
To do so, the client app registers at the so-called Authorization Server (in our case: XSUAA).
After registration (in our case, create service instance of cpi-runtime), the client receives credentials to call the Authorization server.
In our case, these credentials are provided in the binding and are contained in the properties clientid and clientsecret (like user/pwd).
So the client app calls the Auth server with these credentials and in the response it receives a JWT token.
This token can be used to access a resource that is protected using the same clientid.
How does it work?
The issued JWT token is a piece of data in JSON format (encoded with base64).
The data contains information that is validated by the resource (in our case, the iFlow endpoint).
The validator reads the JWT data and is interested in this basic info:
🔸the token must be issued by the same Authorization server
This info is contained in the iss claim.
🔸the token must be issued for the same oauth client, with the same id
This info is contained in the aud claim
The audience is the intended receiver of the token
What is the mechanism?
In our example, the clientid which is contained in the instance of cpi-runtime would be the required client.
But this cannot be achieved, because the IAS simply has no knowledge about the clientid of cpi-runtime.
The built-in mechanism to ensure compatibility between IAS and XSUAA based components, is different.
To work with IAS from BTP, we need to “establish Trust” between the subaccount and the IAS tenant.
During this process, a client is registered at IAS.
This client represents the subaccount.
More precisely, it represents the XSUAA server of the subaccount.
This client has a client id.
And this is the client id that is added to the audience.
OK
Now, with the XSUAA-client in the audience, we do token exchange.
We send the IAS-token to the XSUAA server which recognizes its own clientid in the token and agrees to proceed.
This request contains the clientid of cpi-runtime and so the exchanged token can be accepted by the iFlow.
And that’s it.
This is how we get a JWT token which is accepted by the iFlow, even though the clientid of CPI is not contained in the aud.
What about Authorization?
Up to now we’ve considered only authentication.
However, REST endpoints in BTP do typically require a certain scope or User Role.
So the question is: how to get the required scope into the token?
The solution is standard mechanism, when working with external Identity Providers.
In BTP, the CPI-roles are added to a role collection.
The role collection is mapped to a “user group”.
This user group is defined in the IAS and the end-user of the scenario is added to the group.
This is how an end-user who logs in at IAS, will get the scope required by XSUAA.

Summarize
We have special config for identity service
user logs in to frontend app
IAS issues a JWT token
It contains the XSUAA-clientid in the aud
We do token exchange
Result: JWT token with CPI-clientid and CPI-scopes
What’s next?
That has been all much too theoretical.
Now we can start with the tutorial.
And we repeat the theory with practical examples.
omg
Haha – just kidding
Disclaimer:
Below code and design is not an official recommendation.
It is just my personal learning which I like to share with the community.
The first short part of the tutorial takes place in the CPI tenant.
We need to create a very simple iFlow that can be called by our node app.
The iFlow should be protected by a user role .
First of all, we create some user roles in CPI -> Monitor Artifacts -> Manage Security -> User Roles
We “Add” 2 roles like:
🔹Ntif.Read
🔹Ntif.Write
The dashboard allows to download or copy the roles in json format, which is useful for the next step.
Optional: View Roles
After creating User Roles in the CPI dashboard, the standard role mechanism of BTP is triggered under the hood. Means that scopes and role templates and default roles are generated under the hood.
See: Subaccount -> Security -> Roles -> filter for Ntif
I recommend this little chapter for understanding Roles in BTP.
Our integration flow is very simple:
We only need to create an HTTPS sender adapter.
No more steps are required.
When we call the endpoint from our app, we’ll receive a response from CPI anyways.
The configuration of the HTTP adapter:
🔸 Address
set to /ntif
Note that this endpoint name must match the endpoint used in our node app
🔸 Authorization
Set to "User Role"
🔸 User Role
We press the “Select” button and choose "Ntif.Read"
🔸 CSRF
Checkbox disabled.
After configuring the HTTPS adapter, we can save and deploy the iFlow.
In this chapter we maintain a user in our IAS tenant.
We login with admin user to the IAS at e.g.
https://abc.accounts400.ondemand.com/admin/
For our testing, we create a new business user (end user).
Users & Authorizations -> User Management
We press “Add User” button in the right bottom corner and enter some data of our choice.
We choose to set an "initial password" because like that we don't need a real eMail for verification.
Afterwards we should enter the details page of the user, press the pencil icon for edit more, then enable the checkbox “email verified”.
Note that the user will need to change password upon first login.
To create a user group, we navigate to
Users & Authorizations -> User Groups -> Create
We name the new group as "ntifiasgroup"
Finally, we add our new user to the new group.
We select the group in the list, then press “Add”.
From the list, we select our new user and press “Save”.
We can verify the assignment in the user details of the new user (see “Groups” Tab).
In this chapter we’re doing some required configuration steps in our subaccount of BTP
Note:
It must be the same subaccount in which the CPI tenant is subscribed.
What we want to do:
Allow IAS-users to access our ntif-application which calls the iFlow, in our subaccount.
To do so,
1. we need trust and
2. we need to take care about authorizations.
To configure the IAS as trusted Identity Provider, we just need to press one button.
To press that one button, we need to press other buttons to navigate
to our subaccount -> Security -> Trust Configuration
Here we press the one “Establish Trust” button.
In the wizard you should see at least one entry of IAS tenant that is assigned to your account by SAP.
If not, you probably need to open a support ticket.
In the course of the wizard, you can enter some names that will later appear in the Trust-Configuration-List and in the logon page.
For our tutorial, we disable the checkbox “ Use as default for noninteractive logon”
The result can be viewed in the details screen of the new trust configuration:
Note:
Such trust configuration can be easily deleted after testing, or some names can be configured after definition.
Also, an existing trusted IdP can be temporarily disabled
Or it can be marked as not available for user login.
Docu can be found here.
Optional: Understand IAS
After establishing trust, we can go to our IAS tenant to view what has happened:
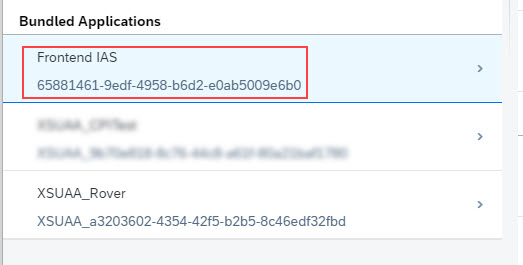
We go to "Applications" and find:
We can see that an “application” (this is IAS-language) has been generated.
The upper name is prefixed with "XSUAA" to show that it has been created by XSUAA.
The suffix is the subaccount name, as there's only one XSUAA server per subaccount.
The second name (below) contains the guid of the subaccount-tenant which can be found in the subaccount overview screen:
We select this new application and open the “OpenID Connect Configuration”, where we can see the name of the IAS-trust and the IDP-certificate that is now trusted by our XSUAA.
We leave this screen and open the “Client Authentication” screen.
Here we have a look at the generated client id:
This means that XSUAA itself can act as an oauth-client and is entitled to receive a JWT token.
This is important to get our scenario running.
We should remember this client id, it starts with cf2af and we remember it in red color.
Optional: Remember client id
Here it is again:
Now that we’ve enabled IAS-users to access our BTP-subaccont, we need to take care about authorizations.
In previous chapter we’ve assigned our IAS-user to an IAS-group.
What we want to achieve now:
All members of that IAS-Group should automatically get our BTP-roles assigned when they log in to our BTP-app.
In BTP, Roles are assigned via “Role Collections”.
We create a Role Collection with a name of your choice at
Subaccount -> Security -> Role Collections -> Press big blue plus and enter a name
Now we can select the role collection and press “Edit”
Add Roles
We add the 2 Ntif-roles which we created in CPI tenant.
Configure User Group
In the section “User Group”, we choose our IAS from the drop-down (there might be only one entry).
In the right field, we have to enter the exact name of our group which we created in IAS
That’s it, we can save.
We want to create a very simple frontend application that is protected with OIDC via IAS.
The login is handled by Approuter.
The app does nothing than calling the iFlow endpoint.
However, this is not too trivial, as it is supposed to use the user-JWT token, which allows to propagate the user-identity to any backend that can be connected to the iFlow
First we create 2 required service instances.
This step contains one of the 2 basic learnings of this tutorial:
The magic configuration option which allows to exchange an IAS-token for an XSUAA-token.
The config file for identity service creation looks like this:
🔷 config-ias.json
🔸redirect-uris
This property contains a list of allowed URLs.
Redirect takes place during the OAuth flow "Authorization Code":
A short string is sent by IAS to this URL and to ensure security, it is done only if the redirect-URL is allowed.
So if you get errors during login, the reason might be in this config.
You have to adapt the redirect URL to match the URL of your deployed app.
🔸display-name
The display name is optional and is shown in the IAS and in login for end users.
We'll see it later when we run our scenario.
🔸xsuaa-cross-consumption
This property tells IAS to issue a token which is not only consumed by our IAS-based application.
It can be also consumed by XSUAA itself.
To do so, the client id of XSUAA will be added to the aud claim of the issued token.
That’s all the magic
OK.
To create the service instance, we run the following command from our project directory:
cf cs identity application frontendIas -c config-ias.json
Optional: View IAS
After creation, we can view the result in IAS
We can see that an "application" entry has been created.
The second name is the guid of the service instance
Don’t believe?
To confirm, run the following command:
cf service frontendIas --guid
If we need to change the configured redirect uris, we can do so in the “OpenID Connect Configuration” screen.
An interesting configuration can be found in the “Dependencies” screen.
Here we can see that the Subaccount-XSUAA-application has been entered as dependency:
Means our client requires the other client, so both have to go into the audience
We need to create an instance of the "cpi-runtime".
This is how I call it 😉
In reality, it is called “Process Integration Runtime” or the technical name “it-rt”.
This instance is required because it provides us with access to the iFlow endpoint.
Creating an instance of cpi-runtime will lead to creation of an instance of XSUAA under the hood.
The hidden XSUAA instance is configured with the settings that we provide for the cpi-runtime.
These are the settings:
🔷 config-cpi.json
🔸grant-types
This is a kind of filter.
The iFlow is called with a jwt token, and the jwt token contains a property (claim) which carries the information about how it was obtained.
In our example, if the jwt token was fetched by using the client-credentials flow, then the access to the iFlow will be denied.
We allow only tokens that were fetched with token exchange (jwt-bearer).
🔸roles
The roles specified here will be added to the JWT token.
However, the roles must have been created beforehand in the CPI dashboard.
OK.
To create the instance:
cf cs it-rt integration-flow ntifIfl -c config-cpi.json
Our application consists of 2 modules: Approuter and the application itself
4.3.1. Approuter
Approuter is typically used by people-centric applications. Users access the app via Approuter, which handles the login.
Approuter is an existing node module provided by SAP.
It only needs to be configured.
During deployment, it is downloaded and started as configured in its package.json file.
🔷 package.json:
So when a user accesses our application, he will open the URL of Approuter.
Our task is to define a route from Approuter to our app:
🔷 xs-app.json:
The snippet shows:
Approuter will handle the login with IAS.
The user will type an entry url following this scheme:
<approuterURL>/tofrontend/<serviceEndpoint>
The serviceEndpoint is looked up at the destination which is created in the cockpit or simply defined in our manifest (favorite approach for POCs and tutorials).
4.3.2. Application
Our application has only one job to do: call the iFlow endpoint.
Afterwards, it just displays some interesting information about JWT-internals.
Our app is accessed via a REST endpoint.
it takes the JWT token which is forwarded by Approuter
This is the OIDC – token that was issued by IAS.
It is an id-token, it contains information about the user, nothing else.
Means, it doesn’t contain information about authorization, user roles, etc
Now we use this token and exchange it for an XSUAA token
We’ll come to the details in a second.
The token was exchanged for CPI, so we can use it to call the iFlow endpoint:
That’s it.
The response of our webservice just prints the (relevant) content of the 2 tokens to the browser:
Now let’s have a look into the interesting part, which is the second (and last) main learning of this whole tutorial:
How to exchange an IAS-token for an XSUAA-token?
The answer is: it is just normal.
So the main second learning is: we do token exchange without mighty additions.
Yes, it is interesting that it works without special setting.
Anyways, let’s view what we’re doing:
🔷 server.js
We’re fetching a token at the normal token endpoint of XSUAA.
We get the full URL from the binding of cpi-runtime service.
Note:
Full URL means, we don’t have to append /oauth/token, as we usually do.
So below line is specific to CPI:
The request is authenticated with clientid / secret, as usual.
We take the credentials from the CPI-binding.
The absolute surprising learning here is:
Why can we exchange the token, if the clientid of cpi is not contained in the aud claim?
Yes, it works because the XSUAA-clientid is in the aud .
The POST-request contains the usual data which is used for token exchange:
The grant type used for token exchange is fully qualified jwt-bearer and the existing IAS-token is sent as well as request parameter.
The rest of the code is just the normal POST-request sent to the iFlow endpoint and some lines for formatting the response.
The full code can be found in the appendix.
Before we deploy we can have a short look at the deployment descriptor
🔷 manifest.yml:
We can see that it contains 2 entries for our 2 apps.
We can see that both apps are bound to the instance of identity service, which is used to protect the endpoints.
We can also see the destination which is used by the Approuter-route and which is set as environment variable.
The short look is over and we deploy the app to Cloud Foundry with
cf push
Reaching the last chapter of this tutorial.
After deploying iFlow and application, we’re ready to run the scenario, hoping that the configurations in IAS and BTP are correct
To run our scenario, we invoke our app which will then trigger the iFlow and print the response of the iFlow in the browser window.
In my example, the app has the following url:
https://frontrouter.cfapps.eu12.hana.ondemand.com/tofrontend/homepage
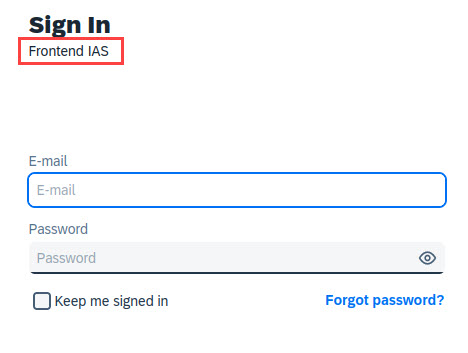
First we’re asked for login.
As we can see, the screen is sent by IAS, and it contains the display name which we configured when creating the instance of identity service.
After entering mail and (updated) pwd of our joe cool user, we get the desired result:
We can see that our good friend Joe has logged into our frontend app.
And we can even see the (IAS-) group assigned to him.
The token doesn’t contain the oauth-information like clientid or scopes.
But it contains the aud claim and we can see what we were talking about:
It contains 2 entries....
YES
The second one is the one that we wanted to remember cf2af in red color.
This is the special client which is important for your scenario, as it allows to exchange the IAS-token for XSUAA-token.
It is the client id of the XSUAA.
The first aud entry is - as usual - the client id of the identity-service-instance itself.
We can check it e.g. by viewing the environment variable of our app
cf env frontapp
We can see the guid starting with 21d9
After token exchange, we can see that the user details have been preserved, we see the name and uuid:
Interesting to see, the issuer of the token is now the XSUAA server.
However, the IAS is still there, it is in the oidcissuer attribute of the external attributes claim.
And we have the information in the origin, which is filled with the origin-key of the Trust Configuration (remember? See chapter 3.1.)
The very interesting part is that the required scope is available
Yippieeee!!
Also interesting is again the aud claim: here the (IAS-)client ids have disappeared and we can see the clientid of the cpi-runtime-instance.
To verify the client id, we can have a look at the app environment again, this time the CPI-env:
That’s it, we’ve seen what we wanted to see and we’ve learned at least a bit of what we wanted to learn.
yipie..;-(
Oh, sounds disappointed.
Was hoping to learn more...
OK, let's add 2 more optional chapters.
The IAS provides a useful feature for troubleshooting which allows us to view the (relevant) info of OIDC tokens.
It can be accessed from the admin landing page -> Monitoring & Reporting -> Troubleshooting Logs
Or the direct link:
https://abcd.accounts400.ondemand.com/admin/#/troubleshootingLogs
To view existing log entries we adapt the filter:
- Change Severity to INFO
- Adapt date if necessary
press Go
To further refine the result list:
- we type “issueJwt” in the Search field
press Enter
It might be necessary to adapt the time box, as the JWT token is issued only at first request
Once we have an entry, we can click on “Log Details”.
Example result:
Explanation:
🔸objectType
The type is not an oauth-client, but openIdClient, sounds logical.
🔸objectId
is the client id of our identity service instance. With other words, it is the client id of the “application” entry in IAS (with name Frontend IAS).
🔸workflow
OIDC is used for authentication and it adds a few security relevant steps during login.
🔸userIdentifier
is the user_uuid.
🔸grant_type
As we know, OIDC relies on OAuth as authorization framework and the OAuth flow used during login is the well-know “Authorization Code” flow which is also used by XSUAA-based logins.
🔸serviceProvider
is the guid of the instance of identity service. With other words, it is the second name of the “application” entry in the IAS.
For the sake of curiosity, in this section we want to add one last curious peek:
We want to view the user info from inside the iFlow.
Because that's why we're doing all this token exchange stuff: because we want to have the user in the iFlow, and we want to propagate it to a connected backend, and maybe we need to evaluate some data to adapt the iFlow.
Yes, maybe.
So, let's add a groovy script step to our iFlow with below code:
Note:
It might be necessary "allow incoming headers" in the iFlow:
Click on background of iFlow -> property sheet -> Runtime Configuration
In the field “Allowed Headers”, enter header name, or just an asterisk during prototyping.
To help you with housekeeping, please find below the required steps for your convenience.
🔹 Delete app and approuter
cf d -r -f frontapp
cf d -r -f frontrouter
🔹 Delete service instances
cf ds frontendIas -f
cf ds ntifIfl -f
🔹 Delete User Roles in CPI (this deletes also the roles in BTP)
🔹 Delete iFlow
In this blog post we’ve learned how to access an iFlow endpoint from an IAS-based application.
The challenge in this scenario is the fact that theiFlow is protected with XSUAA and cannot accept an OIDC token which is issued by IAS.
The solution is a built-in support for exchanging IAS-token for XSUAA-token.
The solution involves 2 steps:
Create identity service instance with a specific parameter.
Do token exchange to get an XSUAA token from IAS-token.
In our scenario we’ve used IAS, BTP, a node app and an iFlow.
To get the scenario running, 2 basic infos are required:
1. The important setting in the config params for creating identity service instance:
"xsuaa-cross-consumption": true
2. Do token exchange
This is just a normal token exchange request (jwt-bearer), nothing special for IAS-XSUAA-cross.
The clientid/secret are used from CPI runtime instance.
SAP Help Portal
CPI:
Creating Service instance and Key for Inbound Authentication
Examples for Service Instance and Key Parameters.
SAP Cloud Identity Services - Identity Authentication:
Entry in Discovery Center
IAS Landing Page
IAS User Management
Identity service: Reference for config params
IAS: View Troubleshooting Logs, to view OIDC tokens
IAS: logging OICD tokens
IAS: getting a tenant
Establish trust
Node.js
IAS supported by Security Library for node.js
SAP Approuter
Blog Posts
Mandys blog post about inbound connection.
My blog post about XSUAA user attributes.
Blog about user roles and attributes and accessing JWT in script
Security Glossary Blog
Other
JWT specification: rfc7519
IANA JWT Claims.
Cloud Foundry UAA docu: introspect token
Cloud Foundry CLI Installation guide
Spec for token exchange, i.e. request access token via JWT bearer token
OAuth 2.0 Token Exchange rfc8693
Project Structure:
Note:
You might need to adapt the app names in manifest and the domain of the routes.
Also, if you changed the name of the target endpoint, make sure to adapt.
root
config-cpi.json
config-ias.json
manifest.yml
app
package.json
server.js
approuter
package.json
xs-app.json
In this tutorial we create an app in Cloud Foundry that is protected via IAS and calls an iFlow.
Since the iFlow is protected via XSUAA, it requires some special blog post to learn how this scenario can be realized.
Alternatively, if you're not on IAS, try this blog post: call iFlow from XSUAA-based app
Alternatively, if you're looking for outbound scenario, see here.
Technologies covered:
SAP Business Technology Platform (BTP), Cloud Foundry
SAP Cloud Integration (CPI)
Identity Authentication Service (IAS)
XSUAA
Node.js
Quicklinks:
Quick Guide
Sample Code
Content
0.1. Prerequisites
0.2. Preparation
0.3. Introduction:
1. CPI: Create Roles and iFlow
2. IAS: Create User and Group
3. BTP: Configure Trust and Role Collection
4. DEV: Create Frontend Application
5. Run
6. Optional: Troubleshooting
7. Optional: Access User Info in Script
8. Clean Up
Appendix: Sample Application Code
0.1. Prerequisites
- Access to BTP and admin permissions in subaccount
- Access to a Cloud Integration tenant.
- Access to IAS
- Familiar with Node.js, although the tutorial can be followed without local Node.js installation.
0.2. Preparation
In the course of the tutorial we're going to create a node app, so we need a project folder on file system.
In my example, the structure looks as follows:

The full file content can be found in the appendix.
0.3. Introduction
In SAP BTP Cloud Foundry environment, we’re creating an application and we’re using IAS / OIDC to protect it.
Means, we aren’t using XSUAA to protect it.
Why not?
Because IAS and OIDC is more complex and more safe and more powerful and new and hyped, etc.
Our app is a frontend application that uses Approuter to handle user-login.
The JWT token that is issued on user-login, is forwarded to our application endpoint.
This token is not compatible with those that are issued or required by XSUAA.
As such, we cannot use it to call a REST endpoint that is protected with XSUAA.
That’s a pity
However, in our application setup, we need to send a request from our app to an endpoint in CPI.
CPI uses XSUAA to protect the exposed endpoints.
That's a problem
Yes.
Bad news
But there's a good news:
Although this doesn’t work out-of-the-box, there’s a way to achieve it.
Is it shown in this tutorial?
Siure.
Below diagram shows the high-level scenario:
We can see the 2 basic components: the frontend app (node.js) and the iflow.
The frontend app is protected with OIDC, it is bound to an instance of Identity service.
The frontend app needs to call the iFlow endpoint, but that is protected with OAuth, via XSUAA.
The Subaccount has a trust relationship to a tenant of Identity Authentication Service (IAS).
End user calls the frontend app and is authenticated against the IAS.
The second diagram shows a few more details:
The node app has binding to identity service instance to protect its endpoint.
The user login is handled by Approuter, the IAS-token is sent to the node app.
Note: "IAS-token" is not an official term, just using to distinguish.
The node app has another binding to cpi-runtime service, so it can get credentials to call the iFlow endpoint, with a token issued by XSUAA.
The identity service acts as a proxy to the IAS-tenant.
What is the challenge?
After user logs in to our frontend app, a JWT token is issued by IAS.
We cannot use this token for calling the iFlow, as it requires a JWT token issued by XSUAA.
Usually in such scenarios, we would do token exchange.
What is token exchange?
We have a user-centric frontend app. The app wants to call a protected service in BTP.
To do so, the jwt-bearer grant type can be used to fetch a token.
An existing user-token is sent to XSUAA and a new token is returned which can be used to call the backend service.
The advantage: the user information is preserved
See my blog series to learn more about it.
In our example, token exchange allows to propagate the user-identity to any backend that can be connected to the iFlow.
That’s why we don’t use client-credentials grant type for calling the iFlow.
However: a token can only be exchanged if it is accepted by the target.
And the IAS-token wouldn’t be accepted by the XSUAA-protected iFlow endpoint.
What isthe solution?
The solution is easy.
There’s a built-in mechanism to support exactly our scenario:
When creating an instance of identity service, we can add the property
xsuaa-cross-consumption and set it to true.
As a consequence, the IAS will issue a JWT token that contains a second entry in the audience claim.
This has the effect that the token exchange will be successful.
We’ll have a closer look during our tutorial.
What is the "audience"?
The "audience" is a property which is contained in the JWT token, called the aud claim.
As we know, OAuth is a framework to describe how authorization info can be accessed on behalf of a user.
We have a resource that should be accessed by a client app.
To do so, the client app registers at the so-called Authorization Server (in our case: XSUAA).
After registration (in our case, create service instance of cpi-runtime), the client receives credentials to call the Authorization server.
In our case, these credentials are provided in the binding and are contained in the properties clientid and clientsecret (like user/pwd).
So the client app calls the Auth server with these credentials and in the response it receives a JWT token.
This token can be used to access a resource that is protected using the same clientid.
How does it work?
The issued JWT token is a piece of data in JSON format (encoded with base64).
The data contains information that is validated by the resource (in our case, the iFlow endpoint).
The validator reads the JWT data and is interested in this basic info:
🔸the token must be issued by the same Authorization server
This info is contained in the iss claim.
🔸the token must be issued for the same oauth client, with the same id
This info is contained in the aud claim
The audience is the intended receiver of the token
What is the mechanism?
In our example, the clientid which is contained in the instance of cpi-runtime would be the required client.
But this cannot be achieved, because the IAS simply has no knowledge about the clientid of cpi-runtime.
The built-in mechanism to ensure compatibility between IAS and XSUAA based components, is different.
To work with IAS from BTP, we need to “establish Trust” between the subaccount and the IAS tenant.
During this process, a client is registered at IAS.
This client represents the subaccount.
More precisely, it represents the XSUAA server of the subaccount.
This client has a client id.
And this is the client id that is added to the audience.
OK
Now, with the XSUAA-client in the audience, we do token exchange.
We send the IAS-token to the XSUAA server which recognizes its own clientid in the token and agrees to proceed.
This request contains the clientid of cpi-runtime and so the exchanged token can be accepted by the iFlow.
And that’s it.
This is how we get a JWT token which is accepted by the iFlow, even though the clientid of CPI is not contained in the aud.
What about Authorization?
Up to now we’ve considered only authentication.
However, REST endpoints in BTP do typically require a certain scope or User Role.
So the question is: how to get the required scope into the token?
The solution is standard mechanism, when working with external Identity Providers.
In BTP, the CPI-roles are added to a role collection.
The role collection is mapped to a “user group”.
This user group is defined in the IAS and the end-user of the scenario is added to the group.
This is how an end-user who logs in at IAS, will get the scope required by XSUAA.
Summarize
We have special config for identity service
user logs in to frontend app
IAS issues a JWT token
It contains the XSUAA-clientid in the aud
We do token exchange
Result: JWT token with CPI-clientid and CPI-scopes
What’s next?
That has been all much too theoretical.
Now we can start with the tutorial.
And we repeat the theory with practical examples.
omg
Haha – just kidding
Disclaimer:
Below code and design is not an official recommendation.
It is just my personal learning which I like to share with the community.
1. CPI: Create Roles and iFlow
The first short part of the tutorial takes place in the CPI tenant.
We need to create a very simple iFlow that can be called by our node app.
The iFlow should be protected by a user role .
1.1. Create User Roles
First of all, we create some user roles in CPI -> Monitor Artifacts -> Manage Security -> User Roles
We “Add” 2 roles like:
🔹Ntif.Read
🔹Ntif.Write

The dashboard allows to download or copy the roles in json format, which is useful for the next step.
Optional: View Roles
After creating User Roles in the CPI dashboard, the standard role mechanism of BTP is triggered under the hood. Means that scopes and role templates and default roles are generated under the hood.
See: Subaccount -> Security -> Roles -> filter for Ntif

I recommend this little chapter for understanding Roles in BTP.
1.2. Create iFlow
Our integration flow is very simple:
We only need to create an HTTPS sender adapter.
No more steps are required.
When we call the endpoint from our app, we’ll receive a response from CPI anyways.

The configuration of the HTTP adapter:
🔸 Address
set to /ntif
Note that this endpoint name must match the endpoint used in our node app
🔸 Authorization
Set to "User Role"
🔸 User Role
We press the “Select” button and choose "Ntif.Read"
🔸 CSRF
Checkbox disabled.

After configuring the HTTPS adapter, we can save and deploy the iFlow.
2. IAS: Create User and Group
In this chapter we maintain a user in our IAS tenant.
We login with admin user to the IAS at e.g.
https://abc.accounts400.ondemand.com/admin/
2.1. Create User
For our testing, we create a new business user (end user).
Users & Authorizations -> User Management
We press “Add User” button in the right bottom corner and enter some data of our choice.
We choose to set an "initial password" because like that we don't need a real eMail for verification.

Afterwards we should enter the details page of the user, press the pencil icon for edit more, then enable the checkbox “email verified”.
Note that the user will need to change password upon first login.
2.2. Create Group
To create a user group, we navigate to
Users & Authorizations -> User Groups -> Create
We name the new group as "ntifiasgroup"

2.3. Add user to group
Finally, we add our new user to the new group.
We select the group in the list, then press “Add”.
From the list, we select our new user and press “Save”.
We can verify the assignment in the user details of the new user (see “Groups” Tab).
3. BTP: Configure Trust and Role Collection
In this chapter we’re doing some required configuration steps in our subaccount of BTP
Note:
It must be the same subaccount in which the CPI tenant is subscribed.
What we want to do:
Allow IAS-users to access our ntif-application which calls the iFlow, in our subaccount.
To do so,
1. we need trust and
2. we need to take care about authorizations.
3.1. Establish Trust
To configure the IAS as trusted Identity Provider, we just need to press one button.
To press that one button, we need to press other buttons to navigate
to our subaccount -> Security -> Trust Configuration
Here we press the one “Establish Trust” button.
In the wizard you should see at least one entry of IAS tenant that is assigned to your account by SAP.
If not, you probably need to open a support ticket.
In the course of the wizard, you can enter some names that will later appear in the Trust-Configuration-List and in the logon page.
For our tutorial, we disable the checkbox “ Use as default for noninteractive logon”
The result can be viewed in the details screen of the new trust configuration:

Note:
Such trust configuration can be easily deleted after testing, or some names can be configured after definition.
Also, an existing trusted IdP can be temporarily disabled
Or it can be marked as not available for user login.
Docu can be found here.
Optional: Understand IAS
After establishing trust, we can go to our IAS tenant to view what has happened:
We go to "Applications" and find:

We can see that an “application” (this is IAS-language) has been generated.
The upper name is prefixed with "XSUAA" to show that it has been created by XSUAA.
The suffix is the subaccount name, as there's only one XSUAA server per subaccount.
The second name (below) contains the guid of the subaccount-tenant which can be found in the subaccount overview screen:

We select this new application and open the “OpenID Connect Configuration”, where we can see the name of the IAS-trust and the IDP-certificate that is now trusted by our XSUAA.
We leave this screen and open the “Client Authentication” screen.
Here we have a look at the generated client id:

This means that XSUAA itself can act as an oauth-client and is entitled to receive a JWT token.
This is important to get our scenario running.
We should remember this client id, it starts with cf2af and we remember it in red color.
Optional: Remember client id
Here it is again:
cf 2 af
3.2. Create Role Collection
Now that we’ve enabled IAS-users to access our BTP-subaccont, we need to take care about authorizations.
In previous chapter we’ve assigned our IAS-user to an IAS-group.
What we want to achieve now:
All members of that IAS-Group should automatically get our BTP-roles assigned when they log in to our BTP-app.
In BTP, Roles are assigned via “Role Collections”.
We create a Role Collection with a name of your choice at
Subaccount -> Security -> Role Collections -> Press big blue plus and enter a name
3.3. Configure Role Collection and Mapping
Now we can select the role collection and press “Edit”
Add Roles
We add the 2 Ntif-roles which we created in CPI tenant.
Configure User Group
In the section “User Group”, we choose our IAS from the drop-down (there might be only one entry).
In the right field, we have to enter the exact name of our group which we created in IAS

That’s it, we can save.
4. DEV: Create Frontend Application
We want to create a very simple frontend application that is protected with OIDC via IAS.
The login is handled by Approuter.
The app does nothing than calling the iFlow endpoint.
However, this is not too trivial, as it is supposed to use the user-JWT token, which allows to propagate the user-identity to any backend that can be connected to the iFlow
First we create 2 required service instances.
4.1. Create IAS Service Instance
This step contains one of the 2 basic learnings of this tutorial:
The magic configuration option which allows to exchange an IAS-token for an XSUAA-token.
The config file for identity service creation looks like this:
🔷 config-ias.json
"oauth2-configuration":{

   "redirect-uris": [" https://*.cfapps.eu12.hana.ondemand.com/login/callback" ]

},

"xsuaa-cross-consumption": true,

"display-name": "Frontend IAS"
🔸redirect-uris
This property contains a list of allowed URLs.
Redirect takes place during the OAuth flow "Authorization Code":
A short string is sent by IAS to this URL and to ensure security, it is done only if the redirect-URL is allowed.
So if you get errors during login, the reason might be in this config.
You have to adapt the redirect URL to match the URL of your deployed app.
🔸display-name
The display name is optional and is shown in the IAS and in login for end users.
We'll see it later when we run our scenario.
🔸xsuaa-cross-consumption
This property tells IAS to issue a token which is not only consumed by our IAS-based application.
It can be also consumed by XSUAA itself.
To do so, the client id of XSUAA will be added to the aud claim of the issued token.
That’s all the magic
OK.
To create the service instance, we run the following command from our project directory:
cf cs identity application frontendIas -c config-ias.json
Optional: View IAS
After creation, we can view the result in IAS
We can see that an "application" entry has been created.
The second name is the guid of the service instance
Don’t believe?
To confirm, run the following command:
cf service frontendIas --guid
If we need to change the configured redirect uris, we can do so in the “OpenID Connect Configuration” screen.
An interesting configuration can be found in the “Dependencies” screen.
Here we can see that the Subaccount-XSUAA-application has been entered as dependency:

Means our client requires the other client, so both have to go into the audience
4.2. Create CPI Service Instance
We need to create an instance of the "cpi-runtime".
This is how I call it 😉
In reality, it is called “Process Integration Runtime” or the technical name “it-rt”.
This instance is required because it provides us with access to the iFlow endpoint.
Creating an instance of cpi-runtime will lead to creation of an instance of XSUAA under the hood.
The hidden XSUAA instance is configured with the settings that we provide for the cpi-runtime.
These are the settings:
🔷 config-cpi.json
{

    "grant-types": [

        "urn:ietf:params:oauth:grant-type:jwt-bearer"

    ],

    "roles": [

      "Ntif.Write",

      "Ntif.Read"

    ]

}
🔸grant-types
This is a kind of filter.
The iFlow is called with a jwt token, and the jwt token contains a property (claim) which carries the information about how it was obtained.
In our example, if the jwt token was fetched by using the client-credentials flow, then the access to the iFlow will be denied.
We allow only tokens that were fetched with token exchange (jwt-bearer).
🔸roles
The roles specified here will be added to the JWT token.
However, the roles must have been created beforehand in the CPI dashboard.
OK.
To create the instance:
cf cs it-rt integration-flow ntifIfl -c config-cpi.json
4.3. Create Application
Our application consists of 2 modules: Approuter and the application itself
4.3.1. Approuter
Approuter is typically used by people-centric applications. Users access the app via Approuter, which handles the login.
Approuter is an existing node module provided by SAP.
It only needs to be configured.
During deployment, it is downloaded and started as configured in its package.json file.
🔷 package.json:
    "dependencies": {

        "@sap/approuter": "latest"

    },

    "scripts": {

        "start": "node node_modules/@sap/approuter/approuter.js"
So when a user accesses our application, he will open the URL of Approuter.
Our task is to define a route from Approuter to our app:
🔷 xs-app.json:
    "authenticationMethod": "route",

    "routes": [{

        "source": "^/tofrontend/(.*)$",

        "target": "$1",

        "destination": "destination_frontend",

        "authenticationType": "ias"
The snippet shows:
Approuter will handle the login with IAS.
The user will type an entry url following this scheme:
<approuterURL>/tofrontend/<serviceEndpoint>
The serviceEndpoint is looked up at the destination which is created in the cockpit or simply defined in our manifest (favorite approach for POCs and tutorials).
4.3.2. Application
Our application has only one job to do: call the iFlow endpoint.
Afterwards, it just displays some interesting information about JWT-internals.
Our app is accessed via a REST endpoint.
app.get('/homepage', async (req, res) => {it takes the JWT token which is forwarded by Approuter
const userToken = req.tokenInfo.getTokenValue()This is the OIDC – token that was issued by IAS.
It is an id-token, it contains information about the user, nothing else.
Means, it doesn’t contain information about authorization, user roles, etc
Now we use this token and exchange it for an XSUAA token
const cpiToken = await _doTokenExchange(userToken)We’ll come to the details in a second.
The token was exchanged for CPI, so we can use it to call the iFlow endpoint:
const cpiResult = await _callCPI(cpiToken)That’s it.
The response of our webservice just prints the (relevant) content of the 2 tokens to the browser:
res.send(`  <h4>JWT after user login via IAS</h4>${htmlUser}

            <h4>JWT after token exchange</h4>${htmlExchanged}

            <h4>Response from iFlow</h4>${cpiResult}.</p>`)
Now let’s have a look into the interesting part, which is the second (and last) main learning of this whole tutorial:
How to exchange an IAS-token for an XSUAA-token?
The answer is: it is just normal.
So the main second learning is: we do token exchange without mighty additions.
Yes, it is interesting that it works without special setting.
Anyways, let’s view what we’re doing:
🔷 server.js
async function  _doTokenExchange(jwt) {

    const grant = 'urn:ietf:params:oauth:grant-type:jwt-bearer'

    const options = {

        url: CREDENTIALS_CPI.tokenurl,

        headers: {

            Authorization: "Basic " + Buffer.from(CREDENTIALS_CPI.clientid + ':' + CREDENTIALS_CPI.clientsecret).toString("base64"),

            'Content-Type': 'application/x-www-form-urlencoded'

        },

        method: 'POST',

        data : `grant_type=${grant}&response_type=token&assertion=${jwt}`

    }


    const response = await axios(options)

    return response.data.access_token

}
We’re fetching a token at the normal token endpoint of XSUAA.
We get the full URL from the binding of cpi-runtime service.
Note:
Full URL means, we don’t have to append /oauth/token, as we usually do.
So below line is specific to CPI:
url: CREDENTIALS_CPI.tokenurl,The request is authenticated with clientid / secret, as usual.
We take the credentials from the CPI-binding.
Authorization: "Basic " + Buffer.from(CREDENTIALS_CPI.clientid + ':' + CREDENTIALS_CPI.clientsecret).toString("base64"),The absolute surprising learning here is:
Why can we exchange the token, if the clientid of cpi is not contained in the aud claim?
Yes, it works because the XSUAA-clientid is in the aud .
The POST-request contains the usual data which is used for token exchange:
const grant = 'urn:ietf:params:oauth:grant-type:jwt-bearer'

data : `grant_type=${grant}&response_type=token&assertion=${jwt}`
The grant type used for token exchange is fully qualified jwt-bearer and the existing IAS-token is sent as well as request parameter.
The rest of the code is just the normal POST-request sent to the iFlow endpoint and some lines for formatting the response.
The full code can be found in the appendix.
4.4. Deploy
Before we deploy we can have a short look at the deployment descriptor
🔷 manifest.yml:
---

applications:

  - name: frontapp

    routes:

    - route: frontapp.cfapps.eu12.hana.ondemand.com

    services:

    - name: frontendIas

    - name: ntifIfl

  - name: frontrouter

    routes:

    - route: frontrouter.cfapps.eu12.hana.ondemand.com

    env:

      destinations: >

        [

          {

            "name":"destination_frontend",

            "url":"https://frontapp.cfapps.eu12.hana.ondemand.com",

            "forwardAuthToken": true

          }

        ]

    services:

    - name: frontendIas
We can see that it contains 2 entries for our 2 apps.
We can see that both apps are bound to the instance of identity service, which is used to protect the endpoints.
We can also see the destination which is used by the Approuter-route and which is set as environment variable.
The short look is over and we deploy the app to Cloud Foundry with
cf push
5. Run Scenario
Reaching the last chapter of this tutorial.
After deploying iFlow and application, we’re ready to run the scenario, hoping that the configurations in IAS and BTP are correct
To run our scenario, we invoke our app which will then trigger the iFlow and print the response of the iFlow in the browser window.
In my example, the app has the following url:
https://frontrouter.cfapps.eu12.hana.ondemand.com/tofrontend/homepage
First we’re asked for login.
As we can see, the screen is sent by IAS, and it contains the display name which we configured when creating the instance of identity service.
After entering mail and (updated) pwd of our joe cool user, we get the desired result:

We can see that our good friend Joe has logged into our frontend app.
And we can even see the (IAS-) group assigned to him.
The token doesn’t contain the oauth-information like clientid or scopes.
But it contains the aud claim and we can see what we were talking about:
It contains 2 entries....
YES
The second one is the one that we wanted to remember cf2af in red color.
This is the special client which is important for your scenario, as it allows to exchange the IAS-token for XSUAA-token.
It is the client id of the XSUAA.
The first aud entry is - as usual - the client id of the identity-service-instance itself.
We can check it e.g. by viewing the environment variable of our app
cf env frontapp
We can see the guid starting with 21d9

After token exchange, we can see that the user details have been preserved, we see the name and uuid:

Interesting to see, the issuer of the token is now the XSUAA server.
However, the IAS is still there, it is in the oidcissuer attribute of the external attributes claim.
And we have the information in the origin, which is filled with the origin-key of the Trust Configuration (remember? See chapter 3.1.)
The very interesting part is that the required scope is available
Yippieeee!!
Also interesting is again the aud claim: here the (IAS-)client ids have disappeared and we can see the clientid of the cpi-runtime-instance.
To verify the client id, we can have a look at the app environment again, this time the CPI-env:

That’s it, we’ve seen what we wanted to see and we’ve learned at least a bit of what we wanted to learn.
yipie..;-(
Oh, sounds disappointed.
Was hoping to learn more...
OK, let's add 2 more optional chapters.
6. Optional: View Troubleshooting Logs
The IAS provides a useful feature for troubleshooting which allows us to view the (relevant) info of OIDC tokens.
It can be accessed from the admin landing page -> Monitoring & Reporting -> Troubleshooting Logs
Or the direct link:
https://abcd.accounts400.ondemand.com/admin/#/troubleshootingLogs
To view existing log entries we adapt the filter:
- Change Severity to INFO
- Adapt date if necessary
press Go
To further refine the result list:
- we type “issueJwt” in the Search field
press Enter
It might be necessary to adapt the time box, as the JWT token is issued only at first request

Once we have an entry, we can click on “Log Details”.
Example result:
| state="successful", action="issueJwtToken", objectType="openIdClient", objectId="21d9f84c-21b1-46ff-9b1c-6306f4c17b8f", category="audit.authentication", jwtPayload="{ <skip because we know already> }", workflow="openIdConnect", userIdentifier="4f09655f-0f2f-4f3b-bd17-047d280e33ac", grant_type="authorization_code", serviceProvider="65881461-9edf-4958-b6d2-e0ab5009e6b0" |
Explanation:
🔸objectType
The type is not an oauth-client, but openIdClient, sounds logical.
🔸objectId
is the client id of our identity service instance. With other words, it is the client id of the “application” entry in IAS (with name Frontend IAS).
🔸workflow
OIDC is used for authentication and it adds a few security relevant steps during login.
🔸userIdentifier
is the user_uuid.
🔸grant_type
As we know, OIDC relies on OAuth as authorization framework and the OAuth flow used during login is the well-know “Authorization Code” flow which is also used by XSUAA-based logins.
🔸serviceProvider
is the guid of the instance of identity service. With other words, it is the second name of the “application” entry in the IAS.
7. Optional: Access User Info in Groovy Script
For the sake of curiosity, in this section we want to add one last curious peek:
We want to view the user info from inside the iFlow.
Because that's why we're doing all this token exchange stuff: because we want to have the user in the iFlow, and we want to propagate it to a connected backend, and maybe we need to evaluate some data to adapt the iFlow.
Yes, maybe.
So, let's add a groovy script step to our iFlow with below code:
import com.sap.gateway.ip.core.customdev.util.Message;

import groovy.json.*

import org.apache.commons.codec.binary.Base64;

import com.sap.it.rt.scc.connectivity.security.IToken


def Message processData(Message message) {

    def messageLog = messageLogFactory.getMessageLog(message);


    //get auth object

    IToken authObject = message.getProperties().get("SAP_AuthHeaderValue");

    String serializedToken = authObject.serializeToken()


    // parse the auth object

    def jsonSlurper = new JsonSlurper();

    def authObjectJson = jsonSlurper.parseText(serializedToken)

    def token = authObjectJson.APP_TOKEN;


    // decode the JWT token

    String[] tokenSegments = token.split(\\.);

	def jwtPayloadBase64 = tokenSegments[1];

    Base64 base64 = new Base64(true);

    def jwtPayloadDecoded = new String(base64.decode(jwtPayloadBase64));

	def slurper = new JsonSlurper();

	def object = slurper.parseText(jwtPayloadDecoded)


	// access the info

	messageLog.addAttachmentAsString("JWT", "The JWT token: " + jwtPayloadDecoded, "text/plain");

	messageLog.addAttachmentAsString("USER", "The user: " + object.email, "text/plain");


    return message;

}
Note:
It might be necessary "allow incoming headers" in the iFlow:
Click on background of iFlow -> property sheet -> Runtime Configuration
In the field “Allowed Headers”, enter header name, or just an asterisk during prototyping.
8. Clean Up
To help you with housekeeping, please find below the required steps for your convenience.
🔹 Delete app and approuter
cf d -r -f frontapp
cf d -r -f frontrouter
🔹 Delete service instances
cf ds frontendIas -f
cf ds ntifIfl -f
🔹 Delete User Roles in CPI (this deletes also the roles in BTP)
🔹 Delete iFlow
Summary
In this blog post we’ve learned how to access an iFlow endpoint from an IAS-based application.
The challenge in this scenario is the fact that theiFlow is protected with XSUAA and cannot accept an OIDC token which is issued by IAS.
The solution is a built-in support for exchanging IAS-token for XSUAA-token.
The solution involves 2 steps:
Create identity service instance with a specific parameter.
Do token exchange to get an XSUAA token from IAS-token.
In our scenario we’ve used IAS, BTP, a node app and an iFlow.
Key Takeaways
To get the scenario running, 2 basic infos are required:
1. The important setting in the config params for creating identity service instance:
"xsuaa-cross-consumption": true
2. Do token exchange
This is just a normal token exchange request (jwt-bearer), nothing special for IAS-XSUAA-cross.
The clientid/secret are used from CPI runtime instance.
Links
SAP Help Portal
CPI:
Creating Service instance and Key for Inbound Authentication
Examples for Service Instance and Key Parameters.
SAP Cloud Identity Services - Identity Authentication:
Entry in Discovery Center
IAS Landing Page
IAS User Management
Identity service: Reference for config params
IAS: View Troubleshooting Logs, to view OIDC tokens
IAS: logging OICD tokens
IAS: getting a tenant
Establish trust
Node.js
IAS supported by Security Library for node.js
SAP Approuter
Blog Posts
Mandys blog post about inbound connection.
My blog post about XSUAA user attributes.
Blog about user roles and attributes and accessing JWT in script
Security Glossary Blog
Other
JWT specification: rfc7519
IANA JWT Claims.
Cloud Foundry UAA docu: introspect token
Cloud Foundry CLI Installation guide
Spec for token exchange, i.e. request access token via JWT bearer token
OAuth 2.0 Token Exchange rfc8693
Appendix 1: Sample Application Code
Project Structure:

Note:
You might need to adapt the app names in manifest and the domain of the routes.
Also, if you changed the name of the target endpoint, make sure to adapt.
root
config-cpi.json
{

    "grant-types": [

        "urn:ietf:params:oauth:grant-type:jwt-bearer"

    ],

    "roles": [

      "Ntif.Write",

      "Ntif.Read"

    ]

}
config-ias.json
{

    "oauth2-configuration":{

      "redirect-uris": ["https://*.cfapps.eu12.hana.ondemand.com/login/callback"]

    },

    "xsuaa-cross-consumption": true,

    "display-name": "Frontend IAS"

}
manifest.yml
---

applications:

  - name: frontapp

    path: app

    memory: 64M

    routes:

    - route: frontapp.cfapps.eu12.hana.ondemand.com

    buildpacks:

      - nodejs_buildpack

    services:

    - name: frontendIas

    - name: ntifIfl

  - name: frontrouter

    routes:

    - route: frontrouter.cfapps.eu12.hana.ondemand.com

    buildpacks:

      - nodejs_buildpack

    path: approuter

    memory: 128M

    env:

      destinations: >

        [

          {

            "name":"destination_frontend",

            "url":"https://frontapp.cfapps.eu12.hana.ondemand.com",

            "forwardAuthToken": true

          }

        ]

    services:

    - name: frontendIas
app
package.json
{

  "dependencies": {

    "@sap/xsenv": "latest",

    "@sap/xssec": "^3.2.13",

    "express": "^4.17.1",

    "passport": "^0.4.0",

    "axios": "0.24.0"

  }

}
server.js
const xsenv = require('@sap/xsenv')


const INSTANCES = xsenv.getServices({

    myIas:  {label:'identity'},

    myCpi:  {name: 'ntifIfl'}})

const CREDENTIALS_IAS = INSTANCES.myIas

const CREDENTIALS_CPI = INSTANCES.myCpi.oauth


const axios = require('axios')

const xssec = require('@sap/xssec')

const passport = require('passport')

const JWTStrategy = xssec.JWTStrategy

passport.use('JWT', new JWTStrategy(CREDENTIALS_IAS, "IAS"))


const express = require('express')

const app = express();

app.use(passport.initialize())

app.use(passport.authenticate('JWT', { session: false, failWithError: true }));


/* the server */

app.listen(process.env.PORT)


/* the endpoint */

app.get('/homepage', async (req, res) => {

    const userToken = req.tokenInfo.getTokenValue()


    // exchange IAS-token for XSUAA-token

    const cpiToken = await _doTokenExchange(userToken)

    // call iFlow

    const cpiResult = await _callCPI(cpiToken)


    // print token info to browser

    const htmlUser = _formatClaims(userToken)

    const htmlExchanged = _formatClaims(cpiToken)

    res.send(`  <h4>JWT after user login via IAS</h4>${htmlUser}

                <h4>JWT after token exchange</h4>${htmlExchanged}

                <h4>Response from iFlow</h4>${cpiResult}.</p>`)

})


async function  _doTokenExchange(jwt) {

    const grant = 'urn:ietf:params:oauth:grant-type:jwt-bearer'

    const options = {

        url: CREDENTIALS_CPI.tokenurl,

        headers: {

            Authorization: "Basic " + Buffer.from(CREDENTIALS_CPI.clientid + ':' + CREDENTIALS_CPI.clientsecret).toString("base64"),

            'Content-Type': 'application/x-www-form-urlencoded'

        },

        method: 'POST',

        data : `grant_type=${grant}&response_type=token&assertion=${jwt}`

    }


    const response = await axios(options)

    return response.data.access_token

}


async function _callCPI(jwt) {

    const options = {

        url: `${CREDENTIALS_CPI.url}/http/ntif`,

        headers: {

           'Content-Type': 'application/text',

           'Authorization': 'Bearer ' + jwt

        },

        method: 'POST',

        data : "Sending some Data from node application in BTP Cloud to iFlow endpoint"

    }


    const response = await axios(options)

    return response.data

}


function _formatClaims(jwtEncoded){

    const tokenInfo = new xssec.TokenInfo(jwtEncoded)

    const jwtDecoded = tokenInfo.getPayload()

    console.log(`===> The full JWT decoded: ${JSON.stringify(jwtDecoded)}`)


    const claims = new Array()

    claims.push(`email: ${jwtDecoded.email}`)

    claims.push(`<br>given name: ${jwtDecoded.given_name}</br>`)

    claims.push(`family name: ${jwtDecoded.family_name}`)

    claims.push(`<br>groups: ${JSON.stringify(jwtDecoded.groups)}</br>`)

    claims.push(`user_uuid: ${tokenInfo.getUserId()}`)

    claims.push(`<br>subject: ${tokenInfo.getSubject()}</br>`)

    claims.push(`aud: ${jwtDecoded.aud}`)

    claims.push(`<br>issuer: ${tokenInfo.getIssuer()}</br>`)

    claims.push(`origin: ${jwtDecoded.origin}`)

    claims.push(`<br>client_id: ${jwtDecoded.client_id}</br>`)

    claims.push(`grant_type: ${jwtDecoded.grant_type}`)

    claims.push(`<br>scopes: ${jwtDecoded.scope}</br>`)

    claims.push(`xs.system.attributes: ${JSON.stringify(jwtDecoded['xs.system.attributes'])}`)

    claims.push(`<br>ext_attr: ${JSON.stringify(jwtDecoded.ext_attr)}</br>`)


    return claims.join('')

}
approuter
package.json
{

    "dependencies": {

        "@sap/approuter": "latest"

    },

    "scripts": {

        "start": "node node_modules/@sap/approuter/approuter.js"

    }

}
xs-app.json
{

    "authenticationMethod": "route",

    "routes": [{

        "source": "^/tofrontend/(.*)$",

        "target": "$1",

        "destination": "destination_frontend",

        "authenticationType": "ias"

      }

    ]

}
Labels:
1 Comment
You must be a registered user to add a comment. If you've already registered, sign in. Otherwise, register and sign in.
Labels in this area
-
ABAP CDS Views - CDC (Change Data Capture)
2 -
AI
1 -
Analyze Workload Data
1 -
BTP
1 -
Business and IT Integration
2 -
Business application stu
1 -
Business Technology Platform
1 -
Business Trends
1,658 -
Business Trends
107 -
CAP
1 -
cf
1 -
Cloud Foundry
1 -
Confluent
1 -
Customer COE Basics and Fundamentals
1 -
Customer COE Latest and Greatest
3 -
Customer Data Browser app
1 -
Data Analysis Tool
1 -
data migration
1 -
data transfer
1 -
Datasphere
2 -
Event Information
1,400 -
Event Information
72 -
Expert
1 -
Expert Insights
177 -
Expert Insights
340 -
General
1 -
Google cloud
1 -
Google Next'24
1 -
GraphQL
1 -
Kafka
1 -
Life at SAP
780 -
Life at SAP
14 -
Migrate your Data App
1 -
MTA
1 -
Network Performance Analysis
1 -
NodeJS
1 -
PDF
1 -
POC
1 -
Product Updates
4,575 -
Product Updates
384 -
Replication Flow
1 -
REST API
1 -
RisewithSAP
1 -
SAP BTP
1 -
SAP BTP Cloud Foundry
1 -
SAP Cloud ALM
1 -
SAP Cloud Application Programming Model
1 -
SAP Datasphere
2 -
SAP S4HANA Cloud
1 -
SAP S4HANA Migration Cockpit
1 -
Technology Updates
6,872 -
Technology Updates
472 -
Workload Fluctuations
1
Related Content
- SAP Gui Spricting Vba "Application.DisplayAlters = False" in Technology Q&A
- Service broker destination-service-broker failed in Technology Q&A
- Correlation id as part of Application logs in Technology Q&A
- Error "Missing JWT Token for forwardAuthToken" When Using worker_threads/spawn in SAP CAP in Technology Q&A
- Retrieving iFlow Name or ID at Runtime in SAP Cloud Integration in Technology Q&A
Top kudoed authors
| User | Count |
|---|---|
| 17 | |
| 14 | |
| 12 | |
| 10 | |
| 9 | |
| 8 | |
| 7 | |
| 7 | |
| 6 | |
| 6 |