
- SAP Community
- Products and Technology
- Technology
- Technology Blogs by SAP
- Convert REST to OData through a Proxy Service usin...
Technology Blogs by SAP
Learn how to extend and personalize SAP applications. Follow the SAP technology blog for insights into SAP BTP, ABAP, SAP Analytics Cloud, SAP HANA, and more.
Turn on suggestions
Auto-suggest helps you quickly narrow down your search results by suggesting possible matches as you type.
Showing results for
Product and Topic Expert
Options
- Subscribe to RSS Feed
- Mark as New
- Mark as Read
- Bookmark
- Subscribe
- Printer Friendly Page
- Report Inappropriate Content
06-07-2023
10:23 PM
NOTE: this blog post is intended for developers who have some experience in developing CAP applications using SAP Business Application Studio and SAP BTP destinations.
As a CAP developer you might have already faced the scenario where you need to access an external service (which is extremely common in the decoupled world of cloud applications) that is pure REST and incorporate it's response into an entity of your own service's domain model, right?
In a traditional straightforward approach it usually involves:
This approach leads to:
In summary, it's not so easy to combine something that's natively OData (CAP) with other services that are pure REST (or even worse: SOAP).
This is a totally different story when you have your entire services ecosystem fully working on top of OData, hence creating one single "decoupled data model".
Therefore, there's the motivation for this post: make it possible to harmonize services so that they fit into a full OData ecosystem.
To achieve such goal, we will create a proxy service to convert the response from a REST service into OData. And this will be the sole purpose of that service.
For that, we will leverage the awesome capabilities of the SAP Cloud Application Programming Model (CAP) framework, which fully serves OData v4 out-of-the-box for any defined data model.
As you may know, the backbone of CAP is the Core Data Services (in short CDS) which works on the domain model level, meaning it's focused on entities, associations and compositions exposed by the framework via the OData v4 protocol. It basically does it by making queries directly in the database and converting the results into OData responses.
So, it's easy to figure out that in order to hand the job over to CAP (ant let it do its magic) we need to store the REST response into a CAP database entity, right?
Well, fortunately we can do it without having to "physically" persist the incoming data as CAP works with in-memory SQLite DB, that will serve as a kind of "cache" for the proxy service.
The flow here is quite simple: source REST service > proxy service (serves same data as OData) > destination service.
Then, the resulting OData entity (or entities) from the proxy service can be easily incorporated into the destination service domain model and associated to other entities in there.
The appliance of the proposed technique can result in the following benefits:
To illustrate the technique in a "hands-on" exercise we will leverage this extremely simple business scenario:
Imagine you're required to develop an event management application (simple CRUD) where events have name, description, start/end date and time, maximum capacity (for participants) and a location where they're going to take place. Such location is a Space managed by an SAP Cloud for Real Estate tenant (an SAP Industry Cloud solution built on top of SAP S/4HANA Cloud and running on SAP BTP).
So, it' easy to envision the straightforward relationship between the Event entity and the Space entity (location) from the SAP Cloud for Real Estate backend system. right?
The thing here is that SAP Cloud for Real Estate provides an API package for Location Management where the Spaces are exposed, but... guess what? It's REST and not OData.
But the good news is that it makes the perfect scenario for our quick exercise! In the steps of this blog post we'll create the described application with very few lines of code! (you'll notice that most of the job is just setting up parameters, making configurations, defining and exposing entities and doing some UI annotations).
To follow-up with this blog post you must comply with the following prerequisites:
Here’s a diagram representing the application's data model:
Here’s a diagram representing the overall architecture of the application:
Using SAP BTP Cockpit create a new destination with the information below (remember: destination properties names are always case-sensitive!):
As previously planned, we will break the application into two separate projects (in order to be able to work with different database engines and apply reusability): the main service and the proxy service.
Make sure your SAP Business Application Studio (BAS) dev space has the projects folder as the active workspace, open-up a terminal and issue the following commands:
1. Jumpstart the main service
2. Jumpstart the proxy service within the main service
As usual for cloud applications, the app settings should reside in the platform, hence the information required to create HTTP requests is stored in destinations (which we already created), thus requiring the usage of the destination service and its intrinsic dependency: the authorization and trust management service (XSUAA).
So, create an instance of those services (if you haven't one already):
1. Login to Cloud Foundry
2. Create service instances
NOTE: if you already have ready-to-use destination and xsuaa service instances you can leverage them and bind to the local projects.
We will bind those services to the local projects using the default-env.json approach, because later we'll need that environment to create a local destination do the proxy service.
If you're not familiar with the procedure to bind CF services to local projects using the default-env.json approach in BAS, please follow the instructions on the Bind Destination and XSUAA Services topic of this blog post.
3. Copy the default-env.json file to the main service project
The proxy will make HTTP requests to the C4RE REST API and, for that, we rely on the SAP Cloud SDK HTTP client package. Also, we need to move the SQLite dependency from dev to dependencies as this is the database engine we will effectively use.
1. Install @Sap-cloud-sdk/http-client
2. Move SQLite to dependencies in package.json
3. Install other dependencies
We need to instruct CAP that we will strictly use the in-memory SQLite (no other engine) even in production and access the C4RE API through the defined destination.
Add the following JSON to the end of package.json (right before the last - closing - curly bracket):
1. Paste the snippet below into a schema.cds file that you must create under the db folder:
2. Paste the snippet below into a service.cds file that you must create under the srv folder:
Paste the snippet below into a service.js file that you must create under de srv folder:
As you can see, our service has only one entity called Space and in its first read attempt, we get the information from the corresponding C4RE REST API and fill-in the Space database table (in this case an in-memory SQLite table) with it.
Now, all the OData v4 operations are automatically taken care by the CAP framework out-of-the-box. No further code needed!
1. Run the command below:
2. Open the service home page in a new tab:
3. Open the Space entity in a new tab:
OK, now our proxy service is completed and fully working. Press CTRL+C in the terminal to stop the service.
Now, split your terminal into a second one and start working in there.
I believe you're quite familiar with the procedure for consuming external OData services in CAP. If not, here's the official documentation.
1. Run the command below to export the proxy metadata in EDMX format:
IMPORTANT NOTE: if you did not stop the service in the first terminal like previously instructed, this command will fail and the service will break in the terminal. So, don't forget to stop it there before issuing the command and keep working in the second splitted terminal!
2. Import the proxy metadata to the main service project:
3. In the first terminal run the command to start the service again, and then immediately go back to work in the second terminal:
Once again, the service will make HTTP requests to the proxy OData entity and, for that, we rely on the SAP Cloud SDK HTTP client package.
As it's an external entity we would also need to write "custom handlers" to manage the OData operations inside the main service. However, fortunately, the product team from the BAS low-code tools has created a very nice node package to do it for us, so, once again, no coding required here!
1. Install @Sap-cloud-sdk/http-client
2. Install @Sap/low-code-event-handler
2. Install other dependencies
To access the proxy service we also use a destination as a best practice. But, as we are still in development, we will define it through an environment variable created inside default-env.json.
Open the default-env.json (the one in the main service folder - event-mngr - not the proxy!) and add the snippet below right after the first opening curly bracket:
Remember: you left the proxy service running on port 4003 in the first terminal, right? So, it's easy to realize that the destination is pointing to it.
CDS has automatically created the reference to the proxy service in package.json when we imported the metadata. Now, we need to set the service credentials to point to the previously defined destination and set the service path.
We also need to instruct CAP to use the low code event handler package as the source to implement the handling of external services entities.
1. Add the snippet below to the external service reference (C4RE) in package.json (right after "model": "srv/external/C4RE")::
2. Add the snippet below to cds.requires in package.json (right after the last - closing - curly bracket of the C4RE definition):
This is the very last phase of the app development. In the service definition we will also include a series of CDS annotations to serve a Fiori UI, which will be tested through the usual Fiori Preview.
As the objective of this post is not to explain UI annotations, you can learn more in this nice Fiori Elements annotations reference and feature showcase git.
1. Paste the snippet below into a schema.cds file that you must create under the db folder:
Here you see we reference the external service directly in the data model associating the Space entity to the Event entity.
2. Paste the snippet below into a service.cds file that you must create under the srv folder:
Create a folder named data under the db folder. In that folder create a file named event.mngr.db-Event.csv and paste the content below into it:
1. Run the command below:
2. Open the service home page in a new tab:
3. Open the Fiori preview (next to the Event entity) in a new tab:
Notice that the Space (Location) has been automatically fetched from the proxy due to the association to Event.
4. Now, click on the Location filter:
You can see that it automatically brings-up the spaces from the proxy, which also serves as value help to fill the space property of the Event entity on create and update operations.
All of that happens just because, now, the spaces are represented by an OData entity instead of the plain REST provided by the original API.
And this concludes the development of the hands-on exercise!
Of course, you can move further and create the Fiori Elements application using the Fiori generator from BAS, add HANA for persistence, configure an MTA for deployment and so on. For this exercise we just stop here.
Here's a list of resources to enhance your learning experience on this topic:
After reading through this blog post and completing the steps of the proposed hands-on exercise you should have successfully developed a simple application that consumes OData entities from a proxy service and learnt the corresponding technique that transforms REST responses into OData using CAP.
Have you noticed how much NodeJS code was written in this app? Only the strictly necessary to fetch the data from the REST API and store it into the in-memory DB. Nothing else! That's one of the (many) big advantages of using CAP!
OK, now you might ask: "hey, what if the data in the backend system changes (which is something very common)?". Well, in that case you can easily write an unbound action (see here) to refresh the proxy internal cache (simply clean-up the memory table and re-populate using the same code from the first read attempt). Such action can be invoked by the calling service whenever fresh data is required.
I'm sure you might be wondering: "does this technique also work with SOAP web services?". And the answer is: "yes! of course!". After all, SOAP is just another (old) data exchange HTTP-based protocol like REST, and we all know that many legacy systems still provide only SOAP-based APIs. So, if you want to know how to use SOAP instead of REST with this technique, please read through this blog post.
Now that you understood and experimented the technique the sky is the limit: you can enhance it as much as you wish!
Hope you find this information useful and have enjoyed the exercise!
Please, do not hesitate to submit your questions in Q&A in SAP Community: https://answers.sap.com/index.html
Introduction
As a CAP developer you might have already faced the scenario where you need to access an external service (which is extremely common in the decoupled world of cloud applications) that is pure REST and incorporate it's response into an entity of your own service's domain model, right?
In a traditional straightforward approach it usually involves:
- Create a non-persistent service entity to accommodate data coming from the external service
- Write custom handlers to fill-in the entity with data coming from the REST service and manage related queries and associations
This approach leads to:
- High coding and maintenance effort
- High level of dependency between the CAP service and the external REST service
- Low and/or forced adaptability of the external service to the internal domain model
In summary, it's not so easy to combine something that's natively OData (CAP) with other services that are pure REST (or even worse: SOAP).
This is a totally different story when you have your entire services ecosystem fully working on top of OData, hence creating one single "decoupled data model".
Therefore, there's the motivation for this post: make it possible to harmonize services so that they fit into a full OData ecosystem.
The Technique
To achieve such goal, we will create a proxy service to convert the response from a REST service into OData. And this will be the sole purpose of that service.
For that, we will leverage the awesome capabilities of the SAP Cloud Application Programming Model (CAP) framework, which fully serves OData v4 out-of-the-box for any defined data model.
As you may know, the backbone of CAP is the Core Data Services (in short CDS) which works on the domain model level, meaning it's focused on entities, associations and compositions exposed by the framework via the OData v4 protocol. It basically does it by making queries directly in the database and converting the results into OData responses.
So, it's easy to figure out that in order to hand the job over to CAP (ant let it do its magic) we need to store the REST response into a CAP database entity, right?
Well, fortunately we can do it without having to "physically" persist the incoming data as CAP works with in-memory SQLite DB, that will serve as a kind of "cache" for the proxy service.
The flow here is quite simple: source REST service > proxy service (serves same data as OData) > destination service.
Then, the resulting OData entity (or entities) from the proxy service can be easily incorporated into the destination service domain model and associated to other entities in there.
The Benefits
The appliance of the proposed technique can result in the following benefits:
- Ability to work with different database engines in the context of the same application (SQLite in the proxy and any other in the service)
- Decoupling (isolation) of the main service from the external REST service (changes in the REST service affect only the proxy which is responsible for maintaining compatibility with the other calling services)
- Reusability: the proxy service can be easily reused by any other service
- Very low coding effort: OData "responsibilities" are transferred to the CAP framework in the proxy service
- The OData entity (or entities) from the proxy service are treated like regular entities and easily associated to other entities in the main service's domain model
The Business Scenario
To illustrate the technique in a "hands-on" exercise we will leverage this extremely simple business scenario:
Imagine you're required to develop an event management application (simple CRUD) where events have name, description, start/end date and time, maximum capacity (for participants) and a location where they're going to take place. Such location is a Space managed by an SAP Cloud for Real Estate tenant (an SAP Industry Cloud solution built on top of SAP S/4HANA Cloud and running on SAP BTP).
So, it' easy to envision the straightforward relationship between the Event entity and the Space entity (location) from the SAP Cloud for Real Estate backend system. right?
The thing here is that SAP Cloud for Real Estate provides an API package for Location Management where the Spaces are exposed, but... guess what? It's REST and not OData.
But the good news is that it makes the perfect scenario for our quick exercise! In the steps of this blog post we'll create the described application with very few lines of code! (you'll notice that most of the job is just setting up parameters, making configurations, defining and exposing entities and doing some UI annotations).
Prerequisites
To follow-up with this blog post you must comply with the following prerequisites:
- Create an SAP BTP Trial Account following this tutorial;
- Setup SAP Business Application Studio in your SAP BTP trial following this tutorial;
- In your SAP Business Application Studio, create a dev space for Full-Stack Cloud Application development.
- Have an account to access SAP Business Accelerator Hub (former SAP API Business Hub - https://api.sap.com/) as an authenticated user.
Data Model
Here’s a diagram representing the application's data model:
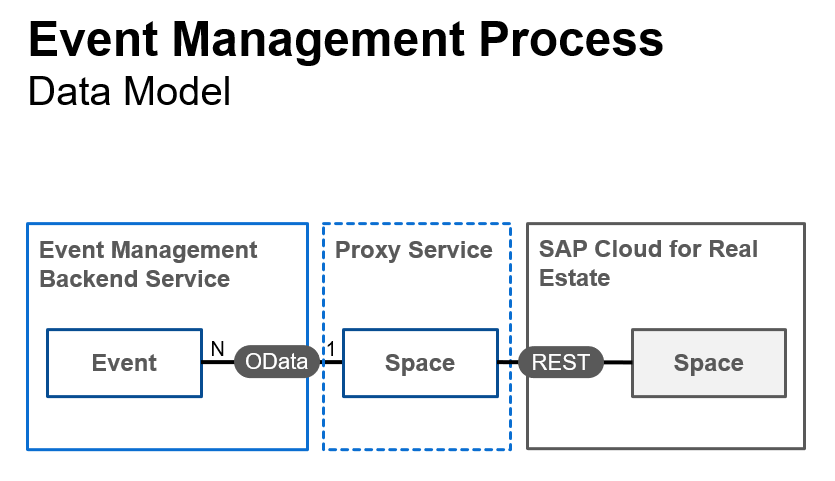
Figure 1 - Application Data Model
Application Architecture
Here’s a diagram representing the overall architecture of the application:

Figure 2 - Application Architecture
Get API Key from SAP Business Accelerator Hub
- Access SAP Business Accelerator Hub (former SAP API Business Hub - https://api.sap.com) and login to the site.
- Search for the Location Management REST API package using the serach box in the top left and click on it.
- Click on the Show API Key button at the top right and copy the key.

Figure 3 - API Key
Create Destination to the SAP Cloud for Real Estate (C4RE) Sandox
Using SAP BTP Cockpit create a new destination with the information below (remember: destination properties names are always case-sensitive!):

Figure 4 - Destination to C4RE Sandbox
Jumpstart Two Projects: Main Service and Proxy Service
As previously planned, we will break the application into two separate projects (in order to be able to work with different database engines and apply reusability): the main service and the proxy service.
Make sure your SAP Business Application Studio (BAS) dev space has the projects folder as the active workspace, open-up a terminal and issue the following commands:
1. Jumpstart the main service
cds init event-mngr2. Jumpstart the proxy service within the main service
cd event-mngr && cds init c4re-spacesBind BTP Services: Destination and XSUAA
As usual for cloud applications, the app settings should reside in the platform, hence the information required to create HTTP requests is stored in destinations (which we already created), thus requiring the usage of the destination service and its intrinsic dependency: the authorization and trust management service (XSUAA).
So, create an instance of those services (if you haven't one already):
1. Login to Cloud Foundry
cd c4re-spaces && cf login2. Create service instances
cf create-service destination lite dest-srv && cf create-service xsuaa application xsuaa-srvNOTE: if you already have ready-to-use destination and xsuaa service instances you can leverage them and bind to the local projects.
We will bind those services to the local projects using the default-env.json approach, because later we'll need that environment to create a local destination do the proxy service.
If you're not familiar with the procedure to bind CF services to local projects using the default-env.json approach in BAS, please follow the instructions on the Bind Destination and XSUAA Services topic of this blog post.
3. Copy the default-env.json file to the main service project
cp default-env.json ..Install Proxy Dependencies
The proxy will make HTTP requests to the C4RE REST API and, for that, we rely on the SAP Cloud SDK HTTP client package. Also, we need to move the SQLite dependency from dev to dependencies as this is the database engine we will effectively use.
1. Install @Sap-cloud-sdk/http-client
npm install @sap-cloud-sdk/http-client2. Move SQLite to dependencies in package.json
  "dependencies": {

    "@sap-cloud-sdk/http-client": "^3.1.1",

    "@sap/cds": "^6",

    "express": "^4",

    "sqlite3": "^5.0.4"

  }
3. Install other dependencies
npm installSetup Proxy CDS
We need to instruct CAP that we will strictly use the in-memory SQLite (no other engine) even in production and access the C4RE API through the defined destination.
Add the following JSON to the end of package.json (right before the last - closing - curly bracket):
,

  "cds" : {

    "requires": {

      "db": {

        "[development]": {

          "kind": "sqlite",

          "model": "db",

          "credentials": {

            "database": ":memory:"

          }

        },

        "[production]": {

          "kind": "sqlite",

          "model": "db",

          "credentials": {

            "database": ":memory:"

          }

        },

        "model": [

          "db",

          "srv"

        ]

      },

      "C4RE": {

        "kind": "rest",

        "credentials": {

          "destination": "C4RE-Sandbox"

        }

      }

    },

    "features": {

      "fiori_preview": false,

      "in_memory_db": true

    }

  }
Create Proxy Data Model and Service Definition
1. Paste the snippet below into a schema.cds file that you must create under the db folder:
namespace c4re.spaces.db;


entity Space {

    key irn       : String(80);

        shortName : String(20);

        longName  : String(100);

}
2. Paste the snippet below into a service.cds file that you must create under the srv folder:
using c4re.spaces.db as db from '../db/schema';


namespace c4re.spaces.srv;


@path: 'c4re'

service C4REService {

    entity Space as projection on db.Space;

}
Develop the Proxy Logic
Paste the snippet below into a service.js file that you must create under de srv folder:
module.exports = cds.service.impl(async function () {

    /*** SERVICE ENTITIES ***/

    const {

        Space

    } = this.entities;


    const c4re = await cds.connect.to('C4RE');

    var firstRead = true;


    /*** SERVICE HANDLERS ***/

    this.before('READ', Space, async (req) => {

        try {

            if (firstRead) {

                const resp = await c4re.get('/spaces');

                const spaces = resp.content;

                const entries = [];

                spaces.forEach(space => {

                    entries.push({

                        irn: space.irn,

                        shortName: space.shortName,

                        longName: space.longName

                    });

                });

                await cds.tx(req).run(INSERT.into(Space).entries(entries));

                firstRead = false;

            }

            return req;

        } catch (err) {

            req.error(500, err.message);

        }

    });

});
As you can see, our service has only one entity called Space and in its first read attempt, we get the information from the corresponding C4RE REST API and fill-in the Space database table (in this case an in-memory SQLite table) with it.
Now, all the OData v4 operations are automatically taken care by the CAP framework out-of-the-box. No further code needed!
Test the Proxy Service
1. Run the command below:
cds watch --port 40032. Open the service home page in a new tab:

Figure 5 - Proxy Service home page
3. Open the Space entity in a new tab:

Figure 6 - Spaces from the C4RE Sandbox
OK, now our proxy service is completed and fully working. Press CTRL+C in the terminal to stop the service.
Now, split your terminal into a second one and start working in there.
Import the Proxy Metadata to the Main Service
I believe you're quite familiar with the procedure for consuming external OData services in CAP. If not, here's the official documentation.
1. Run the command below to export the proxy metadata in EDMX format:
IMPORTANT NOTE: if you did not stop the service in the first terminal like previously instructed, this command will fail and the service will break in the terminal. So, don't forget to stop it there before issuing the command and keep working in the second splitted terminal!
cds compile srv -s c4re.spaces.srv.C4REService -2 edmx > C4RE.edmx && mv C4RE.edmx .. && cd ..2. Import the proxy metadata to the main service project:
cds import C4RE.edmx3. In the first terminal run the command to start the service again, and then immediately go back to work in the second terminal:
cds watch --port 4003Install Service Dependencies
Once again, the service will make HTTP requests to the proxy OData entity and, for that, we rely on the SAP Cloud SDK HTTP client package.
As it's an external entity we would also need to write "custom handlers" to manage the OData operations inside the main service. However, fortunately, the product team from the BAS low-code tools has created a very nice node package to do it for us, so, once again, no coding required here!
1. Install @Sap-cloud-sdk/http-client
npm install @sap-cloud-sdk/http-client2. Install @Sap/low-code-event-handler
npm install @sap/low-code-event-handler2. Install other dependencies
npm installDefine a Destination to the Proxy Service
To access the proxy service we also use a destination as a best practice. But, as we are still in development, we will define it through an environment variable created inside default-env.json.
Open the default-env.json (the one in the main service folder - event-mngr - not the proxy!) and add the snippet below right after the first opening curly bracket:
    "destinations": [

        {

            "name": "C4RE-Spaces",

            "url": "http://localhost:4003"

        }

    ],
Remember: you left the proxy service running on port 4003 in the first terminal, right? So, it's easy to realize that the destination is pointing to it.
Setup Service CDS
CDS has automatically created the reference to the proxy service in package.json when we imported the metadata. Now, we need to set the service credentials to point to the previously defined destination and set the service path.
We also need to instruct CAP to use the low code event handler package as the source to implement the handling of external services entities.
1. Add the snippet below to the external service reference (C4RE) in package.json (right after "model": "srv/external/C4RE")::
,

        "credentials" : {

          "destination" : "C4RE-Spaces",

          "path" : "/c4re"

        }
2. Add the snippet below to cds.requires in package.json (right after the last - closing - curly bracket of the C4RE definition):
,

      "app-service": {

        "impl": "@sap/low-code-event-handler"

      }
Create Data Model and Service Definition
This is the very last phase of the app development. In the service definition we will also include a series of CDS annotations to serve a Fiori UI, which will be tested through the usual Fiori Preview.
As the objective of this post is not to explain UI annotations, you can learn more in this nice Fiori Elements annotations reference and feature showcase git.
1. Paste the snippet below into a schema.cds file that you must create under the db folder:
using {cuid} from '@sap/cds/common';

using {C4RE as c4re} from '../srv/external/C4RE';


namespace event.mngr.db;


entity Event : cuid {

    name          : String(100);

    description   : String(250);

    startDateTime : DateTime;

    endDateTime   : DateTime;

    capacity      : Integer;

    space         : Association to one Space;

}


@cds.autoexpose

entity Space as projection on c4re.Space;
Here you see we reference the external service directly in the data model associating the Space entity to the Event entity.
2. Paste the snippet below into a service.cds file that you must create under the srv folder:
using event.mngr.db as db from '../db/schema';


@path: 'event-mngr'

service EventService {

    @odata.draft.enabled

    entity Event as projection on db.Event;


    annotate Event with {

        ID            @(

            Common: {

                Label: 'ID',

                Text : {

                    $value                : name,

                    ![@UI.TextArrangement]: #TextOnly,

                }

            },

            UI    : {Hidden: true}

        );

        name          @(Common: {Label: 'Name'});

        description   @(Common: {Label: 'Description'});

        startDateTime @(Common: {Label: 'Start'});

        endDateTime   @(Common: {Label: 'End'});

        capacity      @(Common: {Label: 'Capacity'});

        space         @(Common: {

            Label                   : 'Location',

            Text                    : {

                $value                : space.longName,

                ![@UI.TextArrangement]: #TextOnly,

            },

            ValueList               : {

                $Type         : 'Common.ValueListType',

                CollectionPath: 'Space',

                Parameters    : [

                    {

                        $Type            : 'Common.ValueListParameterInOut',

                        LocalDataProperty: space_irn,

                        ValueListProperty: 'irn',

                    },

                    {

                        $Type            : 'Common.ValueListParameterDisplayOnly',

                        ValueListProperty: 'shortName',

                    },

                    {

                        $Type            : 'Common.ValueListParameterDisplayOnly',

                        ValueListProperty: 'longName',

                    }

                ]

            },

            ValueListWithFixedValues: false

        });

    };


    annotate Event @(Capabilities: {

        SearchRestrictions: {

            $Type     : 'Capabilities.SearchRestrictionsType',

            Searchable: true

        },

        Insertable        : true,

        Deletable         : true,

        Updatable         : true

    });


    annotate Event @(UI: {

        UpdateHidden       : false,

        DeleteHidden       : false,

        CreateHidden       : false,

        Identification     : [{Value: name}],

        HeaderInfo         : {

            $Type         : 'UI.HeaderInfoType',

            TypeName      : 'Event',

            TypeNamePlural: 'Events',

            Title         : {

                $Type: 'UI.DataField',

                Value: name

            },

            Description   : {

                $Type: 'UI.DataField',

                Value: description

            }

        },

        LineItem           : [

            {

                $Type: 'UI.DataField',

                Value: name

            },

            {

                $Type: 'UI.DataField',

                Value: description

            },

            {

                $Type: 'UI.DataField',

                Value: startDateTime

            },

            {

                $Type: 'UI.DataField',

                Value: endDateTime

            },

            {

                $Type: 'UI.DataField',

                Value: capacity

            },

            {

                $Type: 'UI.DataField',

                Value: space_irn

            }

        ],

        SelectionFields    : [

            name,

            startDateTime,

            endDateTime,

            space_irn

        ],

        FieldGroup #General: {

            $Type: 'UI.FieldGroupType',

            Data : [

                {

                    $Type: 'UI.DataField',

                    Value: startDateTime

                },

                {

                    $Type: 'UI.DataField',

                    Value: endDateTime

                },

                {

                    $Type: 'UI.DataField',

                    Value: capacity

                },

                {

                    $Type: 'UI.DataField',

                    Value: space_irn

                }

            ]

        },

        Facets             : [{

            $Type : 'UI.ReferenceFacet',

            ID    : 'General',

            Label : 'General',

            Target: '@UI.FieldGroup#General'

        }]

    });


    annotate db.Space with {

        irn       @(

            Common: {

                Label: 'ID',

                Text : {

                    $value                : shortName,

                    ![@UI.TextArrangement]: #TextOnly,

                }

            },

            UI    : {Hidden: true}

        );

        shortName @(Common: {Label: 'Code'});

        longName  @(Common: {Label: 'Name'});

    };

}
Create Test Data
Create a folder named data under the db folder. In that folder create a file named event.mngr.db-Event.csv and paste the content below into it:
name;description;startDateTime;endDateTime;capacity;space_irn

SAP Sapphire Orlando 2023;2023 edition of the global SAP event Sapphire to be held in Orlando/FL.;2023-05-22T08:00:00.000Z;2023-05-23T18:00:00.000Z;2000;space(_jWxK0UVQnqTDeVA0DU0PQ)
Test the Main Service
1. Run the command below:
cds watch2. Open the service home page in a new tab:

Figure 7 - Service home page
3. Open the Fiori preview (next to the Event entity) in a new tab:

Figure 8 - Fiori Preview
Notice that the Space (Location) has been automatically fetched from the proxy due to the association to Event.
4. Now, click on the Location filter:

Figure 9 - Location filter
You can see that it automatically brings-up the spaces from the proxy, which also serves as value help to fill the space property of the Event entity on create and update operations.
All of that happens just because, now, the spaces are represented by an OData entity instead of the plain REST provided by the original API.
And this concludes the development of the hands-on exercise!
Of course, you can move further and create the Fiori Elements application using the Fiori generator from BAS, add HANA for persistence, configure an MTA for deployment and so on. For this exercise we just stop here.
Additional Resources
Here's a list of resources to enhance your learning experience on this topic:
- SAP Developers - Create a Destination in the SAP BTP Cockpit
- CAP - Project-Specific Configurations
- CAP - Domain Modelling
- CAP - Providing Services
- CAP - Consuming Services
- CAP - Serving Fiori UIs
- CAP - Deploy to Cloud Foundry
- SAP Samples on GitHub - Fiori Elements annotations reference and feature showcase
- SAP Community - Consuming SOAP Web Services in SAP Cloud Application Programming Model (CAP)
Conclusion
After reading through this blog post and completing the steps of the proposed hands-on exercise you should have successfully developed a simple application that consumes OData entities from a proxy service and learnt the corresponding technique that transforms REST responses into OData using CAP.
Have you noticed how much NodeJS code was written in this app? Only the strictly necessary to fetch the data from the REST API and store it into the in-memory DB. Nothing else! That's one of the (many) big advantages of using CAP!
OK, now you might ask: "hey, what if the data in the backend system changes (which is something very common)?". Well, in that case you can easily write an unbound action (see here) to refresh the proxy internal cache (simply clean-up the memory table and re-populate using the same code from the first read attempt). Such action can be invoked by the calling service whenever fresh data is required.
I'm sure you might be wondering: "does this technique also work with SOAP web services?". And the answer is: "yes! of course!". After all, SOAP is just another (old) data exchange HTTP-based protocol like REST, and we all know that many legacy systems still provide only SOAP-based APIs. So, if you want to know how to use SOAP instead of REST with this technique, please read through this blog post.
Now that you understood and experimented the technique the sky is the limit: you can enhance it as much as you wish!
Hope you find this information useful and have enjoyed the exercise!
Please, do not hesitate to submit your questions in Q&A in SAP Community: https://answers.sap.com/index.html
Labels:
5 Comments
You must be a registered user to add a comment. If you've already registered, sign in. Otherwise, register and sign in.
Labels in this area
-
ABAP CDS Views - CDC (Change Data Capture)
2 -
AI
1 -
Analyze Workload Data
1 -
BTP
1 -
Business and IT Integration
2 -
Business application stu
1 -
Business Technology Platform
1 -
Business Trends
1,658 -
Business Trends
117 -
CAP
1 -
cf
1 -
Cloud Foundry
1 -
Confluent
1 -
Customer COE Basics and Fundamentals
1 -
Customer COE Latest and Greatest
3 -
Customer Data Browser app
1 -
Data Analysis Tool
1 -
data migration
1 -
data transfer
1 -
Datasphere
2 -
Event Information
1,400 -
Event Information
75 -
Expert
1 -
Expert Insights
177 -
Expert Insights
358 -
General
1 -
Google cloud
1 -
Google Next'24
1 -
GraphQL
1 -
Kafka
1 -
Life at SAP
780 -
Life at SAP
15 -
Migrate your Data App
1 -
MTA
1 -
Network Performance Analysis
1 -
NodeJS
1 -
PDF
1 -
POC
1 -
Product Updates
4,575 -
Product Updates
398 -
Replication Flow
1 -
REST API
1 -
RisewithSAP
1 -
SAP BTP
1 -
SAP BTP Cloud Foundry
1 -
SAP Cloud ALM
1 -
SAP Cloud Application Programming Model
1 -
SAP Datasphere
2 -
SAP S4HANA Cloud
1 -
SAP S4HANA Migration Cockpit
1 -
Technology Updates
6,871 -
Technology Updates
493 -
Workload Fluctuations
1
Related Content
- Extend Upload Set with Table to Fiori Elements and utilize Object Store in Technology Blogs by Members
- Consume ODATA v4 API within the same S4HANA Cloud in Technology Q&A
- SUM Error - Standalone Enqueue Server in Technology Q&A
- SAP CAP Error - invalid table name: Could not find table/view in Technology Q&A
- AI@FRE (Part 1) - Enabling Enterprise AI Adoption through the BTP FRE Engagement Model in Technology Blogs by SAP
Top kudoed authors
| User | Count |
|---|---|
| 16 | |
| 8 | |
| 7 | |
| 7 | |
| 6 | |
| 6 | |
| 5 | |
| 5 | |
| 5 | |
| 5 |