
- SAP Community
- Products and Technology
- Technology
- Technology Blogs by SAP
- Data Science at Enterprise Scale Part 1: JupyterHu...
Technology Blogs by SAP
Learn how to extend and personalize SAP applications. Follow the SAP technology blog for insights into SAP BTP, ABAP, SAP Analytics Cloud, SAP HANA, and more.
Turn on suggestions
Auto-suggest helps you quickly narrow down your search results by suggesting possible matches as you type.
Showing results for
former_member74
Explorer
Options
- Subscribe to RSS Feed
- Mark as New
- Mark as Read
- Bookmark
- Subscribe
- Printer Friendly Page
- Report Inappropriate Content
05-24-2021
3:26 PM
TL;DR - An enterprise ready data science environment in 20 mins!
With SAP Business Technology Platform (SAP BTP), data scientists and developers have numerous options to run their data science experiments in the cloud. The best option is SAP Data Intelligence as it enables them to use their Jupyter notebooks and turn these into pipelines.
However, for various reasons, organisations may not have this option. If that’s you, don’t be afraid! In this blog post, I'm going to demonstrate another option for using Jupyter notebooks on SAP BTP, which will help you explore data and train machine learning models. This option involves using SAP BTP, Kyma runtime.
In this blog post, we’ll first have a quick look at Jupyter, and why it has become the de facto tool for data scientists. We’ll then look into Kyma runtime and explore how we can set up Jupyter through a series of steps.
Before we continue, I'd like to thank damien.cleary and ilung.pranata.sap for working with me on this project and contributing to this blog post.
Why Jupyter?
Solving data science problems at an enterprise scale requires multiple people collaborating together - this could involve data scientists, data engineers, developers and domain experts. To do this effectively, we require an environment where you can share your work easily, transparently, and reproducibly.
Jupyter notebooks provide this in an interactive environment that allows the execution of Python code, the lingua franca for data science, in small pieces. To bring the power of notebooks to groups of people and allow them to work collaboratively, we require JupyterHub.
Why Use The Kyma Runtime?
Often we need to setup an environment for our data scientists to experiment and train machine learning models. It is important that the resources (i.e. processor and memory) can be expanded when needed, such as when we are working on large datasets.
The Kyma runtime does this by leveraging Kubernetes. Kubernetes helps us manage application containers, and lets us enable additional containers (with extra processing and memory power) when the need arises. Kubernetes also allows the use of Docker to manage all the required dependencies, getting your data science project off the ground, quickly.
Historically, getting the Kubernetes environment up and running would require a number of setup and installation hurdles. With the Kyma runtime, we’ll be up and running in only 20 mins!
So, let’s deploy JupyterHub on SAP BTP, using the Kyma runtime!
Technical steps
The following 15 steps are required to setup JupyterHub on SAP BTP. I have separated these steps into two sections - Deploying a JupyterHub Docker Image, and Accessing the container to Install Libraries and Provision Users.
Section 1: Deploying a JupyterHub Docker Image onto the Kyma Runtime
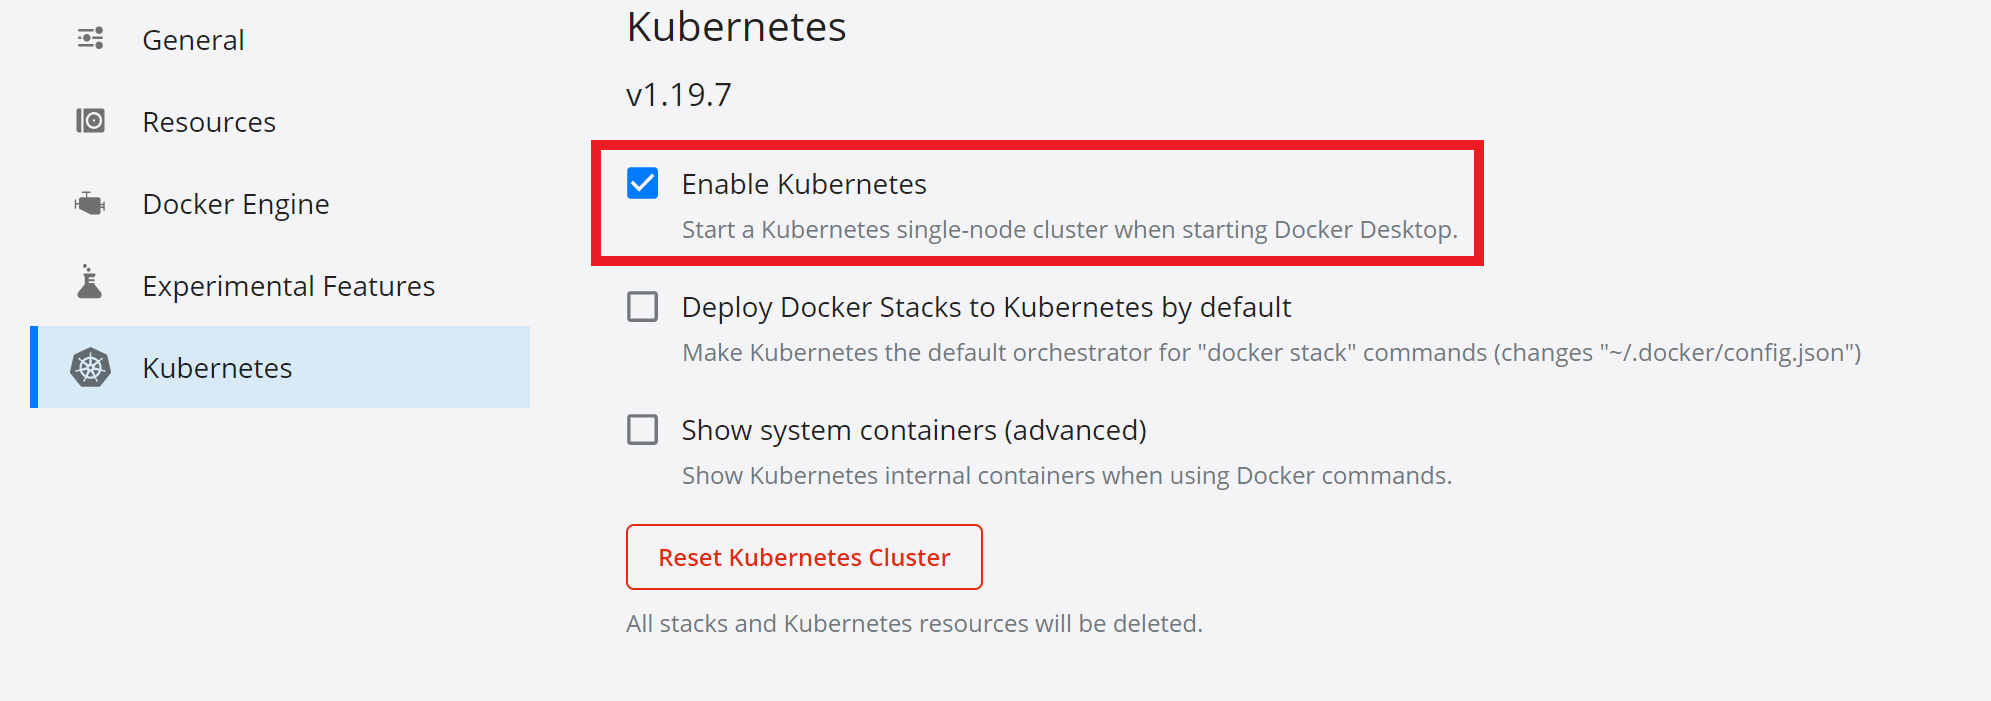
- Firstly, everything that is deployed to SAP BTP can be tested locally on your environment. If you haven’t already, download Docker and enable Kubernetes. Also ensure you have kubectl (the Kubernetes command-line tool) installed on your machine.
- The Docker image we are going to be using can be found on Docker hub, called: jupyterhub/jupyterhub. You can see a technical overview on the Docker hub website. We need to create a YAML script that contains this image and a port (shown below).
apiVersion: v1
kind: Service
metadata:
name: jupyterhub
labels:
app: jupyterhub
spec:
ports:
- name: http
port: 8000
selector:
app: jupyterhub
---
apiVersion: apps/v1
kind: Deployment
metadata:
name: jupyterhub
spec:
selector:
matchLabels:
app: jupyterhub
replicas: 1
template:
metadata:
labels:
app: jupyterhub
spec:
containers:
- image: jupyterhub/jupyterhub
name: jupyterhub
ports:
- containerPort: 8000
- Once you’ve got your configuration script, it’s time to upload this to Kyma runtime for SAP BTP. Once you have the Kyma runtime working with the appropriate user roles, open the dashboard:

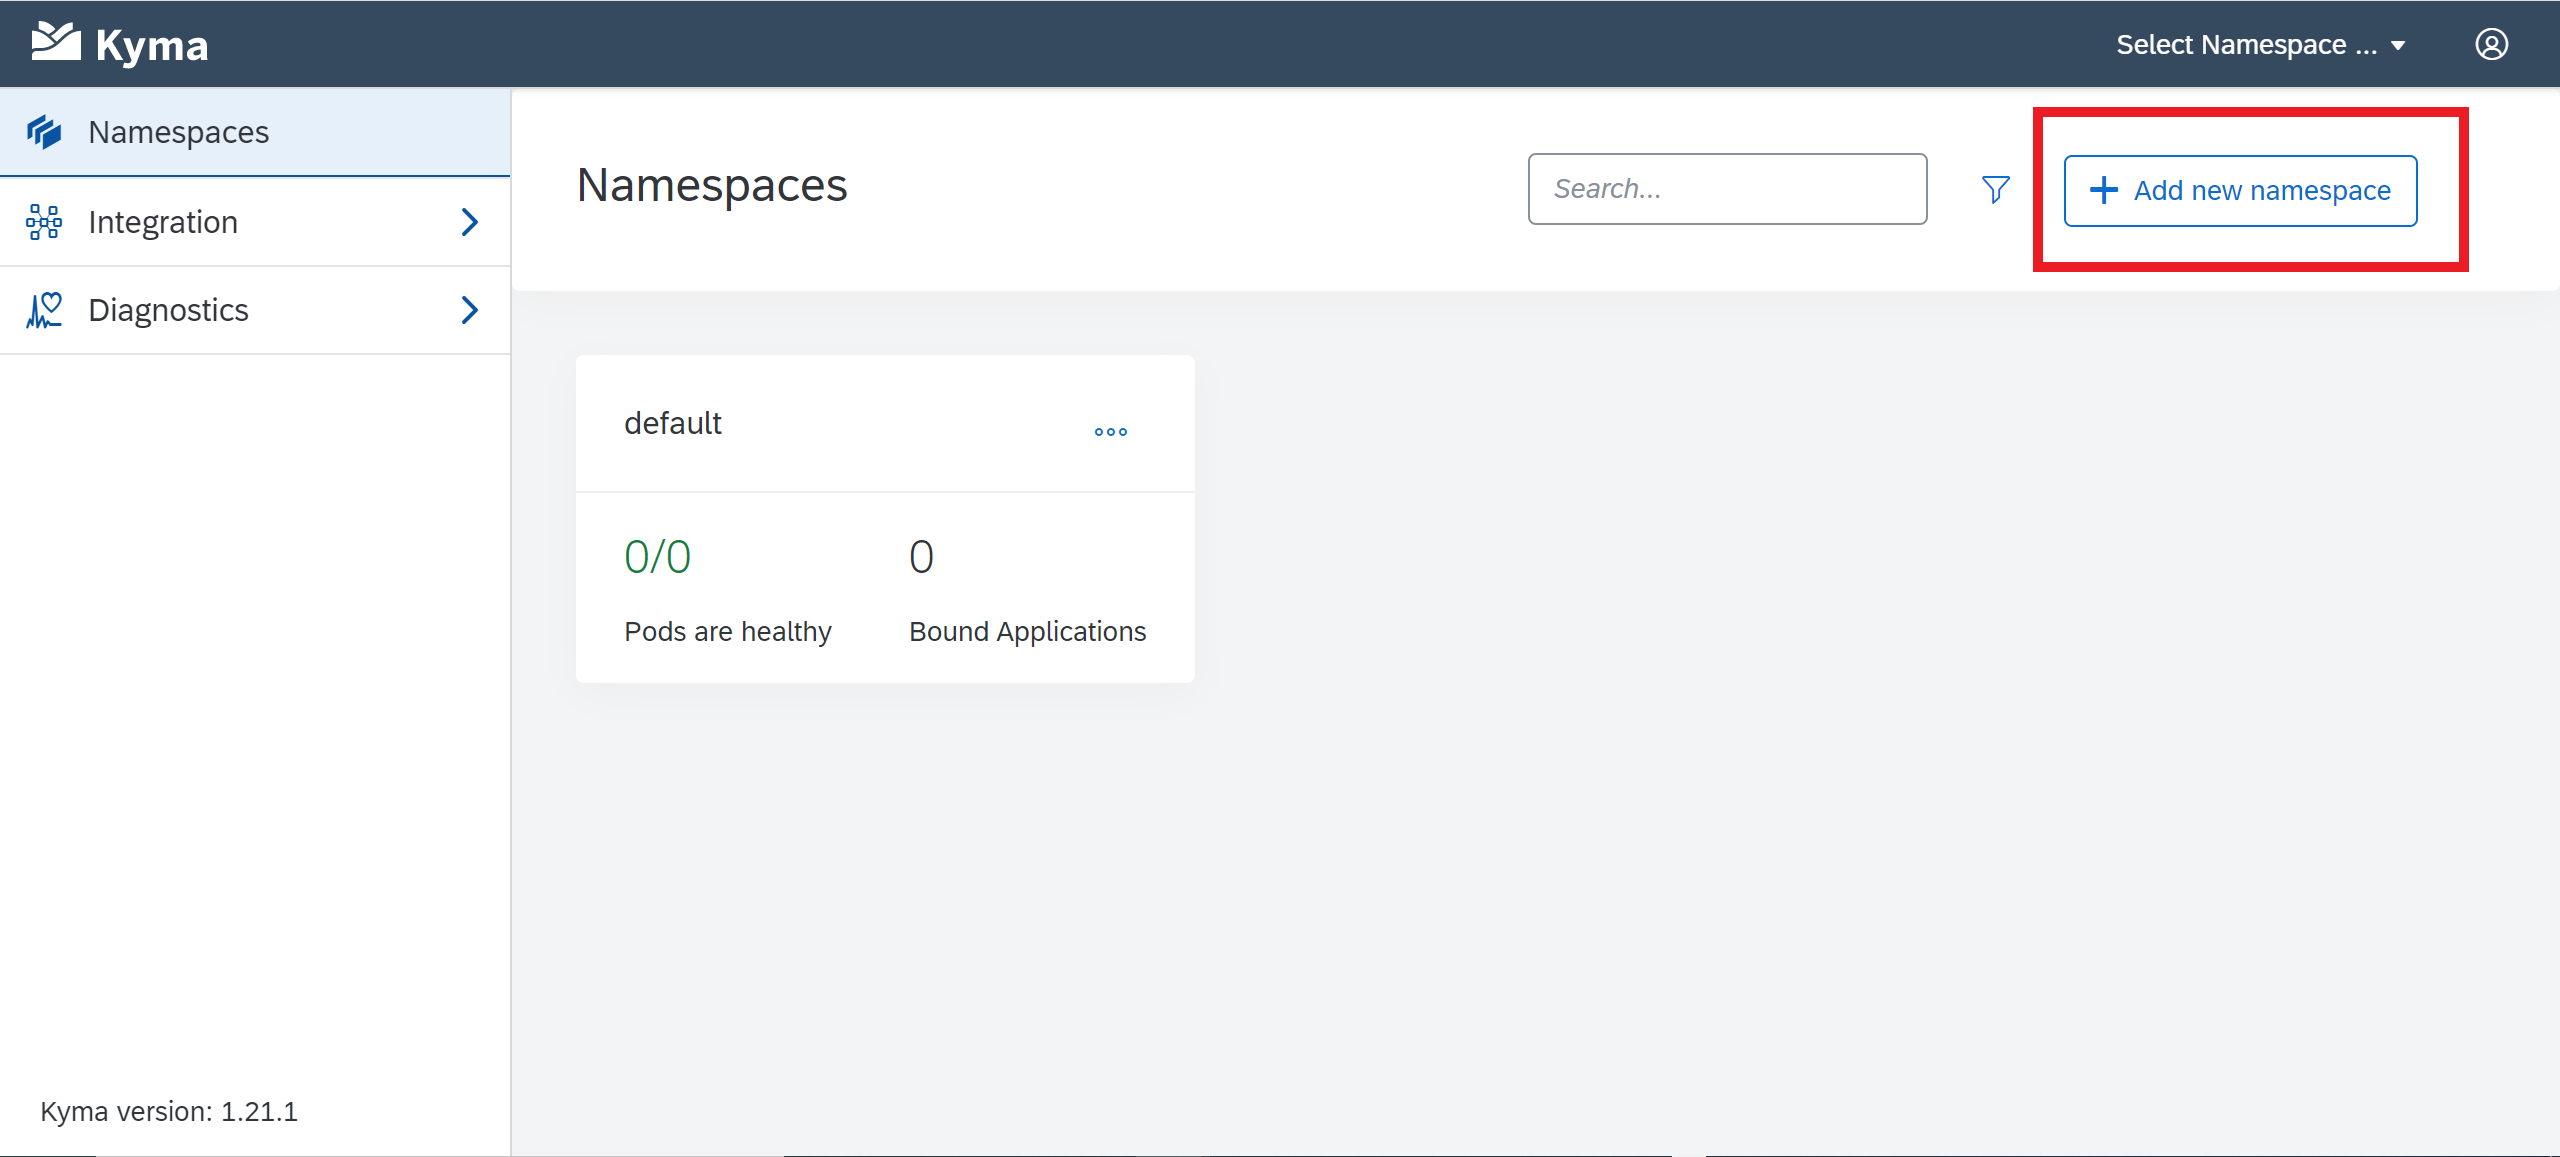
- The dashboard should look like this. Select “Add new namespace” and give it a name – here, we call it “jupyterhub”. Leave all other options at their default (labels, side-car injection, etc.). If you’d prefer, you can also skip this step and just use the default namespace that has been provided.
- In the namespace, select “Deploy new workload”, and upload the YAML configuration script by choosing “Upload YAML”. Select “Deploy” once the file has been chosen.


You should get a pop-up message that says, “Successfully deployed”, and a few moments later, the “Deployments” and “Pods” statuses will update to reflect what is currently running. If you select “Pods”, you will see the name of the pod – copy this down, as we will need it later to provision users.
- Next, we want to create a link to our JupyterHub environment. Navigate to API rules within the jupyterhub namespace and select “Create API Rule”.

- In the creation of the API Rule, enter a “Name” and “Hostname”. Note that the service port is the same as what was specified in our YAML script. Click create once done. Leave the access strategies as the default.

Once the rule is successfully created, you can see a host URL that will take you to JupyterHub.
Click this link, and it should open a new tab with the sign-in page.
 Wonderful, we now have access to JupyterHub on SAP BTP! Let's proceed further to see how we can provision users and install our Python libraries.
Section 2: Accessing the Container, Installing Libraries and Provisioning Users
- Now that we can access JupyterHub on SAP BTP, the next step is to provision users who can log in and use notebooks. This can be done using the Kubernetes command line tool. Firstly, download the Kubeconfig file from Kyma – top right user Icon, and “Get Kubeconfig”.
- Open a command line and enter the following command:
set KUBECONFIG=<path to kubeconfig file>

You can test if the configuration file is set by running the following command (the cluster should end with hana.ondemand.com):
kubectl config get-contexts

- Now run the following command to get a list of available namespaces. We can see our jupyterhub namespace in the list. The status should read as “Active”.
kubectl get namespace

- Finally, we want to open a command line for the cluster itself – this will allow us to provision users and install new libraries for the Python environment. Run the following command using the pod name you noted down earlier.
kubectl exec -it --namespace=<namespace><pod> -- /bin/bash

You should now have a command line that directly connects with the container on SAP BTP. From here, you can enter python3 to start the python environment, and use pip commands to install additional libraries. - The next step is to use pip to install notebook, which will also install other libraries (such as ipython) that are required for Jupyter. Use the following command:
pip install notebook

You can use “pip list” to view the current libraries installed in the container. - Lastly, you can provision users using the following command:
adduser user1

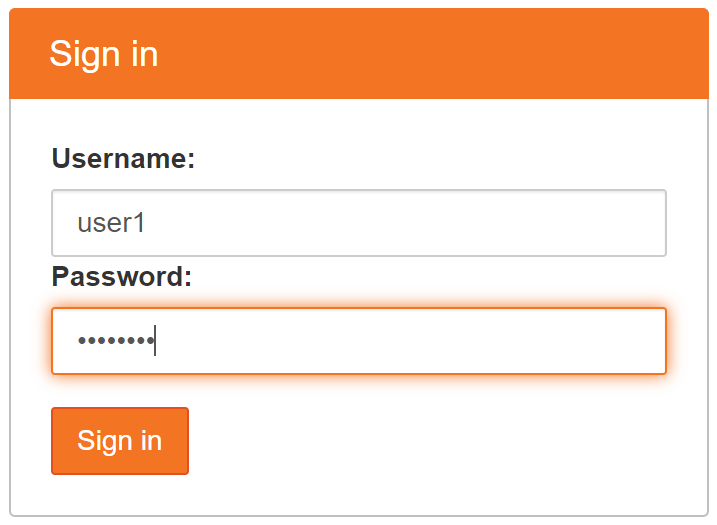
Here, we are creating a user with username “user1”. Once entered, the command line will ask you to create a password and enter details about the new user:

- Once the user has been created, navigate back to JupyterHub and Log in.
- Nice! We can now access JupyterHub on SAP BTP.

You can use JupyterHub as you normally do on your local environment, such as creating a new Python3 script. If you require any data science libraries (such as Pandas, Numpy), remember to use pip in the command line to install them.
Conclusion
In this article, we have been introduced to SAP BTP, Kyma runtime, and its containerisation technology. The Kyma runtime allows you to expand computing resources in minutes when you need to train a machine learning model with large datasets. We have also seen how JupyterHub can be deployed quickly on SAP BTP using the Kyma runtime.
In Part II of this series, we’ll learn how to connect our Kyma runtime to a data lake storage to start analysing big data and build a machine learning model.
Thank you for reading the first article in this series! Please try the steps for yourselves and leave a comment to share your experience, thoughts, or ask any questions. The resources I used during this project are provided below.
References and Further Reading:
Manage your First Container using Kubernetes in SAP Cloud Platform, Kyma Runtime : https://blogs.sap.com/2021/01/07/manage-your-first-container-using-kubernetes-in-sap-cloud-platform-...
Selecting a Docker Image:
https://jupyter-docker-stacks.readthedocs.io/en/latest/using/selecting.html
How to Run Jupyter Notebook on Docker:
https://towardsdatascience.com/how-to-run-jupyter-notebook-on-docker-7c9748ed209f
- SAP Managed Tags:
- SAP BTP, Kyma runtime,
- SAP Data Intelligence,
- Python
Labels:
4 Comments
You must be a registered user to add a comment. If you've already registered, sign in. Otherwise, register and sign in.
Labels in this area
-
ABAP CDS Views - CDC (Change Data Capture)
2 -
AI
1 -
Analyze Workload Data
1 -
BTP
1 -
Business and IT Integration
2 -
Business application stu
1 -
Business Technology Platform
1 -
Business Trends
1,658 -
Business Trends
116 -
CAP
1 -
cf
1 -
Cloud Foundry
1 -
Confluent
1 -
Customer COE Basics and Fundamentals
1 -
Customer COE Latest and Greatest
3 -
Customer Data Browser app
1 -
Data Analysis Tool
1 -
data migration
1 -
data transfer
1 -
Datasphere
2 -
Event Information
1,400 -
Event Information
75 -
Expert
1 -
Expert Insights
177 -
Expert Insights
354 -
General
1 -
Google cloud
1 -
Google Next'24
1 -
GraphQL
1 -
Kafka
1 -
Life at SAP
780 -
Life at SAP
14 -
Migrate your Data App
1 -
MTA
1 -
Network Performance Analysis
1 -
NodeJS
1 -
PDF
1 -
POC
1 -
Product Updates
4,575 -
Product Updates
398 -
Replication Flow
1 -
REST API
1 -
RisewithSAP
1 -
SAP BTP
1 -
SAP BTP Cloud Foundry
1 -
SAP Cloud ALM
1 -
SAP Cloud Application Programming Model
1 -
SAP Datasphere
2 -
SAP S4HANA Cloud
1 -
SAP S4HANA Migration Cockpit
1 -
Technology Updates
6,871 -
Technology Updates
490 -
Workload Fluctuations
1
Related Content
- Develop with Joule in SAP Build Code in Technology Blogs by SAP
- Business AI for Aerospace, Defense and Complex Manufacturing in Technology Blogs by SAP
- Kyndryl Shines a Spotlight on Master Data at 2024 Sapphire Orlando in Technology Blogs by SAP
- Want to learn more about SAP Master Data Governance at SAP Sapphire 2024? in Technology Blogs by SAP
- SAP BusinessObjects Mobile alternatives in Technology Blogs by SAP
Top kudoed authors
| User | Count |
|---|---|
| 20 | |
| 11 | |
| 8 | |
| 8 | |
| 7 | |
| 7 | |
| 7 | |
| 6 | |
| 6 | |
| 6 |