
- SAP Community
- Products and Technology
- Technology
- Technology Blogs by SAP
- Empowering End-users and SAP Customers: Training a...
Technology Blogs by SAP
Learn how to extend and personalize SAP applications. Follow the SAP technology blog for insights into SAP BTP, ABAP, SAP Analytics Cloud, SAP HANA, and more.
Turn on suggestions
Auto-suggest helps you quickly narrow down your search results by suggesting possible matches as you type.
Showing results for
Advisor
Options
- Subscribe to RSS Feed
- Mark as New
- Mark as Read
- Bookmark
- Subscribe
- Printer Friendly Page
- Report Inappropriate Content
06-30-2023
2:01 PM
Introduction
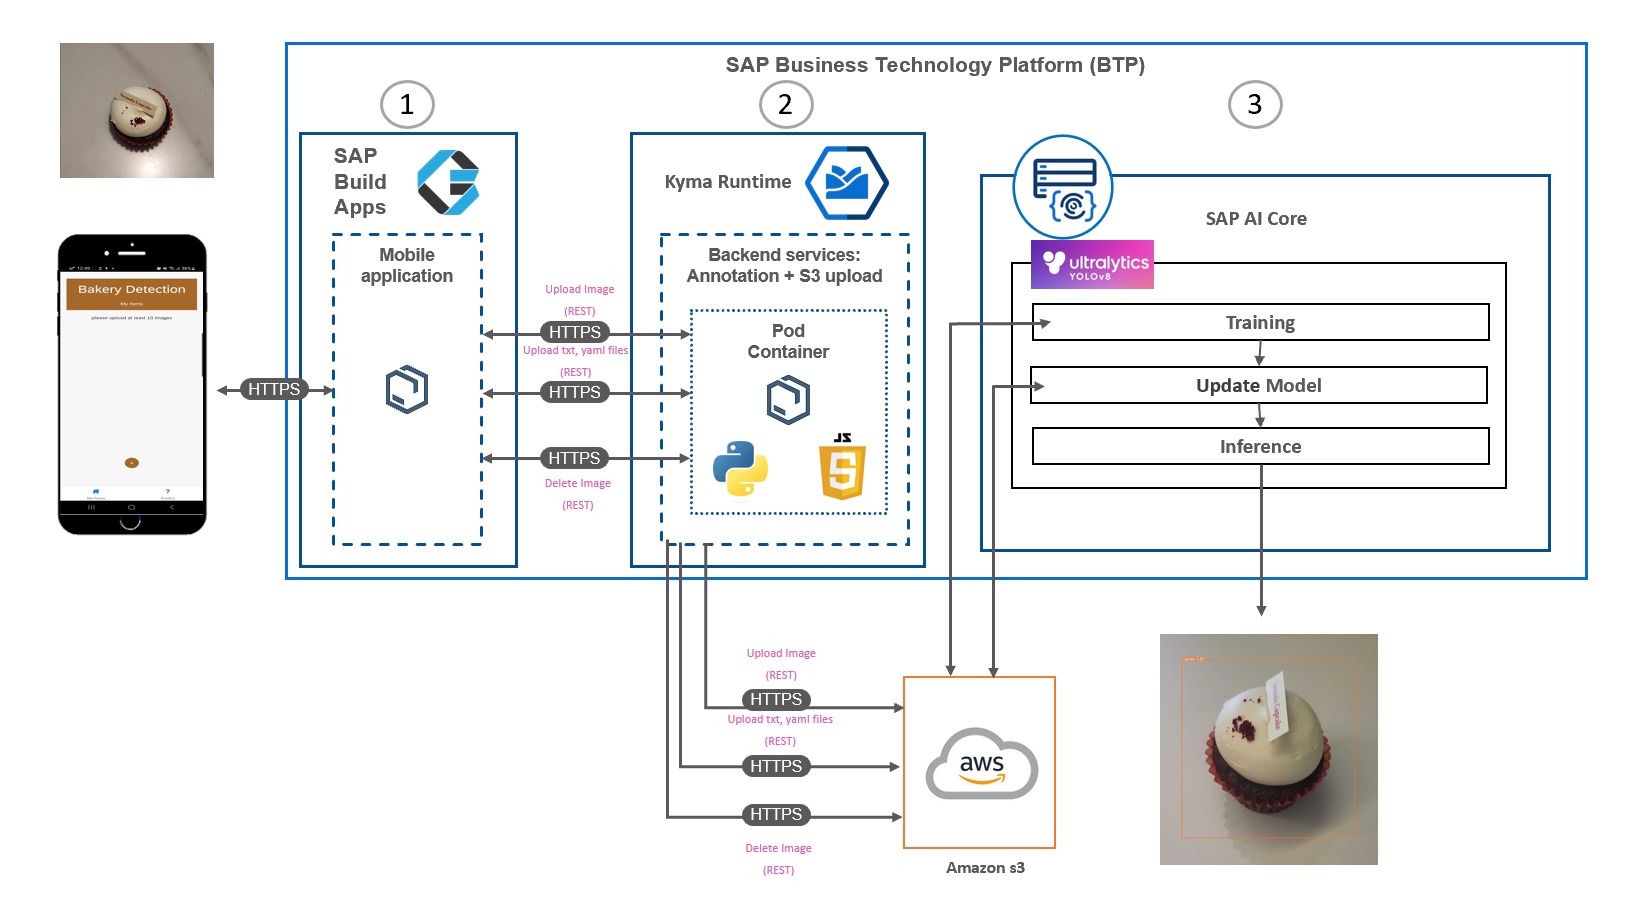
One of the most frequently asked questions by end-users and customers is whether it is possible to train and update models directly through SAP BTP. In this blog post, we will explore a demo available during SAP Customer Checkout that showcases this capability.
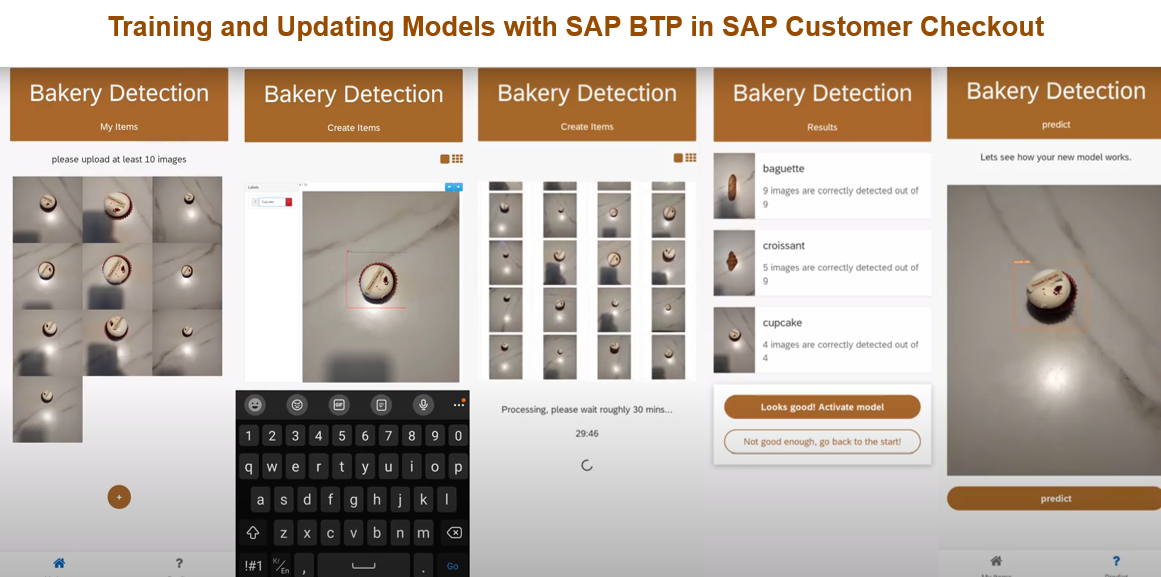
This demo utilizes a prepared dataset that includes a combination of 50 images of baguettes and croissants. Additionally, we will demonstrate the process of adding new data, specifically images of cupcakes, and training the model accordingly. The app facilitates a streamlined workflow, encompassing image upload, labeling, training, updating the model, and prediction, both on the front-end and back-end sides.
front-end
The workflow can be divided into three main steps: image upload and labeling, training and updating the model, and prediction.
1. Image Upload and Labeling:
- By default, the app is preloaded with images of a baguette and a croissant for training.
- To incorporate new data, such as a cupcake or any other new products, the labeling process is applied in Build Apps.
- By clicking on two points on the image, the image is labeled.
- This step enables the app to handle additional image data.
https://youtu.be/cUKzLVFINtQ
2. Training and Updating Model:
- The training data consists of images of baguettes and croissants, which are kept separate from other products.
- This separation ensures that the model learns to distinguish between the default items and any newly added products.
https://youtu.be/trwei4PAQiE
3. Prediction:
- In the inference stage, the model is updated with the newly trained data.
https://youtube.com/shorts/Wze67Fit-PY
Why is this workflow significant?
Previously, the steps of image upload, training, model updates, and inference were separate processes. However, to achieve hyper-automation using SAP BTP, such as SAP AI Core, SAP Build Apps, and SAP BTP Kyma runtime, it is necessary to integrate and streamline these steps.
By following this workflow, businesses can leverage AI capabilities to automate and optimize processes in SAP Customer Checkout, enhancing efficiency and accuracy.
Architecture
If the user uploads 10, 20, or 100 images or more, they can then proceed to label the object and predict the images.
back-end
1. SAP Build Apps
SAP Build Apps provides a variety of functions, such as REST API Calls and Logic functions, but you will need to create your own functions. Below are the functions that I have created.
Using a timer is crucial to inform users about the remaining time. You can use the timer function in SAP Build Apps as a reference.
- timer
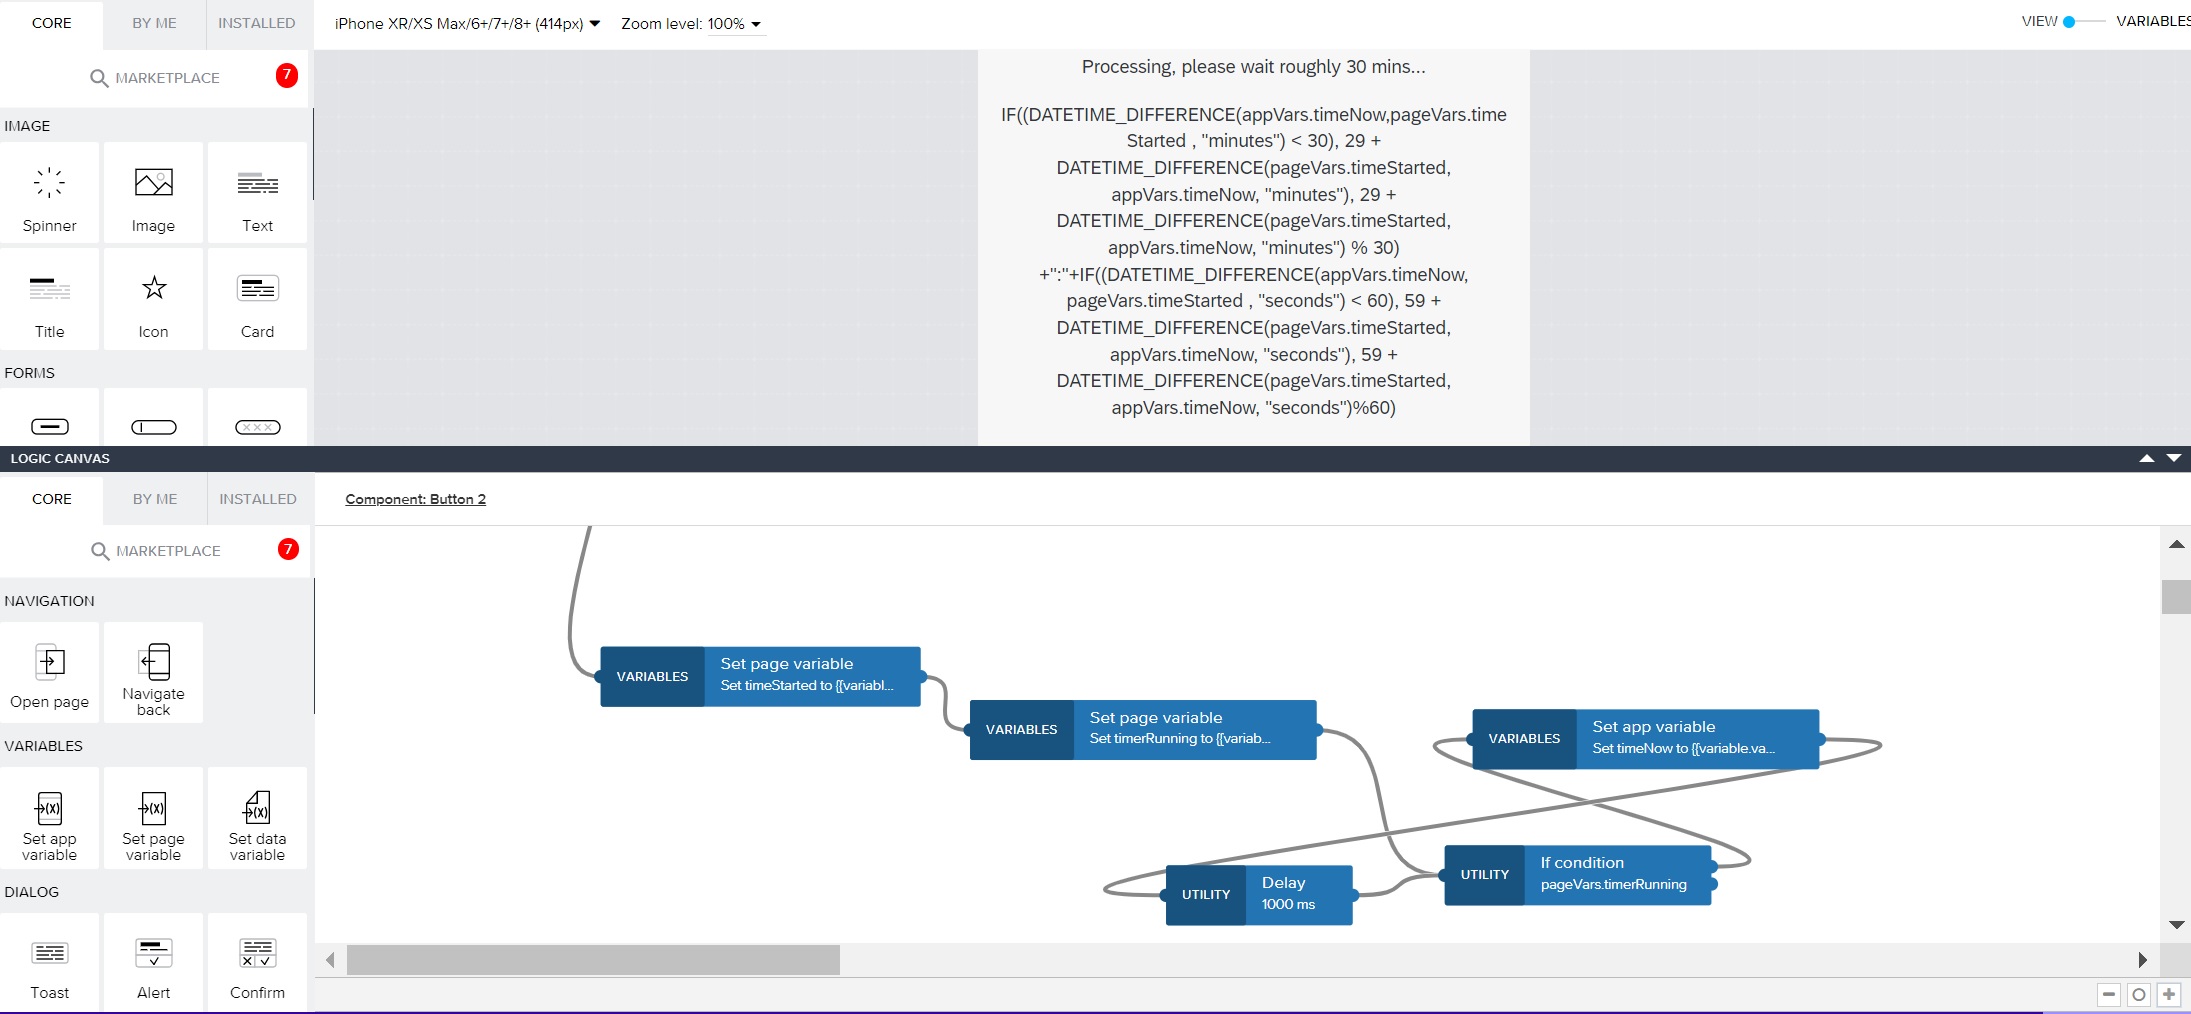
timer
Since REST API Call in SAP Build Apps does not support the multipart/form-data content type, you need to utilize custom JavaScript in SAP Build Apps. As a result, the jpg, txt, and yaml files can be updated and uploaded to an S3 bucket in SAP BTP Kyma using the custom SAP Build Apps multipart form header. You can use a reference, "multipart/form-data".
Plus, the updated jpg, txt, and yaml files are utilized for training the model. During training in SAP Build Apps, data is fetched from SAP AI Core using a 30-second delay. This delay is necessary to avoid a stack overflow. The logic for this process includes executing the training, retrieving the latest execution ID, fetching metrics through the REST API and repeating the process.
- training

Logic flow for training
The logic for updating the model involves obtaining the Configuration ID and creating a configuration name by appending the user's time to the name. Then, the model is updated using the Patch method.
- Update Model

Logic flow for updating model
When receiving predicted images from SAP AI Core, it is necessary to transform the images into base64 format. Please refer to this blog post when you need to convert image data using REST API Calls.
Lastly, here are the REST API Calls that I used. And you must put the host name in header when using REST API Call, if not, you might encounter CORS Error.

SAP BTP Kyma runtime
SAP BTP Kyma runtime is used for web-based labeling, before which we input the URL into SAP Build Apps. The labeling process uses the framework such as Python flask and JavaScript.
The grid view enables users to easily view the images they have uploaded.
- Grid-View
<!DOCTYPE html>

<html>

<head>

    <title>Grid View</title>

    <style>

        .grid-container {

            display: grid;

            grid-template-columns: repeat(auto-fill, minmax(200px, 1fr));

            grid-gap: 10px;

        }


        .grid-item {

            display: flex;

            justify-content: center;

            align-items: center;

            height: 200px;

            border: 1px solid #ddd;

        }


        .grid-item img {

            max-width: 100%;

            max-height: 100%;

        }

    </style>

    <script>

        document.addEventListener("DOMContentLoaded", function() {

            const images = document.querySelectorAll('.grid-item img');


            images.forEach(function(img) {

                img.onload = function() {

                    // Adjust the CSS properties of the image element if needed

                    this.style.maxWidth = '100%';

                    this.style.maxHeight = '100%';

                    this.style.margin = '0';

                };

                img.src = '/images/directory/' + img.getAttribute('data-filename');

            });

        });

    </script>

</head>

<body>

    <h1>Grid View</h1>

    <div class="grid-container">

        {% for image in images %}

            <div class="grid-item">

                <img src="" alt="{{ image }}" data-filename="{{ image }}">

            </div>

        {% endfor %}

    </div>

</body>

</html>
Grid-view
SAP Build Apps does not support multiple image uploads all at once. Therefore, we need to create custom JavaScript code in SAP BTP Kyma. Although it is not included in this app, you can use this code to upload multiple images at once in your SAP Build Apps since I tested it worked.
- Drag and Drop for uploading multiple image
  <script>

    $(document).ready(function() {

    const dropArea = document.getElementById('dropArea');

    const selectFilesBtn = document.getElementById('selectFilesBtn');

    const fileInput = document.getElementById('fileInput');


    // Prevent default drag behaviors

    ['dragenter', 'dragover', 'dragleave', 'drop'].forEach(eventName => {

        dropArea.addEventListener(eventName, preventDefaults, false);

        document.body.addEventListener(eventName, preventDefaults, false);

    });


    // Highlight the drop area when a file is dragged over it

    ['dragenter', 'dragover'].forEach(eventName => {

        dropArea.addEventListener(eventName, highlight, false);

    });


    // Remove the highlight when a file is dragged out of the drop area

    ['dragleave', 'drop'].forEach(eventName => {

        dropArea.addEventListener(eventName, unhighlight, false);

    });


    // Handle dropped files

    dropArea.addEventListener('drop', handleDrop, false);


    // Open file selection dialog when the select files button is clicked

    selectFilesBtn.addEventListener('click', function() {

        fileInput.click();

    });


    // Handle file selection through the file input element

    fileInput.addEventListener('change', function(event) {

        const files = event.target.files;

        handleFiles(files);

        }, false);


    function preventDefaults(event) {

        event.preventDefault();

        event.stopPropagation();

    }


    function highlight() {

        dropArea.classList.add('highlight');

    }


    function unhighlight() {

        dropArea.classList.remove('highlight');

    }


    function handleDrop(event) {

        const files = event.dataTransfer.files;

        handleFiles(files);

    }


    function handleFiles(files) {

        const formData = new FormData();

        for (let i = 0; i < files.length; i++) {

            formData.append('files', files[i]);

        }


        // Send the files to the Flask server using AJAX

        uploadFiles(formData);

    }


    function uploadFiles(formData) {

        $.ajax({

        type: 'POST',

        url: '/upload',

        data: formData,

        processData: false,

        contentType: false,

        success: function(response) {

            console.log(response);

            // Handle the server response as needed

        },

        error: function(xhr, status, error) {

            console.error(xhr.responseText);

            // Handle the error as needed

        }

        });

    }

    function displayImages(images) {

    const imageGrid = document.getElementById('imageGrid');

    imageGrid.innerHTML = ''; // Clear the previous content


    images.forEach(function(image) {

        const imgElement = document.createElement('img');

        imgElement.src = image; // Set the source of the image


        // Adjust the CSS properties of the image element if needed

        imgElement.style.maxWidth = '200px';

        imgElement.style.maxHeight = '200px';

        imgElement.style.margin = '10px';


        imgElement.addEventListener('load', function() {

        // Image loaded successfully

        imageGrid.appendChild(imgElement); // Add the image to the grid container

        });


        imgElement.addEventListener('error', function() {

        // Image failed to load

        imageGrid.removeChild(imgElement); // Remove the image from the grid container

        });

    });

    }

    });

  </script>
Drag and Drop for uploading multiple images all at once
By clicking on two points on the image, the training dataset, such as the YOLO format text file, is generated.
- Yolo format
def pascal_to_yolo(image_width, image_height, xMin, yMin, xMax, yMax):

    dw = 1.0 / image_width

    dh = 1.0 / image_height

    x = (float(xMin) + float(xMax)) / 2.0

    y = (float(yMin) + float(yMax)) / 2.0

    w = float(xMax) - float(xMin)

    h = float(yMax) - float(yMin)


    x = x * dw

    w = w * dw

    y = y * dh

    h = h * dh


    return x, y, w, h
X,Y Coordinate is changed to yolo format
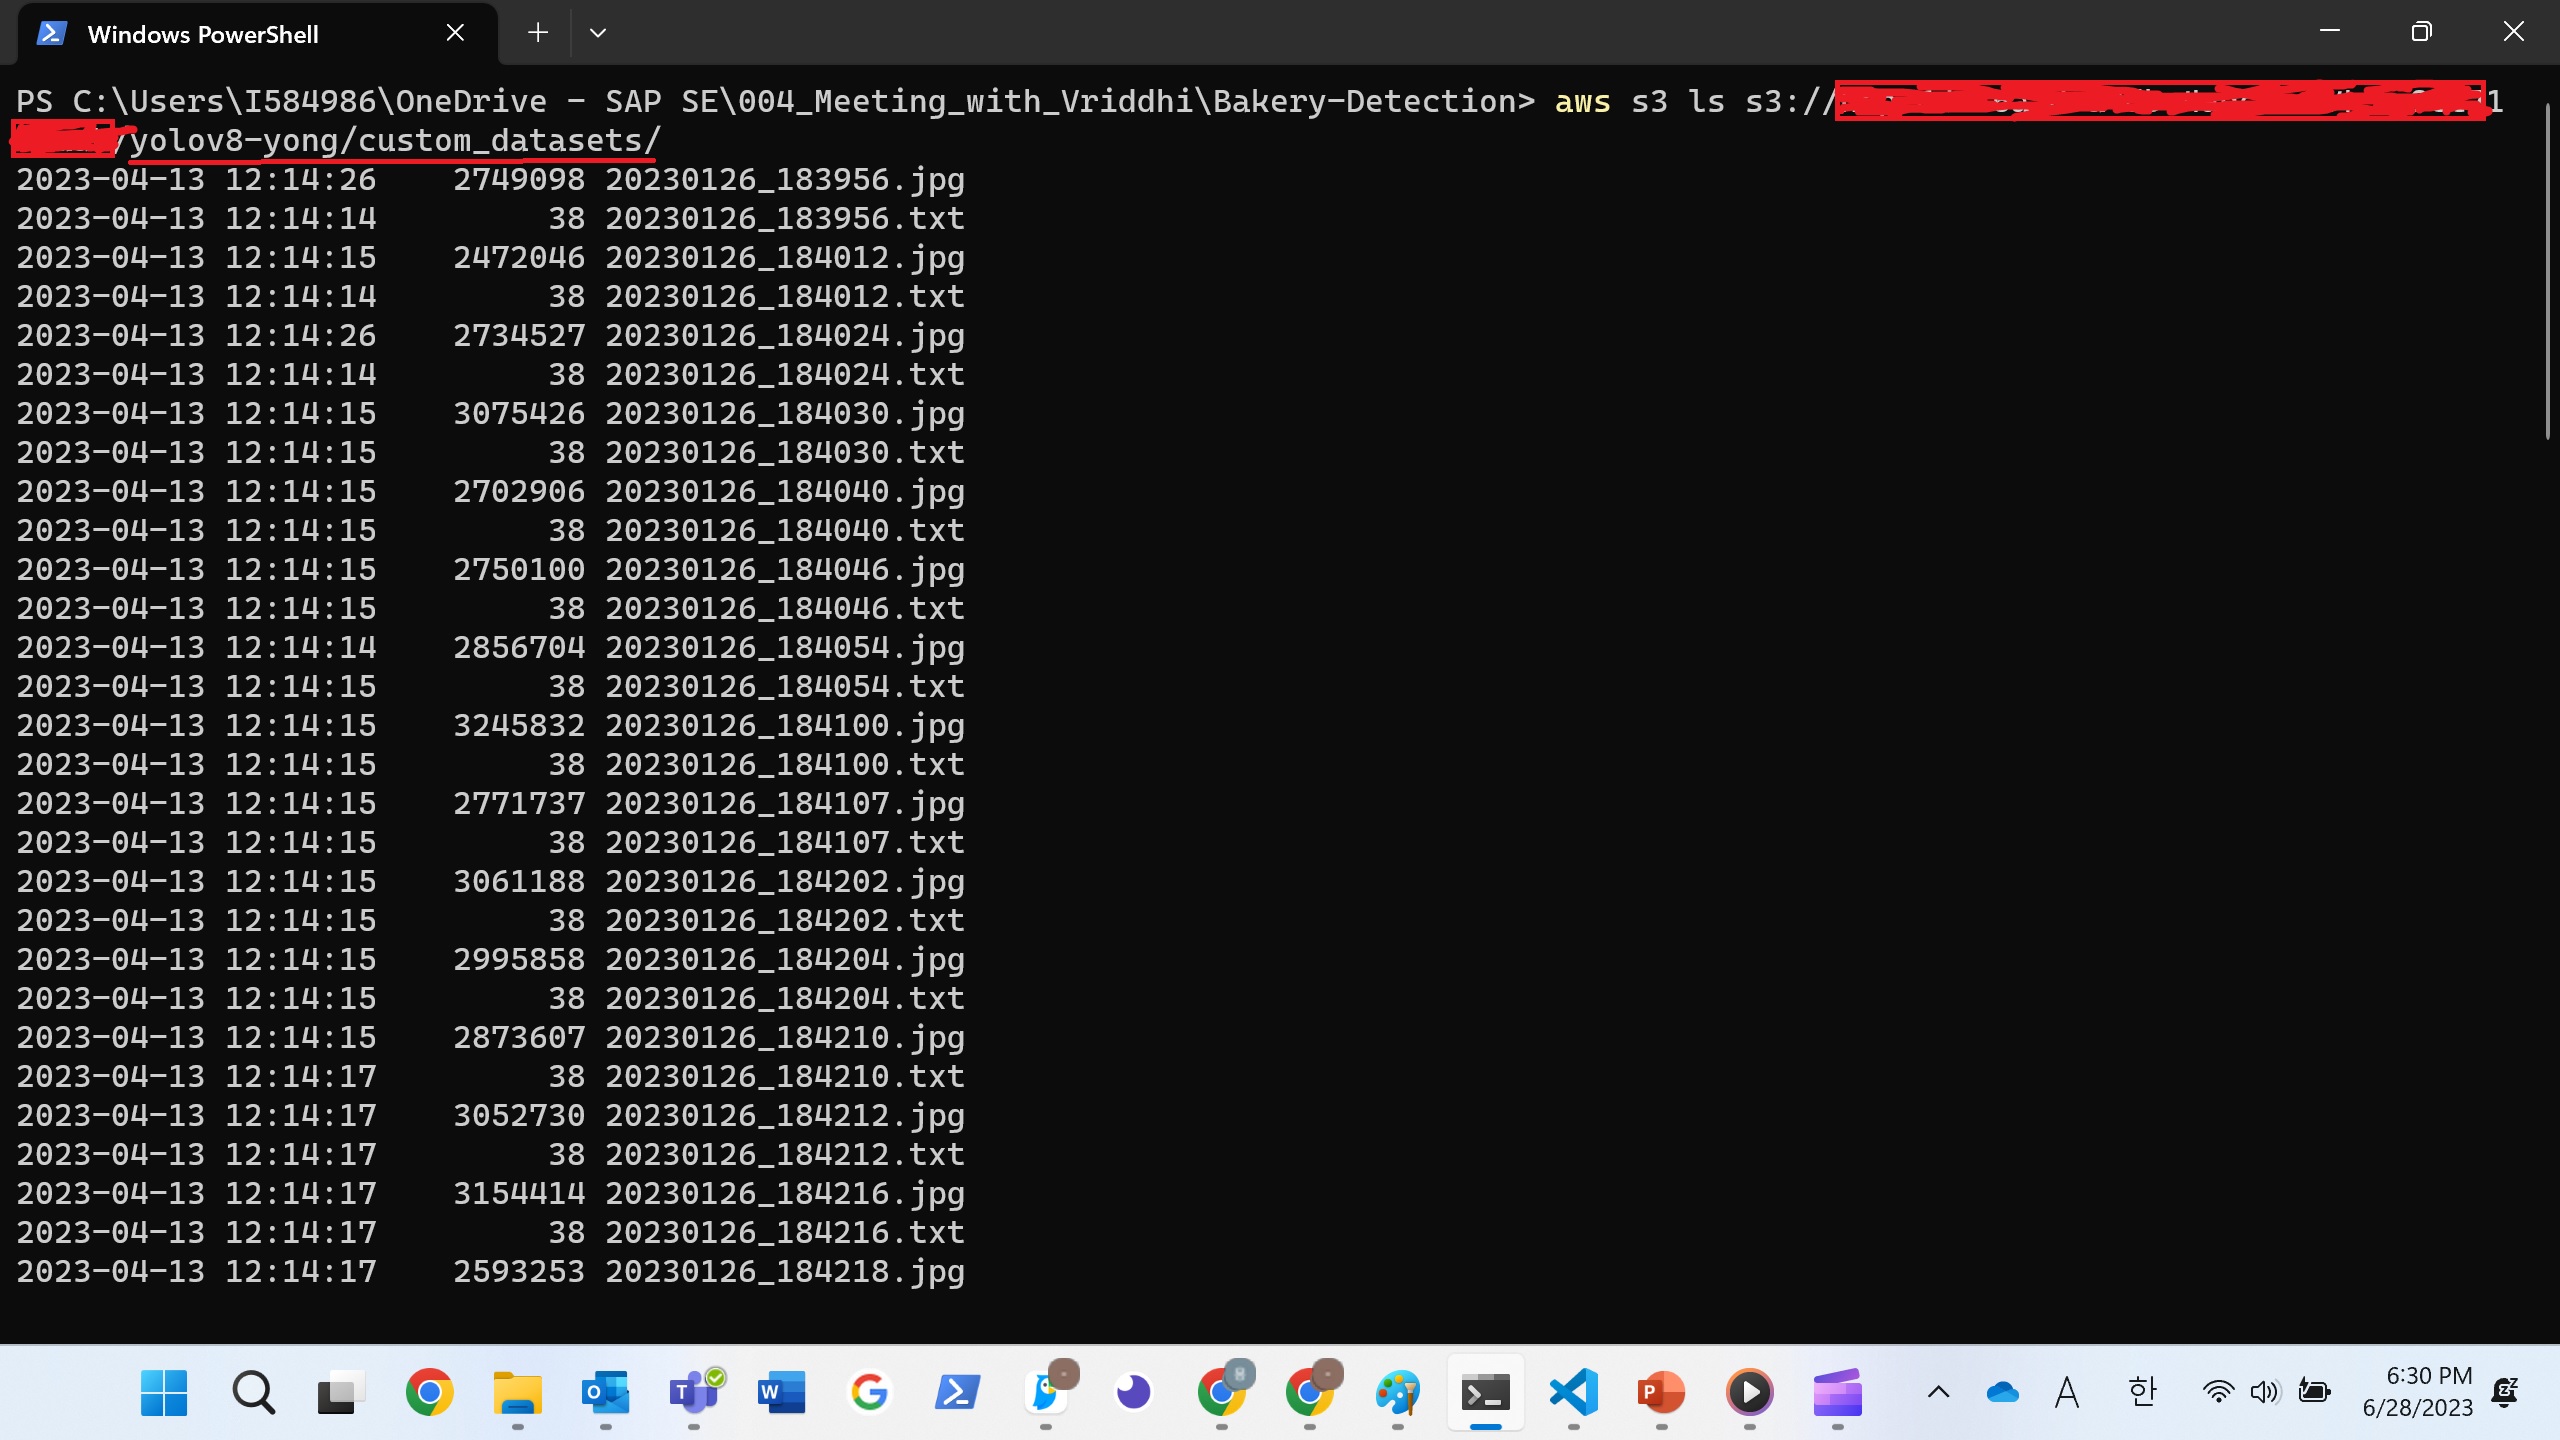
In Flask, the line "file2 = io.Bytes(data)" is important because without it, the data will not be stored in S3 or SAP BTP Kyma.
- Upload Images to flask and S3
# Upload image from SAP BTP Kyma to S3

@app.route('/update', methods=['GET', 'POST'])

def upload_file():

    if request.method == 'POST':

        if 'file1' not in request.files: # when uploading multiple images in "/upload" route

            if 'Bucket-Name' not in request.headers:

                return 'there is no Bucket Name'

            if 'Access_Key' not in request.headers:

                return 'there is no Access Key'

            if 'Secret_Key' not in request.headers:

                return 'there is no Secret Key'

            app.config['S3_BUCKET'] = request.headers['Bucket-Name']

            app.config['S3_KEY'] = request.headers['Access_Key']

            app.config['S3_SECRET'] = request.headers['Secret_Key']


            s3 = boto3.client(

                    "s3",

                    aws_access_key_id=app.config['S3_KEY'],

                    aws_secret_access_key=app.config['S3_SECRET']

            )

            acl="private"

            path = os.listdir(app.config['UPLOAD_FOLDER'])

            for filename in path:

                with open(app.config['UPLOAD_FOLDER'] +"/"+ filename, 'rb') as f:

                    data = f.read()


                file2 = io.BytesIO(data)

                try:

                    s3.upload_fileobj(

                    file2,

                    app.config['S3_BUCKET'],

                    "yolov8-yong/custom_datasets"+ "/new_data/" + filename,

                    ExtraArgs={

                        "ACL": acl,

                        #"ContentType": file1.content_type    #Set appropriate content type as per the file

                        "ContentType": "multipart/form-data"

                    }

                    )

                except Exception as e:

                    print("Something Happened: ", e)

                    return str(e)


            return 'ok'

        else: # when uploading image one by one from SAP Build Apps

            app.config['S3_BUCKET'] = request.headers['Bucket-Name']

            app.config['S3_KEY'] = request.headers['Access_Key']

            app.config['S3_SECRET'] = request.headers['Secret_Key']


            s3 = boto3.client(

                    "s3",

                    aws_access_key_id=app.config['S3_KEY'],

                    aws_secret_access_key=app.config['S3_SECRET']

            )

            file1 = request.files['file1']

            path = os.path.join(app.config['UPLOAD_FOLDER'], file1.filename)

            acl="private"


            file1.save(path)

            with open(path, 'rb') as f:

                data = f.read()


            file2 = io.BytesIO(data)

            try:

                s3.upload_fileobj(

                file2,

                app.config['S3_BUCKET'],

                "yolov8-yong/custom_datasets"+ "/new_data/" +file1.filename,

                ExtraArgs={

                    "ACL": acl,

                    #"ContentType": file1.content_type    #Set appropriate content type as per the file

                    "ContentType": "multipart/form-data"

                }

                )

            except Exception as e:

                print("Something Happened: ", e)

                return str(e)


            return 'ok'

        return '''

        <h1>Upload new File</h1>

        <form method="post" enctype="multipart/form-data">

        <input type="file" name="file[]" multiple>

        <input type="submit">

        </form>

        '''
Custom REST API Call in flask server
Lastly, it is crucial that we are able to integrate the latest YOLOv8 into SAP AI Core.
SAP AI Core
The dataset includes images, txt files, and yaml files containing categories. The txt files are formatted using the YOLO format, and the default yaml file contains baguette and croissant as categories.
The prepared dataset consists of a combination of 50 images of baguettes and croissants.
Data (consisting of jpg, txt, and dataset.yaml files) for 50 images of baguettes and croissants.
Cupcake images have been added to the dataset, along with the dataset.yaml file.
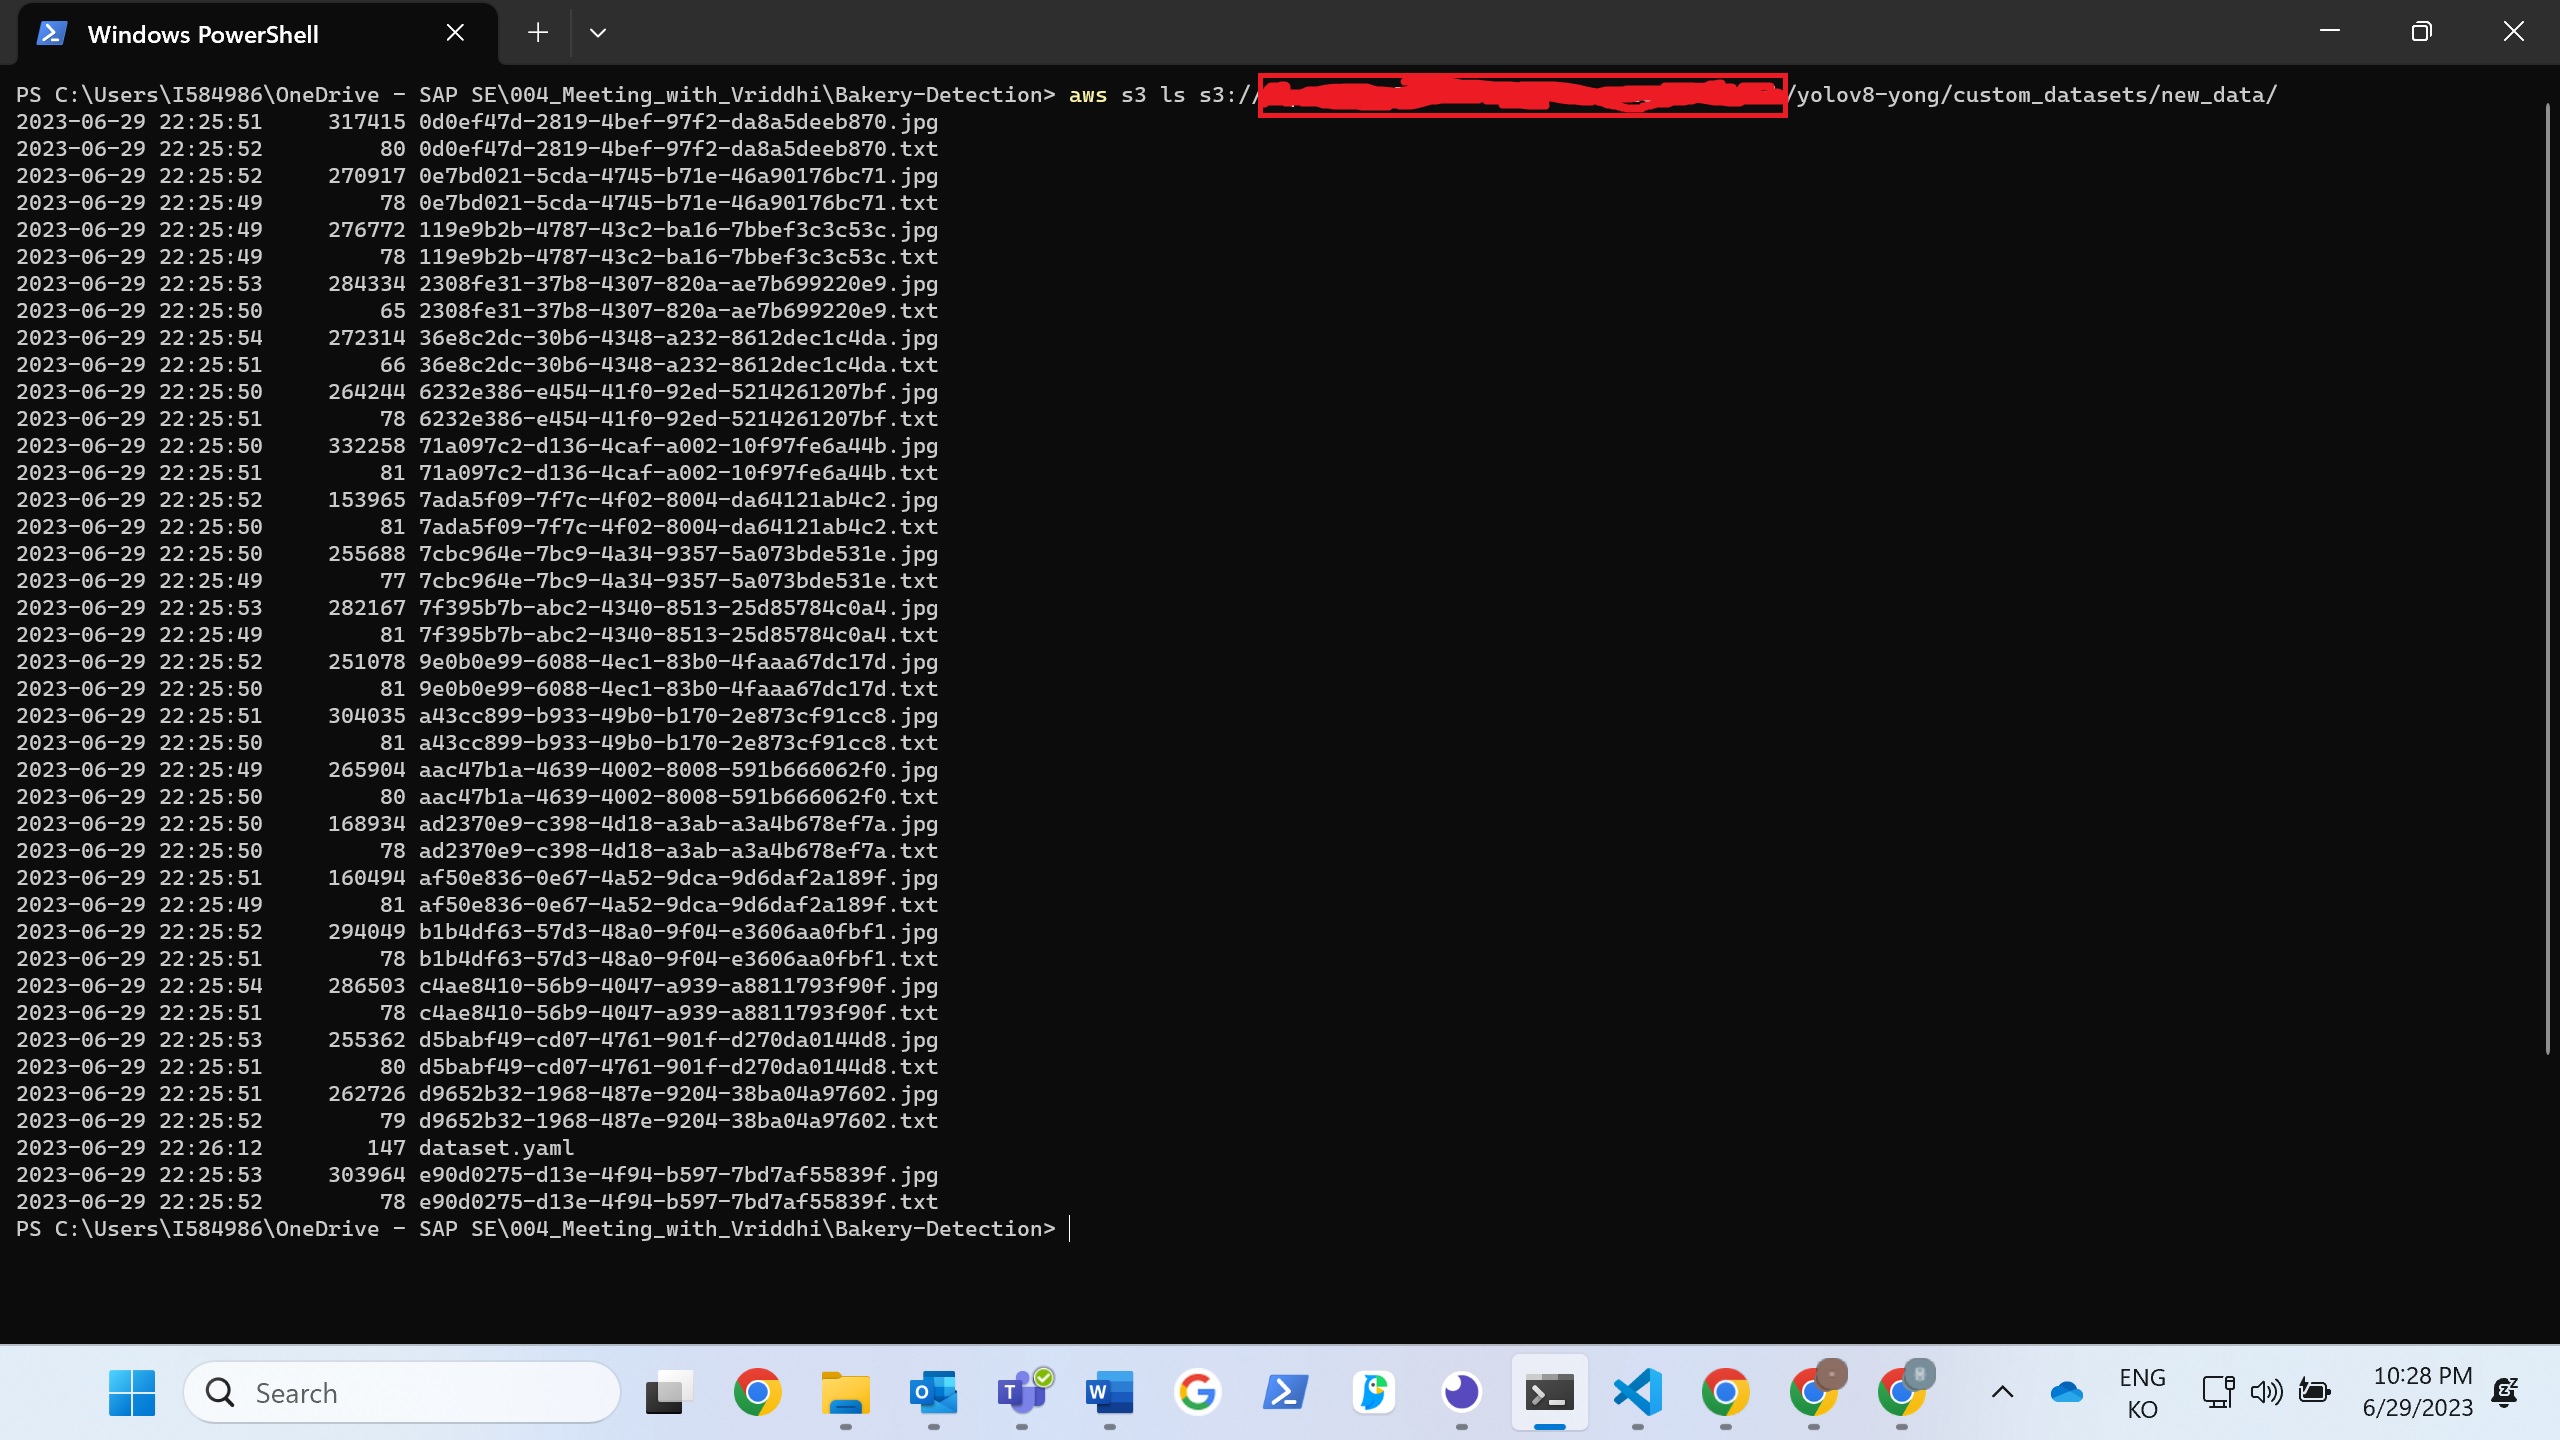
New data is stored in s3
The path is important during training and inference because the advantage of cloud computing is that we have the flexibility to modify our dataset and model according to our needs.
# FROM docker.io/pytorch/pytorch:latest

FROM pytorch/pytorch:latest


# Downloads to user config dir

ADD https://ultralytics.com/assets/Arial.ttf https://ultralytics.com/assets/Arial.Unicode.ttf /root/.config/Ultralytics/


# Install linux packages

ENV DEBIAN_FRONTEND noninteractive

RUN apt update

RUN TZ=Etc/UTC apt install -y tzdata

RUN apt install --no-install-recommends -y gcc git zip curl htop libgl1-mesa-glx libglib2.0-0 libpython3-dev gnupg g++

# RUN alias python=python3


# Security updates

# https://security.snyk.io/vuln/SNYK-UBUNTU1804-OPENSSL-3314796

# RUN apt upgrade --no-install-recommends -y openssl


# Create working directory

RUN mkdir -p /usr/src/ultralytics

COPY ultralytics /usr/src/ultralytics


RUN mkdir -p /usr/src/custom_datasets

RUN mkdir -p /usr/src/ultralytics/runs/detect/train/weights

RUN mkdir -p /usr/src/ultralytics/runs/detect/train/weights/test

#pip install

COPY requirements.txt /usr/src/requirements.txt

RUN pip3 install -r /usr/src/requirements.txt


#work dir

WORKDIR /usr/src/ultralytics


# Data source

ENV DATA_SOURCE=/usr/src/custom_datasets/

ENV OUTPUT_PATH=/usr/src/ultralytics/runs/detect/train/weights/


ENV TRAIN_PATH_IMG=/usr/src/datasets/images/train

ENV TRAIN_PATH_LABEL=/usr/src/datasets/labels/train


ENV VAL_PATH_IMG=/usr/src/datasets/images/val

ENV VAL_PATH_LABEL=/usr/src/datasets/labels/val


ENV TEST_PATH=/usr/src/datasets/test

ENV YAML_PATH=/usr/src/ultralytics/ultralytics/datasets/


ENV NEW_DATA_PATH=/usr/src/custom_datasets/new_data/


# Set environment variables

ENV OMP_NUM_THREADS=1

ENV PYTHONPATH /usr/src/ultralytics


# Cleanup

ENV DEBIAN_FRONTEND teletype


# Required to execute script

RUN chgrp -R nogroup /usr/src && \

    chmod -R 770 /usr/src
Dockerfile for Training in SAP AI Core
Then we can achieve result from Confusion Matrix. The diagnal part of Confusion Matrix means probablity of correct answer out of test data.
names=trainer.validator.names

nt= trainer.validator.nt_per_class

def isNaN(num):

    return num != num


for name in names:

    if isNaN(trainer.validator.confusion_matrix.array[name][name]):

        trainer.validator.confusion_matrix.array[name][name]=0

        aic_connection.set_custom_info(

            custom_info=[

                MetricCustomInfo(name=names[name],

                                    value=str(round(trainer.validator.confusion_matrix.array[name][name] * nt[name]))

                                    + " images are correctly detected "

                                    + "out of "

                                    + str(nt[name]))

                ]

            )

    else:

        aic_connection.set_custom_info(

            custom_info=[

                MetricCustomInfo(name=names[name],

                                    value=str(round(trainer.validator.confusion_matrix.array[name][name] * nt[name]))

                                    + " images are correctly detected "

                                    + "out of "

                                    + str(nt[name]))

                ]

            )
Confusion Matrix for Result of Yolov8
There are numerous code blocks, YAML files, and SAP Build Apps functions involved in the entire process. If you wish to understand the entire process, please reach out to vriddhishetty or gunteralbrecht
Overall
This app provides a comprehensive solution by integrating image upload, labeling, training, updating model and prediction into a unified workflow. By utilizing SAP technologies, businesses can not only achieve hyper-automation and unlock the potential for advanced AI-driven capabilities in SAP Customer Checkout but also enable end-users to easily train and update the model.
Credits
gunteralbrecht manages the project well and patiently waits for a long time to complete it.
vriddhishetty provides logical feedback and never gives up on the project, which motivates me to put immense energy into it.
stella022 guides me with a user-friendly workflow. Thanks to her efforts, this app is neat and clean.
lsm1401 provides guidance for the presentation and documentation.
Reference
- SAP Managed Tags:
- SAP BTP, Kyma runtime,
- SAP AI Core,
- SAP AI Launchpad
Labels:
1 Comment
You must be a registered user to add a comment. If you've already registered, sign in. Otherwise, register and sign in.
Labels in this area
-
ABAP CDS Views - CDC (Change Data Capture)
2 -
AI
1 -
Analyze Workload Data
1 -
BTP
1 -
Business and IT Integration
2 -
Business application stu
1 -
Business Technology Platform
1 -
Business Trends
1,658 -
Business Trends
93 -
CAP
1 -
cf
1 -
Cloud Foundry
1 -
Confluent
1 -
Customer COE Basics and Fundamentals
1 -
Customer COE Latest and Greatest
3 -
Customer Data Browser app
1 -
Data Analysis Tool
1 -
data migration
1 -
data transfer
1 -
Datasphere
2 -
Event Information
1,400 -
Event Information
67 -
Expert
1 -
Expert Insights
177 -
Expert Insights
301 -
General
1 -
Google cloud
1 -
Google Next'24
1 -
GraphQL
1 -
Kafka
1 -
Life at SAP
780 -
Life at SAP
13 -
Migrate your Data App
1 -
MTA
1 -
Network Performance Analysis
1 -
NodeJS
1 -
PDF
1 -
POC
1 -
Product Updates
4,577 -
Product Updates
346 -
Replication Flow
1 -
REST API
1 -
RisewithSAP
1 -
SAP BTP
1 -
SAP BTP Cloud Foundry
1 -
SAP Cloud ALM
1 -
SAP Cloud Application Programming Model
1 -
SAP Datasphere
2 -
SAP S4HANA Cloud
1 -
SAP S4HANA Migration Cockpit
1 -
Technology Updates
6,873 -
Technology Updates
430 -
Workload Fluctuations
1
Related Content
- Start page of SAP Signavio Process Insights, discovery edition, the 4 pillars and documentation in Technology Blogs by SAP
- Improving Time Management in SAP S/4HANA Cloud: A GenAI Solution in Technology Blogs by SAP
- IoT - Ultimate Data Cyber Security - with Enterprise Blockchain and SAP BTP 🚀 in Technology Blogs by Members
- Accelerate Business Process Development with SAP Build Process Automation Pre-Built Content in Technology Blogs by SAP
- It’s Official - SAP BTP is Again a Leader in G2’s Reports in Technology Blogs by SAP
Top kudoed authors
| User | Count |
|---|---|
| 27 | |
| 17 | |
| 15 | |
| 13 | |
| 11 | |
| 9 | |
| 8 | |
| 8 | |
| 8 | |
| 7 |