- SAP Community
- Products and Technology
- Technology
- Technology Blogs by SAP
- How to get a "Display only" Fiori app from a "Mana...
- Subscribe to RSS Feed
- Mark as New
- Mark as Read
- Bookmark
- Subscribe
- Printer Friendly Page
- Report Inappropriate Content
Ever come across a really good Standard Fiori app which you would like to use both for users that are allowed to create new business context, but also for those who should only display them? Sometimes there is a "display" or "List" app available, but not always. In this blog you'll learn how you can create your own "display only" app without having to redo everything SAP standard "did for you".
Example Case
In this example I'll be using "Manage Sales Order" app (F3893): Manage Sales Orders - Version 2
CDS Development
Step 1: Get Main CDS
The first thing we have to do is to figure out the main CDS view of the original standard app. In this example it's very simple because with have an OData service that was developed with RAP according to ABAP Cloud: C_SALESORDERMANAGE_SRV. We open this object in ADT and soon find the main CDS: C_SalesOrderManage.
I won't go into details here how to find the main CDS. In another blog post I have explained how to check an OData service and find CDS, please check there. If you still need help, maybe I make a new blog for that topic alone, we'll see.
Step 2: Decide Approach (yes, there is more than one)
Now that we have C_SalesOrderManage open (this is a projection view), we can check from which CDS it gets the data; R_SalesOrderTP. Looking at that CDS tells us that this is a root view entity which has composition children. So we can't just select from R_SalesOrderTP in our own CDS and reuse the compositions. For example R_SalesOrderItemTP is linked to R_SalesOrderTP and we cannot change SAP Standard so that it links to our own CDS. Meaning we go 1 level lower to the basic interface view that is used by R_SalesOrderTP; I_SalesOrder. Here some help how the CDS looks like:
We can see that for "as select from" we have I_SalesOrder. This is the one we want to use, because looking at it confirms it's no root view entity, but a regular CDS view/entity which we can reuse for our purpose.
At this point we should make a choice:
- Do we want to have full functionality as in the original app, for example navigating from a sales order details page, all the way into a sales order item details page?
- Or is it enough with one list report and one detail page? Namely in this example, a way to search for sales orders via filters, then clicking on a sales order and display all wanted details, but no further navigation.
Important: both are possible.
- Choice one, full functionality: this means more wrappers and more work. You will basically create your own root view entity, with your own composite child entities (all wrapping around standard ones so you don't create them from scratch, thus called wrapper) for all the data you wish to display in your display-only app. You will then create the proper projection view, just like C_SalesOrderManage, create service definition and binding, which then gives you your OData service for the Fiori app.
- Choice two: if we just need a simple list report with details page, we can generate an OData service directly from a CDS view entity. In this example I will go with this option, for simpleness sake. But basically the steps are as said just above, creating a wrapper for all CDS you want in the end and creating a proper OData service with RAP and ABAP Cloud.
Step 3: Create wrapper for CDS
- Create a new data definition: ZC_SalesOrderTP (we give it C in its name for "consumption" because we will directly expose this CDS as OData service, and "TP" for transactional processing).
- As reference CDS view, be sure to enter I_SalesOrder as identified in the previous step. If you do, ADT will add all fields and associations for you.
- First off, at the beginning of your view entity you will need below two semantics. The first will make sure we don't just blindly take over all semantics from I_SalesOrder (this could be handy and potentially faster, but since we may not use absolutely all associations etc., it is in my opinion better to recreate your own semantics and thus the syntax checker will also help you to make sure everything is correct). The second one allows us to create an extra metadata extension file, which we can use for all UI annotations, which makes the whole thing less messy. I always recommend to separate UI annotations from other semantics.
@Metadata.ignorePropagatedAnnotations: true
@Metadata.allowExtensions: true
- Next we add that we want to publish this CDS as OData service (with @OData.publish: true). This is only needed if you are going the more simple option. Otherwise you leave this out and create the OData service via Service Definition and Binding, once you built the complete RAP object.
- Next I copied some of the semantics from the standard CDS and here is the complete start of my CDS so far:
- Add the associations you want to use (again, simply copy from standard CDS) - if you are doing the more functionality route, be sure to use composite child instead of association and you have to create z-wrappers for each, and use the z-CDS here, not for example R_SalesOrderItemTP:
association [0..*] to I_SalesOrderItem as _Item
on $projection.SalesOrder = _Item.SalesOrder
association [0..*] to R_SalesOrderTextTP as _Text
on $projection.SalesOrder = _Text.SalesOrder
association [0..*] to I_SalesOrderPartner as _Partner
on $projection.SalesOrder = _Partner.SalesOrder
association [0..1] to I_SalesOrderPartner as _SoldToParty
on $projection.SalesOrder = _SoldToParty.SalesOrder
and _SoldToParty.PartnerFunction = 'AG'
association [0..1] to C_SlsDocStdPartnerContactInfo as _SoldToPartyContactInfo
on $projection.SalesOrder = _SoldToPartyContactInfo.SalesDocument
and $projection.SoldToParty = _SoldToPartyContactInfo.SoldToParty
and $projection.SalesOrderType = _SoldToPartyContactInfo.SalesDocumentType
association [0..1] to I_SalesOrderPartner as _ShipToParty
on $projection.SalesOrder = _ShipToParty.SalesOrder
and _ShipToParty.PartnerFunction = 'WE'
association [0..1] to I_SlsOrganizationDistrChnl as _SlsOrganizationDistrChnl
on $projection.SalesOrganization = _SlsOrganizationDistrChnl.SalesOrganization
and $projection.DistributionChannel = _SlsOrganizationDistrChnl.DistributionChannel
//Extension Association
association [1] to E_SalesDocumentBasic as _Extension on $projection.SalesOrder = _Extension.SalesDocument
- Now I do the same per field that is important: add semantics to have a good UX. Here a couple of examples (I won't add everything as it would just get too big):
@Search: {
defaultSearchElement: true,
fuzzinessThreshold: 0.9,
ranking: #HIGH }
key SalesOrder.SalesOrder,
@ObjectModel.text.element: ['CustomerName']
@Search: {
defaultSearchElement: true,
fuzzinessThreshold: 0.8 }
SalesOrder.SoldToParty,
@Semantics.text:true
_SoldToParty.FullName as CustomerName,
If you go the more functionality route, you keep creating your z-version for each "composition [0..*] of " that you feel you want to use in your display-only app. Once the wrappers are done, you can come back to the main one and activate it with the correct children-links.
Step 4: Authorization
If you paid attention above, we of course want to make sure that users still only see the sales orders they are supposed to see; the standard authorization. Once again, we don't need to redo this, we can inherit the standard one.
In ADT, create a new Access Control with the same name as your CDS you want to be checked, in my case ZC_SalesOrderTP. Then simply enter the "inheriting conditions from entity", save and done:
@EndUserText.label: 'Sales Order for Display Access'
@MappingRole: true
define role ZC_SALESORDERTP {
  grant
    select on ZC_SalesOrderTP
      where
        inheriting conditions from entity R_SalesOrderTP;
}
Step 5: UI Annotations for Fiori
I recommend to add all UI annotations that you want Fiori display via a metadata extension file. In ADT, create a metadata extension file that has the exact same name as your CDS, in my case ZC_SalesOrderTP. Here once again I opened the standard metadata extension file with Ctrl + Shift + A in ADT, and entering the same name as the main CDS: C_SalesOrderManage. In the dialog that shows all the hits, choose the metadata extension file instead of the Data Definition.
Now, at this point you may need some extra time. Instead of blindly copying all the annotations from the standard file, I went through and only added the facets that I wanted on my display-only app, and only the fields that I wanted. If you add too much (meaning you add annotations to something that doesn't exist in your z-wrapper CDS) syntax check will catch it but, there can be some "hidden" errors. And those will result in your Fiori app not functioning properly. For example, let's say you add a certain facet:
{
  id: 'CompletionStatus',
  label: 'Completion Status',
  purpose: #STANDARD,
  type: #FIELDGROUP_REFERENCE,
  parentId: 'StatusTab',
  importance: #HIGH,
  position: 30,
  targetQualifier: 'CompletionStatus'
},
The above looks all fine and will pass syntax check. We have the "CompletionStatus" and we can add fields to this facet. BUT, if you paid close attention, you may noticed this line: parentId: 'StatusTab'. This means our CompletionStatus facet is inside another, a parent facet. If you now didn't copy that parent facet, and there is no facet with id StatusTab, then your Fiori application will not work properly, because it cannot resolve this.
This is probably the part where you spend most of your time on. Myself when I did this example it took me about 1-2 hours.
Step 6: Publish OData Service
Next we need to publish our custom OData service with transaction /IWFND/MAINT_SERVICE for OData V2 services or /IWFND/V4_ADMIN for OData V4. Note that when using @OData.publish: true the system will add _CDS to your OData service name. Confirm your service and metadata was loaded successfully before continuing.
Fiori Development
Next up, we create our display-only Fiori elements app.
Open Business Application Studio (BAS) on your SAP BTP and start a space for Fiori development.
Create a new Project from Template and choose SAP Fiori application. The first thing we need to do is connect to a data source. In my case an S/4HANA on-premise system that I have connected to my SAP BTP via Cloud Connector. I select in this step the Destination to that S/4HANA system via Cloud Connector, and then I select my OData service:
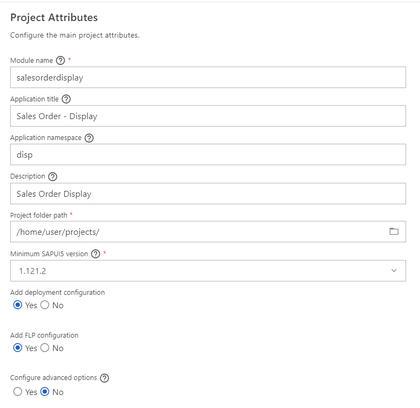
Next, we enter the project details, for example:
You should add deployment configuration and also FLP configuration here. I again select my S/4HANA system destination and enter a technical name for the Fiori app to be created on the ABAP platform of my S/4HANA system. You also need to enter package and transport at this point.
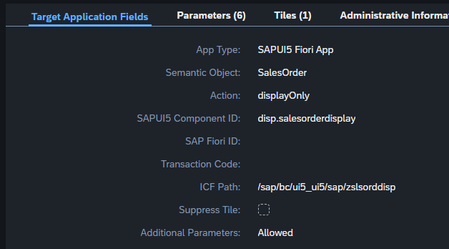
For the FLP configuration it's business as usual, except be careful with your semantic object and action. Be sure to not reuse what standard is using, for example I used SalesOrder as object (because that is correct) and then I said the action is "displayOnly" to be sure to not have another intent like that:
Once the wizard is done, simply test your app. Because we have done all the UI annotations, you should be good to go.
Deploy your app and we are almost done.
Adding your App to the Fiori Launchpad
The app is now in our system but it has no catalog etc. So we gotta do this per usual practice. I won't go into super details here:
- Create a technical catalog if you don't have a suitable one using Launchpad App Manager - Cross Client
- From your technical catalog, choose Add App to add an "app descriptor item", or Tile and Target Mapping in other words (so we are still in Launchpad App Manager - Cross Client we have created/navigated to our technical catalog, in edit mode and choose Add App)
- Here under application component ID you have to enter the full application name you chose for your Fiori application when you first created it in BAS. In my case i had namespace "disp" and name "salesorderdisplay", meaning disp.salesorderdisplay. If you enter this, the app should fetch all the necessary FLP config you already did in BAS (it will also fetch ICF path for you):
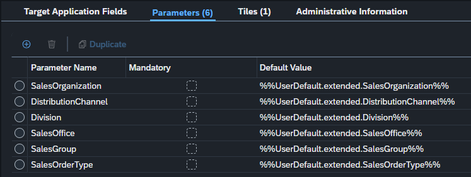
- In my case, because I chose "Mange Sales Orders" app, I also added all the parameters which that app uses - be sure not to forget this!
- Save this.
- Next, we need to add the app to a business catalog (maybe create a new business catalog if needed) or several, depending on your setup
- Then we need to add our business catalog(s) for this app to all the appropriate roles who should have this display-only app
- Lastly, if the app should be on a Space and Page, we need to do that config
All done! You have a display-only app, using standard CDS which you have wrapped into a custom OData service, for a custom app.
And if you were wondering; Is this Clean Core? Then yes. Custom development that follows the ABAP Cloud programming model is "clean". One thing to consider when you create such "wrappers" (Tier 2) is to keep an eye out if SAP Standard delivers a solution that makes your custom development unnecessary; then you should switch to SAP Standard and retire your own development (and you will be on Tier 1).
Solution
The final app - list report page (including smart links to customer, without us having to code it ourselves):
Details/Object page:
Hope this was helpful! Let me know if you wonder anything.
- SAP Managed Tags:
- SAP Fiori for SAP S/4HANA,
- ABAP RESTful Application Programming Model
You must be a registered user to add a comment. If you've already registered, sign in. Otherwise, register and sign in.
-
ABAP CDS Views - CDC (Change Data Capture)
2 -
AI
1 -
Analyze Workload Data
1 -
BTP
1 -
Business and IT Integration
2 -
Business application stu
1 -
Business Technology Platform
1 -
Business Trends
1,658 -
Business Trends
93 -
CAP
1 -
cf
1 -
Cloud Foundry
1 -
Confluent
1 -
Customer COE Basics and Fundamentals
1 -
Customer COE Latest and Greatest
3 -
Customer Data Browser app
1 -
Data Analysis Tool
1 -
data migration
1 -
data transfer
1 -
Datasphere
2 -
Event Information
1,400 -
Event Information
67 -
Expert
1 -
Expert Insights
177 -
Expert Insights
301 -
General
1 -
Google cloud
1 -
Google Next'24
1 -
GraphQL
1 -
Kafka
1 -
Life at SAP
780 -
Life at SAP
13 -
Migrate your Data App
1 -
MTA
1 -
Network Performance Analysis
1 -
NodeJS
1 -
PDF
1 -
POC
1 -
Product Updates
4,577 -
Product Updates
346 -
Replication Flow
1 -
REST API
1 -
RisewithSAP
1 -
SAP BTP
1 -
SAP BTP Cloud Foundry
1 -
SAP Cloud ALM
1 -
SAP Cloud Application Programming Model
1 -
SAP Datasphere
2 -
SAP S4HANA Cloud
1 -
SAP S4HANA Migration Cockpit
1 -
Technology Updates
6,873 -
Technology Updates
430 -
Workload Fluctuations
1
| User | Count |
|---|---|
| 26 | |
| 17 | |
| 15 | |
| 13 | |
| 11 | |
| 9 | |
| 8 | |
| 8 | |
| 8 | |
| 7 |


