
- SAP Community
- Products and Technology
- Technology
- Technology Blogs by SAP
- Integrating OpenAI Chat Completion into an existin...
Technology Blogs by SAP
Learn how to extend and personalize SAP applications. Follow the SAP technology blog for insights into SAP BTP, ABAP, SAP Analytics Cloud, SAP HANA, and more.
Turn on suggestions
Auto-suggest helps you quickly narrow down your search results by suggesting possible matches as you type.
Showing results for
Advisor
Options
- Subscribe to RSS Feed
- Mark as New
- Mark as Read
- Bookmark
- Subscribe
- Printer Friendly Page
- Report Inappropriate Content
03-31-2023
2:46 PM
Background
One activity that I like to engage in on weekends is learning about new compute topics that are outside my normal area of expertise (during the week, I’m a Senior Architect on the SAP BTP SDK for Android team). A couple of topics that have been on my radar for a while are “low-code, no-code” (specifically SAP’s Build Apps offering) and OpenAI APIs (specifically the “Chat Completion” API), so I figured “Why not do both at the same time… how difficult could that be?” Short answer - not difficult, not difficult at all, but that’s not to say there weren’t a few stumbling blocks along the way.
Step 1- Create an App with SAP Build
First things first - getting up to speed on SAP Build Apps. Being a complete novice in this area, I did a quick search for tutorials and landed almost immediately on “Create an Application with SAP Build Apps” - a perfect introduction for a beginner like me. About an hour later, I had a functional app for scanning food product barcodes and displaying product name, image and caloric information - Step 1 accomplished!
Step 2 - Integrate the Chat Completion API
First, some exploration
On to Step 2, which I rightfully assumed might take a bit more than an hour. First, what enhancement could I make to the food scanner app within a reasonable amount of time, while still providing some relevant functionality. My first thought was, “I know… put a chat client into the app!”, but that didn’t really seem like it would fit the “reasonable amount of time” requirement and, as it turns out, kirill_l has already done some great work in this area, so no need to retread old ground.
Going back then to the tutorial app and the product information displayed, I thought it might be interesting to display something more interesting than the caloric information… what about a clever marketing slogan based on the product name?
Armed with the product name from the tutorial used in Step 1 (“Lakritsi Original”), I headed over to OpenAI Playground and submitted “Write some marketing copy explaining why I should buy Lakritsi Original” and received an eloquent response :
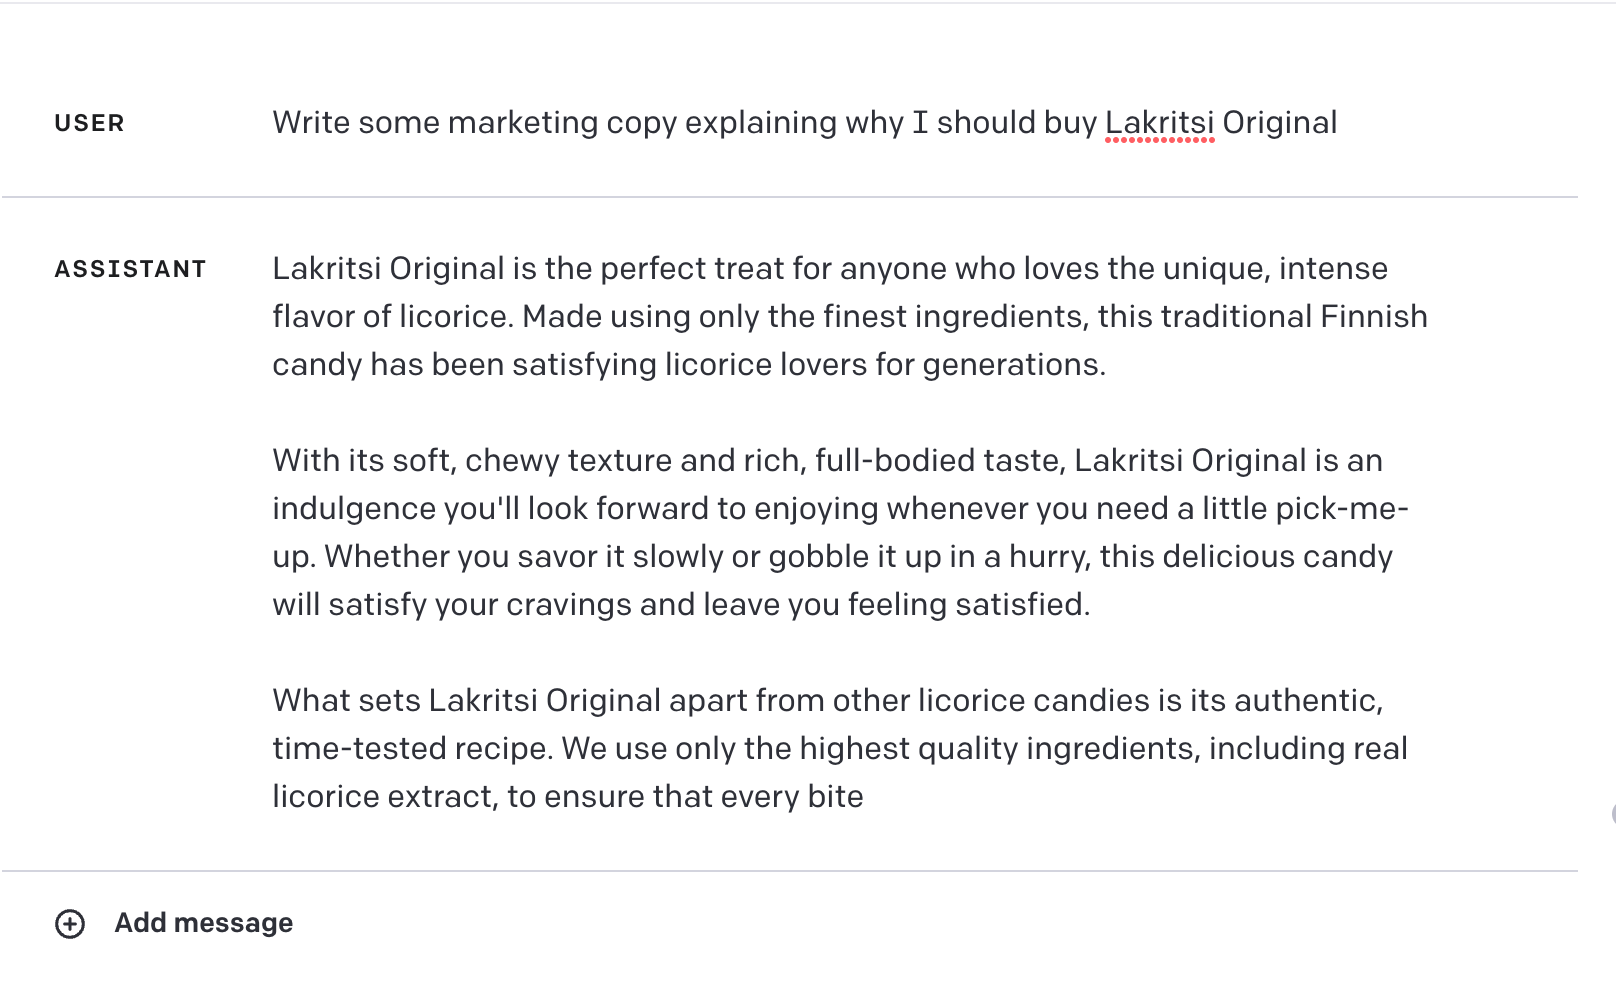
Using the Chat Playground to generate some marketing copy
Not bad… It reads a bit like a radio spot from the 1960’s, but pretty decent overall. One problem - it’s not going to fit very well within a mobile app because of the long length of the text, so I wanted to tighten it up a bit…

Using the Chat Playground to generate a slogan instead
Much better. Combining the two prompts, I settled on “Write a marketing slogan explaining why I should buy product name” as the prompt to be used in the app.
Next, learning about the API and creating a key
Now, on to the fun part - adding the OpenAI “Chat Completion” API to the app. Fortunately, OpenAI has a great guide for its Chat Completion API. After reading through the guide and poking around a bit in the API documentation, I had a fairly good idea regarding the minimum parameters needed for the request as well as how to parse the response.
First, I had to get an OpenAI API Key to make any calls to any of the OpenAI APIs. For this, I went to https://platform.openai.com, created an account, and then created an API Key (available by navigating to “View API Keys” under account information and pressing “Create new secret key”) :

Creating the API Key
As the dialog indicates, I made sure to copy the key before pressing OK, because I knew I wouldn't see it again (and don’t worry… I deleted this key right after creating this blog post, so don't get any ideas!).
Next, unfortunately, I had to enter a payment method for billing purposes. At the time of this writing, there’s no free tier when it comes to Chat Completion requests. Fortunately, the pricing is quite reasonable at $0.002 USD per 1K tokens (for reference, the chat completion used in this blog uses around 50 tokens). All the testing I did to write this blog entry (combined with some other miscellaneous poking around) came to a grand total of $0.05 USD :

API usage costs for developing this integration
Storing the API Key
In order to keep the API Key in a central location where it can easily be changed (or revoked) as needed, I created an App Variable for it. These are located in the “APP VARIABLES” section of the “VARIABLES” pane. I created a new App Variable, called it “APIKEY” and gave it the initial value of “Bearer ” (without the quotes) followed by the secret key I just created :

Creation of the APIKEY App Variable
Creating the OpenAI data entity
Having added the “Open Food Facts” data entity in the earlier tutorial, I was pretty sure I’d need another data entity for OpenAI, which should be a Direct REST Integration as well. Here’s what I entered for the “Base” information, with the mandatory parts outlined in red :

Base information for the Data Entity
The “Resource ID” and “Short description” can be anything, and the Resource URL of “https://api.openai.com/v1” comes from the OpenAI docs. The value of the AUTHORIZATION header (created by clicking on the + sign in the HTTP Header section) will be resolved at runtime using the APIKEY App Variable from the previous step (more on this later). Accordingly, I set both “Is static” and “Is optional” to off.
Next I came to the most complex (for me, anyway) part of this whole exercise; configuring the “POST” request. First, I clicked on “CREATE RECORD (POST)” and toggled "Create record (POST) is current disabled, enable to configure" to "on" to ensure that “Method enabled” was toggled to true. Then, I entered “/chat/completions” in the “Relative Path” box as shown in the OpenAI API docs :

Base configuration for the POST request
Then, I clicked on the SCHEMA tab to configure the Schema for the request and selected "Custom Schema" for both "Create record (POST) request schema" and "Create record (POST) response schema" to start creating the schema.
Pressing the "ADD PROPERTY" button to the right of "Properties of this schema", I added an element with a "Key" value of "messages", a "Value Type" of "List" and a "List Item Type" of "Object" :

Creating the POST Schema - Step 1
Note that this automatically adds a property of the object with the key value of "id" of type text. Clicking on this property, I changed the Key to "content" and then added another Text property, "role", checking "Value is required" for both. There were more parameters I could have added here (based on the API documentation available at https://platform.openai.com/docs/api-reference/chat/create), but I kept it to a minimum for the time being :

Creating the POST Schema - Step 2
It was also at this point that I made the accidental discovery that changing the "Value type" from "Text" to "Number" resulted in a new "Initial value" field being added to the property panel (and that the field remained after toggling the "Value type" back to "Text"). Taking advantage of this, I was able to add initial values for the following properties :
- role (inside the "messages" Object) - Initial value = user (this specifies that the content is entered by the user)
- model - Initial value = gpt-3.5-turbo (the gpt-3.5-turbo model is the latest latest readily available language model, optimized for speed)
This prepared me for the next step which was...
Running a test
Having configured the request schema, I was ready to run a test (which also helped in creating the schema for the Response). I clicked on the "TEST" tab, and then on the "ABC" button below "Authorization" :

Initializing the Authorization Header for the test
On the next screen, I clicked on "Data and Variables" :

Selecting Data and Variables
Next, I clicked on "App Variable" :

Selecting App Variable
Finally, I selected "APIKEY" (the only App Variable available) and "SAVE" :

Saving the APIKEY
This, in turn, brought me back to the "TEST" tab with the Authorization Header now initialized. I then clicked on “Custom Object” in the “Record properties” section to fill that in :

TEST Tab with Authorization Header initialized
I noted that "gpt-3.5-turbo" and "user" were filled in automatically using the initial values from the previous step. The the full text I entered in the content box was “Write a marketing slogan explaining why I should buy Lakritsi Original” :

Creating the test Request
I then pressed save and, having entered the test data, pressed “RUN TEST”. After a short period of time, the following appeared :

Results of a successful test
A Status of "OK" was a definite requirement before proceeding, as it was my only indication that everything was configured properly.
Creating the Response schema
Having confirmed a Status of "OK", I then proceeded to create the Response schema. This was as simple as pressing “SET SCHEMA FROM RESPONSE”, which took me back to the SCHEMA tab once more. Scrolling down to the bottom, I saw :
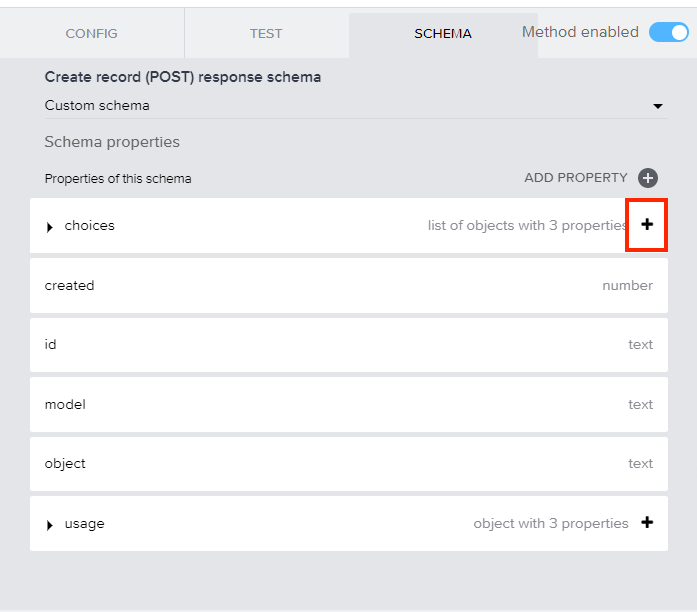
Top level of the Response schema
Expanding the “choices” section and then the “message” section within that produced this :

Expanding the "choices" and "message" elements
As was the case with the POST request, it's really the content that matters in the response. I'll come back to this later when modifying the Scan button logic.
First, though, I pressed “SAVE DATA ENTITY” to complete the configuration (and then saved the whole app for good measure - I definitely didn't want to have to create that POST Request schema again).
Creating a Variable
Next, I added the variable to store the content of the response in order to eventually display it in the UI. To do this, I started by switching to the “Variables” view and clicking on “PAGE VARIABLES”, then "ADD PAGE VARIABLE" :

Adding a Page Variable
I then created a new Text Variable named "slogan" :

Creating a Text variable named "slogan"
Finally, I saved the app again.
Adding more logic
Now it was time to add the logic steps to make the call to the Chat Completion API and populate the results into the Page Variable I'd just created.
First, I went back to the UI Canvas View, selected the “Scan” button and pressed the “Add logic to BUTTON 1” link. I hadn't made any changes to the food scanner tutorial, so it looked like this :

Initial state of the Scan Button logic
Next, just as I used a “Get record” call to retrieve the product data in the tutorial from Step 1, I knew that I was going to use a “Create record” call against the OpenAI Data Entity in order to create the marketing slogan. So I dragged a “Create record” component into the logic editor and created a connection between the top connector on the “Get record” node for “OpenFoodFacts” and the input to the new “Create Record” node :

Adding the Create record node
Then, I clicked on the “Create record” node and noticed that, in the Inputs section on the right, “OpenAI” was already selected as the Resource name (since OpenFoodFacts doesn’t have a Create record request). Right away though I could also see that I was going to have to enter the Authorization Header value again :

Entering the Authorization Header in the Create Record node
Here, I went through the same steps of selecting the APIKEY App Variable that I followed when running the Test Request; I won't bother repeating them here.
Once I was finished with that step, this is what the INPUTS panel looked like :

Create record INPUTS
I then clicked on “Custom object” under “Record properties”. Here, as expected, the model was already filled in :

Object properties with model filled in
Then, I clicked on “Custom list (0 items)” and then “Add a value”, noting that "user" was prefilled :

Adding the role and content
Next I wanted to populate the “content” parameter with a formula composed of the static string "Write a marketing slogan explaining why I should buy" followed by the product name from the OpenFoodFacts GET request.
To do this, I pressed on the “ABC” button under content, which brought up a collection of possible binding types. I clicked on “Formula” :

Creating a formula for the "content" element
In the Formula dialog, I clicked in the Formula edit box, which brought up a context-sensitive editor. I entered the static string "Write a marketing slogan explaining why I should buy " (with the “non-smart” quotes) followed by a plus sign :

Beginning of the "content" element formula
The validation logic complained that the syntax is incomplete… which it was. To complete it, I entered “product_name” in the search box :

Searching for "product_name"
Then, I selected the entry labeled data.OpenFoodFacts1.product.product_name and pressed the Enter key (double-click would have worked as well) :
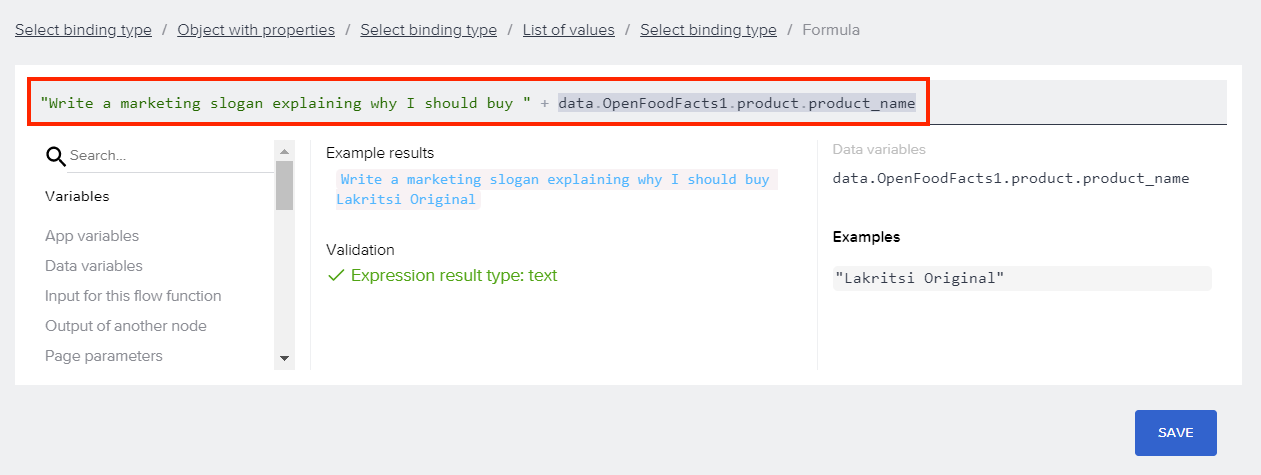
The completed "content" Formula
Then I pressed “SAVE” followed by “SAVE” two more times, and then saved the app.
Setting the Variable
I knew I was entering the home stretch at this point… just one more logic step to go and then I could add the new marketing slogan to the UI. For this step, I dragged a “Set page variable” component to the right of the “Create record” node and drew a connection from the top output on the “Create record” node to the Variables’ input :

Adding a new "Page variable" node
Then, I clicked on the “Set page variable” node that was just added. In the Properties pane, I noted that the "slogan" variable name was already entered (since it's the only Page Variable I had) and clicked on the "ABC" button below "Assigned Value" :

Customize the Variable
On the next screen, I clicked on “Formula” :

Creating a Formula for the Page Variable
This took me to a Formula dialog containing an edit box with a pair of empty quotes :

Initial "binding type" formula
I clicked in the “Formula” edit box to bring up the context-sensitive editor :

Context-sensitive Formula editor
I removed the quotes and typed in “choices” (without the quotes) to narrow down the list of prospective source values :

Entering "choices" into the formula
I then clicked on the one ending with “.message.content”, followed by a double-click (the Enter Key would have worked here as well) and then "SAVE", which took me back to the Page Variable properties :

Completed Page Variable
At this point I saved the app again.
Updating the UI
And now, I had just one more step before being able to test out the updated app. Back in the UI Canvas view, I selected the Text element that was being used to display the caloric content :

Initial contents of the Text element
In the “Properties” tab, I wanted to edit the formula to refer to the new page variable instead, so I clicked the box to the right of the “Formula” icon that contains the text starting with “data.OpenFoodFacts1” which displayed the context-sensitive edit dialog for the formula.
I then removed the existing content and selected "Page Variables" below the Search box, which displayed my "slogan" page variable :

Text element formula
I double clicked on "pageVars.slogan", pressed "SAVE" and then "SAVE" again before finally saving the app one final time.
Testing the completed app
I then loaded the app into the SAP Build Apps preview app on my phone and tried scanning various food products, treating me to an assortment of clever and innovative product slogans! Here’s one that was generated for a bag of prawn crisps I happened to have sitting around :

A slogan generated by OpenAI for a bag of crisps
Conclusion
All things considered, not a bad way to spend an afternoon. I had broadened my knowledge of products in the SAP BTP portfolio and learned a bit about OpenAI as well!
I hope that you found reading this blog to be time well spent as well. Please let me know if you have any questions or suggested improvements… I’m still a novice on both of these topics, so all comments are welcome.
Disclaimer:
SAP notes that posts about potential uses of generative AI and large language models are merely the individual poster's ideas and opinions, and do not represent SAP's official position or future development roadmap. SAP has no legal obligation or other commitment to pursue any course of business, or develop or release any functionality, mentioned in any post or related content on this website.
- SAP Managed Tags:
- Artificial Intelligence,
- SAP Build Apps
Labels:
13 Comments
You must be a registered user to add a comment. If you've already registered, sign in. Otherwise, register and sign in.
Labels in this area
-
ABAP CDS Views - CDC (Change Data Capture)
2 -
AI
1 -
Analyze Workload Data
1 -
BTP
1 -
Business and IT Integration
2 -
Business application stu
1 -
Business Technology Platform
1 -
Business Trends
1,658 -
Business Trends
117 -
CAP
1 -
cf
1 -
Cloud Foundry
1 -
Confluent
1 -
Customer COE Basics and Fundamentals
1 -
Customer COE Latest and Greatest
3 -
Customer Data Browser app
1 -
Data Analysis Tool
1 -
data migration
1 -
data transfer
1 -
Datasphere
2 -
Event Information
1,400 -
Event Information
75 -
Expert
1 -
Expert Insights
177 -
Expert Insights
358 -
General
1 -
Google cloud
1 -
Google Next'24
1 -
GraphQL
1 -
Kafka
1 -
Life at SAP
780 -
Life at SAP
15 -
Migrate your Data App
1 -
MTA
1 -
Network Performance Analysis
1 -
NodeJS
1 -
PDF
1 -
POC
1 -
Product Updates
4,575 -
Product Updates
398 -
Replication Flow
1 -
REST API
1 -
RisewithSAP
1 -
SAP BTP
1 -
SAP BTP Cloud Foundry
1 -
SAP Cloud ALM
1 -
SAP Cloud Application Programming Model
1 -
SAP Datasphere
2 -
SAP S4HANA Cloud
1 -
SAP S4HANA Migration Cockpit
1 -
Technology Updates
6,871 -
Technology Updates
493 -
Workload Fluctuations
1
Related Content
- Use Cases of Generative AI in SAP Cloud ALM in Technology Blogs by Members
- Simple way to renew NW ABAP SSL certificate with STRUST Replacement Wizard in Technology Blogs by Members
- Unlocking the Potential of Business AI: Engineering Best Practices in Technology Blogs by SAP
- Notes to Documents Migration in Technology Blogs by SAP
- SAP BTP FAQs - Part 2 (Application Development, Programming Models and Multitenancy) in Technology Blogs by SAP
Top kudoed authors
| User | Count |
|---|---|
| 16 | |
| 8 | |
| 7 | |
| 7 | |
| 6 | |
| 6 | |
| 5 | |
| 5 | |
| 5 | |
| 5 |