
- SAP Community
- Products and Technology
- Technology
- Technology Blogs by SAP
- Multiclass Classification with APL (Automated Pred...
Technology Blogs by SAP
Learn how to extend and personalize SAP applications. Follow the SAP technology blog for insights into SAP BTP, ABAP, SAP Analytics Cloud, SAP HANA, and more.
Turn on suggestions
Auto-suggest helps you quickly narrow down your search results by suggesting possible matches as you type.
Showing results for
Advisor
Options
- Subscribe to RSS Feed
- Mark as New
- Mark as Read
- Bookmark
- Subscribe
- Printer Friendly Page
- Report Inappropriate Content
04-01-2022
11:04 AM
Common machine learning scenarios such as fraud detection, customer churn, employee flight risk, aim to predict Yes/No outcomes using binary classification models. But sometimes the target to predict has more than just two classes. This is the case of Delivery Timeliness that can have three categories: Early/On-time/Late.
From this article you will learn how to train and apply a multiclass classification model in a Python notebook with HANA ML APL.
The following example was built using HANA ML 2.12.220325 and APL 2209.
Census Income will be our training dataset.
Let’s check the size of the HANA dataframe in number of rows.
Marital status is our multiclass target.
We do a fit and ask for a final model with no more than six variables. The processing is done within the HANA database.
The target distribution looks like this:
At this point we choose to save the APL trained model.
One hour or one day later …
We are back. We load our multiclass model.
We request the model reports and display first the accuracy overall.
We take a deeper look with the class-by-class report:
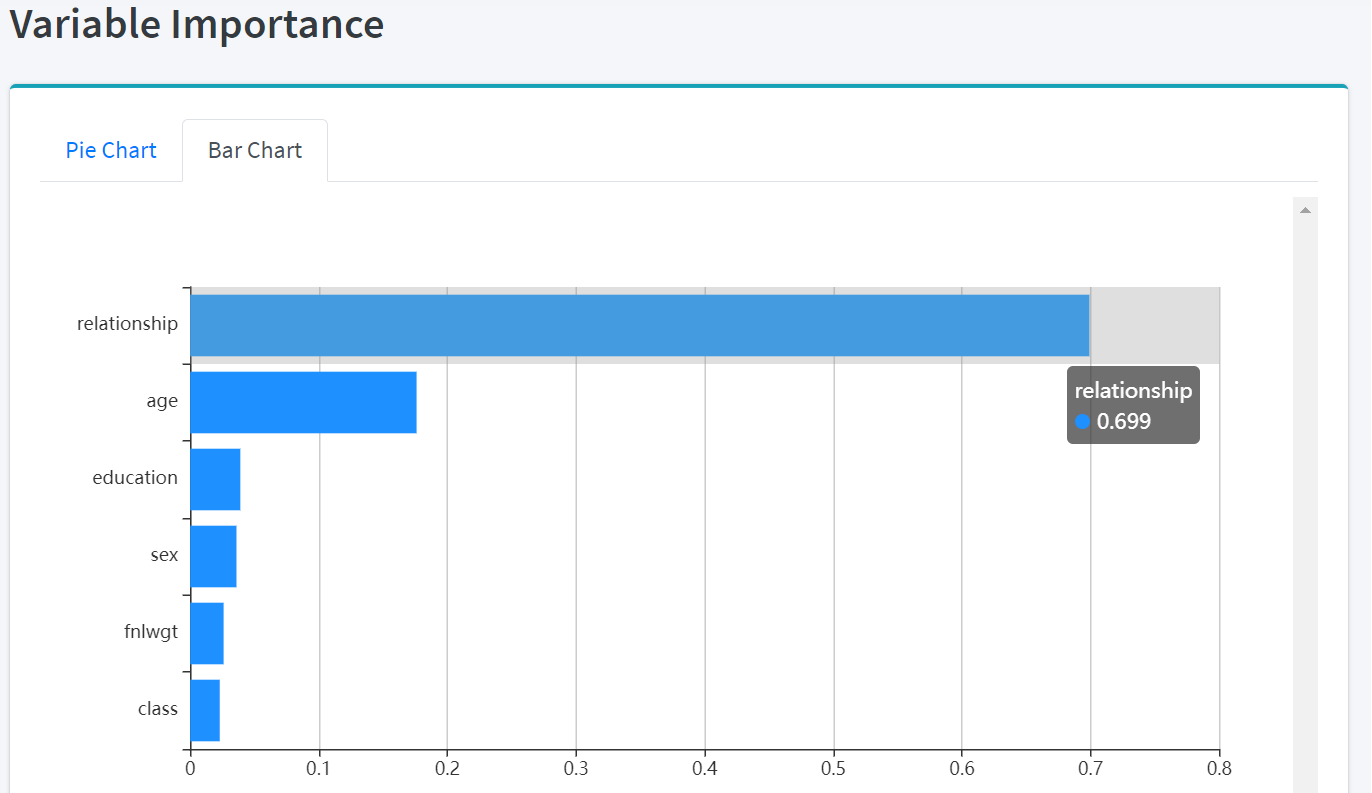
Here are the variables that APL selected.
We want to know which variables were excluded during the training, and why:
We define a new dataframe with a few rows to try the APL model.
We do a predict and ask for the top three reasons. Again, the processing is done within the database.
One can also request the score for each class. The class with the highest score becomes the prediction.
Another option is to export the model equation for scoring in stand-alone JavaScript.
To know more about APL
From this article you will learn how to train and apply a multiclass classification model in a Python notebook with HANA ML APL.
The following example was built using HANA ML 2.12.220325 and APL 2209.
Census Income will be our training dataset.
from hana_ml import dataframe as hd

conn = hd.ConnectionContext(userkey='MLMDA_KEY')

sql_cmd =  """

select * from apl_samples.census

where "marital-status" not in (

  select "marital-status" from apl_samples.census

  group by "marital-status" having count(*) < 1500 )

order by "id"

"""

hdf_train= hd.DataFrame(conn, sql_cmd)

hdf_train.head(5).collect().style.hide(axis='index')
Let’s check the size of the HANA dataframe in number of rows.
hdf_train.shape[0]![]()
Marital status is our multiclass target.
col_key = 'id'

col_target = 'marital-status'

col_predictors = hdf_train.columns

col_predictors.remove(col_key)

col_predictors.remove(col_target)

col_predictors.remove('education-num')

len(col_predictors)
We do a fit and ask for a final model with no more than six variables. The processing is done within the HANA database.
from hana_ml.algorithms.apl.gradient_boosting_classification import GradientBoostingClassifier

apl_model = GradientBoostingClassifier()

apl_model.set_params(variable_auto_selection = True,

                     variable_selection_max_nb_of_final_variables = '6')

apl_model.fit(hdf_train, label=col_target, key=col_key, features=col_predictors)
The target distribution looks like this:
my_filter = "\"Partition\" = 'Estimation'"

df = apl_model.get_debrief_report('MultiClassTarget_Statistics').filter(my_filter).collect()

df.drop('Oid', axis=1, inplace=True)

df.drop('Target Key', axis=1, inplace=True)

format_dict = {'% Weight':'{:,.2f}%', 'Weight':'{:,.0f}'}

df.style.format(format_dict).hide(axis='index')
At this point we choose to save the APL trained model.
from hana_ml.model_storage import ModelStorage

model_storage = ModelStorage(connection_context=conn, schema='USER_APL')

apl_model.name = 'My Multiclass Model'

model_storage.save_model(model=apl_model, if_exists='replace')

model_storage.list_models()
One hour or one day later …
We are back. We load our multiclass model.
from hana_ml import dataframe as hd

conn = hd.ConnectionContext(userkey='MLMDA_KEY')

from hana_ml.model_storage import ModelStorage

model_storage = ModelStorage(connection_context=conn, schema='USER_APL')

apl_model = model_storage.load_model(name='My Multiclass Model')

apl_model.get_model_info()
We request the model reports and display first the accuracy overall.
from hana_ml.visualizers.unified_report import UnifiedReport

UnifiedReport(apl_model).build().display()
We take a deeper look with the class-by-class report:

Here are the variables that APL selected.
We want to know which variables were excluded during the training, and why:
df = apl_model.get_debrief_report('ClassificationRegression_VariablesExclusion').collect()

df = df[['Variable', 'Reason For Exclusion']]

df.style.hide(axis='index')
We define a new dataframe with a few rows to try the APL model.
sql_cmd = 'select * from apl_samples.census where "id" between 550 and 554 order by "id"'

hdf_apply = hd.DataFrame(conn, sql_cmd)

hdf_apply.collect().style.hide(axis='index')

We do a predict and ask for the top three reasons. Again, the processing is done within the database.
apl_model.set_params( extra_applyout_settings=

{ 'APL/ApplyExtraMode': 'Advanced Apply Settings',

  'APL/ApplyPredictedValue': 'false',

  'APL/ApplyProbability': 'false',

  'APL/ApplyDecision': 'true',

  'APL/ApplyReasonCode/TopCount': '3',

  'APL/ApplyReasonCode/ShowStrengthValue': 'false',

  'APL/ApplyReasonCode/ShowStrengthIndicator': 'false' }

)

df = apl_model.predict(hdf_apply).collect()

df.columns = ['Id', 'Actual', 'Prediction', 'Reason 1 Name', 'Reason 1 Value', 'Reason 2 Name', 'Reason 2 Value', 'Reason 3 Name', 'Reason 3 Value']

df.style.hide(axis='index')
One can also request the score for each class. The class with the highest score becomes the prediction.
apl_model.set_params( extra_applyout_settings=

{ 'APL/ApplyExtraMode': 'Advanced Apply Settings',

  'APL/ApplyPredictedValue': 'true',

  'APL/ApplyProbability': 'false',

  'APL/ApplyDecision': 'true',

 }

)

df = apl_model.predict(hdf_apply).collect()

df.rename(columns={'TRUE_LABEL': 'Actual','PREDICTED': 'Prediction'}, inplace=True)

df.columns = [hdr.replace("gb_score_marital-status_", "") for hdr in df]

df.style.hide(axis='index')
Another option is to export the model equation for scoring in stand-alone JavaScript.
apl_scoring_equation = apl_model.export_apply_code(code_type='JSON')

text_file = open("apl_model.json", "w")

text_file.write(apl_scoring_equation)

text_file.close()
To know more about APL
- SAP Managed Tags:
- Machine Learning,
- SAP HANA Cloud,
- Python,
- SAP HANA
Labels:
3 Comments
You must be a registered user to add a comment. If you've already registered, sign in. Otherwise, register and sign in.
Labels in this area
-
ABAP CDS Views - CDC (Change Data Capture)
2 -
AI
1 -
Analyze Workload Data
1 -
BTP
1 -
Business and IT Integration
2 -
Business application stu
1 -
Business Technology Platform
1 -
Business Trends
1,658 -
Business Trends
116 -
CAP
1 -
cf
1 -
Cloud Foundry
1 -
Confluent
1 -
Customer COE Basics and Fundamentals
1 -
Customer COE Latest and Greatest
3 -
Customer Data Browser app
1 -
Data Analysis Tool
1 -
data migration
1 -
data transfer
1 -
Datasphere
2 -
Event Information
1,400 -
Event Information
75 -
Expert
1 -
Expert Insights
177 -
Expert Insights
357 -
General
1 -
Google cloud
1 -
Google Next'24
1 -
GraphQL
1 -
Kafka
1 -
Life at SAP
780 -
Life at SAP
14 -
Migrate your Data App
1 -
MTA
1 -
Network Performance Analysis
1 -
NodeJS
1 -
PDF
1 -
POC
1 -
Product Updates
4,575 -
Product Updates
398 -
Replication Flow
1 -
REST API
1 -
RisewithSAP
1 -
SAP BTP
1 -
SAP BTP Cloud Foundry
1 -
SAP Cloud ALM
1 -
SAP Cloud Application Programming Model
1 -
SAP Datasphere
2 -
SAP S4HANA Cloud
1 -
SAP S4HANA Migration Cockpit
1 -
Technology Updates
6,871 -
Technology Updates
493 -
Workload Fluctuations
1
Related Content
- Business AI for Aerospace, Defense and Complex Manufacturing in Technology Blogs by SAP
- Exploring ML Explainability in SAP HANA PAL – Classification and Regression in Technology Blogs by SAP
- SAP Datasphere catalog - Harvesting from SAP Datasphere, SAP BW bridge in Technology Blogs by SAP
- SAP HANA Cloud's Vector Engine vs. HANA on-premise in Technology Blogs by Members
- New Machine Learning features in SAP HANA Cloud in Technology Blogs by SAP
Top kudoed authors
| User | Count |
|---|---|
| 20 | |
| 11 | |
| 8 | |
| 8 | |
| 7 | |
| 7 | |
| 7 | |
| 6 | |
| 6 | |
| 6 |