
- SAP Community
- Products and Technology
- Technology
- Technology Blogs by SAP
- Part 1 - Upload file to Python Flask container in ...
Technology Blogs by SAP
Learn how to extend and personalize SAP applications. Follow the SAP technology blog for insights into SAP BTP, ABAP, SAP Analytics Cloud, SAP HANA, and more.
Turn on suggestions
Auto-suggest helps you quickly narrow down your search results by suggesting possible matches as you type.
Showing results for
Product and Topic Expert
Options
- Subscribe to RSS Feed
- Mark as New
- Mark as Read
- Bookmark
- Subscribe
- Printer Friendly Page
- Report Inappropriate Content
09-14-2022
1:57 PM
Get creative using SAP BTP, Kyma Runtime! Part 1
I've recently spent some time working on business applications that leverage a mix of Python and SAP Business Technology Platform. Having picked up some new technical skills I thought it would be great to share these with the community so others can leverage within their own work!
I'll build a simple frontend user interface giving the user the option to upload select a file and trigger an upload. Flask allows me to develop web applications in Python and use it to receive the upload document and store it. The portable image for this app will be created using Docker and then we'll launch a container in a SAP BTP, Kyma runtime pod
If you want to try this, you'll need several prerequisites to get up and running, but once it's in place you can get really creative, solve many business problems that typically go unaddressed within organizations and innovate to build new processes that couple into your existing cloud or on-prem systems! I like advanced document information extraction and optical character recognition solutions, so I'll be focusing on these types of use cases. Using this same underlying framework you can think about using other python packages for things like image classification, machine learning, automation and many (many) more!
Prerequisites
- SAP Business Technology Platform (BTP) Trial
- Download and Install Docker Desktop
- Enable Kubernetes in the application
- Create a Docker Hub account and login from Docker Desktop
- Install Docker command line interface (CLI)
- Leverage an Integrated Development Environment (IDE)
- I'm using PyCharm while writting this post. You use whatever you're comfortable with.
- Make sure you've got a Python interpreter configured and a package manager (pip or similar) setup to bring in the Flask package.
- Optional - Kubernetes command-line tool and Krew
Build a Flask app in Python to manage a simple upload
After getting the prerequisites operational, I'll create a new project in your IDE, with a python file called app.py and create a folder in the project root directory called 'uploadFolder'. We'll slightly embellish Flask's awesome standard documentation for some fast upload code:
import os

from flask import Flask, flash, request, redirect, url_for

from werkzeug.utils import secure_filename


UPLOAD_FOLDER = 'uploadFolder/'

ALLOWED_EXTENSIONS = {'txt', 'pdf', 'png', 'jpg', 'jpeg', 'gif'}


app = Flask(__name__)

app.config['UPLOAD_FOLDER'] = UPLOAD_FOLDER


def allowed_file(filename):

    return '.' in filename and \

           filename.rsplit('.', 1)[1].lower() in ALLOWED_EXTENSIONS


@app.route('/upload/', methods=['GET', 'POST'])

def upload_file():

    if request.method == 'POST':

        # check if the post request has the file part

        print('File type is ' + str(request.files), flush=True)


        if 'file' not in request.files:

            print('No file part', flush=True)

            return redirect(request.url)


        file = request.files['file']

        # If the user does not select a file, the browser submits an

        # empty file without a filename.

        if file.filename == '':

            print('No selected file', flush=True)

            return redirect(request.url)


        if file and allowed_file(file.filename):


            filename = secure_filename(file.filename)

            file.save(os.path.join(app.config['UPLOAD_FOLDER'], filename))

            print('File saved to directory: ' + str(UPLOAD_FOLDER), flush=True)


            return '''

            <!doctype html>

            <title>Upload new File</title>

            <h1>Got it! Upload another?</h1>

            <form method=post enctype=multipart/form-data>

              <input type=file name=file>

              <input type=submit value=Upload>

            </form>

            '''


        print('The file name was not allowed.', flush=True)


    return '''

    <!doctype html>

    <title>Upload new File</title>

    <h1>Upload new File</h1>

    <form method=post enctype=multipart/form-data>

      <input type=file name=file>

      <input type=submit value=Upload>

    </form>

    '''


if __name__ == '__main__':

    app.run('0.0.0.0','5000')
Note that I've directed the UPLOAD_FOLDER variable to directory we created in above 'uploadFolder/'. This is where the documents we upload get saved to when running locally.
The python code is hosting a web service on my localhost that is accessible on port 5000. When I connect to the Flask route I defined for the upload service '/upload/', the program will run the upload_file() function. If you've set up correctly, you should be able to run this program, navigate to http://localhost:5000/upload/ and be greeted by webpage running the bottom html snippet functions return statement as seen in Figure 1.

Figure 1. Expected output: localhost:5000/upload
NOTE - Navigating onto this webpage used the GET method and the system jumped straight to the bottom html return code since if request.method == 'POST' was NOT satisfied. The POST doesn't get triggered until we actually upload like as seen in Figure 2.

Figure 2. Expected output after successful upload via localhost
I can now see that the file has been saved to 'uploadFolder' directory. Awesome, that's our functional part done. We can start to perform some processing on the file in the future.
(Aside - It's important to note that Flask is expecting 'enctype=multipart/form-data', which is included in the HTML code snippet, and if I'm not providing this encoding, I'd need to consider other options. For example if I wanted to use Build Apps to perform the upload, I could convert to base64 (if I wanted a no-code UI option) or perhaps write some custom JavaScript (if I wanted a low-code UI option). Note - with a base64 encoding from UI, I'd also need to decode the payload in my Python app!)
Get this working on a local Docker container
If I want to deploy my app in a container, I need to build my image using a Dockerfile. I can think of these as the blueprint for the container.
Firstly, I need to ensure my Python dependencies are going to be available in the container, so I'll generate a requirements.txt file for these. This can usually be done directly from an IDE. Check for 'Sync Python Requirements' tool or similar. Or if you want to do this from CLI, try this:
pip3 freeze > requirements.txtEither way you should probably have something like this as the contents:
Flask~=2.2.2

Werkzeug~=2.2.2
We'll now build our docker image that runs this program in a container on our local machine. Create a new file from your IDE called Dockerfile without a file extension and populate it with the following:
FROM python:3.9


WORKDIR /program


COPY . .

RUN pip3 install -r requirements.txt


EXPOSE 5000


CMD ["python3", "./app.py"]
This Dockerfile is basically saying, set our working directory on the container, copy in everything from our project folder, install our dependencies, open port 5000 and run our program. Running the following command from the CLI with working directory as root directory of my program will build my image:
docker build -t flaskupload .Then run a container based on this image:
docker run -p 5000:5000 flaskuploadNow my app will once again be available on the localhost, but this time it will be running from inside the the docker container. I can test this from http://localhost:5000/upload/ by upload a file and getting the same results as before. My container logs should be active with the GET and POST methods as I interact with the application. I can also check where the upload files are by connecting to the CLI for my container from the docker desktop and running 'ls' to see contents of my working directory, 'cd uploadFolder' to navigate to my where my uploads should be and then 'ls' again to see it's current contents, which should be empty as seen in Figure 3.

Figure 3. Docker logs and CLI to container
After I upload some files, I can see my log entries and the attachments now successfully in the destination directory on the container like Figure 4.

Figure 4. Docker container showing upload files
We now have an architecture that looks something like Figure 5.

Figure 5. Architecture with local deployment
Tag and push Docker container to SAP BTP, Kyma runtime
Now I want to login to Docker from desktop application (or from CLI using command 'docker login') and from CLI I'll tag it with my docker image with my username and push it to DockerHub using:
  docker tag flaskupload willconlon/flaskupload

  docker push willconlon/flaskupload
I should see my image now uploaded on DockerHub as seen in Figure 6.

Figure 6. Docker Hub deployment of image
The goal of the next step is to bring this container into Kyma and to do that I need to upload a YAML file with my configuration to a namepace. I'll create the Kyma namespace and call it 'sandbox'. Once inside the sandbox namespace I'll user Upload YAML to create my deployment, service and connection API. Here you can see the code I've used for this but if you're following along you'll need to replace some values with those from your own Kyma account.
---

apiVersion: apps/v1

kind: Deployment

metadata:

  name: flaskupload

spec:

  selector:

    matchLabels:

      app: flaskupload

  replicas: 1

  template:

    metadata:

      labels:

        app: flaskupload

    spec:

      containers:

      - env:

        - name: PORT

          value: "5000"

        image: /flaskupload  # replace with your Docker Hub account name

        name: flaskupload

        ports:

        - containerPort: 5000

        resources:

          limits:

            ephemeral-storage: 256M

            memory: 256M

          requests:

            cpu: 100m

            ephemeral-storage: 256M

            memory: 256M

---

apiVersion: v1

kind: Service

metadata:

  name: flaskupload-service

  labels:

    app: flaskupload

spec:

  ports:

  - name: http

    port: 5000

  selector:

    app: flaskupload

---

apiVersion: gateway.kyma-project.io/v1alpha1

kind: APIRule

metadata:

  name: flaskupload-api

  labels:

    app: flaskupload

spec:

  gateway: kyma-gateway.kyma-system.svc.cluster.local

  rules:

  - accessStrategies:

    - handler: allow

    methods:

    - GET

    - POST

    path: /.*

  service:

    host: -node. # replace with the values of your account

    name: flaskupload

    port: 5000
After I've deployed these I can see my pod is running and I can access the application from my local browser using the Host URL found in the Kyma Namespace > Discovery and Network > API Rules menu as seen in Figure 7. Don't forget to add the /upload/ to URL string!!
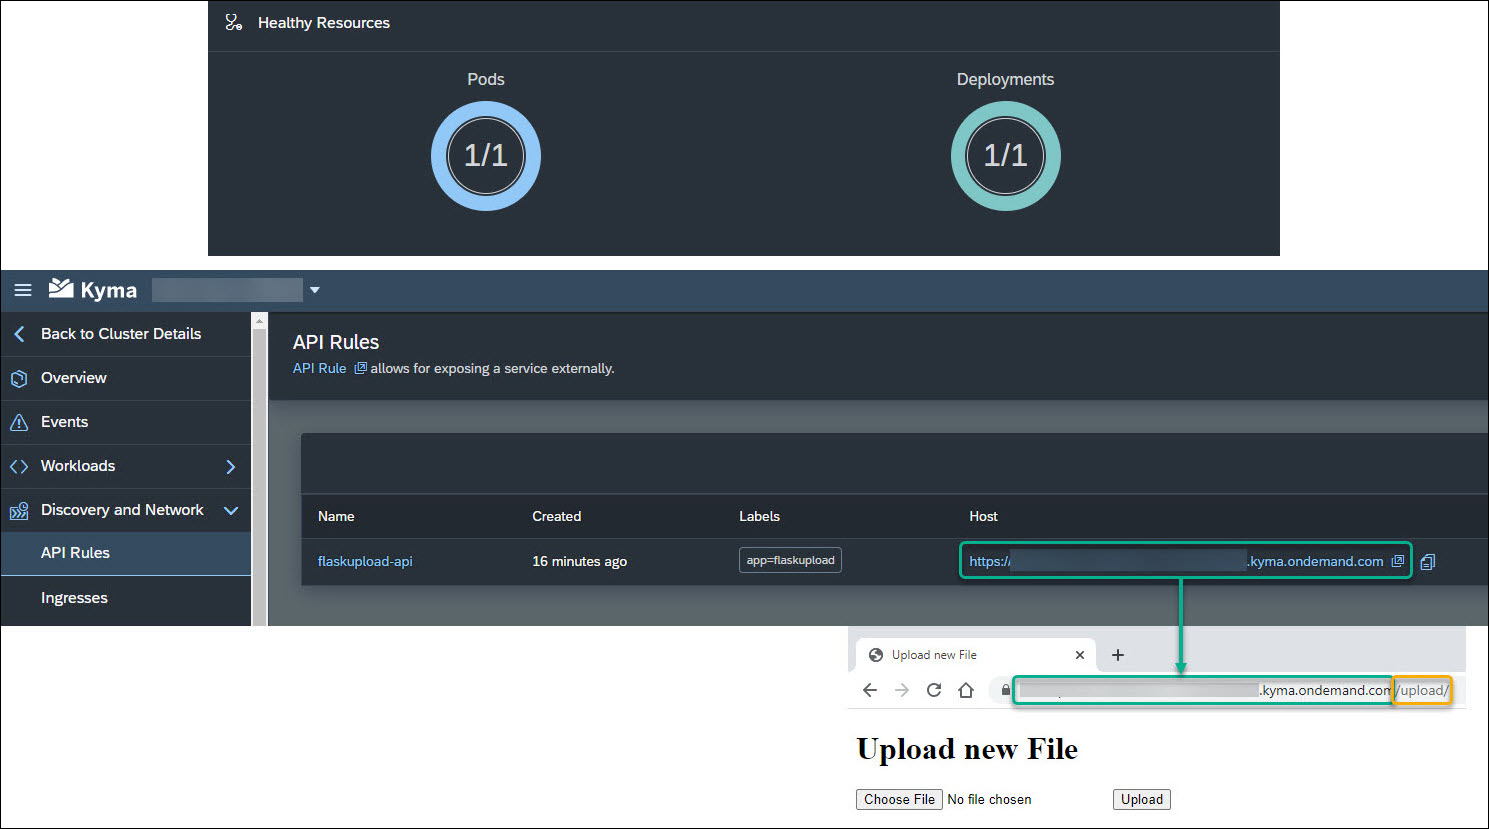
Figure 7. Kyma Resources, API Rules and Flask app accessible remotely
I'm now up and running with my app on Kyma and can start uploading my files to the container. For prototyping applications like these storing documents on the container is fine, but for anything heavier duty, enterprise grade volumes ideally via SAP Document Management Services are necessary.
Optional - Verify folder contents on SAP BTP, Kyma runtime pod from local terminal
I'm now keen to check that my documents are actually uploaded. One way I can check this is by looking at the pod logs in my sandbox namespace under Workload > Pods > mypod > View Logs and look for my Python 'print' statements, but to be more hands on I can access the Kyma Kubernetes cluster from the CLI and check the pods content myself using the shell (/bin/sh)
There is a blog here which describes the method, but some additional work is needed which has not been included that I'll try to describe below as I have configured on Windows 10 21H2:
- Ensure kubectl cli operational. Use: 'kubectl version' command for version info.
- Download kubeconfig.yaml and put somewhere easy to access
- Add environment variable KUBECONFIG linking to directory from Step 2
- Install Krew using .\krew install krew (Command Prompt as Administrator)
- Add %USERPROFILE%\.krew\bin to your PATH environment variable PATH
- Add oidc_login plug-in to kubectl using command kubectl krew install oidc-login (Command Prompt as Administrator)
I can now authenticate when connecting to my Kyma environment using:
      kubectl get pods -n <namespace>


      kubectl exec -i -t <pod name> -n <namespace> -- /bin/sh
In Figure 8 I've accessed the pod running my flaskupload app from a powershell terminal on my local machine. Note that after I navigate to the uploadFolder using 'cd uploadFolder' the folder is empty, I've then uploaded two files as using API route in Figure 6 and then re-check the folder contents to see that they're now there.

Figure 8. Check uploadFolder on SAP BTP, Kyma runtime pod /bin/sh/ from local terminal
So now we have an architecture that looks something like Figure 9.

Figure 9. Architecture of SAP BTP, Kyma runtime deployment
Great, this is functioning well and now... it needs a user-friendly front-end to upload the documents. Once this is done, then I can start to perform some processing on these uploads!!!
If you have found this has been helpful, or have some feedback to share on this topic, please leave a comment and follow my profile for future posts.
For more information please see:
SAP Business Technology Platform Topic Page
Ask questions about SAP Business Technology Platform
Read other SAP Business Technology Platform articles and follow blog posts
There are other links embedded in the Blog which may be of use.
- SAP Managed Tags:
- SAP BTP, Kyma runtime,
- API,
- Python,
- SAP Business Technology Platform
Labels:
2 Comments
You must be a registered user to add a comment. If you've already registered, sign in. Otherwise, register and sign in.
Labels in this area
-
ABAP CDS Views - CDC (Change Data Capture)
2 -
AI
1 -
Analyze Workload Data
1 -
BTP
1 -
Business and IT Integration
2 -
Business application stu
1 -
Business Technology Platform
1 -
Business Trends
1,658 -
Business Trends
102 -
CAP
1 -
cf
1 -
Cloud Foundry
1 -
Confluent
1 -
Customer COE Basics and Fundamentals
1 -
Customer COE Latest and Greatest
3 -
Customer Data Browser app
1 -
Data Analysis Tool
1 -
data migration
1 -
data transfer
1 -
Datasphere
2 -
Event Information
1,400 -
Event Information
69 -
Expert
1 -
Expert Insights
177 -
Expert Insights
322 -
General
1 -
Google cloud
1 -
Google Next'24
1 -
GraphQL
1 -
Kafka
1 -
Life at SAP
780 -
Life at SAP
13 -
Migrate your Data App
1 -
MTA
1 -
Network Performance Analysis
1 -
NodeJS
1 -
PDF
1 -
POC
1 -
Product Updates
4,576 -
Product Updates
367 -
Replication Flow
1 -
REST API
1 -
RisewithSAP
1 -
SAP BTP
1 -
SAP BTP Cloud Foundry
1 -
SAP Cloud ALM
1 -
SAP Cloud Application Programming Model
1 -
SAP Datasphere
2 -
SAP S4HANA Cloud
1 -
SAP S4HANA Migration Cockpit
1 -
Technology Updates
6,873 -
Technology Updates
454 -
Workload Fluctuations
1
Related Content
- Buildpack compile failed for python app in Technology Q&A
- The 2024 Developer Insights Survey: The Report in Technology Blogs by SAP
- Deployment of Seamless M4T v2 models on SAP AI Core in Technology Blogs by SAP
- Extract blob data (PDF) from CAPM using python library of Document information extraction service. in Technology Blogs by Members
- Personalization for tables in HTML Container for SAP UI5 application in Technology Q&A
Top kudoed authors
| User | Count |
|---|---|
| 23 | |
| 11 | |
| 8 | |
| 7 | |
| 7 | |
| 7 | |
| 6 | |
| 6 | |
| 6 | |
| 6 |