
- SAP Community
- Products and Technology
- Technology
- Technology Blogs by SAP
- Realize Service Delivery with SAP SuccessFactors W...
Technology Blogs by SAP
Learn how to extend and personalize SAP applications. Follow the SAP technology blog for insights into SAP BTP, ABAP, SAP Analytics Cloud, SAP HANA, and more.
Turn on suggestions
Auto-suggest helps you quickly narrow down your search results by suggesting possible matches as you type.
Showing results for
Product and Topic Expert
Options
- Subscribe to RSS Feed
- Mark as New
- Mark as Read
- Bookmark
- Subscribe
- Printer Friendly Page
- Report Inappropriate Content
10-24-2023
1:03 AM
Introduction
In today's ever-changing business landscape, the importance of efficient HR service delivery cannot be overstated. The success of an organization depends on the satisfaction and productivity of its employees, which in turn rely on seamless processes and easy access to critical resources. When it comes to HR service delivery customers are looking for forms which can help them to standardize the input of their employees and so make them usable for further (automated) processes.
Goal
Today, we will explore how customers are seeking efficient ways to standardize employee input and make it suitable for automated processes. To achieve this, we will explore the integration of SAP SuccessFactors Work Zone, SAP Customer Experience (Employee Central Service Center), and SAP SuccessFactors. Our ultimate objective is to create a user-friendly UI Integration Card within the SAP SuccessFactors Work Zone. This card will empower employees to submit specific service requests to the service delivery organization in the form of tickets.
Overview Software Components
Series:
This blog post is part of a series
- Realize Service Delivery with SAP SuccessFactors Work Zone and SAP Customer Experience (ECSC) – A te...
- Realize Service Delivery with SAP SuccessFactors Work Zone and SAP Customer Experience (ECSC) – Set ...
Prerequisites:
In order to complete this tutorial, you will need some basic understanding of the SAP Business technology Platform (BTP), Business Application Studio (BAS) and SAP SuccessFactors Work Zone.
BAS and SAP SuccessFactors Work Zone should be configured so that a direct deployment is possible, but this is not mandatory.
Further Information how to set up the deployment can be found here Link
As ticket system, we will be using is SAP Customer Experience, but you could adapt the following tutorial to any other system providing REST APIs for external communication.
Required Software Components
To implement the solution described in this tutorial, you should have access to the BTP Cockpit, BAS, SAP SuccessFactors Work Zone and SAP Customer Experience.
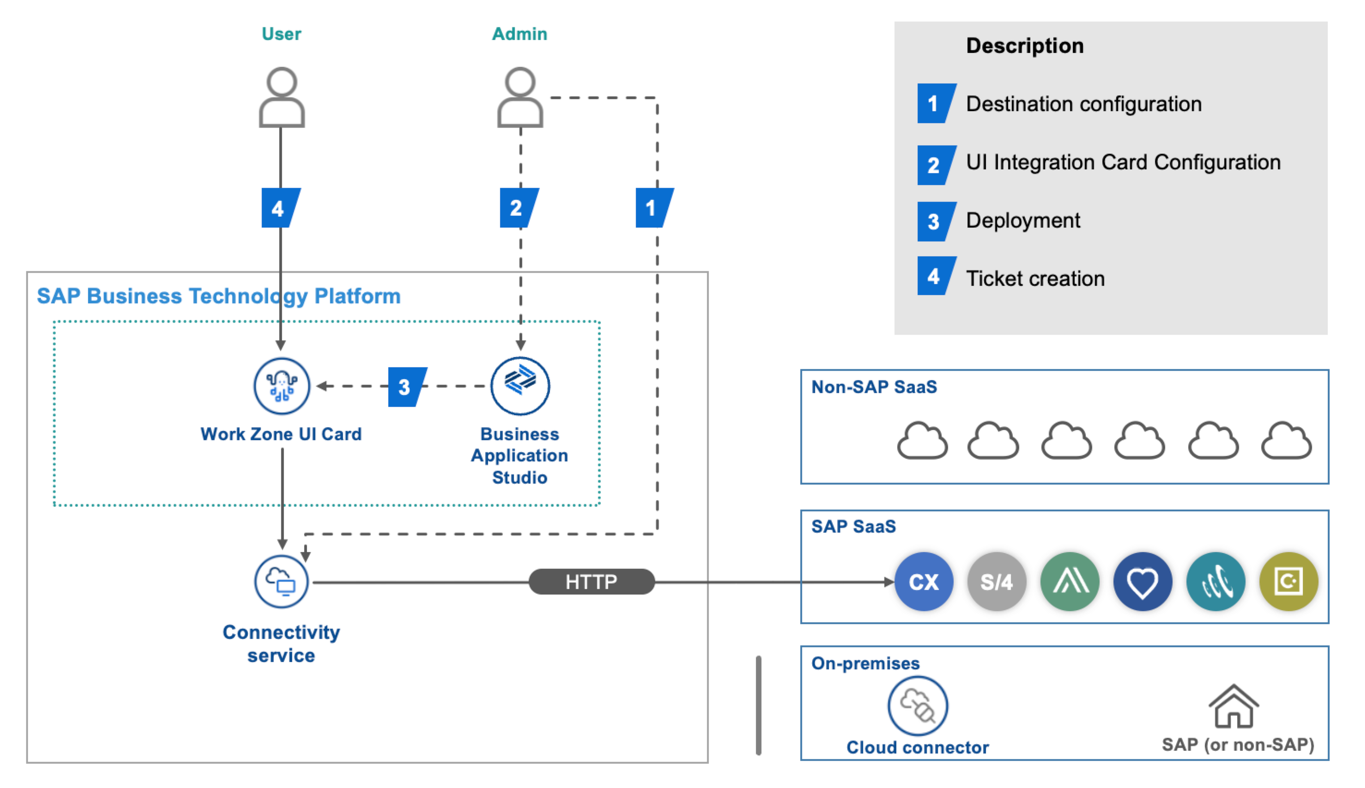
Implementation
During this tutorial, we will impersonate 2 users: the administrator (or technical user) and the end user.
The main effort will reside on the administrator side, who will:
- configure an SAP SuccessFactors Work Zone UI Integration Card in BAS
- configure a BTP destination from within the BTP cockpit
- deploy the UI Integration card
Eventually, the end user will create a ticket through the SAP SuccessFactors Work Zone UI Integration Card.
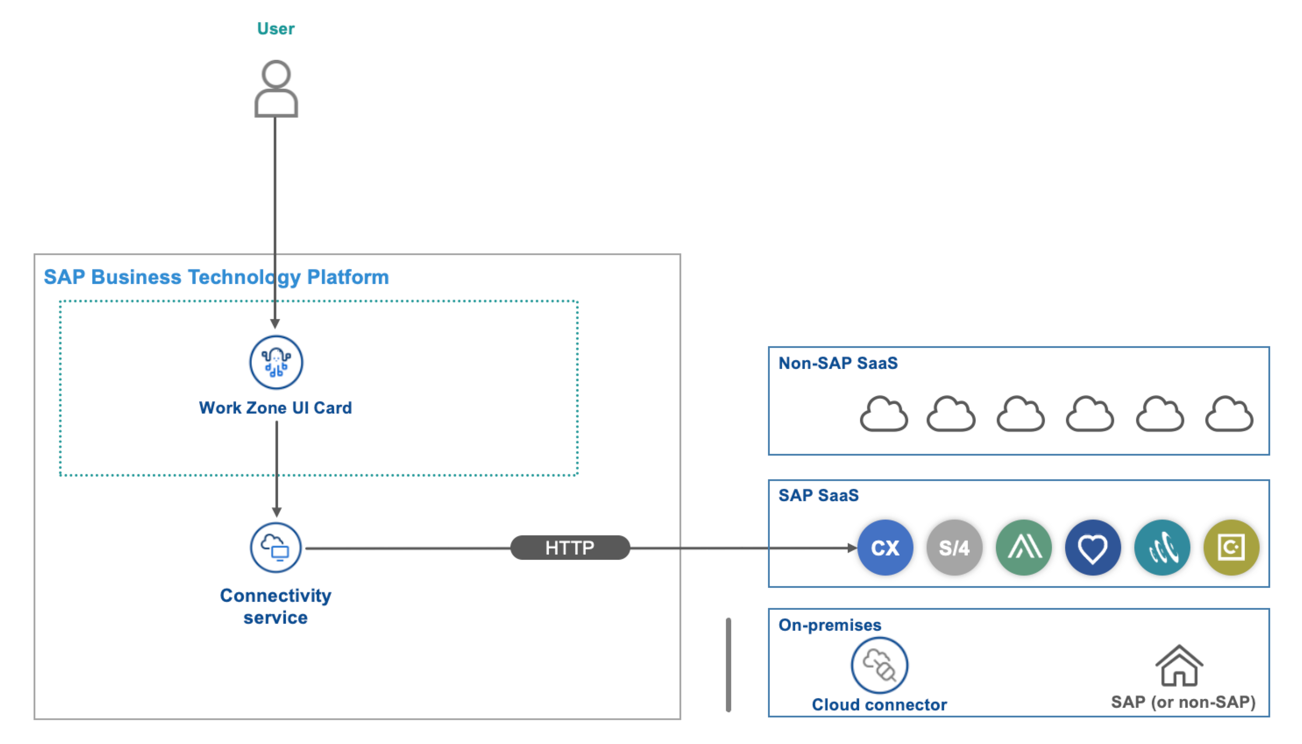
Architectural Overview
Configure UI Integration Card in Workzone
A central aspect of the SAP SuccessFactors Work Zone are UI Integration Cards. These cards can be used to render information from various systems and make them available in the SAP SuccessFactors Work Zone. Adaptive Cards are a specific variant of the UI Integration Cards and help to send information to a backend system.

Figure 1 - UI Integration Card
A comprehensive list and information about UI Integration Cards can be found here.
The configuration and preview of UI Integration Cards is mainly done in BAS.
The BAS will help us in this example to adapt the manifest, get a preview of the card and deploy it finally to the SAP SuccessFactors Work Zone.
In our guide we start with an adaptive card type „Submit Action“ with Custom Payload.
Open BAS, create a New Project from Template and select the UI Integration Card.

Figure 2 - Business Application Studio
Click start and give your project a name, for instance „TicketSubmission”.
Give the project a namespace, for instance the name of the company you work for.
Select the Submit Action Card sample.
Give the project a title and subtitle, for instance “Create Ticket”.
Select finish and your project will be created.

Figure 3 – New Project from Template in Business Application Studio
You can see a bunch of files that have been generated. Especially the manifest.json is important since it defines the behavior of the card.
Right-click on the manifest.json file and select UI Integration Card: Preview.
In the preview you’ll see how the card will look like whenever you make changes to it in the manifest.

Figure 5 - Preview of the card
The next steps will be to connect the card to the target system, SAP Customer Experience. This requires some configuration that we’ll now do.
SAP Customer Experience/ Employee Central Service Center
To establish an inbound communication channel via OData API in the SAP Customer Experience we need to perform the following actions:
- Create Communication System
- Create Communication Arrangement & Authentication Method
Create communication System
First go to your Administrator site of your SAP Customer Experience system

Figure 6 - SAP Customer Experience Admin Area
Find the communication system and arrangements in the area of integration.
Create a new communication system.
Give it a meaningful ID and host name such as “IntegrationCard”.
The System Access Type should be “Internet”.
On the right hand side click on Save and then on Actions and Set to active.

Figure 7- SAP Customer Experience Communication Systems
Create Communication Arrangement & Authentication Method
Create a new Communication Arrangement and select OData Services for Business Objects as communication scenario.
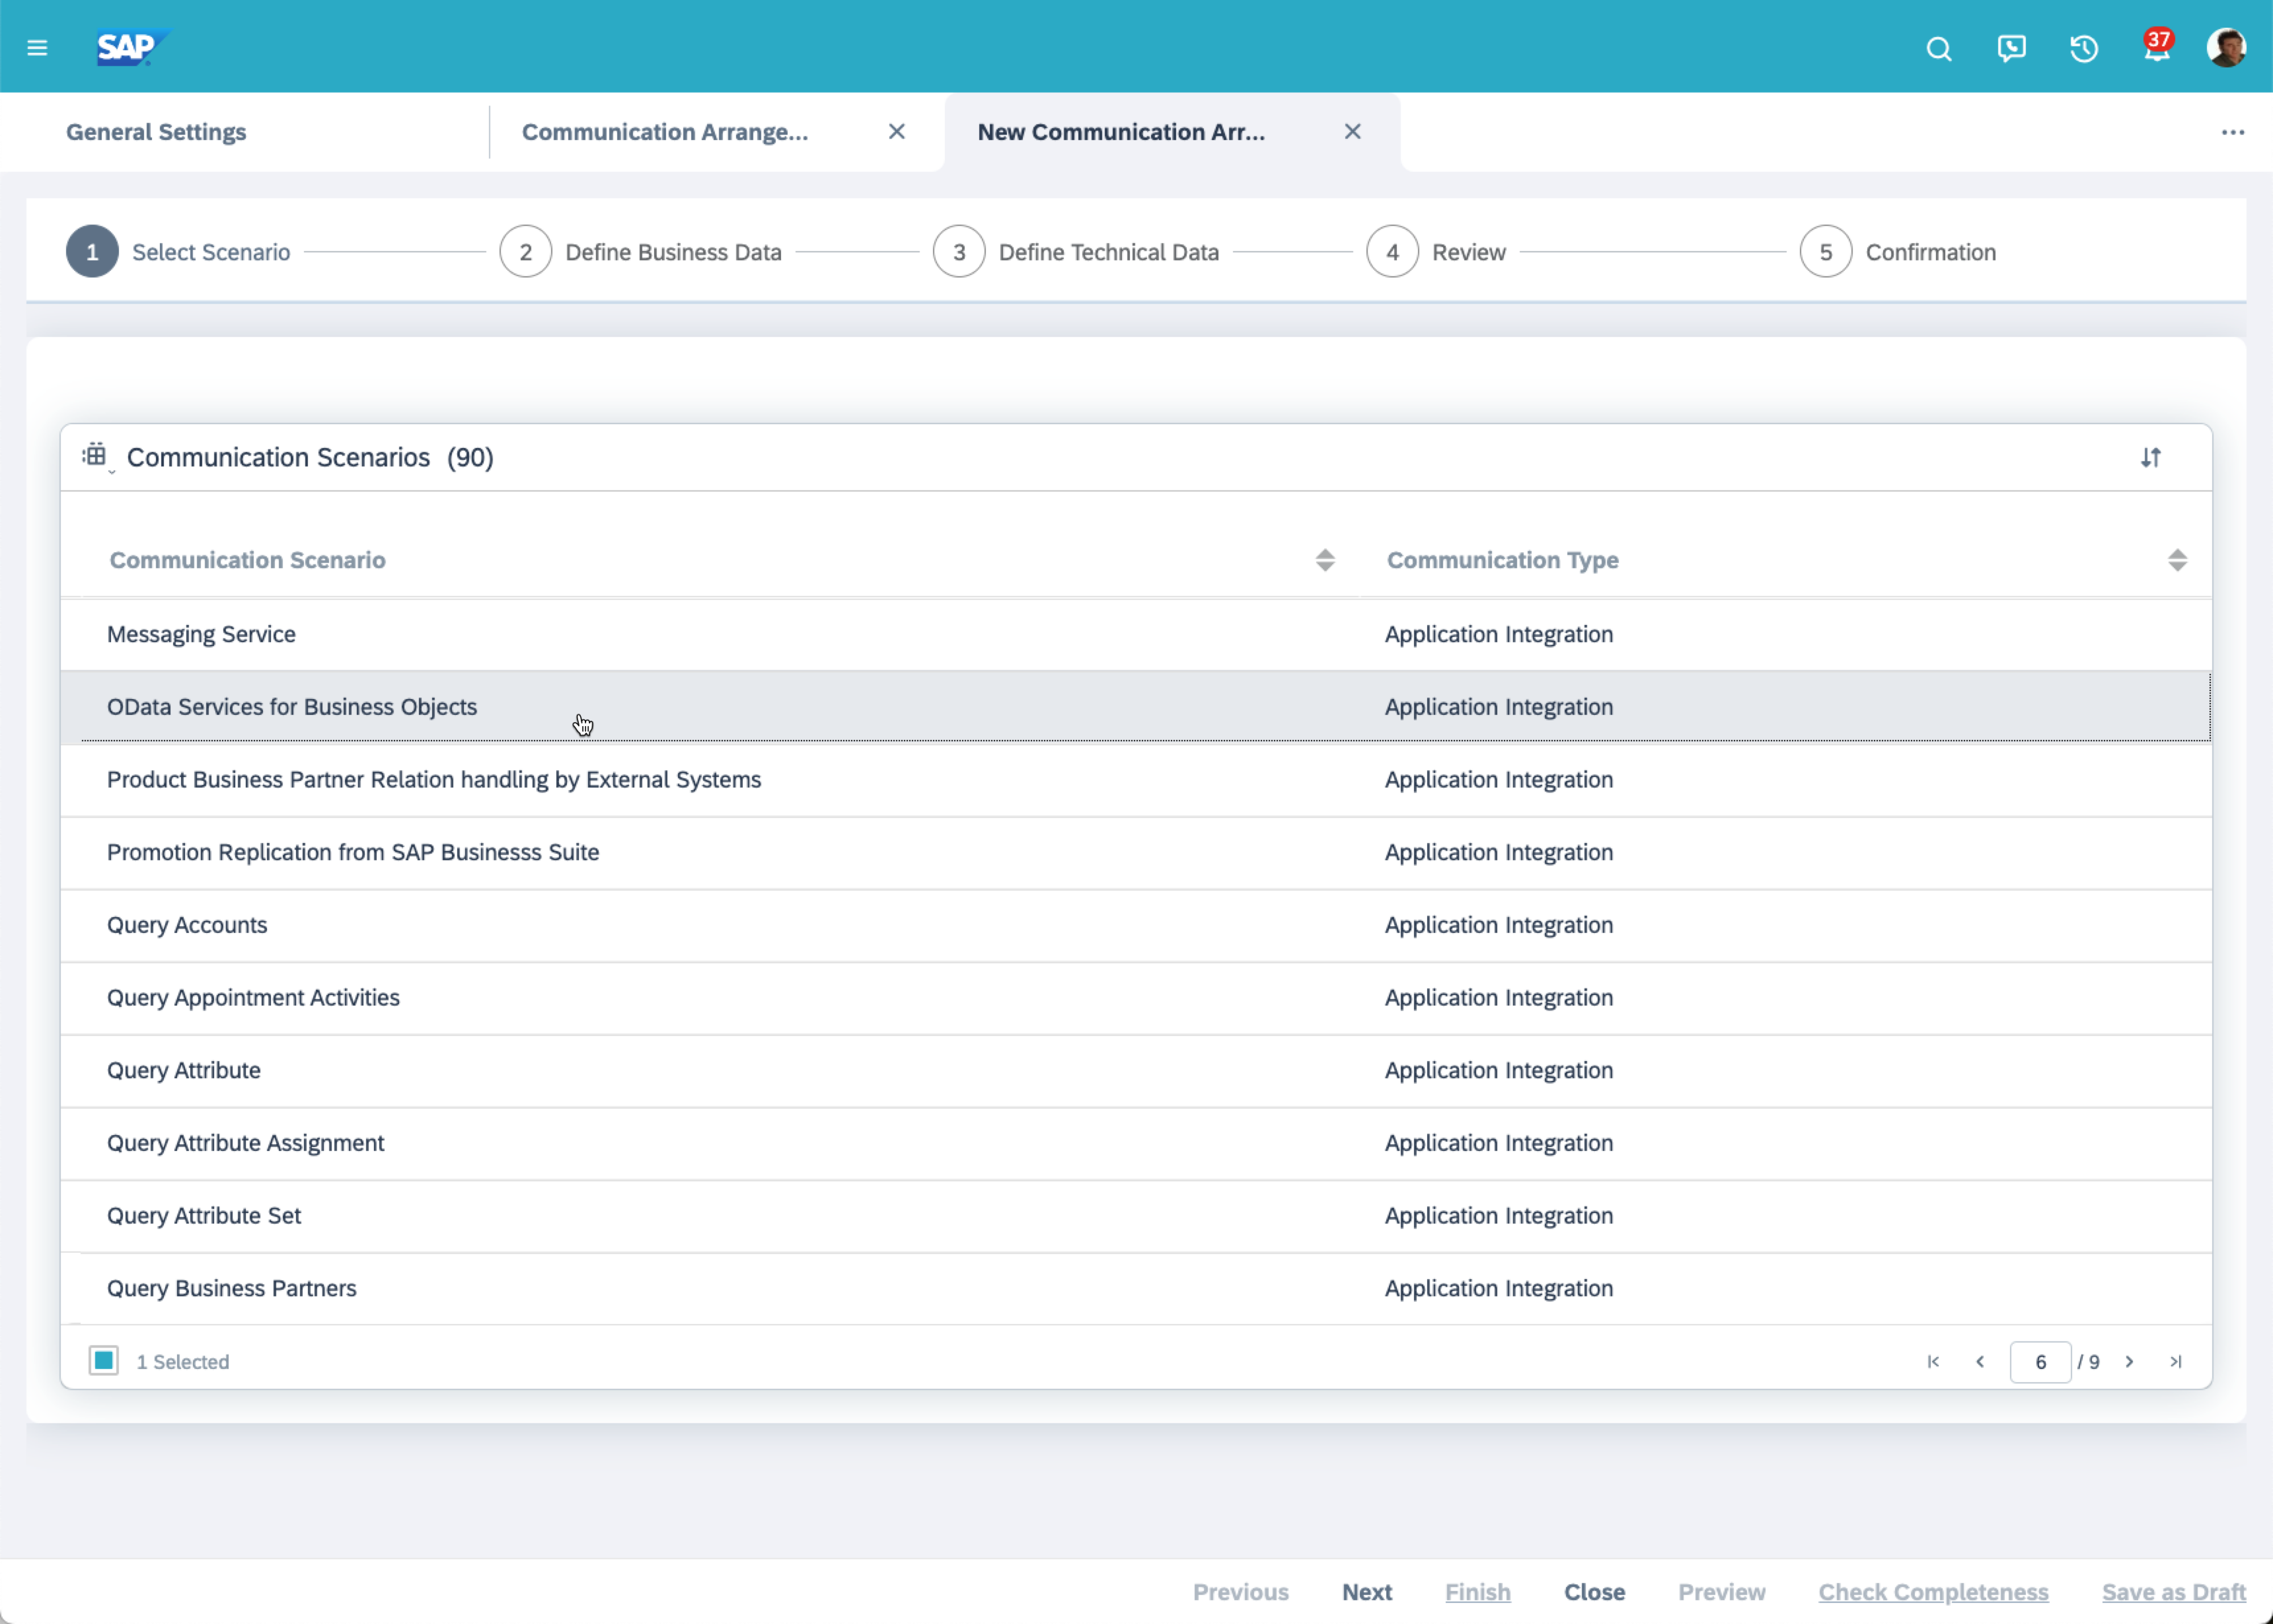
Figure 8 - SAP Customer Experience Communication Arrangement
Click Next at the bottom of the screen and select the communication system you just created.

Figure 9 - SAP Customer Experience Communication Arrangement
Click Next.
Set the Authentication Method to User ID and Password.
Right to the User ID field, click on Edit Credentials and enter the password for the user. Click OK when done.
Note the user and the password. You’ll need them later for the SAP BTP Destination Service.
Now select Ticket from the list of services used.
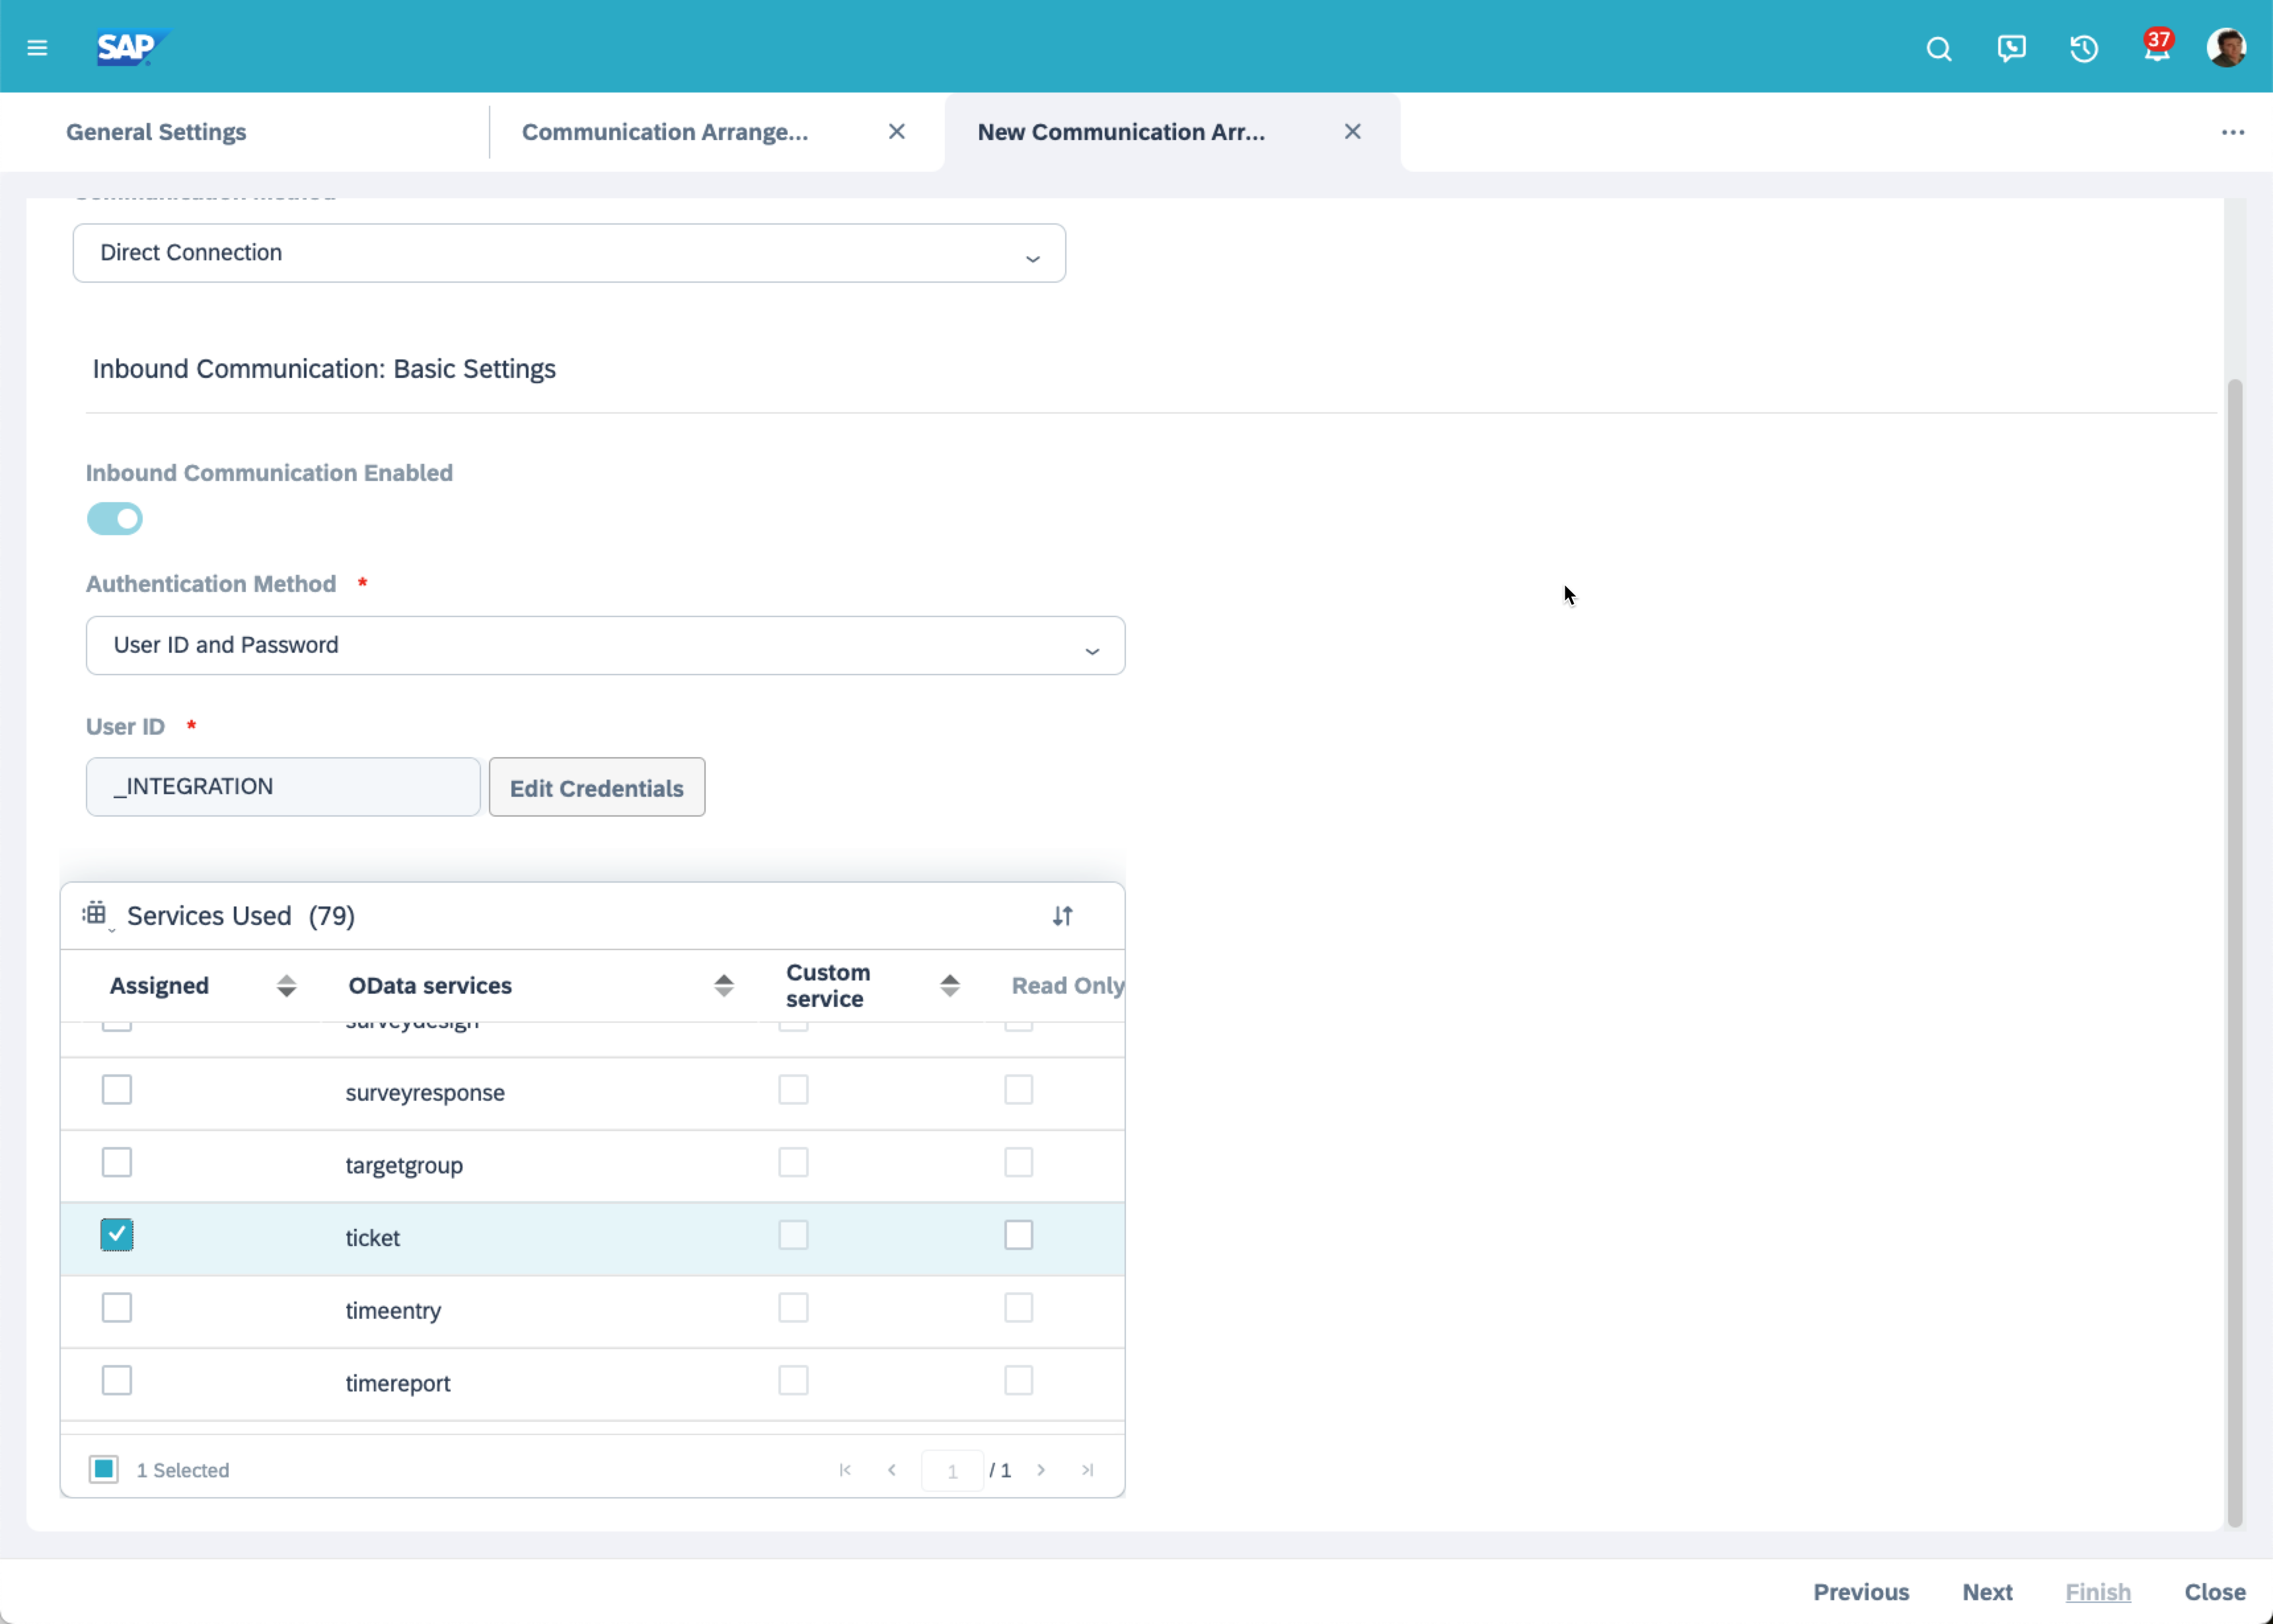
Figure 10 - SAP Customer Experience Communication Arrangement
Click Next, review your Arrangement and click on Finish.
For the next step, please save the URL of the OData Service from your communication arrangement.
To do so, locate your communication arrangement from the list by sorting the Changed On column in a descending order. You should now see your communication arrangement at the top.

Figure 11 - SAP Customer Experience Communication Arrangement
Open it by clicking on it.
Now click on the link next to ticket Odata Service.

Figure 12 - SAP Customer Experience Communication Arrangement
Copy the URL and replace the “$metadata” path with “ServiceRequestCollection”.

Figure 13 - SAP Customer Experience Communication Arrangement
Your URL should look something like this:
https://<your_id>.crm.ondemand.com/sap/c4c/odata/v1/ticket/ServiceRequestCollection
Save this URL fort he next steps.
Further information about Communication Systems and Arrangement can be found here.
The initial setup for the inbound communication of the SAP Customer Experience is now finished. A communication system, arrangement and user has been created. Next step is to connect the SAP Customer Experience with the UI Integration Card through the BTP destination.
BTP Destinations
BTP Destinations can be understood as the central communication hub of the BTP, be it internal or external. In ourtutorial the destinations work as man in the middle between the UI Integration Card and the SAP Customer Experience.
Further information about the BTP Destination Service can be found here.
Go to your BTP subaccount cockpit and Select Destinations in the menu.
Create a new destination and fill in the required information from your SAP Customer Experience.
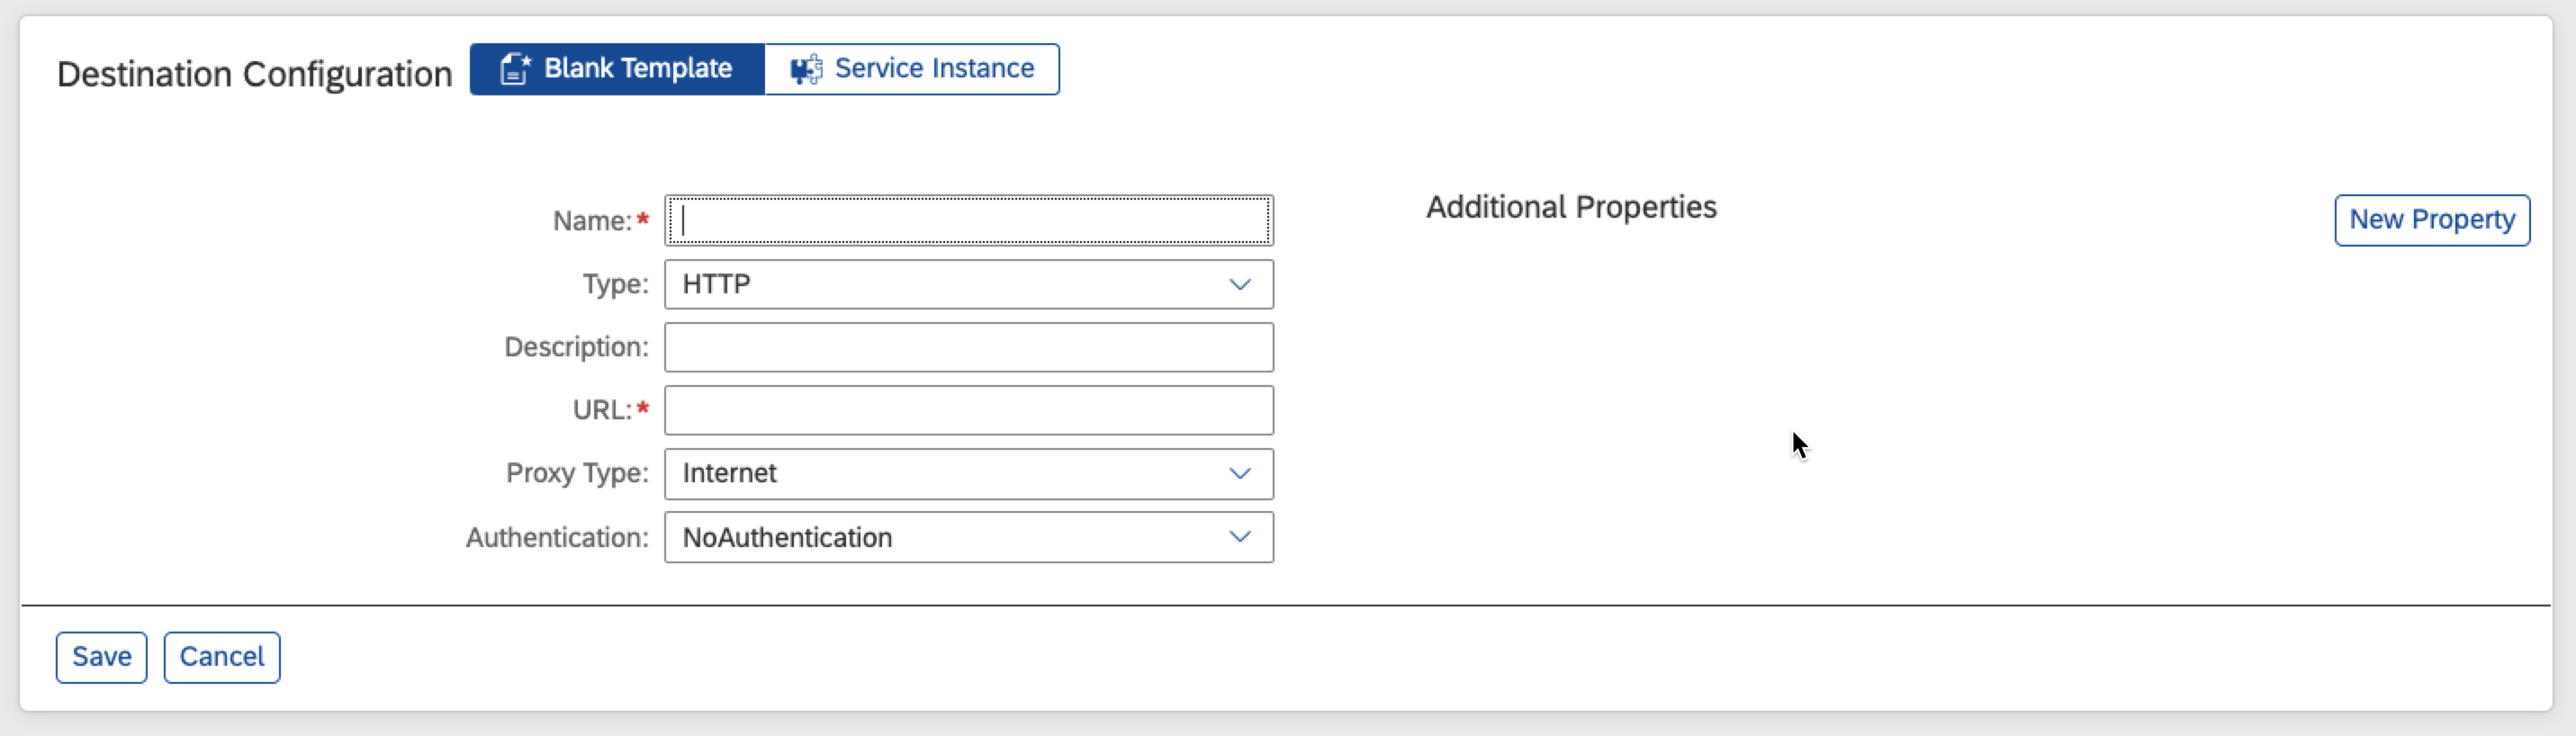
Figure 14 - Create BTP Destination
Give the destination a name, for instance “SAPCX”, select HTTP as Type and fill in the URL endpoint you copied previously:
https://<your_id>.crm.ondemand.com/sap/c4c/odata/v1/ticket/ServiceRequestCollection
Specify the Authentication to be BasicAuthentication and fill in the user and the password you copied previously fromyour Communication Arrangement.
Specify Additional Properties as follows:
- DynamicDestination: true
- WebIDEEnabled: true
- WebIDEUsage: odata_gen
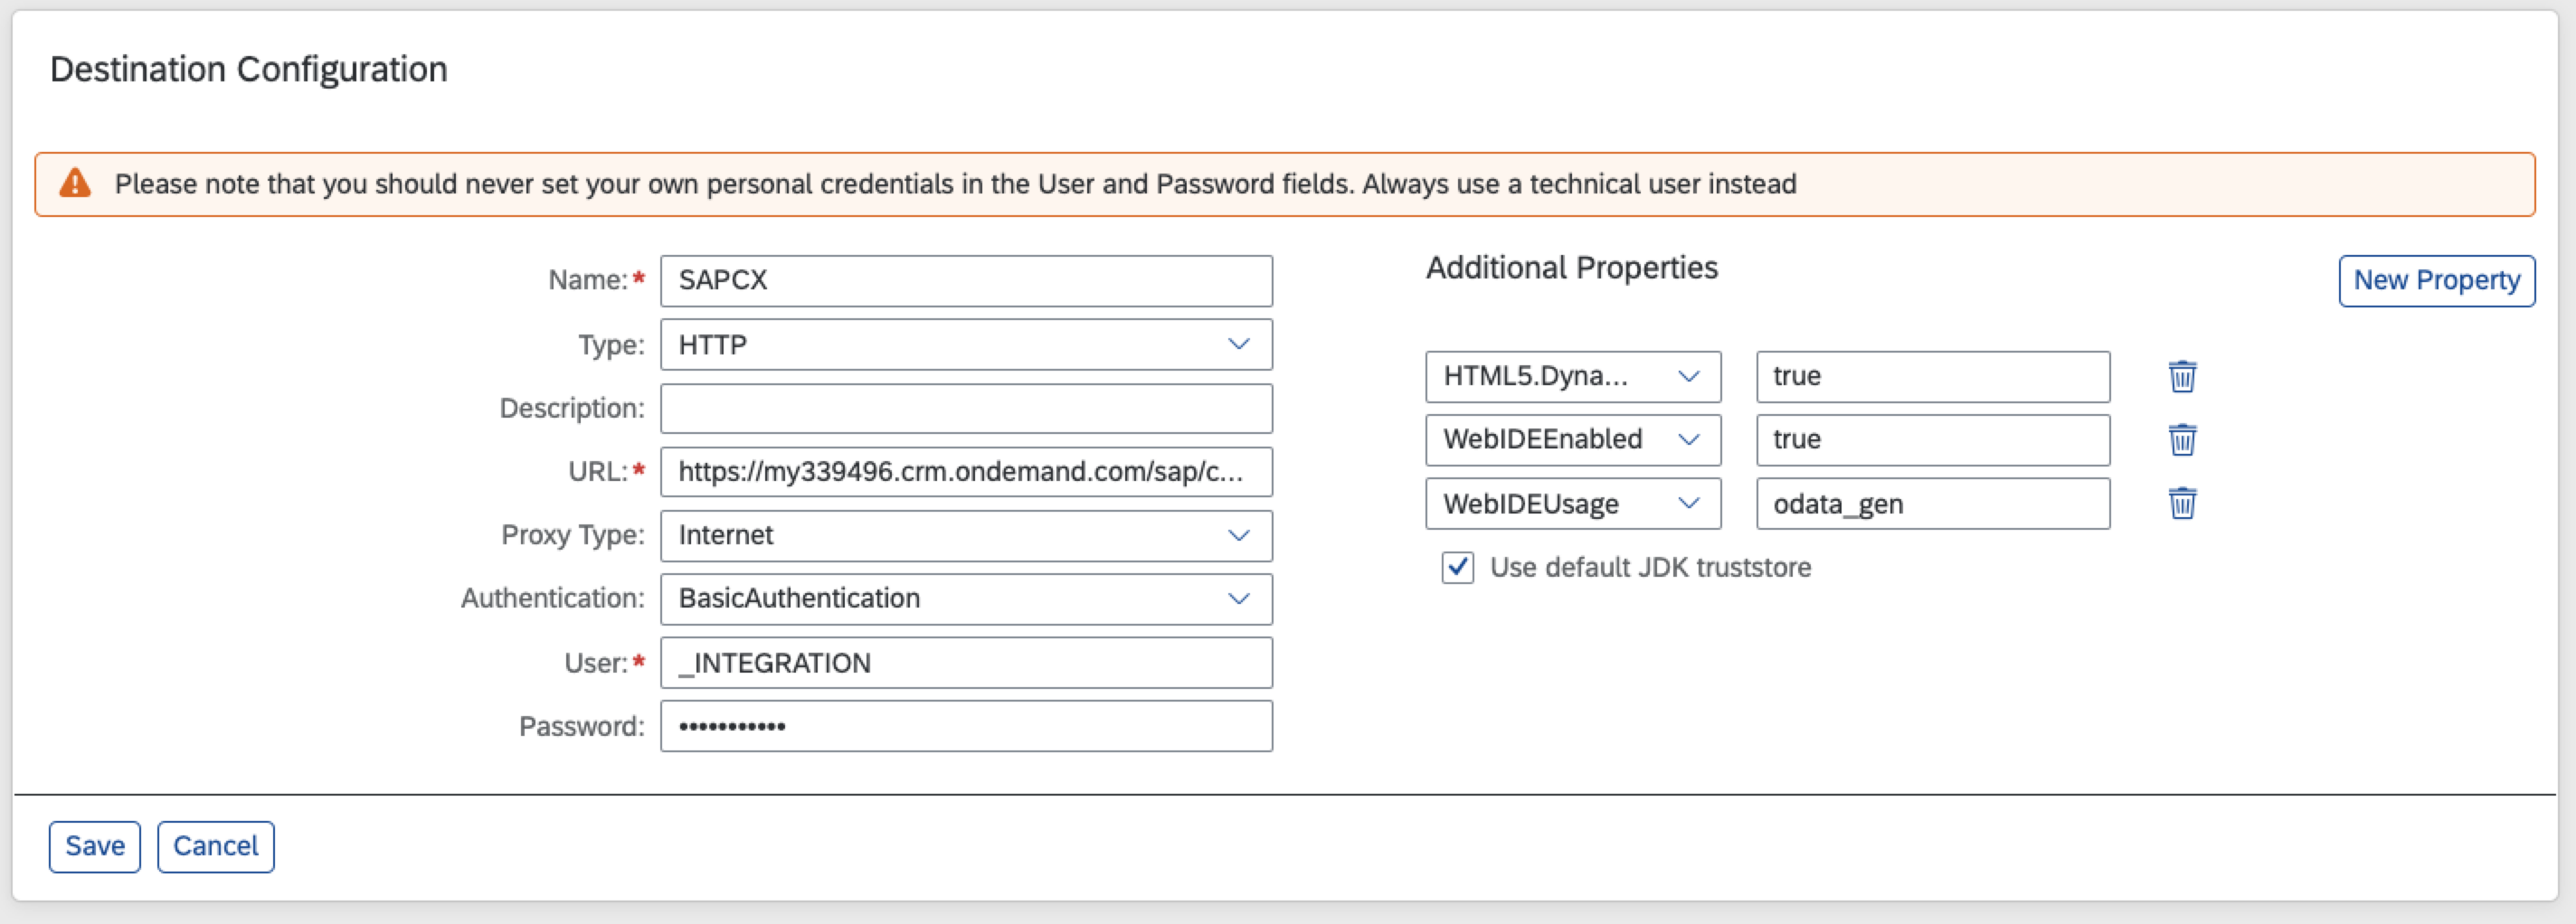
Figure 15 - BTP Destination
Save your destination.
If you check the connection the response should be positive, ie. „200: OK“.

Figure 16 - BTP Success Message
Business Application Studio (BAS)
After we successfully created the connection between the SAP Customer Experience and the BTP Destination Service we can now configure the UI Integration card.
First, we need to define the destination in the card manifest, bind it to the action handler and map the relevant fields to the payload.
Switch back to your BAS project, open your manifest.json file and adapt the sap.card section as follows:
- Add your previously created destination to the sap.card section:
            "destinations": {


                "SAPCX": {


                    "name": "SAPCX"


                }


            }
- Replace the actionHandler as follows:
"actionHandlers": {


"submit": {


"url": "{{destinations.SAPCX}}/ ",


"method": "POST",


"headers": {


"Content-Type":"application/json"


},


"parameters": {


"Name": "{form>/Subject}"


},


"withCredentials": true


}


}
The end result look something like this:
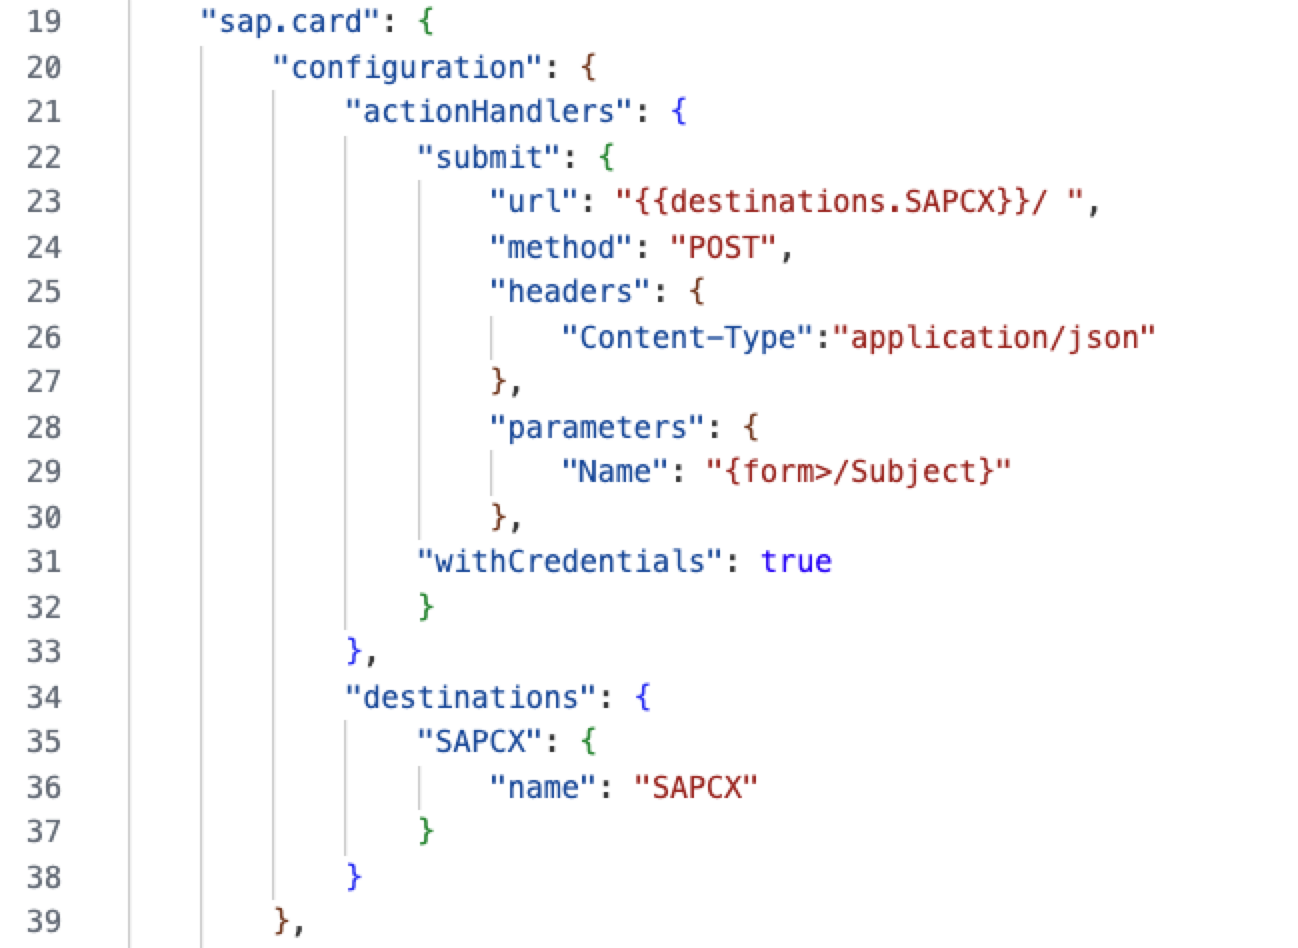
Figure 17 - Overview UI Integration Card
The card can now communicate with the SAP Customer Experience through the SAP BTP destination. When submitting the UI Card data to CX Service Cloud, we configured the “Subject” element to be sent as parameter. Hence we need to change the user interface to add the “Subject” field and discard the unnecessary ones.
Note: this is the minimum setting in my SAP Customer Experience system – the final payload might vary. In case you need additional fields, please add them as needed.
- In the sap.card section, change the body of the content section as follows:
    "body": [


                {


                    "type": "Input.Text",


                    "placeholder": "Your request goes here",


                    "label": "Please specify your Request",


                    "isRequired": true,


                    "isMultiline": true,


                    "style": "text",


                    "id": "Subject"


                }


            ]
Also, your Preview should look like this:
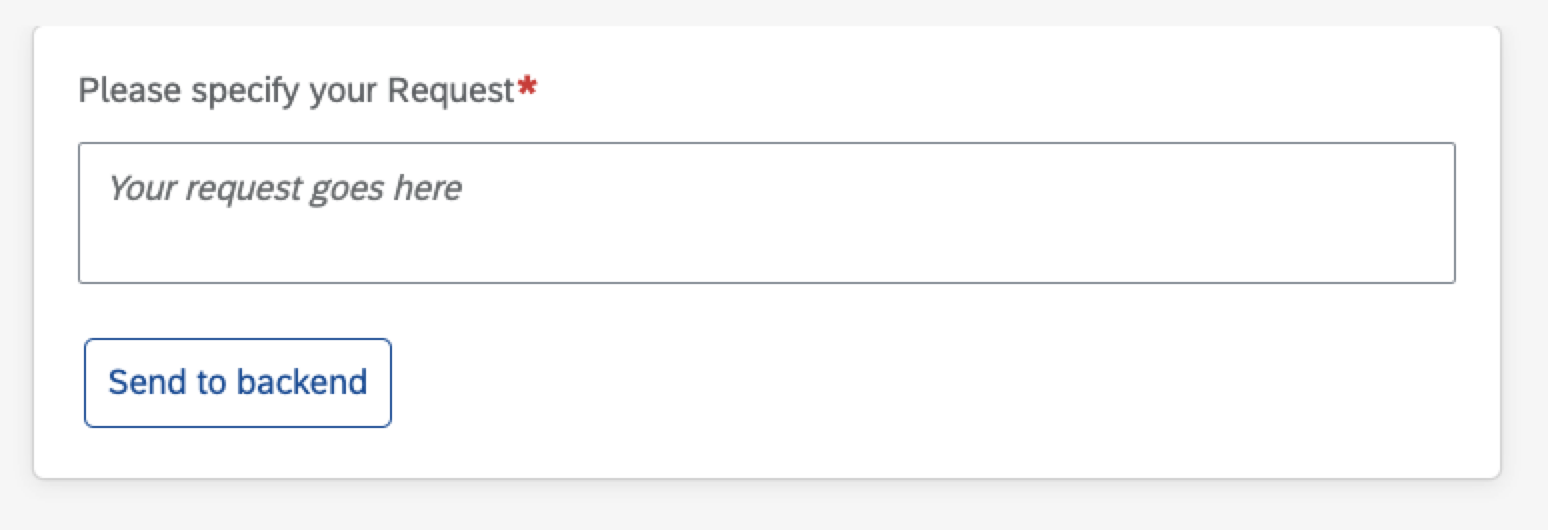
Figure 18 - Preview of the adapted card
Testing
After we successfully deployed the UI Integration Card to our SAP SuccessFactors Work Zone environment, we can start testing it.
Log in as Administrator to the Work Zone and enable the card in the Administration console.
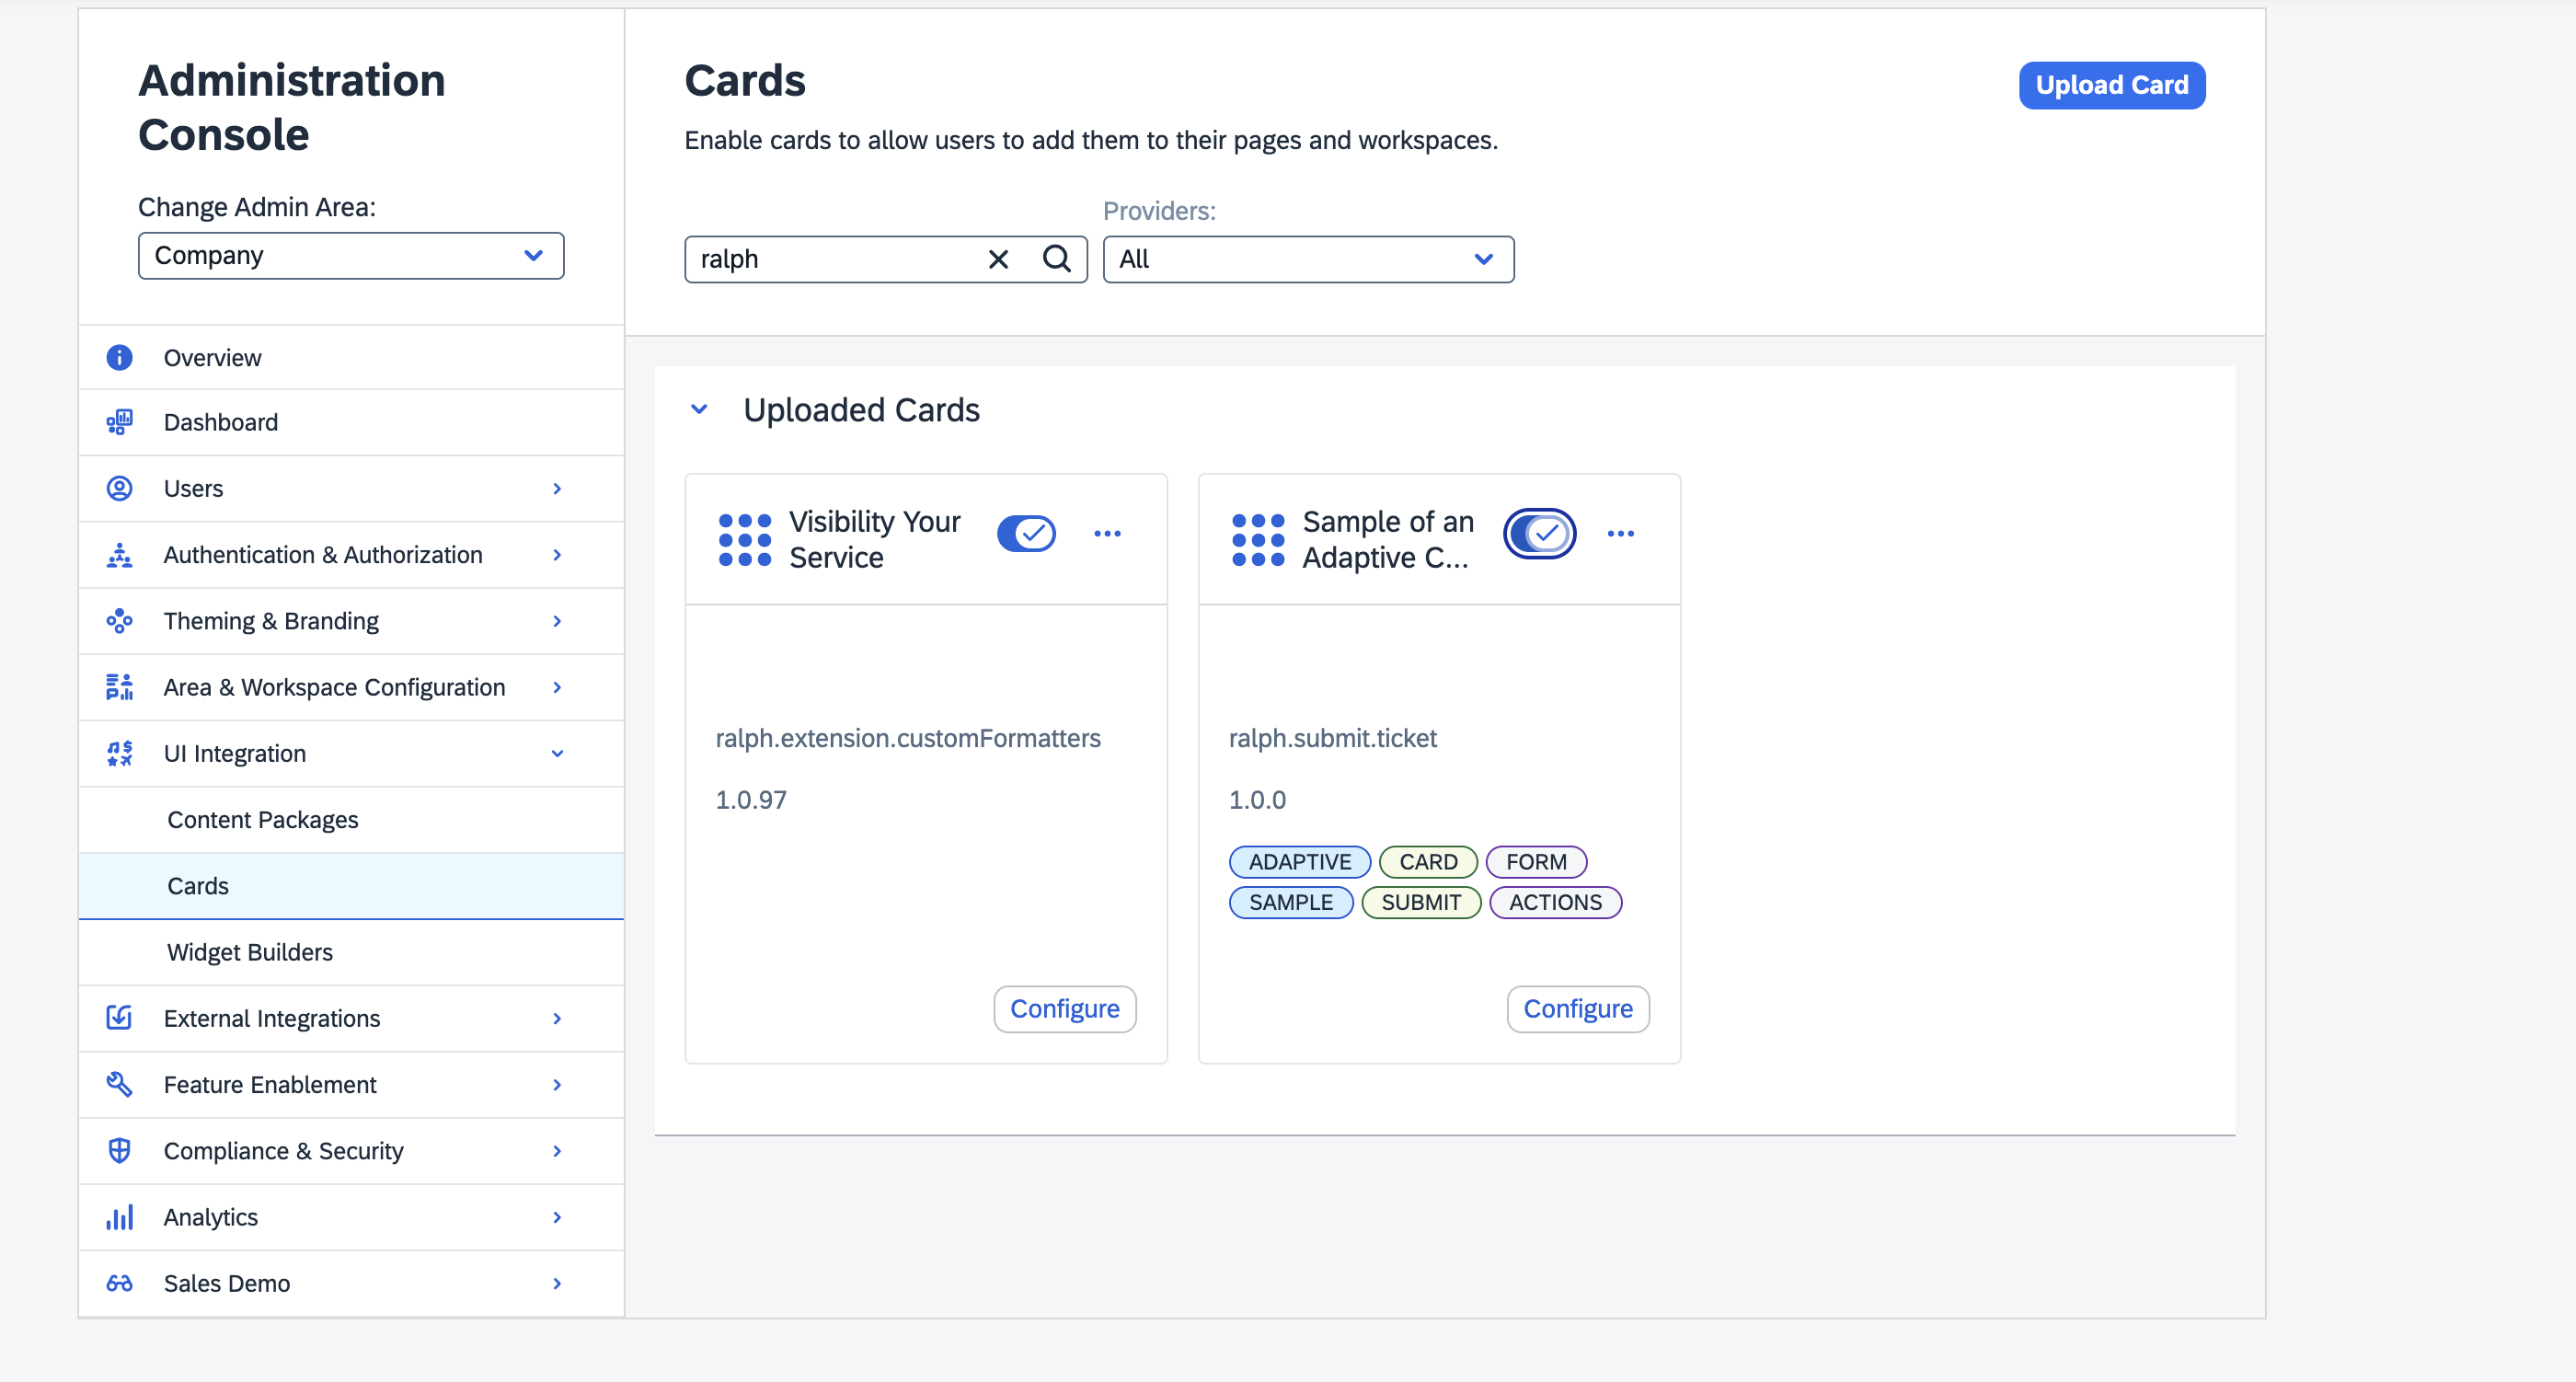
Figure 19 - SuccessFactors WorkZone Admin Area
Add the card e.g. to your workspace and create the ticket.

Figure 20 - Deployed Card
Get the positive result and see your ticket in the SAP Customer Experience Ticket Overview.
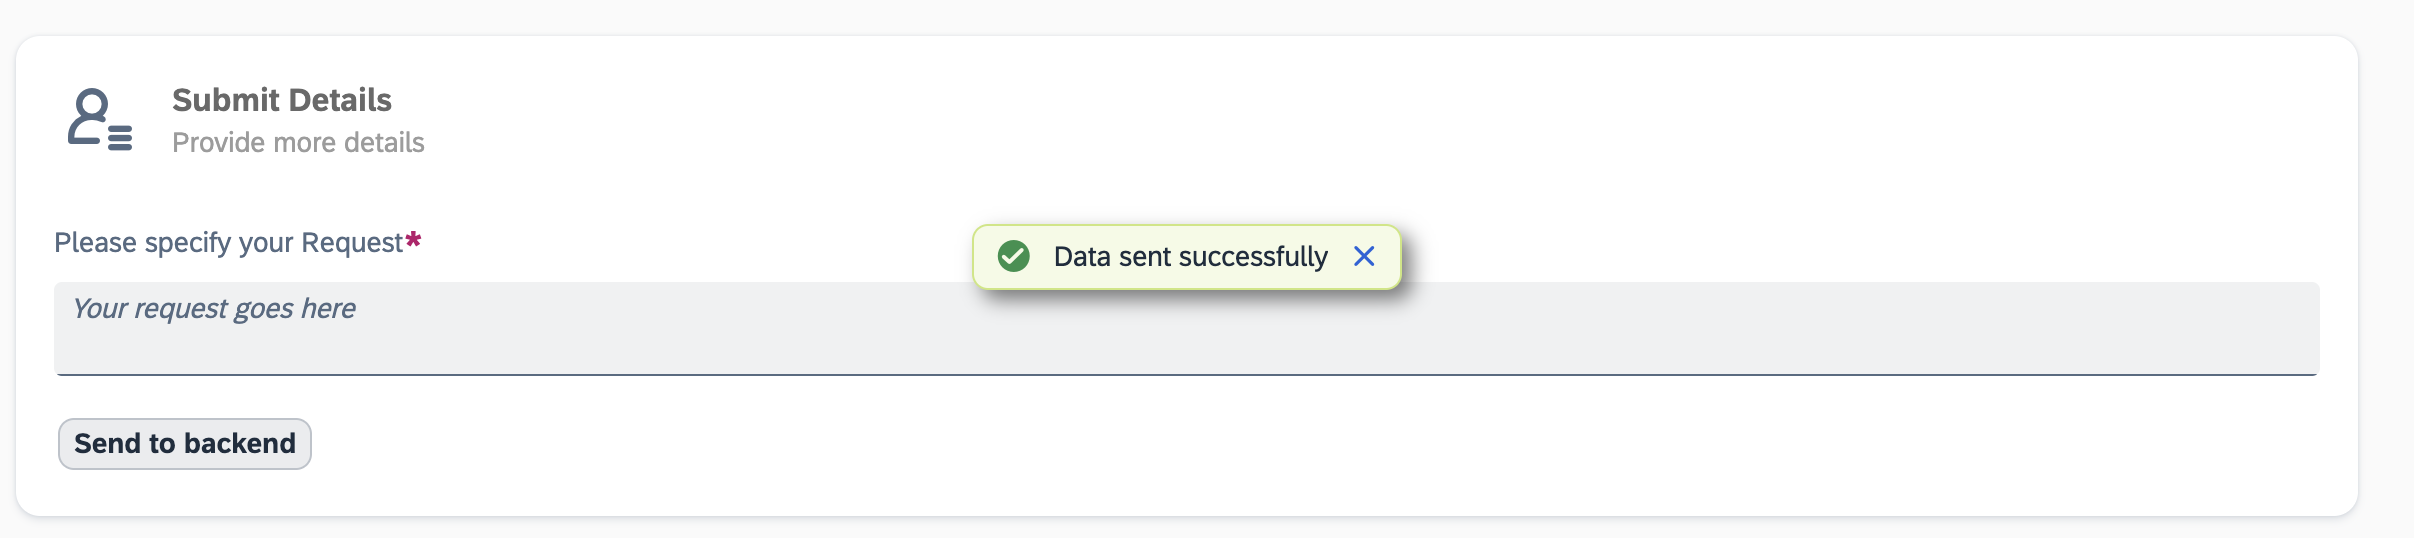
Figure 21 - Deployed Card - SuccessMessage

Figure 22 - Created Ticket in SAP Service Cloud
Summary
In this tutorial it was shown how to connect an SAP Service Cloud application to the SAP SuccessFactors Work Zone to empower employees to submit specific service requests to the service delivery organization in the form of tickets.
The creation of a ticket can now be gently done from the SAP SuccessFactors Work Zone vie a UI Integration Card consuming the BTP Destination service and finally posting against the SAP Service Cloud.
- SAP Managed Tags:
- SAP SuccessFactors Work Zone,
- SAP Service Cloud,
- Future of Work
Labels:
2 Comments
You must be a registered user to add a comment. If you've already registered, sign in. Otherwise, register and sign in.
Labels in this area
-
ABAP CDS Views - CDC (Change Data Capture)
2 -
AI
1 -
Analyze Workload Data
1 -
BTP
1 -
Business and IT Integration
2 -
Business application stu
1 -
Business Technology Platform
1 -
Business Trends
1,658 -
Business Trends
93 -
CAP
1 -
cf
1 -
Cloud Foundry
1 -
Confluent
1 -
Customer COE Basics and Fundamentals
1 -
Customer COE Latest and Greatest
3 -
Customer Data Browser app
1 -
Data Analysis Tool
1 -
data migration
1 -
data transfer
1 -
Datasphere
2 -
Event Information
1,400 -
Event Information
67 -
Expert
1 -
Expert Insights
177 -
Expert Insights
301 -
General
1 -
Google cloud
1 -
Google Next'24
1 -
GraphQL
1 -
Kafka
1 -
Life at SAP
780 -
Life at SAP
13 -
Migrate your Data App
1 -
MTA
1 -
Network Performance Analysis
1 -
NodeJS
1 -
PDF
1 -
POC
1 -
Product Updates
4,577 -
Product Updates
346 -
Replication Flow
1 -
REST API
1 -
RisewithSAP
1 -
SAP BTP
1 -
SAP BTP Cloud Foundry
1 -
SAP Cloud ALM
1 -
SAP Cloud Application Programming Model
1 -
SAP Datasphere
2 -
SAP S4HANA Cloud
1 -
SAP S4HANA Migration Cockpit
1 -
Technology Updates
6,873 -
Technology Updates
429 -
Workload Fluctuations
1
Related Content
- Maximize Your XP Points with Linea Surge Referral Code 'aMb3UVLbcZ' in Technology Q&A
- SAP BW/4 - revamp and true to the line 2024 in Technology Blogs by Members
- Quick & Easy Datasphere - When to use Data Flow, Transformation Flow, SQL View? in Technology Blogs by Members
- SAP Analytics Cloud: Support Universal Account Model (UAM) with Custom Widget in Technology Blogs by SAP
- Customer & Partner Roundtable for SAP BTP ABAP Environment #12 in Technology Blogs by SAP
Top kudoed authors
| User | Count |
|---|---|
| 32 | |
| 17 | |
| 15 | |
| 13 | |
| 11 | |
| 9 | |
| 8 | |
| 8 | |
| 8 | |
| 7 |