
- SAP Community
- Products and Technology
- Technology
- Technology Blogs by SAP
- SAP BTP – Security – OAuth 2.0 – Understanding Tok...
Technology Blogs by SAP
Learn how to extend and personalize SAP applications. Follow the SAP technology blog for insights into SAP BTP, ABAP, SAP Analytics Cloud, SAP HANA, and more.
Turn on suggestions
Auto-suggest helps you quickly narrow down your search results by suggesting possible matches as you type.
Showing results for
Product and Topic Expert
Options
- Subscribe to RSS Feed
- Mark as New
- Mark as Read
- Bookmark
- Subscribe
- Printer Friendly Page
- Report Inappropriate Content
04-06-2022
12:28 PM
This blog post gives an example on how to implement token exchange in a multitenant scenario.
It builds on the previous tutorial and adds multitenant capabilities.
0. Introduction
1. Backend Application
2. Frontend Application
3. Run the Scenario
Appendix: Sample Code
To follow this tutorial, the following prerequisites are required:
- Access to 2 subaccounts in SAP BTP.
- Basic Node.js skills.
- Basic understanding of OAuth 2.0.
- We use the command line client for Cloud Foundry, but the same can be achieved in the cockpit.
- Assuming that the previous tutorial has been read and understood.
- This blog post is meant for beginners, as usual, even multitenancy beginners can use it.
But most basic understanding of multitenancy is required.
In this tutorial we’re going to build a multitenant sample scenario, for better understanding how token exchange works.
Please refer to the previous tutorial for a detailed description of the scenario.
Summary:
In our scenario, we have a user-centric frontend app that calls a (protected) backend app.
The frontend app is accessed by a human user who has all required roles assigned.
User login is handled by approuter, which in turn redirects to core server app.
The core app receives the user-token and fetches a JWT token from XSUAA, required to call the backend app endpoint.
The mechanism of fetching the JWT token is not client-credentials, but instead, token exchange is used.
This means that in addition to the XSUAA-credentials, the user-token is sent to XSUAA.
This way, user-info will be preserved in the new token and the backend can read the info as well.
In the multitenant-world, the frontend app is subscribed by a customer.
The end user accesses the Frontend application via subscription.
In our scenario, the backend application is deployed in the provider account.
It is not a multitenant application, but it is multitenant aware.
In our minimalistic example, this means that it is interested in the tenant info.
Below diagram gives a little bit more details about application structure:
Finally, the last diagram shows the details of authorization flow:
The end user accesses the frontend app via the approuter.
The approuter takes care of login.
Note that the approuter and the core app are both bound to the same instance of XSUAA.
In case of multitenancy, the tenant-specific XSUAA instance is used for login (note that XSUAA instance is declared as “shared”).
As a consequence, a tenant-specific JWT token is issued.
"Tenant-specific JWT token" means, that the token contains the information about the subscribing subdomain and the issuer (which is the URL of the tenant-specific XSUAA authorization server), because it was issued by the subscriber-XSUAA, instead of the provider-XSUAA which is bound to the application.
This is the basic difference to previous tutorial: the token is tenant-specific.
The frontend core application wants to call the backend application and thus needs to fetch a JWT token.
To do so, it needs to send a request to XSUAA.
Which XSUAA?
In case of multitenancy, it has to call the tenant-specific XSUAA token endpoint.
In addition, for token exchange, it has to send the tenant-specific JWT token.
Afterwards, the newly exchanged token can be sent to the backend application.
The token is accepted, because previously the required scope was granted.
The grant mechanism was explained in previous tutorial and the multitenancy doesn’t change anything here.
To follow this tutorial, we're creating a project "texmt", as described in the appendix.
Our backend application represents an OAuth-protected API provider and exposes an endpoint.
It requires a JWT token containing a scope.
In addition, it requires that the token contains user info, needed to write audit logs.
Today, there’s no change to the backend app, so please refer to previous blog post for detailed explanation.
1.1. Create XSUAA Service Instance
The configuration for the XSUAA service instance can be found in the appendix.
To create the service instance, we jump to the folder c:\texmt\backend and execute the following command:
cf cs xsuaa application texBackendXsuaa -c backend-security.json
1.2. Create Backend App
The backend app just reads the user information from the incoming JWT token and writes some data to the Cloud Foundry log, which is meant to represent the audit logging.
The application code can be found in the appendix.
1.3. Deploy
Before deploying the Frontend app, we need to make sure that our cloud foundry command line client is targeting the provider subaccount.
The following command gives the answer:
cf t
After deploy, we take a note of the final URL of our endpoint.
In my example:
https://texbackend.cfapps.sap.hana.ondemand.com/endpoint
Our frontend app represents a standard UI application in SAP BTP, which needs to call a backend API to fetch some data.
It is protected with OAuth and it requires a scope.
User login is handled by approuter and the user-token is forwarded to the core app, as usual.
Detailed explanation can be found in previous blog post.
However, todays frontend app will have a few changes in code to support multitenancy.
2.1. Create XSUAA Service Instance
Both core app and approuter are bound to the same instance of XSUAA.
To support multitenancy, we need to set the tenant-mode:
In addition, we want to protect the SaaS callback endpoints with a scope.
We define a scope just for this purpose and we grant the scope to the SaaS registry.
All other settings remain the same like in previous blog (e.g. the grant and scope-reference mechanism, to get the backend scope assigned).
The configuration is stored in C:\texmt\frontend\frontend-security.json and can be found in the appendix.
To create the service instance, we jump into directory C:\texmt\frontend and execute the following command:
cf cs xsuaa application texFrontendXsuaa -c frontend-security.json
Once service instance is created, we can create a service key for it. We need it for configuration of the service in next step.
To create the service key:
cf csk texFrontendXsuaa sk
To view the content of the service key:
cf service-key texFrontendXsuaa sk
From the content, we take a note of the property xsappname.
2.2. Create SaaS Registry Service Instance
To support multitenancy, we need to register our app in the SaaS registry.
So we create an instance of the saas-registry service with the following configuration:
Note:
Make sure to adapt the values as explained below.
Brief explanation:
appid
Here we need to paste the value of the xsappname property from previous step.
appName
Here we can enter any name of our choice.
This name is used only internally by SaaS registry.
appUrls: onSubscription
This is the URL of the callback endpoint in our core app.
It has the following structure:
https://<base-url-of-app>/<endpoint-for-MT>/{<variable-name>}
Note: here you might need to adapt the URL, but only if you changed the app name.
displayName
This value is displayed in the cloud cockpit when doing subscription. Any name of our choice.
To create the service instance, we jump into directory C:\texmt\frontend and execute the following command:
cf cs saas-registry application texSaasreg -c config-saasreg.json
2.3. Create Core Application
This app is supposed to call the backend app - just call it and print the content of the 2 involved JWT tokens.
To call the backend app, a valid JWT token is required, which is fetched with token exchange.
To do the token exchange, we’re using the convenience library @Sap/xssec, like in previous tutorial.
However, we have to consider:
As mentioned in the Introduction, we need to call the tenant-specific XSUAA URL.
The difference of the URL is in the subdomain of the URL:
URL in provider account, the URL which we get in our app from binding:
https://provideraccount.authentication.eu10.hana.ondemand.com/oauth/token
The URL which we need:
https://subscriberaccount.authentication.eu10.hana.ondemand.com/oauth/token
So the difference is only in the subdomain of the URL.
At designtime, when writing our app, we cannot know who will subscribe to our app in future.
So we cannot know the correct token-URL.
But at runtime we can access the subdomain of the subscriber which is using our app.
How?
The info is in the JWT token.
Remember?
The end user does login and gets a login screen in the subscriber account.
Thus, the issued JWT token is tenant-specific and contains the subscriber subaccount name.
This token is forwarded by approuter to our core app and we can access the content.
We’re using the help of the convenience library @Sap/xssec
This subdomain is passed to @Sap/xssec such that it can use it for properly determining the tenant-XSUAA:
That’s it about the multitenant-specific token exchange.
About multitenancy:
In addition, the core app has to implement the 2 required callbacks for SaaS registry.
The first one is called during subscription, the second one during unsubscription.
In both callbacks we check if the scope - which we defined in the xs-security.json file - is available:
Above snippet shows the subscription callback. It expects that we return the URL of the entry point to our application.
We compose the URL of approuter and append the route to the “app” endpoint of our core application. This route is declared to require authentication (see below).
Below snippet shows the callback method which is called by SaaS registry when the customer unsubscribes from the TEX application.
We check for the scope, but don't need do anything else, so just send any response with the expected status code.
Quick recap:
To perform token exchange in a multitenant application, we need to:
1. obtain the tenant-specific subdomain by extracting it from the tenant-specific JWT token
2. use the tenant-specific subdomain for fetching a JWT token.
2.4. Create Approuter
The approuter code is almost the same like in previous tutorial.
What is it expected to do?
The main entry URL of our frontend application is this tenant-specific approuter-URL:
https:// subscriberaccount-texfrontendrouter.cfapps.sap.hana.ondemand.com/tofrontend/app
When it is called, approuter is configured to redirect to
https://texfrontend.cfapps.sap.hana.ondemand.com/app
HOWEVER:
This route is marked as "authenticationType": "xsuaa"
As such, the approuter will initiate the OAuth flow (called "authorization-code") and this leads to the login-screen being displayed.
As mentioned, the app is opened in subscriber account, so the login is done by tenant-specific XSUAA.
This means that approuter has to call the XSUAA in subscriber account
(similar like what we do in token exchange code).
Yes, approuter has to know the tenant-specific URL of the "shared" XSUAA instance.
As mentioned, it would look like this:
https://subscriberaccount.authentication.eu10.hana.ondemand.com/oauth/token
How should approuter guess this URL?
Yes, it can do.
Approuter has been called by end-user like this:
https://subscriberaccount-texfrontendrouter.cfapps.sap.hana.ondemand.com…
Now approuter can extract the tenant-specific subdomain from this URL.
Approuter only needs to know which of the segments it needs to cut off.
To learn how to know this, we need to tell.
We tell it in the environment variable TENANT_HOST_PATTERN
This means:
Approuter URLs of all subscribers/tenants will follow this pattern:
<subdomain>-approuter
More precise
<subdomain>--texfrontendrouter.cfapps.sap.hana.ondemand.com
With other words:
^(.*)-texfrontendrouter.cfapps.sap.hana.ondemand.com
As such, we declare the env variable as follows:
We declare this variable in the manifest file (see below).
Quick recap:
To enable approuter to support multitenancy, we need to add the TENANT pattern variable to the manifest.
2.5. Deploy Frontend App
Before we deploy the multitenant Frontend app, let’s have a look at the manifest at C:\texmt\frontend\manifest.yml
We can see 2 differences compared to the singletenant version of this app:
1. We need to add a tenant-specific route.
We can do this if we know the subdomain of the subscriber before deployment. Otherwise we need to create and map that new route after subscription and before opening the app.
Note:
No need to mention that the need of creating and mapping a new route for each subscriber is only required during testing phase, when tenant-specific URLs are computed with concatenating subdomain to appname.
This is the usual way, during testing.
In enterprise-ready applications, this is replaced by "custom domains".
2. We need to add the TENANT_HOST_PATTERN variable in the env section of approuter app
Deploy
Before deploying the Frontend app, we need to make sure that our cloud foundry command line client is targeting the provider subaccount (same like backend app).
We can go ahead and jump into folder C:\texmt\frontend and push our 2 app modules to cloud foundry.
After deployment, we cannot access the app, because it is multitenant app and it needs to be subscribed in the customer-subaccount.
Subscribe
We open the cockpit and navigate to the subaccount which is supposed to represent the customer subaccount.
We open the “Service Marketplace” screen.
We search for our TEX app, e.g. by typing “TEX” in the filter.
Once we’ve found it, we can press “Create”.
During creation, our callback is invoked where we compose the application URL by using the subdomain of the subaccount which we’re currently using.
We knew this subaccount beforehand and already created the route (we specified it in the manifest).
But nevertheless, we still cannot open the app.
Reason: the app requires a scope and defines a corresponding role.
This role has been made available in the customer subaccount after subscription.
As such, we can now assign the role to our user.
Assign Role
Short description:
Create Role Collection e.g. “tex_roles”.
Add role “FrontendUserRole”.
Add user.
Save.
Open
Now we can press the button “Go to application” in the subscription.
Or use this URL, in my example:
https://consumer-texfrontendrouter.cfapps.sap.hana.ondemand.com/tofrontend/app/
A login screen is displayed (typically, it contains the name of the subdomain).
After login, the approuter will use the configured route to redirect us to our core app endpoint.
There, the token exchange is done and the backend app is called.
Afterwards, the claims of the login token and of the exchanged token are displayed in the browser.
In my example it looks as follows:
We can see that the token contain the subdomain name of our subscriber subaccount.
And we can also see the URL of the issuer, which is the tenant-specific XSUAA, as we mentioned in the explanations above.
Finally, we have a look into the audit log of our backend app.
Sure, because we want to see who has accessed and used the backend app.
On command line, we run
cf logs texbackend --recent
And we can see which user from which subscription has accessed the app
We can see how useful it is to receive the user-info in the backend via token exchange.
Short recap:
To open our application, we need to
- go to customer subaccount and subscribe
- assign the required role to our user (This role is available only after subscription)
- make sure that the subscriber route is defined in manifest, or manually create it with the CLI or in the cockpit.
Note:
Make sure to unsubscribe before deleting the artifacts.
cf d -r -f texfrontend
cf d -r -f texfrontendrouter
cf d -r -f texbackend
cf ds -f texBackendXsuaa
cf dsk -f texFrontendXsuaa sk
cf ds -f texFrontendXsuaa
cf ds -f texSaasreg
If we don't want dependency to the useful @Sap/xssec library, we can use the following code sample which uses the native https module.
It also shows how the tenant-specific URL is composed for fetching the JWT token.
We’ve learned something about multitenancy.
The relevant learning: in multitenant app, we need to pass the subdomain of current tenant to the token-fetch function.
The current subdomain can be retrieved from the JWT token (which is tenant-specific).
Extract the subdomain from the JWT token which was used to call our endpoint:
This subdomain is passed to xssec convenience method:
Tutorial for granting scopes.
Same, but across subaccount borders.
OAuth for dummies, explained by Dummy.
Info about the content of JWT tokens, explained in my dummy way.
Introduction and first dummy steps with approuter.
Spec for token exchange, i.e. request access token via JWT bearer token
Documentation in Cloud Foundry about token exchange.
Github for node-fetch module to execute HTTP requests.
npm site for xssec library.
Reference for xs-security.json file in the SAP Help portal.
Security Glossary.
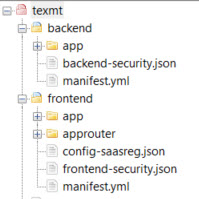
On filesystem, we create a root project folder C:\texmt containing 2 subfolders for the 2 applications (which themselves have subfolders for their modules)
C:\texmt
backend
app
frontend
app
approuter
Or see this screenshot:
Each app folder contains a few files required for little node server apps.
We create the required files in the folders and copy the content that can be found below.
C:\texmt
backend
app
package.json
server.js
backend-security.json
manifest.yml
frontend
app
package.json
server.js
approuter
package.json
xs-app.json
config-saasreg.json
frontend-security.json
manifest.yml
Screenshot with all files:
backend-security.json
manifest.yml
package.json
server.js
frontend-security.json
config-saasreg.json
Note: make sure to adapt the appId and the URL if necessary
manifest.yml
Note: make sure to adapt the route for the subscriber
app
package.json
server.js
package.json
xs-app.json
It builds on the previous tutorial and adds multitenant capabilities.
Quicklinks:
Quick Guide
Sample Code
Content
0. Introduction
1. Backend Application
2. Frontend Application
3. Run the Scenario
Appendix: Sample Code
Prerequisites
To follow this tutorial, the following prerequisites are required:
- Access to 2 subaccounts in SAP BTP.
- Basic Node.js skills.
- Basic understanding of OAuth 2.0.
- We use the command line client for Cloud Foundry, but the same can be achieved in the cockpit.
- Assuming that the previous tutorial has been read and understood.
- This blog post is meant for beginners, as usual, even multitenancy beginners can use it.
But most basic understanding of multitenancy is required.
Introduction
In this tutorial we’re going to build a multitenant sample scenario, for better understanding how token exchange works.
Please refer to the previous tutorial for a detailed description of the scenario.
Summary:
In our scenario, we have a user-centric frontend app that calls a (protected) backend app.
The frontend app is accessed by a human user who has all required roles assigned.
User login is handled by approuter, which in turn redirects to core server app.
The core app receives the user-token and fetches a JWT token from XSUAA, required to call the backend app endpoint.
The mechanism of fetching the JWT token is not client-credentials, but instead, token exchange is used.
This means that in addition to the XSUAA-credentials, the user-token is sent to XSUAA.
This way, user-info will be preserved in the new token and the backend can read the info as well.
In the multitenant-world, the frontend app is subscribed by a customer.
The end user accesses the Frontend application via subscription.
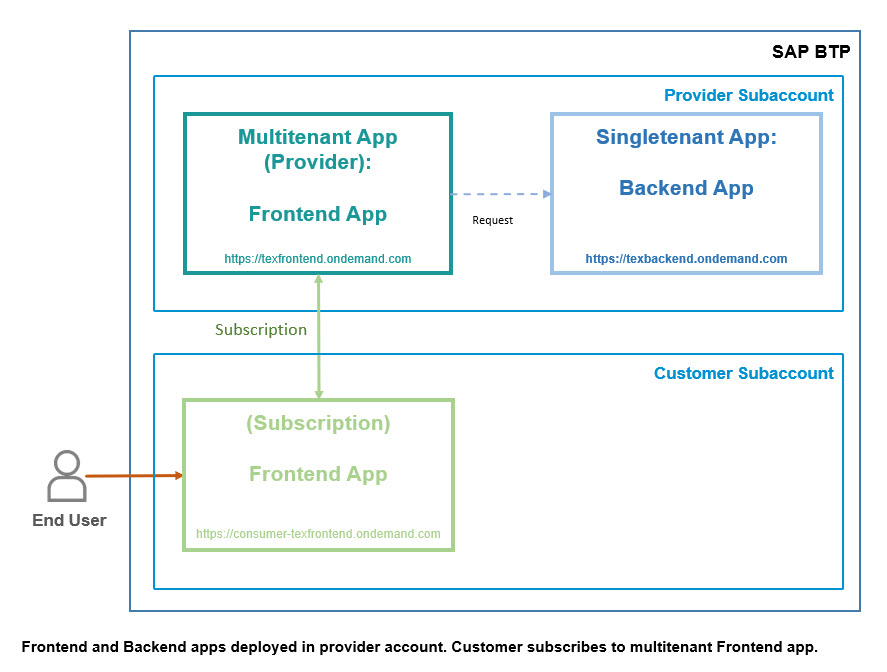
In our scenario, the backend application is deployed in the provider account.
It is not a multitenant application, but it is multitenant aware.
In our minimalistic example, this means that it is interested in the tenant info.
Below diagram gives a little bit more details about application structure:

Finally, the last diagram shows the details of authorization flow:

The end user accesses the frontend app via the approuter.
The approuter takes care of login.
Note that the approuter and the core app are both bound to the same instance of XSUAA.
In case of multitenancy, the tenant-specific XSUAA instance is used for login (note that XSUAA instance is declared as “shared”).
As a consequence, a tenant-specific JWT token is issued.
"Tenant-specific JWT token" means, that the token contains the information about the subscribing subdomain and the issuer (which is the URL of the tenant-specific XSUAA authorization server), because it was issued by the subscriber-XSUAA, instead of the provider-XSUAA which is bound to the application.
This is the basic difference to previous tutorial: the token is tenant-specific.
The frontend core application wants to call the backend application and thus needs to fetch a JWT token.
To do so, it needs to send a request to XSUAA.
Which XSUAA?
In case of multitenancy, it has to call the tenant-specific XSUAA token endpoint.
In addition, for token exchange, it has to send the tenant-specific JWT token.
Afterwards, the newly exchanged token can be sent to the backend application.
The token is accepted, because previously the required scope was granted.
The grant mechanism was explained in previous tutorial and the multitenancy doesn’t change anything here.
Preparation
To follow this tutorial, we're creating a project "texmt", as described in the appendix.
1. Backend Application
Our backend application represents an OAuth-protected API provider and exposes an endpoint.
It requires a JWT token containing a scope.
In addition, it requires that the token contains user info, needed to write audit logs.
Today, there’s no change to the backend app, so please refer to previous blog post for detailed explanation.
1.1. Create XSUAA Service Instance
The configuration for the XSUAA service instance can be found in the appendix.
To create the service instance, we jump to the folder c:\texmt\backend and execute the following command:
cf cs xsuaa application texBackendXsuaa -c backend-security.json
1.2. Create Backend App
The backend app just reads the user information from the incoming JWT token and writes some data to the Cloud Foundry log, which is meant to represent the audit logging.
The application code can be found in the appendix.
1.3. Deploy
Before deploying the Frontend app, we need to make sure that our cloud foundry command line client is targeting the provider subaccount.
The following command gives the answer:
cf t
After deploy, we take a note of the final URL of our endpoint.
In my example:
https://texbackend.cfapps.sap.hana.ondemand.com/endpoint
2. Frontend Application
Our frontend app represents a standard UI application in SAP BTP, which needs to call a backend API to fetch some data.
It is protected with OAuth and it requires a scope.
User login is handled by approuter and the user-token is forwarded to the core app, as usual.
Detailed explanation can be found in previous blog post.
However, todays frontend app will have a few changes in code to support multitenancy.
2.1. Create XSUAA Service Instance
Both core app and approuter are bound to the same instance of XSUAA.
To support multitenancy, we need to set the tenant-mode:
"tenant-mode": "shared",In addition, we want to protect the SaaS callback endpoints with a scope.
We define a scope just for this purpose and we grant the scope to the SaaS registry.
{

    "name": "$XSAPPNAME.scopeforsaas",

    "description": "Scope required by subscription callbacks",

    "grant-as-authority-to-apps": [ "$XSAPPNAME(application,sap-provisioning,tenant-onboarding)" ]

}
All other settings remain the same like in previous blog (e.g. the grant and scope-reference mechanism, to get the backend scope assigned).
The configuration is stored in C:\texmt\frontend\frontend-security.json and can be found in the appendix.
To create the service instance, we jump into directory C:\texmt\frontend and execute the following command:
cf cs xsuaa application texFrontendXsuaa -c frontend-security.json
Once service instance is created, we can create a service key for it. We need it for configuration of the service in next step.
To create the service key:
cf csk texFrontendXsuaa sk
To view the content of the service key:
cf service-key texFrontendXsuaa sk
From the content, we take a note of the property xsappname.
2.2. Create SaaS Registry Service Instance
To support multitenancy, we need to register our app in the SaaS registry.
So we create an instance of the saas-registry service with the following configuration:
{

  "appId": "frontendxsuaa!t12345",

  "appName": "texFrontendSaasregAppname",

  "appUrls": {

    "onSubscription" : https://texfrontend.cfapps.sap.hana.ondemand.com/mtcallback/{tenantId}

  },

  "displayName": "TEX Frontend Application"

}
Note:
Make sure to adapt the values as explained below.
Brief explanation:
appid
Here we need to paste the value of the xsappname property from previous step.
appName
Here we can enter any name of our choice.
This name is used only internally by SaaS registry.
appUrls: onSubscription
This is the URL of the callback endpoint in our core app.
It has the following structure:
https://<base-url-of-app>/<endpoint-for-MT>/{<variable-name>}
Note: here you might need to adapt the URL, but only if you changed the app name.
displayName
This value is displayed in the cloud cockpit when doing subscription. Any name of our choice.
To create the service instance, we jump into directory C:\texmt\frontend and execute the following command:
cf cs saas-registry application texSaasreg -c config-saasreg.json
2.3. Create Core Application
This app is supposed to call the backend app - just call it and print the content of the 2 involved JWT tokens.
To call the backend app, a valid JWT token is required, which is fetched with token exchange.
To do the token exchange, we’re using the convenience library @Sap/xssec, like in previous tutorial.
However, we have to consider:
As mentioned in the Introduction, we need to call the tenant-specific XSUAA URL.
The difference of the URL is in the subdomain of the URL:
URL in provider account, the URL which we get in our app from binding:
https://provideraccount.authentication.eu10.hana.ondemand.com/oauth/token
The URL which we need:
https://subscriberaccount.authentication.eu10.hana.ondemand.com/oauth/token
So the difference is only in the subdomain of the URL.
At designtime, when writing our app, we cannot know who will subscribe to our app in future.
So we cannot know the correct token-URL.
But at runtime we can access the subdomain of the subscriber which is using our app.
How?
The info is in the JWT token.
Remember?
The end user does login and gets a login screen in the subscriber account.
Thus, the issued JWT token is tenant-specific and contains the subscriber subaccount name.
This token is forwarded by approuter to our core app and we can access the content.
We’re using the help of the convenience library @Sap/xssec
const authInfo = req.authInfo

const subdomain = authInfo.getSubdomain())
This subdomain is passed to @Sap/xssec such that it can use it for properly determining the tenant-XSUAA:
async function _doTokenExchange (jwt, subdomain){

   . . .

   xssec.requests.requestUserToken(jwt, UAA_CREDENTIALS, null, 'backendxsuaa!t14860.backendscope', subdomain, null, (error, token)=>{
That’s it about the multitenant-specific token exchange.
About multitenancy:
In addition, the core app has to implement the 2 required callbacks for SaaS registry.
The first one is called during subscription, the second one during unsubscription.
In both callbacks we check if the scope - which we defined in the xs-security.json file - is available:
app.put('/mtcallback/:tenant_id', passport.authenticate('JWT', {session: false}), (req, res) => {

    if (!req.authInfo.checkScope(UAA_CREDENTIALS.xsappname + '.scopeforsaas')) {

       res.status(403).end('Forbidden')

    }else{

       const appHost = req.hostname.replace('texfrontend','texfrontendrouter')

       const subDomain = req.body.subscribedSubdomain

       res.status(200).send(`https://${subDomain}-${appHost}/tofrontend/app`)

    }

})
Above snippet shows the subscription callback. It expects that we return the URL of the entry point to our application.
We compose the URL of approuter and append the route to the “app” endpoint of our core application. This route is declared to require authentication (see below).
Below snippet shows the callback method which is called by SaaS registry when the customer unsubscribes from the TEX application.
We check for the scope, but don't need do anything else, so just send any response with the expected status code.
 app.delete('/mtcallback/:tenant_id', passport.authenticate('JWT', {session: false}), (req, res) => {

    if (!req.authInfo.checkScope(UAA_CREDENTIALS.xsappname + '.scopeforsaas')) {

       res.status(403).end('Forbidden')

    }else{

       res.status(200).end('unsubscribed')

    }

 })
Quick recap:
To perform token exchange in a multitenant application, we need to:
1. obtain the tenant-specific subdomain by extracting it from the tenant-specific JWT token
2. use the tenant-specific subdomain for fetching a JWT token.
2.4. Create Approuter
The approuter code is almost the same like in previous tutorial.
What is it expected to do?
The main entry URL of our frontend application is this tenant-specific approuter-URL:
https:// subscriberaccount-texfrontendrouter.cfapps.sap.hana.ondemand.com/tofrontend/app
When it is called, approuter is configured to redirect to
https://texfrontend.cfapps.sap.hana.ondemand.com/app
HOWEVER:
This route is marked as "authenticationType": "xsuaa"
As such, the approuter will initiate the OAuth flow (called "authorization-code") and this leads to the login-screen being displayed.
As mentioned, the app is opened in subscriber account, so the login is done by tenant-specific XSUAA.
This means that approuter has to call the XSUAA in subscriber account
(similar like what we do in token exchange code).
Yes, approuter has to know the tenant-specific URL of the "shared" XSUAA instance.
As mentioned, it would look like this:
https://subscriberaccount.authentication.eu10.hana.ondemand.com/oauth/token
How should approuter guess this URL?
Yes, it can do.
Approuter has been called by end-user like this:
https://subscriberaccount-texfrontendrouter.cfapps.sap.hana.ondemand.com…
Now approuter can extract the tenant-specific subdomain from this URL.
Approuter only needs to know which of the segments it needs to cut off.
To learn how to know this, we need to tell.
We tell it in the environment variable TENANT_HOST_PATTERN
This means:
Approuter URLs of all subscribers/tenants will follow this pattern:
<subdomain>-approuter
More precise
<subdomain>--texfrontendrouter.cfapps.sap.hana.ondemand.com
With other words:
^(.*)-texfrontendrouter.cfapps.sap.hana.ondemand.com
As such, we declare the env variable as follows:
TENANT_HOST_PATTERN: "^(.*)-texfrontendrouter.cfapps.sap.hana.ondemand.com"We declare this variable in the manifest file (see below).
Quick recap:
To enable approuter to support multitenancy, we need to add the TENANT pattern variable to the manifest.
2.5. Deploy Frontend App
Before we deploy the multitenant Frontend app, let’s have a look at the manifest at C:\texmt\frontend\manifest.yml
---

applications:

  - name: texfrontend

    path: app

    memory: 64M

    routes:

    - route: texfrontend.cfapps.sap.hana.ondemand.com

    services:

      - texFrontendXsuaa

  - name: texfrontendrouter

    routes:

    - route: consumer-texfrontendrouter.cfapps.sap.hana.ondemand.com

    path: approuter

    memory: 128M

    env:

      destinations: >

        [

          {

            "name":"destination_frontend",

            "url":"https://texfrontend.cfapps.sap.hana.ondemand.com",

            "forwardAuthToken": true

          }

        ]

      TENANT_HOST_PATTERN: "^(.*)-texfrontendrouter.cfapps.sap.hana.ondemand.com"

    services:

      - texFrontendXsuaa
We can see 2 differences compared to the singletenant version of this app:
1. We need to add a tenant-specific route.
We can do this if we know the subdomain of the subscriber before deployment. Otherwise we need to create and map that new route after subscription and before opening the app.
Note:
No need to mention that the need of creating and mapping a new route for each subscriber is only required during testing phase, when tenant-specific URLs are computed with concatenating subdomain to appname.
This is the usual way, during testing.
In enterprise-ready applications, this is replaced by "custom domains".
2. We need to add the TENANT_HOST_PATTERN variable in the env section of approuter app
Deploy
Before deploying the Frontend app, we need to make sure that our cloud foundry command line client is targeting the provider subaccount (same like backend app).
We can go ahead and jump into folder C:\texmt\frontend and push our 2 app modules to cloud foundry.
3. Run the Scenario
After deployment, we cannot access the app, because it is multitenant app and it needs to be subscribed in the customer-subaccount.
Subscribe
We open the cockpit and navigate to the subaccount which is supposed to represent the customer subaccount.
We open the “Service Marketplace” screen.
We search for our TEX app, e.g. by typing “TEX” in the filter.
Once we’ve found it, we can press “Create”.
During creation, our callback is invoked where we compose the application URL by using the subdomain of the subaccount which we’re currently using.
We knew this subaccount beforehand and already created the route (we specified it in the manifest).
But nevertheless, we still cannot open the app.
Reason: the app requires a scope and defines a corresponding role.
This role has been made available in the customer subaccount after subscription.
As such, we can now assign the role to our user.
Assign Role
Short description:
Create Role Collection e.g. “tex_roles”.
Add role “FrontendUserRole”.
Add user.
Save.
Open
Now we can press the button “Go to application” in the subscription.
Or use this URL, in my example:
https://consumer-texfrontendrouter.cfapps.sap.hana.ondemand.com/tofrontend/app/
A login screen is displayed (typically, it contains the name of the subdomain).
After login, the approuter will use the configured route to redirect us to our core app endpoint.
There, the token exchange is done and the backend app is called.
Afterwards, the claims of the login token and of the exchanged token are displayed in the browser.
In my example it looks as follows:
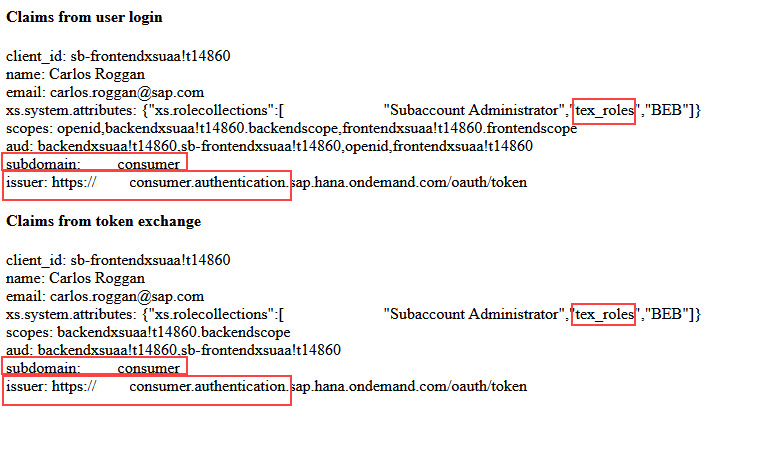
We can see that the token contain the subdomain name of our subscriber subaccount.
And we can also see the URL of the issuer, which is the tenant-specific XSUAA, as we mentioned in the explanations above.
Finally, we have a look into the audit log of our backend app.
Sure, because we want to see who has accessed and used the backend app.
On command line, we run
cf logs texbackend --recent
And we can see which user from which subscription has accessed the app

We can see how useful it is to receive the user-info in the backend via token exchange.
Short recap:
To open our application, we need to
- go to customer subaccount and subscribe
- assign the required role to our user (This role is available only after subscription)
- make sure that the subscriber route is defined in manifest, or manually create it with the CLI or in the cockpit.
4. Optional: cleanup
Note:
Make sure to unsubscribe before deleting the artifacts.
cf d -r -f texfrontend
cf d -r -f texfrontendrouter
cf d -r -f texbackend
cf ds -f texBackendXsuaa
cf dsk -f texFrontendXsuaa sk
cf ds -f texFrontendXsuaa
cf ds -f texSaasreg
5. Optional: Native Code
If we don't want dependency to the useful @Sap/xssec library, we can use the following code sample which uses the native https module.
It also shows how the tenant-specific URL is composed for fetching the JWT token.
const https = require('https')


async function  _doTokenExchange(jwt, subdomain) {

    return new Promise ((resolve, reject) => {

       const uaadomain = UAA_CREDENTIALS.uaadomain

       const oauthEndpoint = `${subdomain}.${uaadomain}`

       const options = {

          host: oauthEndpoint,

          path: '/oauth/token',

          method: 'POST',

          headers: {

             Authorization: "Basic " + Buffer.from(UAA_CREDENTIALS.clientid + ':' + UAA_CREDENTIALS.clientsecret).toString("base64"),

             'Content-Type': 'application/x-www-form-urlencoded'

          }

       }


       const granttype = 'urn:ietf:params:oauth:grant-type:jwt-bearer'

       const data = `grant_type=${granttype}&response_type=token&assertion=${jwt}&scope=backendxsuaa!t14860.backendscope`

       const req = https.request(options, (res) => {

          let response = ''

          res.on('data', chunk => {

            response += chunk

          })

          res.on('end', () => {

            resolve(JSON.parse(response).access_token)

          })

       })

       req.write(data)

       req.end()

    })

}
Summary
We’ve learned something about multitenancy.
The relevant learning: in multitenant app, we need to pass the subdomain of current tenant to the token-fetch function.
The current subdomain can be retrieved from the JWT token (which is tenant-specific).
Quick Guide
Extract the subdomain from the JWT token which was used to call our endpoint:
const authInfo = req.authInfo

const subdomain = authInfo.getSubdomain())
This subdomain is passed to xssec convenience method:
xssec.requests.requestUserToken(jwt, UAA_CREDENTIALS, null, '<scope>', subdomain, null, (error, token)=>{
Links
Tutorial for granting scopes.
Same, but across subaccount borders.
OAuth for dummies, explained by Dummy.
Info about the content of JWT tokens, explained in my dummy way.
Introduction and first dummy steps with approuter.
Spec for token exchange, i.e. request access token via JWT bearer token
Documentation in Cloud Foundry about token exchange.
Github for node-fetch module to execute HTTP requests.
npm site for xssec library.
Reference for xs-security.json file in the SAP Help portal.
Security Glossary.
Appendix 1: Sample Code
On filesystem, we create a root project folder C:\texmt containing 2 subfolders for the 2 applications (which themselves have subfolders for their modules)
C:\texmt
backend
app
frontend
app
approuter
Or see this screenshot:
Each app folder contains a few files required for little node server apps.
We create the required files in the folders and copy the content that can be found below.
C:\texmt
backend
app
package.json
server.js
backend-security.json
manifest.yml
frontend
app
package.json
server.js
approuter
package.json
xs-app.json
config-saasreg.json
frontend-security.json
manifest.yml
Screenshot with all files:

Backend
backend-security.json
{

    "xsappname": "backendxsuaa",

    "tenant-mode": "dedicated",

    "scopes": [{

        "name": "$XSAPPNAME.backendscope",

        "granted-apps" : ["$XSAPPNAME(application, frontendxsuaa)"]

    }]

}
manifest.yml
---

applications:

  - name: texbackend

    path: app

    memory: 64M

    routes:

    - route: texbackend.cfapps.sap.hana.ondemand.com

    services:

      - texBackendXsuaa
app
package.json
{

  "dependencies": {

    "@sap/xsenv": "latest",

    "@sap/xssec": "^3.2.13",

    "express": "^4.17.1",

    "passport": "^0.4.0"

  }

}
server.js
const xsenv = require('@sap/xsenv')


const UAA_CREDENTIALS = xsenv.getServices({myXsuaa: {tag: 'xsuaa'}}).myXsuaa


const express = require('express')

const app = express();

const xssec = require('@sap/xssec')

const passport = require('passport')

const JWTStrategy = xssec.JWTStrategy

passport.use('JWT', new JWTStrategy(UAA_CREDENTIALS))

app.use(passport.initialize())

app.use(express.json())


// start server

app.listen(process.env.PORT)


// Endpoint to be called by frontend app

app.get('/endpoint', passport.authenticate('JWT', {session: false}), (req, res) => {

    const auth = req.authInfo

    if (! auth.checkScope(UAA_CREDENTIALS.xsappname + '.backendscope')) {

        res.status(403).end('Forbidden. Missing authorization.')

    }


    // The fake audit logging

    console.log(`===> [AUDIT] backend called by user '${auth.getGivenName()}' from subdomain '${auth.getSubdomain()}' with oauth client: '${auth.getClientId()}'`)


    res.json({'jwtToken': auth.getAppToken()})

})
Frontend
frontend-security.json
{

    "xsappname": "frontendxsuaa",

    "tenant-mode": "shared",

    "scopes": [

        {

            "name": "$XSAPPNAME.frontendscope",

            "description": "Scope required for human users to login to homepage"

        },

        {

            "name": "$XSAPPNAME.scopeforsaas",

            "description": "Scope required by subscription callbacks",

            "grant-as-authority-to-apps": [ "$XSAPPNAME(application,sap-provisioning,tenant-onboarding)" ]

        }

    ],

    "role-templates": [

        {

            "name": "FrontendUserRole",

            "description": "Role for end users, allows to login to app",

            "scope-references": [   "$XSAPPNAME.frontendscope",

                                    "$XSAPPNAME(application,backendxsuaa).backendscope"]

        }

    ],

    "foreign-scope-references": ["$XSAPPNAME(application,backendxsuaa).backendscope"],

    "oauth2-configuration": {"token-validity": 5}

}
config-saasreg.json
Note: make sure to adapt the appId and the URL if necessary
{

  "appId": "frontendxsuaa!t14860",

  "appName": "texFrontendSaasregAppname",

  "appUrls": {

    "onSubscription" : "https://texfrontend.cfapps.sap.hana.ondemand.com/mtcallback/{tenantId}"

  },

  "displayName": "TEX Frontend Application"

}
manifest.yml
Note: make sure to adapt the route for the subscriber
---

applications:

  - name: texfrontend

    path: app

    memory: 64M

    routes:

    - route: texfrontend.cfapps.sap.hana.ondemand.com

    services:

      - texFrontendXsuaa

  - name: texfrontendrouter

    routes:

    - route: consumer-texfrontendrouter.cfapps.sap.hana.ondemand.com

    path: approuter

    memory: 128M

    env:

      destinations: >

        [

          {

            "name":"destination_frontend",

            "url":"https://texfrontend.cfapps.sap.hana.ondemand.com",

            "forwardAuthToken": true

          }

        ]

      TENANT_HOST_PATTERN: "^(.*)-texfrontendrouter.cfapps.sap.hana.ondemand.com"

    services:

      - texFrontendXsuaa
app
package.json
{

  "dependencies": {

    "@sap/xsenv": "latest",

    "@sap/xssec": "^3.2.13",

    "express": "^4.17.1",

    "node-fetch": "2.6.2",

    "passport": "^0.4.0"

  }

}
server.js
const xsenv = require('@sap/xsenv')


const UAA_CREDENTIALS = xsenv.getServices({myXsuaa: {tag: 'xsuaa'}}).myXsuaa


const fetch = require('node-fetch')

const express = require('express')

const app = express();

const xssec = require('@sap/xssec')

const passport = require('passport')

const JWTStrategy = xssec.JWTStrategy

passport.use('JWT', new JWTStrategy(UAA_CREDENTIALS))

app.use(passport.initialize())

app.use(express.json())


// start server

app.listen(process.env.PORT)


// display frontend

app.get('/app', passport.authenticate('JWT', {session: false}), async (req, res) => {

    const authInfo = req.authInfo

    if (! authInfo.checkScope(UAA_CREDENTIALS.xsappname + '.frontendscope')) {

        res.status(403).end('Forbidden. Authorization for homepage access is missing.')

    }


    // login token

    const userJWT = authInfo.getAppToken()

    const htmlUser = _formatClaims(userJWT)


    // token exchange

    const texJwtToken = await _doTokenExchange(userJWT, authInfo.getSubdomain())// tenant-specific

    const serviceResponseTEX = await _callService(texJwtToken)

    const htmlTEX = _formatClaims(serviceResponseTEX.jwtToken)


    res.send(`  <h4>Claims from user login</h4>${htmlUser}

                <h4>Claims from token exchange</h4>${htmlTEX}`)

})


/* Multi Tenancy callbacks */


app.put('/mtcallback/:tenant_id', passport.authenticate('JWT', {session: false}), (req, res) => {

    if (!req.authInfo.checkScope(UAA_CREDENTIALS.xsappname + '.scopeforsaas')) {

       res.status(403).end('Forbidden')

    }else{

       const appHost = req.hostname.replace('texfrontend','texfrontendrouter')

       const subDomain = req.body.subscribedSubdomain

       res.status(200).send(`https://${subDomain}-${appHost}/tofrontend/app`)

    }

 })


 app.delete('/mtcallback/:tenant_id', passport.authenticate('JWT', {session: false}), (req, res) => {

    if (!req.authInfo.checkScope(UAA_CREDENTIALS.xsappname + '.scopeforsaas')) {

       res.status(403).end('Forbidden')

    }else{

       res.status(200).end('unsubscribed')

    }

 })


/* HELPER */


async function _callService (jwtToken){

    const options = {

       headers: { Authorization: 'Bearer ' + jwtToken }

    }

    const serviceURL = 'https://texbackend.cfapps.sap.hana.ondemand.com/endpoint'

    const response = await fetch(serviceURL, options)

    const responseJson = await response.json()

    return responseJson

 }


async function _doTokenExchange (jwt, subdomain){

    return new Promise ((resolve, reject) => {

        xssec.requests.requestUserToken(jwt, UAA_CREDENTIALS, null, 'backendxsuaa!t14860.backendscope', subdomain, null, (error, token)=>{

            resolve(token)

        })

    })

}


function _formatClaims(jwtEncoded){

    const jwtBase64Encoded = jwtEncoded.split('.')[1]

    const jwtDecodedAsString = Buffer.from(jwtBase64Encoded, 'base64').toString('ascii')

    const jwtDecodedJson = JSON.parse(jwtDecodedAsString)

    console.log(`===> The full JWT: ${jwtDecodedAsString}`);


    const claims = new Array()

    claims.push(`client_id: ${jwtDecodedJson.client_id}`)

    claims.push(`<br>name: ${jwtDecodedJson.given_name} ${jwtDecodedJson.family_name}</br>`)

    claims.push(`email: ${jwtDecodedJson.email}`)

    claims.push(`<br>xs.system.attributes: ${JSON.stringify(jwtDecodedJson['xs.system.attributes'])}</br>`)

    claims.push(`scopes: ${jwtDecodedJson.scope}`)

    claims.push(`<br>aud: ${jwtDecodedJson.aud}</br>`)

    claims.push(`subdomain: ${jwtDecodedJson.ext_attr.zdn}`)

    claims.push(`<br>issuer: ${jwtDecodedJson.iss}</br>`)

    return claims.join('')

}
Approuter
package.json
{

    "dependencies": {

        "@sap/approuter": "latest"

    },

    "scripts": {

        "start": "node node_modules/@sap/approuter/approuter.js"

    }

}
xs-app.json
{

  "authenticationMethod": "route",

  "routes": [

    {

      "source": "^/tofrontend/(.*)$",

      "target": "$1",

      "destination": "destination_frontend",

      "authenticationType": "xsuaa"

    }

  ]

}- SAP Managed Tags:
- Node.js,
- SAP BTP, Cloud Foundry runtime and environment,
- Security,
- SAP Business Technology Platform
Labels:
8 Comments
You must be a registered user to add a comment. If you've already registered, sign in. Otherwise, register and sign in.
Labels in this area
-
ABAP CDS Views - CDC (Change Data Capture)
2 -
AI
1 -
Analyze Workload Data
1 -
BTP
1 -
Business and IT Integration
2 -
Business application stu
1 -
Business Technology Platform
1 -
Business Trends
1,658 -
Business Trends
102 -
CAP
1 -
cf
1 -
Cloud Foundry
1 -
Confluent
1 -
Customer COE Basics and Fundamentals
1 -
Customer COE Latest and Greatest
3 -
Customer Data Browser app
1 -
Data Analysis Tool
1 -
data migration
1 -
data transfer
1 -
Datasphere
2 -
Event Information
1,400 -
Event Information
69 -
Expert
1 -
Expert Insights
177 -
Expert Insights
322 -
General
1 -
Google cloud
1 -
Google Next'24
1 -
GraphQL
1 -
Kafka
1 -
Life at SAP
780 -
Life at SAP
13 -
Migrate your Data App
1 -
MTA
1 -
Network Performance Analysis
1 -
NodeJS
1 -
PDF
1 -
POC
1 -
Product Updates
4,576 -
Product Updates
367 -
Replication Flow
1 -
REST API
1 -
RisewithSAP
1 -
SAP BTP
1 -
SAP BTP Cloud Foundry
1 -
SAP Cloud ALM
1 -
SAP Cloud Application Programming Model
1 -
SAP Datasphere
2 -
SAP S4HANA Cloud
1 -
SAP S4HANA Migration Cockpit
1 -
Technology Updates
6,873 -
Technology Updates
454 -
Workload Fluctuations
1
Related Content
- Exploring GraphQL and REST for SAP Developers in Technology Blogs by SAP
- 10+ ways to reshape your SAP landscape with SAP Business Technology Platform – Blog 4 in Technology Blogs by SAP
- Top Picks: Innovations Highlights from SAP Business Technology Platform (Q1/2024) in Technology Blogs by SAP
- SAP Sustainability Footprint Management: Q1-24 Updates & Highlights in Technology Blogs by SAP
- Unveiling Customer Needs: SAP Signavio Community supporting our customer`s adoption in Technology Blogs by SAP
Top kudoed authors
| User | Count |
|---|---|
| 24 | |
| 11 | |
| 8 | |
| 7 | |
| 7 | |
| 7 | |
| 6 | |
| 6 | |
| 6 | |
| 6 |