
- SAP Community
- Products and Technology
- Technology
- Technology Blogs by SAP
- SAP Build Work Zone: Integrate SAP S/4HANA Public ...
Technology Blogs by SAP
Learn how to extend and personalize SAP applications. Follow the SAP technology blog for insights into SAP BTP, ABAP, SAP Analytics Cloud, SAP HANA, and more.
Turn on suggestions
Auto-suggest helps you quickly narrow down your search results by suggesting possible matches as you type.
Showing results for
Advisor
Options
- Subscribe to RSS Feed
- Mark as New
- Mark as Read
- Bookmark
- Subscribe
- Printer Friendly Page
- Report Inappropriate Content
08-03-2023
3:50 AM
Introduction
There is no special introduction needed on how relevant it is to have a mobile application to expose SAP’s business content in a safe and secure environment using our smart phone.
In this blog, we would like to cover how the contents like roles, groups, apps etc. from an SAP S/4HANA public Cloud system can be federated into SAP Launchpad service on BTP and then further make it available for mobile users using SAP Mobile Start.
SAP Mobile Start is a native app that serves as the mobile entry point to SAP’s business applications and content, providing users with a consumer-grade experience.
Pre-requisites:
- SAP Business Technology Platform tenant with dedicated subaccount with Administrator role
- SAP Build Work Zone, standard edition subscription
- SAP Cloud Identity Services – Identity Authentication with Administrator role
- SAP S/4HANA Public Cloud with Administrator role.
1. Create a Sub Account and Enable SAP Build Work Zone
- In the SAP BTP cockpit, log on to your sub-account as administrator.
- Go to Services and choose Instances and Subscriptions.
- In the header bar, choose Create.
- Search for SAP Build Work Zone, standard edition.
- Choose the standard subscription plan.
- Save your entries.
In order to configure the SAP Build Work zone, you need the role Launchpad_Admin and this achieved by going into the Role Collection under Security.
2. Communication Arrangement in SAP S/4HANA Cloud
2.1 Create Communication System:
In the Host Name field, enter the host of SAP Build Work Zone, standard edition, that is, <subdomain of your subaccount>.launchpad.cfapps.<region>.hana.ondemand.com.

Fig1: HostName
2.2 Create a Communication User
Create the Users for Inbound and Outbound Communication.
- In the Users for Inbound Communication section choose Add
- You need to select the authentication method:Username and Password
- Provide a username (e.g. Subaccount name with the suffix _COM_0647, which is the related communication scenario for exposing the content)Press New User to create a new user and you will get redirected to the Communication User app
- The user for my inbound communication is LPD_EXPOSURE_USR and user for outbound Communication is set to None
2.3 Communication Arrangement for Exposing Content
Create new Communication Arrangement, select the communication scenario SAP_COM_0647. The arrangement name is prefilled with SAP_COM_0647. As suffix, add _LPD_EXPOSURE and I named it: SAP_COM_0647_LPD_EXPOSURE

Fig 2: Communication Arrangement
Protect against Clickjacking:
Add your SAP Build Work zone standard edition as trusted host to the allowlist.
- Open the app Maintain Protection Allowlist.
- Choose + to a new host.
- Add the trusted Host Name: <subdomain>.launchpad.cfapps.<region>.hana.ondemand.com
- Schema: HTTPS
- Port: 443
3. Runtime and Designtime Destinations in SAP BTP
- Destination for exposing the content: You define the location from which SAP Build Work Zone, standard edition fetches the exposed content.
- Destination for consuming the content: You define the location for fetching data for dynamic tiles.
- Destination (default) for consuming the content: You define the location for launching apps in an iFrame using a direct URL to the SAP S/4HANA Cloud UI host.
3.1 Destination for Exposing the content.
| Name | N5T_Starter_dt |
| Type | HTTP |
| Description | design-time connection |
| URL | https://<S/4HANACloudtenantID>-api.s4hana.ondemand.com/sap/bc/http/sap/aps_flp_content_exposure/entities |
| Proxy Type | Internet |
| Authentication | Basic Authentication |
| User | LPD_EXPOSURE_COM_0647_USER |
| Password | *************** |
Additional Properties
| HTML5.DynamicDestination | true |
| Use default JDK trust store | Checked |
3.2 Destination for consuming the content of the runtime tiles.
| Name | N5T_Starter_rt_tiles |
| Type | HTTP |
| Description | runtime tiles |
| URL | https://<SAP S/4HANA Cloud tenant ID>-api.s4hana.ondemand.com |
| Proxy Type | Internet |
| Authentication | SAML Assertion |
| Audience | https://<SAP S/4HANA Cloud tenant ID>.s4hana.ondemand.com |
| AuthnContextClassRef | urn:oasis:names:tc:SAML:2.0:ac:classes:PreviousSession |
Additional Properties
| HTML5.DynamicDestination | true |
| nameIdFormat | urn:oasis:names:tc:SAML:1.1:nameid-format:emailAddress |
| Use default JDK trust store | Checked |
3.3 Create destinations for consuming the content for launching in an iFrame.
| Name | N5T_Starter_rt_apps |
| Type | HTTP |
| Description | RunTimeApps |
| URL | https://<SAP S/4HANA Cloud tenant ID>-api.s4hana.ondemand.com |
| Proxy Type | Internet |
| Authentication | No Authentication |
Additional Properties
| HTML5.DynamicDestination | true |
| sap-platform | ABAP |
| Use default JDK trust store | Checked |
4. Downloading Files from BTP for Trust Establishment
4.1 Export the SAML Metadata of the Subaccount
- Login as Administrator in the SAP BTP Cockpit
- Go to Security -->Trust Configuration
- Download SAML Metadata
- Save the Metadata File while setting up Trust with Identity Authentication
4.2 Export the Trust Certificate of the Sub Account
- Login as administrator in SAP BTP Cockpit
- Go to Connectivity-->Destinations
- Download the Trust to export the file
- Save the Metadata File while setting up Trust with Identity Authentication
5. Setting Up Content Consumption
5.1 Create Communication System for consuming Content
This step is performed to establish trust with SAP BTP subaccount using necessary SAML2 Configurations.
Create a communication system and upload the SAML certificate downloaded from Trust Certificate of the Sub Account. Refer to step: 4.2

6. Set up Identity Management
Configure Identity Authentication tennant as a proxy to corporate Identity Provider(IdP) for the SAP BTP SubAccount.
a. Choose + Create to add an application Name from Application & Resources > Applications
b. Application Type choose SAP BTP solution -->Save
c. In the application you’ve created, choose SAML 2.0 configuration.
d. Browse the file exported from SAP BTP Cockpit. All fields are pre-filled -->Save
e. Under Subject Name Identifier, choose Basic Configuration and select the basic attribute E-Mail
f. Choose Email as the Default Name ID format.
g. Conditional Authentication: Choose Identity Authentication as default Identity provider.
h. Assertion Attribute: Groups
6.1 Create a User Group
Go to Users and Authorizations --> User Groups--> Create.
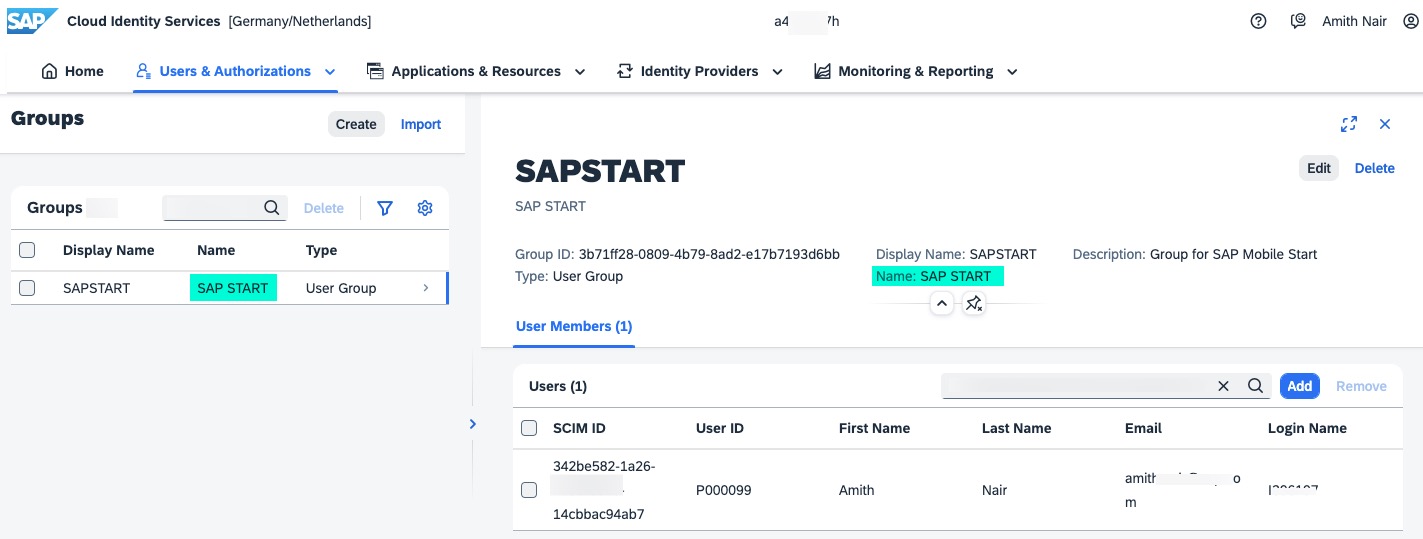
User Group
Please make a note of the Group Name.
6.2 Export SAML Metadata of Identity Authentication
- Access Identity Authentication Administration Console as Administrator
- Go to Application and Resource and Choose Tenant Settings
- Authentication--> Single Sign On --> SAML 2.0
- Download and save the file (say) Metadata_IAS
6.3 Set up Trust with Identity Authentication
Establish New Trust Configuration in BTP cockpit of your respective Sub Account.
- Go to Sub Account--> Security--> Trust Configuration
- New Trust Configuration--> Upload SAML 2.0 metadata file. Refer to step 6.2
7. Generate the Credentials for Notifications
7.1 Launch SAP Build Work Zone, standard edition from your subaccount
7.2 In the site Directory, choose + Create Site.
7.3 Enter a Site name of your choice. For e.g. SAP Start.
7.4 Click the cog wheel icon to display the Settings and navigate to Notifications

Settings
7.5 Go to Notification tab
7.6 Choose Generate to get the credentials required to configure Communication System(You can bookmark the URL to access SAP Build Work Zone, standard edition more quickly)
8. Setting up Notifications in SAP S/4HANA Cloud
8.1 Create Communication System using the credentials generated from Step 7.4

Comm.System_Notification
8.2 Create Communication Arrangement using the Comm.Scenario SAP_COM_0683. In the Outbound Services Outbound HTTP Service for Notifications Publish section, make sure that Path is set to /v2 and the Port is set to the 443 default value.
9. Define SAP S/4HANA Cloud System as the content provider
- Launch SAP Build Work Zone, standard edition from your sub-Account
- Navigate to Channel Manager and add new Content Provider

ChannelManager
Click on the pencil(Edit) button and enter the details as below which is consumed from the Destination created

ContentProvider
| Title | Refer to your S/4HANA System ID |
| ID | Automatically derived from Title |
| Design-Time Destination | Select the destination for exposing N5T_starter_dt |
| Runtime Destination | Select the destination for runtime apps |
| Runtime Destination for Dynamic Data | Select the destination for fetching data for dynamic tiles |
| Content Addition Mode | Automatic addition of all content Items |
10. Import Roles
10.1 Select Roles to Expose Content
- Open the app Maintain Business Roles app
- Select the roles you want to expose, for example, BR_Accountant role
- Choose Expose to SAP BTP--> Expose
The content is ready to be consumed by SAP Build Work Zone, standard edition.
Note: It takes ~2-3 minutes for the role to reflect in the site Editor.
Since we already created Site( refer Step 7.1 to 7.3), click the cog wheel icon to display the site Settings.

Site Directory
- Click ‘Edit’ button from header and use the + Assign icon to add roles that were included in the section Roles to Expose the Content in S4HANA Cloud

Site Editor
11. Role Collection Mapping in SAP BTP
11.1 In your SAP BTP Account, go to the respective Sub Account and navigate to Trust Configuration under Security Tab.
11.2 Click on the Custom Identity Provider created from step 6.3
11.3 Navigate to Role Collection Mappings
11.4 Click New Role Collection Mapping
11.5 Select the Role you have imported from Step 10
11.6: Select the attribute in this case: Groups from the step: 6(h)
11.7: Select the Value as Group Name from Step 6.1

Role Collection
12. Review the SAP Mobile Start application
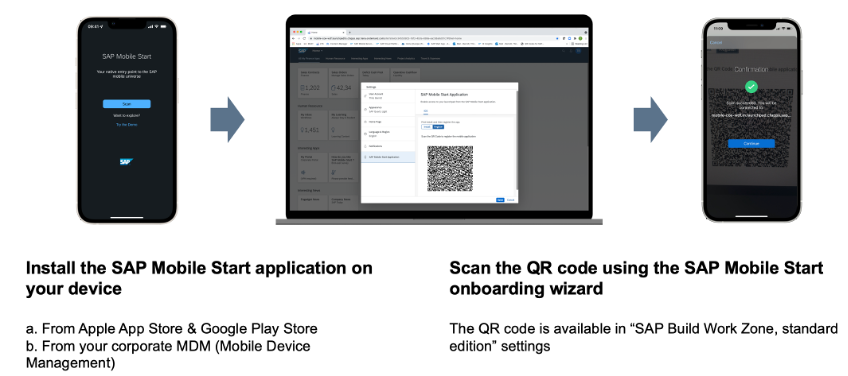
12.1 Install the app: SAP Start from the App store or Play store
12.2 Scan the QR Code from the site: Under User Profile --> Settings --> SAP Mobile Start Application. Register( not Install)

Scan the QR Code: Register
Demo: Receiving SAP S/4HANA Cloud Workflow Notifications
https://www.youtube.com/watch?v=R3_49jHjSuQ
Summary:
SAP Mobile Start puts people at the heart of business processes — anywhere and anytime.
- Monitor your Business from Phone Screen
- Discover Business Content at your fingerprints
- Stay up to date anywhere and anytime
- Explore all of your apps in one place
- Be Aware of Business Critical Situations
- Take Quick Action within App using Notification Service.
References
Integration Guide
Trust Configuration: Mapping
Learning Journey
SAP MobileStart: Intelligent Enterprise at your fingerprints
SAP MobileStart: Community Page
Voice Commands Using Siri Shortcuts (iOS Only)
Courtesy: dennis.koehler for offering his expertise in this topic.
Labels:
2 Comments
You must be a registered user to add a comment. If you've already registered, sign in. Otherwise, register and sign in.
Labels in this area
-
ABAP CDS Views - CDC (Change Data Capture)
2 -
AI
1 -
Analyze Workload Data
1 -
BTP
1 -
Business and IT Integration
2 -
Business application stu
1 -
Business Technology Platform
1 -
Business Trends
1,658 -
Business Trends
108 -
CAP
1 -
cf
1 -
Cloud Foundry
1 -
Confluent
1 -
Customer COE Basics and Fundamentals
1 -
Customer COE Latest and Greatest
3 -
Customer Data Browser app
1 -
Data Analysis Tool
1 -
data migration
1 -
data transfer
1 -
Datasphere
2 -
Event Information
1,400 -
Event Information
73 -
Expert
1 -
Expert Insights
177 -
Expert Insights
345 -
General
1 -
Google cloud
1 -
Google Next'24
1 -
GraphQL
1 -
Kafka
1 -
Life at SAP
780 -
Life at SAP
14 -
Migrate your Data App
1 -
MTA
1 -
Network Performance Analysis
1 -
NodeJS
1 -
PDF
1 -
POC
1 -
Product Updates
4,575 -
Product Updates
387 -
Replication Flow
1 -
REST API
1 -
RisewithSAP
1 -
SAP BTP
1 -
SAP BTP Cloud Foundry
1 -
SAP Cloud ALM
1 -
SAP Cloud Application Programming Model
1 -
SAP Datasphere
2 -
SAP S4HANA Cloud
1 -
SAP S4HANA Migration Cockpit
1 -
Technology Updates
6,871 -
Technology Updates
478 -
Workload Fluctuations
1
Related Content
- Automated check for SAP HANA Cloud availability with SAP Automation Pilot in Technology Blogs by SAP
- Tracking HANA Machine Learning experiments with MLflow: A technical Deep Dive in Technology Blogs by SAP
- Streamlining User Provisioning from IBM Verify to SAP Cloud Identity Services in Technology Blogs by Members
- Digital Twins of an Organization: why worth it and why now in Technology Blogs by SAP
- SAP BTP FAQs - Part 1 (General Topics in SAP BTP) in Technology Blogs by SAP
Top kudoed authors
| User | Count |
|---|---|
| 17 | |
| 15 | |
| 13 | |
| 11 | |
| 9 | |
| 8 | |
| 8 | |
| 7 | |
| 7 | |
| 7 |