
- SAP Community
- Products and Technology
- Technology
- Technology Blogs by SAP
- The fastest and easiest way to run full-stack appl...
Technology Blogs by SAP
Learn how to extend and personalize SAP applications. Follow the SAP technology blog for insights into SAP BTP, ABAP, SAP Analytics Cloud, SAP HANA, and more.
Turn on suggestions
Auto-suggest helps you quickly narrow down your search results by suggesting possible matches as you type.
Showing results for
Employee
Options
- Subscribe to RSS Feed
- Mark as New
- Mark as Read
- Bookmark
- Subscribe
- Printer Friendly Page
- Report Inappropriate Content
08-02-2023
12:24 PM
Debugging and testing your application can be complicated. It can be rather easy to test it locally and with mock-ups, but when you want to take it to the next level and test it with live data, remote services, or customize some defaults, it gets much harder.
To improve the run experience and the developer’s productivity, SAP Business Application Studio introduced the Run Configurations tool. It provides the option to test the application with different configurations that are quick and easy to set and save the developer tedious manual steps.
The tool uses the VS Code launch configuration concept, so each run configuration is de facto a launch configuration. It provides different options to run the application without changing the application itself.
In this blog, I’ll give an overview on running a full-stack application created in the ‘Full-Stack Application Using Productivity Tools’ dev space.
The full-stack application is a CAP application with an SAP Fiori/MDK UI, and the different run options the tool provides are based on the capabilities of these technologies.
To create a new run configuration, you first need to open the Run Configurations View from the activity bar. Then, create a new run configuration from the + button on the Run Configurations View, and select the option that shows your application name and PT in brackets (indicating your application is of type ‘productivity tools’).
When you create a new run configuration, it will be created with the following defaults:
Let’s review the different run configuration options:
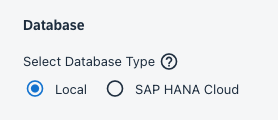
You can run your application with either a local database (SQLite in-memory database) or with an instance of SAP HANA Cloud.
If you select to run with SAP HANA Cloud, you’ll need to select an instance from the list of available instances. Your application will then be bound to this instance, (You need to be logged on to a specific CF space to see the list). If you don’t have an instance, check out the documentation to see how to easily create one using the Cloud Foundry Tools.
Any time you change your application schema, you must select the ‘Deploy data model to the SAP HANA instance before running’ checkbox.
You can run your application with different authentication strategies.
If you choose the dummy authentication, the application user automatically passes all authorization checks, thus disabling all user authorization checks.
If you choose the ‘XSUAA’ option, then the application authorization will be handled by the XSUAA service using a bound service instance.
The run configuration will either provision a new instance of the XSUAA service for you when you create a new configuration, or it will prompt you to create a new instance when you edit a configuration. In both cases, the instance that is created is unique for your application. If the expected instance was already created by a previous run configuration, or by another colleague working on the same application, then it will be reused. (You need to be logged on to a specific CF space to generate a new service or check for an existing service).
If you check the ‘Update the XSUAA instance with the application roles before running’, each time you run the application, the security data will be deployed to the XSUAA service instance. Since this action takes time, I would recommend checking it only when you make changes in your application security data (i.e. roles).
Another important thing to point out, is that, to run with XSUAA, the application uses the approuter. The approuter component implements the necessary authentication flow with XSUAA.
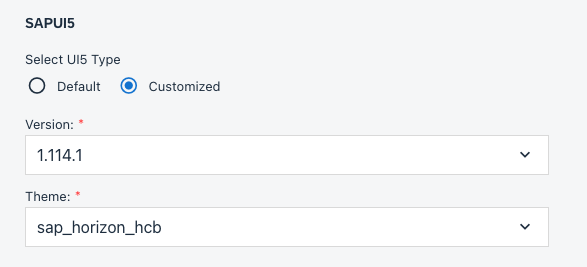
You can choose the SAPUI5 version and theme with which you want to test your application with. The default selection is compatible with the version defined when the project is generated.
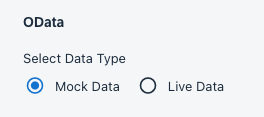
If your application consumes external OData services, you can choose to either run it with mock or live data.
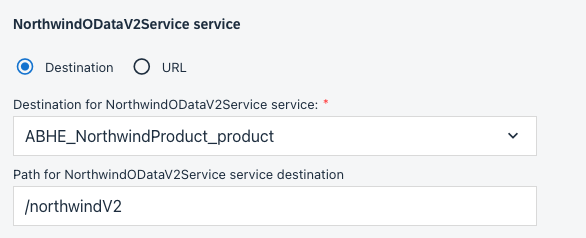
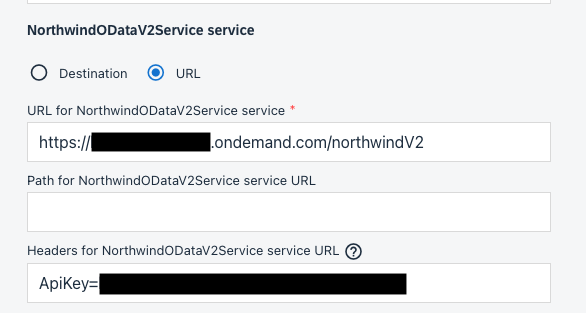
If you choose live data, for each OData service, you must specify the target configuration that refers to the external OData service:
Now, let’s dive a little deeper to understand how the run configuration works:
I hope this blog was helpful and that you are as excited as I am with these new capabilities, and eager to try them out.
To get more information about SAP Business Application Studio, check out our documentation.
Looking forward to your feedback. Feel free to add your comments below or send us ideas.
Happy coding 🙂
To improve the run experience and the developer’s productivity, SAP Business Application Studio introduced the Run Configurations tool. It provides the option to test the application with different configurations that are quick and easy to set and save the developer tedious manual steps.
The tool uses the VS Code launch configuration concept, so each run configuration is de facto a launch configuration. It provides different options to run the application without changing the application itself.
In this blog, I’ll give an overview on running a full-stack application created in the ‘Full-Stack Application Using Productivity Tools’ dev space.
The full-stack application is a CAP application with an SAP Fiori/MDK UI, and the different run options the tool provides are based on the capabilities of these technologies.
To create a new run configuration, you first need to open the Run Configurations View from the activity bar. Then, create a new run configuration from the + button on the Run Configurations View, and select the option that shows your application name and PT in brackets (indicating your application is of type ‘productivity tools’).
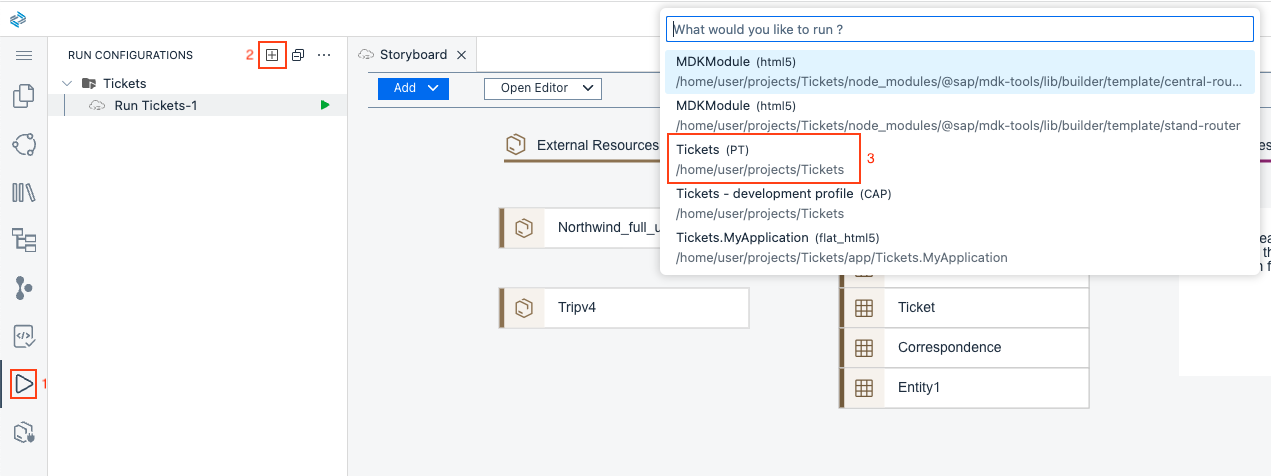
Creating a new run configuration.
When you create a new run configuration, it will be created with the following defaults:
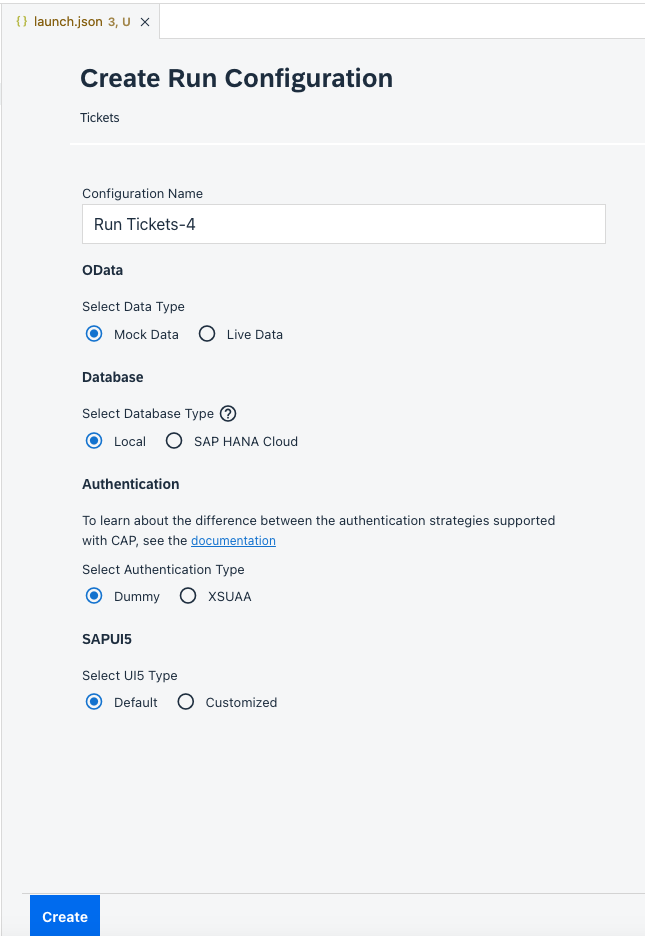
Default run configuration.
Let’s review the different run configuration options:
Database
You can run your application with either a local database (SQLite in-memory database) or with an instance of SAP HANA Cloud.
If you select to run with SAP HANA Cloud, you’ll need to select an instance from the list of available instances. Your application will then be bound to this instance, (You need to be logged on to a specific CF space to see the list). If you don’t have an instance, check out the documentation to see how to easily create one using the Cloud Foundry Tools.
Any time you change your application schema, you must select the ‘Deploy data model to the SAP HANA instance before running’ checkbox.

Authentication
You can run your application with different authentication strategies.

If you choose the dummy authentication, the application user automatically passes all authorization checks, thus disabling all user authorization checks.
If you choose the ‘XSUAA’ option, then the application authorization will be handled by the XSUAA service using a bound service instance.
The run configuration will either provision a new instance of the XSUAA service for you when you create a new configuration, or it will prompt you to create a new instance when you edit a configuration. In both cases, the instance that is created is unique for your application. If the expected instance was already created by a previous run configuration, or by another colleague working on the same application, then it will be reused. (You need to be logged on to a specific CF space to generate a new service or check for an existing service).
If you check the ‘Update the XSUAA instance with the application roles before running’, each time you run the application, the security data will be deployed to the XSUAA service instance. Since this action takes time, I would recommend checking it only when you make changes in your application security data (i.e. roles).
Another important thing to point out, is that, to run with XSUAA, the application uses the approuter. The approuter component implements the necessary authentication flow with XSUAA.

SAPUI5
You can choose the SAPUI5 version and theme with which you want to test your application with. The default selection is compatible with the version defined when the project is generated.
OData
If your application consumes external OData services, you can choose to either run it with mock or live data.
If you choose live data, for each OData service, you must specify the target configuration that refers to the external OData service:
- BTP destination name and an optional path to the service endpoint
- Endpoint URL, optional path, and optional headers
Now, let’s dive a little deeper to understand how the run configuration works:
- As I mentioned in the beginning, the Run Configuration tool uses the VS Code launch configuration concept.
When you create a new run configuration, a new launch configuration is created and a corresponding .env file is created with it. (If you have several files, they will be called .env1, .env2, and so on.) The .env file is read and injected to the command when it is executed. - When you run the run configuration, you actually run the launch configuration. The launch configuration runs the app using the ‘cds watch’ command.
- Before launching the application, a prelaunch task and its depending tasks are executed. It runs npm install, builds the MDK project, and generates a launchpad page.
- To support the default run configuration values, the default .env file contains a definition for the dummy authentication strategy.
- Whenever the run configuration is bound to a BTP service instance, its credentials are saved in the corresponding .env file.
- Additional tasks are created in the 'tasks.json' file to support other possible configurations, such as deploying the application’s schema. By the way, you can view all the tasks that are created in the 'tasks.json' file and also run them independently using the command Terminal-> Run Task.
- When you select a customized SAPUI5 version and/or theme, the customized value is passed to the task that generates the launchpad page used for the local run.
- When you select to run with live data, the target information for each OData service is added to the .env file.
I hope this blog was helpful and that you are as excited as I am with these new capabilities, and eager to try them out.
To get more information about SAP Business Application Studio, check out our documentation.
Looking forward to your feedback. Feel free to add your comments below or send us ideas.
Happy coding 🙂
- SAP Managed Tags:
- SAP Business Application Studio,
- SAP Cloud Application Programming Model
Labels:
1 Comment
You must be a registered user to add a comment. If you've already registered, sign in. Otherwise, register and sign in.
Labels in this area
-
ABAP CDS Views - CDC (Change Data Capture)
2 -
AI
1 -
Analyze Workload Data
1 -
BTP
1 -
Business and IT Integration
2 -
Business application stu
1 -
Business Technology Platform
1 -
Business Trends
1,658 -
Business Trends
93 -
CAP
1 -
cf
1 -
Cloud Foundry
1 -
Confluent
1 -
Customer COE Basics and Fundamentals
1 -
Customer COE Latest and Greatest
3 -
Customer Data Browser app
1 -
Data Analysis Tool
1 -
data migration
1 -
data transfer
1 -
Datasphere
2 -
Event Information
1,400 -
Event Information
67 -
Expert
1 -
Expert Insights
177 -
Expert Insights
301 -
General
1 -
Google cloud
1 -
Google Next'24
1 -
GraphQL
1 -
Kafka
1 -
Life at SAP
780 -
Life at SAP
13 -
Migrate your Data App
1 -
MTA
1 -
Network Performance Analysis
1 -
NodeJS
1 -
PDF
1 -
POC
1 -
Product Updates
4,577 -
Product Updates
346 -
Replication Flow
1 -
REST API
1 -
RisewithSAP
1 -
SAP BTP
1 -
SAP BTP Cloud Foundry
1 -
SAP Cloud ALM
1 -
SAP Cloud Application Programming Model
1 -
SAP Datasphere
2 -
SAP S4HANA Cloud
1 -
SAP S4HANA Migration Cockpit
1 -
Technology Updates
6,873 -
Technology Updates
430 -
Workload Fluctuations
1
Related Content
- Sapphire 2024 user experience and application development sessions in Technology Blogs by SAP
- Exploring GraphQL and REST for SAP Developers in Technology Blogs by SAP
- Deployment of Seamless M4T v2 models on SAP AI Core in Technology Blogs by SAP
- Integrating Smart contracts with SAPUI5 in Technology Blogs by Members
- For application 'Training': Routes cannot be mapped to destinations in different spaces in Technology Q&A
Top kudoed authors
| User | Count |
|---|---|
| 28 | |
| 17 | |
| 15 | |
| 13 | |
| 11 | |
| 9 | |
| 8 | |
| 8 | |
| 8 | |
| 7 |