
- SAP Community
- Products and Technology
- Technology
- Technology Blogs by SAP
- Use SAP Cloud Platform Mobile Cards with SAP Cloud...
Technology Blogs by SAP
Learn how to extend and personalize SAP applications. Follow the SAP technology blog for insights into SAP BTP, ABAP, SAP Analytics Cloud, SAP HANA, and more.
Turn on suggestions
Auto-suggest helps you quickly narrow down your search results by suggesting possible matches as you type.
Showing results for
Product and Topic Expert
Options
- Subscribe to RSS Feed
- Mark as New
- Mark as Read
- Bookmark
- Subscribe
- Printer Friendly Page
- Report Inappropriate Content
09-16-2019
10:50 PM
One of the things I like about SAP Cloud Platform Mobile Cards is its simplicity and its ability to quickly and easily enable many different scenario's to be used on your mobile device. Also, it's ability to do this against multiple back-end services all while keeping it in a single application on your device.
SAP Cloud Platform Workflow has the same approach to simplicity and multiple back-ends where it presents your workflows in a single inbox.
SAP Cloud Platform Workflow lets you build, run, and manage workflows, from simple approvals to end-to-end processes that span across organizations and apps. With an inbox app and custom-built UIs, you involve end users into business processes for decision making and data entry. The service comes with web-based tools for workflow modeling, APIs for consumption in custom apps, monitoring tools, and Fiori-based apps for end-user access. You can use JavaScript to embed custom business logic.
It's only natural that given some of the similarities of these solutions they should work together, so that's what I'm going to show. I'll show how you can quickly take a workflow and have that workflow show in mobile cards.

Before we go into setting up so you can get workflows in mobile cards, let me give you a bit of an overview.
Mobile Cards has always had the ability to automatically create cards based on Fiori Overview Cards. When you create a destination in Mobile Services that points to your Fiori Launchpad, you can use the plugin in Launchpad to send an overview card to Mobile Cards and a card will be auto-generated for your mobile device. It may look similar to this.

Similarly, Mobile Cards provides a template where you can deliver the items that are part of Inbox. This is often used for things like Purchase Order Approval.

With SAP Cloud Platform Workflow, Mobile Cards is doing something similar as the above. When you create a Workflow that uses Forms for the UI, Mobile Cards will read from the same oData services that your Fiori Launchpad uses where you have enabled Inbox for Workflows. Mobile Cards will create the card and deliver it to the device that is registered and subscribed to the Workflow card. It will be aware of the decision steps you may create and you will have the ability to send the decisions back as an Action like Approve and Reject.
Getting this going is pretty simple. I'm not going to go through how to create a Workflow, but for the example in this blog I'll be going off of the following tutorial. Once you have this working all you need to do is map your destination and create the workflow card.
In Mobile Services create a Mobile Destination that is mapped to your Fiori Launchpad and name it Workflow. This is the same Launchpad you would have used in the following tutorial when creating the workflow. When you create the destination the URL will need to be similar to the below, making sure you add the /sap/fiori/bpmmyinbox to the URL.
https://flpportal-xxxxxx0trial.dispatcher.hanatrial.ondemand.com/sap/fiori/bpmmyinbox

One the destination is created make sure to add it to the Connectivity Feature for Mobile Cards.


Now, create the card in WebIDE. The workflow card doesn't have any UI that other cards have, but you need to generate the metadata.json file. In your WebIDE, make sure you have the Mobile Services App and Development Tools enabled.

Start a new project from template

Change the Category to Mobile Services and highlight Mobile Cards Kit Micro App and select Next

Name it Workflow or similar

Make sure to select "Create Blank Card" and select Next

Now that you have the Workflow Mobile Cards project created, the only thing we actually need is the metadata.json file. Go ahead and delete the template_en.html and userdata.json

We are going to replace the data that is in metadata.json. Right click on metadata.json and Open Code Editor

Replace the code with the following code. If you didn't name your destination Workflow, change the connection name. Otherwise you should be able to leave all else as is.
Make sure to save the file and then right click on your project and select Deploy->Deploy Card to Mobile Services. Follow the prompts to deploy to your cloud platform.

You can go to your Mobile Services Admin and should see the new card deployed called Workflow. Make sure to select the check under Actions and set it as Productive.

On your device, subscribe to the Workflow card. Any Workflows that are in your Inbox should now be in your Mobile Cards app. You will be able to use the action button in the bottom left corner to Approve or Reject based on the decisions you defined in the workflow form.


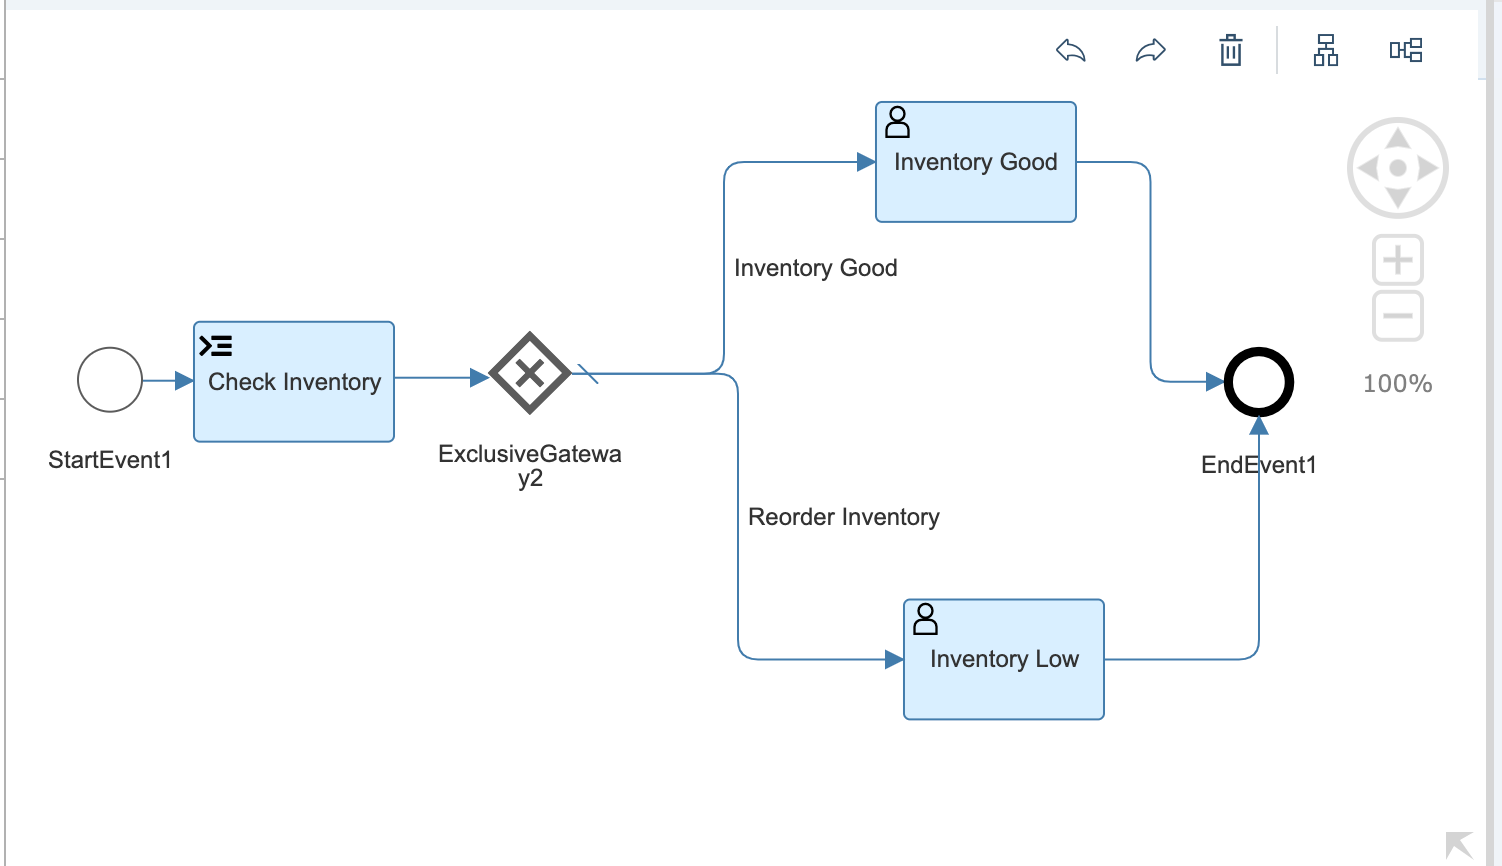
Let's do one more thing to show the use case a little bit more. Let's modify the workflow to check the inventory of the book. If the inventory is greater than 20 we will leave it. If it's less we can change the decision to reorder instead of Approve and Reject. This only requires a change in the workflow and not in Mobile Cards.
Add a Script Task that checks the inventory. If the inventory is greater than 20 return true.
First put the Script Task after the Start Event and then change the name to Check Inventory. Select Create File and name the file however you like.

Add the following to the JS file
$.context.inventorycheck = $.context.inventory > 20;

Add a new User Task to the flow the same way you created the first user task in the tutorial. Instead of listing the product and price, show the the product and inventory for the fields. The context path for the Inventory field will be ${context.inventory}

You can create a positive and negative decision if you'd like, in my case I just created a Neutral decision.

Add an Exclusive Gateway to the flow after the Check Inventory Script Task. Select the top SequenceFlow and change the name. Also mark this flow as the Default.

Select the bottom SequenceFlow and name it Reorder Inventory. Set the condition to
${context.inventorycheck == false}
This makes it so that if the inventory is less than 20 follow this flow.

Make sure to connect your User Task for Inventory Low to the End Event to complete the Workflow

Your final Workflow should look similar.
Make sure to save everything and deploy both the new form and the workflow. When you start a new instance in the Workflow Monitor start one with inventory more than 20 and one with inventory less than 20.

You should see two items in the Inbox. The low inventory will have a field for Inventory instead of price and the decision will be set to Reorder.

Now refresh Mobile Cards and you should see two new cards. You'll see one as you did before with the price and the option to Approve and Reject. The other one will be the Workflow with low inventory and you'll be able to Reorder


Workflows can be more advanced of course, but as you can see the simplicity of both Workflows and Mobile Cards work well together.
SAP Cloud Platform Workflow has the same approach to simplicity and multiple back-ends where it presents your workflows in a single inbox.
SAP Cloud Platform Workflow lets you build, run, and manage workflows, from simple approvals to end-to-end processes that span across organizations and apps. With an inbox app and custom-built UIs, you involve end users into business processes for decision making and data entry. The service comes with web-based tools for workflow modeling, APIs for consumption in custom apps, monitoring tools, and Fiori-based apps for end-user access. You can use JavaScript to embed custom business logic.
It's only natural that given some of the similarities of these solutions they should work together, so that's what I'm going to show. I'll show how you can quickly take a workflow and have that workflow show in mobile cards.
Before we go into setting up so you can get workflows in mobile cards, let me give you a bit of an overview.
Mobile Cards has always had the ability to automatically create cards based on Fiori Overview Cards. When you create a destination in Mobile Services that points to your Fiori Launchpad, you can use the plugin in Launchpad to send an overview card to Mobile Cards and a card will be auto-generated for your mobile device. It may look similar to this.
Similarly, Mobile Cards provides a template where you can deliver the items that are part of Inbox. This is often used for things like Purchase Order Approval.
With SAP Cloud Platform Workflow, Mobile Cards is doing something similar as the above. When you create a Workflow that uses Forms for the UI, Mobile Cards will read from the same oData services that your Fiori Launchpad uses where you have enabled Inbox for Workflows. Mobile Cards will create the card and deliver it to the device that is registered and subscribed to the Workflow card. It will be aware of the decision steps you may create and you will have the ability to send the decisions back as an Action like Approve and Reject.
Getting this going is pretty simple. I'm not going to go through how to create a Workflow, but for the example in this blog I'll be going off of the following tutorial. Once you have this working all you need to do is map your destination and create the workflow card.
In Mobile Services create a Mobile Destination that is mapped to your Fiori Launchpad and name it Workflow. This is the same Launchpad you would have used in the following tutorial when creating the workflow. When you create the destination the URL will need to be similar to the below, making sure you add the /sap/fiori/bpmmyinbox to the URL.
https://flpportal-xxxxxx0trial.dispatcher.hanatrial.ondemand.com/sap/fiori/bpmmyinbox
One the destination is created make sure to add it to the Connectivity Feature for Mobile Cards.
Now, create the card in WebIDE. The workflow card doesn't have any UI that other cards have, but you need to generate the metadata.json file. In your WebIDE, make sure you have the Mobile Services App and Development Tools enabled.
Start a new project from template
Change the Category to Mobile Services and highlight Mobile Cards Kit Micro App and select Next
Name it Workflow or similar
Make sure to select "Create Blank Card" and select Next
Now that you have the Workflow Mobile Cards project created, the only thing we actually need is the metadata.json file. Go ahead and delete the template_en.html and userdata.json
We are going to replace the data that is in metadata.json. Right click on metadata.json and Open Code Editor
Replace the code with the following code. If you didn't name your destination Workflow, change the connection name. Otherwise you should be able to leave all else as is.
{

    "APNSEnabled": true,

    "ActionConfiguration": {

        "Actions": [{

            "ActionBody": "{\"status\": \"COMPLETED\", \"decision\": \"${decision}\", \"context\": ${context}}",

            "ActionHeaders": [{

                "HeaderName": "X-Requested-With",

                "HeaderValue": "XMLHttpRequest"

            }],

            "ActionName": "ACTION",

            "ActionParameters": [{

                "isKey": false,

                "maxLength": 255,

                "name": "context",

                "nullable": false,

                "type": "Edm.String"

            }, {

                "isKey": false,

                "maxLength": 255,

                "name": "decision",

                "nullable": false,

                "type": "Edm.String"

            }],

            "ActionUrl": "/html5apps/bpmformplayer/bpmworkflowruntime/rest/v1/task-instances/${ID2}",

            "HttpMethod": "PATCH",

            "Labels": [{

                "language": "EN",

                "text": "ACTION"

            }]

        }],

        "BehaviorAfterAction": "ACTIVE",

        "Category": "ACTION",

        "XCSRFTokenUrl": "/html5apps/bpmformplayer/bpmworkflowruntime/rest/v1/xsrf-token"

    },

    "AppLaunchUrl": null,

    "AutoSubscribe": false,

    "CardClass": "HtmlTemplate",

    "CardRenderer": "WorkflowForm",

    "CollectionType": "useCollection",

    "Connection": "Workflow",

    "CustomType": "Query",

    "Descriptions": [{

        "language": "EN",

        "text": "My Workflow"

    }],

    "DevelopmentStatus": "Productive",

    "FormRenderer": "WorkflowForm",

    "GatekeeperConfiguration": null,

    "GroupName": "",

    "HiddenSubscription": false,

    "LastModifiedAt": "",

    "LastModifiedBy": "",

    "Locked": false,

    "Name": "Workflow",

    "NewsEnabled": false,

    "NotificationMessages": null,

    "NotificationRules": [],

    "Parameters": {

        "Parameters": []

    },

    "QueryConfiguration": {

        "CacheQueryResult": false,

        "QueryEntityKeyPaths": [

            "$.d.__metadata.uri"

        ],

        "QueryURLCollectionRoot": "$.d.results"

    },

    "QueryReturnsEntityCollection": true,

    "QueryURL": "/bpmworkflowruntime/odata/v1/tcm/TaskCollection?$skip=0&$top=1000&$orderby=CreatedOn%20desc&$filter=(Status%20eq%20%27READY%27%20or%20Status%20eq%20%27RESERVED%27%20or%20Status%20eq%20%27IN_PROGRESS%27%20or%20Status%20eq%20%27EXECUTED%27)&$select=SAP__Origin%2cInstanceID%2cTaskDefinitionID%2cTaskDefinitionName%2cTaskTitle%2cCreatedByName%2cCreatedBy%2cCompletionDeadLine%2cSubstitutedUserName%2cStatus%2cPriority%2cPriorityNumber%2cHasComments%2cHasAttachments%2cHasPotentialOwners%2cCreatedOn%2cTaskSupports%2cSupportsClaim%2cSupportsRelease%2cSupportsForward%2cSupportsComments%2cSupportsAttachments%2cGUI_Link%2cCustomAttributeData&$inlinecount=allpages",

    "ResourceIdentifiers": [{

        "ImagePaths": "",

        "Order": 0,

        "Uri": ""

    }, {

        "ImagePaths": null,

        "Order": 1,

        "Shared": false,

        "Uri": "/html5apps/bpmformplayer/bpmworkflowruntime/rest/v1/task-instances/${ID2}/context"

    }, {

        "ImagePaths": null,

        "Order": 2,

        "Shared": false,

        "Uri": "/html5apps/bpmformplayer/bpmworkflowruntime/rest/internal/v1/task-instances/${ID2}/form/model"

    }],

    "RouteName": "TargetView1",

    "SortCardsWith": null,

    "SubscribableTo": {

        "Users": []

    },

    "TemplateName": "User defined template",

    "UrlMatch": null,

    "changedNotification": "",

    "newNotification": ""

}
Make sure to save the file and then right click on your project and select Deploy->Deploy Card to Mobile Services. Follow the prompts to deploy to your cloud platform.
You can go to your Mobile Services Admin and should see the new card deployed called Workflow. Make sure to select the check under Actions and set it as Productive.
On your device, subscribe to the Workflow card. Any Workflows that are in your Inbox should now be in your Mobile Cards app. You will be able to use the action button in the bottom left corner to Approve or Reject based on the decisions you defined in the workflow form.
Let's do one more thing to show the use case a little bit more. Let's modify the workflow to check the inventory of the book. If the inventory is greater than 20 we will leave it. If it's less we can change the decision to reorder instead of Approve and Reject. This only requires a change in the workflow and not in Mobile Cards.
Add a Script Task that checks the inventory. If the inventory is greater than 20 return true.
First put the Script Task after the Start Event and then change the name to Check Inventory. Select Create File and name the file however you like.
Add the following to the JS file
$.context.inventorycheck = $.context.inventory > 20;
Add a new User Task to the flow the same way you created the first user task in the tutorial. Instead of listing the product and price, show the the product and inventory for the fields. The context path for the Inventory field will be ${context.inventory}
You can create a positive and negative decision if you'd like, in my case I just created a Neutral decision.
Add an Exclusive Gateway to the flow after the Check Inventory Script Task. Select the top SequenceFlow and change the name. Also mark this flow as the Default.
Select the bottom SequenceFlow and name it Reorder Inventory. Set the condition to
${context.inventorycheck == false}
This makes it so that if the inventory is less than 20 follow this flow.
Make sure to connect your User Task for Inventory Low to the End Event to complete the Workflow
Your final Workflow should look similar.
Make sure to save everything and deploy both the new form and the workflow. When you start a new instance in the Workflow Monitor start one with inventory more than 20 and one with inventory less than 20.
You should see two items in the Inbox. The low inventory will have a field for Inventory instead of price and the decision will be set to Reorder.
Now refresh Mobile Cards and you should see two new cards. You'll see one as you did before with the price and the option to Approve and Reject. The other one will be the Workflow with low inventory and you'll be able to Reorder
Workflows can be more advanced of course, but as you can see the simplicity of both Workflows and Mobile Cards work well together.
- SAP Managed Tags:
- SAP Mobile Services,
- SAP Mobile Cards,
- SAP Workflow Management, workflow capability,
- Mobile
Labels:
21 Comments
You must be a registered user to add a comment. If you've already registered, sign in. Otherwise, register and sign in.
Labels in this area
-
ABAP CDS Views - CDC (Change Data Capture)
2 -
AI
1 -
Analyze Workload Data
1 -
BTP
1 -
Business and IT Integration
2 -
Business application stu
1 -
Business Technology Platform
1 -
Business Trends
1,658 -
Business Trends
105 -
CAP
1 -
cf
1 -
Cloud Foundry
1 -
Confluent
1 -
Customer COE Basics and Fundamentals
1 -
Customer COE Latest and Greatest
3 -
Customer Data Browser app
1 -
Data Analysis Tool
1 -
data migration
1 -
data transfer
1 -
Datasphere
2 -
Event Information
1,400 -
Event Information
70 -
Expert
1 -
Expert Insights
177 -
Expert Insights
336 -
General
1 -
Google cloud
1 -
Google Next'24
1 -
GraphQL
1 -
Kafka
1 -
Life at SAP
780 -
Life at SAP
14 -
Migrate your Data App
1 -
MTA
1 -
Network Performance Analysis
1 -
NodeJS
1 -
PDF
1 -
POC
1 -
Product Updates
4,575 -
Product Updates
378 -
Replication Flow
1 -
REST API
1 -
RisewithSAP
1 -
SAP BTP
1 -
SAP BTP Cloud Foundry
1 -
SAP Cloud ALM
1 -
SAP Cloud Application Programming Model
1 -
SAP Datasphere
2 -
SAP S4HANA Cloud
1 -
SAP S4HANA Migration Cockpit
1 -
Technology Updates
6,872 -
Technology Updates
468 -
Workload Fluctuations
1
Related Content
- Tracking HANA Machine Learning experiments with MLflow: A conceptual guide for MLOps in Technology Blogs by SAP
- Celebrating The League Of Storytellers in Technology Blogs by SAP
- How to troubleshoot BusinessObjects Business Intelligence Platform server/service issues in Technology Blogs by SAP
- Unveiling SAP Analytics Cloud Performance Analysis Insights for Optimal Performance in Technology Blogs by Members
- Syniti RDG provides an effortless way to create Data Model extension. in Technology Q&A
Top kudoed authors
| User | Count |
|---|---|
| 18 | |
| 12 | |
| 11 | |
| 8 | |
| 7 | |
| 6 | |
| 6 | |
| 6 | |
| 6 | |
| 6 |