
- SAP Community
- Products and Technology
- Technology
- Technology Blogs by SAP
- Using BTP Authentication and Destinations with SAP...
Technology Blogs by SAP
Learn how to extend and personalize SAP applications. Follow the SAP technology blog for insights into SAP BTP, ABAP, SAP Analytics Cloud, SAP HANA, and more.
Turn on suggestions
Auto-suggest helps you quickly narrow down your search results by suggesting possible matches as you type.
Showing results for
Product and Topic Expert
Options
- Subscribe to RSS Feed
- Mark as New
- Mark as Read
- Bookmark
- Subscribe
- Printer Friendly Page
- Report Inappropriate Content
07-01-2022
10:19 PM
Motivation
Maybe some of you experienced that it was not very easy to access SAP data sources with SAP Build Apps (formerly SAP AppGyver) because of some CORS issues (Cross-origin resource sharing (CORS) protects your backend by allowing only the allowed domains to access your system).
Additionally, weren’t you also looking for an easy built-in authentication for your app?
Then you should read this blog. I am going to show you, how you can enable the new SAP BTP authentication feature in AppGyver and also how to use BTP destinations as data sources for your app:
Update 27.07.2022 - I also added guide how to deploy the app to BTP
Prerequisites:
Getting Started
We are accessing the Low Code / No Code (LCNC) entry point called ‘Lobby’ on the BTP account to create a new AppGyver project by clicking the Create button and select Build an Application and afterwards Web & Mobile Application.
Now the new project is created. To consume BTP destinations in SAP Build Apps, we go directly to the AUTH tab at the top of the UI and click on Enable Authentication.
And now select SAP BTP authentication.
Confirm with OK.
SAP BTP Authentication is now enabled. What does that mean:
An additional page is added to your SAP Build APpsproject, which will be automatically opened if a user opens your app. This page checks the credentials of this user coming from the SAP BTP account. After a successful logon the initial screen will be closed automatically. You don’t have to do anything further on this page. Currently, only web apps are supported by the SAP BTP authentication. Mobile apps will be coming soon.
Now we have authenticated BTP and can use BTP destinations as data sources. Of course, you need the necessary rights to access destinations. These rights can be typically provided by an IT administrator. Additionally, the destinations needs the property HTML5.DynamicDestination=true and WebIDEEnabled=true. If this property is missing, you will receive the following error message:
If you have the necessary rights and the destination is configured correctly, the data can now be accessed by clicking on the DATA tab and selecting ADD INTEGRATION
Select BTP Destinations
Now a list of all your destinations from your subaccount should appear. You can also use the search field to find the destination of your choice.
Select the destination you want to use. Now you will get an overview of all data entities on the left side of this destination. On the right-hand side, you will see all capabilities and fields of this specific data entity.
We are going to install the data source by clicking INSTALL INTEGRATION.
Let’s have a look on the data from on entity. In my example I use the email addresses of the business partners coming from a S/4 HANA Cloud system. We will use the Data Browser to preview the data.
This will show us a preview of the data and if we really want to use it in our app.
The data seems to be right for our app, so we will enable this data entity by clicking ENABLE DATA ENTITY.
That’s it! Now we can use the Business Partner Data in our App.
To display the data we will use the component “scrollable basic list” from the component market. There close the data tab and search in the component market for the list.
Install the new component by clicking INSTALL.
Now drag & drop the component into the UI.
Last thing we have to do is to bind the data from the BTP destination to the component. Click on Configure on the properties page.
And select the data resource.
Now drag & drop the fields you want to use in the basic list. Afterwards click Save & Exit. We have connected our data to the basic list.
That’s it. Now you can preview your app. Click on the LAUNCH tab and preview the app on the web preview portal.
Update 27.07.2022 Deploy the AppyGver App to BTP
In the Launch Tab go to DISTRIBUTE and open the Build Service
Now you have to configure the web app.
Select any AppGyver Hosted Domain and select build scheme "MTAR" during the configuration.
After you have finished the configuration, press the BUILD button
Select File Type MTAR, define a version like 1.0.0. and press the build button.
After 10-30 minutes your MTAR should be available for download. Press the download button.
Now go back to the lobby and create an empty Business Application Studio Project. Choose a name of your choice. The initial set up of the BAS project can take some minutes.
Now just enable the explorer.
And drag&drop your AppGyver mtar to the project.
Open a new terminal

Run the command "cf login" and log in you Cloud Foundry space.
Afterwards just run the command "cf deploy yourmtar.mtar".
Conclusion
With the new BTP Authentication and Destination support in SAP Build Apps, we have an easy way to create a secured app which can consume data from any SAP systems with a few clicks. Additionally with these features we can use it as a great governance feature that IT administrators can control which data sources (destinations) are available for the citizen developers.
You can also find the whole setup process in this video:
Do you want to learn more:
Find out how to build software applications, side-by-side extensions, and integrations from and to cloud applications by exploring SAP’s free learning content on SAP BTP. It is made for both integration designers and extension developers from all levels of expertise and will help you stay up to date with the latest SAP BTP innovations. Check out even more role-based learning resources and opportunities to get certified in one place on SAP Learning site.
Maybe some of you experienced that it was not very easy to access SAP data sources with SAP Build Apps (formerly SAP AppGyver) because of some CORS issues (Cross-origin resource sharing (CORS) protects your backend by allowing only the allowed domains to access your system).
Additionally, weren’t you also looking for an easy built-in authentication for your app?
Then you should read this blog. I am going to show you, how you can enable the new SAP BTP authentication feature in AppGyver and also how to use BTP destinations as data sources for your app:
- With the SAP BTP authentication, a log on page is pushed automatically in front of your app which checks for the credentials of the end user of the app
- The BTP destinations as new data sources allows you to easily consume data coming from any cloud or on-premise SAP system
Update 27.07.2022 - I also added guide how to deploy the app to BTP
Prerequisites:
- Access to an SAP Business Technology Platform Account
- SAP Build Apps service running on this BTP account (Guide to run the booster)
- A configured destination on this BTP account and also access to this destination. The destination needs the property DynamicDestination=true and WebIDEEnabled=true
Getting Started
We are accessing the Low Code / No Code (LCNC) entry point called ‘Lobby’ on the BTP account to create a new AppGyver project by clicking the Create button and select Build an Application and afterwards Web & Mobile Application.

Lobby
Now the new project is created. To consume BTP destinations in SAP Build Apps, we go directly to the AUTH tab at the top of the UI and click on Enable Authentication.
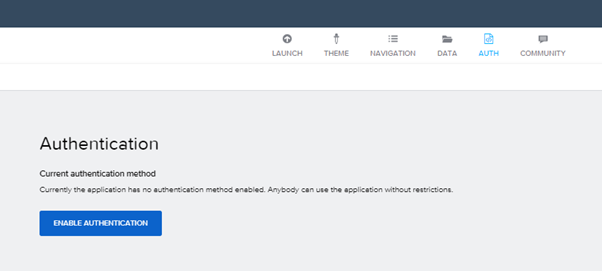
Authentication
And now select SAP BTP authentication.

SAP BTP Authentication
Confirm with OK.
Enable Authentication
SAP BTP Authentication is now enabled. What does that mean:

Authentication enabled
An additional page is added to your SAP Build APpsproject, which will be automatically opened if a user opens your app. This page checks the credentials of this user coming from the SAP BTP account. After a successful logon the initial screen will be closed automatically. You don’t have to do anything further on this page. Currently, only web apps are supported by the SAP BTP authentication. Mobile apps will be coming soon.

Additional Page added automatically
Now we have authenticated BTP and can use BTP destinations as data sources. Of course, you need the necessary rights to access destinations. These rights can be typically provided by an IT administrator. Additionally, the destinations needs the property HTML5.DynamicDestination=true and WebIDEEnabled=true. If this property is missing, you will receive the following error message:
![]()
Missing destination property error
If you have the necessary rights and the destination is configured correctly, the data can now be accessed by clicking on the DATA tab and selecting ADD INTEGRATION
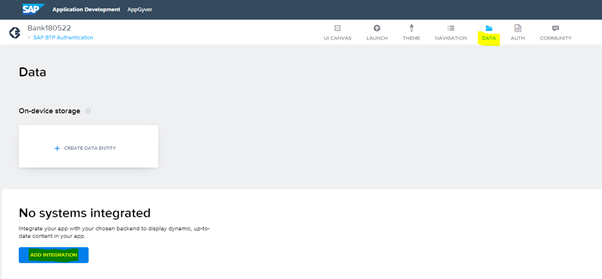
Add Integration
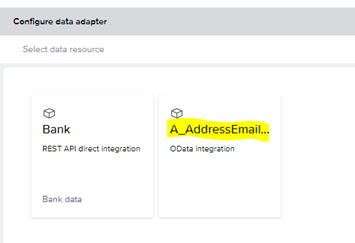
Select BTP Destinations

BTP Destinations
Now a list of all your destinations from your subaccount should appear. You can also use the search field to find the destination of your choice.
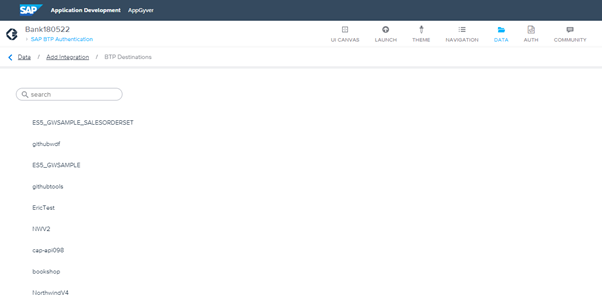
List of destination from your subaccount
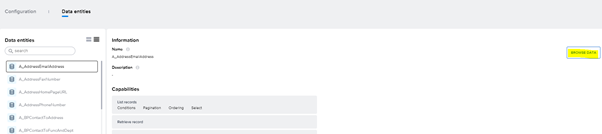
Select the destination you want to use. Now you will get an overview of all data entities on the left side of this destination. On the right-hand side, you will see all capabilities and fields of this specific data entity.

Data entities of the destination
We are going to install the data source by clicking INSTALL INTEGRATION.

Install Integration
Let’s have a look on the data from on entity. In my example I use the email addresses of the business partners coming from a S/4 HANA Cloud system. We will use the Data Browser to preview the data.
Data Browser
This will show us a preview of the data and if we really want to use it in our app.

Preview of the data with the data browser
The data seems to be right for our app, so we will enable this data entity by clicking ENABLE DATA ENTITY.

That’s it! Now we can use the Business Partner Data in our App.
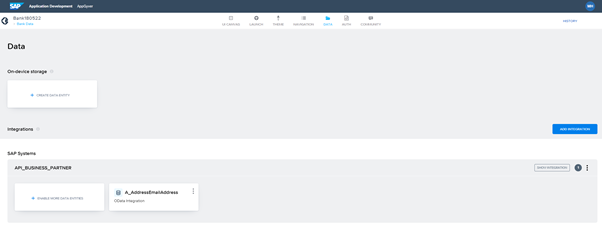
Data entity enabled
To display the data we will use the component “scrollable basic list” from the component market. There close the data tab and search in the component market for the list.
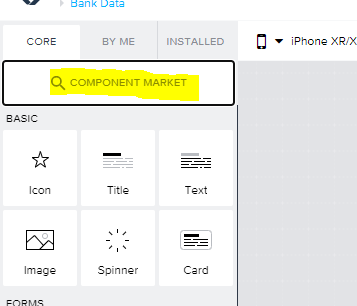
Component Market

Scrollable Basic List
Install the new component by clicking INSTALL.
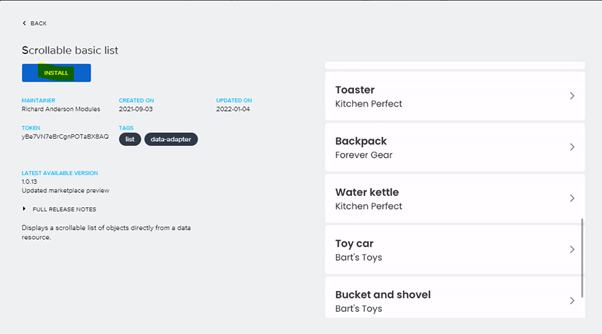
Install scrollable basic list
Now drag & drop the component into the UI.
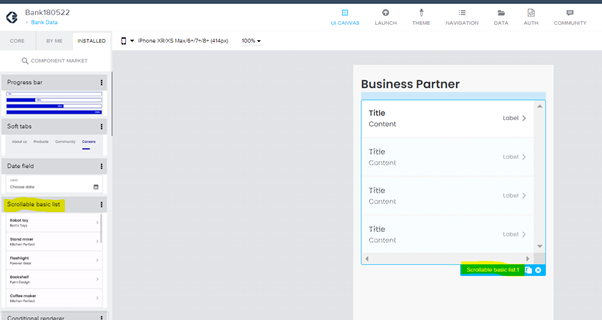
Drag and Drop list to UI
Last thing we have to do is to bind the data from the BTP destination to the component. Click on Configure on the properties page.

Configure the data binding
And select the data resource.
Data source
Now drag & drop the fields you want to use in the basic list. Afterwards click Save & Exit. We have connected our data to the basic list.
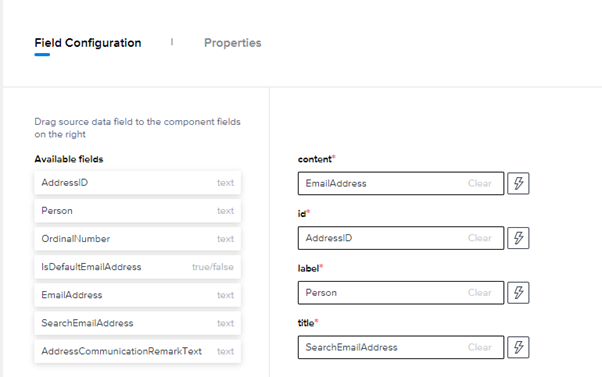
Map the fields
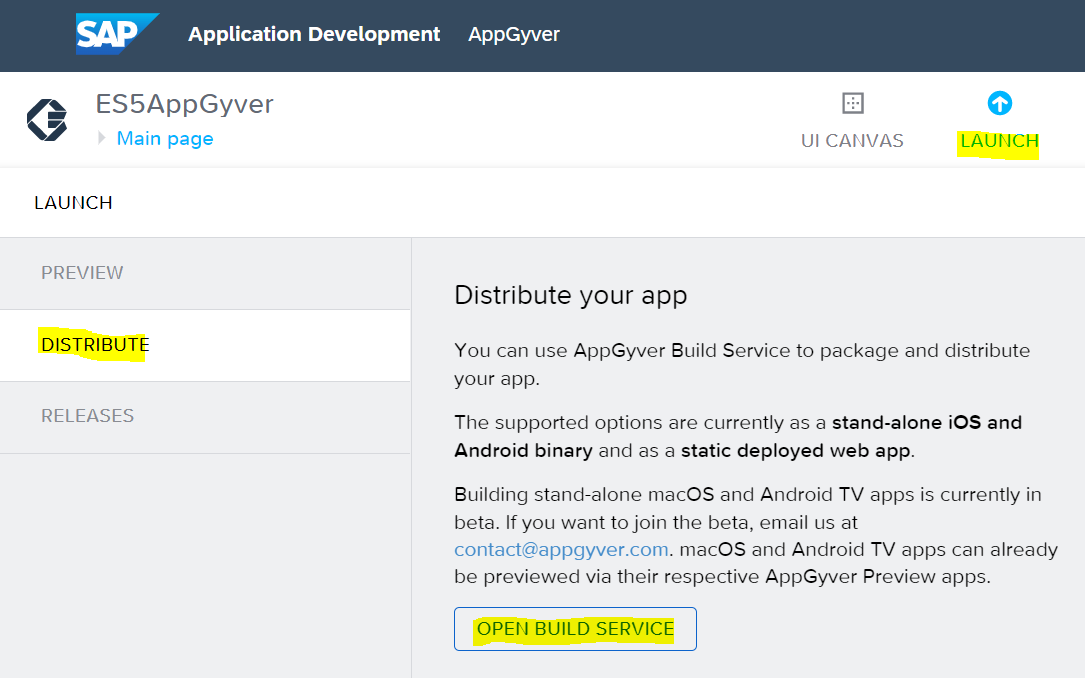
That’s it. Now you can preview your app. Click on the LAUNCH tab and preview the app on the web preview portal.

App preview
Update 27.07.2022 Deploy the AppyGver App to BTP
In the Launch Tab go to DISTRIBUTE and open the Build Service
Now you have to configure the web app.

Select any AppGyver Hosted Domain and select build scheme "MTAR" during the configuration.
After you have finished the configuration, press the BUILD button

Select File Type MTAR, define a version like 1.0.0. and press the build button.
After 10-30 minutes your MTAR should be available for download. Press the download button.

Now go back to the lobby and create an empty Business Application Studio Project. Choose a name of your choice. The initial set up of the BAS project can take some minutes.

Now just enable the explorer.

And drag&drop your AppGyver mtar to the project.
Open a new terminal
Run the command "cf login" and log in you Cloud Foundry space.
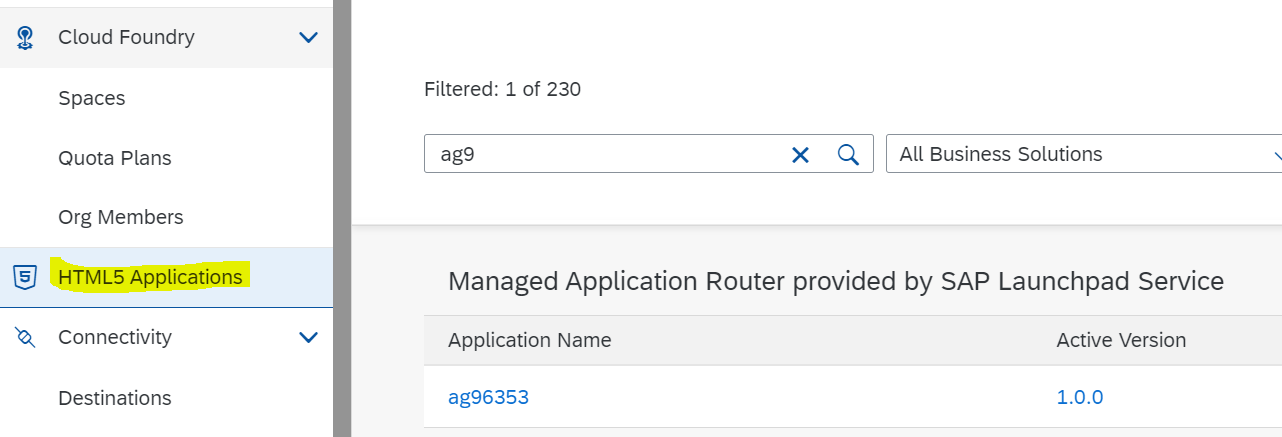
Afterwards just run the command "cf deploy yourmtar.mtar".
That's it. Now you should see your AppGyver app in your HTML5 applications on your BTP subaccount.
Conclusion
With the new BTP Authentication and Destination support in SAP Build Apps, we have an easy way to create a secured app which can consume data from any SAP systems with a few clicks. Additionally with these features we can use it as a great governance feature that IT administrators can control which data sources (destinations) are available for the citizen developers.
You can also find the whole setup process in this video:
Do you want to learn more:
Find out how to build software applications, side-by-side extensions, and integrations from and to cloud applications by exploring SAP’s free learning content on SAP BTP. It is made for both integration designers and extension developers from all levels of expertise and will help you stay up to date with the latest SAP BTP innovations. Check out even more role-based learning resources and opportunities to get certified in one place on SAP Learning site.
- SAP Managed Tags:
- SAP Build Apps,
- SAP Build,
- SAP Business Technology Platform
Labels:
52 Comments
- « Previous
-
- 1
- 2
- Next »
You must be a registered user to add a comment. If you've already registered, sign in. Otherwise, register and sign in.
Labels in this area
-
ABAP CDS Views - CDC (Change Data Capture)
2 -
AI
1 -
Analyze Workload Data
1 -
BTP
1 -
Business and IT Integration
2 -
Business application stu
1 -
Business Technology Platform
1 -
Business Trends
1,658 -
Business Trends
103 -
CAP
1 -
cf
1 -
Cloud Foundry
1 -
Confluent
1 -
Customer COE Basics and Fundamentals
1 -
Customer COE Latest and Greatest
3 -
Customer Data Browser app
1 -
Data Analysis Tool
1 -
data migration
1 -
data transfer
1 -
Datasphere
2 -
Event Information
1,400 -
Event Information
69 -
Expert
1 -
Expert Insights
177 -
Expert Insights
326 -
General
1 -
Google cloud
1 -
Google Next'24
1 -
GraphQL
1 -
Kafka
1 -
Life at SAP
780 -
Life at SAP
13 -
Migrate your Data App
1 -
MTA
1 -
Network Performance Analysis
1 -
NodeJS
1 -
PDF
1 -
POC
1 -
Product Updates
4,575 -
Product Updates
373 -
Replication Flow
1 -
REST API
1 -
RisewithSAP
1 -
SAP BTP
1 -
SAP BTP Cloud Foundry
1 -
SAP Cloud ALM
1 -
SAP Cloud Application Programming Model
1 -
SAP Datasphere
2 -
SAP S4HANA Cloud
1 -
SAP S4HANA Migration Cockpit
1 -
Technology Updates
6,872 -
Technology Updates
458 -
Workload Fluctuations
1
Related Content
- On the lookout with SAP BTP Core services. Cis patrol. in Technology Blogs by SAP
- Build Full Stack Applications in SAP BTP Cloud Foundry as Multi Target Applications (MTA) in Technology Blogs by Members
- SAP CAP - Service Destination MTA defined fails to deploy in Technology Q&A
- SAP Build AppsとSAP Build Process Automationの連携(フォームトリガーの場合) in Technology Blogs by SAP
- SAP Build Apps - より簡単になったSAP Build Process Automationとの連携 in Technology Blogs by SAP
Top kudoed authors
| User | Count |
|---|---|
| 22 | |
| 8 | |
| 8 | |
| 6 | |
| 6 | |
| 6 | |
| 6 | |
| 6 | |
| 5 | |
| 5 |