
- SAP Community
- Products and Technology
- Technology
- Technology Blogs by SAP
- Using mobile device sensor's data with SAP Build A...
Technology Blogs by SAP
Learn how to extend and personalize SAP applications. Follow the SAP technology blog for insights into SAP BTP, ABAP, SAP Analytics Cloud, SAP HANA, and more.
Turn on suggestions
Auto-suggest helps you quickly narrow down your search results by suggesting possible matches as you type.
Showing results for
Advisor
Options
- Subscribe to RSS Feed
- Mark as New
- Mark as Read
- Bookmark
- Subscribe
- Printer Friendly Page
- Report Inappropriate Content
03-17-2023
1:32 PM
The hardware of modern mobile devices contains sensors able to collect many environment and device related information. Between those information, we can find:
Those information can be used for implementing mobile applications that require to track the position, or to deliver specific information about the speed, the compass heading, the acceleration. As an example, I want to mention the most used apps of this kind: the navigation apps that we're using all the days when driving or hiking. Those apps typically uses GPS positioning and compass heading for providing directions on maps. Some more advanced apps are able to provide additional information that are very useful for trekking activities: for instance altitude and barometric pressure for supporting weather forecast.
SAP Build Apps makes very easy to access all those information from the apps you're developing, allowing you to crete your own navigation or weather forecasting app.
In this article I'll explain how information collected from mobile device sensor's can be read and used within SAP Build Apps.
First of all, let's see what are the information that can be accessed: at present SAP Build Apps provides an out-of-the-box support for:
Inside SAP Build Apps, those information are saved into a dedicated set of variables (the sensorVars) that can be accessed from you applications just using formula bindings.
For instance, some of the GPS positioning information are available in the following variables:
A detailed documentation about the sensor variables and the sensor functions can be found on the official documentation.
The content of sensorVars variables is not automatically updated: when you need to use the sensor's data, you must invoke a function that asks the mobile device to read from the sensor. After doing that, the function makes available the required information into the sensorVars variables.
There are two ways for updating the sensorVars variables: the single read, when you just need to collect a single value from a sensor and the continuous polling, when you need to receive continuously and in real-time the updated values. In the latter case, you can also keep the story of the last read values, deciding how many values you want to keep.
Let's explore together the sensor's reading capabilities of SAP Build Apps, implementing a real app that you can run on you mobile phone.
First of all, we need to create a new mobile app from the Lobby.
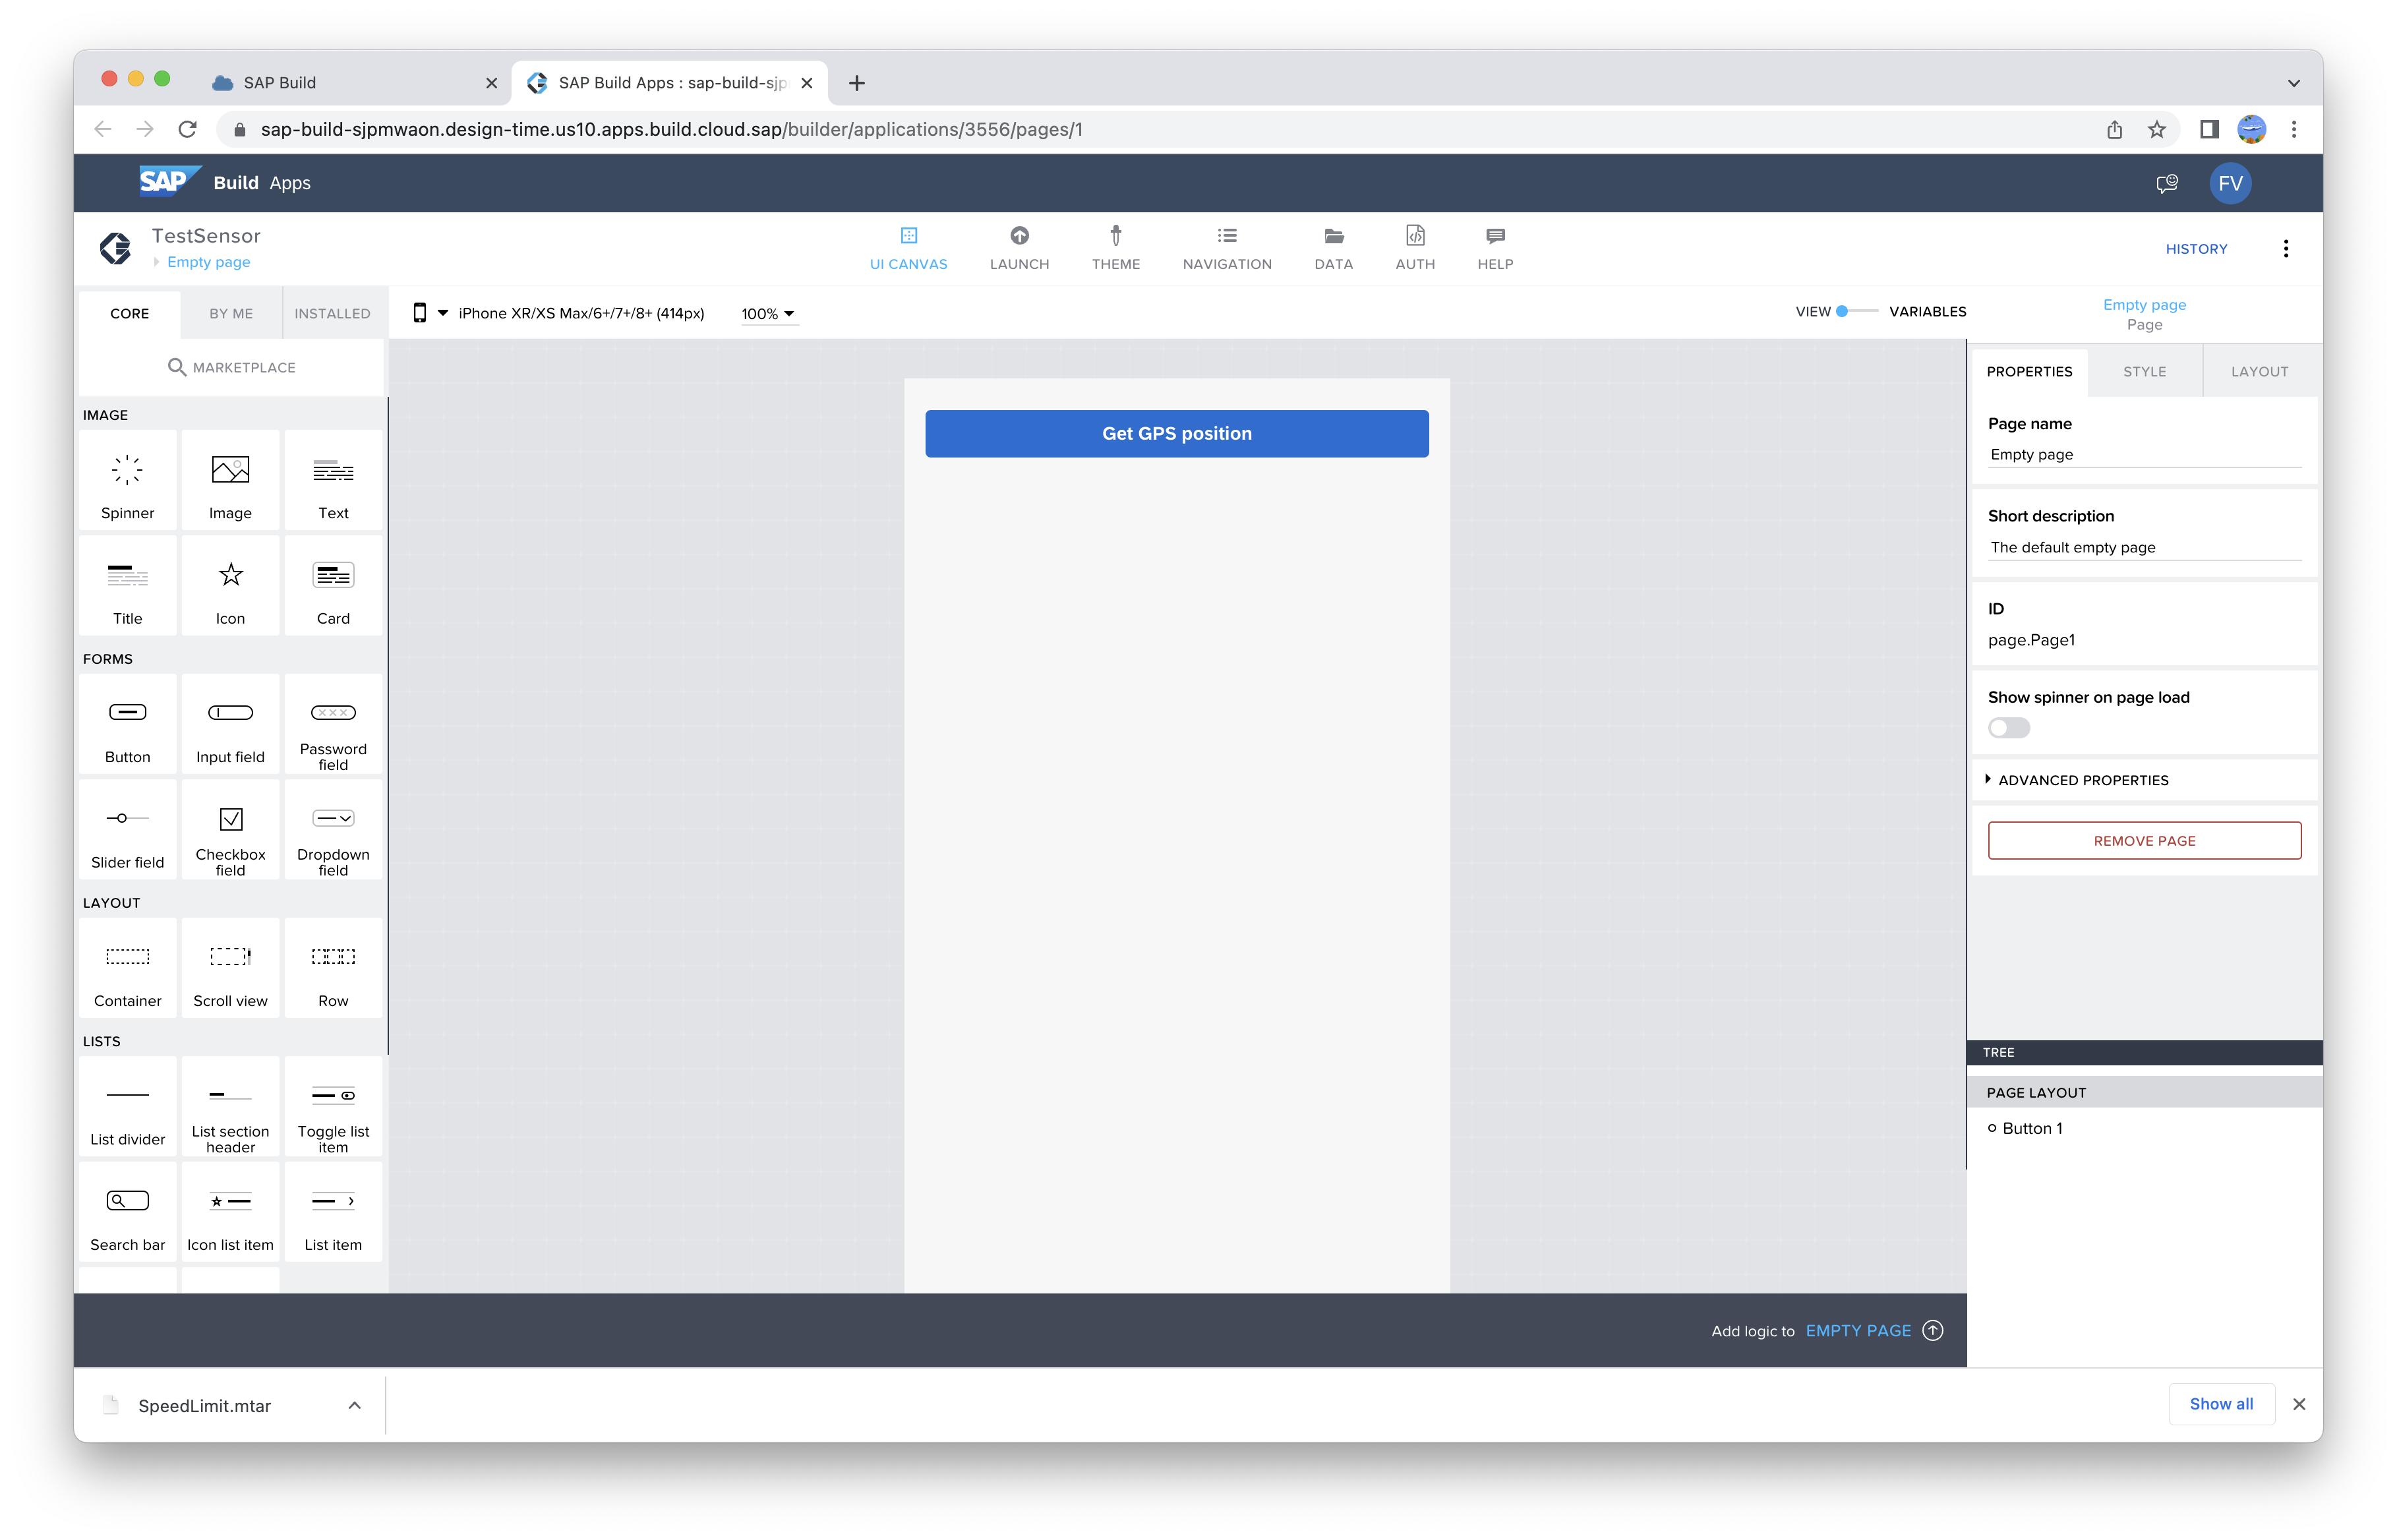
In this app we want to just to read once the GPS positioning data and to display them in the home page. Let's remove the default text lines and let's add a button, named "Get GPS Position":
As usual, we add the logic associated to the button, in this case just dragging and dropping the GPS location component:
After launching the app, every time the button is clicked, the GPS related sensorVars are updated.
Let's display the collected information: we need to add to our application some Text components for displaying the GPS information, available in the sensorVars after clicking the button. A Text component for displaying the latitude can be added to canvas and bound to the following function:
And we can add two additional text components for Longitude and Altitude:
Please notice that the GPS Location component outputs to Port 1 the collected GPS information. If you need to use them in another component that follows, you can do it just binding to the result of the GPS Location component, without the need of accessing the sensorVars thru a formula.
Now we can test the application on our mobile device: we need to install to our device the SAP Build App, available on the Play Store and Apple Store and then we can open the LAUNCH section from you SAP Build Apps environment, click on Preview your app, generate a PIN code from the SAP Build App application on mobile device and typing the code under the Preview on your device section.
After doing that, we can start the preview of the app on your mobile device and, after clicking the button, we can read the GPS positioning information on our home page:
This is a good starting point, but probably the most interesting scenario is when we want to use sensor's information that are updated in real time. For implementing that capabilities, we need to install additional components from the Marketplace. The required components can be found just searching for "polling" in the Marketplace:
For the demo app I'd like to implement, we need to install the Start polling and Stop polling components for GPS, compass and barometer.
After creating a new app and installing those components, we add to the canvas two buttons: Start polling and Stop Polling.
The logic for the Start polling button can be defined dragging and dropping all the installed Start polling components into the canvas, linking them to the Component tap event:
Please notice that each Start polling component has some properties that can be configured in the panel on right hand side of the screen. In particular, we can define the frequency of the update and the size of the history. Depending on the sensor, some other configurable properties may be available. For the purpose of this explanation, we can keep the default values.
The logic for the Stop polling button is very similar: we just need to use the Stop polling components instead of the Start ones.
And now we can add to you app some Text components for displaying the sensor's information, as we did before. We can use the same formulas as before for the GPS location info. For the compass heading we need to add a Text component and bind it to the formula:
And for the atmospheric pressure:
Our app is ready to be tested: we can start the preview on your mobile device, as described before.
As soon as we start the app, we can see that the Text components cannot show any information. But when we click the Start polling button, they begins showing the expected information and those information are updated dynamically: just moving around, pointing the device to different directions and rising and lowering it, makes the displayed information to change in real time.
And when we click the Stop polling button, the information stops updating.
With these simple examples, I demonstrated how mobile device sensor's information can be requested once or continuously and how the related measures can be read from the sensorVars using in your application a formula binding.
Now that you've learnt the basic aspects of sensor's information access, you can explore all the available features and then you can start implementing applications that use sensor's information to deliver an advanced user experience.
And that’s all for today! Now you can continue to follow the SAP Build Apps environment Topic page (https://community.sap.com/topics/build-apps), post and answer questions (https://answers.sap.com/tags/6cfd8176-04ae-4548-8f38-158456e1a47a), and read other posts on the topic (https://blogs.sap.com/tags/6cfd8176-04ae-4548-8f38-158456e1a47a/).
Have a good time with SAP Build Apps! And please continue following my profile for new blogs and let me have your feedbacks.
- GPS positioning
- Atmospheric pressure
- Magnetic field values
- Acceleration values
- Angular velocities
Those information can be used for implementing mobile applications that require to track the position, or to deliver specific information about the speed, the compass heading, the acceleration. As an example, I want to mention the most used apps of this kind: the navigation apps that we're using all the days when driving or hiking. Those apps typically uses GPS positioning and compass heading for providing directions on maps. Some more advanced apps are able to provide additional information that are very useful for trekking activities: for instance altitude and barometric pressure for supporting weather forecast.
SAP Build Apps makes very easy to access all those information from the apps you're developing, allowing you to crete your own navigation or weather forecasting app.
In this article I'll explain how information collected from mobile device sensor's can be read and used within SAP Build Apps.
First of all, let's see what are the information that can be accessed: at present SAP Build Apps provides an out-of-the-box support for:
- GPS location, including latitude, longitude, altitude, speed, heading, accuracy
- Compass heading
- Magnetic field values on the three axis: x, y, z
- Acceleration values on the three axis: x, y, z
- Angular velocities on the three axis: x, y, z
- Atmospheric pressure
Inside SAP Build Apps, those information are saved into a dedicated set of variables (the sensorVars) that can be accessed from you applications just using formula bindings.
For instance, some of the GPS positioning information are available in the following variables:
- sensorVars.geolocation.latestValue.latitude
- sensorVars.geolocation.latestValue.longitude
- sensorVars.geolocation.latestValue.altitude
A detailed documentation about the sensor variables and the sensor functions can be found on the official documentation.
The content of sensorVars variables is not automatically updated: when you need to use the sensor's data, you must invoke a function that asks the mobile device to read from the sensor. After doing that, the function makes available the required information into the sensorVars variables.
There are two ways for updating the sensorVars variables: the single read, when you just need to collect a single value from a sensor and the continuous polling, when you need to receive continuously and in real-time the updated values. In the latter case, you can also keep the story of the last read values, deciding how many values you want to keep.
Let's explore together the sensor's reading capabilities of SAP Build Apps, implementing a real app that you can run on you mobile phone.
First of all, we need to create a new mobile app from the Lobby.
In this app we want to just to read once the GPS positioning data and to display them in the home page. Let's remove the default text lines and let's add a button, named "Get GPS Position":
As usual, we add the logic associated to the button, in this case just dragging and dropping the GPS location component:

After launching the app, every time the button is clicked, the GPS related sensorVars are updated.
Let's display the collected information: we need to add to our application some Text components for displaying the GPS information, available in the sensorVars after clicking the button. A Text component for displaying the latitude can be added to canvas and bound to the following function:
"GPS Latitude: " + sensorVars.geolocation.latestValue.latitudeAnd we can add two additional text components for Longitude and Altitude:
"GPS Longitude: " + sensorVars.geolocation.latestValue.longitude"GPS Altitude: " + sensorVars.geolocation.latestValue.altitudePlease notice that the GPS Location component outputs to Port 1 the collected GPS information. If you need to use them in another component that follows, you can do it just binding to the result of the GPS Location component, without the need of accessing the sensorVars thru a formula.
Now we can test the application on our mobile device: we need to install to our device the SAP Build App, available on the Play Store and Apple Store and then we can open the LAUNCH section from you SAP Build Apps environment, click on Preview your app, generate a PIN code from the SAP Build App application on mobile device and typing the code under the Preview on your device section.
After doing that, we can start the preview of the app on your mobile device and, after clicking the button, we can read the GPS positioning information on our home page:

This is a good starting point, but probably the most interesting scenario is when we want to use sensor's information that are updated in real time. For implementing that capabilities, we need to install additional components from the Marketplace. The required components can be found just searching for "polling" in the Marketplace:

For the demo app I'd like to implement, we need to install the Start polling and Stop polling components for GPS, compass and barometer.
After creating a new app and installing those components, we add to the canvas two buttons: Start polling and Stop Polling.
The logic for the Start polling button can be defined dragging and dropping all the installed Start polling components into the canvas, linking them to the Component tap event:

Please notice that each Start polling component has some properties that can be configured in the panel on right hand side of the screen. In particular, we can define the frequency of the update and the size of the history. Depending on the sensor, some other configurable properties may be available. For the purpose of this explanation, we can keep the default values.
The logic for the Stop polling button is very similar: we just need to use the Stop polling components instead of the Start ones.
And now we can add to you app some Text components for displaying the sensor's information, as we did before. We can use the same formulas as before for the GPS location info. For the compass heading we need to add a Text component and bind it to the formula:
"Compass heaading: " + ROUND(sensorVars.compass.latestValue.heading)And for the atmospheric pressure:
"Barometer pressure: " + sensorVars.barometer.latestValue.pressure + " mbar"Our app is ready to be tested: we can start the preview on your mobile device, as described before.
As soon as we start the app, we can see that the Text components cannot show any information. But when we click the Start polling button, they begins showing the expected information and those information are updated dynamically: just moving around, pointing the device to different directions and rising and lowering it, makes the displayed information to change in real time.

And when we click the Stop polling button, the information stops updating.
With these simple examples, I demonstrated how mobile device sensor's information can be requested once or continuously and how the related measures can be read from the sensorVars using in your application a formula binding.
Now that you've learnt the basic aspects of sensor's information access, you can explore all the available features and then you can start implementing applications that use sensor's information to deliver an advanced user experience.
And that’s all for today! Now you can continue to follow the SAP Build Apps environment Topic page (https://community.sap.com/topics/build-apps), post and answer questions (https://answers.sap.com/tags/6cfd8176-04ae-4548-8f38-158456e1a47a), and read other posts on the topic (https://blogs.sap.com/tags/6cfd8176-04ae-4548-8f38-158456e1a47a/).
Have a good time with SAP Build Apps! And please continue following my profile for new blogs and let me have your feedbacks.
- SAP Managed Tags:
- SAP Build Apps
Labels:
9 Comments
You must be a registered user to add a comment. If you've already registered, sign in. Otherwise, register and sign in.
Labels in this area
-
ABAP CDS Views - CDC (Change Data Capture)
2 -
AI
1 -
Analyze Workload Data
1 -
BTP
1 -
Business and IT Integration
2 -
Business application stu
1 -
Business Technology Platform
1 -
Business Trends
1,658 -
Business Trends
122 -
CAP
1 -
cf
1 -
Cloud Foundry
1 -
Confluent
1 -
Customer COE Basics and Fundamentals
1 -
Customer COE Latest and Greatest
3 -
Customer Data Browser app
1 -
Data Analysis Tool
1 -
data migration
1 -
data transfer
1 -
Datasphere
2 -
Event Information
1,400 -
Event Information
78 -
Expert
1 -
Expert Insights
177 -
Expert Insights
384 -
General
1 -
Google cloud
1 -
Google Next'24
1 -
GraphQL
1 -
Kafka
1 -
Life at SAP
780 -
Life at SAP
16 -
Migrate your Data App
1 -
MTA
1 -
Network Performance Analysis
1 -
NodeJS
1 -
PDF
1 -
POC
1 -
Product Updates
4,571 -
Product Updates
425 -
Replication Flow
1 -
REST API
1 -
RisewithSAP
1 -
SAP BTP
1 -
SAP BTP Cloud Foundry
1 -
SAP Cloud ALM
1 -
SAP Cloud Application Programming Model
1 -
SAP Datasphere
2 -
SAP S4HANA Cloud
1 -
SAP S4HANA Migration Cockpit
1 -
Technology Updates
6,870 -
Technology Updates
520 -
Workload Fluctuations
1
Related Content
- How to connect RF device to sap public cloud CipherLab RK95 Industrial Mobile Computer. in Technology Q&A
- Develop with Joule in SAP Build Code in Technology Blogs by SAP
- SAP BusinessObjects Mobile alternatives in Technology Blogs by SAP
- IoT: RFID integration with SAP HANA Cloud via SAP BTP in Technology Blogs by Members
- SAC Mobile Cannot Find Model Information Error in Technology Q&A
Top kudoed authors
| User | Count |
|---|---|
| 12 | |
| 11 | |
| 7 | |
| 7 | |
| 6 | |
| 5 | |
| 5 | |
| 5 | |
| 5 | |
| 5 |