
- SAP Community
- Groups
- Interest Groups
- DevOps and System Administration
- Blogs
- SAPGUI Encryption and SSO with PSEs and Keychain f...
DevOps and System Administration Blogs
Explore DevOps and system administration blog posts. Stay current with best practices, tools, and insights into efficient IT management strategies.
Turn on suggestions
Auto-suggest helps you quickly narrow down your search results by suggesting possible matches as you type.
Showing results for
dylan-drummond
Contributor
Options
- Subscribe to RSS Feed
- Mark as New
- Mark as Read
- Bookmark
- Subscribe
- Printer Friendly Page
- Report Inappropriate Content
04-12-2023
7:59 PM
Intro
We show how to set up SAP SNC Encryption (both Encryption-Only and SSO), on the two main kinds of Apple MacBook OS architecture, using X.509 certificates handled either by the PSE-Method (using SAP PSEs “Personal Security Environments”) or by the SLC-Method (using a downloadable helper-app called SAP Secure Login Client 3.0 “SLC 3.0”).

We begin by showing how to set up an SAP system to handle the server-side SNC activities - SAP provides an easy workflow (tcode SNCWIZARD) to help us do this.
Then we download and extract the files we need from SAP Software Downloads.
Next we describe, for an amd64 MacBook, Encryption-Only and SSO, using the PSE-Method.
Then we describe Encryption-Only and SSO using the SLC-Method - these steps are essentially the same for both amd64 AND arm64 cases. Also we describe how to switch between SLC-Method and PSE-Method.
After that, we cover the slightly more complex case: for an arm64 MacBook, Encryption-Only and SSO, using the PSE-Method. (The complexity comes from needing a library at logon-time which is not included in the PSE-focused SAR archive, but is available and copy-pastable once you install SLC 3.0 🙂).
Finally we have an Appendix, where we use Wireshark 😱 to show why encrypted SAPGUI traffic is really a good thing.
Table of Contents
Set up SNC using SNCwizard on the target SAP system
Get stuff from SAP Software Centre (amd64, arm64)
Encryption-Only via PSE-Method (amd64)
SSO via PSE-Method (amd64)
Install SLC 3.0 and add NPL server certificate to Apple Keychain Access (amd64, arm64)
Encryption-Only via SLC-Method (amd64,arm64)
SSO via SLC-Method using a PKCS12 file and Apple Keychain Access (amd64, arm64)
Switching off SLC-Method and enabling PSE-Method
Remarks on Uninstalling SLC
Switching on SLC-Method
Prepare for PSE-Method on arm64 by copy-pasting a library
Encryption-Only via PSE-Method (arm64)
SSO via PSE-Method (arm64)
Appendix: Wireshark shows why SNC encryption is valuable
Set up SNC using SNCwizard on the target SAP system
First we note that before using the SNCwizard, our demo SAP system does not have an SNC SAPCryptolib PSE configured. Tcode is STRUST, double-click on the slot in left-hand panel for SNC SAPCryptolib:

It’s empty, which is to be expected.
Now we go to tcode SNCWIZARD (or /nSNCWIZARD if navigating from other transactions than the home screen). You might get this error, at least I did:

The solution to this issue is given in SAP Note 2664502:
“Complete the following steps in order to import your DEFAULT profile without making any changes:
1. Run transaction RZ10
2. Go to the menu "Utilities" -> "Import Profiles" -> "Of active servers"
3. Go back to previous screen “Edit Profiles”
4. Select profile “DEFAULT” and click "Extended maintenance"
5. Click on “Change”
6. Go back to previous screen “Edit Profiles”
7. Click on Save
8. Click on “No” to not show profile errors
9. Click on “Yes” to activate the profile
10. Restart AS ABAP”
So if needed, you implement that advice. Now we try SNCWIZARD again:

Obviously it’s important that this screen contains the message: “The prerequisites for configuring SNC for your ABAP application servers have been checked successfully”. (This blog just assumes that the check was successful).
There is also some generic advice about SNC configuration, which you should read. As my SAP system has SID=NPL, so the suggested SNC Identity is going to be “CN=NPL”. When you are ready, click “Continue” to - you guessed it already - continue to the next step of the wizard, “SNC Identity”:

So here we decide whether to accept the default suggestion for SNC Identity, or if you like you can define your own. For this blog we are keeping the default. So this SNC Identity is the identity of the SAP system for SNC purposes - for example, when a SAPGUI client tries to connect to the SAP system and use SNC encryption or SSO, then the client needs to provide this SAP system’s SNC Identity.
So we click “Continue” to go to the next step, which is “Default Profile Parameters”:
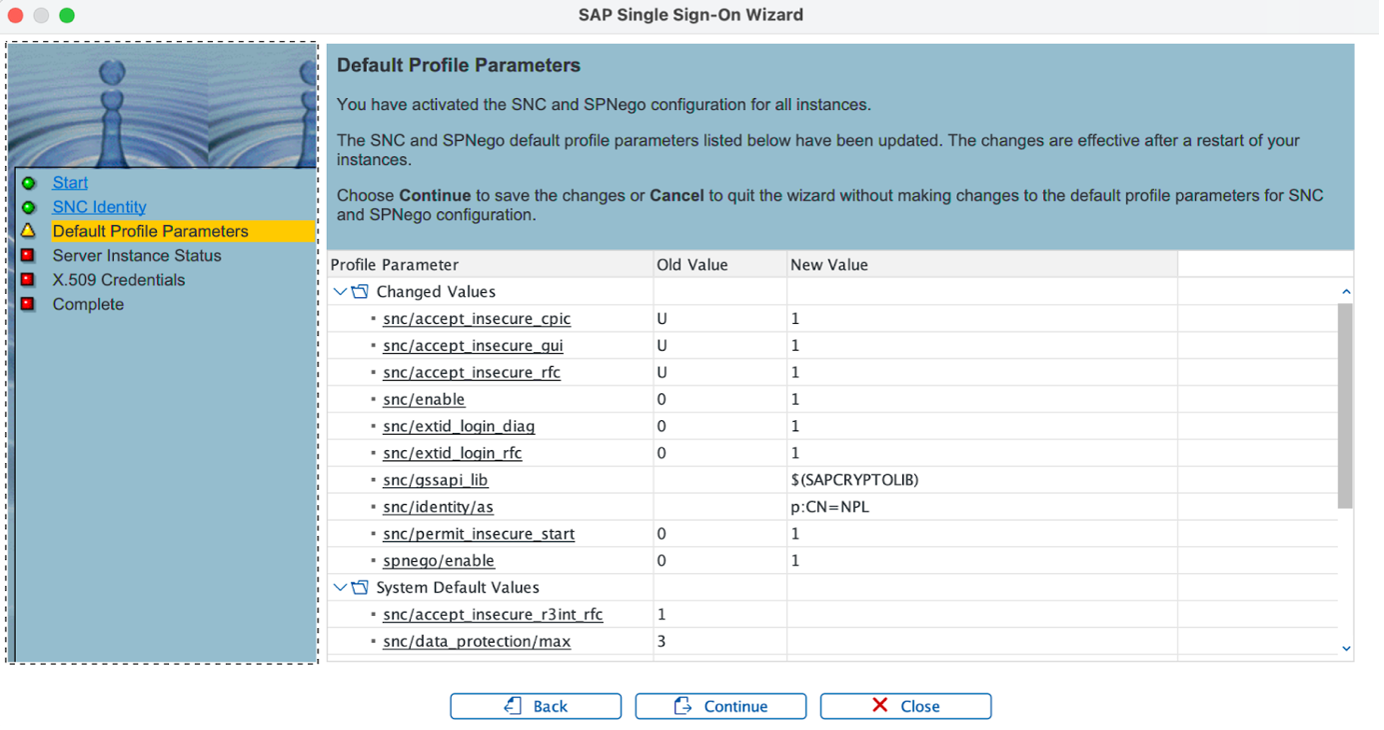
Here we get a list of the proposed new values of various parameters of the default profile (the same default profile that you can view or change from tcode RZ10). Worth reviewing those. We won’t describe all those parameters, but here are explanations of three of them:
snc/enable (which will change to be “1” i.e. enabled)
snc/gssapi_lib (specifying the filepath of the relevant library, we trust the wizard gets this right)
snc/identity/as (the value we defined in the previous step).
Click “Continue” to step “Server Instance Status”:

You’ll maybe have noticed that SAP makes you scroll down to read all the advice-text, anyway there are 2 possible statuses (or should that be “statii”?). One is “Restart required - SNC is activated, please restart the server instance” (to implement at least the default profile changes) - luckily that is the only status I have encountered. The other possibility is “RFC Error - Instance may be unreachable”... good luck solving that one 😱.
Since we need to restart our SAP system now, we can click “Close” to exit from SNCWIZARD (would be good if the wizard told us clearly to do this, instead of leaving you wondering whether that cancels all changes made up to now), log out from SAPGUI, and restart our SAP system, which I will do as follows, on the Linux server as administrator i.e. in our case as npladm:
su -l npladm

stopsap ALL

startsap ALL

sapcontrol -nr 00 -function GetProcessList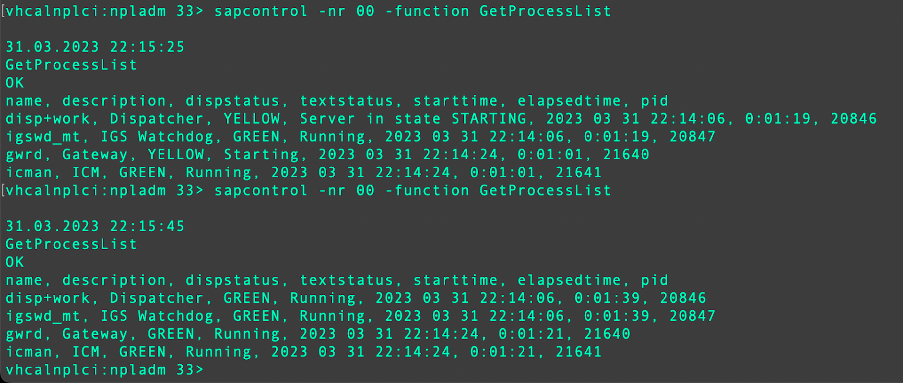
Then we logon to the SAP system again, and go to SNCWIZARD, which tells us that we have done the basic SNC configuration successfully. So now we can continue to do SSO setup with Kerberos and/or X.509 configuration:

That’s good, but let’s first click “Close” to exit the SNCwizard, and try tcode SNCCONFIG, just to check the current profile parameters are what was proposed earlier in the SNCwizard. Looks fine, the three highlighted parameters and their values have been set correctly:

So yeh, now we can go back to tcode SNCWIZARD and complete the remaining steps of that wizard, which are now about the two SSO methods (their server-side configuration). So from step “Start”, click “Continue” to the next step, “Kerberos Credentials”:

We are not going to configure Kerberos, as we have no Microsoft Active Directory or similar solution in use for this SAP NetWeaver Developer Edition SAP system running as a node on my home Wi-Fi network 😃. [If you want to use Kerberos, and you have all the appropriate licences and permissions etc from Microsoft or whoever and from SAP, then good luck with that - ”Continue” launches the tcode SPNEGO in a new window.]
Anyway now we click “Skip”, to skippety skip past Kerberos and onto the next step, “X.509 Credentials”:

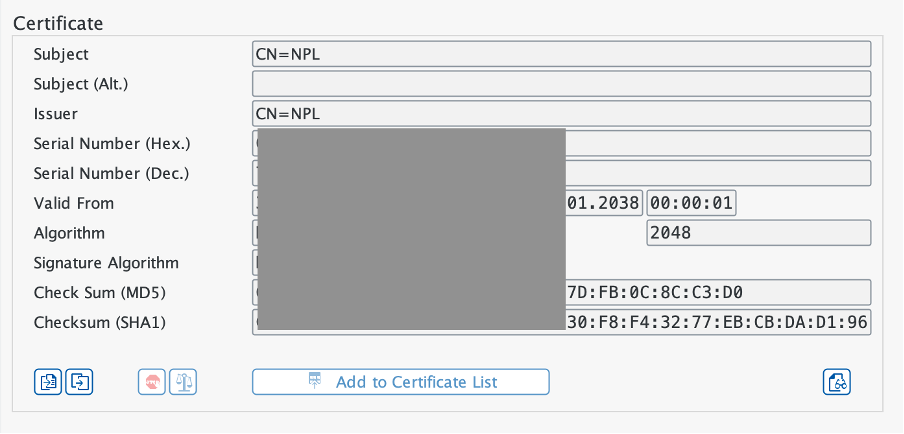
Note the SNC Private Key with Subject CN=NPL and Issuer CN=NPL. We want to use the X.509 Credentials method, so we click “Continue” which opens tcode STRUST in a new window. From there, double-click on SNC SAPCryptolib to see that thanks to earlier SNC configuration we now have an SNC server certificate with Subject CN=NPL:

Double-click on the Subject value CN=NPL to display the certificate in the lower window of right-hand panel (scroll down if it isn’t immediately visible):
That is already good for our purposes, so we can exit STRUST; back in SNCWIZARD, either the wizard itself moves us to the last step “Complete”, or if not, you click “Continue” to get to that last step:

Review the advice about parameters, then click “Complete” to exit the SNCwizard. [In future, calling SNCWIZARD will take you to the start of this “SSO workflow”, i.e. allowing you to then open the relevant Kerberos or X.509 tcodes as new windows.]
Get stuff from SAP Software Centre (amd64, arm64)
[Update May 2023: SAPGUI for Java 7.80 now ships with the needed sapcryptolib, see comment from Johannes Gerlich below: https://blogs.sap.com/2023/04/12/sapgui-encryption-and-sso-with-pses-and-keychain-for-macbooks-amd64... We leave the below advice as-is though - officially as blogs are essentially always a historical snapshot, and unofficially to save the lazy author having to do much editing work].
From the new-look Software Centre at:
https://me.sap.com/softwarecenter
(or from the older URL: https://launchpad.support.sap.com/#/softwarecenter )
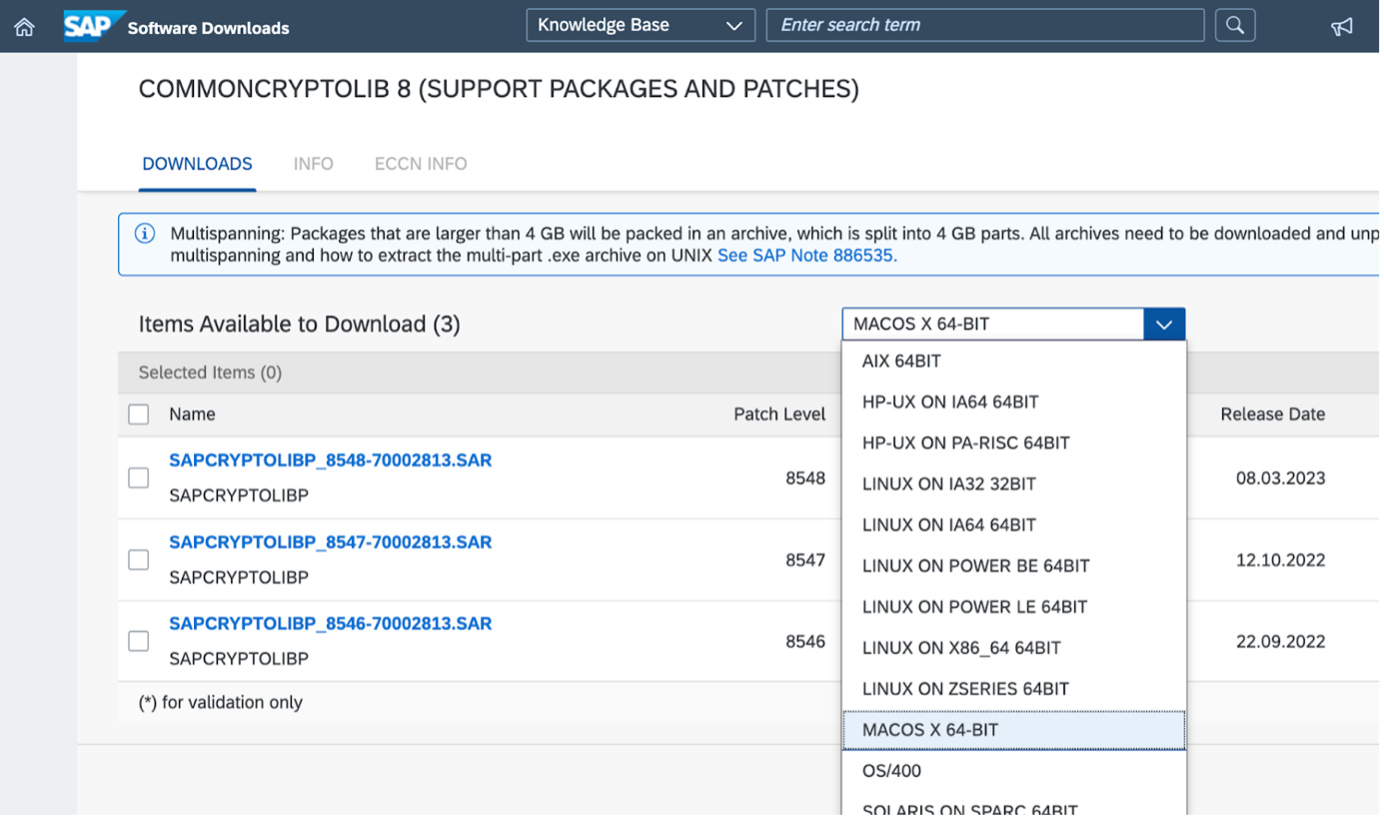
…search on “SAPCRYPTOLIB”, and choose one of the results from the DOWNLOADS category:
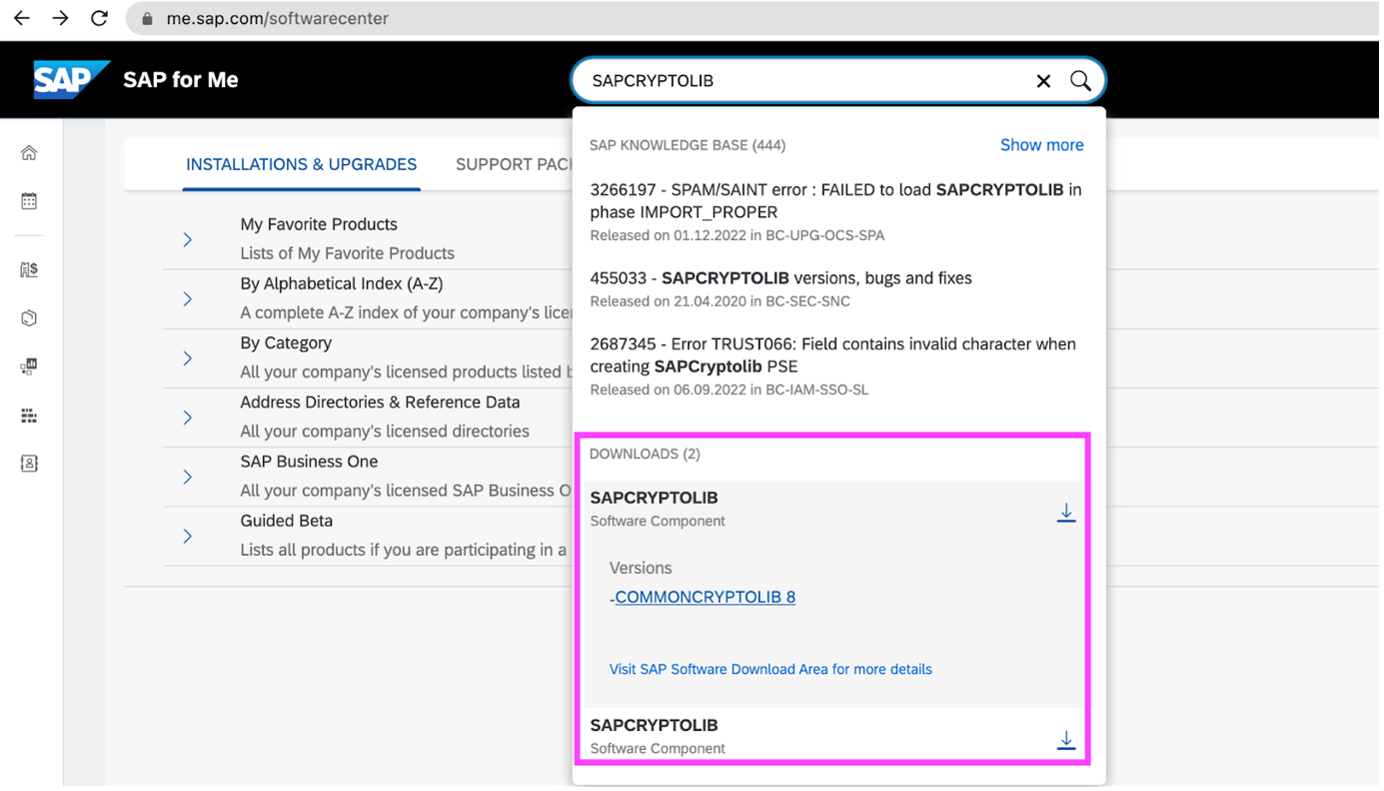
So clicking on the COMMONCRYPTOLIB 8 link, for example, might take you to the old-look Software Downloads site (In April 2023 SAP is “in transition” between old and new sites, so the behaviour may change later). If you were using the old-look site, then using the same Search term, take the Maintenance Software Component category for the non-version item in the results list.
Note that as of April 2023, the downloadable SAR is only offered for macOS running X86_64 (i.e. amd64) architecture. However we will later see that the main utility it contains - sapgenpse - also works on arm64 MacBooks. So, we choose the only available macOS option (“MACOS X 64-BIT”):
Choose the latest version, then Related Info -> Content Info -> Download icon to download the SAR archive.
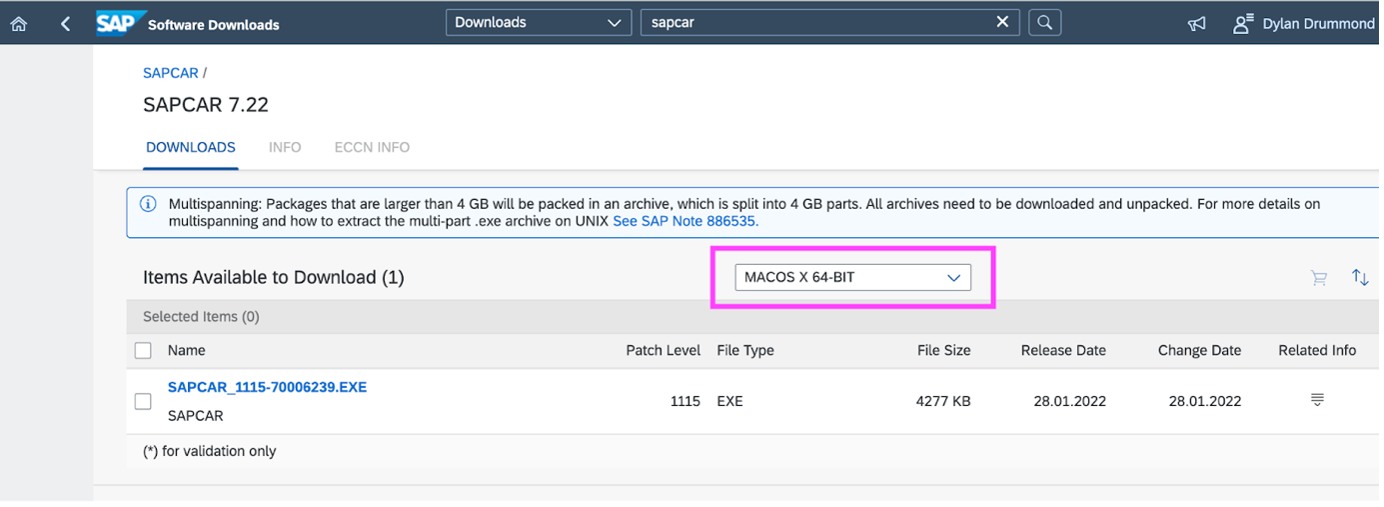
Then search on SAPCAR, Maintenance Software Component, choose the right OS and architecture “MACOS X 64-BIT”), and download that as well:
I put these two files (SAR archive and SAPCAR) in a directory in my home folder called “SAP/SNCetc”, you can put them where you like. Also created a directory in my home folder called “sec”, which in Unix is the same as ~/sec (gloss: “the sec folder of the current user, for example /Users/dylan/sec”) - it’s a good idea to define it exactly as suggested here, as ~/sec so that later, even though no SECUDIR environment variable has been set to persist e.g. after reboot, still the PSE creation process will know to put the new file into your ~/sec directory. (If this directory doesn’t exist, and no SECUDIR variable is known in the Terminal session, the gen_pse command will fail).
mkdir ~/SAP/SNCetc

mkdir ~/sec
Then open Terminal, cd into the relevant directory, make the SAPCAR file executable, and extract the files from the SAPCRYPTOLIB archive:
chmod +x SAPCAR_1115-70006239.EXE

./SAPCAR_1115-70006239.EXE -xvf SAPCRYPTOLIBP_8548-70002813.SAR
The result is that we have the utility sapgenpse, and a library called libsapcrypto.dylib.
Next, we get SAP Secure Login Client (necessary for the arm64 case, optional for the amd64 case). From SAP Software Downloads, search on “secure login client”. Choose “Secure Login Client 3.0… Maintenance Software Component”, then choose “MAC OS” as the relevant OS:
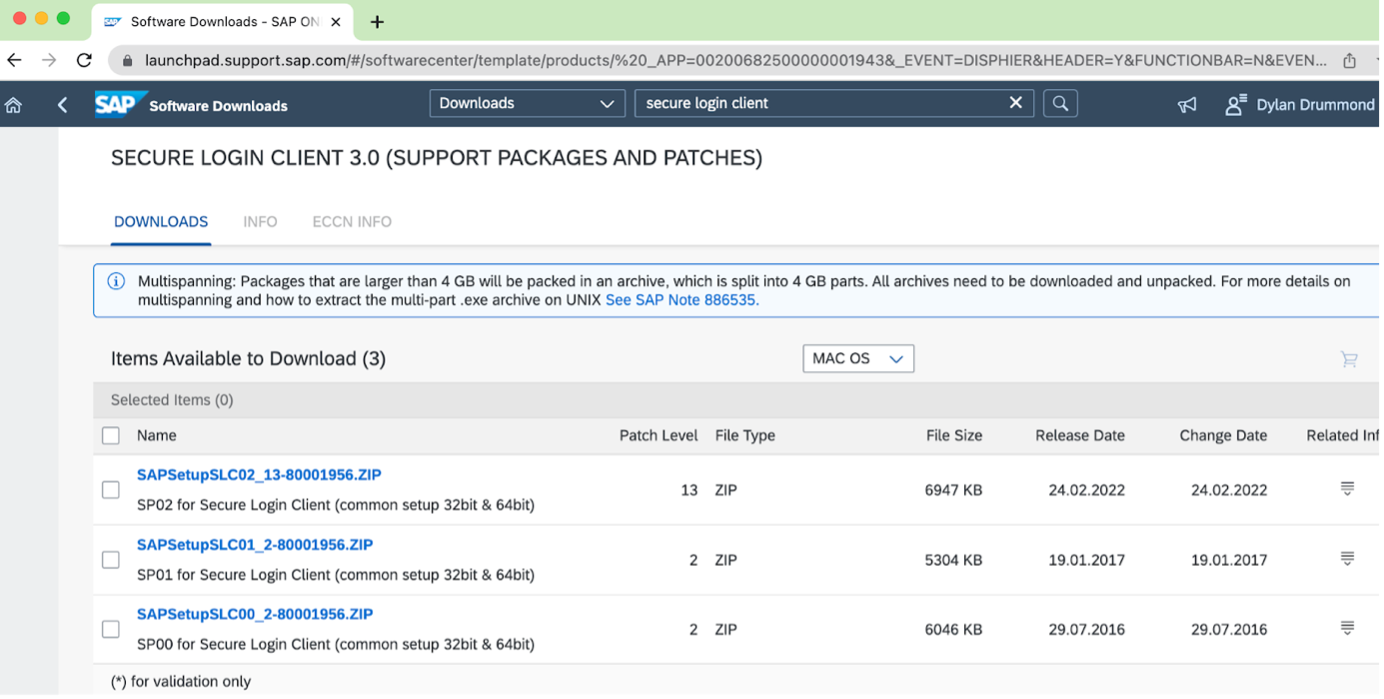
Note that there is only “MAC OS” version listed, no “X86_64 macOS” and “ARM64 macOS” options in the drop-down list box. (Anecdotally, I can say that it seems to install and run just fine on either processor architecture). Choose the latest version, Related Info -> Content Info -> [Download icon] to download it. Then unzip the ZIP file, so you have the SLC Installer SecureLoginClient.pkg available.
Encryption-Only via PSE-Method (amd64)
In this section we are considering an amd64 scenario, where you are happy enough with password-based logins, but you would like (or need, or demand) all the SAPGUI traffic to be encrypted.
We deliberately generate a “dummy client certificate” that will not enable us to do SSO, so we specify a nonsense subject line, one which does not correspond to the SNC name of any SAP user in the target system.
When generating the certificate, be sure to call the new PSE created exactly as follows: SAPSNCS.pse …whereas for the actual CN= and O= details, you can make those up yourself. So in SNCetc directory we use the sapgenpse utility:
./sapgenpse get_pse -s 2048 -p SAPSNCS.pse "CN=sapsnc O=macdummy"You can hit Enter (twice), to avoid password-protecting your new PSE file, or you can supply a password if you prefer. The warning about no SECUDIR environment variable, we can ignore, because in default location ~/sec sapgenpse has successfully created a new PSE (“Personal Security Environment” – SAP terminology). We can think of this PSE as containing a public key certificate (and a private key), and having the ability to import certificates to its certificate list.
Next step is to go to the SAP system you want SNC logon to work with, and download (export) the relevant certificate. Obviously it helps if you can already logon to said system e.g. via password logon, or via SSO from a MacBook or Windows machine, and then you also need rights to tcode STRUST… if this is more access than you have, then hopefully you know someone who can get and send you the exported certificate.
So in our example we do a password login to an SAP system, then go to STRUST, double-click on left-hand menu under SNC SAPCryptolib, then double click on the subject field of the SNC SAPCryptolib “Own certificate” in the right-hand pane, so that its details appear lower down the page, then choose menu Certificate -> Export…

Choose Binary or Base64 format (doesn’t matter), choose a location on your local computer, for example the SNCetc directory where sapgenpse is, give the new certificate a filename and save it. Mine is called sncnpl.cert - you can call yours what you like.
Next step is to use this downloaded certificate and import it to the certificate list of the MacBook’s PSE bundle, so we use sapgenpse utility for that also:
./sapgenpse maintain_pk -v -a sncnpl.cert -p SAPSNCS.pseThen, we want to export our newly modified client certificate of the PSE, as follows:
./sapgenpse export_own_cert -p SAPSNCS.pseThis command runs and then displays the output (exported) X.509 certificate in the terminal window you executed the command in. You need to now copy-paste the text beginning with line —–BEGIN CERTIFICATE—– and ending with line —–END CERTIFICATE—– (including those two lines in the block of text)… and save that text to a new file, using nano, or TextEdit, or whatever. My example is called exportedmacsnc.cert. If you want to view your certificate, and it has the suffix “cert”, then double-click on it in Finder; we are not (yet) adding stuff to Keychains (easier to visit this topic when we come to use SLC-Method) so we avoid that option, instead press “View Certificates”:

Then press “OK”, and then “Cancel” (to avoid adding anything to a Keychain at this stage).
Back on the SAP server in STRUST, we go into Change mode, make sure the SNC Cryptolib certificate is still in focus (double-click on its subject line to make sure it appears in lower window), then scroll down to right-hand window near the bottom of the page, and click on “Import certificate” icon… from there you upload your exportedmacsnc.cert from local machine to server. Then click on “Add to Certificate List”, and hey kids, remember to Save the STRUST transaction from the upper menu (I speak from bitter experience of forgetting this simple Save-task).

So the list should now contain the relevant uploaded certificate:

Next, we adjust our SAPGUI for Java app to use SNC for encryption. We create a new Connection Item. The easiest way is to specify a SAP system’s Message Server in the System tab (for people who know how to provide the Message Server and “sncqop” etcetera etcetera parameters directly in a Connection String, they can use the Advanced tab). Either way, it’s important to specify the Message Server details, as “Direct Connections” to e.g. the Primary Application Server, don’t offer SNC options.
So when creating a new Connection Item, in System tab you click the icon to the right of the System tab’s System-field to open Message Server list:

Click the Create icon (top left before Delete-icon) to add a new Message Server to the List (if no empty line is already available). Define the three needed pieces of information - Name (SID), Server (hostname or IP address), and Port, then hit Enter, and the app constructs the Host Specification value. For NPL, which some of you may know is SAP’s free Developer Edition or “Mini-SAP”, then the Message Server is on port 3601. [Generally, the Message Server’s port is 36nn, where nn is the Instance Number of the ASCS server of an SAP system.]

Once you have defined a Message Server, and selected it as the System tab’s System value from drop-down list-box, then SAPGUI for Java connects to the relevant Message Server and gets the details of Group/Server options (useful for load balancing but not highly relevant to our blog-topics). Anyway as you can see I chose a default Group called “PUBLIC”.
Next, we switch to the Security tab:
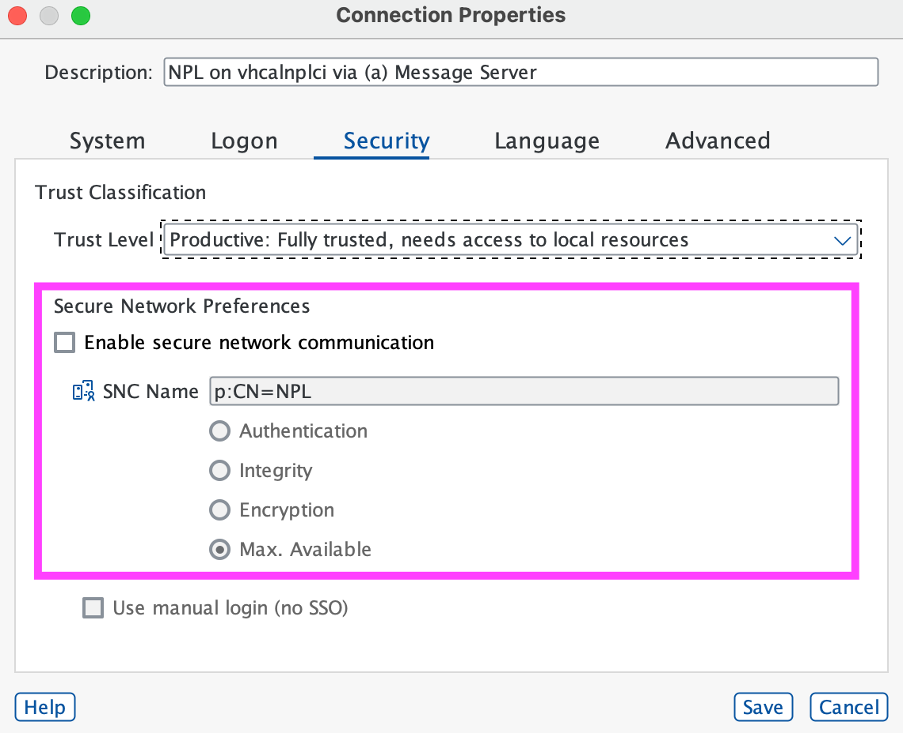
Note that the Message Server has also supplied us with the SNC Name of NPL, “p:CN=NPL”. We check the “Enable secure network communication” checkbox, as we definitely want to use SNC. Let’s keep the “Max. Available” default. Also you can choose “Use manual login (no SSO)” checkbox if you like, this means that SNC is only used to encrypt the transmitted data. [We leave that unchecked, as the warning message we get later is our main clue that SNC encryption is working - SAPGUI for Java doesn’t have that nice Lock/Unlock icon that SAPGUI for WIndows has to tell you about whether SNC encryption is on - later, once you know that SNC is working, and you only need encryption not SSO, then you can get rid of the warning message by checking this option]. Save your settings.
Ok, so what if we now double-click on our Connection Item and see what happens…hmm:

No worries though, we have the solution and the explanation of why it works…
So what we need to do is let the SAPGUI app know the (temporary) values of variables SNC_LIB and SECUDIR. So close SAPGUI altogether (menu path SAPGUI -> Quit SAPGUI). Then we open Terminal, export two environment variables, and then we start up SAPGUI from the Terminal (this matters, as it is only the Terminal session that knows these variables have been set - the result is that when opening from this same Terminal session, the process that then runs the SAPGUI app is able to pick up these variables and make them available to the SAPGUI app). Here are the magic commands as an example:
export SNC_LIB=/Users/dylan/SAP/SNCetc/libsapcrypto.dylib

export SECUDIR=/Users/dylan/sec

cd /Applications/SAP\ Clients/SAPGUI\ 7.80

open SAPGUI\ 7.80.app
Then we try to logon again and… great success!

The SAPGUI session is encrypted by SNC, so we can logon without fear of our password being captured by an evil Wireshark agent or similar. As we provided a client certificate where the Subject (and therefore the related SNC name) doesn’t match the SNC name of any user in the system, so that is why SSO does not occur, hence the warning message in the footer bar.
Note that because we opened the SAPGUI app from the Terminal, the SAPGUI then persists the values for SNC_LIB and SECUDIR in its own internal datastore. Meaning that next time you open SAPGUI app, you can do it from Spotlight, Finder, or Dock icon “as normal”. You only need to open SAPGUI app from Terminal, when you want to tell it new values for environment variables. As we just saw and will see later again, this “run-once-from-Terminal”-trick is very useful.
SSO via PSE-Method (amd64)
From our previous activity for SNC encryption only, we currently have the PSE ~/sec/SAPSNCS.pse, which defines a nonsense subject. At any given moment, in SECUDIR (defaults to ~/sec directory) there can only be one SAPSNCS.pse that is used by SAPGUI for Java. So as preparation for this section’s SSO enablement, we rename this PSE to make it a backup file.
mv SAPSNCS.pse SAPSNCS.pse_bacThat makes space for a new SAPSNCS.pse, which we are now going to generate, again using the sapgenpse utility… The only difference this time compared to the above Encryption-Only steps, is that now we end up with a client certificate with a non-dummy Subject line, that will be used to find the SNC Name of an actual SAP user, and this user will then succeed in doing an SSO logon to the SAP system.
In the SAP system, tcode SU01, let's look at the user details of our SAP user MACMARMOT. In Change mode, go to tab SNC, and enter the SNC Name in this case as “p:CN=MACMARMOT@GARP.RHUBARB” (i.e. “p:” plus the Subject of our client certificate that we will soon create below). We will also check the checkbox “Allow password logon for SAP GUI (user-specific)” as there may be other computers that don’t have client certificates for SSO, from where MACMARMOT would like to logon using their username and password. Save.

Back in our local machine's SNCetc directory, we now create the new PSE:
./sapgenpse get_pse -s 2048 -p SAPSNCS.pse "CN=MACMARMOT@GARP.RHUBARB"Then you modify the new PSE by importing via maintain_pk the file sncnpl.cert (that you already exported from the SAP server previously, see previous section for details):
./sapgenpse maintain_pk -v -a sncnpl.cert -p SAPSNCS.pse…and then you export the updated X.509 certificate:
./sapgenpse export_own_cert -p SAPSNCS.pse…and save the output certificate details from your terminal to a new file (again see previous section for details on copying and saving the relevant block of text); I called this file exportedmacmarmotsnc.cert but of course you can call yours whatever you like.
Then import this exportedmacmarmotsnc.cert to the Certificate List of SNC SAPCryptolib PSE in STRUST of the target SAP system, just as we did for the exported certificate in the previous section. [Note that for this STRUST task, if you want to logon using the same Message Server based Connection Item, you should first temporarily uncheck “Enable secure network communication” from the Item’s config - the reason for this, is left as an exercise for the reader 😀].
Once you have added the new certificate (remember to Save this addition!) then there are two trusted client certificates visible in STRUST, including the new one for our target user that we just imported:

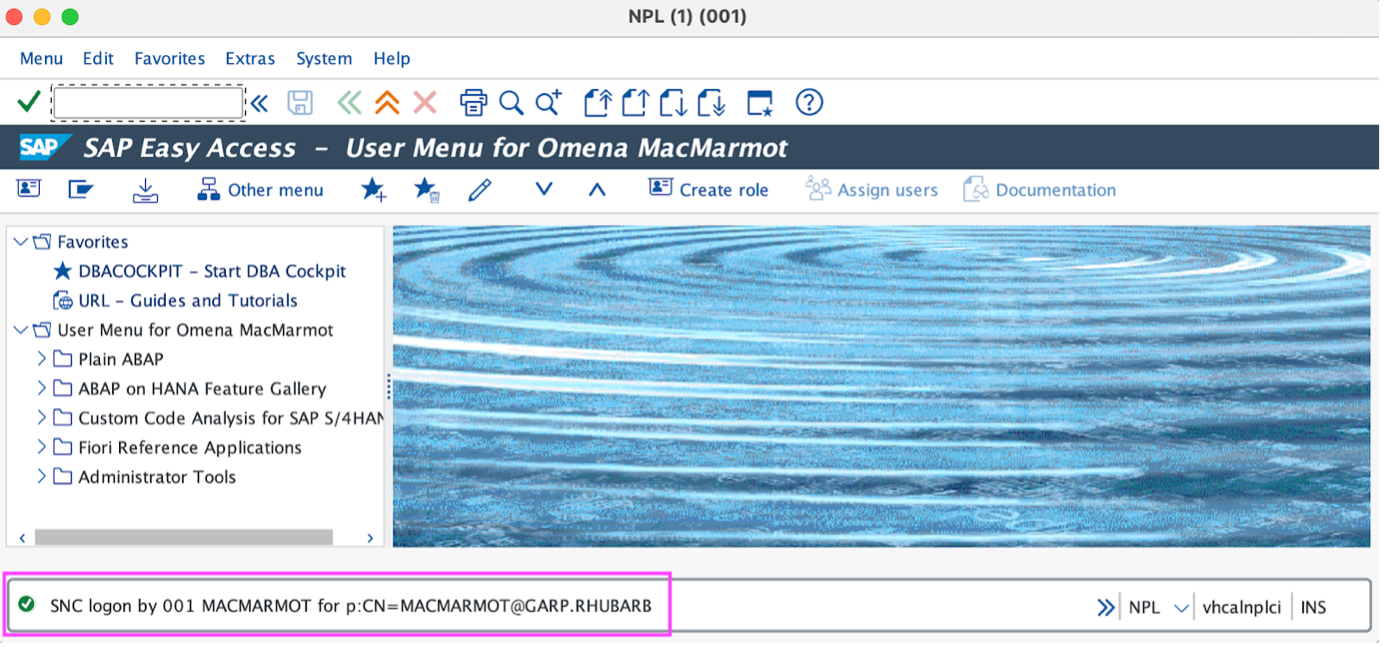
Now we can log off from SAP, quit the SAPGUI app, reopen SAPGUI, and use our SNC-enabled Connection Item to logon. (If you did not already have Security -> SNC preferences -> SNC Name -> radiobutton set to “Max. Available”, then now is a good time to set it that way). Now the encrypted logon succeeds with SSO, no need to enter our username and password - the footer bar informs us of our amazing success:
Although we have seen that Encryption-Only and SSO work on amd64 MacBooks without needing to install SAP Secure Login Client, still it might be that some users have a preference or good reason for using SLC anyway - for example, if there are non-demo SAP systems in your organisation with SLC-based logon set up (Kerberos and/or X.509 certificates), then it might be more convenient to also logon to demo SAP systems using the SLC-Method.
Install SLC 3.0 and add NPL server certificate to Apple Keychain Access (amd64, arm64)
[Screenshots for this section from the amd64 machine, but advice applies also to arm64].
Install SLC using the file we obtained earlier, SecureLoginClient.pkg. Once this is done, SLC sets 4 environment variables, ensuring that next time SAPGUI for Java is opened and a user tries to connect to some SAP system with SNC enabled in the Connection Item, the SAPGUI app recognises SLC as its new “Security Controller”, and opens SLC. But before SLC can successfully do SNC Encryption for SAPGUI sessions, we first need to do some configuration work.
The thing is, that SLC ignores any current valid SAPSNCS.pse that you might (or might not yet) have already set up have in ~/sec, so the SAPSNCS.pse’s X.509 certificate is never presented to the SAP system by SLC. Although SLC does have its own “DummyCredential” that is no doubt signed by an SAP CA and thus trusted widely by SAP servers, on the other hand SLC doesn’t (yet) trust our SAP system (NPL).
This lack of trust in NPL is why, if you try to straight away logon either with Encryption-Only or SSO (with SLC now acting as SAPGUI app’s Security Controller for these activities), you will get an error:
GSS-API(min): A2200210:Peer certificate verification failed
target="p:CN=NPL"
That's because SLC consults your MacBook’s “login”-Keychain to see whether the client computer trusts the SAP system we want to logon to.
The solution is to add the relevant NPL server certificate (sncnpl.cert - see above for details on getting hold of it) to the Keychain. We do this in the Keychain Access app, which you can find from Spotlight or from the /Applications/Utilities directory in Finder. So let’s open Keychain Access.
So in Keychain Access, go to the “login”-keychain area in the left-hand menu, then go to Certificates tab: currently no server certificate from NPL there. File -> Import Items… and select our sncnpl.cert and add it. Then it appears in the Certificates list (not in the My Certificates list, as after all it isn’t mine, it’s NPL’s 😀).
Double-click on the NPL certificate and open the Trust section by clicking on the wee arrow to the left of the heading “Trust”, and then from the blue drop-down-list icon select “Always Trust”:

When you close the window (red dot at top left), you will need to provide your admin password (or Touch ID fingerprint if you have that configured) to save the changes to the Trust-config you just made. Now the NPL certificate is trusted for this (MacBook computer’s) login account:

Now SLC will be able to do its job of encrypting SAPGUI sessions.
Encryption-Only via SLC-Method (amd64,arm64)
[Screenshots for this section from the arm64 machine, but advice applies also to amd64].
Here we show how to use SLC in Encryption-Only mode (without SSO logon). In other words, your SAPGUI sessions are encrypted, but you still logon manually by supplying SAP username and password.
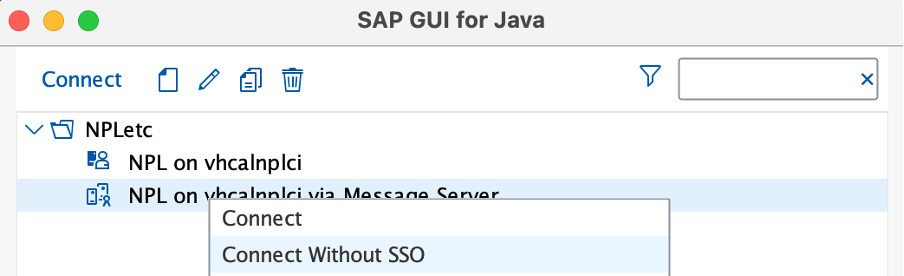
So there are two easy ways to proceed. Either right-click on your Connection Item (the via Message Server one) and select “Connect without SSO”:
Or, if you mostly intend to use Encryption-Only logon, then you can edit the Connection Item and check the checkbox “Use manual login (no SSO)”, and Save.
In this case, double-clicking the Connection Item tells SAPGUI to Connect without SSO (but with SNC Encryption).
In both cases, the result is that we get to the manual logon screen, and SNC Encryption is working (tested using Wireshark, see Appendix for details).

So this is the result we intended, which was nice.
SSO via SLC-Method using a PKCS12 file and Apple Keychain Access (amd64, arm64)
[Screenshots for this section from the arm64 machine, but advice applies also to amd64].
“Note for pedants and/or the doubtful”: setting up the PSEs for arm64 MacBook is described later in this blog. The PSE creation and configuration with server certificate etc using sapgenpse works exactly the same on arm64 as on amd64, i.e. this is NOT dependent on which version of libsapcrypto.dylib you happen to have in SNC_LIB or in your working directory. The library version ONLY matters at logon-time, when SAPGUI for Java wants to enable an actual SAPGUI session to be encrypted using the PSE-Method; but since in this section we are obviously configuring and using the SLC-Method, then SAPGUI for Java will obviously be using the correct library version (the SLC version). In summary, there’s no problem here 😀].
To get SSO working when using Secure Login Client and X.509 certificates for the example SAP user MACMARMOTARM, who has a PSE which contains a private key and a public certificate, we need to first make sure that the relevant PSE is currently the file SAPSNCs.pse in ~/sec. [Note for arm64 MacBook users: do the relevant sapgenpse-related steps shown in section SSO via PSE-Method (arm64) and then you can continue back in this section with SSO via SLC-Method setup].
The command export_p12 of sapgenpse allows us to create a new file, which we give the extension .p12 to make it obvious that the resulting file is a PKCS12 file:
./sapgenpse export_p12 -p SAPSNCS.pse macmarmotarmp12.p12We have to define a password as part of the p12 file creation.
Then we need to import this p12 file to Keychain Access app, “login”-keychain area, My Certificates tab, go to menu File -> Import Items… enter the correct password (the one you just defined for the file):

And as a result we now have our certificate with its private key in My Certificates:

Now from top bar icon of SLC, choose menu “Show Profiles”:
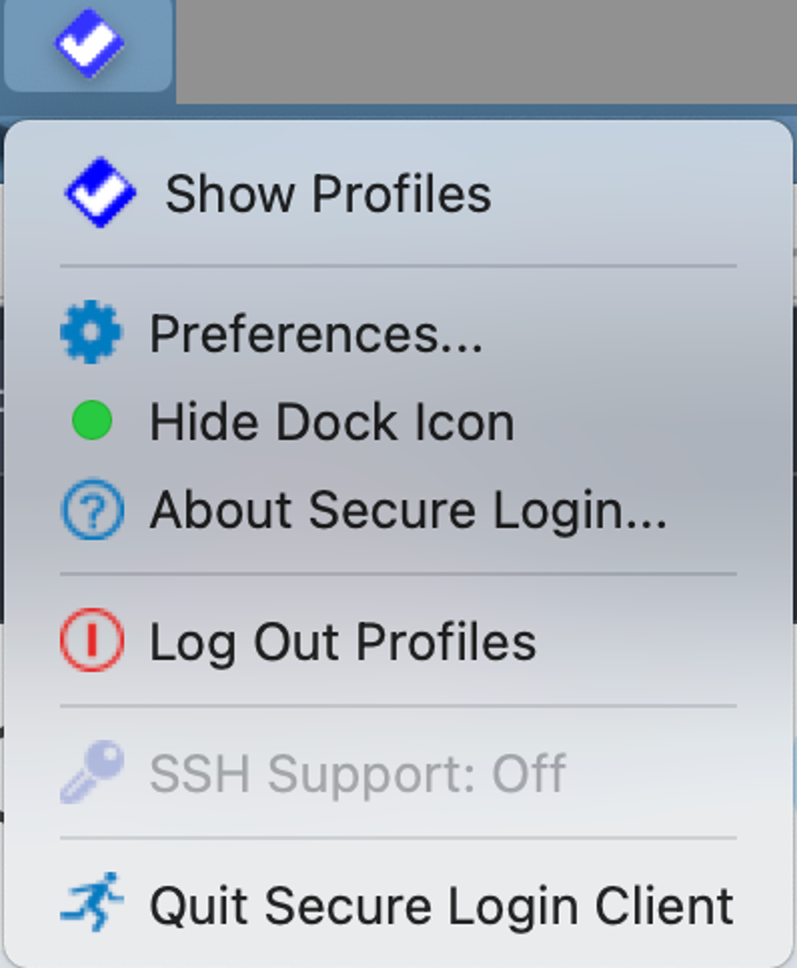
From there, check the checkbox for the option to use the certificate for MACMARMOTARM@GARP.RHUBARB (the certificates in this list are the ones in your “login”-Keychain’s My Certificates List):

Then we try to logon to NPL using the Connection Item configured to go via Message Server, we get a password challenge:

It’s your MacBook user’s password that you need here. Enter it, click “Always Allow”... and… [drum-roll]...:

It works!
Switching off SLC-Method and enabling PSE-Method
Close the SLC app (and SAPGUI for Java app). Now we hide the plist’s 4 environment variables:
cd /Library/LaunchAgents

sudo mv com.sap.secureloginclient.plist com.sap.secureloginclient.plist_bac

launchctl unsetenv SSF_LIBRARY_PATH

launchctl unsetenv SSF_LIBRARY_PATH_64

launchctl unsetenv SNC_LIB

launchctl unsetenv SNC_LIB_64
The mv command prevents those SLC environment variables being set again when you next login or reboot to your MacBook. And the launchctl unsetenv commands remove those environment variables from your current MacBook session.
If you now in this current Terminal session run the command:
printenv | egrep "SNC|SSF"…it still shows the old values of the variables, that is just because those old values were sourced when you opened the current Terminal session, i.e. before you unset them using launchctl unsetenv. So Quit Terminal (from the top bar menu -> Quit Terminal), then open Terminal again - this time the printenv command should return none of those four SLC-related values.
The reason we are doing this unsetting of the 4 SLC variables is because this is how we prevent SAPGUI for Java app from thinking that its Security Controller is SLC.
[In the arm64 case we make sure we have copied the SLC library from /Applications/Secure Login Client.app/Contents/MacOS/lib/libsapcrypto.dylib into a sensible subfolder, mine is in ~/SAP/SNCetc/lib64/ ].
Check we have the relevant SAPSNCS.pse we want to use in ~/sec. [If you still need to complete the PSE-Method configuration e.g. you are an arm64 user and only installed SLC to get hold of the correct libsapcrypto.dylib, then go the section Encryption-Only via PSE-Method (arm64) for that, and once done, come back here to enable the PSE-Method].
We check that SAPGUI has been properly closed (top bar menu -> Quit SAPGUI). Now we close Terminal completely - top bar -> Quit Terminal - then reopen Terminal and do the following (change the values according to your own directories including SAPGUI revN filepath) commands, which set 2 variables temporarily and then open SAPGUI from Terminal:
amd64 example (relevant MacBook user, library in SNCetc, SAPGUI 7.80.app):
export SNC_LIB=/Users/dylan/SAP/SNCetc/libsapcrypto.dylib

export SECUDIR=/Users/dylan/sec

open /Applications/SAP\ Clients/SAPGUI\ 7.80/SAPGUI\ 7.80.app
arm64 example (relevant MacBook user, library in SNCetc/lib64, SAPGUI 7,80rev2.app:
export SNC_LIB=/Users/dylan.drummond/SAP/SNCetc/lib64/libsapcrypto.dylib

export SECUDIR=/Users/dylan.drummond/sec

open /Applications/SAP\ Clients/SAPGUI\ 7.80rev2/SAPGUI\ 7.80rev2.app
Then double-click the Connection Item that has the Message Server target and SNC config:

Which is the result we were looking for - SAPGUI for Java didn’t look for (nor open) SLC this time, but instead sent the X.509 certificate from ~sec/SAPSNCS.pse. Also, SAPGUI for Java persists the values of SNC_LIB and SECUDIR that we exported in Terminal, so it remembers them. So next time we need to open SAPGUI we can do that “normally”, e.g. from Spotlight or Applications folder or from Dock, and SAPGUI app works with ~sec/SAPSNCS.pse i.e. without knowing about SLC.
As a further test, we reboot the MacBook and check that the 4 SLC environment variables do not return to haunt us.
printenv | egrep "SNC|SSF|SECUDIR"It should not return anything related to SLC or SAPGUI (because the plist file was backed up and thus not operational, and because the variables we exported from Terminal have been cleared).

SAPGUI for Java however remembers (from its own datastore) the values of SNC_LIB and SECUDIR for using the PSE-Method, so the PSE-Method is enabled and survives reboot.
Remarks on Uninstalling SLC
Reminder for arm64 MacBook users: before uninstalling SLC, remember to first copy-paste SLC’s 64-bit /Applications/Secure Login Client.app/Contents/MacOS/lib/libsapcrypto.dylib, for example put it in a ~/SAP/SNCetc/lib64 directory. Since you will need this version of the library to use the PSE-Method at logon-time.
If you decide to uninstall SLC - for example you don’t need it for anything else and you prefer the PSE-Method, or whatever - then you can do that by moving it to the Bin from Applications according to SAP’s advice:
https://help.sap.com/docs/SAP_SINGLE_SIGN-ON/df185fd53bb645b1bd99284ee4e4a750/f0085ce3ff954e61a24b38...
“Procedure
Under Applications, drag and drop the Secure Login Client icon to the trashcan.
Provide the admin password twice in order to complete the uninstallation.
You have completely uninstalled Secure Login Client without having left any remains on your Mac client.”
But actually, contra the SAP advice, this procedure does not completely uninstall SLC, as it doesn’t remove the file /Library/LaunchAgents/com.sap.secureloginclient.plist - so, you will need to manually delete that also - either move to the Bin from Finder, or use
sudo rm /Library/LaunchAgents/com.sap.secureloginclient.plist… and then, to allow the PSE-Method to work without needing to reboot your computer, then you should also use the “run-once-from-Terminal”-trick shown in the previous section.
Switching on SLC-Method
If you prefer using SLC instead of your local ~sec/SAPSNCS.pse as the “Security Controller” of SAPGUI for Java app, but you have switched off SLC and enabled the PSE-Method, then you can switch back to using SLC as follows…
Quit SAPGUI. Open Terminal.
cd /Library/LaunchAgents

sudo mv com.sap.secureloginclient.plist_bac com.sap.secureloginclient.plist

launchctl setenv SSF_LIBRARY_PATH "/Applications/Secure Login Client.app/Contents/MacOS/lib/libsapcrypto.dylib"

launchctl setenv SSF_LIBRARY_PATH_64 "/Applications/Secure Login Client.app/Contents/MacOS/lib/libsapcrypto.dylib"

launchctl setenv SNC_LIB "/Applications/Secure Login Client.app/Contents/MacOS/lib/libsapcrypto.dylib"

launchctl setenv SNC_LIB_64 "/Applications/Secure Login Client.app/Contents/MacOS/lib/libsapcrypto.dylib"
[Note that since we essentially recreate the file com.sap.secureloginclient.plist, we may get a notification of this popping up (on arm64 with “Ventura” macOS it pops up, but doesn’t on amd64 with older “Big Sur” macOS):

That is the same notification that appears when you install SLC from the DMG. It’s basically letting us know that /Library/LaunchAgents/com.sap.secureloginclient.plist exists again. About the 4 launchctl setenv commands we provided, those are enabling us (soon) to use SLC via SAPGUI for Java app].
Quit Terminal from top bar menu -> Quit Terminal. Reopen Terminal, check that the relevant SLC environment variables are now known (note there is no need to specify SECUDIR, as SLC doesn’t use that variable):
printenv | egrep "SNC|SSF|SECUDIR"
Now you can open SAPGUI from the Terminal:
open /Applications/SAP\ Clients/SAPGUI\ 7.80rev2/SAPGUI\ 7.80rev2.app…and then you can use SLC for handling encryption and SSO. If you quit SAPGUI, then afterwards you can again reopen it normally (since the new variables have been saved to SAPGUI for Java’s settings). Since we have reinstated the SLC’s plist, then after a reboot SLC will continue to act as the Security Controller for SAPGUI for Java.
Prepare for PSE-Method on arm64 by copy-pasting a library
For the PSE-Method to work on arm64 SAPGUI for Java, we need to use a different version of libsapcrypto.dylib than the one supplied from the SAR archive. Luckily the version we need is contained in the app contents of SLC:
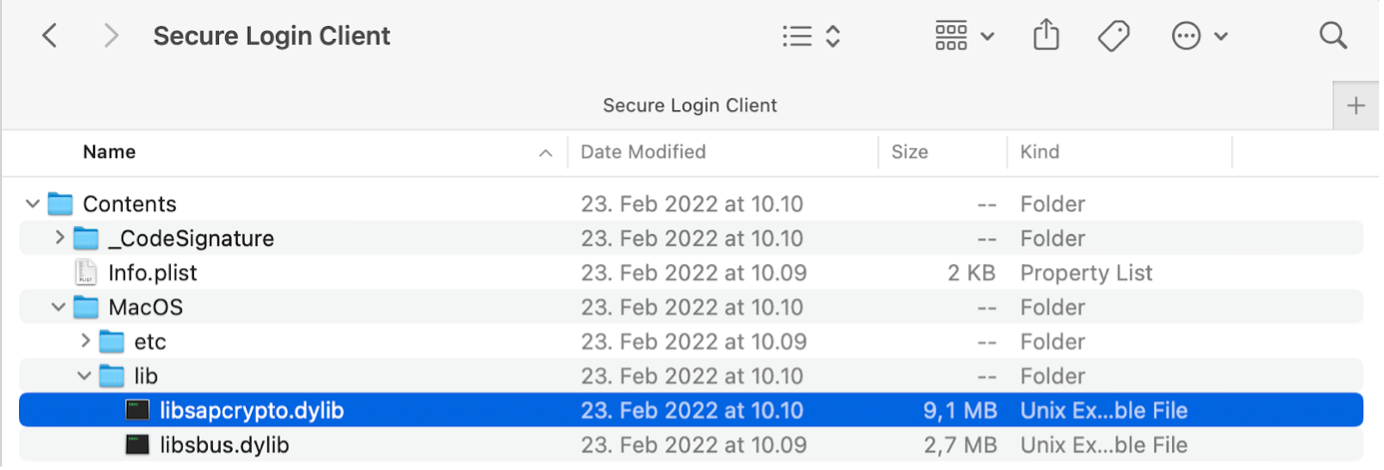
You might note that it is almost twice as big as the version from the SAR archive, about 9 MB.
So copy /Applications/Secure Login Client.app/Contents/MacOS/lib/libsapcryptolib.dylib into e.g. ~/SAP/SNCetc/lib64 directory. You can do this using Finder or using Terminal:
mkdir -p ~/SAP/SNCetc/lib64

cp /Applications/Secure\ Login\ Client.app/Contents/MacOS/lib/libsapcrypto.dylib ~/SAP/SNCetc/lib64
[My guess why SAPGUI for Java on arm64 needs the 64-bit library, is that since this arm64 version of SAPGUI for Java is quite new (released in 2022), and since arm64 MacBooks are in general quite new (since around 2020), so SAP decided not to make this arm64 version of SAPGUI for Java compatible with any older - perhaps 32-bit - libsapcrypto.dylib. But that is just guesswork, I have no inside knowledge; if anyone has a better explanation then feel free to provide it in the Comments section of the blog].
Encryption-Only via PSE-Method (arm64)
SAP offers an arm64 version of SAPGUI for Java, since September 2022 - I have been using the arm64 version and it seems to work just fine. We therefore assume in this blog that you also installed the arm64 version of SAPGUI for Java on your arm64 Mac.
Although at the time of writing (April 2023) SAP doesn’t offer in Software Downloads an arm64 version of the SAPCRYPTOLIB SAR archive (or the SAPCAR utility for extracting SAR archives, the good news is that both SAPCAR works (extracts the SAR contents), and the extracted sapgenpse utility also works.
It’s important that we check that no SLC-related environment variables are set:
printenv | egrep "SNC|SSF"If this returns variables referencing Secure Login Client’s filepaths, and/or if the file /Library/LaunchAgents/com.sap.secureloginclient.plist still exists, then here is the cure:
cd /Library/LaunchAgents

sudo mv com.sap.secureloginclient.plist com.sap.secureloginclient.plist_bac

launchctl unsetenv SSF_LIBRARY_PATH

launchctl unsetenv SSF_LIBRARY_PATH_64

launchctl unsetenv SNC_LIB

launchctl unsetenv SNC_LIB_64
Reminder: make sure also that you have obtained a copy of SLC’s version of libsapcrypto.dylib and put it in a sensible working directory, see section Prepare for PSE-Method (arm64) for details.
Top bar menu -> Quit Terminal. Reopen Terminal. Now those variables are gone; re-run the printenv command to check this.
Now in my working directory ~SAP/SNCetc, I have copied over the SAR archive and SAPCAR, so we extract the SAR archive with the exact same commands as we used in the amd64 scenario:
chmod +x SAPCAR_1115-70006239.EXE

./SAPCAR_1115-70006239.EXE -xvf SAPCRYPTOLIBP_8548-70002813.SAR
This works fine on our arm64 machine, 4 files extracted (including sapgenpse and libsapcrypto.dylib).
We generate our client PSE, this time with a slightly different dummy Subject just for clarity:
./sapgenpse get_pse -s 2048 -p SAPSNCS.pse "CN=sapsncarm O=macdummyarm"This works ok and the SAPSNCS.pse is created. Then in the SAP system NPL, we export (download) the SNC SAPCryptolib certificate the same way as before (see Section Encryption-Only via PSE-Method (amd64) for details, again we will save it as sncnpl.cert.
Add this to the client PSE’s certificate list and then export the updated client certificate, same commands as for amd64 scenario:
./sapgenpse maintain_pk -v -a sncnpl.cert -p SAPSNCS.pseThen, we want to export our newly modified client certificate of the PSE, as follows:
./sapgenpse export_own_cert -p SAPSNCS.pseMine is saved as exportedmacsncarm.cert. So import this and add to the certificate list of the SNC SAPCryptolib PSE (as in the amd64 scenario) and save the change, now it is visible in STRUST:

Logoff NPL. Then we set up a new Connection Item for NPL in our SAPGUI for Java app, using the Message Server information as in the amd64 scenario. Quit SAPGUI for Java.
Open Terminal, export 2 relevant variables, and open SAPGUI from the Terminal:
export SNC_LIB=/Users/dylan.drummond/SAP/SNCetc/lib64/libsapcrypto.dylib

export SECUDIR=/Users/dylan.drummond/sec

open /Applications/SAP\ Clients/SAPGUI\ 7.80rev2/SAPGUI\ 7.80rev2.app
Now your Encryption-Only logon using the relevant Connection Item should work.
SSO via PSE-Method (arm64)
The prerequisites are the same as for Encryption-Only via PSE-Method: you have ensured that SLC-Method is switched off, and you have the 64-bit version of libsapcrypto.dylib copied into a relevant directory such as ~/SAP/SNCetc/lib64. See sections above for details.
Once the prerequisites are fulfilled, the procedure for SSO via PSE-Method is the same as on amd64 MacBooks, only for a different user in our example. We can briefly summarise though.
Back up any current SAPSNCS.pse in ~/sec:
mv SAPSNCS.pse SAPSNCS.pse_bacIn the SAP system, tcode SU01, for our SAP user MACMARMOTARM. In Change mode, go to tab SNC, and enter the SNC Name in this case as “p:CN=MACMARMOTARM@GARP.RHUBARB” (i.e. “p:” plus the Subject of our client certificate that we will soon create below). We will also check the checkbox “Allow password logon for SAP GUI (user-specific)” as there may be other computers that don’t have client certificates for SSO from where MACMARMOTARM would like to logon using their username and password. Save.
Back in our local machine's SNCetc directory, we now create the new PSE:
./sapgenpse get_pse -s 2048 -p SAPSNCS.pse "CN=MACMARMOTARM@GARP.RHUBARB"Then you modify the new PSE by importing via maintain_pk the file sncnpl.cert (that you already exported from the SAP server previously, see e.g. section Encryption-Only via PSE Method (amd64) for details):
./sapgenpse maintain_pk -v -a sncnpl.cert -p SAPSNCS.pse…and then you export the updated X.509 certificate:
./sapgenpse export_own_cert -p SAPSNCS.pse…and save the output certificate details from your terminal to a new file; I called this file exportedmacmarmotarmsnc.cert but of course you can call yours whatever you like.
Then import this exportedmacmarmotarmsnc.cert to the Certificate List of SNC SAPCryptolib PSE in STRUST of the target SAP system, just as we did for the other exported certificates in the previous sections. Now we can log off from SAP, and top bar -> Quit SAPGUI.
Check using printenv that the 4 SLC environment variables don’t exist. If they don’t you can reopen SAPGUI. If they do exist, follow the previous section’s advice for unsetting those:
cd /Library/LaunchAgents

sudo mv com.sap.secureloginclient.plist com.sap.secureloginclient.plist_bac

launchctl unsetenv SSF_LIBRARY_PATH

launchctl unsetenv SSF_LIBRARY_PATH_64

launchctl unsetenv SNC_LIB

launchctl unsetenv SNC_LIB_64
…then top bar -> Quit Terminal. Reopen Terminal, run printenv to check that the unwanted SLC variables are really gone; then export 2 temporary variables and open SAPGUI from Terminal:
export SNC_LIB=/Users/dylan.drummond/SAP/SNCetc/lib64/libsapcrypto.dylib

export SECUDIR=/Users/dylan.drummond/sec

open /Applications/SAP\ Clients/SAPGUI\ 7.80rev2/SAPGUI\ 7.80rev2.app
Now use our SNC-enabled Connection Item to logon. (If you did not already have Security -> SNC preferences -> SNC Name -> radiobutton set to “Max. Available”, then now is a good time to set it that way). Now the logon succeeds with SSO, so no need to enter our username and password for user MACMARMOTARM - the footer bar informs us of our amazing success:

Appendix: Wireshark shows why SNC encryption is valuable
We can use Wireshark to show the difference between a SAPGUI session established without using any SNC Encryption (e.g. logging on directly to the Primary Application Server (NPL instance 00 on port 3200), and a SAPGUI session established using SNC Encryption-Only or SSO (via logging on to the NPL instance 01’s Message Server on port 3601).
Now this blog isn’t about installing or using Wireshark for SAPGUI analysis, if anyone is interested then there is this blog available (warning: self-promotion!):
https://blogs.sap.com/2022/06/12/wireshark-with-sap-dissectors-for-ubuntu-and-macos/
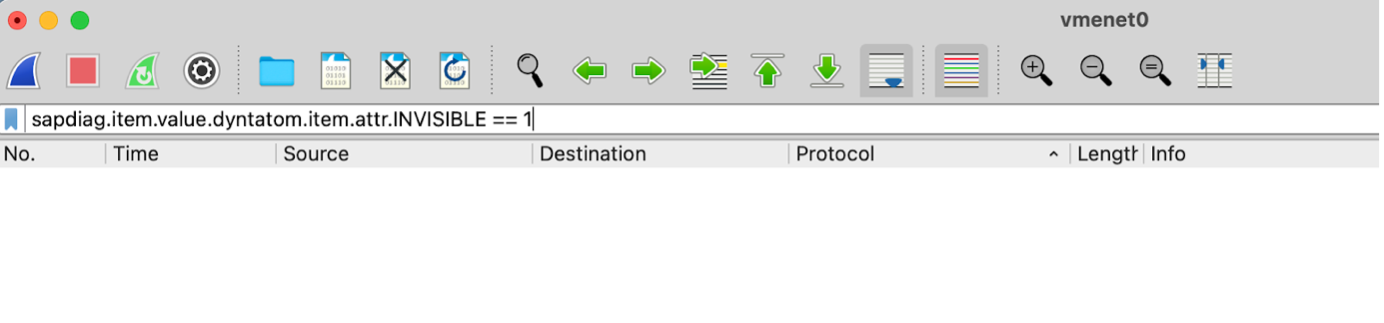
First example: logon directly to NPL without any SNC encryption, e.g. directly calling the Primary Application Instance 00 (and avoiding the Message Server instance 01), using the relevant Connection Item. Wireshark was listening on the relevant interface, and for example the SAP user MARMOT and even the user’s password, are available to our White Hat tester in Wireshark. In the screenshot you see I have done a search on the SAP data inside SAP Diag Protocol / Message / Item… folder using:
sapdiag.item.value.dyntatom.item.attr.INVISIBLE == 1
.. thus easily finding in this case, user and password data:

You can see that the SAP user I input into the SAP logon screen was MARMOT. Note that I put a red box over the actual password, and greyed out the related hexadecimals, so yous don’t get to know MARMOT’s password (we don't want to annoy our furry forest friend, that's clear!) - but I can assure you, that Wireshark with SAP Dissectors really does find and display the password.
And it gets worse. If MARMOT would then go to various business tcodes and start working as an SAP user, all sorts of transaction data would be available in the Wireshark recording. This blog isn’t about telling companies and organisations to improve their SAP security posture, but many of you will note that there are plenty of SAP Landscapes around, where SAPGUI traffic is not encrypted 😱.
Now, we logoff NPL, and this time logon using either Encryption-Only or SSO, both of these are using SNC Encryption. A new Wireshark recording session captures the traffic, but this time there is no useful SAPGUI session data available, because, well, because it is encrypted 😀.
So we can see that indeed the SNC Frame is in action, but the SAP Diag Protocol folder contains only Header info (and does not now contain an SAP-data subfolder / Message with any Items):

Now we search on the same filter for user and password info as we did in the unencrypted case, and this time we find… nothing:

Even if we remove the filter, and search for other kinds of SAPGUI application data, we also find nothing:
So I think we can agree, that is much more secure than having an unencrypted SAPGUI session.
By the way, I did these tests for 5 relevant cases:
(1) Manual logon direct to Application Server (no encryption).
(2a) SNC with dummy certificate and no SLC installed (or SLC not activated by SAPGUI for Java).
(2b) SSO with certificate and no SLC installed (or SLC not activated by SAPGUI for Java),
(3a) SNC with SLC installed and used by SAPGUI for Java,
(3b) SSO with SLC installed and used by SAPGUI for Java, and using the X.509 certificate Profile.
So although SAPGUI for Java doesn’t provide the same convenient icon as SAPGUI for Windows does (to tell the user whether or not their SAPGUI sessions are encrypted), still our tests have shown that when SNC is invoked for the 4 relevant cases, encryption of the relevant SAPGUI data really occurs.
- SAP Managed Tags:
- Basis Technology
3 Comments
You must be a registered user to add a comment. If you've already registered, sign in. Otherwise, register and sign in.