
- SAP Community
- Groups
- Interest Groups
- DevOps and System Administration
- Blogs
- SNC Encryption and SSO for SAPGUI on Windows 11 vi...
DevOps and System Administration Blogs
Explore DevOps and system administration blog posts. Stay current with best practices, tools, and insights into efficient IT management strategies.
Turn on suggestions
Auto-suggest helps you quickly narrow down your search results by suggesting possible matches as you type.
Showing results for
dylan-drummond
Contributor
Options
- Subscribe to RSS Feed
- Mark as New
- Mark as Read
- Bookmark
- Subscribe
- Printer Friendly Page
- Report Inappropriate Content
04-19-2023
6:15 PM
Intro
We show how to use SAP SNC Encryption and SSO on a Windows 11 client machine running SAPGUI for Windows 8.00 PL1 64-bit version, using both the old-school PSE-Method as well as using SAP Secure Login Client ("SLC-Method").

Although all the goals of our demo get achieved, still anyone with the stamina to read this blog will likely notice that the author is not a self-styled Windows expert, and there are various side-trails that I didnae bother editing out (skip past those if you like). The motivation for this blog was mainly to complete a trilogy of blogs, here are the ones I wrote for Linux Desktop clients and for MacBook clients:
https://blogs.sap.com/2023/03/27/setting-up-sapgui-sso-on-a-linux-client/
https://blogs.sap.com/2023/04/12/sapgui-encryption-and-sso-with-pses-and-keychain-for-macbooks-amd64...
As usual, but especially for Windows paradigm, I advise BYODS (Bring Your Own Debug Skills), as I don't run a Helpdesk.
We are using a Windows 11 VM, which was obtained by first installing Windows 10 VM, then upgrading to Windows 11 from inside the Windows 10 VM. [That was the only way I could get Windows 11 VM installed on VMware Fusion 😂].
Installed SAPGUI for Windows 8.00 PL01 64-bit. Not shown here, but it was done the usual way using a standalone installer, GUI800_1-80006342.EXE from SAP Software Downloads, run as Admin user, choosing just the main component:

So yeh, this year, 2023, SAP finally released a 64-bit version of SAPGUI for Windows. (SAPGUI for Java has been 64-bit for a while I believe, at least the MacBook version). There is also a 32-bit version of SAPGUI for Windows 8.00, but everyone on my Home Wi-Fi network always wants to use the latest and greatest stuff when possible.
Server-side configuration of the SAP system has already been done, see the section of my other blog which shows how to do that (in fact our Windows client machine is going to be using the very same SAP system that the SNCwizard config was demoed for in this other blog):
https://blogs.sap.com/2023/04/12/sapgui-encryption-and-sso-with-pses-and-keychain-for-macbooks-amd64...
Table of Contents
Connection Items for the target SAP system
sapmsSID and the port number of Message Server
No SNC product installed on the client PC (yet)
Download SAPCRYPTOLIB and SAPCAR and extract archive
PowerShell and set persistent environment variables
sapgenpse and Certificate Lists
New iteration of Connection Item and environment variables
Activate SNC in Connection Item
Test SLC immediately (it will fail, NPL not yet trusted)
Get Windows machine to trust NPL’s server certificate
Test SLC now we have the NPL certificate installed in a relevant cert-store
Create a .p12 file and import it using the wizard
Test SLC now we have the .p12 file added for our user account
Switching between PSE-Method and SLC-Method
Switch off SLC and enable PSE-Method
Switch on SLC (hiding PSE-Method optional here)
Connection Items for the target SAP system
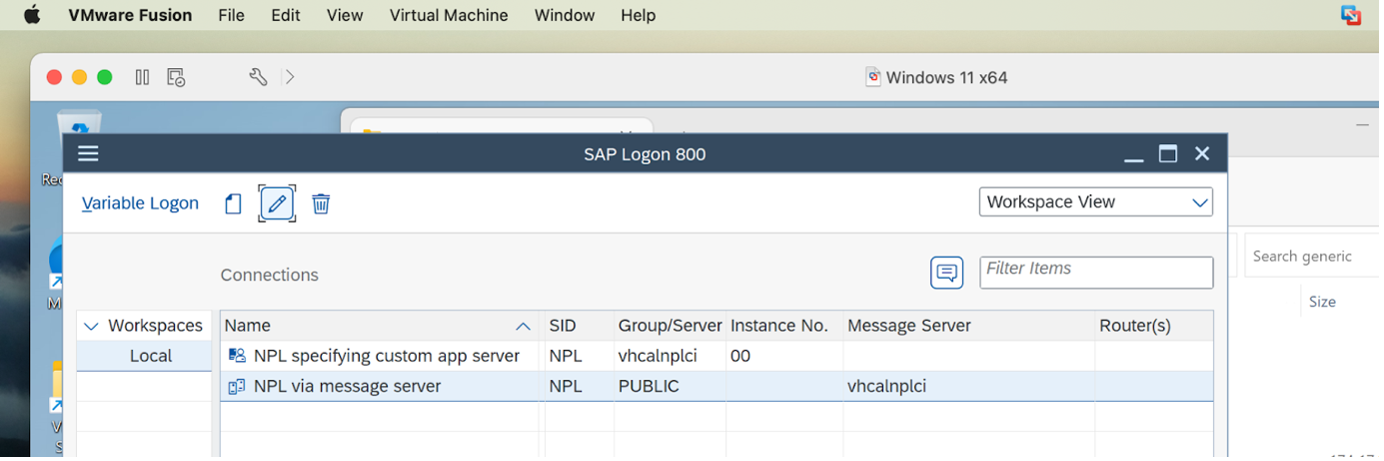
First we check if we can make a non-SNC SAPGUI connection to NPL, the target SAP system (an instance of SAP Netweaver Dev Edition). That is working fine, and we assume you also know how to do this. Then make a new Message Server based Connection Item, by choosing Connection Type Group/Server Selection, specifying System ID and Message Server (but not port - oddly enough… I guess the SAPGUI client probably searches for the port itself…) - and then e.g. PUBLIC (default) logon group from the retrieved list from Message Server to the DDLB):

Then in the Network tab we see that the Message Server also sent us the SNC Name of NPL, p:CN=NPL

Now we have two valid Connection Items, this "NPL via Message Server" one, and also a direct one specified by hostname and Instance Number (having a direct Connection Item is useful when configuring SNC stuff):
Ahm wonderin’... no port number needed for the Message Server? Looking at:
https://help.sap.com/docs/sap_gui_for_windows/63bd20104af84112973ad59590645513/3b694a1fbc9f46d482edd...
… it is not so clear what needs to be specified in the Message Server field. It seems to say we can just add the port number after a colon “:” in the Message Server field - but if I do that, adding port 3601 which I happen to know is the right port:

… now we cannot logon, an error occurs… “Cannot connect with message server…”:

We click “Yes”, and get “hostname ‘vhcalnplci:3601’ unknown … NiPGetHostByName: ‘vhcalnplci:3601’ not found [line break] System Call getaddrinfo”:
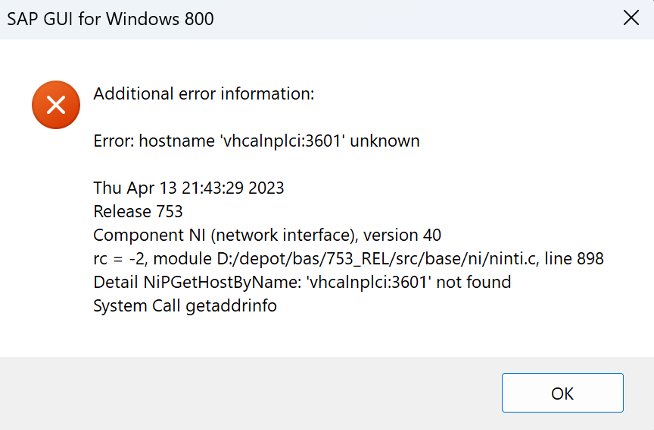
So we should revert back to not specifying a port, since SAPGUI for Windows thinks we have specified a hostname ‘vhcalnplci:3601’, which indeed does not exist and is not even a well-formed hostname (according to RFC 1123)… anyway, changing back to the hostname ‘vhcalnplci’ gets the connection working again. But I would like to understand what is going on here, so let’s investigate.. aha, found the answers I think, discussed in the next section.
sapmsSID and the port number of Message Server
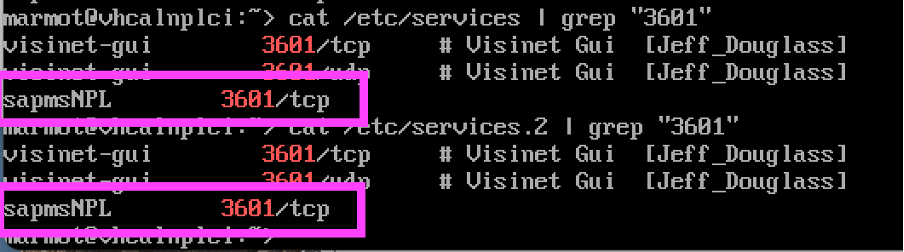
So it turns out that SAPGUI for Windows somehow knows how to obtain the relevant port number from the server the SAP system is on (since it cannot ask the SAP system directly, until, you know, it knows which port to contact relevant SAP system services on 😀). Probably it does a socket getportbyname(“sapmsNPL”) call to vhcalnplci, where “sapmsNPL” is referring to the sap-message-server-of-NPL, and this call then looks up /etc/services file on the server. We will assume something like that happens, since the port name sapmsNPL is listed in both /etc/services and in /etc/services.2:
Looking in tcode SMMS (Message Server Monitor), we can see that this port-name concept really is in use by SAP:

Goto -> Parameters -> Display -> scroll down to find confirmation that there is a “server service” parameter with value “sapmsNPL” and a “server port” parameter with value “3601” and a “use unix domain sockets” parameter with value “TRUE”:
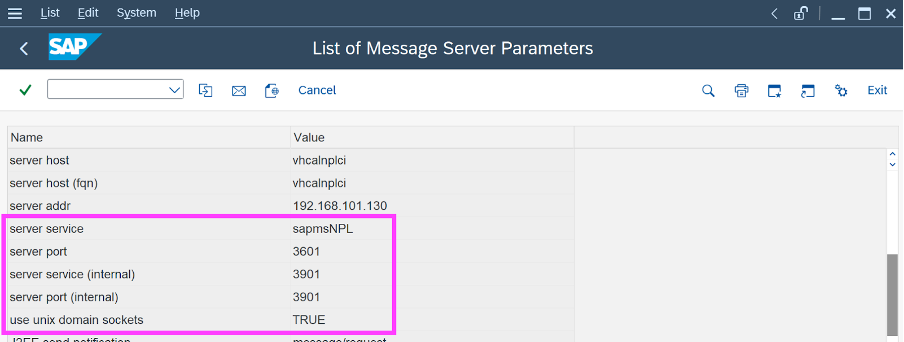
So there you go, the above guess looks right: SAPGUI for Windows contacts asks vhcalnplci via Unix domain sockets for the Message Server port by calling the host server with “server service” value constructed to be “sapmsNPL”.
By the way we can see from the “open padlock” icon that I am logged on to NPL with no SNC Encryption of the SAPGUI session:

That you can see at a glance the encryption-status of your sessions, is a nice feature of SAPGUI for Windows (not implemented as of April 2023 on SAPGUI for Java for MacBook/Linux/Windows, at least I haven’t seen it).
Let’s anyway install Visual Studio Code for free from Microsoft Store, install RedHat XML extension (offers formatting instead of one long line, important that documents are readable after all), and check the SAPGUILandscape.xml file stored in user’s %APPDATA%\Roaming\SAP\Common folder:

Open it, r-click, Format Document, Save.
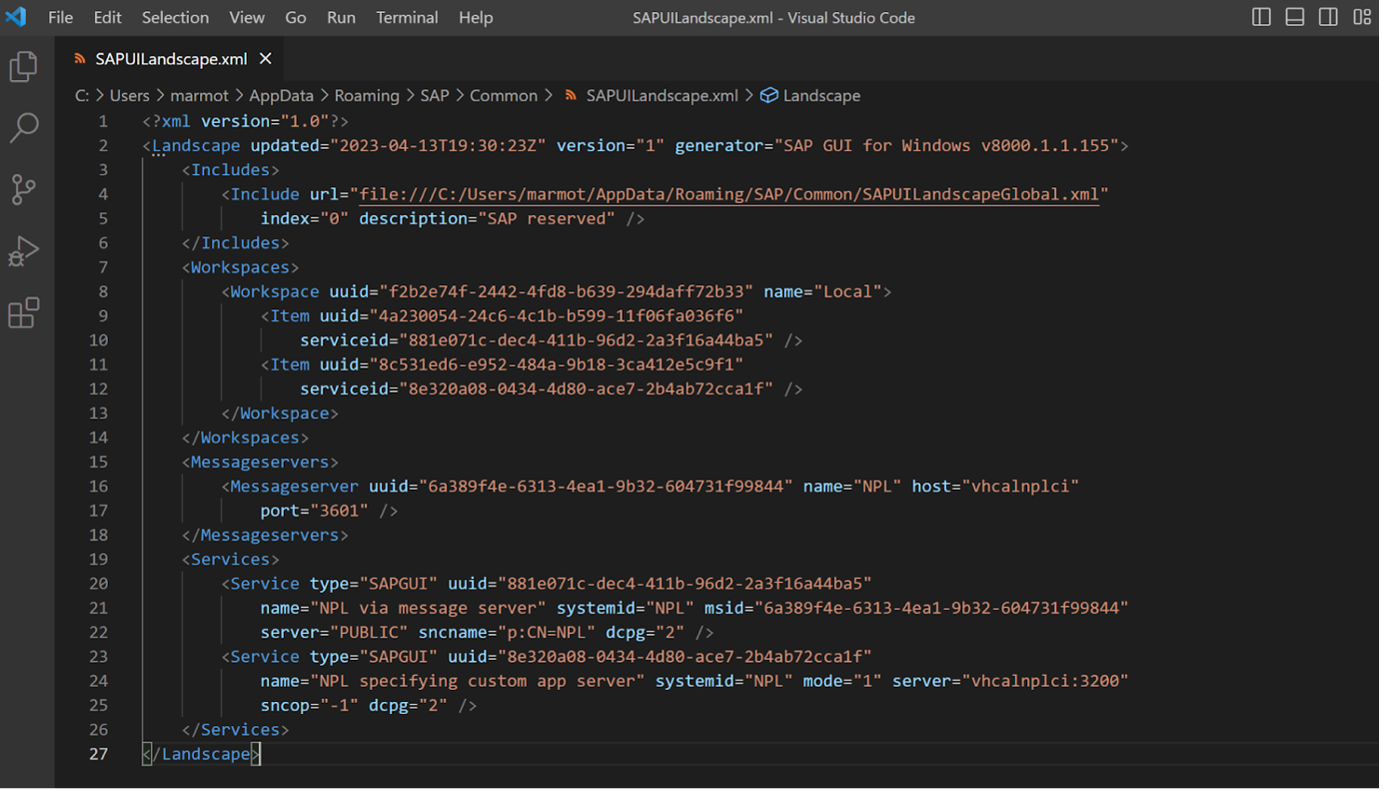
The relevant parts are here:

So we can see the MessageServer item, which is the one that stores the port number of the Message Server of vhcalnplci (which it got via calling vhcalnplci asking for port of sapmsNPL port-name). Then the “NPL via message server” item, has a reference - “msid” - to the NPL Message Server item, and thus does not need to store hostname and port info (and doesn’t). Instead it stores data that it got from the NPL Message Server.
Not sure what “dcpg” is… check The Internet… some kind of “download code-page setting”. Let’s ignore that for now. It’ll be from the 3rd tab “Code Page” of Connection Item config anyway, I haven’t ever had a reason to change the defaults.
No SNC product installed on the client PC (yet)
If we just logon manually using the “via Message Server” Connection Item, then it’s not encrypted (padlock icon is unlocked). But we would need to switch on SNC in the Connection Item’s Network tab… however this doesn’t work straight away, as we have “No SNC product installed on the client PC”, meaning we cannot Save (“OK”) that change, only “Cancel” available as an option:

So we don’t change anything here just yet. Instead we will install an SNC product, then adjust environment variables to point to that (PSE-Method) product, and then this warning will be gone.
PSE-Method (Encryption-Only)
I’m thinking.. there’s not much on the internet about sapgenpse for windows as client computer… let's run through sapgenpse stuff if SAPCRYPTOLIB available for Windows, set the environment variables, and see if that helps us.
Download SAPCRYPTOLIB and SAPCAR and extract archive
So check in Software Downloads… https://launchpad.support.sap.com/#/softwarecenter
[.. since Q2 2023 the new-look Software Centre is at https://me.sap.com/softwarecenter ]
…for SAPCRYPTOLIB… there is a component for X64 Windows:

BTW what is IA64 63BIT? Google it… ok seems to refer to machines running Intel Itanium processors, not for us probably… Let’s just check that in cmd (Command Prompt):
echo %PROCESSOR_ARCHITECTURE%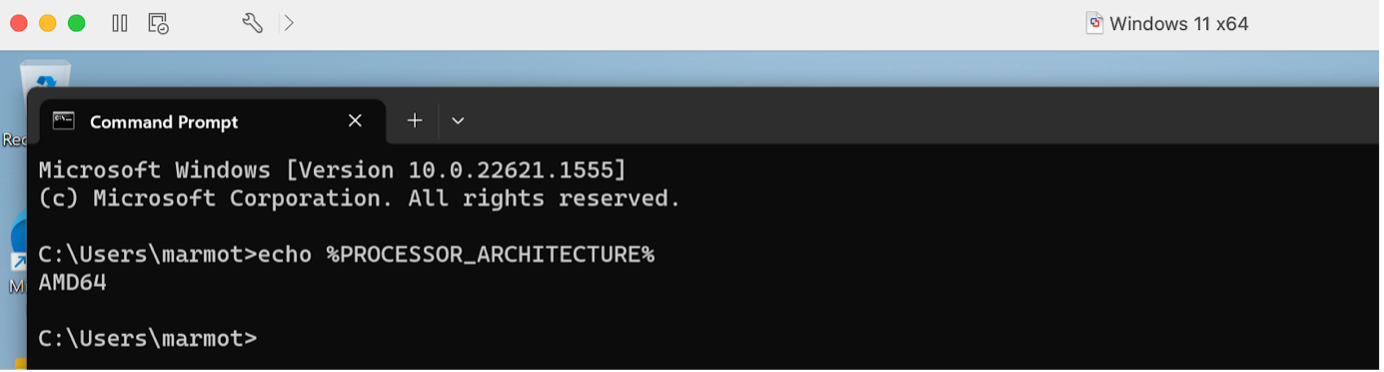
Yes we have a standard amd64 (x64) processor architecture. So we know to take the Windows on x64 64bit (latest) version of the SAP Component. Downloaded, moved to shared folder (that VM has access to on host MacBook), copied to local folder C:\Users\marmot\SAP\SNCetc

Gonnae need a SAPCAR for Windows as well… only one Windows OS supported for SAPCAR, luckily it’s x64 (amd64), so again take the latest version, download and transfer via shared folder to local SNCetc. Done. In Command Prompt go to the SNCetc folder.

Created also the possible default directory for SECUDIR for user marmot, at C:\Users\marmot\sec (as that way we might be able to run gen_pse without an error, speculation based on Linux Desktop and MacBook experience). Extract the SAR archive contents:
SAPCAR_1115-70006231.EXE -xvf SAPCRYPTOLIBP_8548-20011729.SAR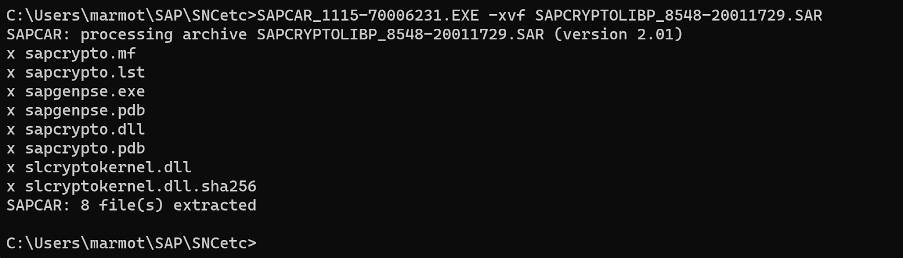
So that gives us sapgenpse.exe and two libraries, sapcrypto.dll and also slcryptokernel.dll - what does Internet say about this slcryptokernel.dll… for example:
https://help.sap.com/docs/SAP_SQL_Anywhere/98ad9ec940e2465695685d98e308dff5/815b96696ce21014bedce01d...

Anyway sapcrypto.dll is the Windows equivalent of libsapcrypto.so on Unix/Linux and libsapcrypto.dylib on macOS, and then slcryptokernel.dll is related to FIPS and involves some kind of licensing. So we will use sapcrypto.dll since we are here trying to work analogously to our experiments with PSE-Method on Linux and on macOS.
PowerShell and set persistent environment variables
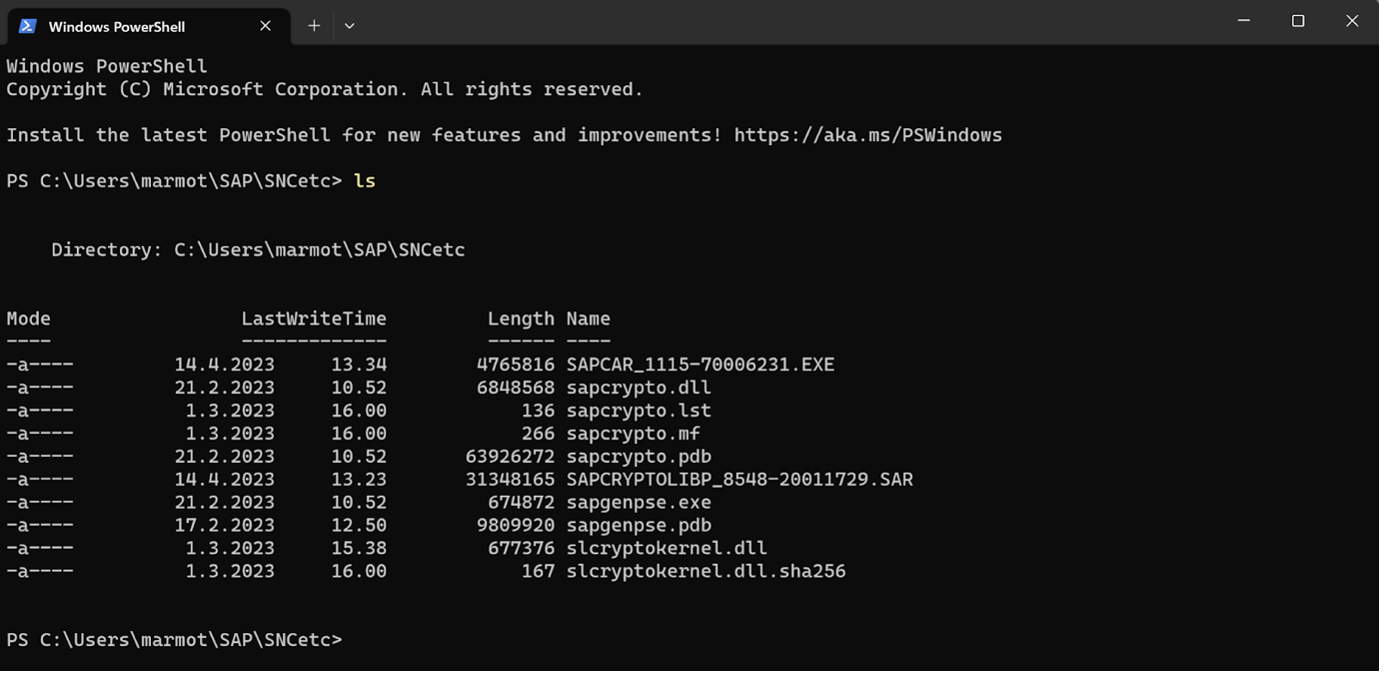
If we right click in Windows 11 File Explorer and choose “Open Terminal”, it opens a PowerShell prompt… I suppose that nowadays PowerShell (“PS”) is more or less a superset of Cmd, so most of the old-school Cmd commands are all implemented in PS, let’s make that our working assumption until something goes wrong. So in this blog we use the PS Terminal app mostly from now on.
Seems that PS also implements the Unix/Linux ls command to list files, so that saves remembering to type “dir” instead, good:
So, the first PSE experiment is to set up Encryption-Only, for which we will use a dummy-Subject X.509 certificate on the client side. So in our SNCetc folder with PS Terminal, let’s try:
./sapgenpse get_pse -s 2048 -p SAPSNCS.pse "CN=sapsnc O=windummy"
Ok, so unlike on Unix (macOS) or Linux, get_pse didn’t work straightaway. So two possible explanations come to mind. One is that on Windows we need to set SECUDIR. The other is that we might need to supply a PIN/Passphrase when creating a PSE.
So let’s first try the maybe more time-consuming one, as my hunch is that this is the likely root cause… the solution involves setting an environment variable, SECUDIR on Windows. Since I have PS open, and since it might be a good idea to learn PS anyway, we can learn how to set environment variables (“env vars”) using PS. To view the current env vars, use
dir env: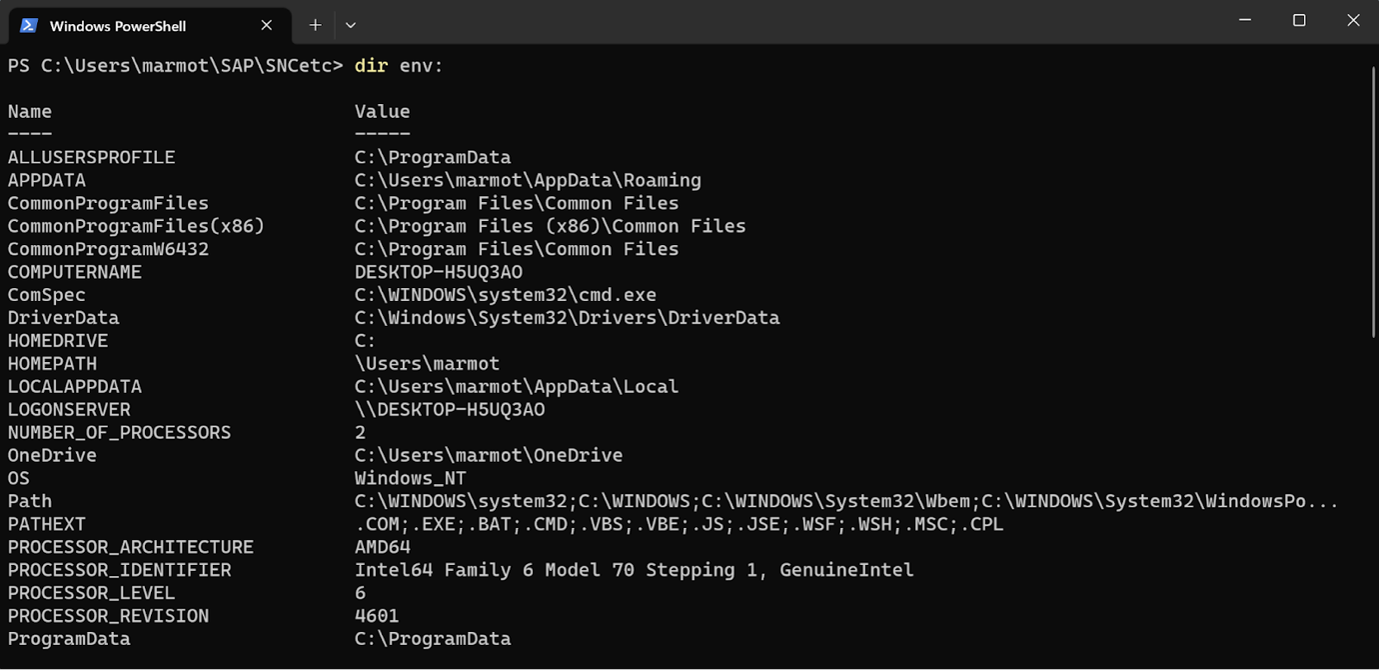
So that’s fine, but we need to both set a new env var, and make it persistent maybe (anyway more convenient i guess). Need to do some self-study as this PS (and Windows generally) is not my home turf.
https://learn.microsoft.com/en-us/powershell/module/microsoft.powershell.core/about/about_environmen...
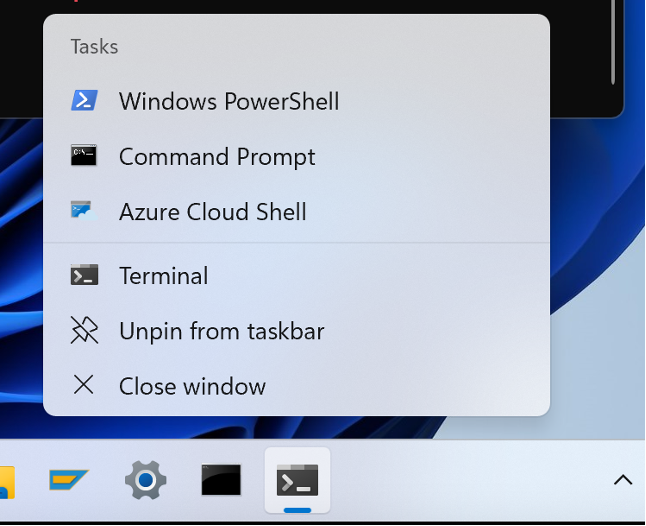
BTW let’s digress to note that “Terminal” in Windows-speak means “PS Terminal”, while “Command Prompt” means “old-school CMD prompt”:
Anyway for persisting env vars we have for example:
[Environment]::SetEnvironmentVariable('Foo', 'Bar', 'User')Once set, seems you need to close and reopen PS to get it visible, as there seems to be no "easy sourcing" command like the Unix/Linux:
source ~/.bashrcSo we close PS and reopen it, then check for Foo (this is WIndows so variable names are not case-sensitive, unlike on Posix):
dir env:foo
Note that echo %env-var% doesn’t work in PS, unlike in CMD:

Fine, we just need to remember to use the PS command instead.
Check this variable-setting survives a reboot… yes it does. Good, now we know what to do to set SECUDIR in PS - let’s try:
[Environment]::SetEnvironmentVariable('SECUDIR', 'C:\Users\marmot\sec', 'User')[Note: we set the ‘User’ scope - there are no other users on our Windows machine so this makes sense. If the env var should be available to all users, then the options are to do the same as above for each user specifying their particular SECUDIR, or use ‘System’ scope if setting the same SECUDIR for all users].
Close and reopen PS, then SECUDIR is also visible in Terminal.
sapgenpse and Certificate Lists
So now let’s navigate to our SNCetc directory and run gen_pse again:
./sapgenpse get_pse -s 2048 -p SAPSNCS.pse "CN=sapsnc O=windummy"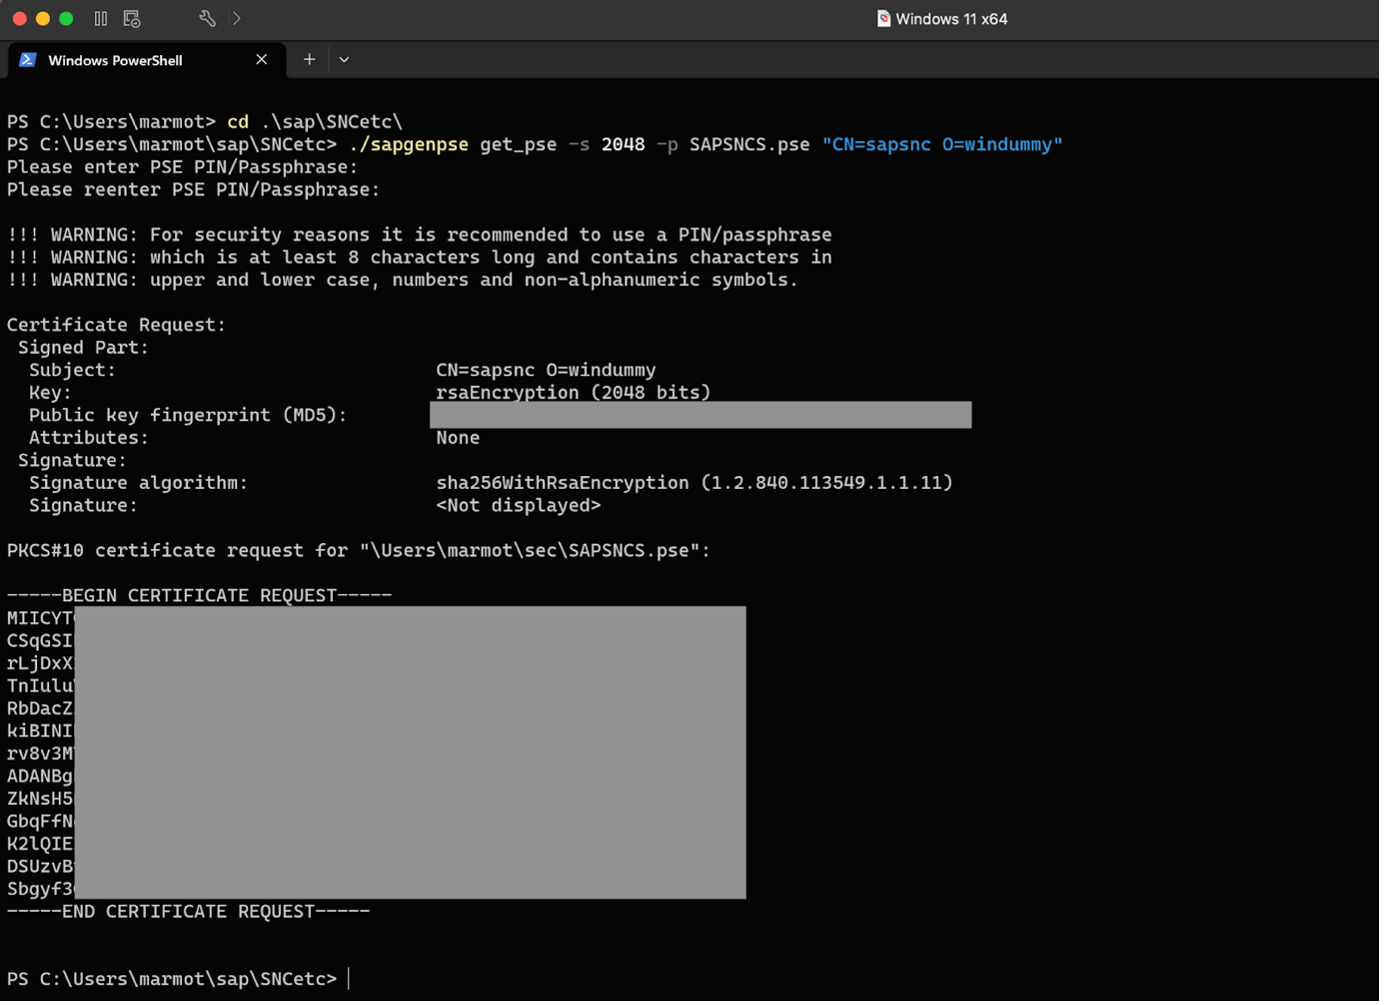
Good, so setting our (User-scope) SECUDIR env var is the solution that allows us to create the new SAPSNCS.pse into our SECUDIR:

Wonder what this “Mode” being “-a—-” means… google the answer… seems to refer to file attributes (not Posix permissions at all). So let’s ignore the Mode stuff since it seems of low relevance to our investigation’s goals.
Next step is to export the SAP server’s certificate to the Windows machine. STRUST, SNC SAPCryptolib folder, double-click the CN=NPL PSE on the right-hand panel to get it visible in the lower-right area of said panel. Menu Certificate -> Export, choose Binary or base64 format (doesn’t matter). Download and let’s call it sncnpl.cert, as that is what I called it in the Linux and MacBook cases also.

Allow the Download to happen, I choose Remember My Decision checkbox - although since this is file-specific, not much time saved in future; if you like, in SAP Logon you can get rid of this popup in future by going to Options… -> Security -> Security Configuration -> Open Security Configuration -> Default Action -> Change from default “Ask” to “Allow” -> Apply -> OK. Anyway in this particular case we choose Allow:

Ok downloaded.
Now to add it to the certificate list of the local machine’s SAPSNCS.pse:
./sapgenpse maintain_pk -v -a sncnpl.cert -p SAPSNCS.pse
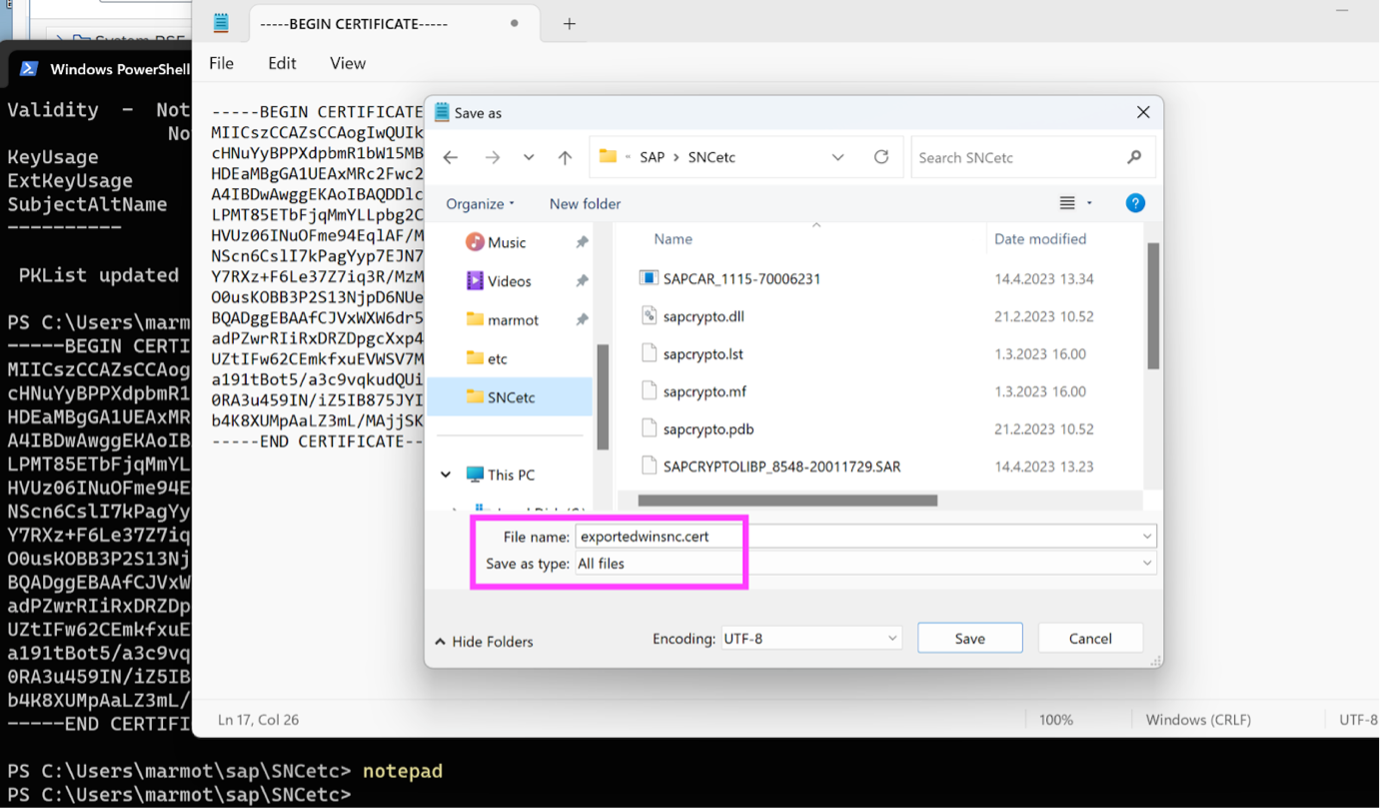
Then, we want to export our newly modified client certificate of the PSE, as follows:
./sapgenpse export_own_cert -p SAPSNCS.pseThis command runs and then displays the output (exported) X.509 certificate in the terminal window you executed the command in. You need to now copy-paste the text beginning with line —–BEGIN CERTIFICATE—– and ending with line —–END CERTIFICATE—– (including those two lines in the block of text)… and save that text to a new file, mine is called exportedwinsnc.cert with the “All files” File Type selected (to avoid that strange Windows “feature not a bug” 😀 where it adds an extra suffix like .txt if you save it as File Type = Text files).
Back on the SAP server in STRUST, we go into Change mode, make sure the SNC Cryptolib certificate is still in focus (double-click on its subject line to make sure it appears in lower window), then scroll down to right-hand window near the bottom of the page, and click on “Import certificate” icon… from there you upload your exportedwinsnc.cert from local machine to server. Then click on “Add to Certificate List”, and hey kids, remember to Save the STRUST transaction from the upper menu (I speak from bitter experience of forgetting this simple Save-task). Now it is in the Certificate List of the server’s SNC PSE:

New iteration of Connection Item and environment variables
Ok, now we go look at our Connection Item via Message Server, can we switch on SNC in the Network tab now that we have the SECUDIR environment variable defined? I would guess not, as the SNC_LIB_64 env var hasn’t been defined yet, but let’s check and find out… Logoff NPL, close SAP Logon, open SAP Logon (so it picks up any changes e.g. if it knows about SAPSNCS.pse changes?), edit the Connection Item, go to the Network tab, check the “Activate SNC” checkbox… yep, still the same error message:

“OK”-button is greyed out so we cannot save the change in configuration. So we Cancel out and close the SAP Logon app.
So let’s set the environment variables we need (SNC_LIB not actually needed in our 64-bit case but we set it anyway):
[Environment]::SetEnvironmentVariable('SECUDIR', 'C:\Users\marmot\sec', 'User')

[Environment]::SetEnvironmentVariable('SNC_LIB', 'C:\Users\marmot\SAP\SNCetc\sapcrypto.dll', 'User')

[Environment]::SetEnvironmentVariable('SNC_LIB_64', 'C:\Users\marmot\SAP\SNCetc\sapcrypto.dll', 'User')
That should fix the problem of the missing SNC Product warning. Now we can activate SNC in the Connection Item.
By the way if you want to check whether a variable has been set at System-scope or User-scope, here are two example commands that query the respective lists of env vars in HKLM and HKCU:
REG QUERY "HKLM\SYSTEM\CurrentControlSet\Control\Session Manager\Environment" /V SNC_LIB

REG QUERY HKCU\Environment /V SNC_LIB
If the query does not return a value for a given scope-level, then it doesn't exist at that scope-level.
Activate SNC in Connection Item
So yeh, open the relevant Connection Item (via Message Server), now there is no warning message in Network tab so we can continue. We check Activate SNC checkbox and keep the default Max. Available, and leave the checkbox blank for "SNC logon with user/password (no Single Sign-On)” even though currently with our dummy Subject certificate, our aim is no SSO - but by leaving it blank, we get a warning message that lets us know that SNC is active… we can always check this checkbox later if you prefer to get to a logon screen and not have the warning message. So yeh, we have this config now, and press OK to save it.

So now let’s try to logon, using that Connection Item…

It works! The padlock icon is showing “locked” which means as the mouse-over text says, that SNC is enabled for this SAPGUI session. The only reason we get a warning message is because there is no such SAP user in NPL with SNC Name “p:CN=sapsnc O=windummy”, so we have to logon manually using our password. However this is still much more secure than logging on manually over an unencrypted SAPGUI connection.
It’s a nice feature of SAPGUI for Windows, the padlock icon that shows the user whether or not their SAPGUI session is encrypted. In SAPGUI for Java case, no such icon, I had to resort to using Wireshark to show that SNC really is enabled when it should be and is encrypting the SAPGUI protocols’ communication. See the relevant section-link here if you like:
https://blogs.sap.com/2023/04/12/sapgui-encryption-and-sso-with-pses-and-keychain-for-macbooks-amd64...
So the end result, is that the sapgenpse and X.509 certificate (“PSE-Method”) works for this Encryption-Only case fine, no need here for SNC CE 2.0 libraries. Just important to remember for 64-bit SAPGUI for Windows to set the env var SNC_LIB_64 correctly, as well as SECUDIR which we need anyway for doing the sapgenpse steps.
[Note: we are not going to test any 32-bit SAPGUI for Windows versions, although I believe the only real difference is that you need to set the SNC_LIB env var to point to the sapcrypto.dll in SNCetc. “But in April 2023, most of the SAPGUI for Windows users have some 32-bit version!”... well, that’s probably true, however I’m not here to solve everyone’s business topics for free, and anyway (b) my bet is that over the next 2 or 3 years, most organisations with SAPGUI users - i.e. almost all organisations using SAP - will switch to the 64-bit versions of SAPGUI for Windows].
Now we have completed the PSE-Method for Encryption-Only, we can probably get SSO using PSE-Method working as well, that is the topic of the next section..
PSE-Method (SSO)
So all we need to do here, is: back up our Encryption-Only PSE; make a new SAPSNCS.pse with the correct Subject for user WINMARMOT; make sure that WINMARMOT’s SNC Name in SU01 is “p:” plus the Subject of our client-side certificate; add sncnpl.cert (the server certificate) to the certificate list of the new PSE, export the updated client certificate to STRUST and add it to the certificate list of the SNC SAPCryptolib. More or less the same steps as for Encryption-Only, but with a correct client PSE Subject and SAP user SNC Name combination. Let’s get that done then..
Back up the current PSE:
cd ~

cd sec

ls

ren .\SAPSNCS.pse .\SAPSNCS.pse_bac_enconly

ls
Create the new PSE for WINMARMOT who is in the “Garp.Rhubarb”-team just like all the other users of my NPL system:
cd ~

cd SAP/SNCetc

./sapgenpse get_pse -s 2048 -p SAPSNCS.pse "CN=WINMARMOT@GARP.RHUBARB"

ls ../../sec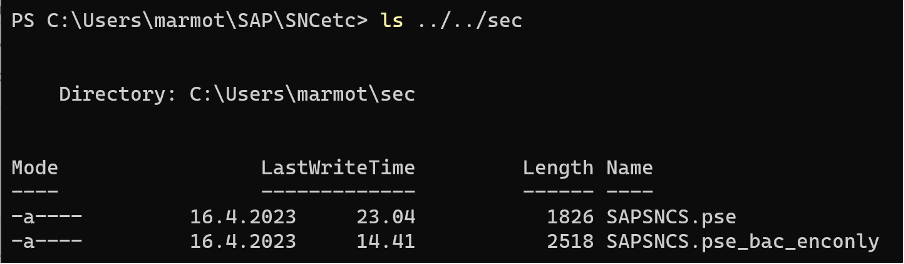
Then as we already have the server certificate (see “sapgenpse and Certificate Lists” section for details), we add it to the client PSE’s certificate list:
./sapgenpse maintain_pk -v -a sncnpl.cert -p SAPSNCS.pseThen we export the updated client certificate:
./sapgenpse export_own_cert -p SAPSNCS.pseSee above for details of how to copy the output and save to file. Our new file is called exportedwinmarmotsso.cert and we upload it to STRUST the same way as for the previous exported client certificate (you will need to logon manually without SNC Activated Connection Item, as we are at this point “between valid PSEs” and so SNC connection will fail during this “PSE Interregnum”); Remember to save the change! The result in STRUST is that our new client certificate is visible in the SNC SAPCryptolib PSE’s Certificate List:

Then the one extra step: in SU01, we set SNC Name of WINMARMOT to be “p:CN=WINMARMOT@GARP.RHUBARB”, i.e. “p:” plus the Subject of the client certificate. Also we check the checkbox to allow the user to do password logon also (for example if the user needs to access from another computer and no SNC config done for that machine, then this is helpful for the user):

Ok that should be all we need. Close our SAPGUI sessions, close the SAP Logon app itself, reopen SAP Logon, and use the Connection Item with SNC activated to logon…

Banzai!!
So we have shown how to use the PSE-Method for SSO.
Next, we turn to the new-school SAP Secure Login Client 3.0 (“SLC”) - this very useful Component has been around for many years in the SAPGUI for Windows paradigm - only later released for SAPGUI for Java for macOS, and as of April 2023 still not released for SAPGUI for Java for Linux - boo! Come on SAP you need to do a Linux version as that’s what the too cool for school kids all demand 😂.
SLC-Method (Encryption-Only)
We will now unset the 3 User-scope env vars that we set in the previous PSE-Method adventures, to give SLC let’s say, a cleaner slate with which to work. I guess they are all defined at User-scope, but quickly check before removing:
REG QUERY HKCU\Environment /V SNC_LIB

REG QUERY HKCU\Environment /V SNC_LIB_64

REG QUERY HKCU\Environment /V SECUDIR
Yep. So now we unset them:
[Environment]::SetEnvironmentVariable('SNC_LIB', '', 'User')

[Environment]::SetEnvironmentVariable('SNC_LIB_64', '', 'User')

[Environment]::SetEnvironmentVariable('SECUDIR', '', 'User')
Close PS. Open PS. Check they are gone. Yep.
Now if we look at the config for our SNC Activated Connection Item, well, because we unset SNC_LIB_64, now the SAP Logon app isn’t happy and the “No SNC product” warning has reappeared. So for now uncheck the “Activate SNC” checkbox and press “OK”. We will reactivate it later once SLC is installed.
Also, although I happen to know that once SLC is installed, it doesn’t use the contents of SECUDIR, anyway we will back up the current PSE so that there is no valid PSE during our SLC-Method experimentation.
Download and install SLC 3.0
Go the SAP Software Centre, tab Support Packages and Patches, search on “secure login client”, choose the latest version which as of April 2023 is SLC 3.0, choose the Maintenance Software Component item of that version, choose OS from DDLB as “WIN 32”, since there seems to be no “WIN 64” options available (April 2023). Choose the latest release, Related Info -> Content info -> Download icon to download it. The one I downloaded is called SAPSetupSLC02_15-80001954.EXE. Stick it in your media folder on the Windows VM.
Then you run this installer by double-clicking on it, upgrading to admin when prompted. Close all SAP applications and click Next. Default suggestion is to install all components of SLC, keep those checked on:

Click Next. The installation run should complete successfully, then click Close to exit the installer.
You can see from Task Manager that SLC has started up, there is a process called sbus.exe and a process called sbusagent.exe running, and we also see that SLC 3.0 is an x86 (32-bit) application:

Then if you go to the Tray (bottom right, click on the arrow icon), you can see there is an SLC item in the Tray (white arrow in blue diamond):

Click on the SLC icon, which shows us the Profiles List:
Currently there are no known client certificates (X.509 certificates) so the only available option is to use a Kerberos Token for the user. Since this Windows VM is not connected to any company network and my Home Wi-fi network has no Kerberos server that could grant Kerberos tokens that SLC could then pass via Kerberos to the SAP system, so we are not going to be able to do SSO using Kerberos. Which is fine, as the point of these experiments is to use X.509 certificates, not Kerberos.
Instead, we need to work out how to get SLC to first trust the NPL server and then to recognise a valid X.509 client certificate so that it is available to SLC to use (i.e. is shown as an additional option in the Profiles List). More on these two topics later.
Let’s check also if new env vars were added. (Re-)open Terminal:

Yep, these 4 new variables added. SNC_LIB points to the location of the (I assume) 32-bit sapcrypto.dll installed by SLC 3.0 installer; so does SSF_LIBRARY_PATH, which I believe is an env var that SAPGUI for Windows (in this case 32-bit SAPGUI for Windows) uses to see if it should treat SLC as its only “Security Controller” i.e. use SLC whenever an Activated SNC Connection Item is used to start a SAPGUI session for an SAP system. Then the SNC_LIB_64 and SSF_LIBRARY_PATH_64 variables, which both point to the (I assume) 64-bit sapcrypto.dll installed by SLC 3.0, these are looked up by our actual 64-bit SAPGUI for Windows app (SAP Logon app).
We can also check that these env vars are defined at the System-scope level:
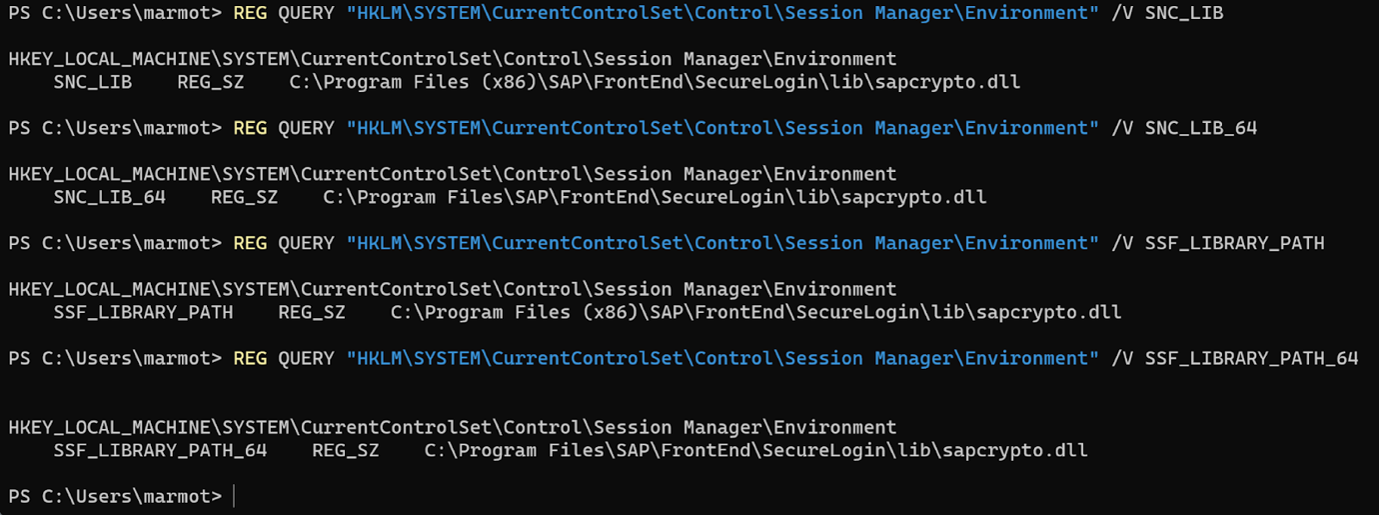
That is what we expect, as the installation run was done as the Admin user, not by e.g. marmot user.
You can also check the HKCU\Environment if you want to be sure these are not also existing for the current user, for example:

Ok, let’s see if this basic installation already gives us Encryption-Only logon feature…
Test SLC immediately (it will fail, NPL not yet trusted)
Open SAP Logon and edit the Connection Item “NPL via Message Server”, Network tab, Activate SNC and for now we keep the checkbox unchecked for “SNC logon with user/password (no Single Sign-On)” - we could check the checkbox now (or later), but for testing purposes, it’s good to see any warning message that indicates why SSO is not possible.
So let’s double-click our Connection Item to connect to NPL - we should expect an error here, since SLC cannot find any trust from the client machine for the NPL server, based on analogy with my experience configuring SLC-Method for MacBook:
https://blogs.sap.com/2023/04/12/sapgui-encryption-and-sso-with-pses-and-keychain-for-macbooks-amd64...
Quoting myself, not something I'm too comfortable with but anyway:
“...if you try to straight away logon either with Encryption-Only or SSO (with SLC now acting as SAPGUI app’s Security Controller for these activities), you will get an error:
GSS-API(min): A2200210:Peer certificate verification failed
target=”p:CN=NPL”
That’s because SLC consults your MacBook’s “login”-Keychain to see whether the client computer trusts the SAP system we want to logon to. The solution is to add the relevant NPL server certificate (sncnpl.cert – see above for details on getting hold of it) to the Keychain.”
Now obviously we are now using Windows, but the basic idea is the same (the main difference will be that the solution will not involve Apple Keychain Access app 😀). Anyway yeh, so we try to logon, but we cannot, due to the expected error:

Note that this error occurs whether you attempt SSO Logon, or (right-click on Connection Item) if you attempt “SNC Logon without Single Sign-On”. That’s because the error is basically saying that because the client computer doesn’t trust the NPL server, a connection will not be made (in either case). In other words, solving this error is a prerequisite for both full SSO Logon and Encryption-Only Logon when using the SLC method.
Get Windows machine to trust NPL’s server certificate
Seems like we need to learn how to use the Certificate Manager (“CertMgr”) tool and/or the "CertLm" tool (for local machine certificates. Let's see what is available on Windows 11… in the main windows search box, let’s type “certmgr”:

So let’s try this “Manage computer certificates”… Need to run as Admin obviously, so click Yes at the prompt. CertLm opens:

Now we don’t have any Root CA certificates to install, but this blog suggests we can add a self-signed certificate as a Trusted Root CA:
https://techcommunity.microsoft.com/t5/windows-server-essentials-and/installing-a-self-signed-certif...
So let’s try doing that. Go to Trusted Root CAs -> Certificates:
Menu path: Action -> All Tasks -> Import… opens the Certificate Import Wizard app:

Because we opened the wizard as Admin, so the Store Location radiobutton is set to Local Machine and greyed out (so we have no choice to select Current User). So click Next, which takes us to:

The formats mentioned in the text are for storing more than one certificate in a single file, this will be useful to know later when we want to do SSO logon over SLC, but for now we just want to import the single certificate of the NPL server. So we browse to its location (in SNCetc working directory in my case) and select it, it’s called sncnpl.cert… ach, Microsoft thinks .cer and .crt are the good suffixes for X.509 certificates, but not .cert:

Well nae bother now, we can copy sncnpl.cert to be called sncnpl.cer, and try again.
Copy-Item .\sncnpl.cert .\sncnpl.cerNow we can select the certificate we want to import:
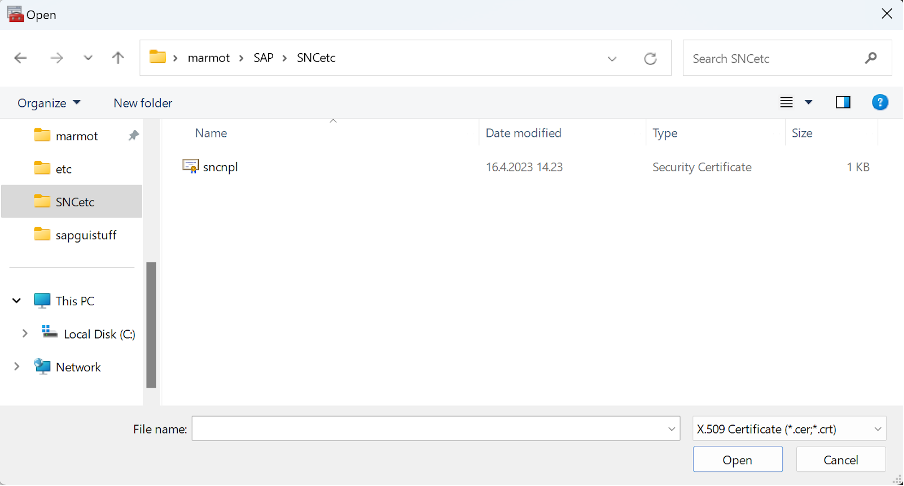
Highlight sncnpl.cer and click Open. Then click Next.

The wizard suggests Trusted Root CAs as the store to place all (one) new certificate in. Maybe because I had highlighted that node before starting the Wizard from CertLm, but anyway it looks right so let’s click Next. A summary of what is about to be imported and to where appears:

Click Finish. Seems the import was successful:

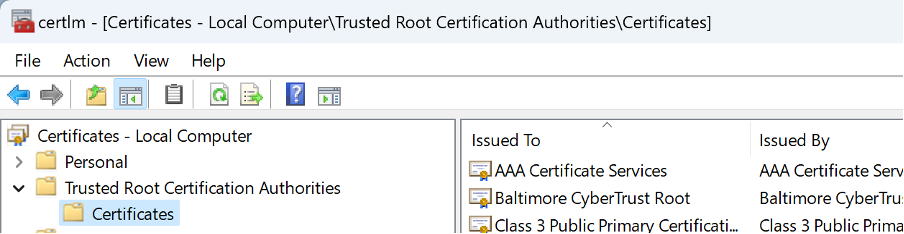
Click OK. Now we can see that the NPL certificate is in the relevant store:

You can double-click on it to view more details, if you like. Then we can close this CertLm MMC app for now.
Test SLC now we have the NPL certificate installed in a relevant cert-store
This time we might succeed… “it’s not the defeats that hurt… it’s the hope”, etcetera. So we open SAP Logon app and double-click our Connection Item (“NPL via Message Server”)... and…

It works! No error about “Peer certificate verification failed”. Padlock icon is in the locked state so SNC Encryption is working. So the SLC-Method for Encryption-Only test has been shown to work.
Next, we want to use SLC-Method for full SSO Logon, for that we will need to do some more work with the CertMgr MMC app…
SLC-Method (SSO)
We are going to need to import a .p12 file to CertMgr containing both target user WINMARMOT’s X.509 certificate which includes in its Certificate List the sncnpl.cert of NPL, AND the private key from the SAPSNCS.pse.
Create a .p12 file and import it using the wizard
So first, we need to move the backed up PSE back to being called SAPSNCS.pse in ~/sec directory… also we need to temporarily probably set SECUDIR to point to that directory. So let’s do those two tasks,
cd ~

cd sec

mv .\SAPSNCS.pse_bac_sso_winmarmot .\SAPSNCS.pse

[Environment]::SetEnvironmentVariable('SECUDIR', 'C:\Users\marmot\sec', 'User')
Close then re-open Terminal, to get it to recognise SECUDIR. Ok, now we can go to the SNCetc directory and issue the magic command to create the .p12 file, which we are going to call winmarmotp12.p12:
cd .\SAP\SNCetc\

./sapgenpse export_p12 -p SAPSNCS.pse winmarmotp12.p12
Note that you have to define a password when generating this new .p12 file.

Now the file winmarmotp12.p12 is in our SNCetc directory.
Next we need to import the .p12 file... remember, in this case, we are wanting to do the equivalent of “My Certificates” for the current user’s login-keychain in Keychain Access on MacBook, so looking for a cert-store that corresponds to this… but if we would open the CertLm app that would not help us, since there we are working at Machine-scope level instead of User-scope level (which is why we get prompted to Run as Admin).
So let’s do things this way: double-clicking on the .p12 file in File Explorer, which starts off the Certificate Import Wizard directly, and this time suggests the option “Current User”, in addition to “Local Machine”:

Well it has to be for the Current User surely, otherwise any other users with accounts on the local machine could impersonate WINMARMOT, which wouldn’t be a good thing. So we keep the suggested “Current User” option and click Next.

The file name and path are defaulted in as the suggested file to import (because we started the wizard by double-clicking on this file). Note that the .p12 format (Windows being case-insensitive for filenames and filepaths) is included in the list of allowed formats for storing more than one cert in a single file. Click Next.
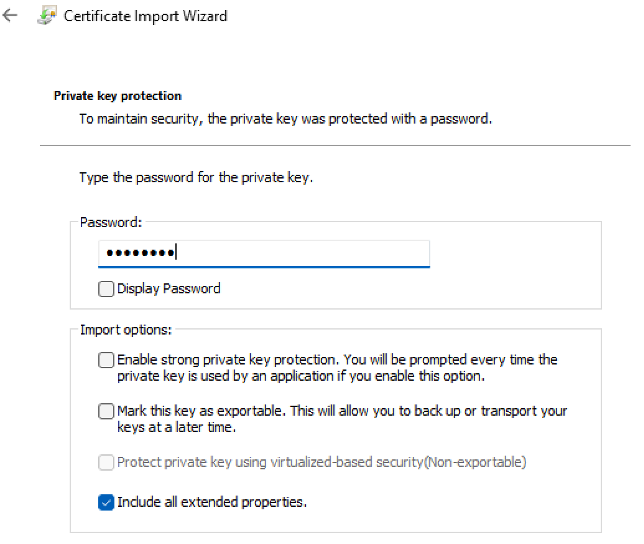
You need to now remember the password you defined when creating the .p12 file, so you enter it in the relevant field. We are leaving the other options with their default suggested values, only one that is checked is therefore “Include all extended properties”. Click Next.

Hmm, which option to choose here… seems that in the Registry for HKCU under Software\MicrosoftSystemCertificates, there would be info on the store locations.. but in REG_BINARY format so not so convenient… by the way, on the current Windows 11 VM, the non-admin users don’t have rights to run regedit (the GUI app) even to display the HKCU and any other trees (even though according to the Permissions for the various trees and hives, our marmot user has “Read Full Control”… but this can be worked around (so long as you have admin rights or know someone who can run "wmic" commands on your local machine) - you can find out the SID of your user (and other users) by:
wmic useraccount get name,sid… then take the SID for your user, open regedit as admin, go to HKEY_USERS hive for the relevant SID, and there you are.
Also “reg query” works for HKLM and HKCU, as well as “reg add” for HKCU, e.g.
reg add HKCU\Software\GARP /v Test /t REG_EXPAND_SZ /d 1 /fRefresh Registry view from View -> Refresh and you can see the added node and value:

Well, let’s not worry too much about this… We will choose radiobutton “Place all certificates in the following store”, then choose Browse, and select “Personal” from the list:
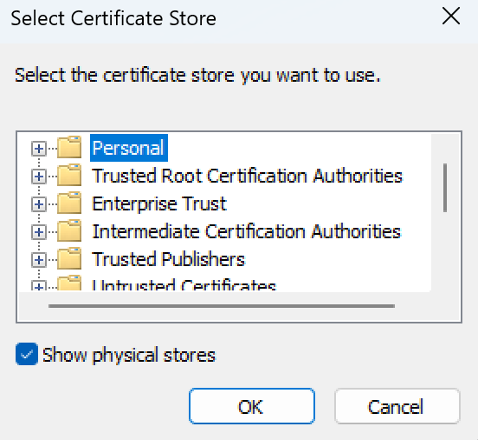
Click OK.

Click Next. We get a summary of what is about to be imported and to which cert-store:
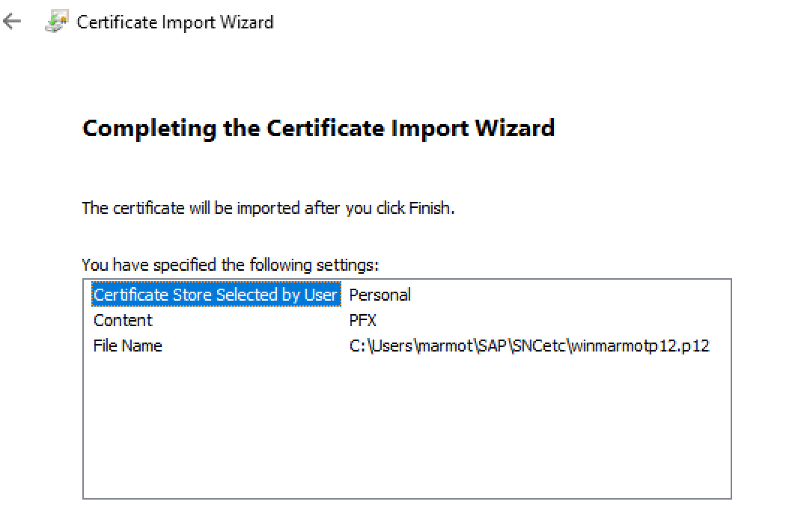
Click Finish. Import successful:

Click OK to exit the wizard.
Test SLC now we have the .p12 file added for our user account
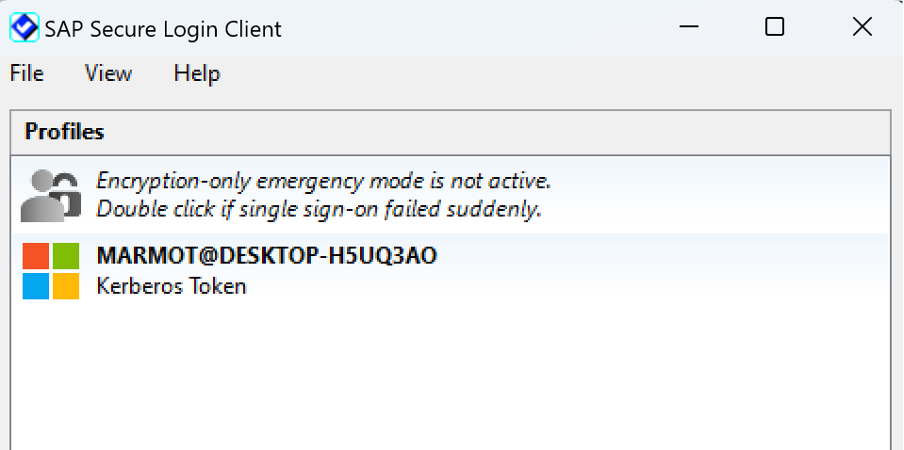
In the Tray (arrow in right-side of Windows footer toolbar), click on the SLC icon (white tick in blue diamond), which shows us the available User Profiles in the Profile List - now we see that a new Profile has been added: it is from the .p12 file which we just imported into Microsoft Certificate Store.

[Note that unlike SLC 3.0 for MacBook, this SLC 3.0 for Windows doesn’t give us a checkbox per item in the list allowing us to say which profiles SLC should apply… see below for a workaround that at least seems to let SLC prefer the X.509 certificate as the first method to try].
Next, just to prove to ourselves that this is really about the .p12 file, we back up SAPSNCS.pse and unset SECUDIR (even though as a matter of fact, those are not being used by SAP Logon App, because it has ceded control of SNC-related matters entirely to SLC at runtime):
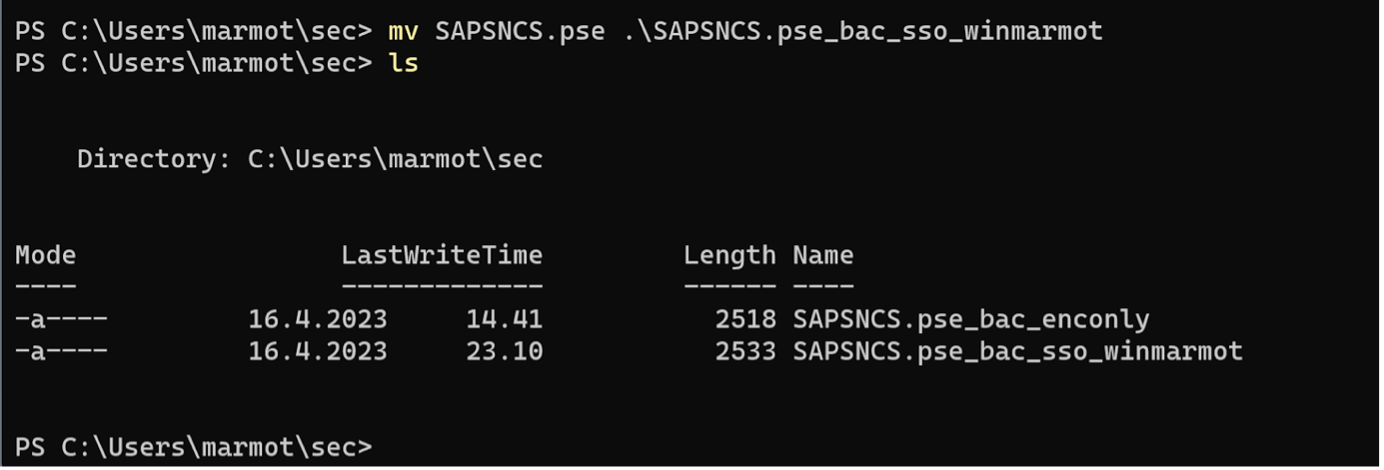
cd ~

cd sec

mv .\SAPSNCS.pse .\SAPSNCS.pse_bac_sso_winmarmot

ls

[Environment]::SetEnvironmentVariable('SECUDIR', '', 'User')
Close and reopen Terminal and check that SECUDIR is gone:
dir env:Yep, now we are all set. Close SAP Logon app if needed, then open SAP Logon App. Double-click our Connection Item (“NPL via Message Server”)... well, it sort of works, but SLC anyway chose the Kerberos Token method as the first method to authenticate:

You can click Cancel and then SLC tries the X.509 certificate as the next profile in its list, and SSO Logon succeeds. But still, that is a bit annoying, we want to get rid of the Kerberos method. Ok, found the solution…
Close SAPGUI session and SAP Logon App. From the Profiles List screen of SLC, choose menu File -> Options, we see that as a default, the “Legacy Compatibility Mode” radiobutton is on.

However our SAP systems are all using non-legacy versions of SAP Cryptographic Library, so we are not forced to prefer Kerberos as the first method SLC tries to authenticate with. We choose “Smart Mode” radiobutton, and we leave unchecked the “Prefer Kerberos” checkbox:

Then we click on the Apply button. Then click OK. And then we close and re-open SAP Logon App, and double-click on our Connection Item (“NPL via Message Server”), and this time:

SSO working and now with no annoying detour (i.e. no Kerberos password challenge to cancel out from).
So the SLC-Method for SSO, using a .p12 file for X.509 certificates, has now been demonstrated. Which was nice!
If you have some SAP systems which can only be logged onto using Kerberos, and then some like NPL where you need to logon using the X.509 certificate, you can go back to the Options of SLC Profiles and check the “Prefer Kerberos” checkbox, Apply and OK, and then you can logon to your Kerberos-friendly SAP systems. In other words from SLC Options you can switch between Kerberos and X.509 certificates as the primary (first choice) for authenticating when using SLC.
Switching between PSE-Method and SLC-Method
You can also switch between using the PSE-Method and using SLC-Method, by switching the sets of environment variables that SAP Logon app looks at when deciding which of these approaches is the “winner” that it delegates client side SNC to work on. We show the switches in both directions.
Switch off SLC and enable PSE-Method
We close SAP Logon App and SLC, then unset the 4 env vars set at Machine-scope level by the SLC installer, and then we set 3 User-scope env vars. Then we can rename one of our backed up PSEs to be the working PSE.
First close SAP Logon App and SLC if they are running. To close SLC, from the Tray, click on the SLC icon, menu path File -> Log out and Exit.
To unset Machine-scope env vars, we need to open Terminal in Run as Admin mode. Then:
[Environment]::SetEnvironmentVariable('SSF_LIBRARY_PATH', '', 'Machine')

[Environment]::SetEnvironmentVariable('SSF_LIBRARY_PATH_64', '', 'Machine')

[Environment]::SetEnvironmentVariable('SNC_LIB', '', 'Machine')

[Environment]::SetEnvironmentVariable('SNC_LIB_64', '', 'Machine')
Now we close the Admin Terminal, and open Terminal again as our ordinary user. Check the current situation of env vars:
dir env:Yep, all 4 are gone. Now we set SNC_LIB, SNC_LIB_64 and SECUDIR at the User-scope level:
[Environment]::SetEnvironmentVariable('SNC_LIB', 'C:\Users\marmot\SAP\SNCetc\sapcrypto.dll', 'User')

[Environment]::SetEnvironmentVariable('SNC_LIB_64', 'C:\Users\marmot\SAP\SNCetc\sapcrypto.dll', 'User')

[Environment]::SetEnvironmentVariable('SECUDIR', 'C:\Users\marmot\sec', 'User')
Then close Terminal, and re-open it, and check the 3 env vars are set. Yes they are, good. Next we pick a backed up PSE in ~/sec directory and make it the working PSE:
cd ~

cd sec

ls

mv .\SAPSNCS.pse_bac_sso_winmarmot .\SAPSNCS.pse
Now we can open SAP Logon App and logon to SAP, which works by the PSE-Method now (in the screenshot, you can see from the Tray that SLC is not open, so the SLC-Method is not currently in use - that’s because we changed the environment variables, and SAP Logon app didn’t find any SSF_LIBRARY_PATH or SSF_LIBRARY_PATH_64 and thus did not try to open SLC as its “Delegated Security Controller” anymore):
Because I didn’t uninstall SLC, and because I chose the option “Launch at sign-in”, so next time we sign in to Windows the sbusagent.exe daemon will start SLC for us again. But we could test actually, whether in this case my guess is right, that also in case SLC is open, still SAP Logon App will use the PSE-Method. Recall that currently we have SLC configured to do full SSO; then in SECUDIR we swap the Encryption-Only PSE to be the working PSE:
cd ~

cd sec

ls

mv .\SAPSNCS.pse .\SAPSNCS.pse_bac_sso_winmarmot

mv .\SAPSNCS.pse_bac_enconly .\SAPSNCS.pse
Now we can open SAP Logon App and logon to NPL via Message Server:

As we can see, (currently unused) SLC is running, but (due to env var configuration in this section) SAP Logon App has set the Encryption-Only PSE as the “Delegated Security Controller” and that is why we get the warning and the manual logon screen appearing. So we have shown how to switch from SLC-Method to PSE-Method.
Switch on SLC (hiding PSE-Method optional here)
Close SAP Logon App and SLC (Tray, File -> Logout and Exit) if they are running. Open Terminal, remove the relevant User-scope env vars (this removal step is probably not needed, but I think it's neater to delete what we don't use):
[Environment]::SetEnvironmentVariable('SNC_LIB', '', 'User')

[Environment]::SetEnvironmentVariable('SNC_LIB_64', '', 'User')

[Environment]::SetEnvironmentVariable('SECUDIR', '', 'User')
Close Terminal, open Terminal, check these env vars are gone, close Terminal.
Now open Terminal in Run as Admin mode, and set the relevant Machine-scope env vars (note that there are 2 different paths, one for the non-64 bit related env vars and the other one for the 64-bit related env vars:
[Environment]::SetEnvironmentVariable('SSF_LIBRARY_PATH', 'C:\Program Files (x86)\SAP\FrontEnd\SecureLogin\lib\sapcrypto.dll', 'Machine')

[Environment]::SetEnvironmentVariable('SSF_LIBRARY_PATH_64', 'C:\Program Files\SAP\FrontEnd\SecureLogin\lib\sapcrypto.dll', 'Machine')

[Environment]::SetEnvironmentVariable('SNC_LIB', 'C:\Program Files (x86)\SAP\FrontEnd\SecureLogin\lib\sapcrypto.dll', 'Machine')

[Environment]::SetEnvironmentVariable('SNC_LIB_64', 'C:\Program Files\SAP\FrontEnd\SecureLogin\lib\sapcrypto.dll', 'Machine')
Close Terminal. Open Terminal as your ordinary user, check that the 4 SLC-related env vars have been set. Yes it’s done:

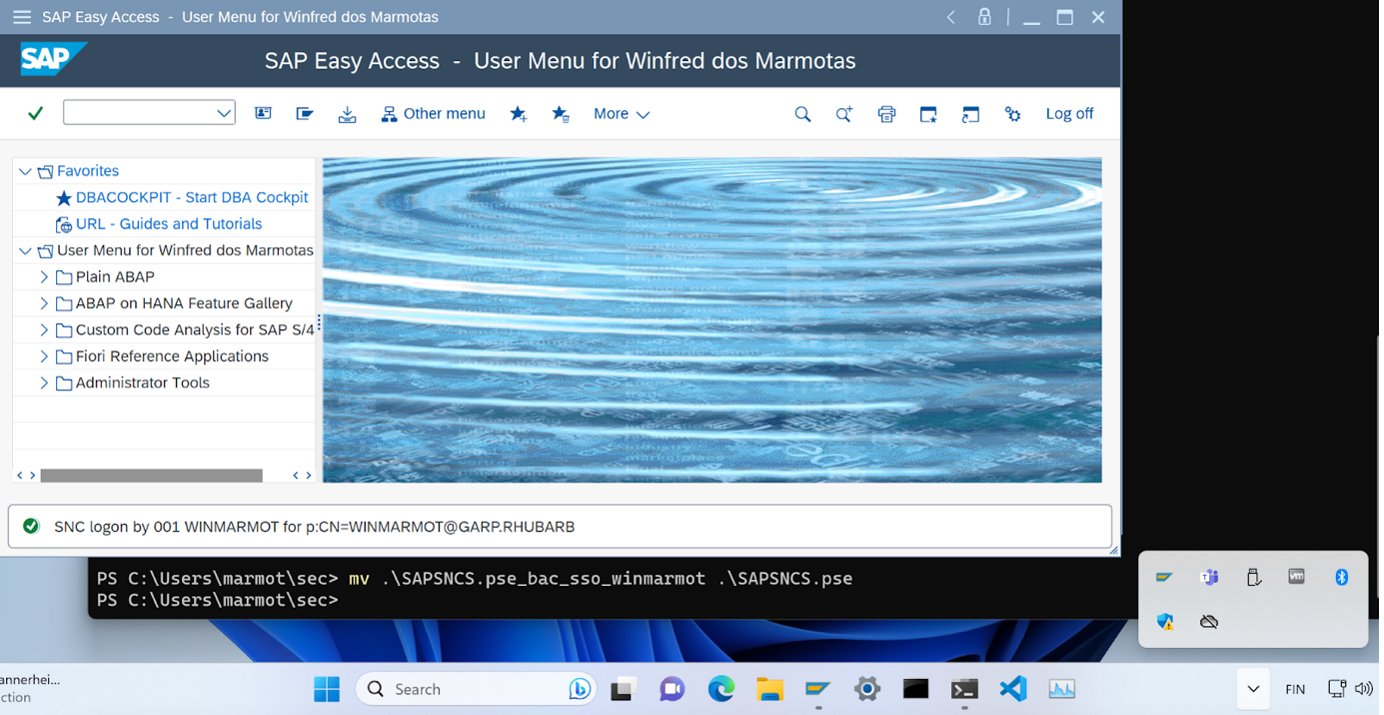
Now we can open SAP Logon App, and try to logon to NPL:

SAP Logon App checked from the env vars that now SLC is the “Delegated Security Controller”, and we got SSO logon via the X.509 certificate that SLC has available. We know that the PSE-Method wasn’t used, as the current PSE is for Encryption-Only, but we got the SSO successful message “SNC logon by 001 WINMARMOT for p:CN=WINMARMOT@GARP.RHUBARB”.
So we have shown how to switch from PSE-Method and SLC-Method as well.
- SAP Managed Tags:
- Basis Technology
You must be a registered user to add a comment. If you've already registered, sign in. Otherwise, register and sign in.