
- SAP Community
- Products and Technology
- Enterprise Resource Planning
- ERP Blogs by SAP
- Bank Communication Using Direct Debit Mandate in S...
Enterprise Resource Planning Blogs by SAP
Get insights and updates about cloud ERP and RISE with SAP, SAP S/4HANA and SAP S/4HANA Cloud, and more enterprise management capabilities with SAP blog posts.
Turn on suggestions
Auto-suggest helps you quickly narrow down your search results by suggesting possible matches as you type.
Showing results for
Employee
Options
- Subscribe to RSS Feed
- Mark as New
- Mark as Read
- Bookmark
- Subscribe
- Printer Friendly Page
- Report Inappropriate Content
06-12-2023
3:00 PM
Direct Debit Mandate (DDM) provides numerous benefits for managing regular recurring payments, for example utility bills and rents. We discussed these advantages in detail in our previous blog post How to authorize Direct Debit Payments outside SEPA in Contract Accounting, highlighting the functionality that Direct Debit Mandate enables, and how to authorize Direct Debit Payment outside SEPA.
Currently, in S/4HANA CE2308 release, SAP delivers generic framework for direct debit instruction and rejected payment file. This blog post is specified for SAP S/4HANA Public Cloud, to learn more about process using SAP S4/HANA Private Cloud and On-Premise, please refer to blog post Bank Communication Using Direct Debit Mandate in SAP S4/HANA Private Cloud and On-Premise.
Under the generic framework mentioned above, SAP provide the implementation for the United Kingdom (UK) according to the Bankers' Automated Clearing System (BACS) standard. Therefore, the blog post primarily focuses on the UK BACS service and the communication between the company and the payment service provider/ bank.
Depending on the local project requirements defined by different standards than BACS, you have a possibility to implement them via the mentioned framework. To dive deeper into these functionalities, we encourage you to continue reading the remainder of the blog post, where you will find comprehensive details.
Direct Debit Instruction is a method by which the organization obtains a payer’s permission to collect money from the payer’s bank account during the direct debit procedure. In the latest release, within generic framework to process direct debit instruction, we offer a specific solution for Automated Direct Debit Instruction Service (AUDDIS) complying with the requirements defined by BACS. Therefore, the customers can freely reuse the functionality delivered for AUDDIS. For S/4 HANA customers who are not using UK BACS payment system, you need to implement your own logic in order to process direct debit instruction.
AUDDIS stands for Automated Direct Debit Instruction Service which enables organizations to send new Direct Debit Instruction to their customer’s payment service provider electronically instead of in paper format via BACS system. Generation of the AUDDIS file containing details of, for example, new and canceled mandates. Via AUDDIS file, the transfer of direct debit instructions is automated from the collecting organization to the paying payment service provider.
Your company has created a new mandate, canceled an existing mandate due to the need of customers, or made changes to master data (for example service user number - SUN) which is linked to the existing mandate. In those situations, you need to inform your payer’s payment service provider about the changes which will potentially impact the process of payment collection later. All the changes will be consolidated within AUDDIS files, which will then be sent to the payer's payment service provider. This ensures the consistency between your direct debit instructions and the processing of the direct debit mandate, thereby maintaining a seamless and aligned approach.
To enable your communication with the bank using direct debit instruction, you need to ensure the following:
For detailed information about setting up the mandate configuration and mandate maintenance, please refer to the blog post How to authorize Direct Debit Payments outside SEPA in Contract Accounting to learn further insight.
4. How to process AUDDIS?
Step 1: Assign instruction type to direct debit procedure
Instruction type is delivered for specific country which is used to determine how the mandate instructions can be transferred from the organization to the payer’s payment service providers.
Currently, SAP has delivered a default instruction type 01 for GB AUDDIS (BACS) in S4/HANA Public Cloud. As a customer, you do not have the possibility to implement your own logic for BAdI in S4/HANA Public Cloud. Instead, you can only rely on the default functionality provided to assign default instruction type 01 to direct debit mandate procedure.
In the predesigned BAdI, we have already defined basic conditions to generate direct debit instructions as listed below:
To assign instruction type to direct debit mandate procedure, enter to Fiori application Manage Your Solution. Set the local version to GB for Great Britain.
In your configuration environment, find the Management of Direct Debit Mandates app and complete the following configuration activities:
For customers who have the system where Central Business Configuration (CBC) is installed, you can also assign instruction type to direct debit mandate procedure via CBC. In Configuration Activities, follow the path: Financial Operations > Contract Accounting > Management of Direct Debit Mandate > Define Direct Debit Procedure.
For your information:
S/4HANA Public Cloud and CBC customers are at the moment limited to use the predefined mapping format (GB_AUDDIS) provided by SAP to map data from instruction files. Therefore, you can only reuse it without making any modifications. In order to view the mapping structure of GB_AUDDIS format tree predefined by SAP, you can follow steps below:
Step 2: Create direct debit mandate instruction media
In the Create Direct Debit Instruction Media app, choose Create to generate a new Job.
Now in displaying Log Details, you can see new direct debit instruction is created.
Step 3: Download files
Open Manage Direct Debit Mandate Media app, fill in information for Run Date and Identification, later Execute to display all instruction files and download them.
Now, you will be able to download the file which was already created by choosing the file and pressing Download.
The output file will resemble the following format.
Step 4: Send the file to payment service provider/bank
After downloading the instruction file, you are now able to send it to your customers’ payment service provider/bank to inform them about all of the relevant changes on direct debit mandates.
Rejected payments are unsuccessful direct debit payments which are sent from the customer’s payment service provider/bank to the organization. In the current release, SAP supports the country specific solution for Great Britain to process rejected payment with Automated Returns of Unpaid Direct Debits Service (ARUDD) file.
ARUDD serves as an automated system used by banks for the purpose of returning unpaid Direct Debit payments under the BACS system. The ARUDD file, which provides a list of unpaid collections, is sent from payer’s payment service provider to SAP system to inform that direct debit payment is not successful. Returns of unpaid direct debit payments are typically triggered by circumstances such as canceled Direct Debits from the customers’ side, insufficient funds in the customer’s account, wrong bank account number, etc.
The service provider/organization sends direct debit requests to the payer’s payment service provider/bank using the GB_BACS payment format for example. In the event of unsuccessful direct debits resulting from for instance insufficient account balance in the customer’s bank account, the payment service provider/bank sends an ARUDD file containing a list of rejected payments to SAP system. The organization then proceeds to handle these rejected payments.
To enable your communication with the bank and process with ARUDD file, you need to ensure the following:
For detailed information about setting up the mandate configuration and mandate maintenance, please refer to the blog post How to authorize Direct Debit Payments outside SEPA in Contract Accounting to learn further insight.
Here is an example of ARUDD file received from the customer’s payment service provider/ bank.
Step 1: Mapping field for ARUDD files
In order to import ARUDD files and transfer data within the file into Electronic Bank Statement database tables (for example FEBKO, FEBEP, FEBRE, etc.) you need to map the field in ARUDD file to the default format mapping structure predefined by SAP. The mapping field structure is sum up in the below table:
In SAP Fiori Launchpad, access to Map Format Data for Incoming Payment Files from Banks app, select RJCT – Payment Rejection in the Mapping Type field. After that, select format mapping GB_ARUDD.
From there you can directly use the predefined mapping to map the information within the ARUDD file to the standard mapping structure.
For SAP S/4HANA Public Cloud customers, it is at the moment impossible to enhance the BAdI to implement your own logic. Therefore, you can only rely on the predefined BAdI - IFME_OUTPUT_POSTPROCESSING provided by SAP.
Step 2: Importing ARUDD files from payment service provider/bank
Open app Manage Incoming Payment Files, Choose Import and select import Payment Rejection.
In Select Format, select ARUDD format mapping – Great Britain (FI-CA), drop the ARUDD file and choose Process to upload the file.
After successfully uploading the file, you can see the log details with information on the payment rejection imported. Now, the information in the file is stored in FEBKO/FEBEP table.
Step 3: Configure and assign return reason
To configure the company specific returns reason, you can follow the customizing activity:
In order to define an internal company-specific return reason for each external house bank return reason, in your configuration environment, in Returns App, go to Assign Return Reasons to House Banks, choose Configure, you can assign the external return reason from the customer’s PSP/ bank to the internal return code according to your need by entering New Entries.
Step 4: Transfer data to returns lot and process ARUDD items
Open app Transfer Account Statement, fill in the required fields for Run Date, Identification and information for Electronic Bank Statement Selection parameter.
Now new returns lot is created with data transfer from your ARUDD file into the standard structure of the returns lot.
You can see details of the returns lot with the return reason received from the customer’s payment service provider/bank.
Bank communication using direct debit mandate with AUDDIS and ARUDD speeds up and simplifies the process of direct debit collection. By following this blog post, you will understand the process to transfer direct debit instruction to payer’s payment service provider/bank and procedure to manage canceled mandate received from the payment service provider/bank.
For detailed information about current and future development of direct debit mandate, please refer to the announcement note - 3289457 - Announcement of support for Preauthorized Direct Debit Payments using Direct Debit Mandate...
Do you find the blog post helpful? Please share your comments and questions in the comment session below.
Following the direct debit mandate, this blog post depicts the communication process between the company and the payment service provider/bank using the mandate. You can learn about by which means the mandate can be sent to the payment service provider to process the payments and how the company can manage canceled mandates. Newly delivered functionality is highlighted in red in the following diagram.
Figure 1: Detailed process with Direct Debit Mandate and Bank Communication
Currently, in S/4HANA CE2308 release, SAP delivers generic framework for direct debit instruction and rejected payment file. This blog post is specified for SAP S/4HANA Public Cloud, to learn more about process using SAP S4/HANA Private Cloud and On-Premise, please refer to blog post Bank Communication Using Direct Debit Mandate in SAP S4/HANA Private Cloud and On-Premise.
Under the generic framework mentioned above, SAP provide the implementation for the United Kingdom (UK) according to the Bankers' Automated Clearing System (BACS) standard. Therefore, the blog post primarily focuses on the UK BACS service and the communication between the company and the payment service provider/ bank.
Depending on the local project requirements defined by different standards than BACS, you have a possibility to implement them via the mentioned framework. To dive deeper into these functionalities, we encourage you to continue reading the remainder of the blog post, where you will find comprehensive details.
Bank communication and process using Direct Debit Mandate
Direct Debit Instruction and AUDDIS
Direct Debit Instruction is a method by which the organization obtains a payer’s permission to collect money from the payer’s bank account during the direct debit procedure. In the latest release, within generic framework to process direct debit instruction, we offer a specific solution for Automated Direct Debit Instruction Service (AUDDIS) complying with the requirements defined by BACS. Therefore, the customers can freely reuse the functionality delivered for AUDDIS. For S/4 HANA customers who are not using UK BACS payment system, you need to implement your own logic in order to process direct debit instruction.
- What is AUDDIS?
AUDDIS stands for Automated Direct Debit Instruction Service which enables organizations to send new Direct Debit Instruction to their customer’s payment service provider electronically instead of in paper format via BACS system. Generation of the AUDDIS file containing details of, for example, new and canceled mandates. Via AUDDIS file, the transfer of direct debit instructions is automated from the collecting organization to the paying payment service provider.
- Business Case
Your company has created a new mandate, canceled an existing mandate due to the need of customers, or made changes to master data (for example service user number - SUN) which is linked to the existing mandate. In those situations, you need to inform your payer’s payment service provider about the changes which will potentially impact the process of payment collection later. All the changes will be consolidated within AUDDIS files, which will then be sent to the payer's payment service provider. This ensures the consistency between your direct debit instructions and the processing of the direct debit mandate, thereby maintaining a seamless and aligned approach.
- Prerequisite
To enable your communication with the bank using direct debit instruction, you need to ensure the following:
- Direct debit mandate configuration is set up.
- Direct debit mandates are created.
For detailed information about setting up the mandate configuration and mandate maintenance, please refer to the blog post How to authorize Direct Debit Payments outside SEPA in Contract Accounting to learn further insight.
4. How to process AUDDIS?
Step 1: Assign instruction type to direct debit procedure
Instruction type is delivered for specific country which is used to determine how the mandate instructions can be transferred from the organization to the payer’s payment service providers.
Currently, SAP has delivered a default instruction type 01 for GB AUDDIS (BACS) in S4/HANA Public Cloud. As a customer, you do not have the possibility to implement your own logic for BAdI in S4/HANA Public Cloud. Instead, you can only rely on the default functionality provided to assign default instruction type 01 to direct debit mandate procedure.
In the predesigned BAdI, we have already defined basic conditions to generate direct debit instructions as listed below:
- Creating a new mandate with an active status
- Changing the status of a mandate from active to inactive (for example canceling an existing mandate)
- Modifying master data associated with the Creditor (for example changing the value of the creditor ID).
To assign instruction type to direct debit mandate procedure, enter to Fiori application Manage Your Solution. Set the local version to GB for Great Britain.
In your configuration environment, find the Management of Direct Debit Mandates app and complete the following configuration activities:
- In Select Application field: Select application 2
- In Define Procedure > Company Code Assignment: Specify 01 in the Instruction Type

For customers who have the system where Central Business Configuration (CBC) is installed, you can also assign instruction type to direct debit mandate procedure via CBC. In Configuration Activities, follow the path: Financial Operations > Contract Accounting > Management of Direct Debit Mandate > Define Direct Debit Procedure.
For your information:
S/4HANA Public Cloud and CBC customers are at the moment limited to use the predefined mapping format (GB_AUDDIS) provided by SAP to map data from instruction files. Therefore, you can only reuse it without making any modifications. In order to view the mapping structure of GB_AUDDIS format tree predefined by SAP, you can follow steps below:
- For S/4HANA Public Cloud customers: In Fiori application, go to Manage Your Solution, set the local version to GB for Great Britain. In your configuration environment, find the Management of Direct Debit Mandates > Map Format Data for Direct Debit Mandate Instruction > Configure. Now you choose GB_AUDDIS to display the mapping structure.

- For CBC customers: Go to Configuration Activities, follow the path: Financial Operations > Contract Accounting > Management of Direct Debit Mandate > Map Format Data for Direct Debit Mandate Instruction > Configure. Now you can display the mapping structure of GB_AUDDIS
Step 2: Create direct debit mandate instruction media
In the Create Direct Debit Instruction Media app, choose Create to generate a new Job.
Later, enter data for required parameters and schedule the job.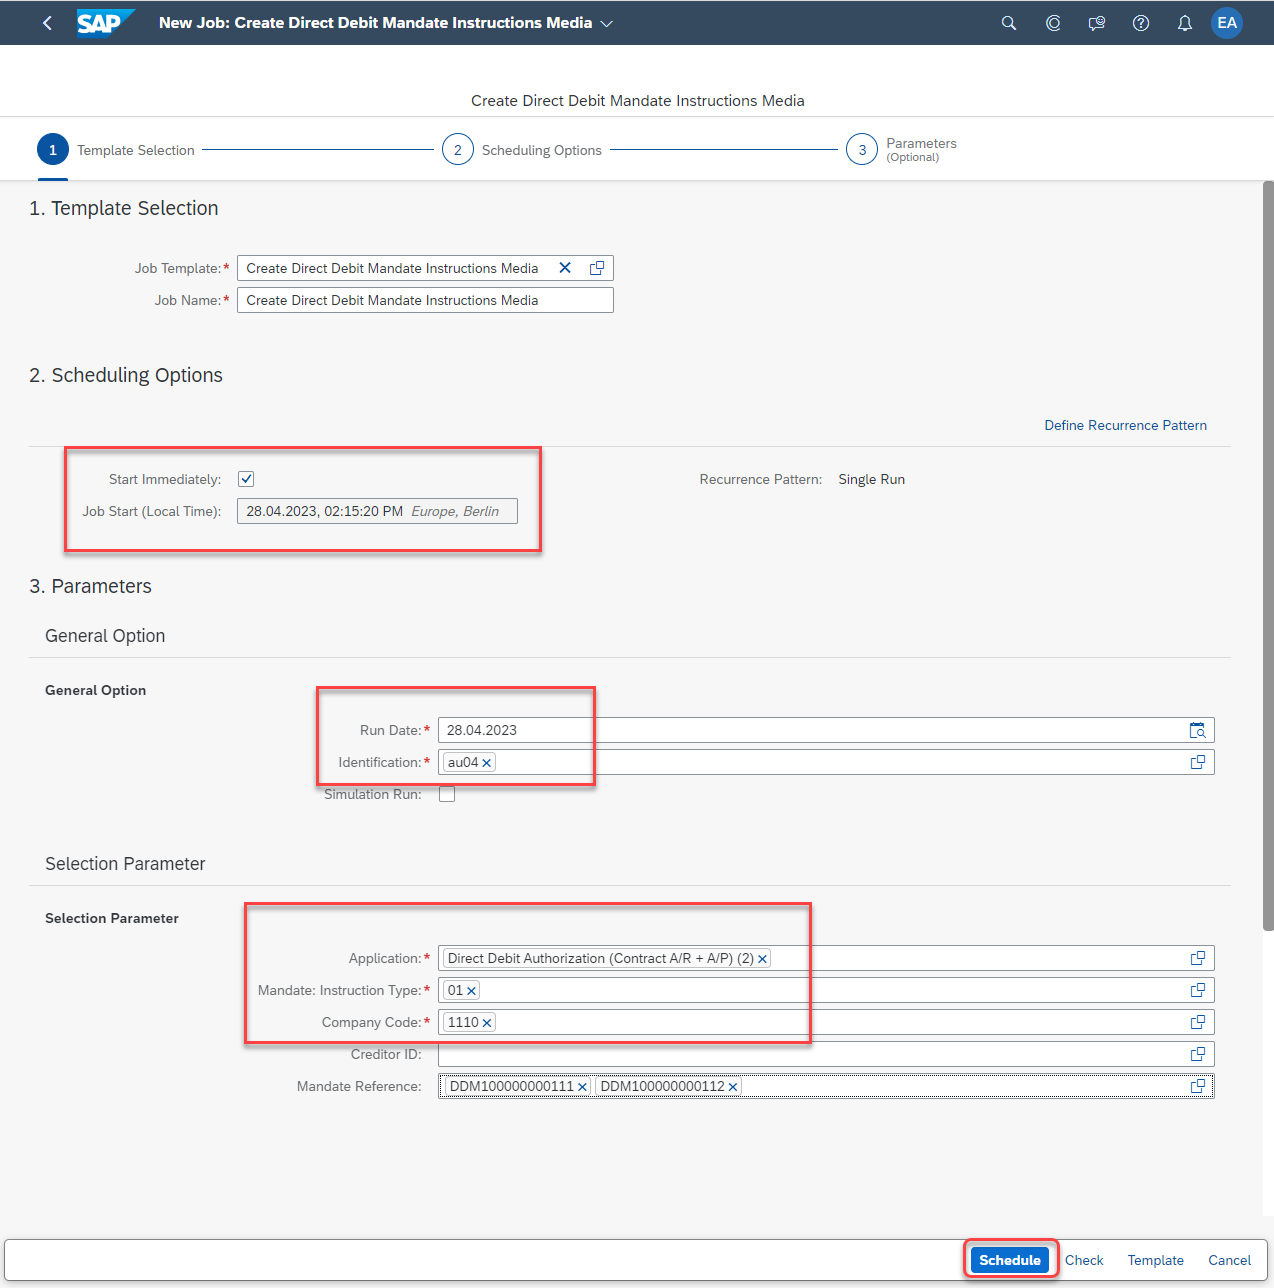
Now in displaying Log Details, you can see new direct debit instruction is created.

Step 3: Download files
Open Manage Direct Debit Mandate Media app, fill in information for Run Date and Identification, later Execute to display all instruction files and download them.

Now, you will be able to download the file which was already created by choosing the file and pressing Download.

The output file will resemble the following format.

Step 4: Send the file to payment service provider/bank
After downloading the instruction file, you are now able to send it to your customers’ payment service provider/bank to inform them about all of the relevant changes on direct debit mandates.
ARUDD – process for rejected payments
Rejected payments are unsuccessful direct debit payments which are sent from the customer’s payment service provider/bank to the organization. In the current release, SAP supports the country specific solution for Great Britain to process rejected payment with Automated Returns of Unpaid Direct Debits Service (ARUDD) file.
- What is ARUDD?
ARUDD serves as an automated system used by banks for the purpose of returning unpaid Direct Debit payments under the BACS system. The ARUDD file, which provides a list of unpaid collections, is sent from payer’s payment service provider to SAP system to inform that direct debit payment is not successful. Returns of unpaid direct debit payments are typically triggered by circumstances such as canceled Direct Debits from the customers’ side, insufficient funds in the customer’s account, wrong bank account number, etc.
- Business Case
The service provider/organization sends direct debit requests to the payer’s payment service provider/bank using the GB_BACS payment format for example. In the event of unsuccessful direct debits resulting from for instance insufficient account balance in the customer’s bank account, the payment service provider/bank sends an ARUDD file containing a list of rejected payments to SAP system. The organization then proceeds to handle these rejected payments.
- Prerequisite
To enable your communication with the bank and process with ARUDD file, you need to ensure the following:
- Direct debit mandate configuration is set up.
- Direct debit mandates are created.
- Mandate is assigned to payment document by invoice posting and payment run.
For detailed information about setting up the mandate configuration and mandate maintenance, please refer to the blog post How to authorize Direct Debit Payments outside SEPA in Contract Accounting to learn further insight.
- How to process ARUDD?
Here is an example of ARUDD file received from the customer’s payment service provider/ bank.

Step 1: Mapping field for ARUDD files
In order to import ARUDD files and transfer data within the file into Electronic Bank Statement database tables (for example FEBKO, FEBEP, FEBRE, etc.) you need to map the field in ARUDD file to the default format mapping structure predefined by SAP. The mapping field structure is sum up in the below table:

In SAP Fiori Launchpad, access to Map Format Data for Incoming Payment Files from Banks app, select RJCT – Payment Rejection in the Mapping Type field. After that, select format mapping GB_ARUDD.

From there you can directly use the predefined mapping to map the information within the ARUDD file to the standard mapping structure.
For SAP S/4HANA Public Cloud customers, it is at the moment impossible to enhance the BAdI to implement your own logic. Therefore, you can only rely on the predefined BAdI - IFME_OUTPUT_POSTPROCESSING provided by SAP.

Step 2: Importing ARUDD files from payment service provider/bank
Open app Manage Incoming Payment Files, Choose Import and select import Payment Rejection.

In Select Format, select ARUDD format mapping – Great Britain (FI-CA), drop the ARUDD file and choose Process to upload the file.
After successfully uploading the file, you can see the log details with information on the payment rejection imported. Now, the information in the file is stored in FEBKO/FEBEP table.

Step 3: Configure and assign return reason
To configure the company specific returns reason, you can follow the customizing activity:
- Access Fiori application Manage Your Solution, set the local version to GB for Great Britain.
- In your configuration environment, find Returns app, in Configure Returns Reasons, you can see the returns reasons are assigned as follow:

In order to define an internal company-specific return reason for each external house bank return reason, in your configuration environment, in Returns App, go to Assign Return Reasons to House Banks, choose Configure, you can assign the external return reason from the customer’s PSP/ bank to the internal return code according to your need by entering New Entries.

Step 4: Transfer data to returns lot and process ARUDD items
Open app Transfer Account Statement, fill in the required fields for Run Date, Identification and information for Electronic Bank Statement Selection parameter.
In the Account Statement Transfer to Payment/Payment Order/Returns Lot/Check Encashment field, check on Post Lot. 
Now new returns lot is created with data transfer from your ARUDD file into the standard structure of the returns lot.

You can see details of the returns lot with the return reason received from the customer’s payment service provider/bank.

Summary
Bank communication using direct debit mandate with AUDDIS and ARUDD speeds up and simplifies the process of direct debit collection. By following this blog post, you will understand the process to transfer direct debit instruction to payer’s payment service provider/bank and procedure to manage canceled mandate received from the payment service provider/bank.
SAP Notes
For detailed information about current and future development of direct debit mandate, please refer to the announcement note - 3289457 - Announcement of support for Preauthorized Direct Debit Payments using Direct Debit Mandate...
Do you find the blog post helpful? Please share your comments and questions in the comment session below.
- SAP Managed Tags:
- SAP S/4HANA Public Cloud
Labels:
2 Comments
You must be a registered user to add a comment. If you've already registered, sign in. Otherwise, register and sign in.
Labels in this area
-
Artificial Intelligence (AI)
1 -
Business Trends
363 -
Business Trends
29 -
Customer COE Basics and Fundamentals
1 -
Digital Transformation with Cloud ERP (DT)
1 -
Event Information
461 -
Event Information
27 -
Expert Insights
114 -
Expert Insights
177 -
General
1 -
Governance and Organization
1 -
Introduction
1 -
Life at SAP
415 -
Life at SAP
2 -
Product Updates
4,682 -
Product Updates
260 -
Roadmap and Strategy
1 -
Technology Updates
1,500 -
Technology Updates
96
Related Content
- Celebrating the Success of the Product Expert Training H1 2024 in Enterprise Resource Planning Blogs by SAP
- How to find AND debug the technical object called in the backend for an API call in S/4 HANA Cloud? in Enterprise Resource Planning Q&A
- Recap of SAP S/4HANA 2023 Highlights Webinar: Overview - Gen AI and Sustainability in Enterprise Resource Planning Blogs by SAP
- SAP S/4HANA Cloud Public Edition: Security Configuration APIs in Enterprise Resource Planning Blogs by SAP
- Introducing the market standard of electronic invoicing for the United States in Enterprise Resource Planning Blogs by SAP
Top kudoed authors
| User | Count |
|---|---|
| 16 | |
| 6 | |
| 5 | |
| 4 | |
| 4 | |
| 4 | |
| 3 | |
| 3 | |
| 3 | |
| 3 |