
- SAP Community
- Products and Technology
- Enterprise Resource Planning
- ERP Blogs by SAP
- Deep Dive 6 with SAP Cloud SDK: Extend your Cloud ...
Enterprise Resource Planning Blogs by SAP
Get insights and updates about cloud ERP and RISE with SAP, SAP S/4HANA and SAP S/4HANA Cloud, and more enterprise management capabilities with SAP blog posts.
Turn on suggestions
Auto-suggest helps you quickly narrow down your search results by suggesting possible matches as you type.
Showing results for
former_member27
Participant
Options
- Subscribe to RSS Feed
- Mark as New
- Mark as Read
- Bookmark
- Subscribe
- Printer Friendly Page
- Report Inappropriate Content
12-20-2017
12:25 PM
Disclaimer: This blog post is only applicable for the SAP Cloud SDK version of at most 2.19.2. We plan to continuously migrate these blog posts into our List of Tutorials. Feel free to check out our updated Tutorials on the SAP Cloud SDK.
This blog post presents how to integrate tenant-aware persistency in your application based on Cloud SDK running in SAP Cloud Platform, Cloud Foundry.
Note: This post is part of a series. For a complete overview visit the SAP Cloud SDK Overview.
In case you have questions or suggestions, reach out to us in Stackoverflow via sap-cloud-sdk tag. Our development team is actively monitoring this tag and is making sure that the questions and requests are addressed properly. You can use this opportunity to share the experience and to get an advice from a broader Stackoverflow community. Of course, we are happy to receive your questions and suggestions in the comments to our blog posts, as well.
Goal of This Blog Post
When you build a side-by-side extension for SAP S/4HANA in SAP Cloud Platform, you can integrate various backing services of SAP Cloud Platform in the application logic. For example, you can enrich the data retrieved from the backend S/4HANA system with an additional data model.
Let's say, you are retrieving the cost center data, its planned and actual costs from SAP S/4HANA. In the application logic in SAP Cloud Platform, you calculate the cost forecast for the next year and store these additional key figures in a persistence service in the cloud platform.
When building a multitenant SaaS application, consumed by several customers, you have to ensure the data isolation by implementing tenant-aware handling of data.
Imagine, you have customer A and customer B. Both of them subscribe to and use one running instance of your application, but they would like to store and access their data independently. Each of them want to be sure that his data is secure and not accessible by any other customer.
There are several possible approaches to the implementation of data isolation in multitenant applications:
- Discriminator column isolation
- Schema isolation
- Dedicated database instance
Each of the approaches has its advantages and disadvantages and each of them is more suitable for some use cases.
In this blog post, we take a look at an example application that implements a schema isolation approach.
Out of Scope
To make this example application simple, we will focus on the topics of Persistency and Multitenancy and leave out some particular aspects, such as:
- Security aspects related to authentication and authorization are only partially covered in this blog post. Please check out the corresponding blog posts in our series to get more details on this topic.
- Managing of the database migrations and database refactoring for multiple tenants.
Prerequisites
Before you continue with a hands on part of this tutorial, make sure that you have installed the development tools, as described in the blog post Step 1 with SAP Cloud SDK: Set up.
In this tutorial, we will work with SAP Cloud Platform, Cloud Foundry. To be able to deploy your application in SAP Cloud Platform, you need to set up your account and Cloud Foundry tools. To do so, please, refer to the section "Setup for CloudFoundry" in the tutorial Step 3 with SAP Cloud SDK: HelloWorld on SCP CloudFoundry.
The application described in this blog post is developed using the Spring Boot framework. I do not cover all the principles of programming with Spring Boot framework in this blog post and I assume that you are already familiar with some basics. If you are interested to learn the details about Spring Boot in general, this guide can be a good starting point.
To focus on the presented topic, I leave out the deep dive into the JPA (Java Persistence API) / Hibernate concept. There are a lot of online resources that make a good introduction into this topic, such as Java Persistence API, Hibernate Documentation, Hibernate Getting Started Guide, just to name a few.
Hands On
Having said that, let us get started with integrating a persistency into an example application based on the SAP Cloud SDK.
Expected Result
As a result of the steps, described in this part of the tutorial, you will have developed an application supporting a tenant-aware persistency.
In this example, I use Spring Boot framework with Hibernate as JPA layer. The application is developed for SAP Cloud Platform, Cloud Foundry and I use PostgreSQL as a persistence service.
We will go through the following steps while developing this simple application:
- Configure Hibernate to implement tenant-aware handling of requests
- Tenant onboarding and offboarding
- Create and read data in a database (forecast for a cost center) for a particular tenant
- Configure persistency for the local testing
- Integration tests
- Configure the integration with a persistency service (PostgreSQL) in SAP Cloud Platform
You can also check out the full source code example from our GitHub repository.
Getting Started
As usual, we get started with the development of the SDK based project by generating a project structure using one of the predefined maven archetypes.
For the development of a Spring based project, use archetype scp-cf-spring, as shown in the maven command below.
mvn archetype:generate -DarchetypeGroupId=com.sap.cloud.s4hana.archetypes -DarchetypeArtifactId=scp-cf-spring -DarchetypeVersion=LATESTIf you worked through some of our previous tutorials, the generated project structure might be familiar to you.
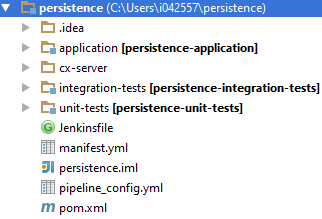
The project contains the following folders:
applicationcx-serverintegration-testsunit-tests
Please, refer to the blog post Step 3 with SAP Cloud SDK: HelloWorld on SCP CloudFoundry for the detailed explanation of this project structure and the reasoning behind this.
Below, we investigate the application folder in more details, as its artifacts are specific for Spring framework and differ from the ones described in the previous blog posts.
application folder contains the source code and configuration of your actual Spring Boot application:
| src/main/java | You will add your application logic here. The folder already contains the classes that implement a simple Spring Boot "Hello World" application, such as Application.java, HelloWorldController.java, HelloWorldResponse.java. |
| src/main/resources | Here, we add resources required in the application logic, such as configuration files. application.yml file is already added here and we will extend it in the later steps for setting up the persistency. |
| src/test/java | Additional test classes. |
| src/test/resources | Additional resources for attached test modules. |
| pom.xml | This is your project management file for Maven where you can maintain other sdk and open source dependencies or use plugins that ease your build environment. |
In order to be able to use additional tools required in this tutorial, you need to extend project dependencies in your application pom.xml file.

In the application pom.xml file, add the following dependencies:
<!-- SDK framework adaptions -->

<dependency>

    <groupId>com.sap.cloud.s4hana.frameworks</groupId>

    <artifactId>cxf</artifactId>

</dependency>


<!-- Additional Spring Boot dependencies for JPA integration and cloud platform service customizing -->

<dependency>

    <groupId>org.springframework.boot</groupId>

    <artifactId>spring-boot-starter-jdbc</artifactId>

    </dependency>

<dependency>

    <groupId>org.springframework.boot</groupId>

    <artifactId>spring-boot-starter-data-jpa</artifactId>

</dependency>

<dependency>

    <groupId>org.springframework.cloud</groupId>

    <artifactId>spring-cloud-spring-service-connector</artifactId>

    <version>1.2.3.RELEASE</version>

</dependency>

<dependency>

    <groupId>org.springframework.cloud</groupId>

    <artifactId>spring-cloud-cloudfoundry-connector</artifactId>

    <version>1.2.3.RELEASE</version>

</dependency>


<!-- Liquibase for database migration -->

<dependency>

    <groupId>org.liquibase</groupId>

    <artifactId>liquibase-core</artifactId>

    <version>3.5.3</version>

</dependency>
1. Configure Hibernate
Now, when the project structure is generated, we can get start extending our simple "Hello World" application. As promised, we will add a capability to persist the data in a database considering multitenant environment.
First of all, we need to adapt the default configuration of Hibernate to make it tenant-aware.
Luckily, when using Spring Boot framework, it can be done with just a few lines of code.
The first class that we need for this purpose is HibernateConfig.java. I add this class in the newly created package com.mycompany.config
Let us take a look at this source code in details. With Spring Boot, you can configure your persistency programmatically without creating of a persistence.xml configuration file.
package com.mycompany.config;


import org.hibernate.MultiTenancyStrategy;

import org.hibernate.cfg.Environment;

import org.hibernate.context.spi.CurrentTenantIdentifierResolver;

import org.hibernate.engine.jdbc.connections.spi.MultiTenantConnectionProvider;

import org.springframework.context.annotation.Bean;

import org.springframework.context.annotation.Configuration;

import org.springframework.orm.jpa.JpaVendorAdapter;

import org.springframework.orm.jpa.LocalContainerEntityManagerFactoryBean;

import org.springframework.orm.jpa.vendor.HibernateJpaVendorAdapter;


import javax.sql.DataSource;

import java.util.HashMap;

import java.util.Map;


@Configuration

public class HibernateConfig {


    @Bean

    public JpaVendorAdapter jpaVendorAdapter() {

        return new HibernateJpaVendorAdapter();

    }


    @Bean

    public LocalContainerEntityManagerFactoryBean entityManagerFactory(DataSource dataSource, MultiTenantConnectionProvider multiTenantConnectionProvider,

                                                                       CurrentTenantIdentifierResolver tenantIdentifierResolver) {

        final LocalContainerEntityManagerFactoryBean em = new LocalContainerEntityManagerFactoryBean();

        em.setDataSource(dataSource);

        em.setPackagesToScan("com.mycompany.models");

        em.setJpaVendorAdapter(this.jpaVendorAdapter());


        final Map<String, Object> jpaProperties = new HashMap<>();

        jpaProperties.put(Environment.MULTI_TENANT, MultiTenancyStrategy.SCHEMA);

        jpaProperties.put(Environment.MULTI_TENANT_CONNECTION_PROVIDER, multiTenantConnectionProvider);

        jpaProperties.put(Environment.MULTI_TENANT_IDENTIFIER_RESOLVER, tenantIdentifierResolver);

        jpaProperties.put(Environment.FORMAT_SQL, true);


        em.setJpaPropertyMap(jpaProperties);

        return em;

    }

}
In method jpaVendorAdapter, we specify that Hibernate implementation of JPA will be used in this application.
In method entityManagerFactory, we can set up additional properties for a used entity manager. For the entity manager factory, we set up a data source, packages to scan to find a related data model in the application, and the JPA vendor adapter.
Multitenancy-related configuration is done via setting of corresponding Hibernate properties in the following lines:
jpaProperties.put(Environment.MULTI_TENANT, MultiTenancyStrategy.SCHEMA);

jpaProperties.put(Environment.MULTI_TENANT_CONNECTION_PROVIDER, multiTenantConnectionProvider);

jpaProperties.put(Environment.MULTI_TENANT_IDENTIFIER_RESOLVER, tenantIdentifierResolver);
Firstly, we specify that multitenancy is implemented as separate schemas.
Secondly, we specify that the object multitenantConnectionProvider will handle creation of connections to your data source. We still need to provide our own implementation of the interface MultiTenantConnectionProvider and we will take a look a this below.
Thirdly, we provide a tenantIdentifierResolver that will take care of retrieving of a tenant id at runtime. For that, we will implement the interface CurrentTenantIdentifierResolver.
Now, let us implement the interface MultiTenantConnectionProvider that is used for Hibernate configuration. We will call this class SchemaPerTenantConnectionProvider:
package com.mycompany.config;


import com.mycompany.util.TenantUtil;

import org.hibernate.HibernateException;

import org.hibernate.engine.jdbc.connections.spi.MultiTenantConnectionProvider;

import org.springframework.beans.factory.annotation.Autowired;

import org.springframework.beans.factory.annotation.Value;

import org.springframework.stereotype.Component;


import javax.sql.DataSource;

import java.sql.Connection;

import java.sql.SQLException;


@Component

public class SchemaPerTenantConnectionProvider implements MultiTenantConnectionProvider {


    @Value("${multitenant.defaultTenant}")

    String defaultTenant;


    @Autowired

    private DataSource dataSource;


    @Override

    public Connection getAnyConnection() throws SQLException {

        return this.dataSource.getConnection();

    }


    @Override

    public void releaseAnyConnection(final Connection connection) throws SQLException {

        connection.close();

    }


    @Override

    public Connection getConnection(final String tenantIdentifier) throws SQLException {

        final Connection connection = this.getAnyConnection();

        try {

            connection.setSchema(TenantUtil.createSchemaName(tenantIdentifier));

        } catch (SQLException e) {

            throw new HibernateException("Could not alter JDBC connection to specified schema [" + tenantIdentifier + "]",

                    e);

        }

        return connection;

    }


    @Override

    public void releaseConnection(final String tenantIdentifier, final Connection connection) throws SQLException {

        try {

            connection.setSchema(TenantUtil.createSchemaName(defaultTenant));

        } catch (SQLException e) {

            throw new HibernateException("Could not alter JDBC connection to specified schema [" + tenantIdentifier + "]",

                    e);

        }

        connection.close();

    }


    @Override

    public boolean supportsAggressiveRelease() {

        return true;

    }


    @Override

    public boolean isUnwrappableAs(final Class aClass) {

        return false;

    }


    @Override

    public <T> T unwrap(final Class<T> aClass) {

        return null;

    }

}
Let us pay particular attention at the following methods of this class:
| getConnection | This method returns a connection set up for a database schema name dependently on a tenant id. TenantUtil is an additional util class that we will implement in order to apply a schema name derivation from the given tenant id. |
| releaseConnection | For the given connection, this method changes the schema in the connection to the default schema (we configure the default schema name in application.yml that will be discussed later) and closes the connection. |
Now, let us create an TenantUtil class in a new package util:
package com.mycompany.util;


public class TenantUtil {

    public static String createSchemaName(final String tenantId) {

        return String.format("tenant_%s", tenantId);

    }

}
In the productive application, you would probably want to apply a different and more meaningful rule for your schema names. For this simple example, we will just add a prefix "tenant_" before tenant id to build a corresponding schema name.
Next, we need to implement CurrentTenantIdentifierResolver interface to retrieve the tenant id information at runtime. We will call this class TenantIdentifierResolver:
package com.mycompany.config;


import org.hibernate.context.spi.CurrentTenantIdentifierResolver;

import org.slf4j.Logger;

import org.springframework.beans.factory.annotation.Value;

import org.springframework.stereotype.Component;


import com.sap.cloud.sdk.cloudplatform.logging.CloudLoggerFactory;

import com.sap.cloud.sdk.cloudplatform.tenant.TenantAccessor;

import com.sap.cloud.sdk.cloudplatform.tenant.exception.TenantNotFoundException;


@Component

public class TenantIdentifierResolver implements CurrentTenantIdentifierResolver {

    private static final Logger logger = CloudLoggerFactory.getLogger(TenantIdentifierResolver.class);


    @Value("${multitenant.defaultTenant}")

    String defaultTenant;


    @Override

    public String resolveCurrentTenantIdentifier() {

        try {

            return TenantAccessor.getCurrentTenant().getTenantId();

        } catch (TenantNotFoundException e) {

            logger.warn("Tenant not found", e);

            return defaultTenant;

        }

    }


    @Override

    public boolean validateExistingCurrentSessions() {

        return true;

    }

}
Here, the SAP Cloud SDK tools come into play. To retrieve the id of the current tenant, all we need to do is to call the method TenantAccessor.getCurrentTenant().getTenantId() that is coming with cloud platform module of SAP Cloud SDK. For the Cloud Foundry edition of SAP Cloud Platform, this method retrieves the tenant id from a corresponding JSON web token. See more details on this topic in the following deep dive blog post.
The value of the default tenant can be customized in application.yml:
multitenant:

  defaultTenant: public
Other required parameters that can be configured in this file will be discussed later.
Before we move forward, let us check the current package structure that we have in the application module at this point:

2. Tenant Onboarding and Offboarding
After the Hibernate configuration is done, we can move forward with the first services supported by the application.
When you develop a multitenant application for SAP Cloud Platform, Cloud Foundry, you will need to create a service for tenant onboarding and offboarding that will be called by SAP Cloud Platfrom each time, when an account subscribes your application.
While publishing your multitenant application, you will need to register your application callback URL that will be called when a consumer tenant subscribes/unsubscribes to an application; callback URL has to comply to following convention: <some-url-path>/<tenantId> and must implement PUT (=subscribe) and DELETE (=unsubscribe).
When we implement schema separated multitemancy, this service needs to take care of creation and cleaning up database schemas for corresponding tenants. Let us provide a simple implementation of such services in our project.
First of all, let us build a tenant provisioning controller that will handle corresponding HTTP requests:
package com.mycompany.controllers;


import com.mycompany.service.TenantProvisioningService;

import org.slf4j.Logger;

import org.slf4j.LoggerFactory;

import org.springframework.beans.factory.annotation.Autowired;

import org.springframework.http.HttpStatus;

import org.springframework.stereotype.Component;

import org.springframework.web.bind.annotation.DeleteMapping;

import org.springframework.web.bind.annotation.PathVariable;

import org.springframework.web.bind.annotation.PutMapping;

import org.springframework.web.bind.annotation.RequestMapping;

import org.springframework.web.bind.annotation.ResponseStatus;

import org.springframework.web.bind.annotation.RestController;

import org.springframework.web.context.annotation.RequestScope;


@Component

@RestController

@RequestScope

@RequestMapping(path = "/callback/tenant")

public class TenantProvisioningController {

    private static final Logger logger = LoggerFactory.getLogger(CostCenterController.class);


    @Autowired

    TenantProvisioningService tenantProvisioningService;


    @PutMapping("/{tenantId}")

    public void subscribeTenant(@PathVariable(value = "tenantId") String tenantId){

        logger.info("Tenant callback service was called with method PUT for tenant {}.", tenantId);

        tenantProvisioningService.subscribeTenant(tenantId);

    }


    @DeleteMapping("/{tenantId}")

    @ResponseStatus(HttpStatus.NO_CONTENT)

    public void unsubscribeTenant(@PathVariable(value = "tenantId")  String tenantId) {

        logger.info("Tenant callback service was called with method DELETE for tenant {}.", tenantId);

        tenantProvisioningService.unsubscribeTenant(tenantId);

    }

}
As required by SAP Cloud Platform, Cloud Foundry, this class implements PUT and DELETE methods for subscribing and unsubscribing of a given tenant. The source code does not compile yet, as we need to provide the implementation of a corresponding TenantProvisioningService.
For that purpose, we will create a simple interface TenantProvisioningService and its default implementation in the class DefaultTenantProvisioningService, as shown in the code below. We put these new artifacts in a new package service in our project.
package com.mycompany.service;


public interface TenantProvisioningService {

    void subscribeTenant(String tenantId);

    void unsubscribeTenant(String tenantId);

}
package com.mycompany.service;
import com.mycompany.util.TenantUtil;
import liquibase.Contexts;
import liquibase.LabelExpression;
import liquibase.Liquibase;
import liquibase.database.Database;
import liquibase.database.DatabaseFactory;
import liquibase.database.jvm.JdbcConnection;
import liquibase.exception.LiquibaseException;
import liquibase.resource.ClassLoaderResourceAccessor;
import org.apache.commons.lang.Validate;
import org.slf4j.Logger;
import org.slf4j.LoggerFactory;
import org.springframework.beans.factory.annotation.Autowired;
import org.springframework.stereotype.Service;
import javax.sql.DataSource;
import javax.ws.rs.BadRequestException;
import java.sql.Connection;
import java.sql.SQLException;
import java.sql.Statement;
import java.util.regex.Pattern;
@Service
public class DefaultTenantProvisioningService implements TenantProvisioningService {
public static final String LIQUIBASE_PATH = "db/changelog/db.changelog-master.yaml";
@Autowired
private DataSource dataSource;
private static final Pattern TENANT_PATTERN = Pattern.compile("[-\\w]+");
private static final Logger logger = LoggerFactory.getLogger(DefaultTenantProvisioningService.class);
@Override
public void subscribeTenant(final String tenantId) {
String defaultSchemaName;
try {
Validate.isTrue(isValidTenantId(tenantId), String.format("Invalid tenant id: \"%s\"", tenantId));
final String schemaName = TenantUtil.createSchemaName(tenantId);
final Connection connection = dataSource.getConnection();
final Database database = DatabaseFactory.getInstance().findCorrectDatabaseImplementation(new JdbcConnection(connection));
try (Statement statement = connection.createStatement()) {
statement.execute(String.format("CREATE SCHEMA IF NOT EXISTS \"%s\"", schemaName));
connection.commit();
defaultSchemaName = database.getDefaultSchemaName();
database.setDefaultSchemaName(schemaName);
final String filePath = LIQUIBASE_PATH;
final Liquibase liquibase = new liquibase.Liquibase(filePath,
new ClassLoaderResourceAccessor(), database);
liquibase.update(new Contexts(), new LabelExpression());
database.setDefaultSchemaName(defaultSchemaName);
}
} catch (SQLException | LiquibaseException | IllegalArgumentException e) {
final BadRequestException badRequestException = new BadRequestException();
logger.error("Tenant subscription failed for {}.", tenantId, e);
throw badRequestException;
}
}
@Override
public void unsubscribeTenant(final String tenantId) {
try {
Validate.isTrue(isValidTenantId(tenantId), String.format("Invalid tenant id: \"%s\"", tenantId));
final String schemaName = TenantUtil.createSchemaName(tenantId);
final Connection connection = dataSource.getConnection();
try (Statement statement = connection.createStatement()) {
statement.execute(String.format("DROP SCHEMA IF EXISTS \"%s\" CASCADE", schemaName));
}
} catch (SQLException | IllegalArgumentException e) {
final BadRequestException badRequestException = new BadRequestException();
logger.error("Tenant unsubscription failed for {}.", tenantId, e);
throw badRequestException;
}
}
private boolean isValidTenantId(final String tenantId) {
return tenantId != null && TENANT_PATTERN.matcher(tenantId).matches();
}
}Let us pay particular attention to the following aspects of the implementation of subscribeTenant method:
- For each new tenant, a database schema is created. The name a this schema is defined using the TenantUtil class that was described above. In our case, we simply add a prefix "tenant_" before the tenant id to build a schema name.
- After creating of a database schema, database tables are created using Liquibase tool. Please, consider that you need to add your Liquibase configuration file in the resource folder under the relative path db/changelog/db.changelog-master.yaml. For the cost center forecast example, the liquibase configuration file looks as follows:

databaseChangeLog:

  - changeSet:

      id: 1

      author: myuser

      changes:

        - createTable:

            tableName: costcenterforecast

            columns:

              - column:

                  name: name

                  type: varchar(100)

                  constraints:

                    primaryKey: true

                    nullable: false

              - column:

                  name: forecast

type: float- Tenant id validation: to avoid SQL injections, we are checking the validity of a given tenant id using pattern matching. In this application, we check that the tenant id contains only letters, numbers, or a dash.
The unsubscribeTenant method deletes the schema that corresponds to the given tenant id. As in case of subscribeTenant, we validate the tenant id against the pattern before executing SQL queries to mitigate SQL injections.
After executing of this step, your project structure should look as follows:

3. Create and Read Data
Now, when the tenant onboarding service and the controller are there, we can develop other data services. Will want to have a simple endpoint that is able to handle HTTP POST and GET requests to create read cost center forecast sums.
Let us start with the definition of a data model.
For this purpose, we create the CostCenterRepository interface extending standard Spring CrudInterface in the already existing package model:
package com.mycompany.models;


import org.springframework.data.repository.CrudRepository;

import org.springframework.stereotype.Repository;


@Repository

public interface CostCenterRepository extends CrudRepository<CostCenterForecast, Long> {}
CostCenterForecast is the Entity class we will work with. The entity will contain two fields: name of a cost center and a forecast of costs for the next year.
package com.mycompany.models;


import lombok.AllArgsConstructor;

import lombok.EqualsAndHashCode;

import lombok.Getter;

import lombok.NoArgsConstructor;

import lombok.Setter;

import lombok.experimental.Accessors;


import javax.persistence.Column;

import javax.persistence.Entity;

import javax.persistence.Id;

import javax.persistence.Table;


@Table( name = "CostCenterForecast" )

@Entity

@NoArgsConstructor

@AllArgsConstructor

@EqualsAndHashCode

@Accessors(chain = true)

public class CostCenterForecast

{

    @Id

    @Column( name = "NAME", length = 100 )

    @Getter

    @Setter

    private String name;


    @Column( name = "FORECAST" )

    @Getter

    @Setter

    private Double forecast;

}
The are some Java persistence annotation used in this class:
@Entity annotation specifies that this class represents JPA entity.
@Table annotation specifies the table name that corresponds to this entity in the database.
@ID for the field name defines this field as a primary key in a corresponding database table.
@Column annotations allow to adapt the name of the corresponding field in the database table.
Other annotations in this class are related to the project Lombok that was also already discussed in our previous blog posts.
After the data model is specified, it is time to create a Spring Controller that will take care of incoming HTTP requests:
package com.mycompany.controllers;


import com.google.common.collect.Lists;

import com.mycompany.models.CostCenterForecast;

import org.springframework.beans.factory.annotation.Autowired;

import org.springframework.data.repository.CrudRepository;

import org.springframework.http.ResponseEntity;

import org.springframework.web.bind.annotation.RequestBody;

import org.springframework.web.bind.annotation.RequestMapping;

import org.springframework.web.bind.annotation.RequestMethod;

import org.springframework.web.bind.annotation.RestController;


import java.util.List;


@RestController

public class CostCenterController

{

    @Autowired

    CrudRepository costCenterRepository;


    @RequestMapping(path = "/cost-center", method = RequestMethod.GET)

    public ResponseEntity<List<CostCenterForecast>> getCostCenters(){

        final List<CostCenterForecast> costCenters = Lists.newArrayList(costCenterRepository.findAll());

        return ResponseEntity.ok(costCenters);

    }


    @RequestMapping(path = "/cost-center", method = RequestMethod.POST)

    public ResponseEntity<List<CostCenterForecast>> postCostCenter(@RequestBody CostCenterForecast costCenter){

        costCenterRepository.save(costCenter);

        final List<CostCenterForecast> costCenters = Lists.newArrayList(costCenterRepository.findAll());

        return ResponseEntity.ok(costCenters);

    }

}
As you can see in the source code of the controller, Spring Boot and Hibernate provide a very simple way to access the basic methods, such as retrieval of entities and to storing of new ones, which we require for this example service.
After finishing of this step, your project structure looks as follows:

With that structure, we are done with the development. Now, we can move on to the customizing and testing of these developed services.
4. Configure the Local Persistency
Let us take a look at the required customizing for the case, when we want to evaluate our application in the local environment.
If you want to deploy this application locally or would like to develop and run integration test, you need to decide, what database you would like to work with. You would need to do some additional customizing in your application to be able to run against your chosen database. I will show these customizing at the example of PostgreSQL.
First of all, we add the corresponding dependency in our application pom.xml file:
<!-- PostgreSQL driver that will be used for local testing -->

<dependency>

    <groupId>postgresql</groupId>

    <artifactId>postgresql</artifactId>

    <version>9.4.1208-jdbc42-atlassian-hosted</version>

</dependency>
Secondly, we configure the data source in application.yml to work against the given database. Below, you can see the final application.yml file content after adding the data source configuration:
logging:

  level:

    com.mycompany: DEBUG

    com.sap.cloud.sdk: INFO

    root: WARN


server:

  port: 8080


multitenant:

  defaultTenant: public


spring:

  jpa:

    generate-ddl: true

    database-platform: org.hibernate.dialect.PostgreSQLDialect

  datasource:

    url: jdbc:postgresql://localhost:<your postgresql port>/<your db name>

    username: <your user>

    password: <your password>
That's it. Now, we can add some integration tests that will automatically run against this configured PostgreSQL instance.
5. Integration Test
Let us now provide integration tests for the developed services to make sure that the application is working as expected even before deploying it in SAP Cloud Platform. This tests will also be later used if we work with CI/CD pipeline.

In the integration-tests folder there is already a class HelloWorldServiceTest that was generated from the SDK archetype.
As we have added some service dependencies to our controllers (see the source code of the class TenantProvisioningController, for example), we have to slightly adapt the source code of the pre-generated test class HelloWorldServiceTest to make it start successfully. The simplest way would be to change the Spring Boot tests annotations so that the whole application context is loaded at the startup.
Just adapt the source code of this class as shown below:
package com.mycompany;


import org.apache.commons.io.IOUtils;

import org.junit.BeforeClass;

import org.junit.Test;

import org.junit.runner.RunWith;

import org.springframework.beans.factory.annotation.Autowired;

import org.springframework.boot.test.autoconfigure.web.servlet.AutoConfigureMockMvc;

import org.springframework.boot.test.context.SpringBootTest;

import org.springframework.test.context.junit4.SpringRunner;

import org.springframework.test.web.servlet.MockMvc;

import org.springframework.test.web.servlet.request.MockMvcRequestBuilders;


import com.sap.cloud.sdk.cloudplatform.servlet.Executable;

import com.sap.cloud.sdk.testutil.MockUtil;


import static java.lang.Thread.currentThread;

import static org.springframework.test.web.servlet.result.MockMvcResultMatchers.content;

import static org.springframework.test.web.servlet.result.MockMvcResultMatchers.status;


@RunWith(SpringRunner.class)

@SpringBootTest

@AutoConfigureMockMvc

public class HelloWorldServiceTest

{

    private static final MockUtil mockUtil = new MockUtil();


    @Autowired

    private MockMvc mvc;


    @BeforeClass

    public static void beforeClass()

    {

        mockUtil.mockDefaults();

    }


    @Test

    public void test() throws Exception

    {

        mockUtil.requestContextExecutor().execute(new Executable()

        {

            @Override

            public void execute() throws Exception

            {

                mvc.perform(MockMvcRequestBuilders.get("/hello"))

                        .andExpect(status().isOk())

                        .andExpect(content().json(

                                IOUtils.toString(

                                        currentThread().getContextClassLoader().getResourceAsStream("expected.json"))));

            }

        });

    }

}
Now, we will add a new class that will be used to test our new services: tenant onboarding and offboarding and cost center services:
package com.mycompany;


import com.fasterxml.jackson.core.JsonProcessingException;

import com.fasterxml.jackson.databind.ObjectMapper;

import com.google.common.collect.Lists;

import com.google.gson.Gson;

import com.mycompany.models.CostCenterForecast;

import com.mycompany.models.CostCenterRepository;

import org.junit.Assert;

import org.junit.Before;

import org.junit.BeforeClass;

import org.junit.Test;

import org.junit.runner.RunWith;

import org.springframework.beans.factory.annotation.Autowired;

import org.springframework.boot.test.autoconfigure.web.servlet.AutoConfigureMockMvc;

import org.springframework.boot.test.context.SpringBootTest;

import org.springframework.http.HttpMethod;

import org.springframework.http.MediaType;

import org.springframework.test.context.junit4.SpringRunner;

import org.springframework.test.web.servlet.MockMvc;

import org.springframework.test.web.servlet.ResultActions;

import org.springframework.test.web.servlet.request.MockMvcRequestBuilders;

import org.springframework.test.web.servlet.result.MockMvcResultMatchers;


import com.sap.cloud.sdk.cloudplatform.servlet.Executable;

import com.sap.cloud.sdk.testutil.MockUtil;


@RunWith(SpringRunner.class)

@SpringBootTest

@AutoConfigureMockMvc

public class CostCenterServiceIntegrationTest

{

    private static final String COSTCENTER_ID_1 = "name1";

    private static final String COSTCENTER_ID_2 = "name2";

    private static final String TENANT_ID_1 = "tenant1";

    private static final String TENANT_ID_2 = "tenant2";


    private static final MockUtil mockSdk = new MockUtil();

    public static final double FORECAST = 50.0;


    @Autowired

    private MockMvc mockMvc;


    @Autowired

    private CostCenterRepository costCenterRepository;


    @BeforeClass

    public static void beforeClass() {

        mockSdk.mockDefaults();

    }


    @Before

    public void before() {

        mockSdk.mockCurrentTenant(TENANT_ID_1);

    }


    @Test

    public void testHttpGet() throws Exception {

        mockSdk.requestContextExecutor().execute(new Executable() {

            @Override

            public void execute() throws Exception {

                ResultActions action = mockMvc.perform(MockMvcRequestBuilders

                        .put("/callback/tenant/" + TENANT_ID_1));

                action.andExpect(MockMvcResultMatchers.status().is2xxSuccessful());


                action = mockMvc.perform(MockMvcRequestBuilders

                        .get("/cost-center"));

                action.andExpect(MockMvcResultMatchers.status().isOk());


                action = mockMvc.perform(MockMvcRequestBuilders

                        .delete("/callback/tenant/" + TENANT_ID_1));

                action.andExpect(MockMvcResultMatchers.status().is2xxSuccessful());

            }

        });

    }


    @Test

    public void testHttpPost() throws Exception {

        final String newCostCenterJson = buildCostCenterJson(COSTCENTER_ID_1);

        mockSdk.requestContextExecutor().execute(new Executable() {

            @Override

            public void execute() throws Exception {

                ResultActions action = mockMvc.perform(MockMvcRequestBuilders

                        .put("/callback/tenant/" + TENANT_ID_1));

                action.andExpect(MockMvcResultMatchers.status().is2xxSuccessful());


                action = mockMvc

                        .perform(MockMvcRequestBuilders

                                .request(HttpMethod.POST, "/cost-center")

                                .contentType(MediaType.APPLICATION_JSON)

                                .accept(MediaType.APPLICATION_JSON)

                                .content(newCostCenterJson));

                action.andExpect(MockMvcResultMatchers.status().isOk());


                action = mockMvc.perform(MockMvcRequestBuilders

                        .delete("/callback/tenant/" + TENANT_ID_1));

                action.andExpect(MockMvcResultMatchers.status().is2xxSuccessful());

            }

        });

    }


    @Test

    public void testWithTwoTenants() throws Exception {


        // onboard and create data

        mockSdk.mockCurrentTenant(TENANT_ID_1);

        mockSdk.requestContextExecutor().execute(new Executable() {

            @Override

            public void execute() throws Exception {

                onboardTenant(TENANT_ID_1);

                createDataInTenant(COSTCENTER_ID_1);

            }

        });


        mockSdk.mockCurrentTenant(TENANT_ID_2);

        mockSdk.requestContextExecutor().execute(new Executable() {

            @Override

            public void execute() throws Exception {

                onboardTenant(TENANT_ID_2);

                createDataInTenant(COSTCENTER_ID_2);

            }

        });


        // read and validate data

        mockSdk.mockCurrentTenant(TENANT_ID_1);

        mockSdk.requestContextExecutor().execute(new Executable() {

            @Override

            public void execute() throws Exception {

                readAndValidateDataInTenant(COSTCENTER_ID_1);

            }

        });


        mockSdk.mockCurrentTenant(TENANT_ID_2);

        mockSdk.requestContextExecutor().execute(new Executable() {

            @Override

            public void execute() throws Exception {

                readAndValidateDataInTenant(COSTCENTER_ID_2);

            }

        });


        mockSdk.requestContextExecutor().execute(new Executable() {

            @Override

            public void execute() throws Exception {

                offboardTenant(TENANT_ID_1);

                offboardTenant(TENANT_ID_2);

            }

        });

    }


    private void offboardTenant(final String tenant) throws Exception {

        ResultActions action = mockMvc.perform(MockMvcRequestBuilders

                .delete("/callback/tenant/" + tenant));

        action.andExpect(MockMvcResultMatchers.status().is2xxSuccessful());

    }


    private void readAndValidateDataInTenant(final String costCenter) throws Exception {

        ResultActions action = mockMvc.perform(MockMvcRequestBuilders

                .get("/cost-center"));


        action.andExpect(MockMvcResultMatchers.status().isOk());

        final String result = action.andReturn().getResponse().getContentAsString();

        final String expected = new Gson().toJson(Lists.newArrayList(new CostCenterForecast(costCenter, FORECAST)));


        Assert.assertEquals(expected, result);

    }


    private void createDataInTenant(String costCenter) throws Exception {

        final String newCostCenterJson = buildCostCenterJson(costCenter);

        ResultActions action = mockMvc

                .perform(MockMvcRequestBuilders

                        .request(HttpMethod.POST, "/cost-center")

                        .contentType(MediaType.APPLICATION_JSON)

                        .accept(MediaType.APPLICATION_JSON)

                        .content(newCostCenterJson));

        action.andExpect(MockMvcResultMatchers.status().isOk());

    }


    private void onboardTenant(String tenant) throws Exception {

        ResultActions action = mockMvc.perform(MockMvcRequestBuilders

                .put("/callback/tenant/" + tenant));

        action.andExpect(MockMvcResultMatchers.status().is2xxSuccessful());

    }


    private String buildCostCenterJson(String costCenterName) throws JsonProcessingException {

        return new ObjectMapper().writeValueAsString(new CostCenterForecast()

                .setName(costCenterName).setForecast(FORECAST));

    }

}
In this simple test, we have three test methods:
| testHttpGet | Validates GET method on the cost center endpoint: This method first onboards a tenant and then verifies that HTTP GET method on the cost center endpoint returns success. After that, the corresponding tenant offboarded. |
| testHttpPost | Validates POST method on the cost center endpoint: This method first onboards a tenant and then verifies that HTTP POST method on the cost center endpoint returns success. After that, the corresponding tenant offboarded. |
| testWithTwoTenants | Validates tenant isolation: This method onboards two tenants and creates tenant-isolated data, then it read the data for each tenant ensuring the isolation, and finally, it offboards the tenants. |
The current structure of your integration test folder should now look as follows:

The integration test is ready and you can execute it in your favorite IDE or just run the maven command as shown below to build your project and execute integration tests.
mvn clean package6. Configure the Integration with a Persistency Service (PostgreSQL) in SAP Cloud Platform
In the previous step, we did the configuration of the local persistency for integration tests (see Section 4 Configuration of the local persistency of this tutorial). When we deploy our application in SAP Cloud Platform, Cloud Foundry, we want to use the corresponding PostgreSQL backing service for the persistency and we want to ignore the configuration of the local persistency. To follow the 12 factors app methodology, we need to have the same codebase for the local testing and for the cloud platform deployments. How to achieve this without adapting of the corresponding data source configuration?
Cloud Foundry platform supports a simple configuration of Spring based application to connect backing services, such as PostgreSQL.
Our case is quite simple: we want to use a single persistence service instance in our application. To configure an automatic scan and connection to the corresponding service instance in SAP Cloud Platform, Cloud Foundry, you would need to execute the following steps:
Step 1. Create a service instance. You can do this step using the command line tool of Cloud Foundry, alternatively, you can create your instance using Cloud Foundry Cockpit, as shown below.
In your Cloud Foundry space, go to the service marketplace and chose the service PostgreSQL:
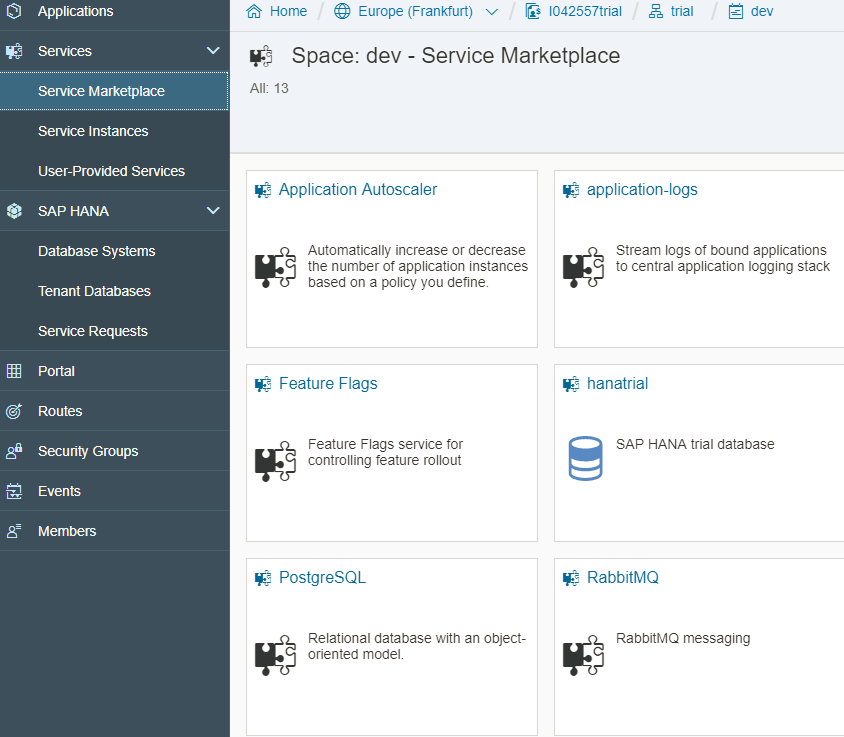
Select "Instances" -> "New Instance":
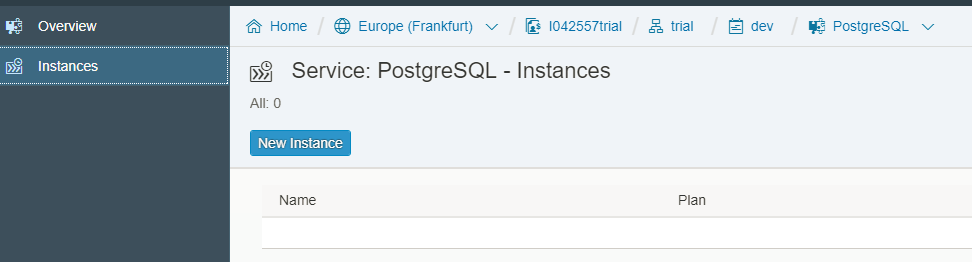
Go through "create instance" dialog by pressing "Next" until you reach the last window, where you have to enter the mandatory service instance name. Type "mydb" and press Finish.

Step 2. Add the configuration class for the profile "cloud" in your application. This class will take care of scanning of all available connected services and instantiating of a data source for the found service. This simple approach will work if you have only one database service instance bound to your application. For a more detailed explanation and solution for more complex cases, please, consult the following documentation of Cloud Foundry platform.
package com.mycompany.config;


import org.springframework.cloud.config.java.ServiceScan;

import org.springframework.context.annotation.Configuration;

import org.springframework.context.annotation.Profile;


@Configuration

@Profile("cloud")

@ServiceScan

public class CloudConfig {

}
Step 3. Add service binding in your manifest.yml file and activate "cloud" profile, as shown below.
---

applications:


- name: persistence

  memory: 768M

  host: persistence-i042557

  path: application/target/persistence-application.jar

  buildpack: sap_java_buildpack

  env:

    TARGET_RUNTIME: main

    JBP_CONFIG_SAPJVM_MEMORY_SIZES: 'metaspace:96m..'

    SPRING_PROFILES_ACTIVE: cloud

  services:

    - mydb
After you have executed these steps, you have implemented the application that can be tested locally using the integration tests.
To be able to evaluate this example in SAP Cloud Platform, Cloud Foundry, you would need to make sure that the application can retrieve corresponding tenant data. The tutorial Step 7 with SAP Cloud SDK: Secure your Application on SAP Cloud Platform, CloudFoundry provides a detailed How-To Guide regarding the securing of applications in SAP Cloud Platform, Cloud Foundry. There are some particularities related to the implementation of this concept for Spring Boot projects. Please, check out the Appendix, where these particularities are highlighted.
Summary
In this blog post, we have discussed one of the possible approaches to building of a tenant-aware application using a persistence service in SAP Cloud Platform, Cloud Foundry with tools provided by the SAP Cloud SDK. This blog post also showcases how you can test such an application locally using integration tests and local persistency.
Related Reading and Next Steps
Of course, the shown application example is simplified and covers just some aspects related to the integration of a persistence service and multitenancy.
There are a lot of additional related materials that you can work with to expand the related knowledge and to build a production ready application. Below, I list a few of them:
- To evaluate your application with various tenant ids in SAP Cloud Platform, Cloud Foundry, you need to integrate security aspects, as described in Step 7 with SAP Cloud SDK: Secure your Application on SAP Cloud Platform, CloudFoundry
- Also, feel free to check out Appendix to this blog post for some additional required adaptions.
- We were using cloud platform abstractions for tenant information in this tutorial. If you are interested to learn more about available platform abstraction in the SAP Cloud SDK, check out the following deep dive blog post: Deep Dive 3 with SAP Cloud SDK: Cloud Platform Abstractions
- Check out Hibernate documentation on implementation of Multitenancy
- Detailed explanation of more complex configuration of data sources for Spring application running in Cloud Foundry, can be found in the following resources: Configuring Service Connections for Spring, Binding to Data Services with Spring Boot in Cloud Foundry, Using Cloud Foundry Services with Spring: Part 2 - Auto-reconfiguration
- For the troubleshooting with PostgreSQL service in SAP Cloud Platform, refer to the following documentation in help.sap.com. Here, you can find some useful commands for Psql.
- Official documentation of SAP Cloud Platform
Appendix
Configure Security
Here, I assume that you are already familiar with the concepts introduced in the blog post Step 7 with SAP Cloud SDK: Secure your Application on SAP Cloud Platform, CloudFoundry and I do not cover security concepts in SAP Cloud Platform, Cloud Foundry in details.
I also assume that you already have an account that you can use for the evaluation. If not, please, check the following blog post: Step 3 with SAP Cloud SDK: HelloWorld on SCP CloudFoundry
The following steps need to be executed to be able to evaluate the developed application in SAP Cloud Platform, Cloud Foundry.
First of all, you need to add an approuter and customize it to forward requests to your persistency application. Consult Step 7 with SAP Cloud SDK: Secure your Application on SAP Cloud Platform, CloudFoundry for more details on how to do that.
For securing of your developed Spring Boot persistency application:
Add the file spring-security.xml to the folder /resources/spring of your application module.
<?xml version="1.0" encoding="UTF-8" ?>

<beans xmlns="http://www.springframework.org/schema/beans"

       xmlns:xsi="http://www.w3.org/2001/XMLSchema-instance"

       xmlns:oauth="http://www.springframework.org/schema/security/oauth2"

       xmlns:sec="http://www.springframework.org/schema/security"


       xsi:schemaLocation="http://www.springframework.org/schema/security/oauth2

       http://www.springframework.org/schema/security/spring-security-oauth2-1.0.xsd

        http://www.springframework.org/schema/security

        http://www.springframework.org/schema/security/spring-security-4.2.xsd

        http://www.springframework.org/schema/beans

        http://www.springframework.org/schema/beans/spring-beans-3.1.xsd">


    <!-- protect secure resource endpoints ================================================ -->


    <sec:http pattern="/**" create-session="never"

              entry-point-ref="oauthAuthenticationEntryPoint"

              access-decision-manager-ref="accessDecisionManager"

              authentication-manager-ref="authenticationManager"

              use-expressions="true">

        <sec:anonymous enabled="false" />

        <sec:csrf disabled="true"/>


        <!-- section to protect your endpoints -->


        <!-- Example: Check a specific OAuth Scope (i.e., authorization) on a resource -->

        <!--<sec:intercept-url pattern="/hello" access="#oauth2.hasScope('${xs.appname}.Display')" method="GET" />-->


        <!-- Example: Check only authentication on a resource -->

        <sec:intercept-url pattern="/**" access="isAuthenticated()" method="GET" />

        <sec:intercept-url pattern="/**" access="isAuthenticated()" method="PUT" />

        <sec:intercept-url pattern="/**" access="isAuthenticated()" method="POST" />

        <sec:intercept-url pattern="/**" access="isAuthenticated()" method="DELETE" />


        <sec:custom-filter ref="resourceServerFilter" before="PRE_AUTH_FILTER" />

        <sec:access-denied-handler ref="oauthAccessDeniedHandler" />

    </sec:http>


    <bean id="oauthAuthenticationEntryPoint"

          class="org.springframework.security.oauth2.provider.error.OAuth2AuthenticationEntryPoint">

    </bean>


    <bean id="oauthWebExpressionHandler"

          class="org.springframework.security.oauth2.provider.expression.OAuth2WebSecurityExpressionHandler">

    </bean>


    <bean id="accessDecisionManager"

          class="org.springframework.security.access.vote.UnanimousBased">

        <constructor-arg>

            <list>

                <bean class="org.springframework.security.web.access.expression.WebExpressionVoter">

                    <property name="expressionHandler" ref="oauthWebExpressionHandler" />

                </bean>

                <bean class="org.springframework.security.access.vote.AuthenticatedVoter"  />

            </list>

        </constructor-arg>

    </bean>


    <sec:authentication-manager alias="authenticationManager"/>


    <oauth:resource-server id="resourceServerFilter"

                           resource-id="springsec" token-services-ref="offlineTokenServices" />


    <bean id="offlineTokenServices"

          class="com.sap.xs2.security.commons.SAPOfflineTokenServices">

        <property name="verificationKey" value="${xs.uaa.verificationkey}" />

        <property name="trustedClientId" value="${xs.uaa.clientid}" />

        <property name="trustedIdentityZone" value="${xs.uaa.identityzone}" />

    </bean>


    <bean id="oauthAccessDeniedHandler"

          class="org.springframework.security.oauth2.provider.error.OAuth2AccessDeniedHandler" />


    <!-- define properties file =========================================================== -->

    <bean class="com.sap.xs2.security.commons.SAPPropertyPlaceholderConfigurer">

        <property name="location"  value="classpath:/application.properties" />

    </bean>

</beans>
In the application pom file, add all dependencies, as described in Step 7 with SAP Cloud SDK: Secure your Application on SAP Cloud Platform, CloudFoundry.
You will also need the bean validator implementation, e.g.:
<dependency>

    <groupId>org.hibernate</groupId>

    <artifactId>hibernate-validator</artifactId>

</dependency>
Add the application.properties file, required by spring security. Your content can look as follows:
xs.appname=${artifactId}

logging.level.com.mycompany=DEBUG

logging.level.com.sap.cloud.sdk=INFO

logging.level.root=WARN


server.port=8080


multitenant.defaultTenant=public


spring.jpa.generate-ddl=true

spring.jpa.database-platform=org.hibernate.dialect.PostgreSQLDialect

spring.datasource.url=jdbc:postgresql://localhost:5432/<local db name>

spring.datasource.username=<local db username>

spring.datasource.password=<local db password>
To use the security customizing, intoduced in spring-security.xml, you can load it in your configuration class, using the following annotation:
@ImportResource("classpath:/spring/spring-security.xml")At this point, you can deploy the approuter and your applications and evaluate it in SAP Cloud Platform, Cloud Foundry.
To still be able to run tests locally, you can introduce an additional profile that will deactivate the added spring security for local testing.
Cloud configuration that considers spring-security.xml configuration:
package com.mycompany.config;


import org.springframework.cloud.config.java.ServiceScan;

import org.springframework.context.annotation.Configuration;

import org.springframework.context.annotation.ImportResource;

import org.springframework.context.annotation.Profile;


@Configuration

@Profile("cloud")

@ImportResource("classpath:/spring/spring-security.xml")

@ServiceScan

public class CloudConfig {

}
Configuration for local testing that deactivates spring security for testing purposes:
package com.mycompany.config;


import org.springframework.context.annotation.Configuration;

import org.springframework.context.annotation.Profile;

import org.springframework.security.config.annotation.web.builders.HttpSecurity;

import org.springframework.security.config.annotation.web.configuration.EnableWebSecurity;

import org.springframework.security.config.annotation.web.configuration.WebSecurityConfigurerAdapter;


@Configuration

@EnableWebSecurity

@Profile("test")

public class TestConfig extends WebSecurityConfigurerAdapter {

    @Override

    protected void configure(HttpSecurity http) throws Exception {

        http.authorizeRequests().antMatchers("/**").permitAll();

        http.csrf().disable();

    }

}
In your integration tests, you select the active profile using the annotation:
@ActiveProfiles("test")Now, you should be able to build the application and run tests locally, as well as evaluate multitenancy in SAP Cloud Platform, Cloud Foundry.
Evaluate in SAP Cloud Platform with Postman
To evaluate the queries against the developed multi-tenant application running in SAP Cloud Platform, Cloud Foundry, you can send the following sequence of requests with Postman:
HTTP GET on the login URL to retrieve the information regarding the session id, and UAA CSRF token

Login using POST method on login.do and respective parameters in the headers and body:


Get CSRF Token to be able to call the onboarding of a tenant

You can now from the CSRF tocken in the header of your HTTP response (X-Csrf-Token).
Onboard your tenant by executing PUT on the tenant onboarding API
Two important aspects:
- In this set up, use the tenant id that corresponds to the subaccount where your application is deployed. You can find the id in the cloud cockpit when you drill down to your subaccount.
- Use just retrieved csrf token in the header of your request

Now, you can POST and GET your data using the cost center API via application router
POST request:

GET request:

- SAP Managed Tags:
- SAP Cloud SDK,
- SAP S/4HANA,
- SAP S/4HANA Cloud Public Edition
Labels:
17 Comments
You must be a registered user to add a comment. If you've already registered, sign in. Otherwise, register and sign in.
Labels in this area
-
Artificial Intelligence (AI)
1 -
Business Trends
363 -
Business Trends
29 -
Customer COE Basics and Fundamentals
1 -
Digital Transformation with Cloud ERP (DT)
1 -
Event Information
461 -
Event Information
28 -
Expert Insights
114 -
Expert Insights
188 -
General
1 -
Governance and Organization
1 -
Introduction
1 -
Life at SAP
414 -
Life at SAP
2 -
Product Updates
4,679 -
Product Updates
273 -
Roadmap and Strategy
1 -
Technology Updates
1,499 -
Technology Updates
100
Related Content
- SAP S/4HANA Cloud Public Edition 2402.3: Final What's New & Product Assistance available in Enterprise Resource Planning Blogs by SAP
- Custom Analytical Queries as an alternative for LIS in SAP S/4HANA Production Planning (PP) in Enterprise Resource Planning Blogs by SAP
- EXTRACTING DATA FROM SAP S/4HANA CLOUD USING THE CUSTOMER DATA RETURN APP AND TRANSFERRING IT in Enterprise Resource Planning Blogs by SAP
- Enhanced Initial Data Migration Profile in SAP Readiness Check for SAP ERP Usage and Data Profiling in Enterprise Resource Planning Blogs by SAP
- Streamlining Customer Business Partner Creation in SAP Using BAPIs in Enterprise Resource Planning Q&A
Top kudoed authors
| User | Count |
|---|---|
| 7 | |
| 6 | |
| 5 | |
| 4 | |
| 4 | |
| 4 | |
| 3 | |
| 3 | |
| 3 | |
| 3 |