Enterprise Resource Planning Blogs by SAP
Get insights and updates about cloud ERP and RISE with SAP, SAP S/4HANA and SAP S/4HANA Cloud, and more enterprise management capabilities with SAP blog posts.
cancel
Showing results for 
Search instead for 
Did you mean: 
Elizaveta2
Advisor
Advisor
This blog post will give you an overview of the mapping values download/upload functionality. You will be able to see how to use this functionality with a practical example and discover all the possibilities and available releases.

Update: If you get an issue by uploading the mapping value file (values are not existing, the file is empty), please be careful with copy and paste. Try to insert your value in the Notepad and then copy from the Notepad and paste to the mapping task template (Paste special + text)

Update: In SAP S/4HANA Cloud, you can delete the mapping values directly in Fiori UI without the need to use download/upload.

Mapping upload/download functionality is available in SAP S/4HANA Cloud and in SAP S/4HANA since SAP S/4HANA 2020 release. With this functionality you can:

  • insert mapping values

  • delete mapping values

  • replace the existing mapping values

  • confirm the uploaded mapping values at once.


Since SAP S/4HANA 2021 release, you can also:

  • delete the whole mapping task (with mapping values) via download/upload.


Please be aware that you can not delete the whole mapping tasks of a control parameter and fixed value type. Helpful KBAs:

  • Inserting and deleting entries for mapping tasks: KBA 3003068

  • Mappings with the control parameter and fixed value should be handled before uploading the file or before preparing mapping tasks: KBA 3076466


In the next paragraphs, I show you how to use the mapping values upload/download functionality.

Let’s assume, that for testing purposes, we have uploaded the data with the template files and deleted some of the data (some of the instances) from the staging tables. Then we repeated this step several times.

As you may know, when you delete the instances from the staging tables, the mapping tasks are not deleted automatically. Therefore, after the instance deletion, there are plenty of mapping tasks existing in the migration project. We aim to remove the unnecessary mapping values and handle the needed mapping values. As a result, we will get all the correct mapping tasks with the status confirmed and will not have any “dummy” values in our project.

In our project example, we see mapping tasks with different statuses - confirmed, error, to be confirmed.

To proceed with the simulation step, we would like to have all mapping values to be confirmed and the redundant values to be removed. We need to download the erroneous mapping values, edit them and delete redundant mapping values.

Redundant mapping values are those that refer to the instances that have been deleted and do not exist anymore in the project. In our example, the supplier instances SUP_100 - SUP_105 were deleted, but the mapping tasks are still existing in the project:

  • supplier instances = 69

  • supplier mapping values = 75


We also would like to delete these 6 mappings tasks for the suppliers (SUP_100 – SUP_105).

Step 1: Open the Mapping Tasks screen and choose the needed mapping tasks. Click Download Values. In this example, I have chosen the mapping tasks with the statuses “Error”, “To be Confirmed”. I have also chosen the “Mapping of Supplier” to delete the unnecessary values (the mapping tasks of deleted instances).

Step 2: Accept the warning message and open Monitoring screen to download the Zip file.

Step 3: Open the zip file with mapping values. Open the excel file “Mapping of Supplier” and unprotect the sheet under “Home, Format, Unprotect Sheet” for your convenience.


Step 4: Delete the mapping tasks for the suppliers (SUP_100 - SUP_105) and save the excel with a new name.

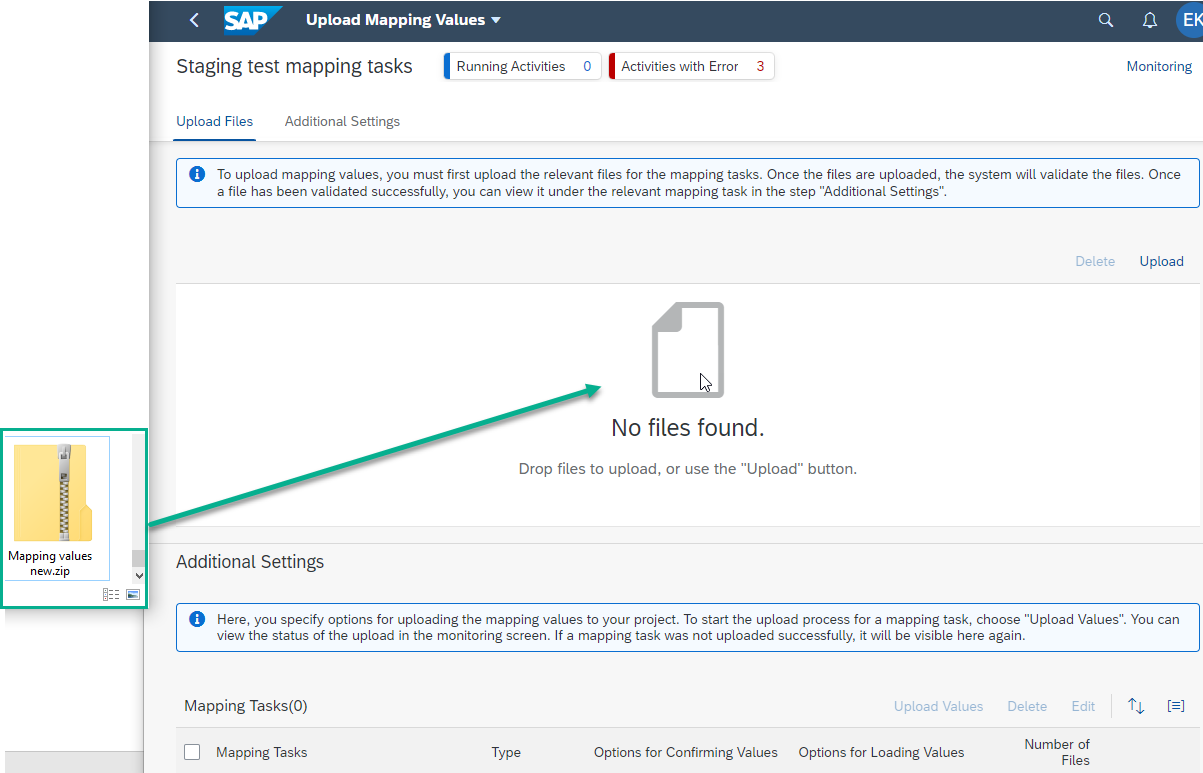
Step 5: Fill the remaining excel files with the mapping values. Afterward, you can compress the excel files to the zip folder for your convenience.


Step 6: Upload the Zip folder to your migration project (you can just drag and drop it). The excel files will be unzipped automatically.

Step 7: Choose options for confirming values “Confirm Values Automatically” and options for existing values “Replace Existing Values”. Select all the mapping tasks and click “Upload values”.

Done! The mapping values are successfully replaced and confirmed, and the unnecessary mapping values are deleted.
15 Comments
kirkupm
Explorer
0 Kudos
Thanks for this write up, it was very helpful.  I have been looking for these functions and could not see them in front of my eyes.  I actually had to look twice even after seeing your training documentation.

Thanks again for your valuable contribution to the support network.
S0007368920
Explorer
0 Kudos
Thanks Elizaveta for this helpful blog.

During my project, I was asked if there is a log for changes in the mapping tables. This would be helpful to verify who created or changed the entries in the mapping tables.

Do you know how to verify who changed what in the mapping tables?

Any comment is appreciated.

BR Hubert
kirkupm
Explorer
Hi Hubert

There is no logging of this area and this is where using the SAP ADM (Advanced Data Migration) offering from Syniti (formerly Back Office Associates) provides an advantage.


Regards
Mark
0 Kudos
Thank you very much Elizaveta.


I followed exactly the same steps as you but I still get an error message after the validation process saying that the file has not the right format.


Do you maybe have any idea of the right format or have you already faced this issue ?


Thank you very much,

Kr,

Mathias
Elizaveta2
Advisor
Advisor
0 Kudos
Hello Mathias, I am not aware of this issue. Are you uploading your files to the Mapping tasks screen and your files are in XML format and you get the error after clicking "upload values", correct?

Best regards,

Elizaveta
kirkupm
Explorer
0 Kudos
I have faced this issue several times and the only way I found to fix it is to download a blank template again, then cut and paste your data into notepad and then paste it back into the blank template.


This solves the issue for me.  I hope this helps.
Elizaveta2
Advisor
Advisor
0 Kudos
Hello, could you please share in which on-prem release you get this error?

thank you and best regards,

Elizaveta
kirkupm
Explorer
0 Kudos
It was in the 2020 version and I logged the issue with SAP Support and that was the solution they provided me, which I found disappointing but it worked.  I have had to do it very frequently and SAP Support said it was because of formatting issues but my text had no formatting in it, but taking it to notepad and bringing it back did work, although sometimes I had to do it more than once.
ThomasZloch
Active Contributor
I had this problem recently and it turned out that the template wanted all CHAR format, but after pasting from another Excel sheet one column ended up as Number format, which resulted in this quite vague error message. You can open the XML files in a text editor to find out how each cell is formatted.
0 Kudos
Is it possible to generically confirm values for mapping?  For example.  I want to accept all cost centers that are uploaded in migration cockpit.  I see where I can specify the values to confirm, but can I generically specify all values are confirmed for mapping?

Thank you,

chuck runyon
Elizaveta2
Advisor
Advisor
0 Kudos
Hi, thank you for sharing. The problem is resolved in later releases.

Best regards,

Elizaveta
Elizaveta2
Advisor
Advisor
0 Kudos

Hi, when you have uploaded the cost centers, you should have seen a 1:1 mapping proposal and the mapping values with the status "to be confirmed". In the mapping tasks screen, you can "select all" checkbox and click "confirm". I may assume you mean something different - you may want to specify your question with a screenshot. 

Best regards,

Elizaveta

0 Kudos
Thank you Elizaveta!  I was hoping that I would not have to specify each value.  For upload of Supplier or Customer, for example, I does not require I confirm each master data value/key.

I guess this is just how the cost center template upload works.

Thanks again,

chuck
Elizaveta2
Advisor
Advisor
0 Kudos
Hi, alternatively, you can upload the file with the mapping values in the "Upload mapping values" screen and choose the option "confirm values automatically". In this case, you will not need to confirm each data value.

Best regards,

Elizaveta
0 Kudos
Thank you!  I will try that.

Best Regards, chuck