
- SAP Community
- Products and Technology
- Enterprise Resource Planning
- ERP Blogs by SAP
- SAP Business ByDesign Side-by-Side Extensions on S...
Enterprise Resource Planning Blogs by SAP
Get insights and updates about cloud ERP and RISE with SAP, SAP S/4HANA and SAP S/4HANA Cloud, and more enterprise management capabilities with SAP blog posts.
Turn on suggestions
Auto-suggest helps you quickly narrow down your search results by suggesting possible matches as you type.
Showing results for
Advisor
Options
- Subscribe to RSS Feed
- Mark as New
- Mark as Read
- Bookmark
- Subscribe
- Printer Friendly Page
- Report Inappropriate Content
05-21-2019
12:09 PM
In the previous blog posts of the blog post series SAP Business ByDesign Side-by-Side Extension on SAP Cloud Platform, we have demonstrated the OData API-based integration of extension applications to SAP Business ByDesign core applications. However, the API-based integration of SAP Business ByDesign is not restricted to OData APIs, standard and custom SOAP APIs of SAP Business ByDesign can also be used to integrate extension applications with SAP Business ByDesign core applications.
This blog post will provide a step-by-step guide on how to consume SAP Business ByDesign SOAP APIs in a side-by-side extension application. This will be achieved by employing a simple extension application that reads product availability data from an SAP Business ByDesign tenant. The extension application will use a custom product master data OData API and the standard SOAP API Determine Availability of Products (ProductAvailabilityDeterminationIn) to determine product availability. The extension application will then present the product availability determination result in a Fiori UI of type list report.
As in the related blog posts, we will apply the SAP Cloud Application Programming Model to implement the services and Fiori UIs of the extension application. Moreover, we will use SAP Cloud SDK to conveniently consume the OData API and SOAP API in the Java module of the extension application.
In this section we will see how to configure communication scenario, communication system and communication arrangement. This configuration will enable SOAP API-based integration between SAP Business ByDesign core applications and the extension applications on SAP Cloud Platform. Detailed information regarding discovery (Service Explorer) and consumption of SAP Business ByDesign SOAP APIs (Web Services) can also be found on the SAP Business ByDesign Help Portal.
Follow the steps below to create an HTTP destination with basic authentication using the credentials of the user that you created during maintenance of communication arrangement on SAP Business ByDesign side.
As previously stated, we will implement a simple extension application that determines the availability of products. The application will comprise the following features:
In this section we will create an extension application project that uses the SAP Cloud Application Programming Model.
In this section, we will add a service using CDS that exposes the product availability entity to the Fiori UI of the extension application and other service consumers.
In this section we will see how remote services (SAP ByD SOAP and OData APIs) are added to the Determine Product Availability extension application.
In this section, we will see how to generate SOAP client classes from a SOAP API WSDL file. The SOAP client classes are API-specific and act as an abstraction layer on the Java code level. The Apache Axis2 Tool WSDL2Code Maven Plugins will be used to generate Java client classes out of a WSDL file. Detailed information regarding the usage of Apache Axis2 in SAP Cloud SDK can be found in the blog post Convenient Consumption of SAP S/4HANA SOAP APIs.
In this section we will see how to implement the Java module that takes care of OData and SOAP API service invocation. We will also see the usage of OData and SOAP API client classes to ensure type safe, convenient and efficient implementation of the Java application. The Java application is made up of two relatively simple classes. These are a pure data structure or POJO Java class ProductAvailabilityEntity, and a remote service invocation class ProductAvailabilityDeterminationHandler.
In this section we will see how to add SAP Fiori UIs to our product availability determination application.
In this section we will add a destination service and bind it to the Java module. Additionally, we will bind an existing (system generated) user authentication and authorization (uaa) service to the Java module.
This blog post illustrates the convenient and efficient way of consuming SAP Business ByDesign SOAP and OData APIs in SAP Cloud Platform side-by-side extension applications. It demonstrates how SAP Cloud Application Programming Model and SAP Cloud SDK can be leveraged to boost developer efficiency and developer experience in building and deploying SAP Business ByDesign side-by-side extension applications in SAP Cloud Platform Cloud Foundry environment.
Follow the link below to go the overview blog post of the blog post series:
This blog post will provide a step-by-step guide on how to consume SAP Business ByDesign SOAP APIs in a side-by-side extension application. This will be achieved by employing a simple extension application that reads product availability data from an SAP Business ByDesign tenant. The extension application will use a custom product master data OData API and the standard SOAP API Determine Availability of Products (ProductAvailabilityDeterminationIn) to determine product availability. The extension application will then present the product availability determination result in a Fiori UI of type list report.
As in the related blog posts, we will apply the SAP Cloud Application Programming Model to implement the services and Fiori UIs of the extension application. Moreover, we will use SAP Cloud SDK to conveniently consume the OData API and SOAP API in the Java module of the extension application.
Configuring Connectivity Between SAP CP and SAP Business ByDesign
On the SAP Business ByDesign Side
In this section we will see how to configure communication scenario, communication system and communication arrangement. This configuration will enable SOAP API-based integration between SAP Business ByDesign core applications and the extension applications on SAP Cloud Platform. Detailed information regarding discovery (Service Explorer) and consumption of SAP Business ByDesign SOAP APIs (Web Services) can also be found on the SAP Business ByDesign Help Portal.
- Create a communication system
A communication system represents an external system which is used for application integration. The communication system can for instance be the SAP Cloud Platform subaccount, on which the extension application is deployed. To maintain a communication system, follow the steps below:
- Open SAP Business ByDesign work center Application and User Management → Communication Systems.
- Create a new communication system by clicking on the button New.
- Enter an ID, host name (this could be any name) and the System Access Type “Internet”.
- On the tab “System Instances”, add a system instance via button Add Row and enter a System Instance ID (this should be a unique ID) and the Preferred Application Protocol “5 – Web Service”.
- Activate the communication system via button Actions → set to Active
- Save and close the communication system.
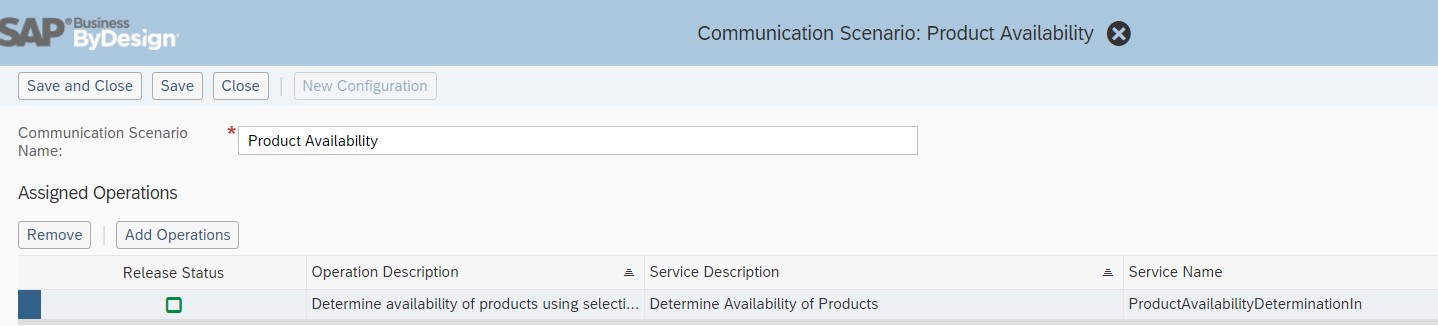
- Create a communication scenario
Communication scenarios are prepackaged (communication scenarios provided by SAP) or customer-defined sets of web services. To create a communication scenario, proceed as follows:
- Open SAP Business ByDesign work center Application and User Management → Communication Scenarios.
- Press button New to create a new communication scenario.
- Enter a communication scenario name.
- Press button Add Operations, filter by the service description “*Service Confirmation*” and select the operation with the description “Maintain service confirmation”.
- Press button OK, save and close the communication scenario.
- Create a communication arrangement
This is an arrangement between two systems to exchange data using web services. Create a communication arrangement as follows:
- Open SAP Business ByDesign work center Application and User Management → Communication Arrangements.
- Create a new communication arrangement via button New.
- Select the communication scenario from step 2 and continue with button Next.
- Select the communication system from step 1 and continue with button Next.
- Select the authentication method “User ID and Password”, edit the credentials and continue with button Next. Make a note of the credentials, since you will need them to maintain an HTTP destination on the SAP Cloud Platform side.
- Review your settings and complete the communication arrangement with button Finish.
On the SAP Cloud Platform Side
Follow the steps below to create an HTTP destination with basic authentication using the credentials of the user that you created during maintenance of communication arrangement on SAP Business ByDesign side.
- Logon to the SAP CP cockpit and select your Cloud Foundry subaccount.
- Select the Connectivity → Destinations and click on New Destinations.
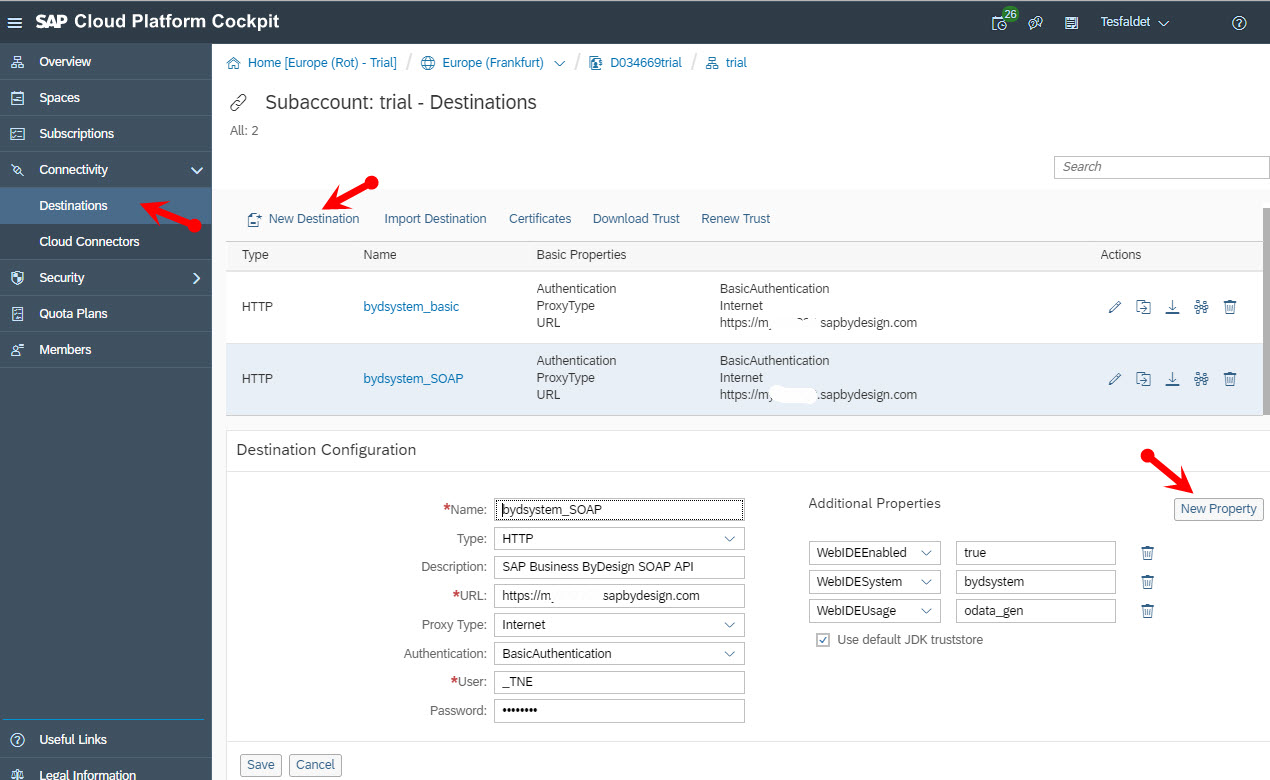
- Configure the setting as shown in the table below:
Parameter
Value
Name
Name of destination e.g. bydsystem_1234
Type
HTTP
Description
Enter meaningful description (Optional)
URL
https:// my< ByD tenant name>.sapbydesign.com
Proxy Type
Internet
Authentication
BasicAuthentication
User
Enter user ID. You can find the User ID on the tab strip Technical Data of the view Communication Arrangements on the SAP ByD work center Application and User Management
Password
Enter the password. This is the password you entered when you maintained the communication arrangement
- Configure the required additional property. To do so, in the Additional Properties panel, choose New Property, and enter the following property:
Parameter
Value
WebIDEEnabled
true
WebIDESystem
The value of the parameter Name of the table above (e.g. bydsystem_1234)
WebIDEUsage
odata_gen
- Select the Use default JDK truststore checkbox.
- Save the entries.
Implementing the Extension Application
As previously stated, we will implement a simple extension application that determines the availability of products. The application will comprise the following features:
- A service model made up of a single Core Data & Services (CDS) Entity, with only read capability.
- SAP Fiori UI of type list report that displays the product availability check result and allows selection by product(s).
- Custom logic made up of the following building blocks:
- A Java implementation to read product master data from the SAP ByD system using an OData API.
- A Java implementation to trigger product availability determination in the SAP ByD tenant using a SOAP API.
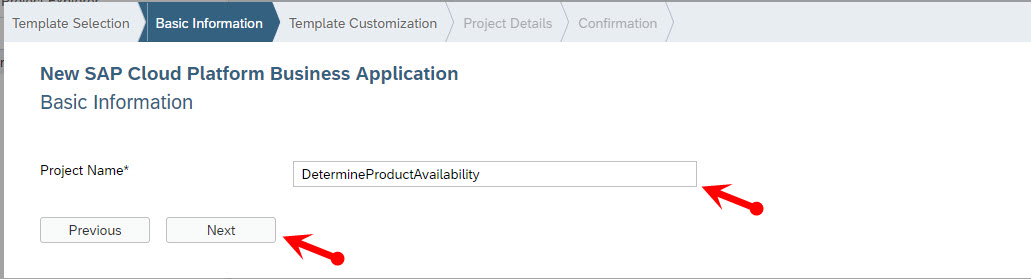
Create an Extension Application Project
In this section we will create an extension application project that uses the SAP Cloud Application Programming Model.
- In SAP Web IDE, go to File → New → Project from Template.
- On the screen shown below, select the tile SAP Cloud Platform Business Application and click Next.

- Enter a project name “DetermineProductAvailability” on the following Basic Information screen and click Next.
- On the Template Customization screen, enter a description, select Use HTML5 Application Repository and click Next.
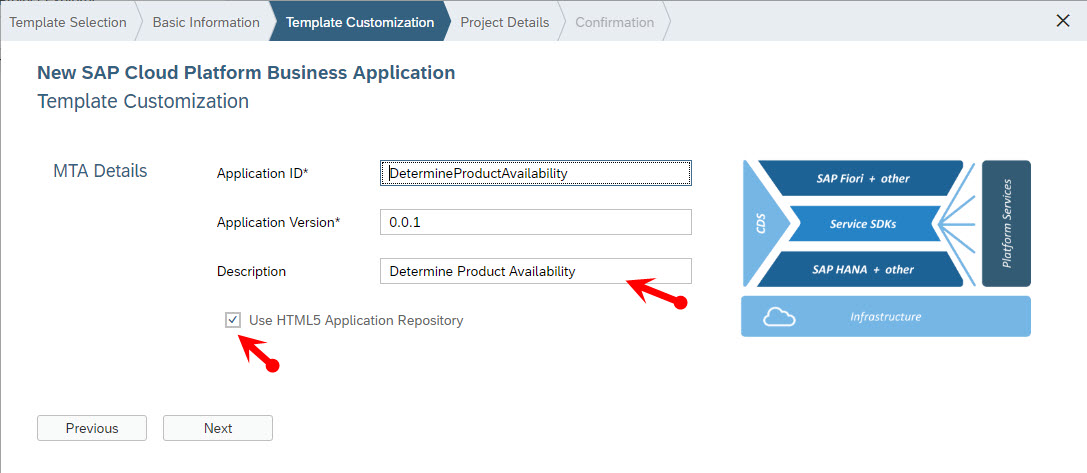
- On the Project Details screen, set the value of the field Database (DB) to not included and leave the rest as it is.

- Click on the Finish button in the lower part of the Project Details screen. This will lead to the creation of a new project with a variety of files, among others CDS templates for service model and a Multi-Target Application Multi-Target Application (MTA) file. The MTA file specifies the configuration, composition and dependencies between the modules and services of the application.
Define Service
In this section, we will add a service using CDS that exposes the product availability entity to the Fiori UI of the extension application and other service consumers.
- Right click on the folder Workspace/DetermineProductAvailability/srv and select New → File.
- Enter the file name my-service.cds and press OK.
- Paste the following CDS model content into the file my-service.cds.
service ProductAvailabilityHandling{

 @cds.persistence.skip

 @Capabilities: { Insertable:false, Updatable:false, Deletable:false, }

entity ProductAvailability {

 Key InternalID : String;

 Key supplyPlanningAreaID  : String;

  currentStockQuantity : Decimal(12,3);

  currentStockQuantityUOM : String;

  requirementQuantity : Decimal(12,3);

  requirementQuantityUOM : String;

  receiptQuantity : Decimal(12,3);

  receiptQuantityUOM : String;

  availableQuantity : Decimal(12,3);

  availableQuantityUOM : String;

};


}
- Go to File → Save All to save your service model.
- Right click on Workspace/DetermineProductAvailability and select Build → Build CDS. This will lead to the generation of an OData EDMX metadata xml file.
Add Remote Services
In this section we will see how remote services (SAP ByD SOAP and OData APIs) are added to the Determine Product Availability extension application.
Add SAP ByD OData API
- In the SAP ByD system, create product master data OData APIs with a metadata specification like the XML file shown below. Details on how to create OData APIs can be found under SAP Business ByDesign OData Service Modeler.
<edmx:Edmx xmlns:edmx="http://schemas.microsoft.com/ado/2007/06/edmx" Version="1.0">

<edmx:DataServices xmlns:m="http://schemas.microsoft.com/ado/2007/08/dataservices/metadata" m:DataServiceVersion="1.0">

<Schema xmlns="http://schemas.microsoft.com/ado/2008/09/edm" xmlns:sap="http://www.sap.com/Protocols/SAPData" xmlns:c4c="http://www.sap.com/Protocols/C4CData" Namespace="cust">

<EntityType Name="Material">

<Key>

<PropertyRef Name="ObjectID"/>

</Key>

<Property Name="ObjectID" Type="Edm.String" Nullable="false" MaxLength="70" FixedLength="true" sap:creatable="false" sap:updatable="false" sap:filterable="true"/>

<Property Name="InternalID" Type="Edm.String" Nullable="true" MaxLength="40" FixedLength="true" sap:creatable="true" sap:updatable="true" sap:filterable="true"/>

<NavigationProperty Name="MaterialAvailabilityConfirmationProcessInformation" Relationship="cust.Material_MaterialAvailabilityConfirmationProcessInformation" FromRole="Material" ToRole="MaterialAvailabilityConfirmationProcessInformation"/>

</EntityType>

<EntityType Name="MaterialAvailabilityConfirmationProcessInformation">

<Key>

<PropertyRef Name="ObjectID"/>

</Key>

<Property Name="ObjectID" Type="Edm.String" Nullable="false" MaxLength="70" FixedLength="true" sap:creatable="false" sap:updatable="false" sap:filterable="true"/>

<Property Name="ParentObjectID" Type="Edm.String" Nullable="true" MaxLength="70" FixedLength="true" sap:creatable="true" sap:updatable="false" sap:filterable="true"/>

<Property Name="SupplyPlanningAreaID" Type="Edm.String" Nullable="true" MaxLength="20" FixedLength="true" sap:creatable="true" sap:updatable="true" sap:filterable="true"/>

<NavigationProperty Name="Material" Relationship="cust.Material_MaterialAvailabilityConfirmationProcessInformation" FromRole="MaterialAvailabilityConfirmationProcessInformation" ToRole="Material"/>

</EntityType>

<Association Name="Material_MaterialAvailabilityConfirmationProcessInformation">

<End Type="cust.Material" Multiplicity="1" Role="Material"/>

<End Type="cust.MaterialAvailabilityConfirmationProcessInformation" Multiplicity="*" Role="MaterialAvailabilityConfirmationProcessInformation"/>

</Association>

<EntityContainer Name="tn_productandsupplyplanningarea" m:IsDefaultEntityContainer="true">

<EntitySet Name="MaterialAvailabilityConfirmationProcessInformationCollection" EntityType="cust.MaterialAvailabilityConfirmationProcessInformation" sap:creatable="true" sap:updatable="true" sap:deletable="true"/>

<EntitySet Name="MaterialCollection" EntityType="cust.Material" sap:creatable="true" sap:updatable="true" sap:deletable="true"/>

<AssociationSet Name="MaterialCollection_MaterialAvailabilityConfirmationProcessInformationCollection" Association="cust.Material_MaterialAvailabilityConfirmationProcessInformation" sap:creatable="true" sap:updatable="false" sap:deletable="false">

<End EntitySet="MaterialCollection" Role="Material"/>

<End EntitySet="MaterialAvailabilityConfirmationProcessInformationCollection" Role="MaterialAvailabilityConfirmationProcessInformation"/>

</AssociationSet>

</EntityContainer>

</Schema>

</edmx:DataServices>

</edmx:Edmx>
- Right click on Workspace/DetermineProductAvailability/srv and select New → Data Model from External Service.
- On the "Data Connection" screen, select under Sources the entry Service URL and click on create new data sources.
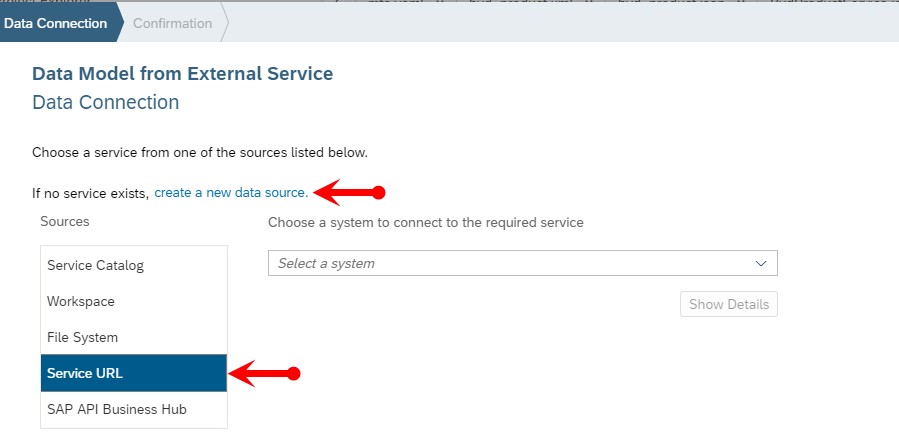
- On the following screen populate the fields as specified below and click Create.
Parameter
Value
User ID
User ID of your SAP CP NEO subaccount
Password
Password of your SAP CP NEO subaccount
Name
Name of Destination e.g. bydsystem_4321
Description
Description of the Destination (optional)
Proxy Type
Internet
URL
https://my<ByD tenant name>.sapbydesign.com
Authentication
BasicAuthentication
Username
User ID of your SAP ByD tenant
Password
Password of your SAP ByD tenant
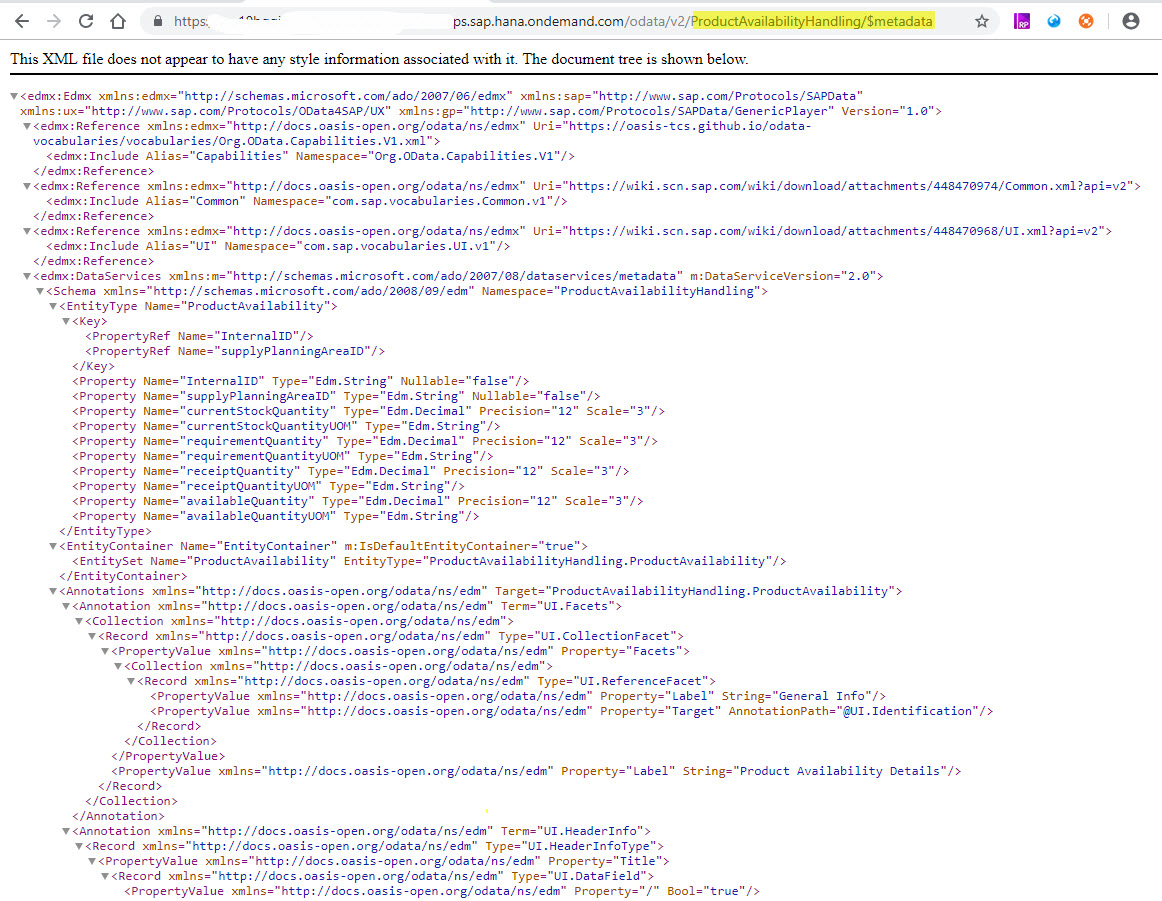
- Next, enter the relative URL of the OData API, that you created in step 1 and press Test. ‘/sap/byd/odata/cust/v1/byd_product/$metadata’ is an example of a relative URL of the OData API. If the result looks like the screenshot below, click Next.

This step generates an edmx file and a core schema notation (csn) file (e.g. byd_product.json and byd_product.xml) in the folder Workspace/DetermineProductAvailability/srv/external/, as well as other files. Additionally, Java virtual data model (VDM) classes are generated. These classes provide fluent and type-safe Java APIs to build queries and access SAP ByD OData endpoints.
Add SAP Business ByDesign SOAP API
In this section, we will see how to generate SOAP client classes from a SOAP API WSDL file. The SOAP client classes are API-specific and act as an abstraction layer on the Java code level. The Apache Axis2 Tool WSDL2Code Maven Plugins will be used to generate Java client classes out of a WSDL file. Detailed information regarding the usage of Apache Axis2 in SAP Cloud SDK can be found in the blog post Convenient Consumption of SAP S/4HANA SOAP APIs.
- Import the WSDL file from the SAP ByD system to the project of the extension application
- Open SAP Business ByDesign work center Application and User Management → Communication Arrangements.
- Select the communication arrangement instance that you created earlier and press on Edit.
- Go to the tab Technical Data and then press on Edit Advanced Settings
- Press on the button Download WSDL and save the WSDL file locally under the name productavailabilitydeterminatiion.WSDL.
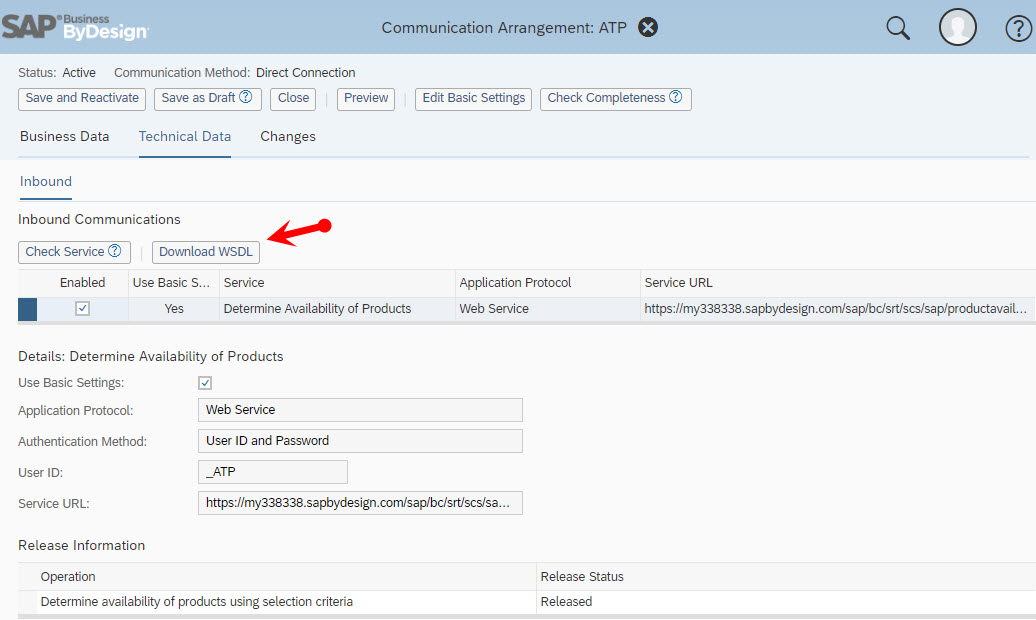
- Open the file productavailabilitydeterminatiion.wsdl in a text editor (e.g. Notepad) and replace the default service name <WSDL:service name="service"> with the product availability determination SOAP API specific service name <WSDL:service name="DetermineAvailabilityOfProducts">.
- Save the changes.
- Right click on the folder Workspace/DetermineProductAvailability/srv/src/resources and select New → Folder.
- Enter the folder name WSDL and press button OK.
- Right click on the folder Workspace/DetermineProductAvailability/srv/src/resources/WSDL and select Import → File or Project.
- Import the WSDL file productavailabilitydeterminatiion.wsdl by browsing to the location, where you have stored the WSDL file earlier and press OK.
- Add Apache Axis2 Tool WSDL2Code Maven Plugin to the projects pom.xml file
- In SAP Web IDE open the pom file by double clicking on Workspace/DetermineProductAvailability/srv/pom.xml.
- Add the following Axis2 maven plugin and its configuration parameters under <profiles>.
<profile>

	<id>wsdl2code</id>

	<build>

		<plugins>

			<plugin>

				<groupId>org.apache.axis2</groupId>

				<artifactId>axis2-wsdl2code-maven-plugin</artifactId>

				<version>1.7.8</version>

			</plugin>

			<plugin>

				<groupId>org.apache.axis2</groupId>

				<artifactId>axis2-wsdl2code-maven-plugin</artifactId>

				<executions>

					<execution>

						<goals>

							<goal>wsdl2code</goal>

						</goals>

						<phase>generate-sources</phase>

						<configuration>

							<packageName>soap.soapclient</packageName>

						<wsdlFile>src/main/resources/wsdl/productavailabilitydeterminati.wsdl</wsdlFile>

							<databindingName>adb</databindingName>

							<syncMode>sync</syncMode>

							<unpackClasses>true</unpackClasses>

						</configuration>

					</execution>

				</executions>

			</plugin>

		</plugins>

	</build>

</profile>
- Save the changes to the pom file.
- Generate SOAP API client classes
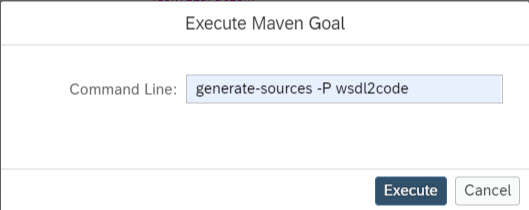
- In SAP Web IDE right click on Workspace/DetermineProductAvailability/srv and select Build → Execute Maven Goal.
- In the following popup screen enter the value “generate-sources -P WSDL2code” and press button Execute.
This will lead to the generation of SOAP API client classes under the folder Workspace/DetermineProductAvailability/srv/target/generated-sources/axis2 as shown in the screenshot below.
- Move SOAP API client classes to the Java folder
Due to a minor SAP Web IDE limitation, the SOAP API client classes are generated in the folder shown in the screenshot above irrespective of the folder configured in Apache Axis2 Tool WSDL2Code Maven Plugin. Therefore, we must move the SOAP API client classes from the folder, where they are generated to the folder Workspace/DetermineProductAvailability/srv/src/main/java. To achieve this, proceed as follows:
- In SAP Web IDE right click on Workspace/DetermineProductAvailability/srv/target/generated-sources/axis2/WSDL2code/src and select Export.
- Store the src.zip file locally.
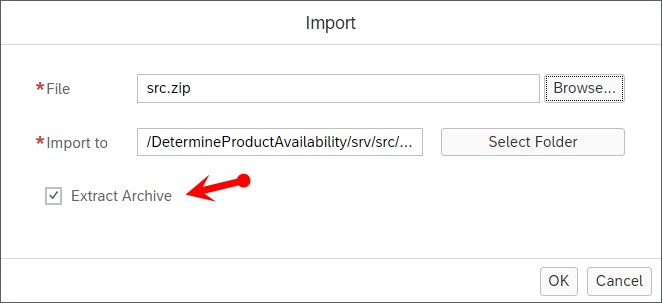
- In SAP Web IDE right click on Workspace/DetermineProductAvailability/srv/src/main/java and select Import → File or Project.
- Import the zip file src.zip by browsing to the location, where you stored the zip file earlier.
- Select Extract Archive and press button OK.
- After the import is completed, delete the folder Workspace/DetermineProductAvailability/srv/target/generated-sources/axis2 with all its content. Otherwise, the build process will fail due to duplicate Java classes.
Add Custom Logic
In this section we will see how to implement the Java module that takes care of OData and SOAP API service invocation. We will also see the usage of OData and SOAP API client classes to ensure type safe, convenient and efficient implementation of the Java application. The Java application is made up of two relatively simple classes. These are a pure data structure or POJO Java class ProductAvailabilityEntity, and a remote service invocation class ProductAvailabilityDeterminationHandler.
- Create the Java class ProductAvailabilityEntity
- In SAP Web IDE right click on Workspace/DetermineProductAvailability/srv /src/main/java/my/company/ and select New → Java Class.
- On the next screen, populate the Name field with ProductAvailabilityEntity and click Next.
- On the Confirmation screen, click Finish.
- Go to the file Workspace/DetermineProductAvailability/srv /src/main/java/my/company/ProductAvailabilityEntity.java and add the following Java code lines to the Java class.
public class ProductAvailabilityEntity {

	@ElementName("InternalID")

	private String InternalID;


	@ElementName("supplyPlanningAreaID")

	private String supplyPlanningAreaID;


	@ElementName("currentStockQuantity")

	private  BigDecimal currentStockQuantity;


	@ElementName("currentStockQuantityUOM")

	private String currentStockQuantityUOM;


	@ElementName("requirementQuantity")

	private  BigDecimal requirementQuantity;


	@ElementName("requirementQuantityUOM")

	private String requirementQuantityUOM;


	@ElementName("receiptQuantity")

	private  BigDecimal receiptQuantity;


	@ElementName("receiptQuantityUOM")

	private String receiptQuantityUOM;


	@ElementName("availableQuantity")

	private  BigDecimal availableQuantity;


	@ElementName("availableQuantityUOM")

	private String availableQuantityUOM;


	public String getInternalID() {

		return InternalID;

	}


	public void setInternalID(String InternalID) {

		this.InternalID = InternalID;

	}


       public String getSupplyPlanningAreaID() {

		return supplyPlanningAreaID;

	}


	public void setSupplyPlanningAreaID(String supplyPlanningAreaID) {

		this.supplyPlanningAreaID = supplyPlanningAreaID;

	}


	public BigDecimal getCurrentStockQuantity() {

		return currentStockQuantity;

	}


	public void setCurrentStockQuantity(BigDecimal currentStockquantity) {

		this.currentStockQuantity = currentStockquantity;

	}


	public String getCurrentStockQuantityUOM() {

		return currentStockQuantityUOM;

	}


	public void setCurrentStockQuantityUOM(String currentStockQuantityUOM) {

		this.currentStockQuantityUOM = currentStockQuantityUOM;

	}


	public BigDecimal getRequirementQuantity() {

		return requirementQuantity;

	}


	public void setRequirementQuantity(BigDecimal requirementQuantity) {

		this.requirementQuantity = requirementQuantity;

	}


	public String getRequirementQuantityUOM() {

		return requirementQuantityUOM;

	}


	public void setRequirementQuantityUOM(String requirementQuantityUOM) {

		this.requirementQuantityUOM = requirementQuantityUOM;

	}


	public BigDecimal getReceiptQuantity() {

		return receiptQuantity;

	}


	public void setReceiptQuantity(BigDecimal receiptQuantity) {

		this.receiptQuantity = receiptQuantity;

	}


	public String getReceiptQuantityUOM() {

		return receiptQuantityUOM;

	}


	public void setReceiptQuantityUOM(String receiptQuantityUOM) {

		this.receiptQuantityUOM = receiptQuantityUOM;

	}


	public BigDecimal getAvailableQuantity() {

		return availableQuantity;

	}


	public void setAvailableQuantity(BigDecimal availableQuantity) {

		this.availableQuantity = availableQuantity;

	}


	public String getAvailableQuantityUOM() {

		return availableQuantityUOM;

	}


	public void setAvailableQuantityUOM(String availableQuantityUOM) {

		this.availableQuantityUOM = availableQuantityUOM;

	}

}
- Create the Java class ProductAvailabilityDeterminationHandler
- In SAP Web IDE right click on Workspace/DetermineProductAvailability/srv /src/main/java/my/company/ and select New → Java Class.
- On the next screen, populate the Name field with ProductAvailabilityDeterminationHandler and click Next.
- On the Confirmation screen, click Finish.
- Go to the file Workspace/DetermineProductAvailability/srv /src/main/java/my/company/ProductAvailabilityDeterminationHandler.java and add the following Java code lines to the Java class.
public class ProductAvailabilityDeterminationHandler {


	private static final Logger logger = LoggerFactory.getLogger(ProductAvailabilityDeterminationHandler.class);

	private static final String DESTINATION_NAME = "bydsystem_basic";

	private static final String SOAP_DESTINATION_NAME = "bydsystem_SOAP";


	@Query(serviceName = "ProductAvailabilityHandling", entity = "ProductAvailability")

	public QueryResponse queryProductAvailability(QueryRequest qryRequest) {


		try {

			// --------------- OData API Call ------------------------

			// Read Product ID and Supply Planning Area ID

			List<Material> results = new DefaultTnProductandsupplyplanningareaService()

					.withServicePath("/sap/byd/odata/cust/v1/tn_productandsupplyplanningarea")

					.getAllMaterial()

					.select(Material.OBJECT_ID, Material.INTERNAL_ID,

							Material.TO_MATERIAL_AVAILABILITY_CONFIRMATION_PROCESS_INFORMATION

									.select(MaterialAvailabilityConfirmationProcessInformation.SUPPLY_PLANNING_AREA_ID))

					.filter(new UncheckedFilterExpression<>(

							FilterExpressionConverter.convertTo(qryRequest.getQueryExpression())))

					.execute(new ErpConfigContext(DESTINATION_NAME));


			// --------------- SOAP API Call ------------------------

			final ErpConfigContext configContext = new ErpConfigContext(SOAP_DESTINATION_NAME);

			final SoapQuery<DetermineAvailabilityOfProductsStub> soapQuery = new SoapQuery<>(

					DetermineAvailabilityOfProductsStub.class, configContext);

			// Assemble query message

			final ProductAvailabilityDeterminationQuery productAvailabilityDeterminationQuery = new ProductAvailabilityDeterminationQuery();

			final ProductAvailabilityDeterminationQueryMessage_sync productAvailabilityDeterminationQueryMessage = new ProductAvailabilityDeterminationQueryMessage_sync();


			// SetIndicator scope of check Inicator

			final Indicator indicator = new Indicator();

			indicator.setIndicator(true);

			productAvailabilityDeterminationQuery.setConsiderScopeOfCheckIndicator(indicator);


			// Set check horizon in days

			final Duration duration = new Duration();

			duration.setDays(14);

			final DAY_Duration dayDuration = new DAY_Duration();

			dayDuration.setDAY_Duration(duration);

			productAvailabilityDeterminationQuery.setProductAvailabilityDeterminationHorizonDuration(dayDuration);


			// Set product type code

			Token typecode = new Token();

			typecode.setValue("1");

			final ProductTypeCode productTypeCode = new ProductTypeCode();

			productTypeCode.setProductTypeCode(typecode);


			List<ProductAvailabilityDeterminationQueryProductAndSupplyPlanningArea> productAndSPAList = new ArrayList<ProductAvailabilityDeterminationQueryProductAndSupplyPlanningArea>();

			for (Material result : results) {

				for (MaterialAvailabilityConfirmationProcessInformation matAvailInfo : result

						.getMaterialAvailabilityConfirmationProcessInformationOrFetch()) {

					ProductAvailabilityDeterminationQueryProductAndSupplyPlanningArea productAndSPA = new ProductAvailabilityDeterminationQueryProductAndSupplyPlanningArea();


					productAndSPA.setProductTypeCode(productTypeCode);


					// Set Product

					Token productInternalIDContent = new Token();

					productInternalIDContent.setValue(result.getInternalID());

					ProductInternalID productInternalID = new ProductInternalID();

					productInternalID.setProductInternalIDContent(productInternalIDContent);

					productAndSPA.setProductInternalID(productInternalID);


					// Set Supply Planning Area

					Token supplyPlanningAreaIDContent = new Token();

					supplyPlanningAreaIDContent.setValue(matAvailInfo.getSupplyPlanningAreaID());

					SupplyPlanningAreaID supplyPlanningAreaID = new SupplyPlanningAreaID();

					supplyPlanningAreaID.setSupplyPlanningAreaIDContent(supplyPlanningAreaIDContent);

					productAndSPA.setSupplyPlanningAreaID(supplyPlanningAreaID);

					productAndSPAList.add(productAndSPA);

				}

			}

			ProductAvailabilityDeterminationQueryProductAndSupplyPlanningArea[] productAndSPAArray = productAndSPAList

					.toArray(new ProductAvailabilityDeterminationQueryProductAndSupplyPlanningArea[productAndSPAList

							.size()]);

			productAvailabilityDeterminationQuery.setProductAndSupplyPlanningArea(productAndSPAArray);

			productAvailabilityDeterminationQueryMessage

					.setProductAvailabilityDeterminationQuery(productAvailabilityDeterminationQuery);


			final ProductAvailabilityDeterminationResponse_sync soapResponse = soapQuery.execute(service -> {

				final ProductAvailabilityDeterminationQuery_sync productAvailabilityDeterminationQueryparam = new ProductAvailabilityDeterminationQuery_sync();

				productAvailabilityDeterminationQueryparam

						.setProductAvailabilityDeterminationQuery_sync(productAvailabilityDeterminationQueryMessage);

				return service.determine(productAvailabilityDeterminationQueryparam);


			});

			final ProductAvailabilityDeterminationResponse[] productAvailabilityResponses = soapResponse

					.getProductAvailabilityDeterminationResponse_sync().getProductAvailabilityDeterminationResponse();


			List<ProductAvailabilityEntity> productAvailabilityList = new ArrayList<ProductAvailabilityEntity>();

			for (ProductAvailabilityDeterminationResponse productAvailabilityResponse : productAvailabilityResponses) {


				ProductAvailabilityEntity productAvailability = new ProductAvailabilityEntity();

				productAvailability.setInternalID(

						productAvailabilityResponse.getProductInternalID().getProductInternalIDContent().toString());

				productAvailability.setSupplyPlanningAreaID(productAvailabilityResponse.getSupplyPlanningAreaID()

						.getSupplyPlanningAreaIDContent().toString());

				productAvailability.setCurrentStockQuantity(

						productAvailabilityResponse.getCurrentStockQuantity().getQuantityContent());

				productAvailability.setCurrentStockQuantityUOM(

						productAvailabilityResponse.getCurrentStockQuantity().getUnitCode().toString());

				productAvailability

						.setReceiptQuantity(productAvailabilityResponse.getReceiptQuantity().getQuantityContent());

				productAvailability.setReceiptQuantityUOM(

						productAvailabilityResponse.getReceiptQuantity().getUnitCode().toString());

				productAvailability.setRequirementQuantity(

						productAvailabilityResponse.getRequirementQuantity().getQuantityContent());

				productAvailability.setRequirementQuantityUOM(

						productAvailabilityResponse.getRequirementQuantity().getUnitCode().toString());

				productAvailability

						.setAvailableQuantity(productAvailabilityResponse.getAvailableQuantity().getQuantityContent());

				productAvailability.setAvailableQuantityUOM(

						productAvailabilityResponse.getAvailableQuantity().getUnitCode().toString());

				productAvailabilityList.add(productAvailability);

			}

			QueryResponse queryResponse = QueryResponse.setSuccess().setData(productAvailabilityList).response();

			return queryResponse;

		} catch (final FilterFunctionException e) {

			logger.error(

					"==> Exception calling backend OData V2 service for query of product mater data: " + e.getMessage(),

					e);

			logger.error("==> Exception calling backend additional data: " + e.getLocalizedMessage());

			ErrorResponse errorResponse = ErrorResponse.getBuilder()

					.setMessage("There is an error.  Check the logs for the details.").setStatusCode(500).setCause(e)

					.response();

			QueryResponse queryResponse = QueryResponse.setError(errorResponse);

			return queryResponse;

		} catch (final ODataException e) {

			logger.error(

					"==> Exception calling backend OData V2 service for query of product master : " + e.getMessage(),

					e);

			logger.error("==> Exception calling backend additional data: " + e.getLocalizedMessage());

			ErrorResponse errorResponse = ErrorResponse.getBuilder()

					.setMessage("There is an error.  Check the logs for the details.").setStatusCode(500).setCause(e)

					.response();

			QueryResponse queryResponse = QueryResponse.setError(errorResponse);

			return queryResponse;

		} catch (SoapException e) {


			ErrorResponse errorResponse = ErrorResponse.getBuilder()

					.setMessage("There is an error.  Check the logs for the details.").setStatusCode(500).setCause(e)

					.response();

			QueryResponse queryResponse = QueryResponse.setError(errorResponse);

			return queryResponse;

		}


	}

}
Add UIs
In this section we will see how to add SAP Fiori UIs to our product availability determination application.
- Add HTML5 module
Add HTML5 module by following the steps in the section “Add HTML5 Module” of the blog post SAP Business ByDesign Side-by-Side Extensions on SAP Cloud Platform: Developing Extension Applicatio.... In this example we will call the HTML5 module “ProductAvailabilityApp”. - Add UI Annotation
SAP Fiori UIs are defined by OData Annotations. In this section, we will see how to add UI annotations using CDS models. However, UI annotations can also be added using the annotation modeler of SAP Web IDE.
- Right click on Workspace/DetermineProductAvailability/srv and select New → File
- On the popup screen, enter the File Name "fiori-annotations.cds" and press OK.
- Go to the file Workspace/DetermineProductAvailability/srv/fiori-annotations.cds and double click the file.
- Add the following code lines to the file fiori-annotations.cds.
using ProductAvailabilityHandling from './my-service';


annotate ProductAvailabilityHandling.ProductAvailability with {

	InternalID

		@Common.Label : 'Product ID';

	supplyPlanningAreaID

		@Common.Label : 'Supply Planning Area ID';

	currentStockQuantity

		@Common.Label : 'Quantity in Stock ';

	currentStockQuantityUOM

		@Common.Label : 'Quantity in Stock UoM ';

	requirementQuantity

		@Common.Label : 'Requirement Quantity';

	requirementQuantityUOM

		@Common.Label : 'Requirement Quantity UoM';

	receiptQuantity

		@Common.Label : 'Receipt Quantity';

	receiptQuantityUOM

		@Common.Label : 'Receipt Quantity UoM';

	availableQuantity

		@Common.Label : 'Available Quantity';

	 availableQuantityUOM

		@Common.Label : 'Available Quantity UoM';

};

annotate ProductAvailabilityHandling.ProductAvailability with @(

UI.SelectionFields: [ InternalID ],

	UI.LineItem: [

		{$Type: 'UI.DataField', Value: InternalID},

		{$Type: 'UI.DataField', Value: supplyPlanningAreaID},

		{$Type: 'UI.DataField', Value: 	currentStockQuantity},

		{$Type: 'UI.DataField', Value: 	currentStockQuantityUOM},

		{$Type: 'UI.DataField', Value: 	requirementQuantity},

		{$Type: 'UI.DataField', Value: 	requirementQuantityUOM},

		{$Type: 'UI.DataField', Value: 	receiptQuantity},

		{$Type: 'UI.DataField', Value: 	receiptQuantityUOM},

		{$Type: 'UI.DataField', Value: 	availableQuantity},

		{$Type: 'UI.DataField', Value: 	availableQuantityUOM},

	],


	UI.HeaderInfo: {

		Title: { Value: InternalID, "/", supplyPlanningAreaID },

		TypeName:'Product Availability ',

        TypeNamePlural:'Product Availability'

	},


	UI.Identification:

	[

		{$Type: 'UI.DataField', Value: InternalID},

		{$Type: 'UI.DataField', Value: supplyPlanningAreaID},

		{$Type: 'UI.DataField', Value: 	currentStockQuantity},

		{$Type: 'UI.DataField', Value: 	currentStockQuantityUOM},

		{$Type: 'UI.DataField', Value: 	requirementQuantity},

		{$Type: 'UI.DataField', Value: 	requirementQuantityUOM},

		{$Type: 'UI.DataField', Value: 	receiptQuantity},

		{$Type: 'UI.DataField', Value: 	receiptQuantityUOM},

		{$Type: 'UI.DataField', Value: 	availableQuantity},

		{$Type: 'UI.DataField', Value: 	availableQuantityUOM},

	],

		UI.Facets:

	[

		{

			$Type:'UI.CollectionFacet',

			Facets: [

						{ $Type:'UI.ReferenceFacet', Label: 'General Info', Target: '@UI.Identification' }

					],

			Label:'Product Availability Details',

		},

	]

);
Enhance the Multi-Target Application File
In this section we will add a destination service and bind it to the Java module. Additionally, we will bind an existing (system generated) user authentication and authorization (uaa) service to the Java module.
- Go to the file Workspace/DetermineProductAvailability/mta.yaml and double click on the file to open it.
- Add the lines highlighted in the following screenshot under the Resource section of the mta.yaml.
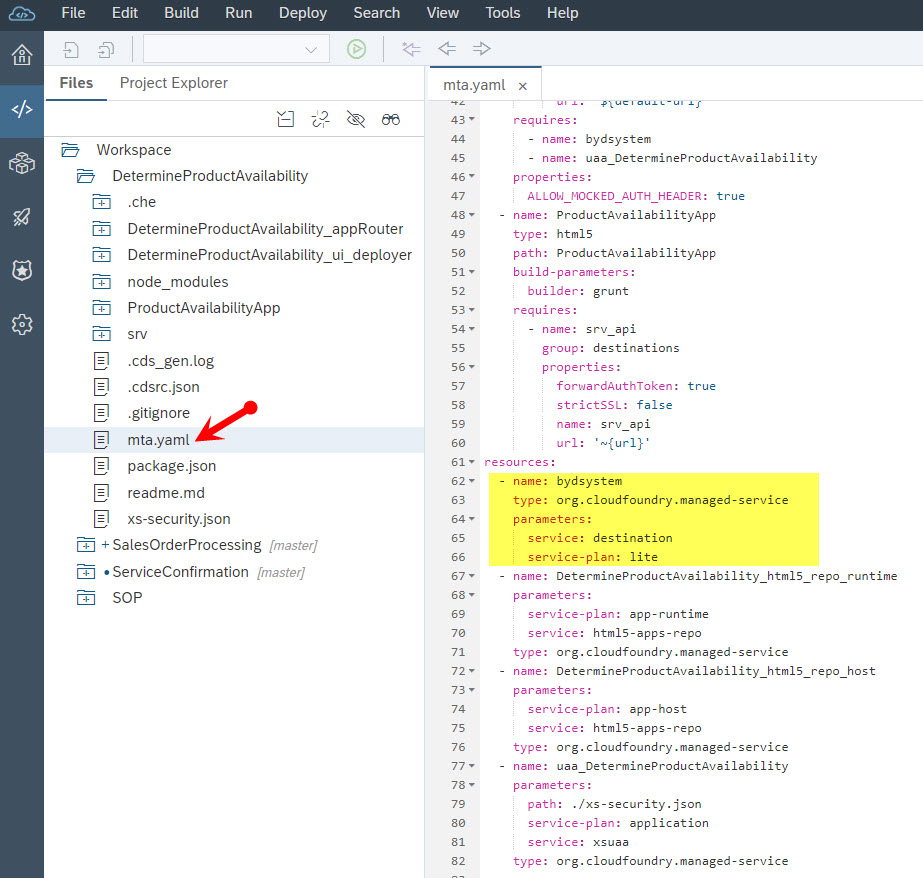
- Bind the destination and uaa services to the Java module in the mta.yaml file as shown in the screenshot below.

Once you are done with the mta.yaml file adjustment, your mta.yaml file should contain at least the modules and services shown in the example mta.yaml file below.
ID: DetermineProductAvailability

_schema-version: '2.1'

description: Determine Product Availability

parameters:

  deploy_mode: html5-repo

version: 0.0.1

modules:

  - name: DetermineProductAvailability_appRouter

    type: approuter.nodejs

    path: DetermineProductAvailability_appRouter

    parameters:

      disk-quota: 256M

      memory: 256M

    requires:

      - name: DetermineProductAvailability_html5_repo_runtime

      - name: srv_api

        group: destinations

        properties:

          forwardAuthToken: true

          name: srv_api

          url: '~{url}'

      - name: uaa_DetermineProductAvailability

  - name: DetermineProductAvailability_ui_deployer

    type: com.sap.html5.application-content

    path: DetermineProductAvailability_ui_deployer

    requires:

      - name: DetermineProductAvailability_html5_repo_host

    build-parameters:

      requires:

        - name: ProductAvailabilityApp

          artifacts:

            - './*'

          target-path: resources/ProductAvailabilityApp

  - name: DetermineProductAvailability-srv

    type: java

    path: srv

    parameters:

      memory: 1024M

    provides:

      - name: srv_api

        properties:

          url: '${default-url}'

    requires:

      - name: bydsystem

      - name: uaa_DetermineProductAvailability

    properties:

      ALLOW_MOCKED_AUTH_HEADER: true

  - name: ProductAvailabilityApp

    type: html5

    path: ProductAvailabilityApp

    build-parameters:

      builder: grunt

    requires:

      - name: srv_api

        group: destinations

        properties:

          forwardAuthToken: true

          strictSSL: false

          name: srv_api

          url: '~{url}'

resources:

  - name: bydsystem

    type: org.cloudfoundry.managed-service

    parameters:

      service: destination

      service-plan: lite

  - name: DetermineProductAvailability_html5_repo_runtime

    parameters:

      service-plan: app-runtime

      service: html5-apps-repo

    type: org.cloudfoundry.managed-service

  - name: DetermineProductAvailability_html5_repo_host

    parameters:

      service-plan: app-host

      service: html5-apps-repo

    type: org.cloudfoundry.managed-service

  - name: uaa_DetermineProductAvailability

    parameters:

      path: ./xs-security.json

      service-plan: application

      service: xsuaa

    type: org.cloudfoundry.managed-service
Build and Deploy
- Deploy the Java Application
- In SAP Web IDE right click on Workspace/DetermineProductAvailability/srv then select Run → Java Application. This will start the deployment of the Java backend application.
- Once the deployment of the Java application is complete, click on the URL on the upper part of the run console to test the application (see screenshot below).

- On the following screen click on the OData endpoint and add /$metadata to the URL to display the metadata of the endpoint.
- On the following screen click on the OData endpoint and add /$metadata to the URL to display the metadata of the endpoint.
- Deploy the UI Application
- In SAP Web IDE right click on Workspace/DetermineProductAvailability/ProductAvailabilityApp then select Run → Run as Web Application. This will start the deployment of the UI Application. If you are running the application for the first time, you will be requested to choose between flpSandBox and flpSandboxMockServer. Select flpSandBox and press OK.
- Once the deployment is completed, a launch pad with the ProductAvailabilityApp tile, as shown below, will appear.
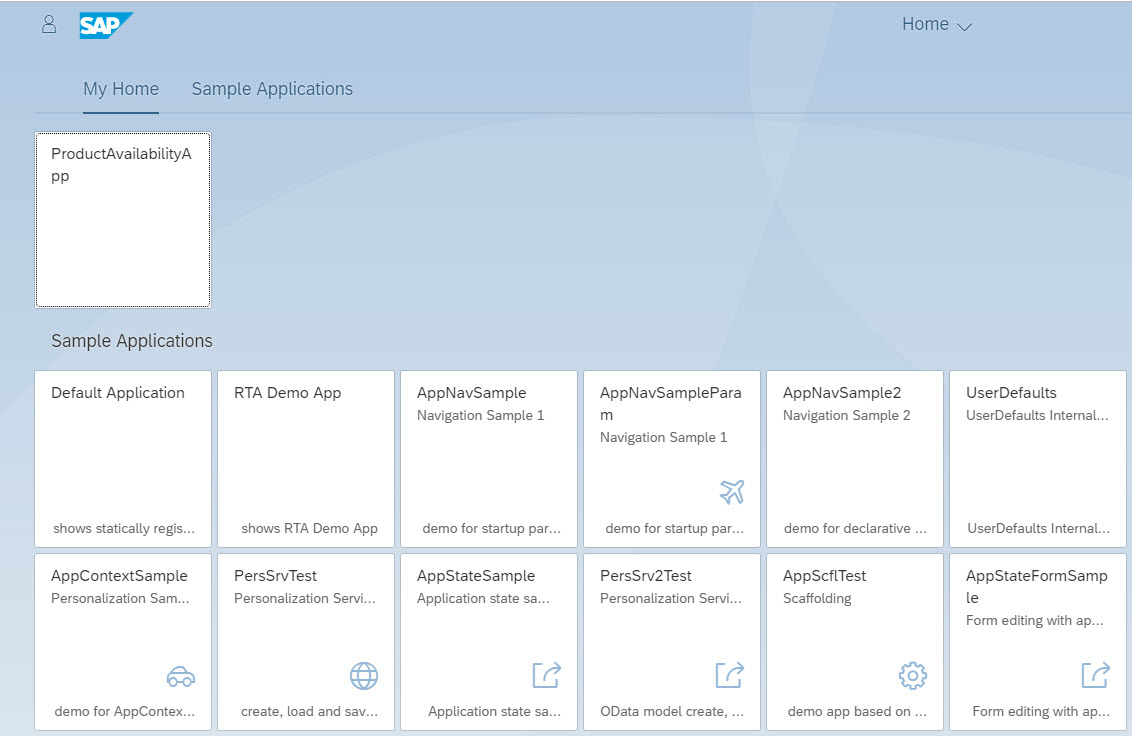
- Double click on the tile ProductAvailabilityApp to launch the application.
- On the following screen, you can start testing the capabilities of the application that you have developed. For instance, you can press Go to show the product availability for all products. The paging mechanism of the Fiori UI will ensure that only a reasonable number of entries are selected and displayed on the UI. Alternatively, you can display the availability of selected product(s).

Conclusion
This blog post illustrates the convenient and efficient way of consuming SAP Business ByDesign SOAP and OData APIs in SAP Cloud Platform side-by-side extension applications. It demonstrates how SAP Cloud Application Programming Model and SAP Cloud SDK can be leveraged to boost developer efficiency and developer experience in building and deploying SAP Business ByDesign side-by-side extension applications in SAP Cloud Platform Cloud Foundry environment.
Further Reading
Follow the link below to go the overview blog post of the blog post series:
SAP Business ByDesign Side-by-Side Extensions on SAP Cloud Platform
Labels:
8 Comments
You must be a registered user to add a comment. If you've already registered, sign in. Otherwise, register and sign in.
Labels in this area
-
Artificial Intelligence (AI)
1 -
Business Trends
363 -
Business Trends
24 -
Customer COE Basics and Fundamentals
1 -
Digital Transformation with Cloud ERP (DT)
1 -
Event Information
461 -
Event Information
24 -
Expert Insights
114 -
Expert Insights
161 -
General
1 -
Governance and Organization
1 -
Introduction
1 -
Life at SAP
415 -
Life at SAP
2 -
Product Updates
4,684 -
Product Updates
225 -
Roadmap and Strategy
1 -
Technology Updates
1,502 -
Technology Updates
89
Related Content
- SAP S/4HANA Cloud Extensions with SAP Build Best Practices: An Expert Roundtable in Enterprise Resource Planning Blogs by SAP
- Easily Upload Data From Excel To Database Table Using RAP Model in Enterprise Resource Planning Q&A
- Enhancements, evolutions, and enabled innovations across SAP’s Public Sector solution portfolio in Enterprise Resource Planning Blogs by SAP
- ABAP Platform for SAP S/4HANA 2023 in Enterprise Resource Planning Blogs by SAP
- Asynchronous code execution using ABAP Cloud in Enterprise Resource Planning Blogs by SAP
Top kudoed authors
| User | Count |
|---|---|
| 10 | |
| 10 | |
| 7 | |
| 7 | |
| 5 | |
| 4 | |
| 4 | |
| 4 | |
| 3 | |
| 3 |