
- SAP Community
- Products and Technology
- Human Capital Management
- HCM Blogs by Members
- DPCS 2.0: SAP SuccessFactors Recruiting
Human Capital Management Blogs by Members
Gain valuable knowledge and tips on SAP SuccessFactors HCM suite and human capital management market from member blog posts. Share your insights with a post of your own.
Turn on suggestions
Auto-suggest helps you quickly narrow down your search results by suggesting possible matches as you type.
Showing results for
antoniovp
Explorer
Options
- Subscribe to RSS Feed
- Mark as New
- Mark as Read
- Bookmark
- Subscribe
- Printer Friendly Page
- Report Inappropriate Content
07-19-2019
3:47 PM
Overview
Today’s increasingly regulated world requires companies to balance legal and business aspects against Data Privacy requirements to purge data when it’s no longer needed for a business purpose. This requirement is becoming even more important now with General Data Protection Regulation (GDPR) imposing new rules in the market.
It is interesting to see how these requirements can be met within the SAP SuccessFactors Recruiting solution, starting with the definition of DPCS-Data Privacy Consent Statement:
The Data Privacy Consent Statement allows customers to present a candidate with a notification detailing how the customer handles the candidate’s personal data. Candidates must accept this statement before entering their data.
There are still two versions of the Data Privacy Consent Statement configuration:
Below is an integrated and full guide (including pre-requisites and implementation steps) on how to:
1. Enable and configure DPCS 2.0
Permissions required
Navigate to Admin Center → Set User Permissions → Manage Permission Roles → [Role Name] → Permissions → Manage System Properties → enable "Data Privacy Consent Statement Settings" and "Manage Data Privacy Configurations".
Set up steps
Notes:

Internal and External DPCS
Once created, the DPCS is triggered every first time an employee creates a candidate profile or applies to a job posting.
If declined, the candidate profile is removed, applications are anonymized, and candidates are sent to a new candidate status.
Log-in DPCS
DPCS can also be configured to be triggered by logging in to the SAP SuccessFactors instance.
If accepted by the candidate, they are allowed to proceed with the expected action.
In this case, if the candidate declines the statement, log-in is denied.
Note: In both scenarios (Internal/External and Log-in), if further edits are made to the statement, all applicants need to agree to the new policies.
Country Specific Consent Options
Occasionally candidates are added to Recruiting Management without creating their own accounts and without seeing the configured statement. This issue happens when an employee refers, or an agency submits, a new candidate as well as when the add candidate functionality is used.
To manage candidate access: Admin Center→ Manage Recruiting → Country Specific Consent Settings, and then complete the information for selected countries.
Note: Users need to have the following permission to be able to work with Country Specific Consent Settings: Admin Center → Manage Permission Role → [Select Role] → Permissions → Administrator Permissions → Manage Recruiting → enable "Country Specific Consent Settings".
2. Enable and configure Anonymization
According to regulations in EMEA candidates/applicants may require from the Recruiters not to store their data under specific circumstances.
The Anonymization is an act of editing the database to change the unique data to no longer unique, allowing statistical reporting to remain intact while honouring the candidate’s privacy.
The Anonymization is triggered in the following scenarios:
There are some fields restricted from anonymization, according to the different templates where they are located (Candidate Profile, Application Template or Offer detail template).
The whole list of available fields is available in KBA #2103393.
In order to prepare the instance for anonymization, the following actions are needed:
In any case, after a candidate has been flagged for anonymization, the candidate will not return in search results and related applications can no longer be actioned.
Outstanding Interview and Offer To-Dos are marked completed and Agencies won't see the candidate available for submission.
Upon his/her return, the candidate will be treated as a brand new candidate.
3. Configure DRTM for Recruiting
Data should not be stored any longer than is required, especially in case local/regional legislations require purging of user data from the system after a certain length of time for data protection and privacy.
The Data Retention Management (DRM) feature set allows users to configure the purge of candidate data from the system on a recurring schedule and based on configurable country-specific retention times via Data Retention Time Management (DRTM) feature set.
The recruiting-specific purge types and their associated objects are as follows:

Note: These data purge types are applicable to external candidates only.
Internal candidates’ profiles and applications will be picked up either by the master data purge or by one of the employee-related purges as part of the Employee Profile or Employee Central data retention process.
DRTM Inactive Application Purge

DRTM Inactive Candidate Purge
Permissions and prerequisits required
Set up steps


Create and Approve a request
Purging data in the SAP SuccessFactors HCM Suite is irreversible, and as such is built to be a multi-step process requiring a request and approval. This ensures oversight before records are permanently and irretrievably removed from the system:
Notes:
More information
Customers can also refer to the following Knowledge Base Articles to learn more:
Today’s increasingly regulated world requires companies to balance legal and business aspects against Data Privacy requirements to purge data when it’s no longer needed for a business purpose. This requirement is becoming even more important now with General Data Protection Regulation (GDPR) imposing new rules in the market.
It is interesting to see how these requirements can be met within the SAP SuccessFactors Recruiting solution, starting with the definition of DPCS-Data Privacy Consent Statement:
The Data Privacy Consent Statement allows customers to present a candidate with a notification detailing how the customer handles the candidate’s personal data. Candidates must accept this statement before entering their data.
There are still two versions of the Data Privacy Consent Statement configuration:
- DPCS 1.0 allows the customer to provide data privacy prompt for internal and external candidates in the candidate's preferred language.
- DPCS 2.0 allows the customer to provide country-specific data privacy prompt for internal and external candidates, in the candidate's preferred language.
Below is an integrated and full guide (including pre-requisites and implementation steps) on how to:
- Enable and configure DPCS 2.0;
- Enable and configure Anonymization;
- Configure DRTM for Recruiting.
1. Enable and configure DPCS 2.0
Permissions required
Navigate to Admin Center → Set User Permissions → Manage Permission Roles → [Role Name] → Permissions → Manage System Properties → enable "Data Privacy Consent Statement Settings" and "Manage Data Privacy Configurations".
Set up steps
- Provisioning → Company Info → Enable "Data Privacy Consent Statement 2.0"
- Provisioning → Edit Candidate Privacy Options → Use DPCS Version DPCS 2.0
Note: If DPCS 1.0 is enabled, you will need to Disable all boxes for DPCS 1.0, Save Settings, Change from DPCS 1.0 to DPCS 2.0, Enable boxes again, Save Settings.
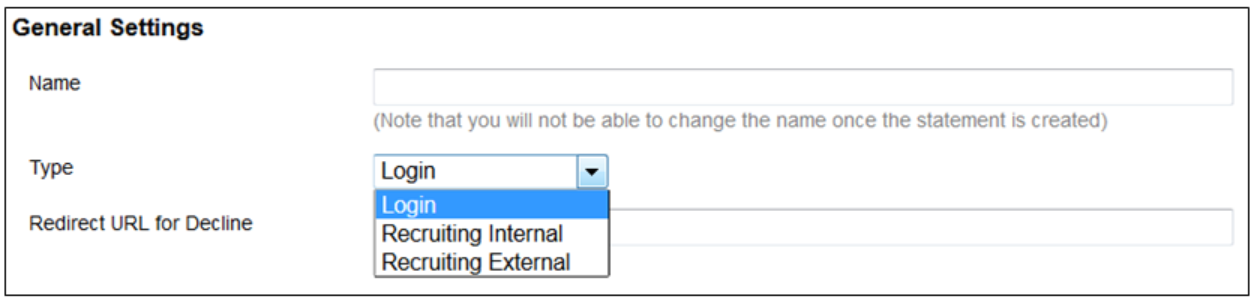
- Admin Center → Data Privacy Statement → Create New Statement
Notes:
- DPCS can be linked to specific countries.
- One country can have only one DPCS statement for a type.
- The "Set this as system default statement" checkbox can be set to assign a default DPCS statement.
- If the DPCS is not configured for a country, then the default DPCS statement is shown to the candidates who belong to that country.
- If a user does not have country data in the employee data file, they will see the default statement.
Internal and External DPCS
Once created, the DPCS is triggered every first time an employee creates a candidate profile or applies to a job posting.
If declined, the candidate profile is removed, applications are anonymized, and candidates are sent to a new candidate status.
Log-in DPCS
DPCS can also be configured to be triggered by logging in to the SAP SuccessFactors instance.
If accepted by the candidate, they are allowed to proceed with the expected action.
In this case, if the candidate declines the statement, log-in is denied.
Note: In both scenarios (Internal/External and Log-in), if further edits are made to the statement, all applicants need to agree to the new policies.
Country Specific Consent Options
Occasionally candidates are added to Recruiting Management without creating their own accounts and without seeing the configured statement. This issue happens when an employee refers, or an agency submits, a new candidate as well as when the add candidate functionality is used.
To manage candidate access: Admin Center→ Manage Recruiting → Country Specific Consent Settings, and then complete the information for selected countries.
Note: Users need to have the following permission to be able to work with Country Specific Consent Settings: Admin Center → Manage Permission Role → [Select Role] → Permissions → Administrator Permissions → Manage Recruiting → enable "Country Specific Consent Settings".
2. Enable and configure Anonymization
According to regulations in EMEA candidates/applicants may require from the Recruiters not to store their data under specific circumstances.
The Anonymization is an act of editing the database to change the unique data to no longer unique, allowing statistical reporting to remain intact while honouring the candidate’s privacy.
The Anonymization is triggered in the following scenarios:
- When a Candidate declines or revokes the DPCS or deletes his profile (with DPCS 2.0 in use);
- DRM: Candidate / Applicant purge routine will anonymize the data for values set up in Admin Tools → Data Retention Management (treated later in this blog);
- Admin action: “Delete Candidate” from Admin Tools.
There are some fields restricted from anonymization, according to the different templates where they are located (Candidate Profile, Application Template or Offer detail template).
The whole list of available fields is available in KBA #2103393.
In order to prepare the instance for anonymization, the following actions are needed:
- Prepare a list of fields to be anonymized;
- Edit the field in the relative XML template changing the value from anonymize="false" to anonymize="true";
 Note: this action must be performed for each relevant template (Candidate Profile, Application Template or Offer detail);
 - Set up a scheduled job in Provisioning with the job type “RCM Entity Anonymization Job”.
Note: It is recommended that the scheduled job runs hourly.
In any case, after a candidate has been flagged for anonymization, the candidate will not return in search results and related applications can no longer be actioned.
Outstanding Interview and Offer To-Dos are marked completed and Agencies won't see the candidate available for submission.
Upon his/her return, the candidate will be treated as a brand new candidate.
3. Configure DRTM for Recruiting
Data should not be stored any longer than is required, especially in case local/regional legislations require purging of user data from the system after a certain length of time for data protection and privacy.
The Data Retention Management (DRM) feature set allows users to configure the purge of candidate data from the system on a recurring schedule and based on configurable country-specific retention times via Data Retention Time Management (DRTM) feature set.
The recruiting-specific purge types and their associated objects are as follows:
- DRTM Inactive Application Purge
- DRTM Inactive Candidate Purge
Note: These data purge types are applicable to external candidates only.
Internal candidates’ profiles and applications will be picked up either by the master data purge or by one of the employee-related purges as part of the Employee Profile or Employee Central data retention process.
DRTM Inactive Application Purge
- Anonymizes all data related to inactive applications
- Retention start time is based on the selection in Admin Center → Manage Recruiting Settings → DRM 2.0 settings
The following options are available:
- Application’s Last Modified date
- The application’s disposition date
- Requisition’s closure date
DRTM Inactive Candidate Purge
- Anonymizes all data related to inactive applications
- Retention start time is based on the Candidate last login date
Permissions and prerequisits required
- Admin Center → Manage Permission Role → Administrator Permission → Metadata Framework → Manage Data.
Note: This gives user the ability to access the manage data screens which is used to manage MDF objects in general, not just for data retention time management. - Admin → Manage Permission Role → User Permission → Data Retention Management and select DRTM Candidate Profile and all fields except Field level override field. Do the same for DRTM Job Application.
Note: these two permission set grants user the ability to set up countries to use data retention time management and then configure data retention times for different countries for the recruiting objects. - Admin Center → Upgrade Center → Optional Upgrades → DRTM Recruiting.
Set up steps
- Configure the anonymize attribute in the XML and schedule the job in Provisioning (described in Point 2 of this article - "Enable and configure Anonymization");
- Check and configure permissions and prerequisites;
- Flag countries for use in DRTM:
- Admin Center → Manage Data → Country → [select country] → Take Action → Make Correction.
- Set the data retention enabled flag to yes and save.
- Repeat this process and enable the data retention flag for every country you recruit in.
Note: this step can be performed also through an import.
- Set up the Country Specific Retention Period
- Candidate Profile: Admin Center → Manage Data → DRTM Candidate Profile → Candidate → Take Action → Make Correction.
Note: Since this is the candidate profile and it is possible that a candidate may have one without ever logging in to see the Consent Statement due to being manually added via referral, agency, or manual add, there is the option to configure the period of non-acceptance of DPCS here. This means the profile will be picked up for anonymization if the DPCS has not been accepted in this time frame.
- Candidate Profile: Admin Center → Manage Data → DRTM Candidate Profile → Candidate → Take Action → Make Correction.
- Application: Admin Center → Manage Data → DRTM Job Application → Application → Take Action → Make Correction.
Create and Approve a request
Purging data in the SAP SuccessFactors HCM Suite is irreversible, and as such is built to be a multi-step process requiring a request and approval. This ensures oversight before records are permanently and irretrievably removed from the system:
- Create the request
Admin Center → Data Retention Management → Create New Purge Request. Select the purge request type, name it, select the countries this purge schedule should cover, and add approvers. The request can be launched immediately without reoccurrence or scheduled with different options. Either option used will send notifications to the approver(s) and either will need approval before they expire in 14 days.
Fully approved purge requests are sent to the job scheduler. For scheduled requests, the purge job runs at the soonest available time after its next scheduled recurrence. For immediate request, the purge job runs at the next available time generally within a few minutes. - Approve a request
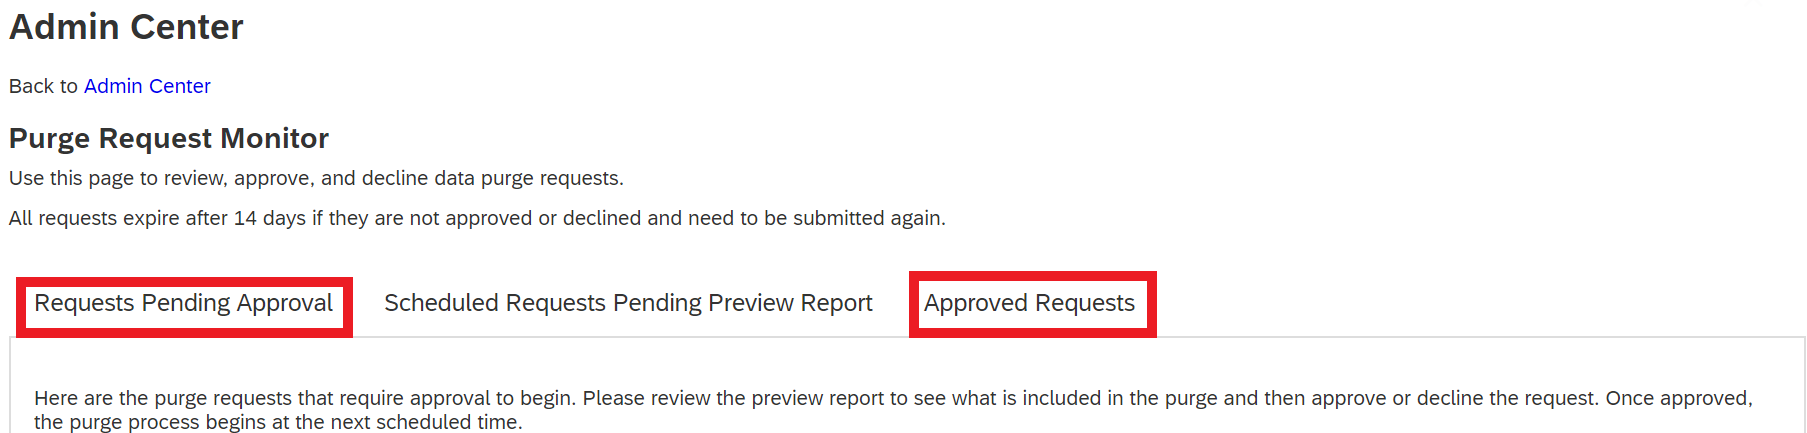
Admin Center → Purge Request Monitor → Request Pending Approval.
Note: Either type of approval (immediate or scheduled) will start on the Purge Request Monitor screen. - Check Purge status
The actual Purge job status can be checked at any time after it is approved by accessing the Approved Request tab. Here the user can download the preview report, view the job details, and/or access view results for the completed report that can be used to confirm whether the purge job was successful or not for each type of data in the purge.
Notes:
- It is possible to put a legal hold on data for a specific candidate so that their data is not removed by a DRTM data purge. Possible use cases are pending litigation or other legal requirements that supersede the configured retention time.
Permission required: Admin Center → Manage Permission Role → Data Retention Management → DRTM Purge Freeze.
Where to put a candidate purge freeze: Admin Center → Manage Data → Create New → DRTM Purge Freeze. - The master data purge permanently and irreversibly removes inactive users from your instance, along with their associated data from across the HCM Suite, including audit data. DRTM Master Data overrides the retention time that is configured for any other DRTM purge objects. However, this purge will not remove any Recruiting Management user
(defined as “Any user Job Requisition Approver, Interviewer, Offer Approver”) who is active in the Recruiting process.
Their pending action will need to be dispositioned or transferred to another user before they can be purged.
More information
Customers can also refer to the following Knowledge Base Articles to learn more:
- 2341240 - "DPCS 2.0 - how to enable version 2.0 of Data Privacy Consent Statement and how to set up privacy statement - Recruiting Management"
- 2103393 - "Which data may be anonymized, when using DPCS 2.0? - Recruiting Management"
- 2166333 - "How to set up anonymization - Recruiting Management"
- 2080965 - "Candidate Anonymization - Recruiting"
- SAP Managed Tags:
- SAP SuccessFactors HXM Suite,
- SAP SuccessFactors Recruiting
11 Comments
You must be a registered user to add a comment. If you've already registered, sign in. Otherwise, register and sign in.
Labels in this area
-
1H 2024 Product Release
5 -
2H 2023 Product Release
1 -
ACCRUAL TRANSFER
1 -
Advanced Workflow
1 -
AI
1 -
AI & Skills Ontology
1 -
Anonymization
1 -
BTP
1 -
Business Rules
1 -
Canvas Report
1 -
Career Development
1 -
Certificate-Based Authentication
1 -
Cloud Platform Integration
1 -
Common Super Domain
1 -
Compensation
1 -
Compensation Information Management
1 -
Compensation Management
1 -
Compliance
2 -
Content
1 -
Conversational AI
2 -
CSD
1 -
Custom Data Collection
1 -
custom portlet
1 -
Data & Analytics
1 -
Data Integration
1 -
Dayforce
1 -
deep link
1 -
deeplink
1 -
Delimiting Pay Components
1 -
Deprecation
1 -
Employee Central
1 -
Employee Central Global Benefits
1 -
Employee Central Payroll
1 -
employee profile
1 -
Employee Rehires
1 -
external terminal
1 -
external time events
1 -
Generative AI
2 -
Getting Started
1 -
Global Benefits
1 -
Guidelines
1 -
h12024
1 -
H2 2023
1 -
HR
2 -
HR Data Management
1 -
HR Transformation
1 -
ilx
1 -
Incentive Management Setup (Configuration)
1 -
Integration Center
2 -
Integration Suite
1 -
internal mobility
1 -
Introduction
1 -
Learning
3 -
LMS
2 -
LXP
1 -
Massively MDF attachments download
1 -
Mentoring
1 -
Metadata Framework
1 -
Middleware Solutions
1 -
OCN
1 -
OData APIs
1 -
ONB USA Compliance
1 -
Onboarding
2 -
Opportunity Marketplace
1 -
Pay Component Management
1 -
Platform
1 -
portlet
1 -
POSTMAN
1 -
Predictive AI
2 -
Recruiting
1 -
recurring payments
1 -
Role Based Permissions (RBP)
2 -
SAP Build CodeJam
1 -
SAP Build Marketplace
1 -
SAP CPI (Cloud Platform Integration)
1 -
SAP HCM (Human Capital Management)
2 -
SAP HR Solutions
2 -
SAP Integrations
1 -
SAP release
1 -
SAP successfactors
5 -
SAP SuccessFactors Customer Community
1 -
SAP SuccessFactors OData API
1 -
SAP Workzone
1 -
SAP-PAYROLL
1 -
self-service migration
1 -
Skills
1 -
Skills Management
1 -
sso deeplink
1 -
Stories in People Analytics
3 -
Story Report
1 -
SuccessFactors
3 -
SuccessFactors Employee central home page customization.
1 -
SuccessFactors Onboarding
1 -
successfactors onboarding i9
1 -
Table Report
1 -
talent
1 -
Talent Intelligence Hub
2 -
talentintelligencehub
1 -
talents
1 -
Tax
1 -
Tax Integration
1 -
TIH
1 -
Time Accounts
1 -
Time Management implementation links
1 -
Workflows
1 -
XML Rules
1
- « Previous
- Next »
Related Content
- First Half 2024 Release: What's new for Talent Management? We have AI-enabled features to share! in Human Capital Management Blogs by SAP
- 1H 2024 the “Employee Experience” release in Human Capital Management Blogs by SAP
- New Recruiting Offer Letter Template Rules - 1H 2024 in Human Capital Management Blogs by Members
- 1H 2024 Release Highlights: New Innovations in SAP SuccessFactors Onboarding in Human Capital Management Blogs by SAP
- 1H 2024 Release Highlights: Leveraging AI within SAP SuccessFactors Recruiting to Accelerate Hiring in Human Capital Management Blogs by SAP
Top kudoed authors
| User | Count |
|---|---|
| 3 | |
| 3 | |
| 2 | |
| 2 | |
| 1 | |
| 1 | |
| 1 | |
| 1 | |
| 1 | |
| 1 |