Overview:
New hire can provide data on custom UI screens presented during Additional Data Collection step. Onboarding 2.0 provides the ability to design custom UI screens using MDF objects and configuration UI’s.
In this blog, we are going to discuss the end-to-end configuration using Extension Center and configuration steps for designing UI with examples such as
- Display instructional long text
- Display fields in flow or form layout
- Show fields in groups and conditional hide/show using config UI rules
- Show group as collapse or expand
- Show/hide field on first page load using config UI rules
- Show/hide fields if user selects value on UI
- Configure default document as attachment
- Browser and upload attachment
- Link to UI page which open as URL
- Handling different labels on UI
Let’s get started with Extension Center.
How to use Extension Center to configure Additional Data Collection
Extension Center is a one-stop page for creating and managing custom elements in SAP SuccessFactors. From here, you can create entirely new elements as well as edit existing ones to meet your business needs.
Pre-requisite to set up Additional Data Collection configuration: You must enable Onboarding 2.0 with all pre-requisites for the Onboarding process creation. RBP should be enabled for additional data collection objects such as Onboarding data collection configuration, Onboarding data collection user configuration and custom UI objects (if they are defined as RBP secured) to new hire as well as responsible users.
Pre-requisite to access Extension Center: You must enable Provisioning switch under Company setting “Enable Extension Center — requires “Enable Generic Objects” and “Enable the Attachment Manager”.
With this you will be able to access Extension Center from Admin Center.
Follow below steps to create custom objects and config UIs from Extension Centers:
Step 1: Create Extension
. Navigate to Admin Center-> Extension Center-> Create SuccessFactors Extension
- Provide Tile and External Code.
- Click on Action Save Extension.
You will see “Add New Object” option once you save the extension.
 Step 2:
 Click on Add New Object.
- Add fields as per your requirement
- Set Data Type for field “externalCode” = Auto number
- It is mandatory to add field “cust_userConfig” for association. Select Data Type = Generic Object and Valid Values Source = ONB2DataCollectionUserConfig
Similarly, you can add more objects as per your requirement.

Step 3: Associating Objects to ONB2DataCollectionUserConfig
- Navigate to Admin Center-> Extension Center->Add Existing Object
- Search for ONB2DataCollectionUserConfig object and Save
- Click on Relationships
- Give the Label and Name appropriate to the association
- Select Destination Object name as custom object that needs to be associated (e.g. Uniform)
- Select Multiplicity as “One to One”
- Select Type as “Join by Column”
- Click on the expand arrow, this opens additional setting section.
- Set the Source Object Column to “internalId” and Destination Object Column as “cust_userConfig”

Step 4: Add UI for custom object
- Navigate to Admin Center-> Manage Configuration UI
- Enter the Id for Config UI
- Select your MDF Custom Object that you have created in step 2
- Delete the system field and keep only fields which you would like to show to new hire

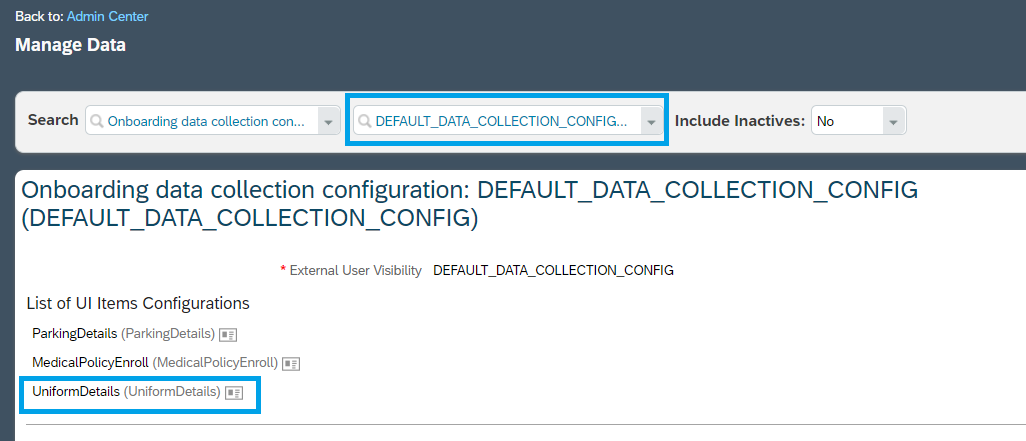
Step 5: Add custom UI created in step 4 to ONBDataCollectionConfig
- Navigate to Admin Center-> Manage Data and search for “Onboarding data collection config”
- Select “DEFAULT_DATA_COLLECTION_CONFIG” in second search box
- Click on Take action
- Search custom object created in step 2 and add into “List of UI Items Configurations” list
- Save the changes
New Hire will see below screen which you have designed in above steps

Let’s discuss configuration steps for designing UI with examples.
Example 1: Setup long read-only text on UI
By default, 255 characters will be shown on UI. You can set long description using the following configuration steps

Configurations:
- Custom Object definition:
Create custom field on the object with
- Maximum length = <as per maximum length> (By default it is 255 characters)
- Data type = String
- Visibility = Read Only

2. Manage Configuration UI:
Set up below properties on config UI screen
- Show Label = No
- Display As = Large Input Field
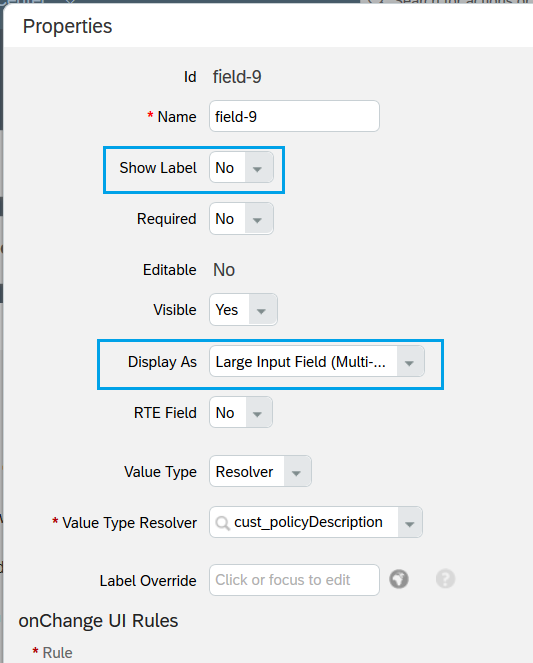
- Close Properties pop up.
- Create Config UI Rule to populate default text in text field

- Click on Manage UI Rules and Add New Rule
- Select text field which is configured in Custom object in previous step and add text which you would like to show on UI

- Go back to Config UI screen
- Click on Edit Properties

- Select rule on OnInit Rules as shown below

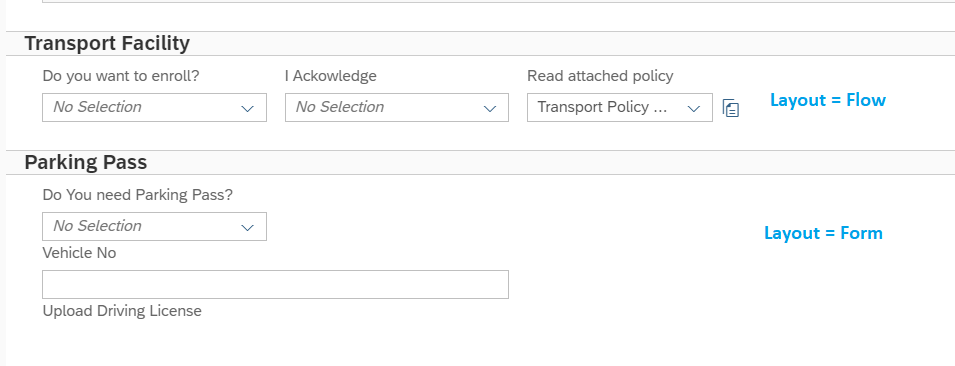
Example 2: Display fields in groups with layout as form or flow
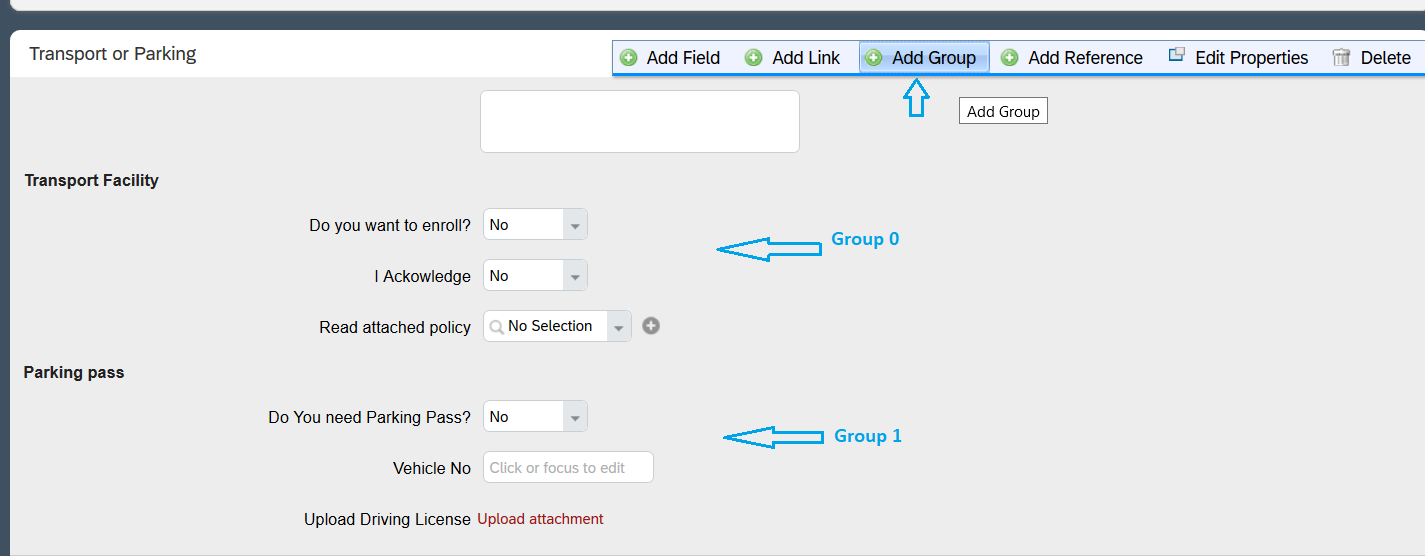
Fields can be shown on UI placed horizontally or vertically. You can do this using layout setting as mentioned below.

- Click on Add Group
- Drag and drop fields in the group
- You can add multiple groups, group name start from group 0, group 1 and so on.
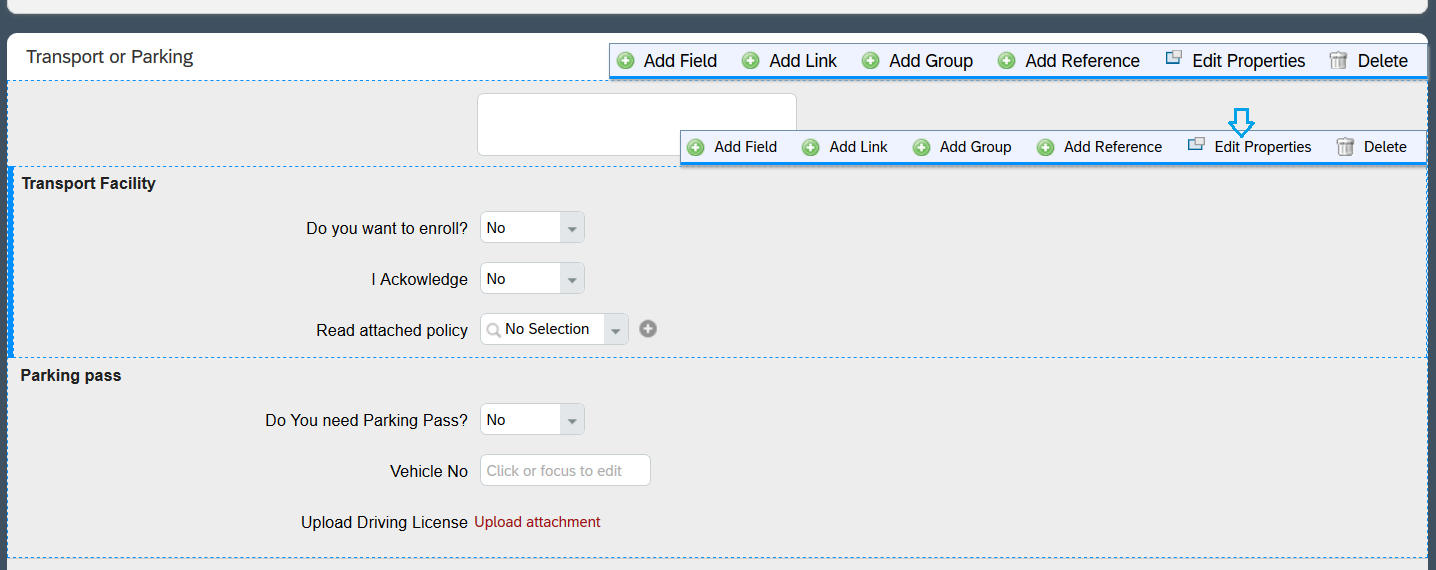
- Click on Edit Properties
- Select Layout

Example 3: Show Group as Collapsed or Expanded
Add Groups and drag/drop fields under groups. Groups can be shown as collapse or expand using below settings.
- Click on Edit Properties for Group
- Select Collapsible = Yes
- Default Collapsed = No or Yes as per your design requirement

If Default Collapsed = Yes, then Group show as per below screenshot

If Default Collapsed = No, then Group show as per below screenshot
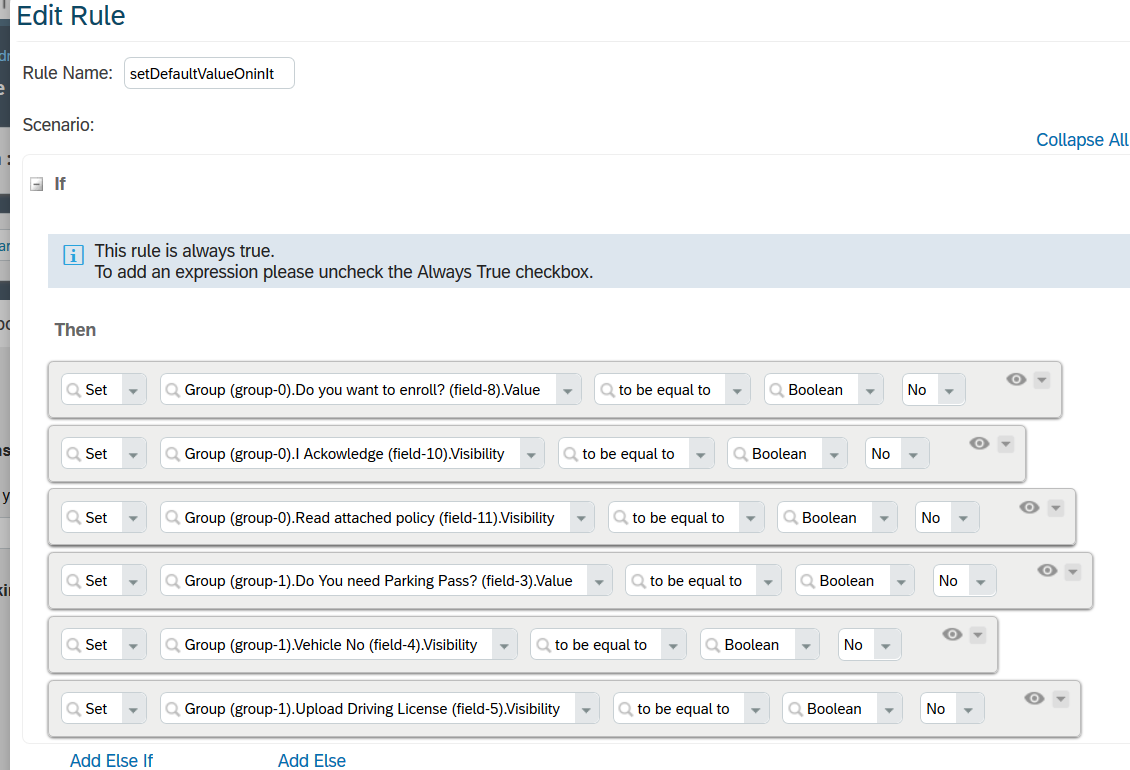
Example 4: Show fields on first load
You can define default UI conditions to display or hide fields on screen

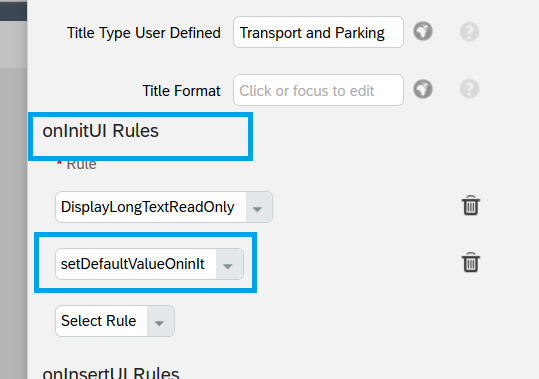
- Set Default Value using Rule
- Select Rule on “OnInitUI” rules

Example 5: Show or Hide fields on condition
You can define UI rules to display or hide fields on screens as per values selected on UI by the new hire.
Set a rule such that other fields display on UI when user selects “Yes” for “Do you want to enroll”.
Before

After


- Select Rule for field in "onChange UI Rules".

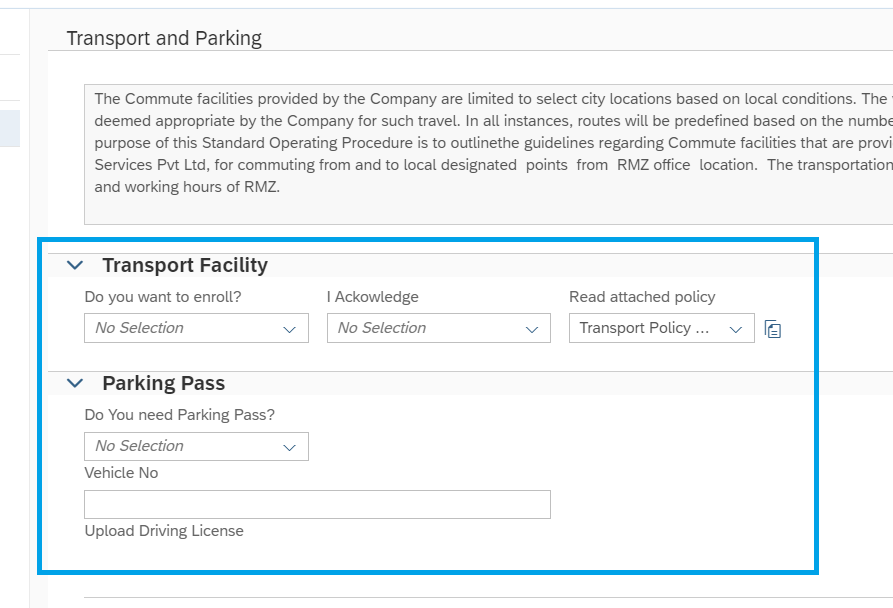
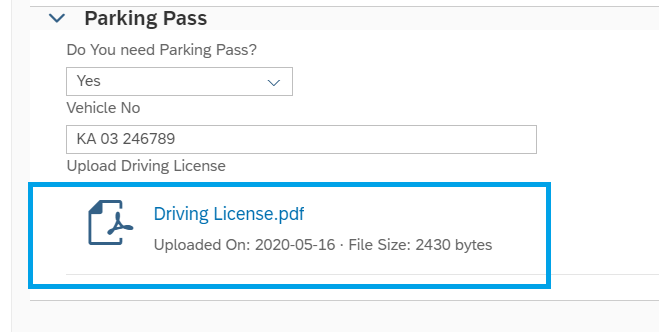
Example 6: Default Attachment
If a new hire wants to read through the policy or additional information before providing his preferences, then you can attach default documents on UI screen. New hire can click on this document and open or download it.

Follow below steps for configuration
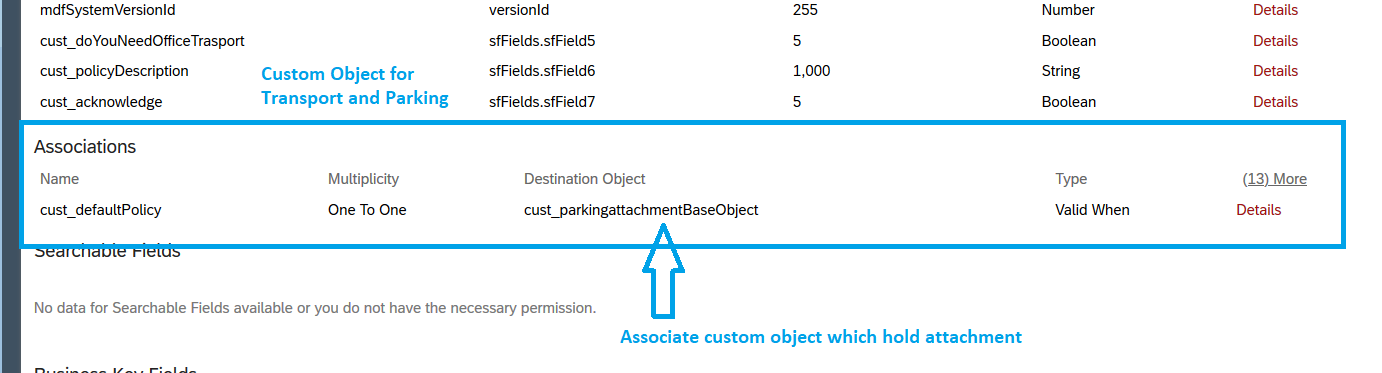
Step1: Create custom object which will hold default policy document and this attached document will be shown on UI screen to new hire e.g. “Transport Policy” document as shown in previous screen.
- Create custom object with fields
- externalCode = string
- add custom field e.g. “attachmentPolicyLink “ of type = attachment
- Set externalUserVisibility field Visibility = Read Only

Step 2: Create and Add “Onsave” rule to set externalUserVisibility for attached policy document = yes on object created in Step1.

Step 3: Go to Admin Center ->Manage Data and Create new instance of object and upload policy document
- Search Object in Create New search box
- Enter mandatory fields and browser and attach document in field e.g. “attachPolicyLink”
- Save object

You will see attached document as shown in below screenshot

Step 4: Associate custom object created in Step 1 with object which is used for Config UI screen.
With this association setup, Policy attached document will show in “Transport and Parking” UI.
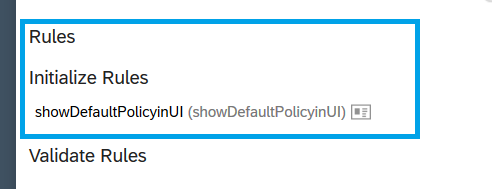
Step 5: Setup Initialize rule on “Transport and Parking” to show attachment pre-populated UI screen

Example 7: Upload attachment
New hire can be asked to upload some documents as a part of additional data collection.
Define a custom object with one of the field as attachment.
New hire can browse for attachment and submit data.
Before

After
Example 8: Add Link to UI page
New hire can get links added on Configuration and click on link takes him/her to the web page.

Step 1: Add link on Config UI and click on Edit icon

Step 2: Enter URL and Link Display text. You can choose Show Label = No and Open In = New Window.

Example 9: Add User define title for page
By default, page tile will be same as object name. You can format title as mentioned in below steps

Step 1: Click on Edit Properties of Config UI

Step 2: Enter text to be shown as title in “Title Format” field and Click ok.

In case, if you have configured custom object as secured then make sure you provide role based access to External User role.

custom object set as Secured Yes in object definition

External User role with custom object permission
I hope you have good understanding of how to design custom UI after reading this blog post.
The regular product documentation will be updated based on a release cycle. It can be found here:
SAP Help Portal .
