
- SAP Community
- Products and Technology
- Technology
- Technology Blogs by SAP
- Connect SAP Cloud Identity Authentication Service ...
Technology Blogs by SAP
Learn how to extend and personalize SAP applications. Follow the SAP technology blog for insights into SAP BTP, ABAP, SAP Analytics Cloud, SAP HANA, and more.
Turn on suggestions
Auto-suggest helps you quickly narrow down your search results by suggesting possible matches as you type.
Showing results for
Product and Topic Expert
Options
- Subscribe to RSS Feed
- Mark as New
- Mark as Read
- Bookmark
- Subscribe
- Printer Friendly Page
- Report Inappropriate Content
06-07-2023
9:31 PM
SAP Cloud Identity Services (IAS) allows integration with a corporate identity providers using OpenID Connect (OIDC) protocol. This feature was originally only supported with Azure AD, but now other OIDC compliant identity providers are also supported. In this blog I will showcase how we can setup Okta as a corporate IDP with SAP Cloud Identity Service using OIDC. This blog is specific to OIDC setup, but we also support integration using SAML. If you are interested in integrating SAP Cloud Identity Authentication Service with Okta using SAML, read this blog.
Create OpenID Connect application in Okta
Note, the Okta configuration below is based on the testing I've done, but it's best to work with your Okta admin and follow best practices recommended by Okta.
Setup Okta as corporate identity provider in SAP Cloud Identity Authentication Service
Test the configuration.
For my setup I am using a SAP BTP subaccount that is already setup to trust SAP Cloud Identity Authentication Service. Furthermore, the shadow user creation options is enabled in SAP BTP so that users are dynamically created.
How can I see the what claims are sent to SAP Cloud Identity Authentication Service by Okta in the token?
The best way to see the JWT token sent to IAS is by reviewing the troubleshooting logs in SAP Cloud Identity Authentication Service.
How can I use the Private Key as the client authentication method instead of using Client secret?
Enjoy!
Create OpenID Connect application in Okta
Note, the Okta configuration below is based on the testing I've done, but it's best to work with your Okta admin and follow best practices recommended by Okta.
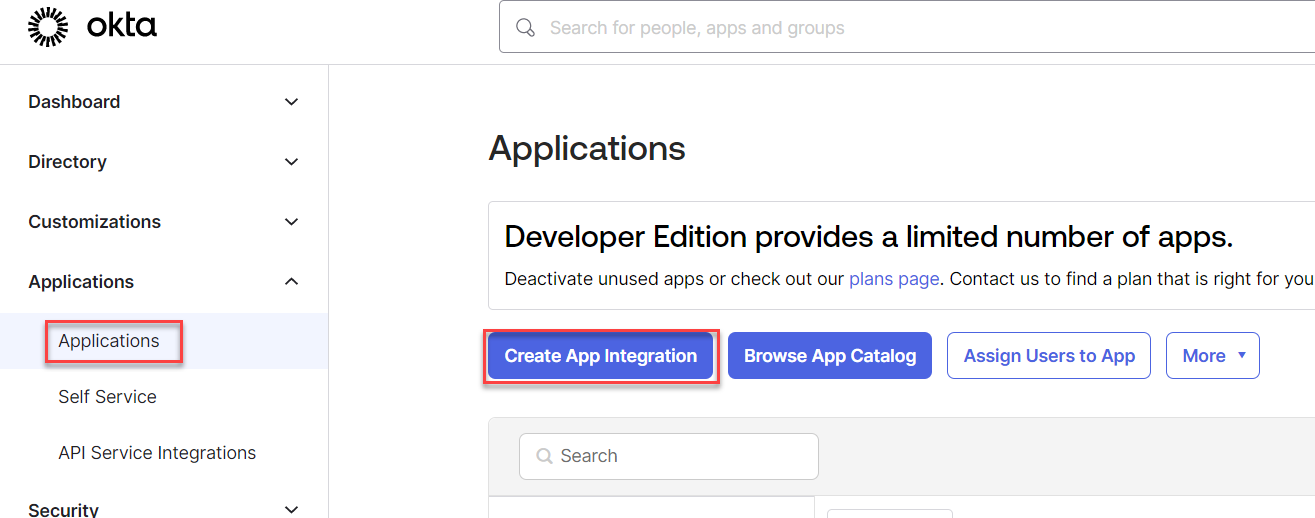
- Access your Okta admin console.
- Click Applications >> Create App Integration.
- Choose OIDC - OpenID Connect for Sign-in method and Web Application as the Application Type.

- Specify App integration name. Authorization Code grant type should be enabled by default.

- Specify the following:
- Sign-in redirect URIs: https://<IAS tenant host>.accounts.ondemand.com/oauth2/callback
- Sign-out redirect URIs: https://<IAS tenant host>.accounts.ondemand.com/oauth2/logout

- Choose who should have access to the application. In my case I chose to allow access to everyone in the organization. Optionally, enable the Federation Broker Mode and Save your application. In my setup I disabled this option.

- Under the General tab of the created application, choose the Client authentication method. By default client authentication is set to use Client secret, but Public key / Private key is also possible. Use the Copy icons to make note of the Client ID and Client Secret as they will be required for setup in SAP Cloud Identity Authentication Service. For now, I will use Client secret, but check the Q&A portion of the blog to see to how to use Public key/ Private key option. See Okta documentation for recommendations on choosing the client authentication method.

- Under the Sign On tab, navigate to the OpenID Connect ID Token section. By default only the user attributes are included in the token, but there may be a requirement to have groups information included in the token as well. For eg, users group information may be required to dynamically assign user to role collection in SAP Business Technology Platform. Edit the configuration and set the Groups claim filter as shown in the screenshot to include all groups.

- If necessary, under Assignments tab, choose the groups that should have access to the application. Everyone group should be listed already, but this will depend upon how you decided to setup the application in step 6 above.

- Click Security >> API from the left panel and select the default authorization server.

- Make note of the Issuer URL. This will be required later SAP Cloud Identity Authentication Service setup.

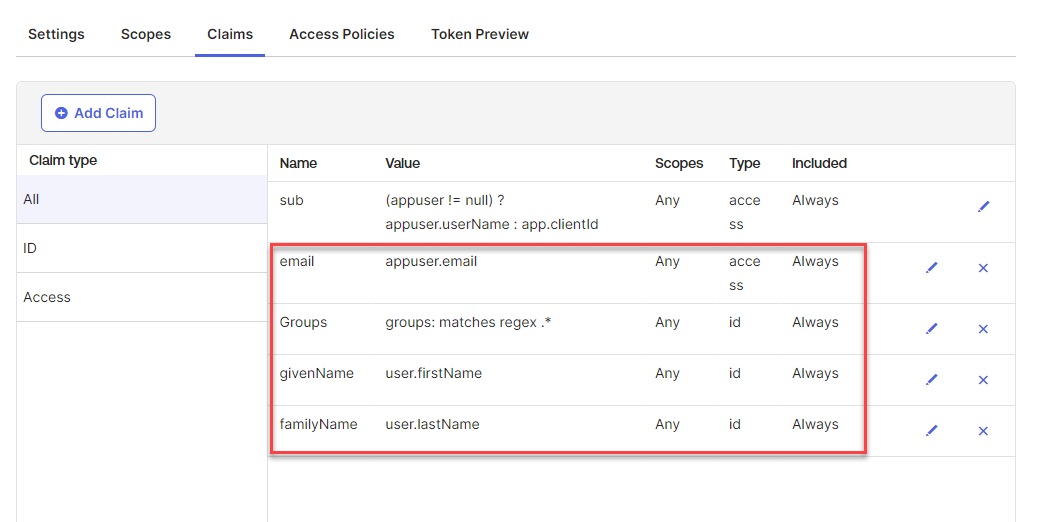
- Click Claims tab and ensure the claims shown below are included. I've modified the default setup to issue the additional claims listed below. Note that Groups, givenName and familyName are of ID token type. These claims will come in handy later if we dynamically create the user in SAP Business Technology Platform or assign dynamic role collections. Without the claims some of the fields in the user profile in SAP BTP won't get populated properly. Ideally givenName and famillyName claims should be given_name and family_name respectively because that's what SAP BTP is expecting, but I couldn't get Okta to include those attributes in the ID token. You will see later that I have to enrich these Okta claims in SAP Cloud Identity Authentication Service for use with SAP BTP.
- givenName
- familyName
- Groups
Setup Okta as corporate identity provider in SAP Cloud Identity Authentication Service
- Log into SAP Cloud Identity Authentication Service admin console.
- Click Identity Provider >> Corporate Identity Providers.

- Click the Create button and specify a Display Name. Click Save.

- Click Identity Provider Type and choose OpenID Connect Compliant. Click Save.

- Click OpenID Connect Configuration and specify a Discovery URL. The Discovery URL is set the Issuer URL copied earlier Okta authorization server configuration. Click the Load button. Most fields on the page should get populated.

- Paste the Client ID and Client Secret copied from Okta application earlier.

- Under Scopes, click Add and add the email scope and click the Save icon.

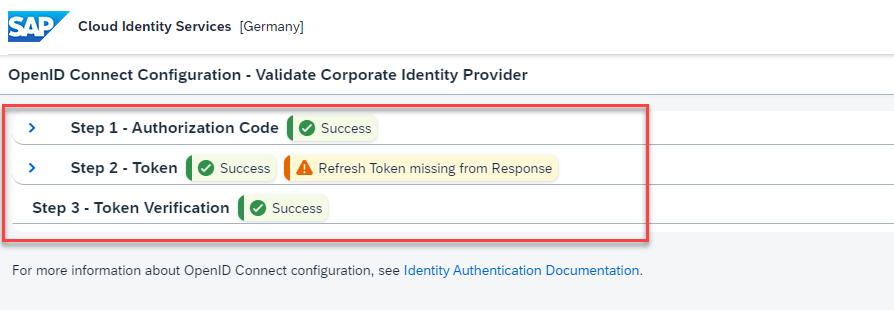
- Click Validate button. Click OK on the popup message. A new browser tab will open.

- Specify credentials of Okta user who has access to the application created in Okta earlier. The validation check should be successful.
- Save the OpenID Connect Configuration.
- Click Subject Name Identifier and change from None to Email.
- Click Enrich Token Claims and set the claims as in the table below. We exposed givenName and familyName in the Okta claim earlier, but this enrichment is required because SAP Business Technology Platform expects the name to be given_name and family _name. Without this enrichment the user's first and last name will not get populated in the user profile in SAP BTP.
Claim
Value
family_name
${familyName}
given_name
${givenName}

- Click Save.
Test the configuration.
For my setup I am using a SAP BTP subaccount that is already setup to trust SAP Cloud Identity Authentication Service. Furthermore, the shadow user creation options is enabled in SAP BTP so that users are dynamically created.
- Log into SAP Cloud Identity Authentication Service admin console.
- Click Applications & Resources >> Applications.
- Select the application associated with your BTP Subaccount and click Conditional Authentication.
- Change the Default Identity Provider from Identity Authentication to Okta and click Save.

- Access your BTP Subaccount and launch any existing application in a new browser session. For my test, I used SAP Build Work Zone, standard edition, but any existing application that requires authentication through SAP Cloud Identity Authentication Service will suffice.
- Choose your SAP Cloud Identity Authentication Service. You should be redirected to Okta for authentication.
- Confirm you are able to successfully authenticate to Okta.
- Note that the user is create automatically in SAP BTP and has the user profile populated properly.

- Optionally, configure the role collection mapping using the users group information from Okta.
How can I see the what claims are sent to SAP Cloud Identity Authentication Service by Okta in the token?
The best way to see the JWT token sent to IAS is by reviewing the troubleshooting logs in SAP Cloud Identity Authentication Service.
- In you IAS admin console click Monitoring and Reporting >> Troubleshooting Logs.
- Click Go to see the last hours logs.
- Search for the word "token" to see the token sent by Okta to IAS or token issued by IAS to SAP BTP.

- Click Log Details to see detailed log. We can easily the see the various attributes received by IAS from Okta.

How can I use the Private Key as the client authentication method instead of using Client secret?
- Edit the IAS application in Okta and switch Client Authentication method to Public key/Private key.
- Select Use a URL to fetch keys dynamically.
- Set the URL to https://<IAS tenant host>.accounts.ondemand.com/oauth2/certs and Save the changes.

- Modify the OpenID Connection Configuration in SAP Cloud Identity Authentication Service and change the Client Authentication Method to Private key JWT.

- Validate your updated configuration and Save.
Enjoy!
- SAP Managed Tags:
- SAP Cloud Identity Services
Labels:
2 Comments
You must be a registered user to add a comment. If you've already registered, sign in. Otherwise, register and sign in.
Labels in this area
-
ABAP CDS Views - CDC (Change Data Capture)
2 -
AI
1 -
Analyze Workload Data
1 -
BTP
1 -
Business and IT Integration
2 -
Business application stu
1 -
Business Technology Platform
1 -
Business Trends
1,658 -
Business Trends
112 -
CAP
1 -
cf
1 -
Cloud Foundry
1 -
Confluent
1 -
Customer COE Basics and Fundamentals
1 -
Customer COE Latest and Greatest
3 -
Customer Data Browser app
1 -
Data Analysis Tool
1 -
data migration
1 -
data transfer
1 -
Datasphere
2 -
Event Information
1,400 -
Event Information
76 -
Expert
1 -
Expert Insights
177 -
Expert Insights
348 -
General
1 -
Google cloud
1 -
Google Next'24
1 -
GraphQL
1 -
Kafka
1 -
Life at SAP
780 -
Life at SAP
14 -
Migrate your Data App
1 -
MTA
1 -
Network Performance Analysis
1 -
NodeJS
1 -
PDF
1 -
POC
1 -
Product Updates
4,575 -
Product Updates
392 -
Replication Flow
1 -
REST API
1 -
RisewithSAP
1 -
SAP BTP
1 -
SAP BTP Cloud Foundry
1 -
SAP Cloud ALM
1 -
SAP Cloud Application Programming Model
1 -
SAP Datasphere
2 -
SAP S4HANA Cloud
1 -
SAP S4HANA Migration Cockpit
1 -
Technology Updates
6,871 -
Technology Updates
485 -
Workload Fluctuations
1
Related Content
- Configuration: SAP Business Network SSO with SAP Cloud Identity Services - Identity Authentication in Technology Blogs by SAP
- How to Connect a Fieldglass System to SAP Start in Technology Blogs by SAP
- RingFencing & DeCoupling S/4HANA with Enterprise Blockchain and SAP BTP - Ultimate Cyber Security 🚀 in Technology Blogs by Members
- Establish SFTP Connection using Public Key Authentication - Key Pair in Technology Q&A
- Risk Based Authentication in SAP CIS in Technology Q&A
Top kudoed authors
| User | Count |
|---|---|
| 14 | |
| 11 | |
| 11 | |
| 10 | |
| 10 | |
| 8 | |
| 8 | |
| 7 | |
| 7 | |
| 7 |