
- SAP Community
- Products and Technology
- Technology
- Technology Blogs by SAP
- Fundamentals of Security in BTP: Implement Authent...
Technology Blogs by SAP
Learn how to extend and personalize SAP applications. Follow the SAP technology blog for insights into SAP BTP, ABAP, SAP Analytics Cloud, SAP HANA, and more.
Turn on suggestions
Auto-suggest helps you quickly narrow down your search results by suggesting possible matches as you type.
Showing results for
Product and Topic Expert
Options
- Subscribe to RSS Feed
- Mark as New
- Mark as Read
- Bookmark
- Subscribe
- Printer Friendly Page
- Report Inappropriate Content
07-08-2022
12:26 PM
This blog series is mainly targeted for developers and administrators. If you are someone who has gone through the plethora of tutorials, documentation, and presentations on security topics in SAP BTP and still lacks the confidence to implement security for your application, you have come to the right place.
In this blog series, you will learn:
For ease of reading, I have split this in multiple blogs, which are:
Note: If you are new to SAP BTP and looking for a simple explanation of what it is and what problem it solves, see Explaining SAP Business Technology Platform (SAP BTP) to a Beginner
So far, we have learnt about the core concepts of security. Now, let’s get our hands dirty by implementing the authentication and authorization.
Note: Although, you can use any other IDE or command line interface to develop and deploy the Node.js app, we will recommend you use SAP Business Application Studio.
If you are new to SAP Business Application Studio, you may go through this tutorial to learn how to use it.
I have saved a simple Node.js hello world application in GitHub. Follow below steps to deploy it to Cloud Foundry environment of BTP.
start.js file - has basic hello world code
manifest.yml file - has runtime configurations
Execute the command cf push to deploy to your cloud foundry space and try to access the app.
You just deployed a Hello World Node.js application to BTP. You should be able to access the application without any authentication required.
Now, let's modify this Node.js application, so that only authenticated users will be able to access it.
Let’s quickly recap what we learnt in previous blogs.
To implement authentication, all we need to do is:
To make it simple, I have saved completed project in GitHub. Let's clone that by running below commands:
Now, let’s check authentication specific implementation.
Remember - technically, Application Router is a Node.js App, available in public in NPM.
To add an App Router in our application, all we need to do is:
Check the cloned project and look into these 2 files.
package.json
xs-app.json
App Router’s configuration is defined in the file called xs-app.json. In this example, we are keeping it simple by just adding a route. The route says - If the response URL pattern matches the given regex expression, forward it to a destination (here myapp).
The destination (myapp) and App Router (approuter1) is specified in manifest.yml file as shown below.
Note: In later blogs, we will look into xs-app.json file in detail.
Before creating an instance of XSUAA, you need an important file called xs-security.json.
Check the file called xs-security.json in the cloned project.
xs-security.json is the file which defines the details of the authentication methods and authorization types to use for access to your application.
The xs-security.json file uses JSON notation to define the security options for an application. The information in this file is used at application-deployment time, for example, to create required roles for your application.
In this example, we are making it extremely simple, by just specifying xsappname and tenant-mode.
There are different ways to create an instance of XSUAA. Major options are:
To make sure we understand what’s happening behind the scenes, let’s use command approach. Executing below command to create the XSUAA instance.
Here nodeuaa is the XSUAA instance name.
We can specify the binding of XSUAA instance with application and app router in manifest.yml file as shown below.
You can check the XSUAA instance and binding status in BTP cockpit as shown below.
Finally, we need to make sure that application entertain only authenticated request containing a valid JWT token. In Node.js we can do that by using passport module.
That’s it. We have implemented the authentication in our Node.js application.
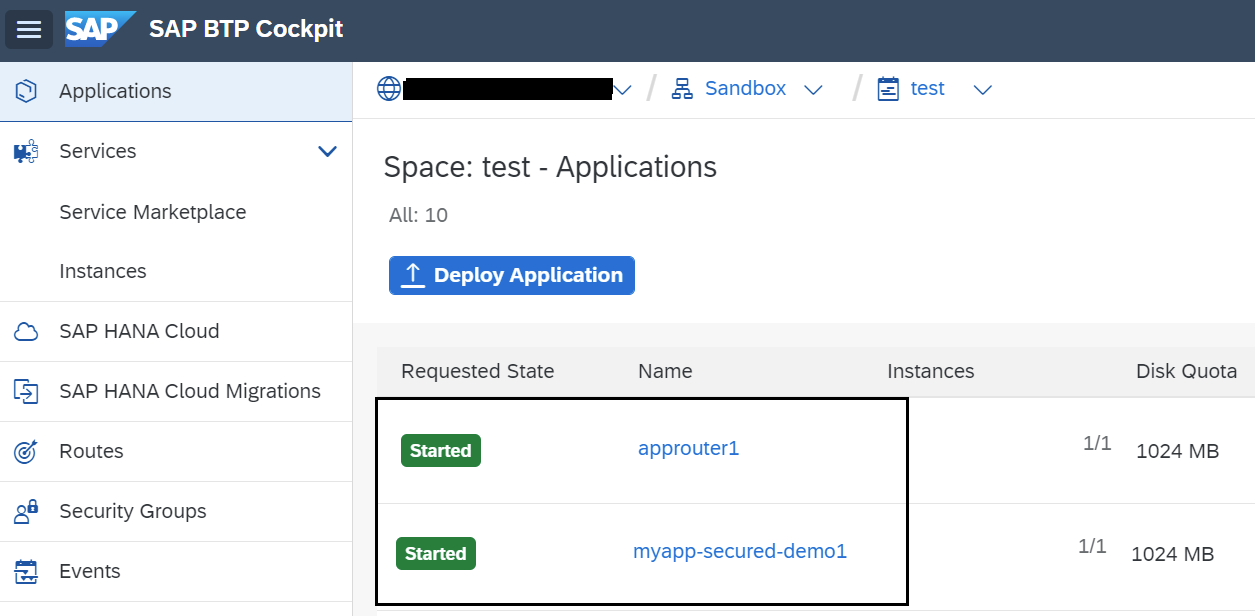
Execute cf push command to deploy the application. It will deploy both app router and application. You can check them in the BTP cockpit.
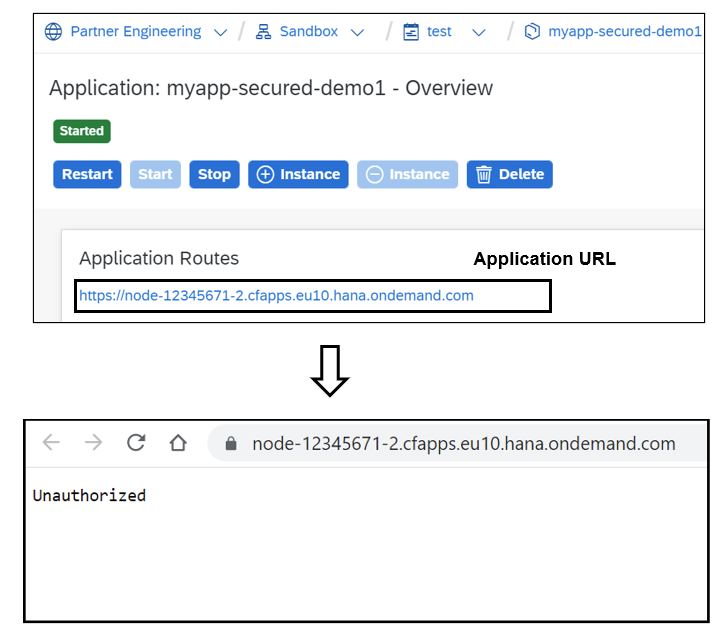
Try to access the application (“myapp-secured-demo1”) directly. It would give “Unauthorized” error.
Now, try to access the application via app router, it will first redirect to Identity Provider and once authenticated (either using username/password or certificate-based login), it redirects to application. Below image shows the call flow if SAP ID Service is used as Identity Provider.
Let’s move to authorization. Before doing the hands-on, let’s first understand few important points about XSUAA and user-role assignment.
A quick recap:
A typical xs-security.json file has 3 design time artifacts:
Here is a sample xs-security.json file.
Scopes are functional authorizations that are assigned to users by means of security roles.
These scopes can be used for functional authorization checks. For example, in the application, we may check the scope using checkScope() function as shown below.
We can use attributes to perform more granular level checks. For example, a manager may have authorization to update employee data but only for a specific country.
In xs-security.json file we create the attribute (say country) and value of the country is assigned at runtime.
A role template combines the scopes and attributes. It is the description of roles (for example, “manager” or “employee”) to apply to a user.
When we create an XSUAA instance, it generates a runtime artifact called Role.
Role is created based on Role Template at runtime. You can check the generated artefacts in the BTP Cockpit as shown below.
In BTP, there is something called Role Collection which helps to bind the Roles to Users.
Role Collections contain one or more roles. Further role collections are assigned to users by administrator.
The above image shows:
Below image shows the tasks/responsibilities of developer and administrator in this context.
Now, let’s implement authorization to the same Node.js app and add some role-based features.
We will:
To make it simple, I have saved completed project in GitHub. Let’s clone that by running below commands:
Now, let’s check authorization specific implementation.
We have added:
in xs-security.json file
In start.js file, notice the use of checkScope() function to implement role based feature. User can get the data only if he has “Display” scope. Similarly, user can edit the data only if he has “Update” scope.
Note that we have a static resource approuter -> resources -> index.html. There is no authorization required (no roles required) to access this file.
As we learned before, run below command to create XSUAA instance.
cf create-service xsuaa application nodeuaa2 -c xs-security.json
Note, that XSUAA instance name is nodeuaa2, the same is bound to application in manifest.yml file.
Next, execute cf push to deploy the app.
Open BTP Cockpit and go to Subaccount --> Role Collections --> Create and create a role collection called Manager.
Select the role collection and add Manager and Viewer roles from your application. Also add your user (or any user you want to give access) to it.
Similarly, you may create another Role Collection called Viewer and only assign Viewer role to it.
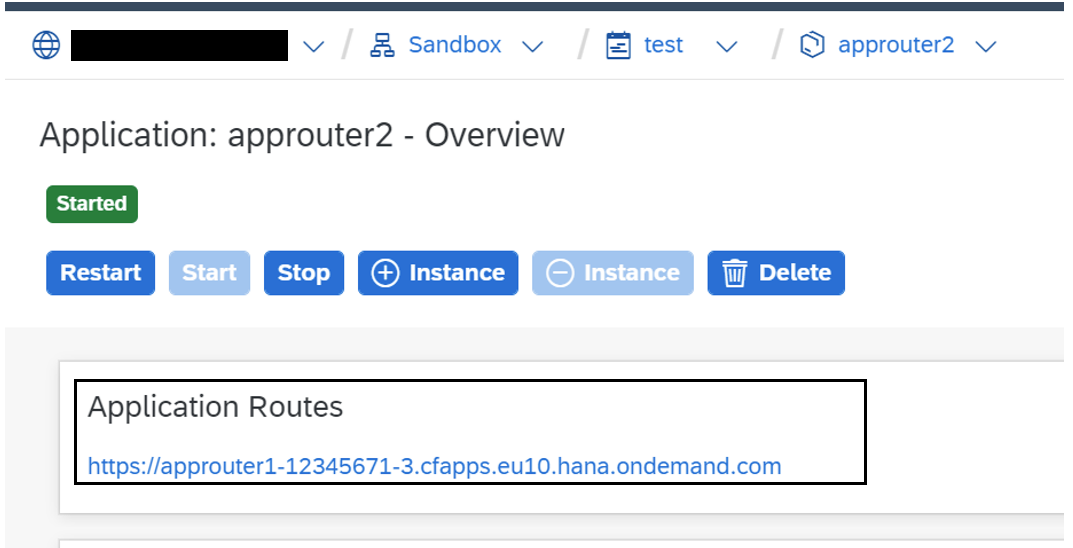
Now, try to access the application via App Router. You can get the App Router URL from cockpit as shown below.
You can access the static resource. But if you click on “Show users”, you will get Forbidden error message.
You can access the static resource as well as see the user data.
However, if you try to add a new user, you get forbidden error message.
You can access the static resource as well as see the user data. You can also add a new user.
I hope now you got overall idea on how authentication and authorization works.
In this blog series, you will learn:
- How to protect an app in SAP BTP, Cloud Foundry environment from unauthorized access
- How to implement role-based features
- How SAP Identity Provider and Single-sign-on works
For ease of reading, I have split this in multiple blogs, which are:
- Fundamentals of Security in BTP: Introduction
- Fundamentals of Security in BTP: What is OAuth? (optional)
- Fundamentals of Security in BTP: Implement Authentication and Authorization in a Node.js App [current blog]
- Run Node.js Applications with Authentication Locally
Note: If you are new to SAP BTP and looking for a simple explanation of what it is and what problem it solves, see Explaining SAP Business Technology Platform (SAP BTP) to a Beginner
What are we going to learn in this blog?
So far, we have learnt about the core concepts of security. Now, let’s get our hands dirty by implementing the authentication and authorization.
- We will first deploy an unsecured Node.js Hello World in BTP, Cloud Foundry
- Then we will implement authentication in the application
- Finally, we will add role based features for authorization

Note: Although, you can use any other IDE or command line interface to develop and deploy the Node.js app, we will recommend you use SAP Business Application Studio.
If you are new to SAP Business Application Studio, you may go through this tutorial to learn how to use it.
Let’s first deploy an unsecured Node.js App
I have saved a simple Node.js hello world application in GitHub. Follow below steps to deploy it to Cloud Foundry environment of BTP.
- Open Business Application Studio. Go to Terminal -> New Terminal and run below command.
git init

git clone https://github.com/rajagupta20/unsecured-nodejs-app.git
- Click on Open Folder and select the application folder (unsecured-nodejs-app). Check below files.
start.js file - has basic hello world code

manifest.yml file - has runtime configurations
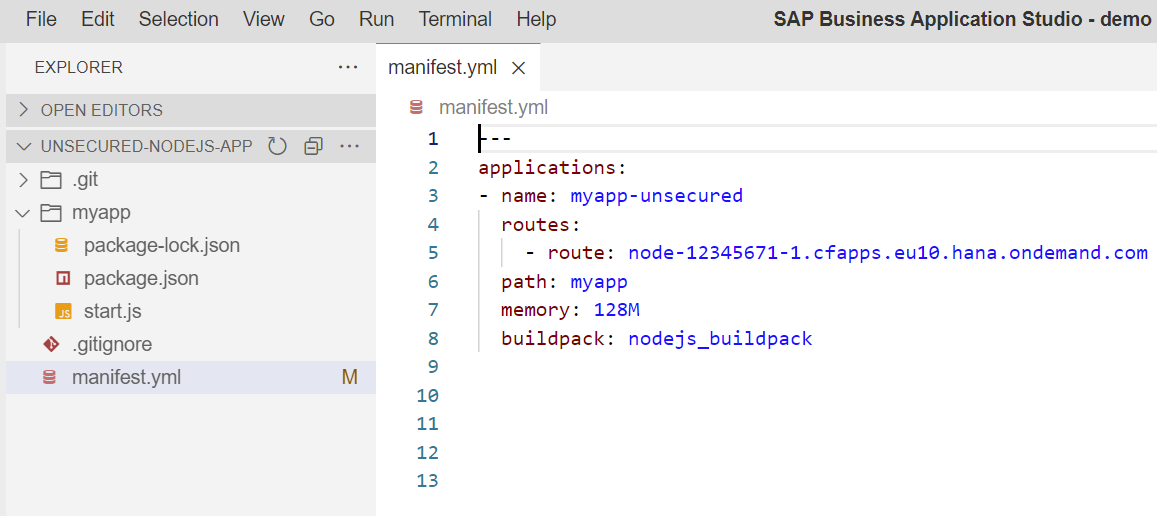
Execute the command cf push to deploy to your cloud foundry space and try to access the app.
Result
You just deployed a Hello World Node.js application to BTP. You should be able to access the application without any authentication required.
Let’s implement authentication to the Node.js App
Now, let's modify this Node.js application, so that only authenticated users will be able to access it.
Let’s quickly recap what we learnt in previous blogs.

- A business user wants to access your application.
- The single point of entry is the application router.
- The application router sends the request to XSUAA.
- The XSUAA further forwards the request to Identity Provider, which takes care of authentication.
To implement authentication, all we need to do is:
- Implement App Router
- Create an instance of XSUAA service
- Bind the application and App Router with XSUAA instance
- Modify the application to make sure it only accepts request contains a JWT token
To make it simple, I have saved completed project in GitHub. Let's clone that by running below commands:
  git init


  git clone https://github.com/rajagupta20/secured-nodejs-app-demo1.git
Now, let’s check authentication specific implementation.
1. Implement App Router
Remember - technically, Application Router is a Node.js App, available in public in NPM.
To add an App Router in our application, all we need to do is:
- Create a folder (say approuter)
- Create a package.json file inside the folder
- In package.json file - add the dependency for Approuter and configure its start point
- Create another file called xs-app.json inside approuter folder to configure the App Router
Check the cloned project and look into these 2 files.
package.json

xs-app.json

xs-app.json (Routing Configuration File)
App Router’s configuration is defined in the file called xs-app.json. In this example, we are keeping it simple by just adding a route. The route says - If the response URL pattern matches the given regex expression, forward it to a destination (here myapp).
The destination (myapp) and App Router (approuter1) is specified in manifest.yml file as shown below.

Note: In later blogs, we will look into xs-app.json file in detail.
2. Create an instance of XSUAA service
Before creating an instance of XSUAA, you need an important file called xs-security.json.
xs-security.json (Application Security Descriptor)
Check the file called xs-security.json in the cloned project.
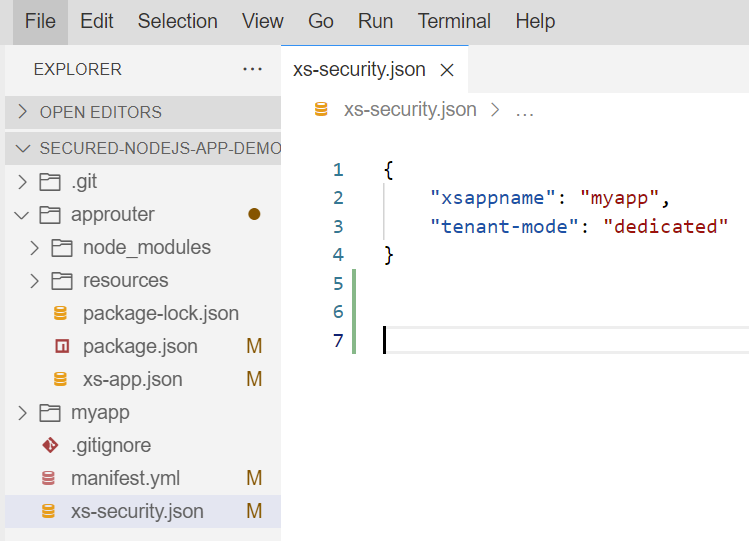
xs-security.json is the file which defines the details of the authentication methods and authorization types to use for access to your application.
The xs-security.json file uses JSON notation to define the security options for an application. The information in this file is used at application-deployment time, for example, to create required roles for your application.
In this example, we are making it extremely simple, by just specifying xsappname and tenant-mode.
- xsappname property specifies the name of the application that the security description applies to.
- tenant-mode can be “dedicated” for single-tenant application and “shared” for multitenant application
Create instance of XSUAA using xs-security.json file
There are different ways to create an instance of XSUAA. Major options are:
- Go to BTP Cockpit -> Subaccount -> Space -> Instance -> Create as shown below
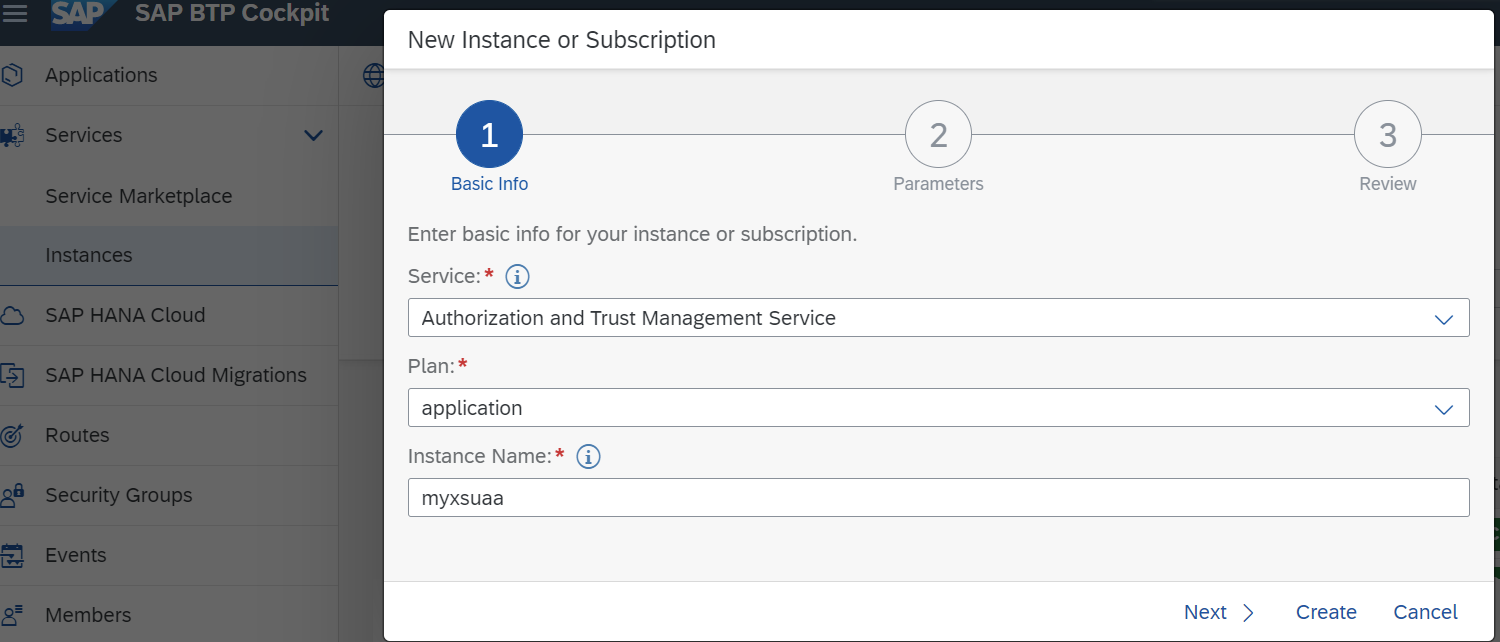
- Use command line tool. Execute below command
cf create-service xsuaa application <service_instance_name> -c xs-security.json- In case of Multitarget Applications (MTA), use configurations specified in yml file, which automatically creates XSUAA instances and bind it with applications. This is the most preferred way, and we will look into it later.
To make sure we understand what’s happening behind the scenes, let’s use command approach. Executing below command to create the XSUAA instance.
cf create-service xsuaa application nodeuaa -c xs-security.jsonHere nodeuaa is the XSUAA instance name.
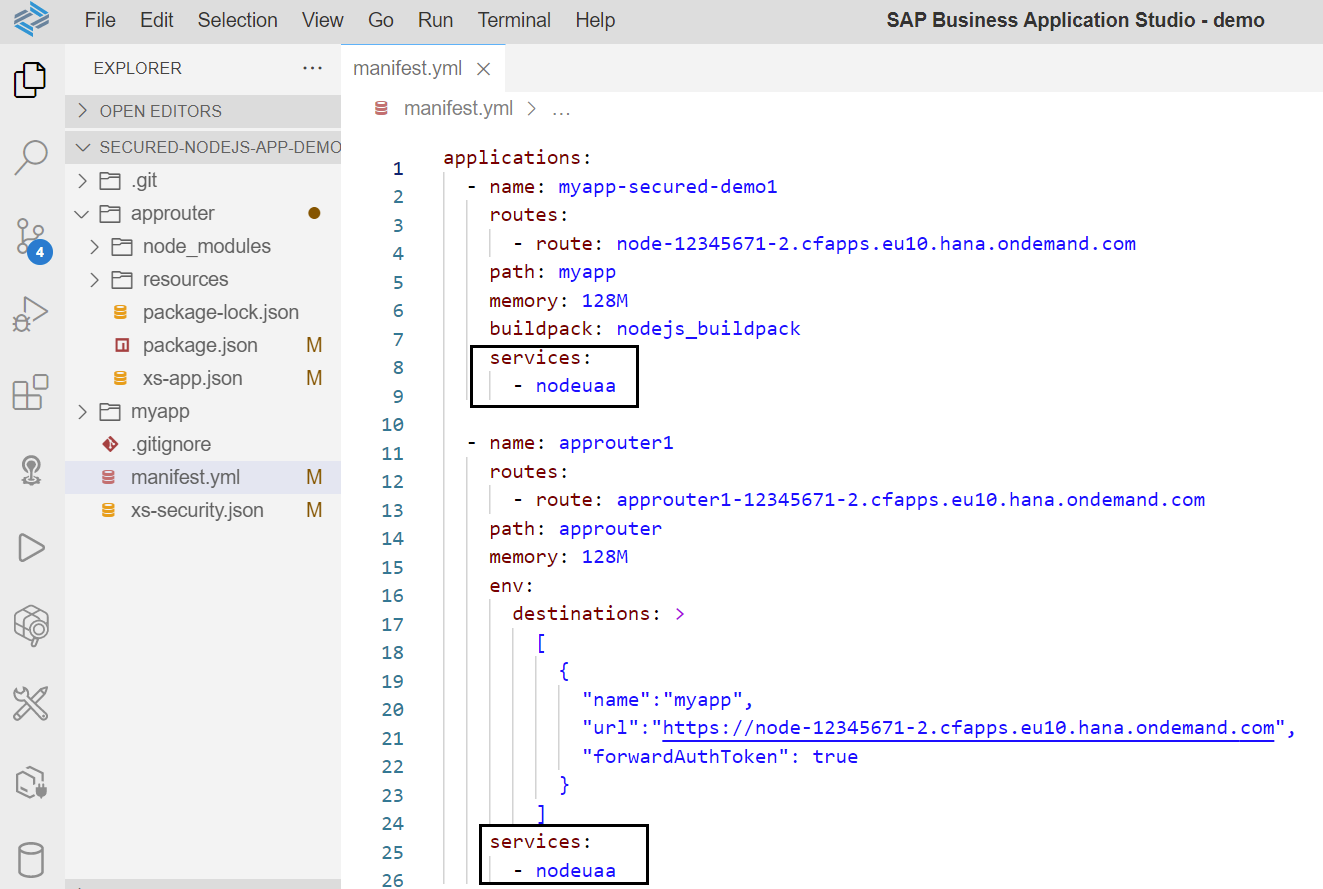
3. Bind the XSUAA instance with application and App Router
We can specify the binding of XSUAA instance with application and app router in manifest.yml file as shown below.
You can check the XSUAA instance and binding status in BTP cockpit as shown below.
4. Modify the application to make sure it only accepts request contains a JWT token
Finally, we need to make sure that application entertain only authenticated request containing a valid JWT token. In Node.js we can do that by using passport module.

That’s it. We have implemented the authentication in our Node.js application.
Execute cf push command to deploy the application. It will deploy both app router and application. You can check them in the BTP cockpit.
Test the Application
Try to access the application (“myapp-secured-demo1”) directly. It would give “Unauthorized” error.
Now, try to access the application via app router, it will first redirect to Identity Provider and once authenticated (either using username/password or certificate-based login), it redirects to application. Below image shows the call flow if SAP ID Service is used as Identity Provider.

How Authorization works in SAP BTP, Cloud Foundry
Let’s move to authorization. Before doing the hands-on, let’s first understand few important points about XSUAA and user-role assignment.
XSUAA Design Time and Runtime Artifacts
A quick recap:
- xs-security.json file is used to create an instance of XSUAA
- When XSUAA instance is being created, it generates few runtime artifacts
A typical xs-security.json file has 3 design time artifacts:
- Scope
- Attribute
- Role-Collection

Here is a sample xs-security.json file.
{

    "xsappname": "myapp2",

    "tenant-mode": "dedicated",

    "scopes": [

        {

            "name": "$XSAPPNAME.Display",

            "description": "Display Users"

        },

        {

            "name": "$XSAPPNAME.Update",

            "description": "Update Users"

        }

    ],

    "role-templates": [

        {

            "name": "Viewer",

            "description": "View Users",

            "scope-references": [

                "$XSAPPNAME.Display"

            ]

        },

        {

            "name": "Manager",

            "description": "Maintain Users",

            "scope-references": [

                "$XSAPPNAME.Display",

                "$XSAPPNAME.Update"

            ]

        }

    ]

}
Scope
Scopes are functional authorizations that are assigned to users by means of security roles.
These scopes can be used for functional authorization checks. For example, in the application, we may check the scope using checkScope() function as shown below.
app.get('/users', function (req, res) {

    var isAuthorized =

            req.authInfo.checkScope('$XSAPPNAME.Display');

    if (isAuthorized) {

        res.status(200).json(users);

    } else {

        res.status(403).send('Forbidden');

    }

});
Attribute
We can use attributes to perform more granular level checks. For example, a manager may have authorization to update employee data but only for a specific country.
In xs-security.json file we create the attribute (say country) and value of the country is assigned at runtime.
Role Templates
A role template combines the scopes and attributes. It is the description of roles (for example, “manager” or “employee”) to apply to a user.
When we create an XSUAA instance, it generates a runtime artifact called Role.

Role
Role is created based on Role Template at runtime. You can check the generated artefacts in the BTP Cockpit as shown below.

Assignment of Roles and Role Collection to Users
In BTP, there is something called Role Collection which helps to bind the Roles to Users.
Role Collection
Role Collections contain one or more roles. Further role collections are assigned to users by administrator.
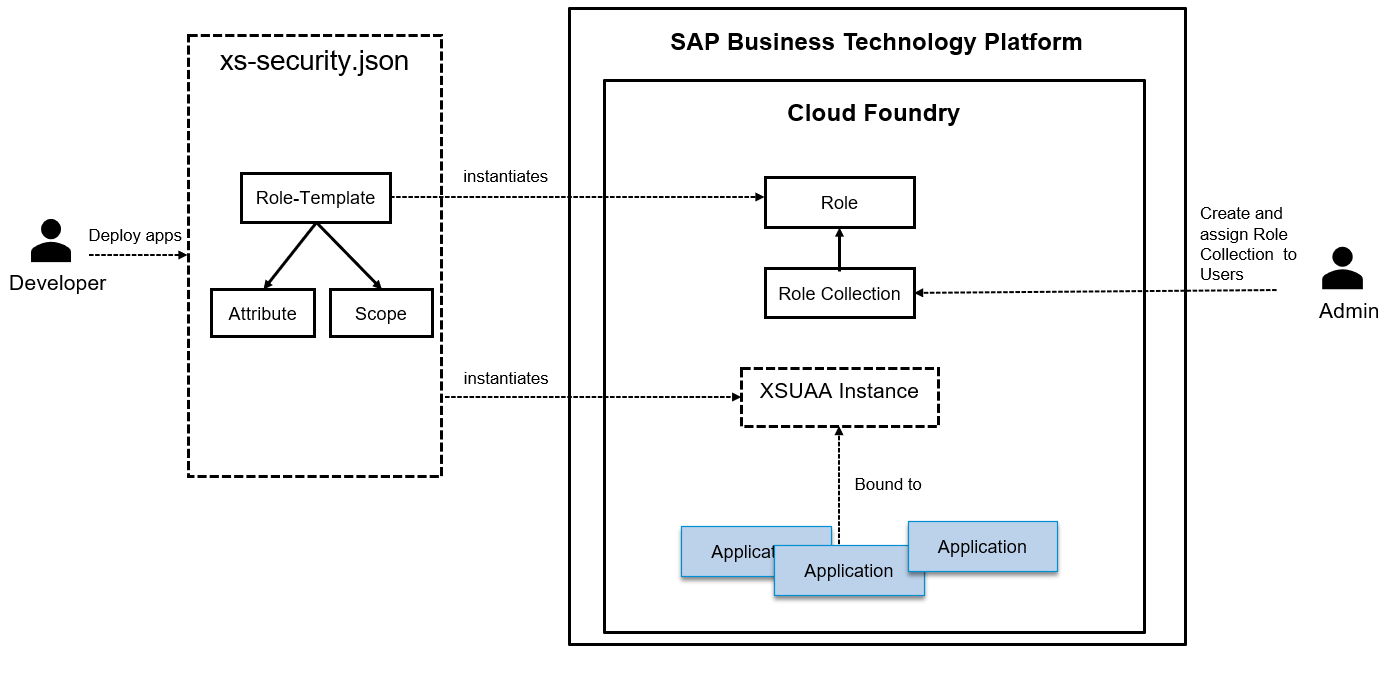
The above image shows:
- the design time (Role Template, Attribute & Scope) and run time artifacts (Role) of XSUAA. Role
- Roles are combined in Role Collection
- Role Collections is assigned to users
- XSUAA instance is also bound to the application
Below image shows the tasks/responsibilities of developer and administrator in this context.

Implement authorization in the Node.js application
Now, let’s implement authorization to the same Node.js app and add some role-based features.
We will:
- Add 2 roles in the application – Manager and Viewer
- Implement that –
- A user having Viewer role can only view the records
- But a user having Manager role can insert/delete the records.
To make it simple, I have saved completed project in GitHub. Let’s clone that by running below commands:
git init


git clone https://github.com/rajagupta20/secured-nodejs-app-demo2.git
Now, let’s check authorization specific implementation.
1. Add Scope and Role Collection in xs-security.json file
We have added:
- 2 Scopes - Display and Update
- 2 Role Templates – Viewer and Manager
in xs-security.json file
{

    "xsappname": "myapp2",

    "tenant-mode": "dedicated",

    "scopes": [

        {

            "name": "$XSAPPNAME.Display",

            "description": "Display Users"

        },

        {

            "name": "$XSAPPNAME.Update",

            "description": "Update Users"

        }

    ],

    "role-templates": [

        {

            "name": "Viewer",

            "description": "View Users",

            "scope-references": [

                "$XSAPPNAME.Display"

            ]

        },

        {

            "name": "Manager",

            "description": "Maintain Users",

            "scope-references": [

                "$XSAPPNAME.Display",

                "$XSAPPNAME.Update"

            ]

        }

    ]

}
2. Implement role based features using Scope
In start.js file, notice the use of checkScope() function to implement role based feature. User can get the data only if he has “Display” scope. Similarly, user can edit the data only if he has “Update” scope.
const express = require('express');

const passport = require('passport');

const bodyParser = require('body-parser');

const xsenv = require('@sap/xsenv');

const JWTStrategy = require('@sap/xssec').JWTStrategy;


const users = require('./users.json');

const app = express();


const services = xsenv.getServices(

                            { uaa: 'nodeuaa2' }

                            );

passport.use(new JWTStrategy(services.uaa));


app.use(bodyParser.json());

app.use(passport.initialize());

app.use(passport.authenticate('JWT', { session: false }));


app.get('/users', function (req, res) {

    var isAuthorized =

            req.authInfo.checkScope('$XSAPPNAME.Display');

    if (isAuthorized) {

        res.status(200).json(users);

    } else {

        res.status(403).send('Forbidden');

    }

});


app.post('/users', function (req, res) {

    const isAuthorized = req.authInfo.checkScope('$XSAPPNAME.Update');

    if (!isAuthorized) {

        res.status(403).json('Forbidden');

        return;

    }


    var newUser = req.body;

    newUser.id = users.length;

    users.push(newUser);


    res.status(201).json(newUser);

});


const port = process.env.PORT || 4000;

app.listen(port, function () {

    console.log('myapp listening on port ' + port);

});
Note that we have a static resource approuter -> resources -> index.html. There is no authorization required (no roles required) to access this file.
3. Create XSUAA instance and deploy the app
As we learned before, run below command to create XSUAA instance.
cf create-service xsuaa application nodeuaa2 -c xs-security.json
Note, that XSUAA instance name is nodeuaa2, the same is bound to application in manifest.yml file.
---

applications:

  - name: myapp-secured-demo2

    routes:

      - route: node-12345671-3.cfapps.eu10.hana.ondemand.com

    path: myapp

    memory: 128M

    buildpack: nodejs_buildpack

    services:

      - nodeuaa2


  - name: approuter2

    routes:

      - route: approuter1-12345671-3.cfapps.eu10.hana.ondemand.com

    path: approuter

    memory: 128M

    env:

      destinations: >

        [

          {

            "name":"myapp",

            "url":"https://node-12345671-3.cfapps.eu10.hana.ondemand.com",

            "forwardAuthToken": true

          }

        ]

    services:

      - nodeuaa2
Next, execute cf push to deploy the app.
4. Create Role Collection and assign to user
Open BTP Cockpit and go to Subaccount --> Role Collections --> Create and create a role collection called Manager.
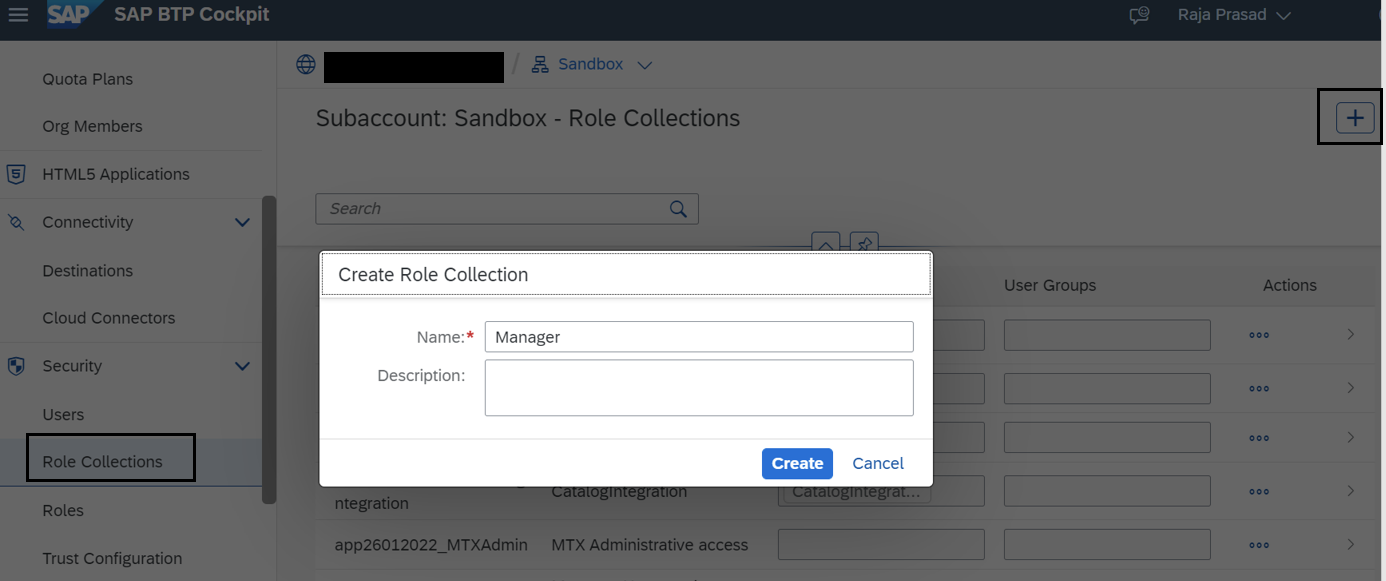
Select the role collection and add Manager and Viewer roles from your application. Also add your user (or any user you want to give access) to it.

Similarly, you may create another Role Collection called Viewer and only assign Viewer role to it.
Test the Application
Now, try to access the application via App Router. You can get the App Router URL from cockpit as shown below.
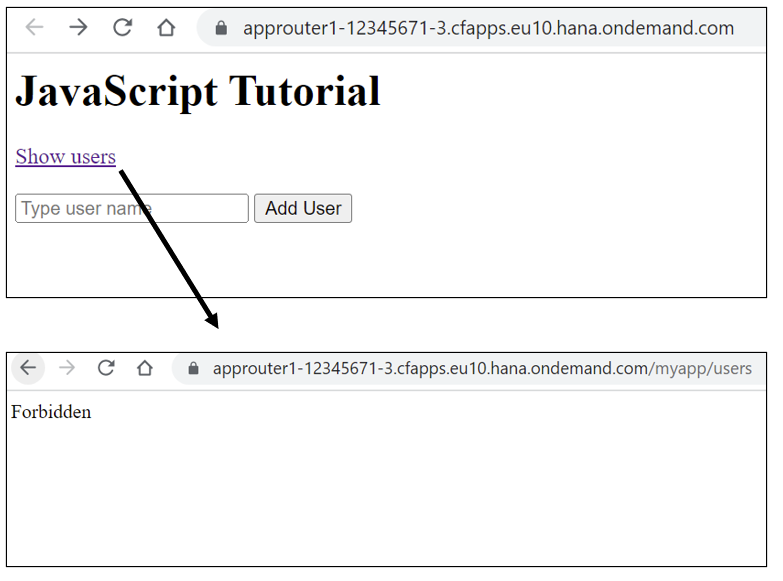
Scenario 1 – User does not have Manager or Viewer role collection assigned
You can access the static resource. But if you click on “Show users”, you will get Forbidden error message.
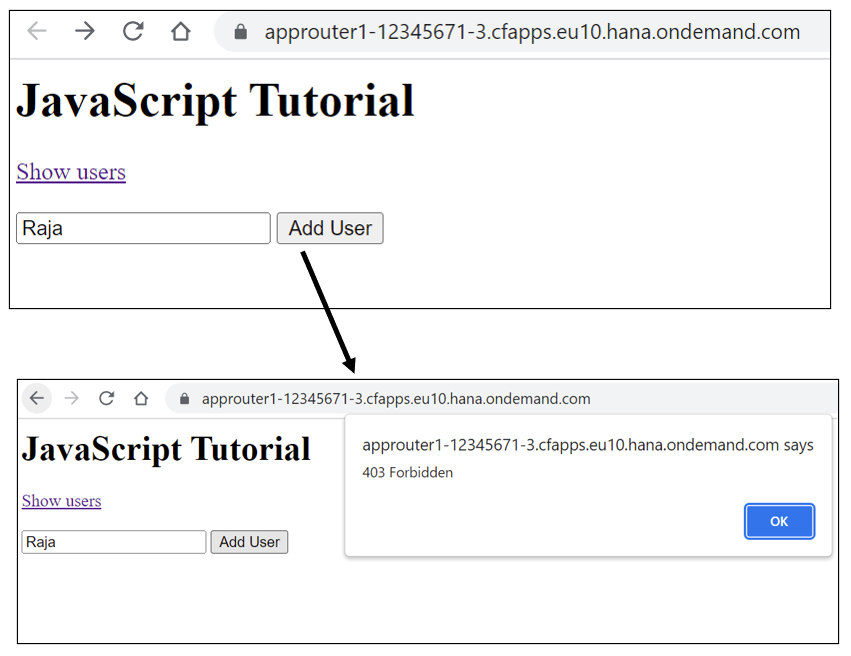
Scenario 2 – User has only Viewer role collection assigned
You can access the static resource as well as see the user data.

However, if you try to add a new user, you get forbidden error message.
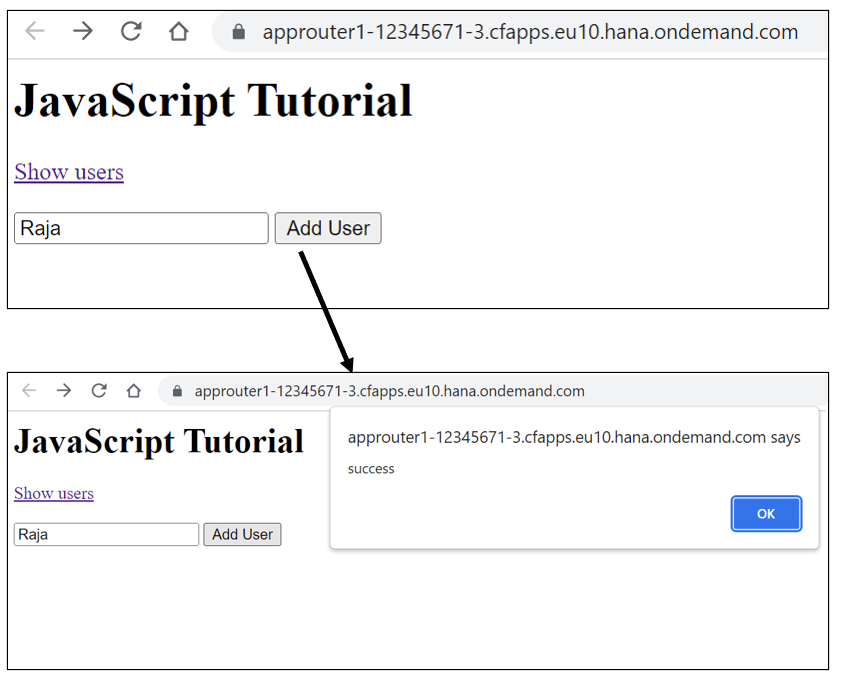
Scenario 3 – User has Manager role collection assigned
You can access the static resource as well as see the user data. You can also add a new user.
I hope now you got overall idea on how authentication and authorization works.
If you have any queries, let me know in comment or get in touch with me at LinkedIn!
Labels:
23 Comments
You must be a registered user to add a comment. If you've already registered, sign in. Otherwise, register and sign in.
Labels in this area
-
ABAP CDS Views - CDC (Change Data Capture)
2 -
AI
1 -
Analyze Workload Data
1 -
BTP
1 -
Business and IT Integration
2 -
Business application stu
1 -
Business Technology Platform
1 -
Business Trends
1,658 -
Business Trends
94 -
CAP
1 -
cf
1 -
Cloud Foundry
1 -
Confluent
1 -
Customer COE Basics and Fundamentals
1 -
Customer COE Latest and Greatest
3 -
Customer Data Browser app
1 -
Data Analysis Tool
1 -
data migration
1 -
data transfer
1 -
Datasphere
2 -
Event Information
1,400 -
Event Information
67 -
Expert
1 -
Expert Insights
177 -
Expert Insights
306 -
General
1 -
Google cloud
1 -
Google Next'24
1 -
GraphQL
1 -
Kafka
1 -
Life at SAP
780 -
Life at SAP
13 -
Migrate your Data App
1 -
MTA
1 -
Network Performance Analysis
1 -
NodeJS
1 -
PDF
1 -
POC
1 -
Product Updates
4,576 -
Product Updates
348 -
Replication Flow
1 -
REST API
1 -
RisewithSAP
1 -
SAP BTP
1 -
SAP BTP Cloud Foundry
1 -
SAP Cloud ALM
1 -
SAP Cloud Application Programming Model
1 -
SAP Datasphere
2 -
SAP S4HANA Cloud
1 -
SAP S4HANA Migration Cockpit
1 -
Technology Updates
6,873 -
Technology Updates
434 -
Workload Fluctuations
1
Related Content
- SAP Cloud ALM and Identity Authentication Service (IAS) in Technology Blogs by SAP
- Consuming SAP with SAP Build Apps - Mobile Apps for iOS and Android in Technology Blogs by SAP
- Onboarding Users in SAP Quality Issue Resolution in Technology Blogs by SAP
- Real time access management with SAP BTP Kyma serverless workloads in Technology Blogs by SAP
- Configure Custom SAP IAS tenant with SAP BTP Kyma runtime environment in Technology Blogs by SAP
Top kudoed authors
| User | Count |
|---|---|
| 24 | |
| 19 | |
| 12 | |
| 11 | |
| 10 | |
| 9 | |
| 9 | |
| 8 | |
| 7 | |
| 7 |