
- SAP Community
- Products and Technology
- Technology
- Technology Blogs by SAP
- How to create Variables and Give Them Meaning in S...
Technology Blogs by SAP
Learn how to extend and personalize SAP applications. Follow the SAP technology blog for insights into SAP BTP, ABAP, SAP Analytics Cloud, SAP HANA, and more.
Turn on suggestions
Auto-suggest helps you quickly narrow down your search results by suggesting possible matches as you type.
Showing results for
former_member80
Participant
Options
- Subscribe to RSS Feed
- Mark as New
- Mark as Read
- Bookmark
- Subscribe
- Printer Friendly Page
- Report Inappropriate Content
06-21-2022
1:30 PM
Welcome back to this blog series on becoming as effective Citizen Developer with SAP Build Apps! In the previous blog, we discussed what variables are and the different types of variables that you can make use of within SAP Build Apps. In this blog I will explain how to create variables in SAP Build Apps and how to assign meaning to these variables.
To create a variable in Build Apps set the toggle in the top right to the variable view:

Navigate to which variable you would like to create and at the bottom right, click on “Add Variable”:

Now, give your variable an appropriate name in the right hand panel. This can be anything you see as relevant for the purpose of the variable:

But, ensure that you select the correct variable type In the drop down under “Variable value type”. The variable type will define the structure of the data that your variable will hold. The type will determine what actions can be performed with the data. For example: if you wish to perform calculations with this data, it wouldn’t make sense for it to be structured as text, but rather a Number. Similarly, we can create a variable of type “Email Address” to associate with a specific user. This way we can even verify that the value inputted is indeed an email address and ensure data integrity.
For now, we can keep the variable type as “Any value”, at the bottom of the list. We will discuss validating email addresses in the next blog on conditional logic.

Now that we have created, or in programming terms, instantiated a variable, we need to assign it, in other words: we have to assign a specific data value to it in order to give it meaning. But let’s see an example: in the steps above, we created a variable called “User” of type “Any type”. We will assign an email address as the value to identify a specific user. But what is the actual email address that this variable will hold and how do we define this?
There are various ways to do this in Build Apps, but we will look at a common example which will build on the variable we have created above. In the image below, I have added the following components to the user interface:
- An input field
- A button
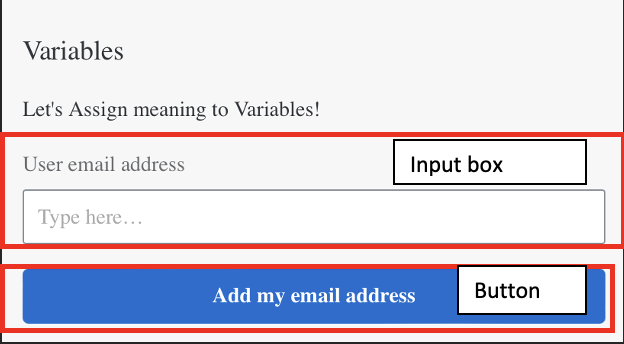
In the input field, the user will enter their email address. When the button is clicked, we want the assign this email address to the value of the user variable that we created.
- Select the button and click on the upward facing arrow in the bottom panel next to “Show logic for Button”:

This will bring up a panel where you can define what will happen when the button is clicked.
- In the left panel of the logic box, you will see various components you can make use of to build the logic of your functions. Scroll down in this panel until you see the “Variables” section:

Here we have 3 distinct options:
- Set app variable
- Set page variable
- Set data variable
For now, we will only work with setting app variables. However, we will make use of setting data and page variables in the coming blogs.
Now, let’s build the logic flow to assign meaning to our user variable!
- Click on the “Set app variable” component and drag it onto the logic box. Then click on the node of the “Component tap” event and connect it to the “Set app variable” component.

So far, we have created logic to set some app variable to some value when the button is clicked. Now, we will specify which variable we will assign and what the assignment value will be.
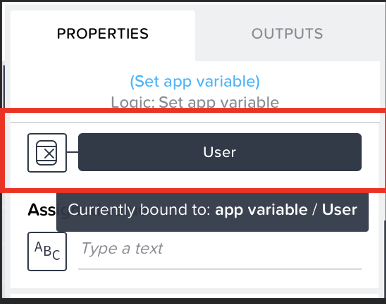
- In the logic box, click on the “Set app variable” component. In the right side panel you can select the app variable who’s value you would like to set in the dropdown.
Now that we know which app variable we want to set, we need to specify what value we want to set it to.
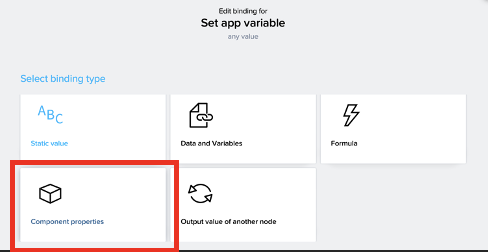
- In the logic box, click on the “Set app variable” component. In the right side panel you can select what value you would like to assign to the variable by clicking on the icon under “Assigned value”:

We want to bind the value of the variable to the value of the input. For this, select “Component properties” as the binding type:
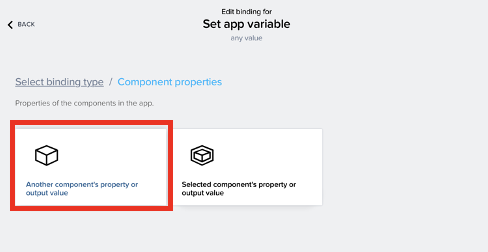
Since we are currently working on the button component, we will find the input field value under “Another component’s property or output value”:
Now we select the component who’s property we want the value of. In other words, since we want the value of Input field 1, we will select it and drill down to the value that is inputted:


Be sure to save this!
Now we have successfully set the value of the App Variable! We can test this by adding a toast to check the value of the variable.
In the left hand side panel of the button’s logic box, find the “Toast” component. This is basically a pop-up message in your application:

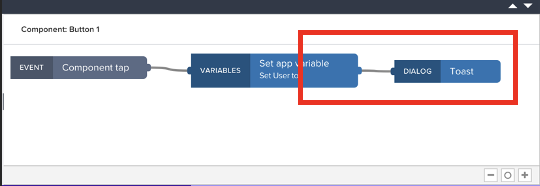
Now, add the toast to your logic flow. This means that once the variable has been set, the toast message will pop up:
Select the toast component and in the “Properties” tab on the right hand side panel, we can add the value we want to display in the toast message:

Now, we want to bind the toast to the value of a variable, so select “Data and Variables”:

Since the variable we are looking at is an app variable, select “App variable” and then the user variable that we created and make sure you save this:


Now, launch the application and enter an email address and when you click the button you will see the toast appear at the bottom of the screen. This toast will contain the value that has been passed to the user variable: your email address!

A variable is one of the most powerful programming concepts, but they don't mean anything in your application until you assign them. Now that we understand how to create variables and assign meaning to them, we will take start to understand what conditional logic is and how it works in the next blog.
Remember to share your feedback and experiences with creating variables in the comments!
- SAP Managed Tags:
- SAP Build Apps,
- SAP Build,
- SAP Business Technology Platform
Labels:
2 Comments
You must be a registered user to add a comment. If you've already registered, sign in. Otherwise, register and sign in.
Labels in this area
-
ABAP CDS Views - CDC (Change Data Capture)
2 -
AI
1 -
Analyze Workload Data
1 -
BTP
1 -
Business and IT Integration
2 -
Business application stu
1 -
Business Technology Platform
1 -
Business Trends
1,658 -
Business Trends
112 -
CAP
1 -
cf
1 -
Cloud Foundry
1 -
Confluent
1 -
Customer COE Basics and Fundamentals
1 -
Customer COE Latest and Greatest
3 -
Customer Data Browser app
1 -
Data Analysis Tool
1 -
data migration
1 -
data transfer
1 -
Datasphere
2 -
Event Information
1,400 -
Event Information
74 -
Expert
1 -
Expert Insights
177 -
Expert Insights
348 -
General
1 -
Google cloud
1 -
Google Next'24
1 -
GraphQL
1 -
Kafka
1 -
Life at SAP
780 -
Life at SAP
14 -
Migrate your Data App
1 -
MTA
1 -
Network Performance Analysis
1 -
NodeJS
1 -
PDF
1 -
POC
1 -
Product Updates
4,575 -
Product Updates
392 -
Replication Flow
1 -
REST API
1 -
RisewithSAP
1 -
SAP BTP
1 -
SAP BTP Cloud Foundry
1 -
SAP Cloud ALM
1 -
SAP Cloud Application Programming Model
1 -
SAP Datasphere
2 -
SAP S4HANA Cloud
1 -
SAP S4HANA Migration Cockpit
1 -
Technology Updates
6,871 -
Technology Updates
484 -
Workload Fluctuations
1
Related Content
- Using Postgresql Database in Cloud Application Programming model in Technology Blogs by Members
- IoT: RFID integration with SAP HANA Cloud via SAP BTP in Technology Blogs by Members
- Configuration as code (CaC) with destinations. in Technology Blogs by SAP
- First steps to work with SAP Cloud ALM Deployment scenario for SAP ABAP systems (7.40 or higher) in Technology Blogs by SAP
- Tracking HANA Machine Learning experiments with MLflow: A technical Deep Dive in Technology Blogs by SAP
Top kudoed authors
| User | Count |
|---|---|
| 14 | |
| 11 | |
| 11 | |
| 10 | |
| 9 | |
| 8 | |
| 8 | |
| 8 | |
| 7 | |
| 7 |