
- SAP Community
- Products and Technology
- Technology
- Technology Blogs by SAP
- RaspberryPi on SAP HCP - IoT blog series part 6.1:...
Technology Blogs by SAP
Learn how to extend and personalize SAP applications. Follow the SAP technology blog for insights into SAP BTP, ABAP, SAP Analytics Cloud, SAP HANA, and more.
Turn on suggestions
Auto-suggest helps you quickly narrow down your search results by suggesting possible matches as you type.
Showing results for
Product and Topic Expert
Options
- Subscribe to RSS Feed
- Mark as New
- Mark as Read
- Bookmark
- Subscribe
- Printer Friendly Page
- Report Inappropriate Content
05-20-2015
11:12 PM
With the new IoT Services on the SAP HANA Cloud Platform (HCP) it has become much easier to work with IoT scenarios on HCP.
I'll take the opportunity and will show you how to use the IoT Services with the scenario around my blog post series Rui's Fish Import/Export.
Table of Contents
What needs to be changed
We'll change what we have done in part 2 of this blog post series and in part 3
To demonstrate that on a high level let's first look into the initial picture I've drawn at the beginning of this series.

The picture is not really very accurate. If we look into the details of what we have built so far, the picture should rather look like this:

Meaning we have developed and deployed a Java application on our HCP account which does two things. On the one side it's a servlet that we use as an endpoint for the application on the Raspberry Pi. That servlet also stores the incoming data in a HANA schema.
On the other side that servlet reads-out the data from the HANA schema and provides it as a JSON stream for our HTML5 app.
With the IoT Services we'll get rid of the Java servlet that retrieves and stores the data. We'll keep the part that provides the JSON stream. With those changes our picture will look like this:

We'll reduce our code footprint and also will get for free the possibility to add authorization capabilities to our scenario along with the IoT Services on HCP. Isn't that cool?!
Let's upgrade our app with the IoT Services
First thing we need to do is to enable the IoT Services in our SAP HANA Cloud Platform cockpit.
1. Enable the IoT Services
| Task | Screenshot |
|---|---|
1. Open your cockpit for your trial account on SAP HANA Cloud Platform via the link https://account.hanatrial.ondemand.com/cockpit and switch to the Services navigation tab. Click on the Enable button at the right for the Internet of Things Services (BETA) and wait a few seconds until you can click on the link Go to Service |  |
| 2. Click on the link Go to Service |  |
| 3. Now you should see the Internet of Things Services Cockpit |  |
2. Install the Message Management Service
The Message Management Service will become our new endpoint for receiving the sensor data of our Raspberry Pi devices. Installing it is a straight-forward thing.
| Task | Screenshot |
|---|---|
1. In your Internet of Things Services Cockpit you need to click on the tile Install Message Management Service. After that you'll have to provide your User Name and your Password of your account. Finally click on the Install button. |  |
2 Now you'll notice that a new block will show-up in the screen. You'll find the link to the installed MMS application at the bottom. Click on that link. |  |
3. The link will bring you to a newly created Java application called iotmms. This app needs to get started first. While it starts we can use the time to assign your own user to the role IoT-MMS-User. To do that click on the Roles tab |  |
4. Select the role Iot-MMS-User with a click on the respective row. Now click on the Assign button and add your user to the list of Individual Users. |  |
5. Now click again on the Overview tab your iotmms Java Application and wait until the State switches to Started. Once that happens you can click on the link you find under the Application URLs. |  |
| 6. The Message Management Service of the IoT Services is now finally up-and-running on your account. | 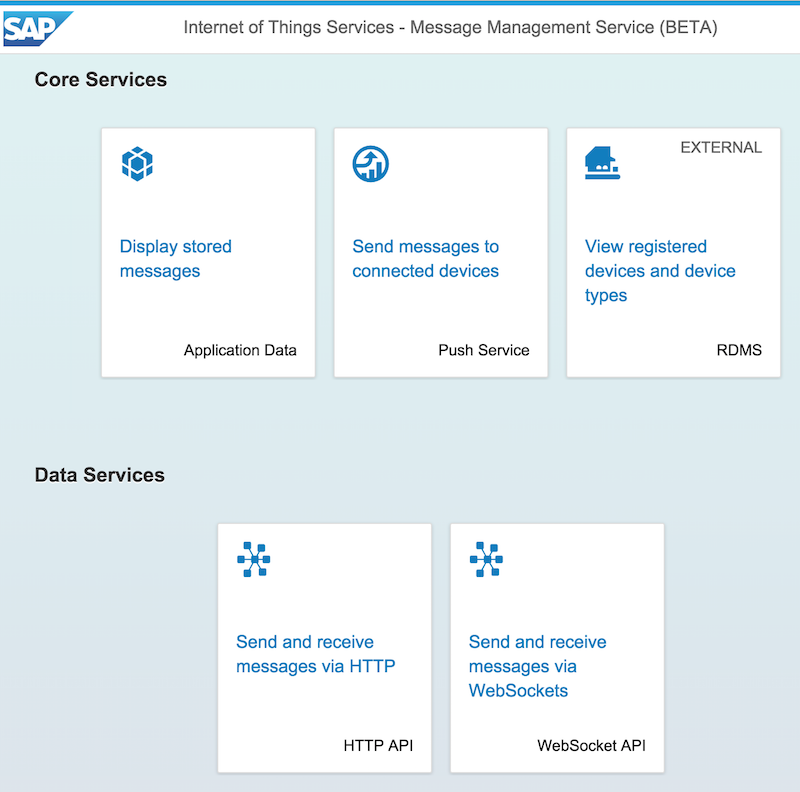 |
3. Create our new endpoint on the IoT Services
Now that the Message Management Service is up and running we can take the next step and configure our new endpoint without having to write one line of code. I'll try to stick to the meta model we have setup in blog 2 of this blog post series so that you should be able to follow the steps easily.
| Task | Screenshot |
|---|---|
1. On our Message Management Service screen we click on the tile View registered devices and device types. As we haven't created anything, yet, there shouldn't be any Device Types, Devices or Message Types available. |  |
2. First we'll click on the tile Device Types. Click on the + button at the bottom to create a New Device Type called Raspberry Pi. Finally click on the Create button. |  |
3. You should see now that we have created one Device Type. In a next step click on the tile called Message Types. | 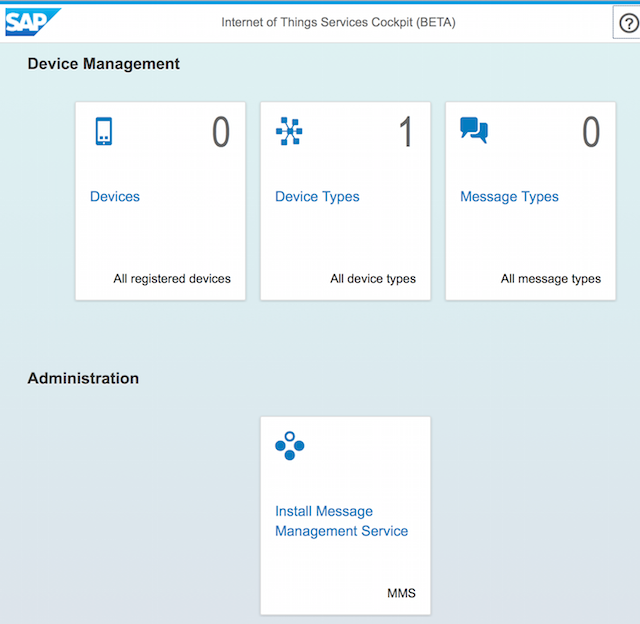 |
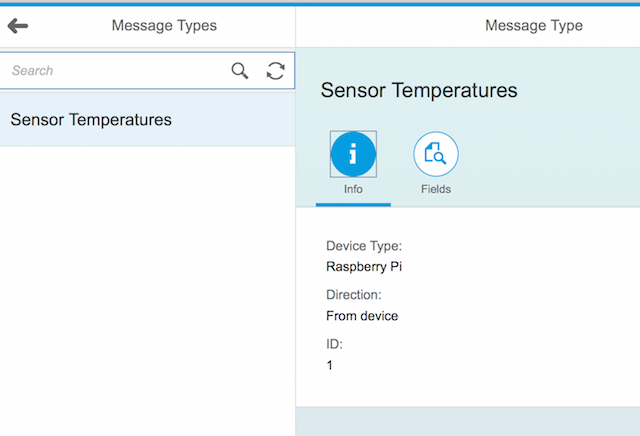
4. The Message Types will be our container for our data model. We click on the + button at the bottom to create a New Message Type called Sensor Temperatures. As a Device Type you should select the entry we've just created before called Raspberry Pi. As a Direction please select From device. Now we add the Fields of our data model to the Message Type. | 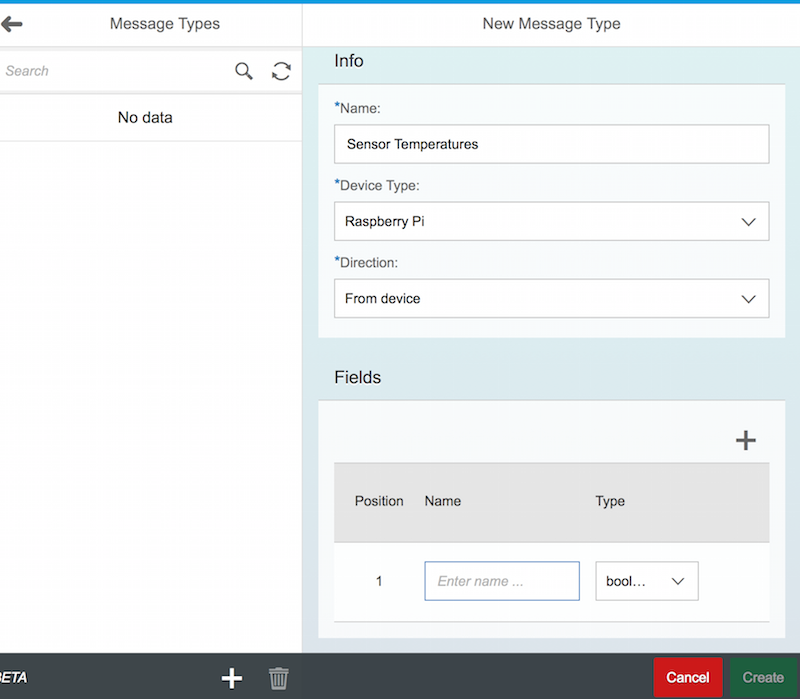 |
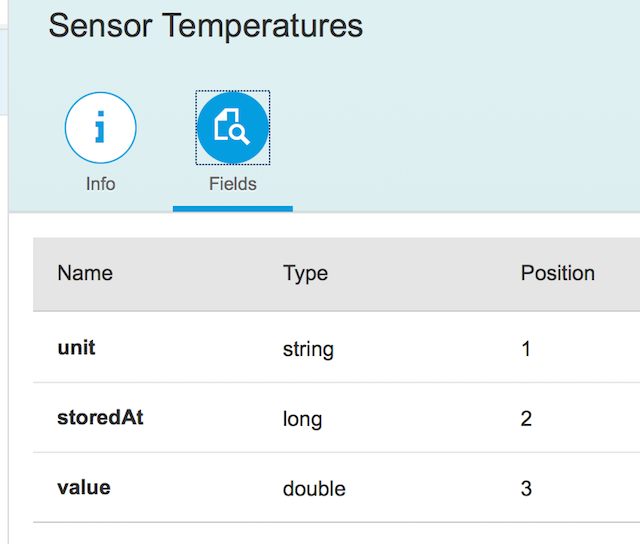
5. Create a field for unit, storedAt and for value as shown in the screenshot at the right. You can add new fields by clicking on the + button in the Fields section. Please be sure the Type for each field is set correctly and click on Create. |  |
6. Your screen should look like the one you see at the right. If you click on the Fields icon you should see the same fields like in the screenshot. Click on the arrow icon at the top left to get back to your IoT Cockpit. If you don't you've done something wrong. Only in such a case: select your Message Type, click on the trash can icon below and create the Message Type again starting from point 4 from above. |
|
7. Your Internet of Things Services Cockpit should now look like the screenshot at the right. Last major step is now to click on the tile called Devices. |  |
8. Click on the + button and type in a New Device called Truck 1 - Fish box Salmon. Click on the Create button to save your New Device. |  |
9. This step is now very important for the new authorization part in our scenario. We'll get an OAuth Token for the device that we need to save somewhere in a text file. After you've done that you can confirm with clicking on the Close button. | 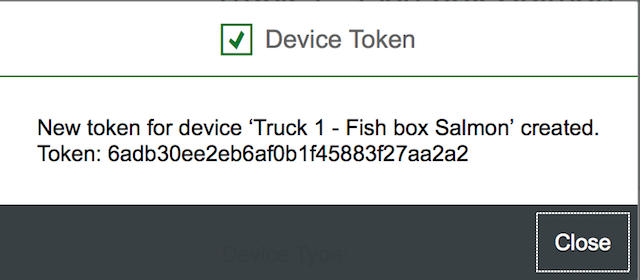 |
10. You should now see your newly created device listed under the list of Devices. Another important ID we'll need later on is the ID of the Device. You can find it if you click on the Info icon. The ID will be shown then. Please also store this ID together with the OAuth token you've already stored before. |  |
11. By clicking on the + button at the bottom you can now create as many Devices as you want to your list of Devices. Just follow the same steps from 8 - 10 to do so. Once you are done just click on the arrow button at the top left to get back to your IoT Cockpit. |  |
| 12. In case you have created 2 devices like I did, your IoT Cockpit should look like the screenshot |  |
What is missing?
Well. We've just clicked together our new IoT endpoint without having to create ONE single line of code. What we have now is an API interface that our Raspberry Pi can use.
We'll have still to:
- update our Java app on the Raspberry Pi to use the new endpoint
- change our former Java app so that it connects to the HANA schema from the new endpoint
- change our former Java app to that it just creates the JSON stream
I'll post these last steps as new blog post within the next couple of days.
Hope you'll have fun with the new IoT Services on the SAP HANA Cloud Platform!!
Best,
Rui
- SAP Managed Tags:
- SAP Business Technology Platform
14 Comments
You must be a registered user to add a comment. If you've already registered, sign in. Otherwise, register and sign in.
Labels in this area
-
ABAP CDS Views - CDC (Change Data Capture)
2 -
AI
1 -
Analyze Workload Data
1 -
BTP
1 -
Business and IT Integration
2 -
Business application stu
1 -
Business Technology Platform
1 -
Business Trends
1,658 -
Business Trends
112 -
CAP
1 -
cf
1 -
Cloud Foundry
1 -
Confluent
1 -
Customer COE Basics and Fundamentals
1 -
Customer COE Latest and Greatest
3 -
Customer Data Browser app
1 -
Data Analysis Tool
1 -
data migration
1 -
data transfer
1 -
Datasphere
2 -
Event Information
1,400 -
Event Information
74 -
Expert
1 -
Expert Insights
177 -
Expert Insights
348 -
General
1 -
Google cloud
1 -
Google Next'24
1 -
GraphQL
1 -
Kafka
1 -
Life at SAP
780 -
Life at SAP
14 -
Migrate your Data App
1 -
MTA
1 -
Network Performance Analysis
1 -
NodeJS
1 -
PDF
1 -
POC
1 -
Product Updates
4,575 -
Product Updates
392 -
Replication Flow
1 -
REST API
1 -
RisewithSAP
1 -
SAP BTP
1 -
SAP BTP Cloud Foundry
1 -
SAP Cloud ALM
1 -
SAP Cloud Application Programming Model
1 -
SAP Datasphere
2 -
SAP S4HANA Cloud
1 -
SAP S4HANA Migration Cockpit
1 -
Technology Updates
6,871 -
Technology Updates
484 -
Workload Fluctuations
1
Related Content
- IoT: RFID integration with SAP HANA Cloud via SAP BTP in Technology Blogs by Members
- Handling profile parameter values in SAP NetWeaver and SAP HANA in Technology Blogs by Members
- The 2024 Developer Insights Survey: The Report in Technology Blogs by SAP
- Hybris - Adding Service product to main product (Price =0) in Technology Q&A
- SAP Cloud ALM and Identity Authentication Service (IAS) in Technology Blogs by SAP
Top kudoed authors
| User | Count |
|---|---|
| 14 | |
| 11 | |
| 11 | |
| 10 | |
| 9 | |
| 8 | |
| 8 | |
| 8 | |
| 7 | |
| 7 |