SAML SSO for Analysis Office 2.x with BI Platform ...
Technology Blogs by SAP
Learn how to extend and personalize SAP applications. Follow the SAP technology blog for insights into SAP BTP, ABAP, SAP Analytics Cloud, SAP HANA, and more.
This article describes the mandatory configuration steps for the setup of SAML SSO between BI Platform and SAP HANA with Analysis Office.
Step 1: Create OLAP Connection
Open CMC and create a new OLAP connection of type "SAP HANA http"
Enter the fully qualified HANA host name and HTTP port
Select SSO as authentication
Save the connection
Step 2: Create Certificate
Open HANA XS Admin UI in the browser to find the name of the HANA service provider: http://<hana_host>:<hana_port>/sap/hana/xs/admin/#/samlSP (the user needs the role "sap.hana.xs.admin.roles::SAMLAdministrator")
In this example the name is S1222
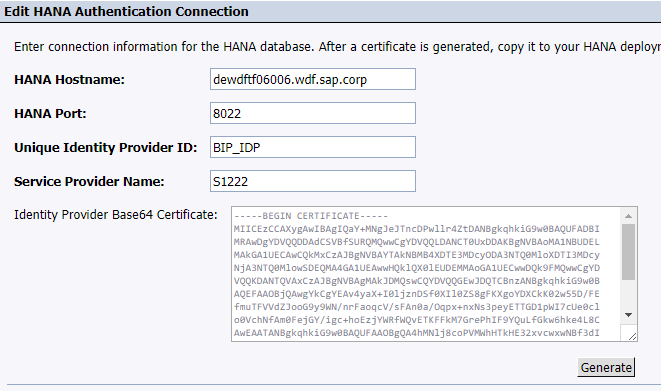
Go back to CMC and open "Applications -> HANA Authentication"
Create new connection
Enter the exact same host name and exact same port like in step 1.2
Enter a name for the unique identity provider ID. You can choose a arbitrary name here. It should somehow reflect you BI Platform system.
Enter the service provider name
Click on the "Generate" button to generate a certificate
Copy the certificate to a text file
Click Ok
Step 3: Import Certificate
Open the Web Dispatcher Administration UI (http://<hana_host>:<hana_port>/sap/hana/xs/wdisp/admin/public/default.html) in your browser. The user needs the role "sap.hana.xs.wdisp.admin::WebDispatcherAdmin"
Go to "PSE Management"
Select "sapsrv.pse" in the dropdown box
Click on "Import Certificate" and paste the certificate content of step 2.9
Click on "Import"
After that you should see the certificate metadata
Copy the content of the "Subject" field. In my example it is "C=CA, SP=BC, O=SAP, OU=BOE, CN=BIP_IDP"
Restart the "webdispatcher" and "xsengine" service of your HANA server.
Step 4: Create Identity Provider
Open the HANA XS Admin UI: http://<hana_host>:<hana_port>/sap/hana/xs/admin/#/samlIDP/0
Create a new identity provider for your BI Platform system
Enter the name of the identity provider from step 2.6
Enter the subject from step 3.7 both for Subject and Issues
For all other fields just enter "/". For our use case the fields are not needed
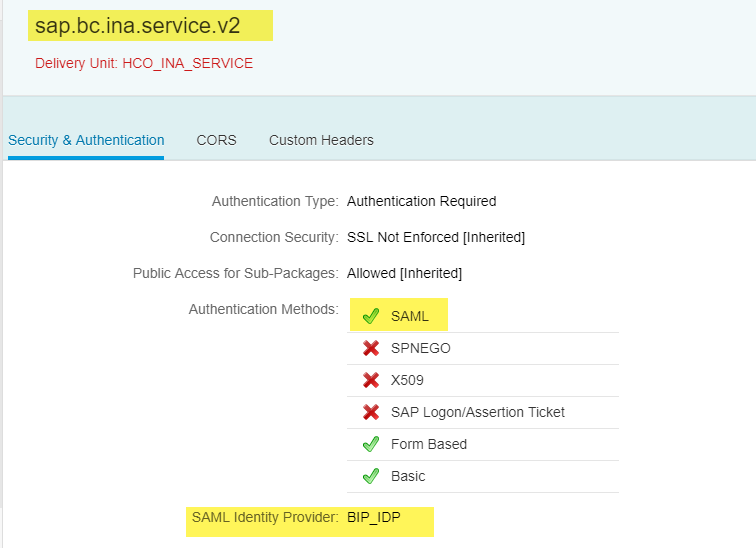
Step 5: Assign identity provider to InA Service
Navigate to http://<hana_host>:<hana_port>/sap/hana/xs/admin/#/package/sap.bc.ina.service.v2
Enable SAML authentication and select your SAML Identity Provider. Important: please ensure that you only activate your SAML Identity Provider for the "sap.bc.ina.service.v2" package:
Step 6: Map the BI Platform user to your HANA user
Go to HANA Studio
Open your user and mark the "SAML" checkbox
Click on "Configure" and Add a new mapping
Select your Identity Provider
Enter the name of your BI Platform user. You have to enter it case sensitive way. If your user is named "Smith" then you should enter it exactly this way. When you enter "smith" or "SMITH" it will not work later.
After all those steps the SSO procedure should work in Analysis Office. In case the SSO logon is not working the HANA "xsengine" trace contains valueable information about the root cause. In order to get all details in the trace you should set the trace level of all “authentication” components in the XSENGINE trace configuration to trace level DEBUG.
The used admin applications in CMC and HANA may look slightly different depending on your used versions.