
- SAP Community
- Products and Technology
- Technology
- Technology Blogs by SAP
- SAP BTP Showcase - Combining AppGyver and Enterpri...
Technology Blogs by SAP
Learn how to extend and personalize SAP applications. Follow the SAP technology blog for insights into SAP BTP, ABAP, SAP Analytics Cloud, SAP HANA, and more.
Turn on suggestions
Auto-suggest helps you quickly narrow down your search results by suggesting possible matches as you type.
Showing results for
Employee
Options
- Subscribe to RSS Feed
- Mark as New
- Mark as Read
- Bookmark
- Subscribe
- Printer Friendly Page
- Report Inappropriate Content
05-10-2021
9:01 PM
Overview
This blog post is part of the SAP Business Technology Platform Showcase series of blogs and videos. We invite you to check this overall blog, so you can understand the full end-to-end story and the context involving multiple SAP BTP solutions.
Here we will expand the Blog 5: Develop a SAP HANA Cloud native application to add authentication to the data from SAP HANA we exposed as an OData service and then connect it to an AppGyver application.
SAP recently announced that it had acquired AppGyver, a no-code app development platform. With this acquisition, SAP is better able to help customers and partners adapt their IT systems efficiently to their specific needs and optimize the usability of their applications. When combined with the enterprise capabilities that SAP BTP has to offer, SAP is unleashing some interesting possibilities, such as consuming SAP HANA Cloud data on an easy and fast way to build an application.
We will leverage the Authentication & Trust Management service (xsuaa) from the SAP BTP to manage user authorizations. User authorizations are managed using technical roles at the application level, which can be aggregated into business-level groups and role collections for large-scale cloud scenarios. When used combined with Cloud Application Programming Model, we can define the permissions for each role and allow or deny access to a specific service being provided by the application using CDS annotations. We will use also JSON Web Tokens, an industry standard, to authenticate against the application. This means that besides speeding up the security development, our application will have the possibility of connecting to non-SAP systems too.
Below you can see that this blog is part of the 5th step of the “Solution Map” prepared for the journey on the referred overall blog:

SAP BTP Showcase – Overall Technical Architecture
You can find the repository with the example code here that will be developed on this post here.
Prerequisites
- Having created a simple SAP Cloud Application Programming Model application, as presented in Blog 5: Develop a SAP HANA Cloud native application
- Having completed the first part of this blog.
- Basic SAP Cloud Application Programming Model and AppGyver knowledge is desirable
- Postman installed
Scenarios
Authenticating Using AppGyver
AppGyver enables the creation of web and mobile applications in a no-code environment. It offers a powerful visual development platform that allows business users with no coding experience to build efficient applications that can be easily configured and that work seamlessly across all operating systems, without writing a single line of code. AppGyver provides a trial environment too, so please feel free to go ahead and create an account. If you have no experience at all with AppGyver, I strongly recommend you to follow the video tutorials that AppGyver provides before you continue.
Before we begin developing our AppGyver application, we need to do one last configuration on the OData service, which is configure the cors for the project. So in the root folder of the service project, add a server.js file with the contents below. Feel free to change these contents later accordingly to the URL generated by the application after we have completed the app deployment.
const cds = require('@sap/cds')


cds.on('bootstrap', (app) => {

    const cors = require('cors')

	app.use(cors())

	app.use((req, res, next) => {

		res.setHeader('Access-Control-Allow-Origin', '*');

		next();

	});

})


cds.on('listening', () => {

	// add more middleware ...

})


module.exports = cds.server // delegate to default server.js
The code above will add a custom logic to the default bootstrapping. You can find more information about this on the official documentation. Also, run the command below to install the cors node dependency to our project:
npm install corsNow, we can head over to AppGvyer. This application example will authenticate against SAP BTP xsuaa service to consume the SAP HANA Cloud data exposed on the previous scenario. First, we will create the application and configure it to use authentication. After you log in to AppGyver, you should see the screen below. Click on the Create New button to add a new project. Name it as <YOUR_APP_NAME>-appgyver.

Once you create and open the project, you should see the app builder. The app builder allows you to:
- define your app´s structure and navigation logic
- build pixel-perfect user interfaces using drag-and-drop
- create complex logic with visual programming
- integrate with external data resources
- bind data to your components to create dynamic views, and more.
Click on the Auth button to add authentication to the application.

After enabling third party authentication, click on Empty page, to open the pages for the app. Besides the empty page, you should see a Log in page that AppGyver added when you enabled authorization. Click on it.

AppGyver will provide you a template for the login page with some components, page variables, and some logic for the login button.

Now, we will add our own logic to request the token to the xsuaa service. Inside the app canvas, click on the log in button, then on show logic for the button.

Search for HTTP Request on the Flow Function Market and install it to the application:

After you have installed it, you should be able to see it on the Installed section for the components. Drag-and-drop the HTTP Request into the logic for the log in button. Connect the HTTP Request to the component tap event and delete the alert that the template provided us. The first output from the HTTP Request will provide us the response from the request made in it, which will be connected to the set app variable logic component. The second output will be used in case the authentication fails. We will connect the second output to an alert that will display the error message. If the authentication is successful, we will set an app variable with the token it has provided us and then dismiss the initial view. The final result should look like this:

Now, we will retrieve the xsuaa access token using the HTTP request. Click on the HTTP request, enter the same xsuaa URL that we we used to test on Postman and select post as the HTTP method. In the optional inputs, set the request body type to x-www-form-urlencoded. For the request body, we will add a formula that will create an object with the page variables created by the templates and that will be used to authenticate against xsuaa. To do this, click on the edit binding button for the request body as shown below:

Select formula as the binding type and insert the formula below. This formula will add an object to the request body with the page variables that will store both the username and password.
{

    "grant_type":"password",

    "username":pageVars.credentials.username,

    "password":pageVars.credentials.password,

    "response_type":"token"

}
Now, just as we configured on Postman, we need to define the Authorization header for the request. We are going to add the basic authorization that Postman generated for us in this header. Open the request you did previously on Postman for the token exchange. On the request headers, copy the Authorization value.

Head back to AppGyver and click on custom list for the headers. Add the Authorization value and paste the value you copied previously on the value field:

Now, we need to create the app variable where the xsuaa token will stored. Switch to the variables view and select app variables to create a new variable. Enter authentication_token as the variable name and select any value as the variable value type.

Then, return to the canvas view to continue editing the log in button. Click on the set app variable logic component, select authentication_token as the variable name that will be set and edit the binding for set app variable as shown below:

And that´s everything we need to do to authenticate against xsuaa using AppGyver! We can go ahead and test the application. Click on the launch button and then on the open app preview portal. When you open the application you created, you should see the login screen created by the template. Enter the credentials from the user that you assigned the roles and click on the log in button. If you are redirected to the empty page, it means that you have acquired a valid token that can be used to access OData service exposing SAP HANA Cloud data.
Consuming SAP HANA Cloud data in AppGyver through SAP Cloud Application Programming Model
Now that we configured the token exchange for the xsuaa service, we can set up the data consumption from a secured endpoint. For this example, we will only build a simple list with the data provided by the OData service.
Head back to the app builder and open the empty page. First, we will configure the data retrieval. Click on the data button and add a REST API direct integration.

For the base URL, enter the resource ID, as well as the root URL to your OData endpoint. Add an Authorization header for the request too, remember to set it as text, making it mandatory to be included on the request and unchecking the static option.

Open the Get Collection to configure the relative path and the response key path. The response key path is important so that AppGyver knows where is the data we are trying to retrieve inside the response. For an OData service, the values are found within the value key path. Here we can also define other HTTP Headers, URL placeholders, and query parameters. For this example we will not be needing those parameters, but through URL placeholders, we are capable of using some OData capabilities such as filtering, top records, among others.

Return to the canvas and switch to the variables view. We will create a data variable that will retrieve the values for us once the page is loaded. Open the data variables and click on add data variable and select the resource API we created previously.

AppGyver will create the data variable for us, it will add some basic logic attached to it too, that will make it retrieve the values once the page has been mounted.

Click on the get record collection logic component. Add a formula binding to the Authorization header:
"bearer " + appVars.authentication_token.access_token
Now, head back to the canvas and delete the components that are in it, then drag-and-drop the row component to the it. We will bind the row repetition with the data variable that we created:

Then, we will assign the contents for the cells. Drag-and-drop a title component inside each of the cells for the row. Edit the title content to bind it to a formula, where we are able to access the current value of the repeated data:

And that´s it! We can go ahead and run another test to see if the application is fetching the results from the OData service. After we login, we should see a list with the records, as shown below:

AppGyver application deployment on SAP Business Technology Platform
Before we begin, it is important to mention that AppGyver also provides the option to host the web application within AppGyver. However, if you want some more advanced monitoring capabilities or even to unify your IT landscape, it is possible to export build the web application and export it as a .zip file and host it on the infrastructure of your choice. In this blog post, I will export the web application and deploy it in the Cloud Foundry Runtime of the SAP Business Technology Platform.
First, click on the launch button, open the distribute panel and click on the open build service button.

On the build service, you will see three options for the build: IOS Mobile, Android Mobile, and Web App. For this post, we will only use the Web App build. Click on the configure button for the Web App.

Select a hostname for the AppGyver hosted domain. This will be used to deploy the app to AppGyver´s cloud and make it available under the myapp.appgyverapp.com subdomain once the project is built. After configuring the application, click on the build button to configure version aspects of the build and build the project. After it has finished building (it might take a while), you will be capable of downloading the build results.

Upload the .zip file to SAP Business Application Studio (or install the Cloud Foundry command line and open it on Visual Studio Code). Create a folder for the project and unzip the file using the command below:
unzip <file_name>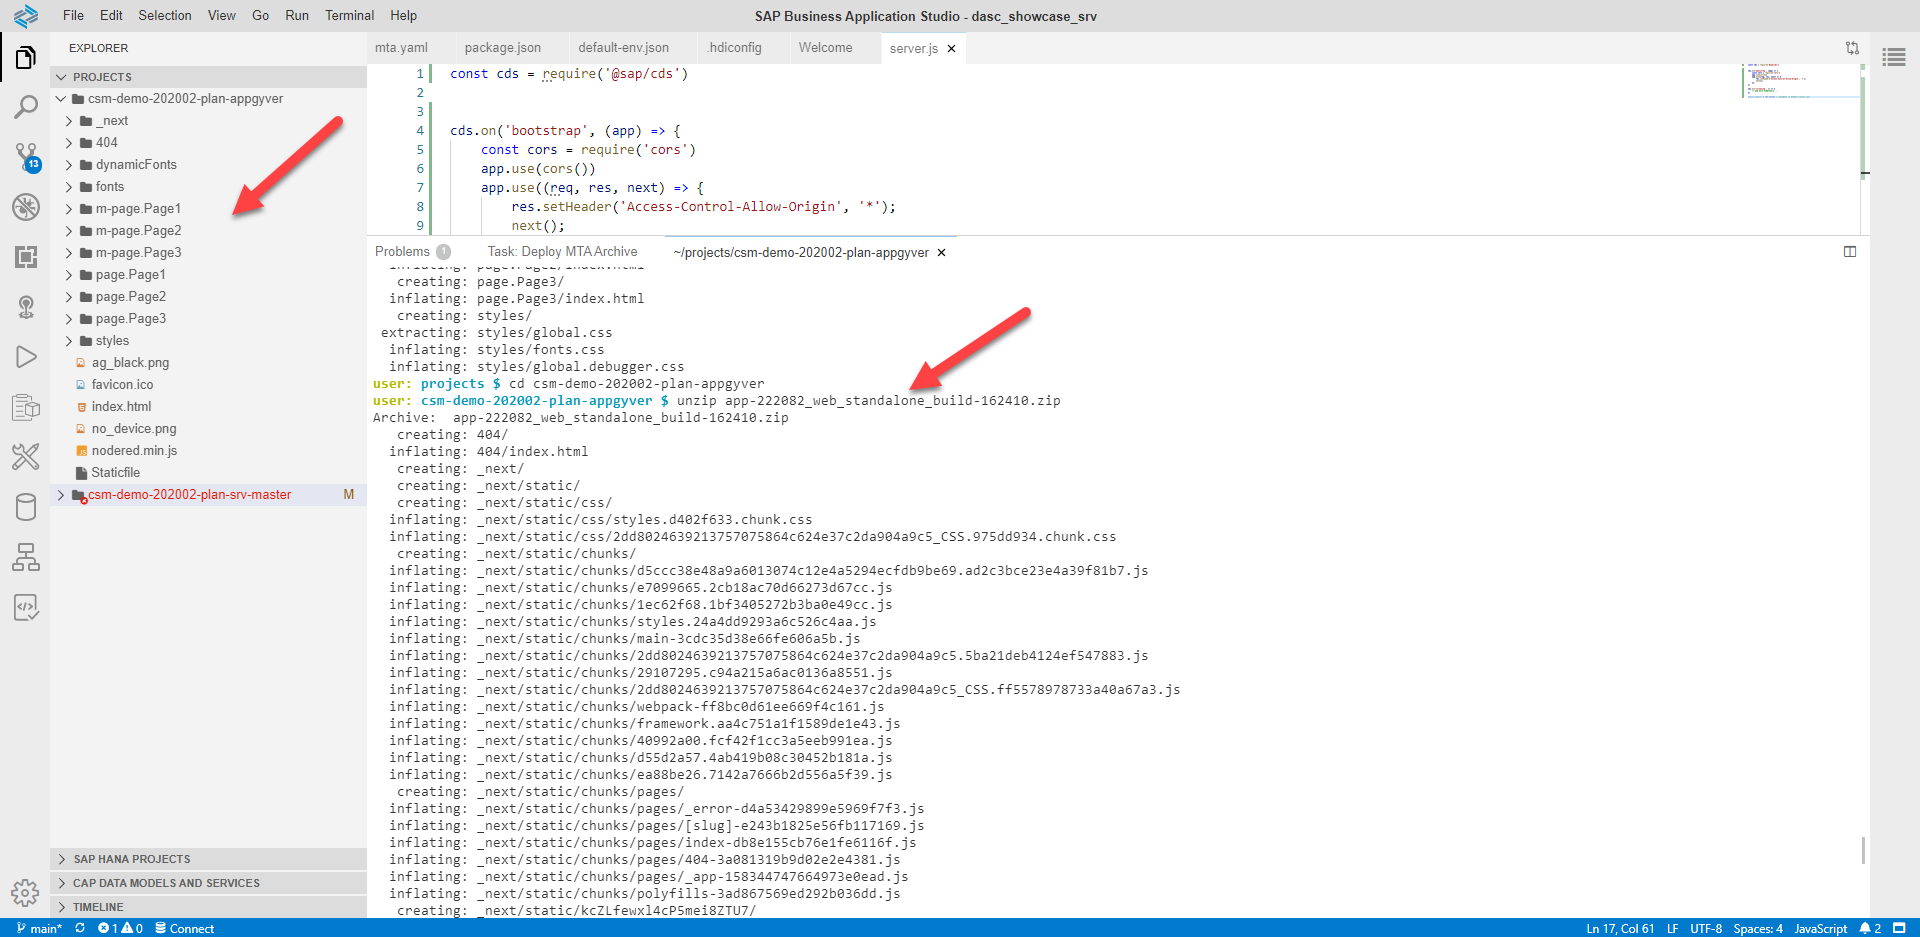
We will deploy an application that requires no backend code other than the NGINX server, which the buildback provides. For our application to use the staticfile buildback, we need to create a Staticfile in the root directory of our project. Cloud Foundry will detect it and use it when pushing the app.

Before running the command that will deploy the application to Cloud Foundry, we have to login using the command palette from SAP Business Application Studio or through the cf login command.

After you are logged in, run the command below to push your AppGyver application to SAP Business Technology Platform Cloud Foundry Runtime.
cf push <your_app_name>Once the deployment has been completed, you can access the route that was created for us to view the final result.


Conclusion
In this blog post we had a glimpse of some exciting opportunities that SAP is bringing to the Intelligent Enterprise. AppGyver combined with SAP BTP will allow business areas to create powerful apps on an easy and fast way. AppGyver is a tool that enables the creation of applications by the business areas that consume enterprise data provided by the SAP HANA platform. And this is just the beginning of AppGyver´s journey with SAP BTP, so stay tuned for the upcoming opportunities!
- SAP Managed Tags:
- SAP Cloud Application Programming Model,
- SAP Build Apps,
- SAP Business Technology Platform
Labels:
7 Comments
You must be a registered user to add a comment. If you've already registered, sign in. Otherwise, register and sign in.
Labels in this area
-
ABAP CDS Views - CDC (Change Data Capture)
2 -
AI
1 -
Analyze Workload Data
1 -
BTP
1 -
Business and IT Integration
2 -
Business application stu
1 -
Business Technology Platform
1 -
Business Trends
1,658 -
Business Trends
116 -
CAP
1 -
cf
1 -
Cloud Foundry
1 -
Confluent
1 -
Customer COE Basics and Fundamentals
1 -
Customer COE Latest and Greatest
3 -
Customer Data Browser app
1 -
Data Analysis Tool
1 -
data migration
1 -
data transfer
1 -
Datasphere
2 -
Event Information
1,400 -
Event Information
75 -
Expert
1 -
Expert Insights
177 -
Expert Insights
357 -
General
1 -
Google cloud
1 -
Google Next'24
1 -
GraphQL
1 -
Kafka
1 -
Life at SAP
780 -
Life at SAP
14 -
Migrate your Data App
1 -
MTA
1 -
Network Performance Analysis
1 -
NodeJS
1 -
PDF
1 -
POC
1 -
Product Updates
4,575 -
Product Updates
398 -
Replication Flow
1 -
REST API
1 -
RisewithSAP
1 -
SAP BTP
1 -
SAP BTP Cloud Foundry
1 -
SAP Cloud ALM
1 -
SAP Cloud Application Programming Model
1 -
SAP Datasphere
2 -
SAP S4HANA Cloud
1 -
SAP S4HANA Migration Cockpit
1 -
Technology Updates
6,871 -
Technology Updates
493 -
Workload Fluctuations
1
Related Content
- Develop with Joule in SAP Build Code in Technology Blogs by SAP
- Enabling In-Order processing with SAP Integration Suite, advanced event mesh Partitioned Queues in Technology Blogs by SAP
- SAP BTP FAQs - Part 3 (Security) in Technology Blogs by SAP
- Business AI for Aerospace, Defense and Complex Manufacturing in Technology Blogs by SAP
- SAP BusinessObjects Mobile alternatives in Technology Blogs by SAP
Top kudoed authors
| User | Count |
|---|---|
| 20 | |
| 11 | |
| 8 | |
| 8 | |
| 7 | |
| 7 | |
| 7 | |
| 6 | |
| 6 | |
| 6 |