
- SAP Community
- Products and Technology
- Technology
- Technology Blogs by SAP
- Setting up SAP Launchpad Service and SAP Mobile S...
Technology Blogs by SAP
Learn how to extend and personalize SAP applications. Follow the SAP technology blog for insights into SAP BTP, ABAP, SAP Analytics Cloud, SAP HANA, and more.
Turn on suggestions
Auto-suggest helps you quickly narrow down your search results by suggesting possible matches as you type.
Showing results for
Product and Topic Expert
Options
- Subscribe to RSS Feed
- Mark as New
- Mark as Read
- Bookmark
- Subscribe
- Printer Friendly Page
- Report Inappropriate Content
09-03-2021
9:04 AM
In this blog I would like to cover how the content (roles, groups, apps etc.) that is already defined in SAP S/4HANA on-premise system can be easily made available on SAP Launchpad service using content federation and to then make it available for mobile users on SAP Mobile Start.
You have an SAP S/4HANA on premise solution with SAP Fiori Launchpad configured with standard or custom business roles, containing apps, groups and catalogs.
You want to reuse the existing content on the SAP Launchpad service and on SAP Mobile Start using content federation.
Note: you can find more information on the supported platforms/products in the documentation.
Some technical settings are required in SAP S/4HANA before exposing any content. These steps are also described in this tutorial.
Go to transaction /n/UI2/FLP_SYS_CONF where you need to add an additional FLP configuration parameter.
Click on “New Entries”.
And enter the following values:
Save the entry and select a transport request when prompted.
Go to transaction UCONCOCKPIT and select the “HTTP Whitelist Scenario” from the list.
Then select in the menu More - HTTP Whitelist - Setup.
Tick both options in the setup menu and save it.
You will now see that the entry “Clickjacking Framing Protection” is added with the logging mode, meaning that connections are just logged but not checked. In production, it is recommended to set it to "Active Check" and to maintain the patterns for the SAP Launchpad service as described in the next step.
If you double click on the row “Clickjacking Framing Protection”, you'll be able to see and edit the blocked and allowed connections.
Go in transaction SICF and activate the service /sap/bc/ui2/cdm3.
Then make sure in to check “use all logon procedures” for the service in the Logon Data tab.
Go in the user maintenance (transaction SU01) and check the parameters for the user who will expose the content.
Go in the tab parameters and make sure that the parameter /UI2/PAGE_CACHE_OFF does not show up there. If it does, remove it.
Your SAP S/4HANA system is now ready for exposure.
Go to transaction /n/UI2/CDM3_EXP_SCOPE
Click on the multiple selection icon to select the roles you want to expose.
Then fill in the business roles you want to expose. In this example I have a set of custom and standard roles.
Then copy the list to your selection, F8 or with the second icon from the left.
Click on Save Selected Roles
Click on Expose.
As a result, the business content is exposed from your SAP S/4HANA system as a json file and accessible with the service path /sap/bc/ui2/cdm3/entities.
With the buttons “Preview” and “View Exposed Content” of the transaction, you can have a more comprehensive view of the exposed content.
We need to create two destinations in the SAP Business Technology Platform, a Design-Time and a Runtime destination.
The Design-Time destination is used by SAP Launchpad service to fetch the exposed data from the SAP S/4HANA system.
The Runtime destination is used during runtime i.e., whenever a user is working on the Launchpad and access backend data.
Logon to your SAP BTP sub-account, navigate to the Destinations and click on “New Destination”.
Design-Time
Clicking the “New Destination” will open a destination template – fill in the following information for the Design-Time destination. For Name use the SAP S/4HANA system ID with the suffix “dt” for Design-Time; for e.g., he4dt.
Important - the destination name must be lower case and must not contain the underscore character (_).
Configuration
Parameter
Save the entered information.
Other authentication methods are supported for this destination but not principal propagation, you can find additional information in the documentation.
Runtime
Create an additional destination for the runtime destination and fill in the following information. For name we use the SAP S/4HANA system ID and the suffix “rt” for Runtime; for e.g., he4rt.
Important – the destination name must be lower case and must not contain the underscore character (_).
Configuration
Parameters
Save the entered information.
HTML5.DynamicDestination is for enabling dynamic tiles.
MobileEnabled is required for SAP Mobile Start.
NOTIF_SERVICEPATH is used in combination with sap-sysid and sap-client by the Notification Service to perform callbacks.
More information on the parameters is available in the documentation.
Logon into SAP BTP sub-account and navigate to the Instances and Subscriptions.
If you haven‘t already done it, create a subscription for the SAP Launchpad service from the Service Marketplace and assign yourself the role collection "Launchpad Admin".
From the three little dots at the right select „Go To Application“, this will open the Site Manager.
Go to the Provider Manager to create a provider for SAP S/4HANA content.
Note that he HTML5 Apps provider is created by default, you can find more information in the documentation.
Click on New and complete the required information.
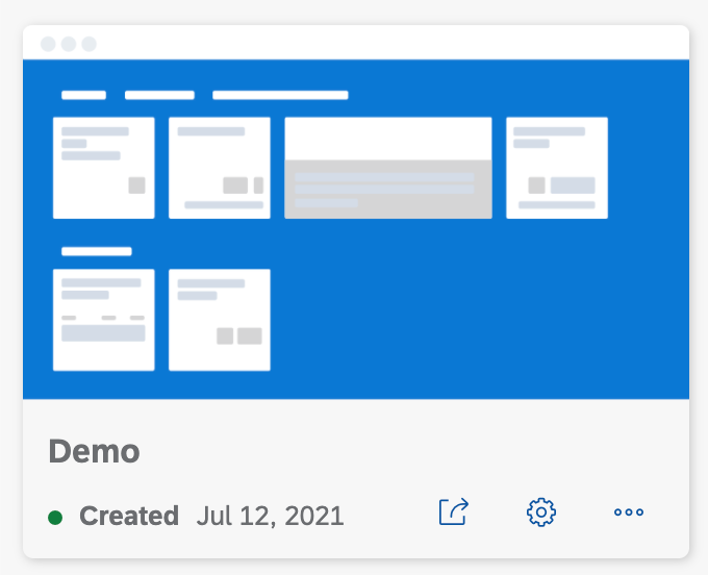
After a few seconds, you should see a new content provider with the green status "created".
If something goes wrong and the status is in error, check the pre-requisite settings in SAP S/4HANA. If this doesn’t help you may check the SAP note 2548392 for connectivity between BTP and SCC with basic authentication.
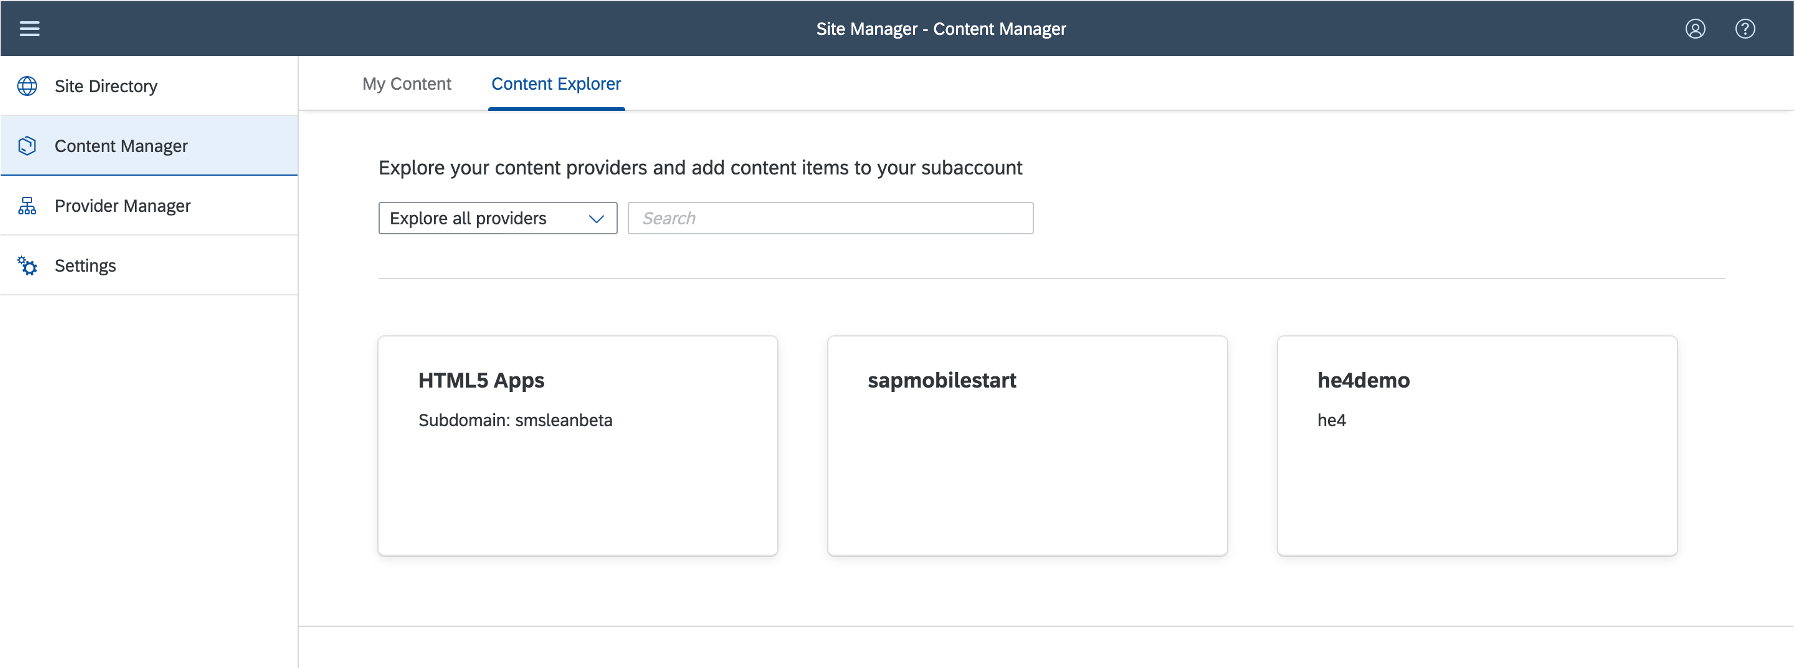
Now navigate to the content manager. In the tab “Content Explorer” you should see the new content provider.
Click on it.
Select the roles and add them to your content with the button “Add to My Content”.
Now you can see the selection in the tab “My Content”.
Clicking on a role will show you the apps included and their parameters.
NOTE: You won’t be able to change anything, remote content can only be edited in the source system.
You can notice the supported devices for the displayed application, it is coming from the backend catalog configuration and apply to the SAP Launchpad service and SAP Mobile Start.
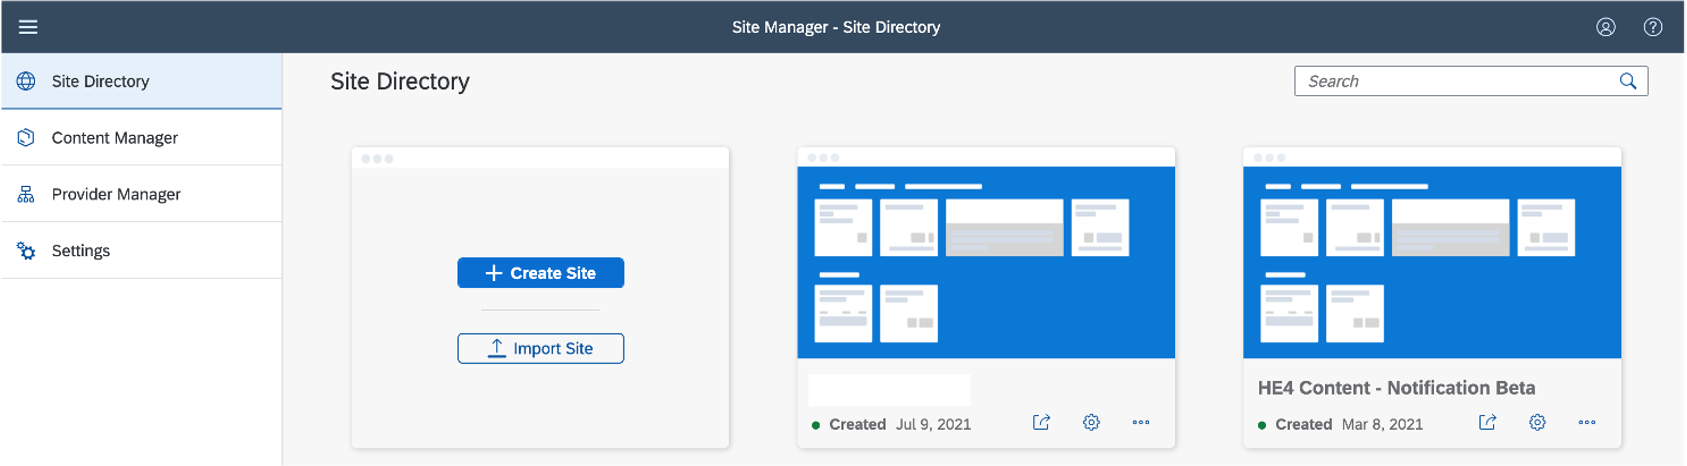
Navigate to the Site Directory and create a new site.
Give your site a name and click “Create”, it will not display anywhere on your final site, it is just reference.
You can review all options.
Make sure to enable SAP Mobile Start under User Capabilities.
Note: The toggle button is enabled by default for new sites. For existing sites, the setting is disabled by default and you'll need to manually toggle it to Yes.
We now need to assign the roles to the site. In the Site Directory, you can access your site settings by clicking on the gear icon.
In edit mode, you can now assign the roles imported from SAP S/4HANA. In the “Assignments” box on the right you can search for the roles to assign to the site.
Click on the + button to assign the roles to the site and save.
Ex:
The last step before testing the site is to assign the roles to the users.
In the SAP BTP sub-account navigate to the security section and select “users”.
Click on a user row, this will open an overview with its details and assigned role collections.
Right to the Role collection search box, click on the three little dots and select “Assign Role Collection”.
Select the role collections you want to assign to the user and click on “Assign Role Collection”. Note you can search with the content provider name.
Note: in a productive scenario and using your own IAS, you’ll prefer to use the Role collection mapping against Idp groups. Please refer to the documentation for more information
Back to the Site Manager, you'll find your site in the Site Directory.
With the arrow icon you can launch it, with the gear icon you'll access its setting and the three little dots give you more option like export, set an alias or delete it.
Launch your site, it is now ready to use.
As an admin with this role collection, you can access the Mobile Services included in SAP Launchpad service.
This role collection doesn't need to be assigned to the SAP Mobile Start end users.
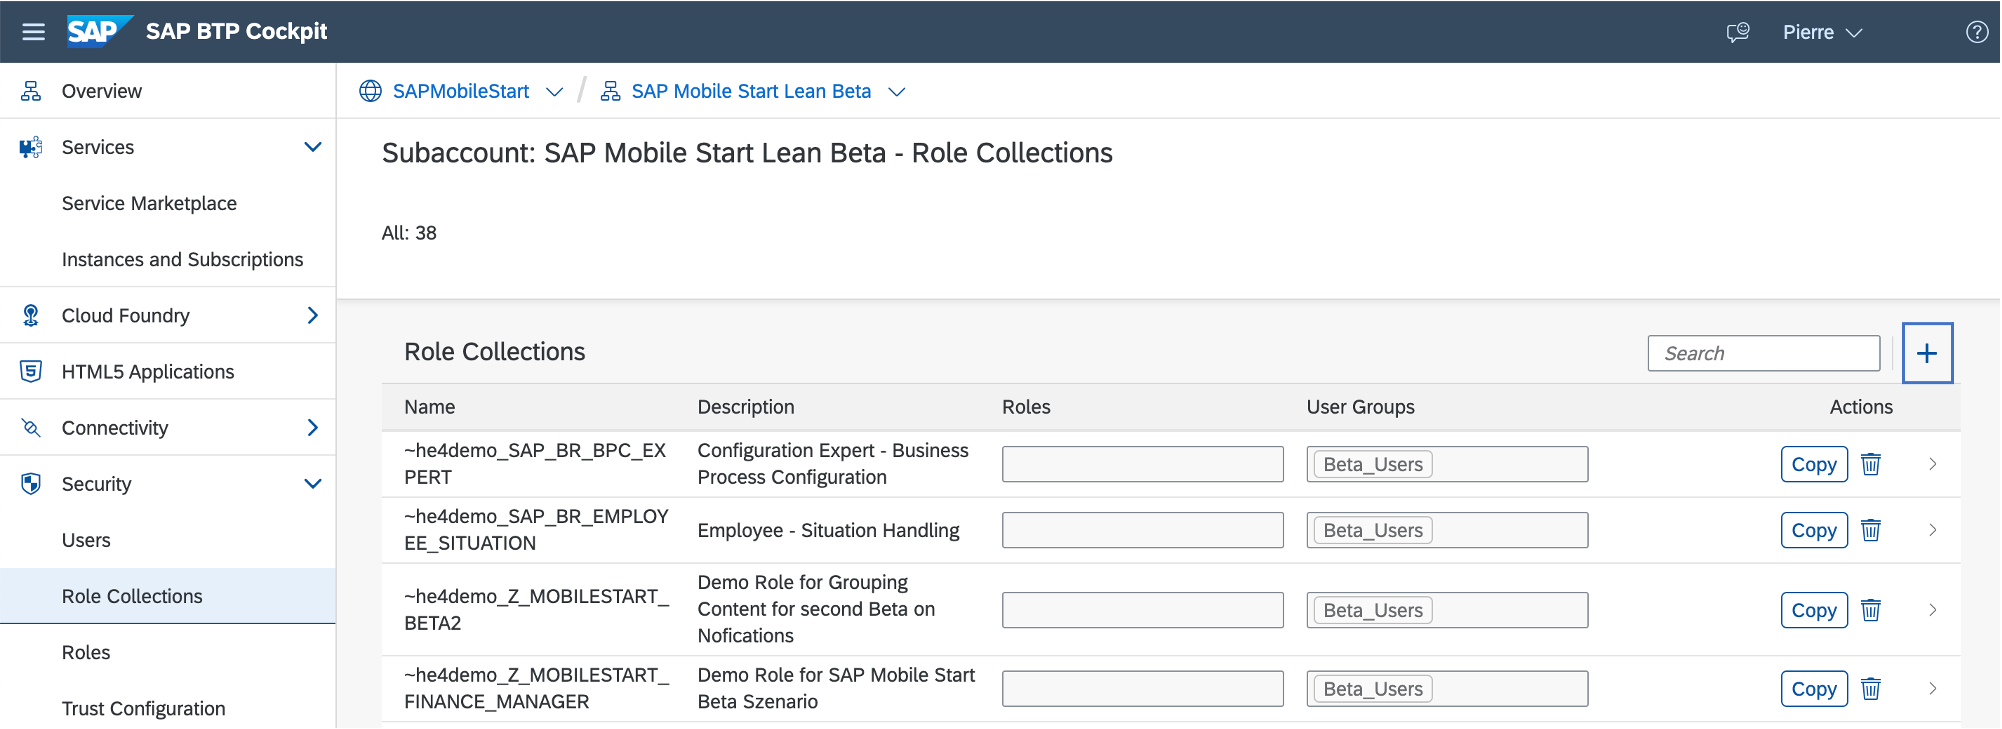
In the SAP BTP sub-account go into the role collections and click on the + button to create a new role collection.
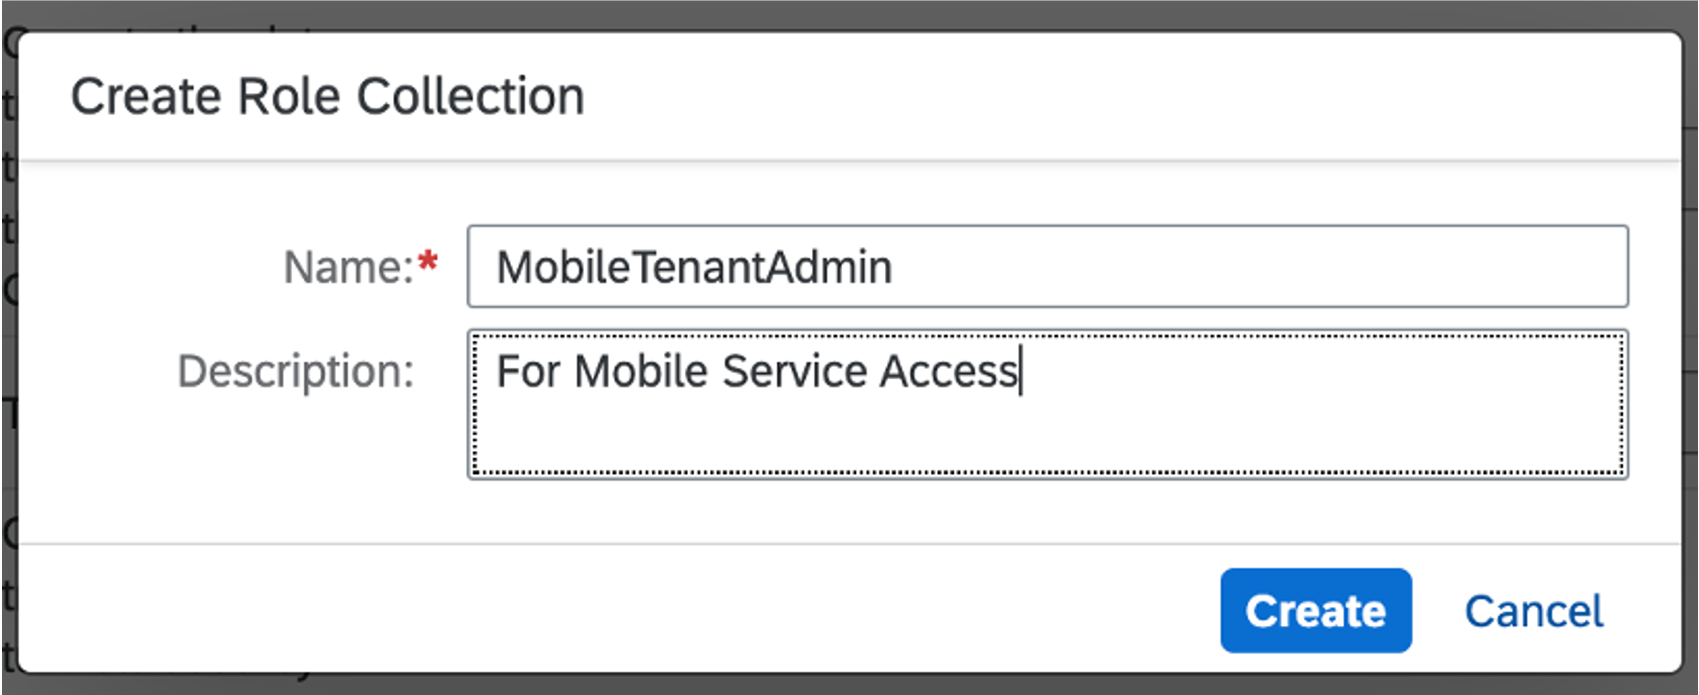
In the dialog pop-up name it “MobileTenantAdmin”, give it a description and click on Create.
In the role collection list, select your new role collection to edit it.
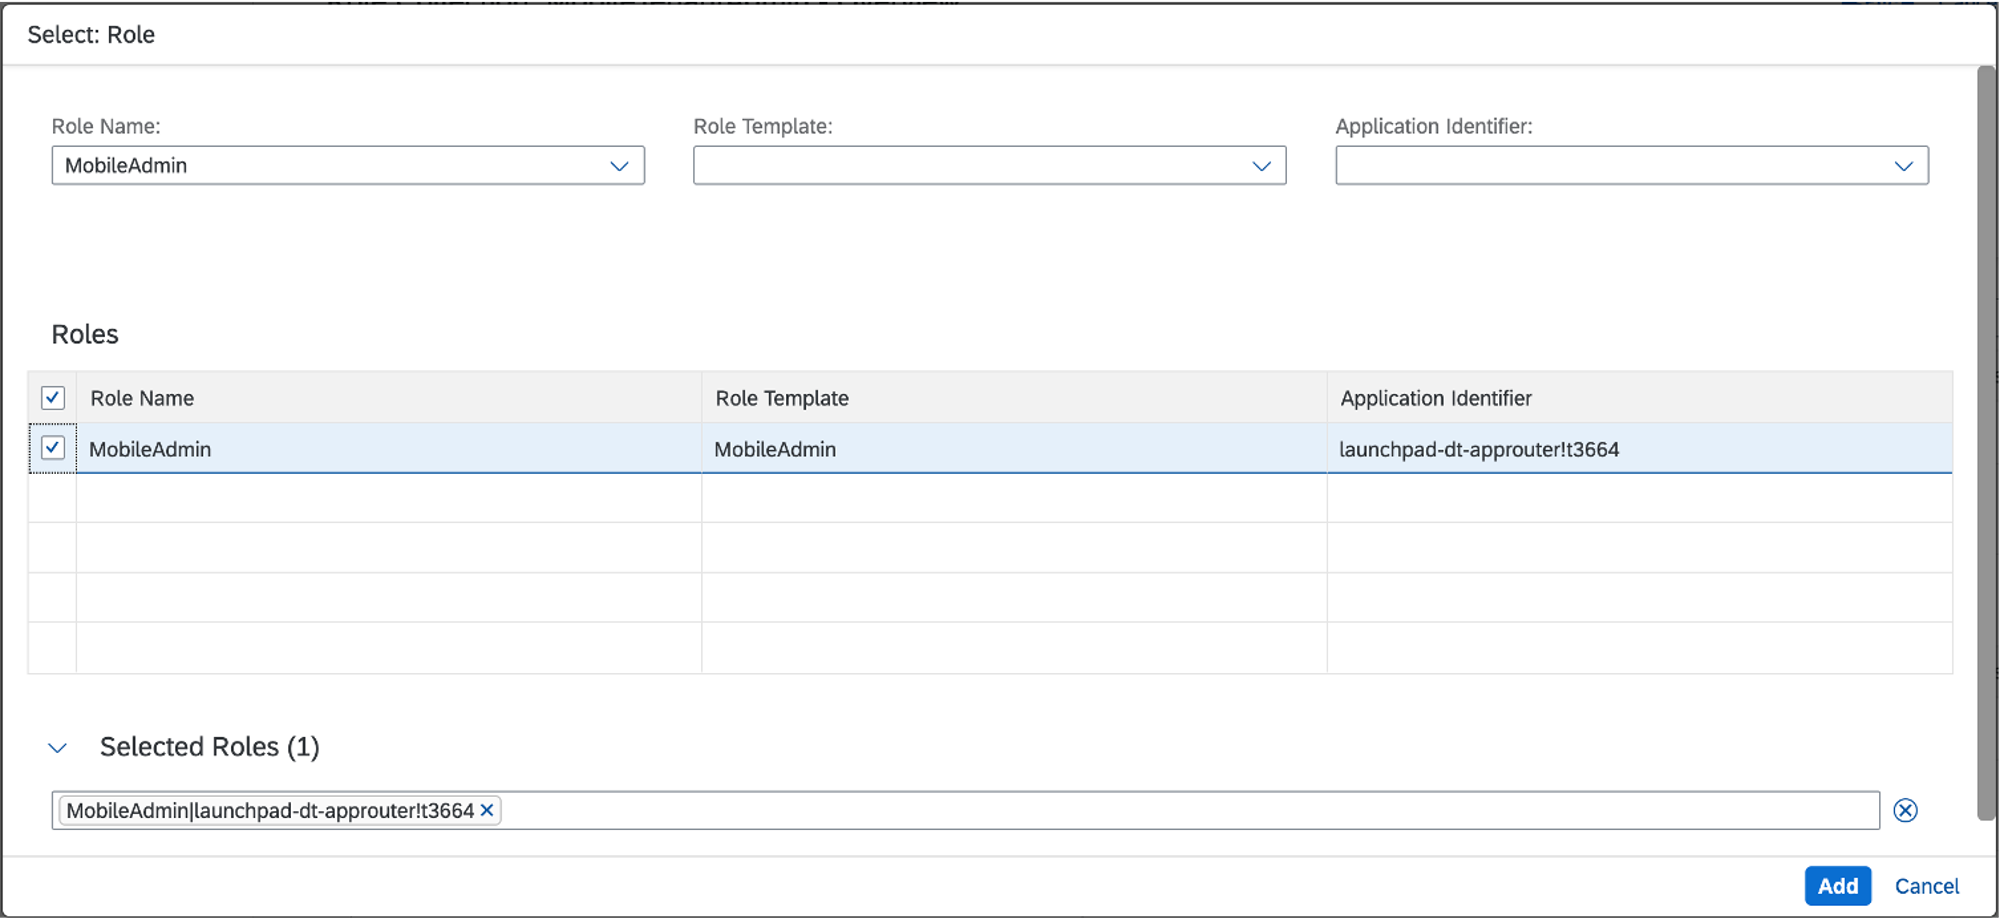
Open the value help and search for the role MobileAdmin and add it to the role collection. Save it.
As an admin, with this role collection you can access the Mobile Services with the url https://<subdomain>.m.launchpad.cfapps.<;region>.hana.ondemand.com/mobileservices/Admin/index.html
Tip: open the Launchpad service and change the bold part in the url.
https://smsleanbeta.dt.launchpad.cfapps.eu10.hana.ondemand.com/sites#Site-Directory
https://smsleanbeta.m.launchpad.cfapps.eu10.hana.ondemand.com/mobileservices/Admin/index.html
In the Mobile Services admin page, no additional configuration is required. But you can review its properties, see the user registrations and optionally edit the passcode policy and the feature flags for the app under Mobile Settings Exchange.
Mobile Settings Exchange:
Important: by default the feature flag for the widgets (GlobalWidget) is not active. Set it to active if you want to allow users to add widgets on their device for SAP Mobile Start.
First open the site in a browser.
In your user settings you can see the QR Code for onboarding in the SAP Mobile Start Application section.
The first QR code is for the app installation from Apple store. If you already have SAP Mobile Start installed on your device select the QR code for registration.
On your device start the application, you'll be prompted to scan the registration QR code and follow the onboarding process.
Here is the result on a smartphone (Home tab with grouped KPI, app suggestions and the applications tab)
Setting up an SAP Launchpad Site can be quick with content federation. Check the SAP documentation for the current restrictions.
We look forward to your comments.
Stay up to date with latest news and post your questions or feedback about SAP Mobile Start in the Q&A area. Start by visiting your SAP Mobile Experience community page and click “follow”. We’ll be publishing more informative blog posts.
Want to be notified? Check your #communications to ensure you have your settings activated.
Scenario
You have an SAP S/4HANA on premise solution with SAP Fiori Launchpad configured with standard or custom business roles, containing apps, groups and catalogs.
You want to reuse the existing content on the SAP Launchpad service and on SAP Mobile Start using content federation.
Required Systems and Components
- Embedded deployment for SAP Fiori Frontend server
- Application content for SAP S/4HANA On-Premise 1809 or above
- For cloud notification functionality, you'll need a S/4HANA release 1909 with component SAP_GWFND 7.54 SP06 or above. For lower releases in 755 (SP00 and SP01) implement SAP note 3005409
- SAP BTP sub-account
- SAP Launchpad service subscription
- SAP Cloud Connector with principal propagation already set up between SAP BTP sub-account and SAP S/4HANA on-premise system (not covered in this blog)
- iOS device with software version 14 or above
Note: you can find more information on the supported platforms/products in the documentation.
Configuration Steps
- Expose content from SAP S/4HANA
- Setup the Runtime and Design-Time destinations in SAP BTP
- Import the content in SAP Launchpad service
- Create a Site and assign the imported roles
- Add the roles to the user
- Review the SAP Mobile Start app settings in Mobile Services and onboard the site on SAP Mobile Start
Expose Content from SAP S/4HANA
Pre-requisites
Some technical settings are required in SAP S/4HANA before exposing any content. These steps are also described in this tutorial.
FLP entries
Go to transaction /n/UI2/FLP_SYS_CONF where you need to add an additional FLP configuration parameter.
Click on “New Entries”.
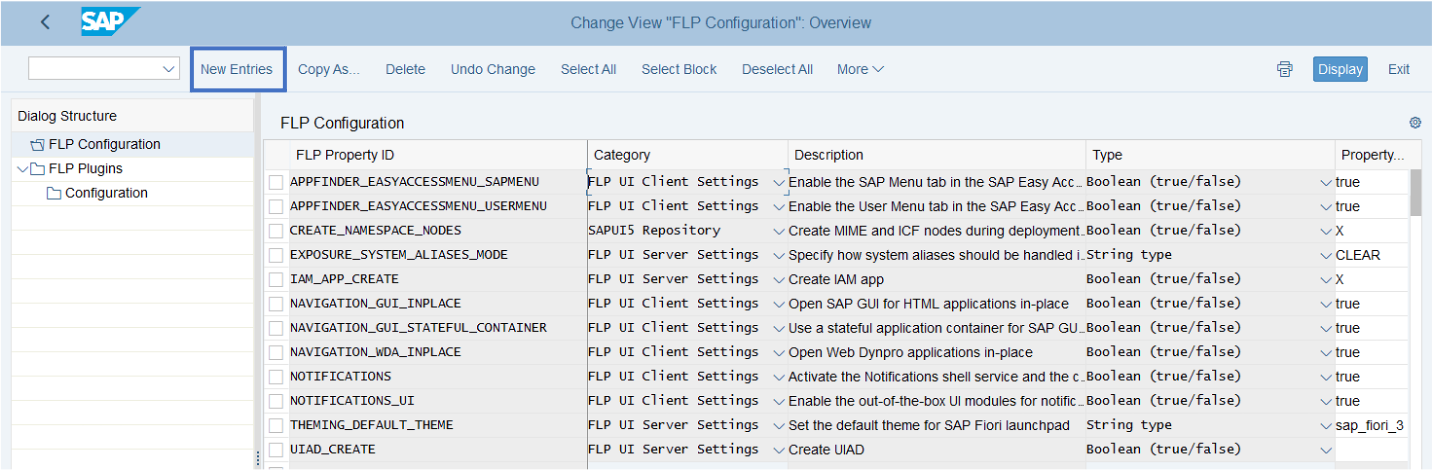
And enter the following values:
| FLP Property ID | Category | Type | Property Value |
| EXPOSURE_SYSTEM_ALIASES_MODE | Automatically filled | Automatically filled | CLEAR |
Save the entry and select a transport request when prompted.
Activate Clickjacking Protection
Go to transaction UCONCOCKPIT and select the “HTTP Whitelist Scenario” from the list.
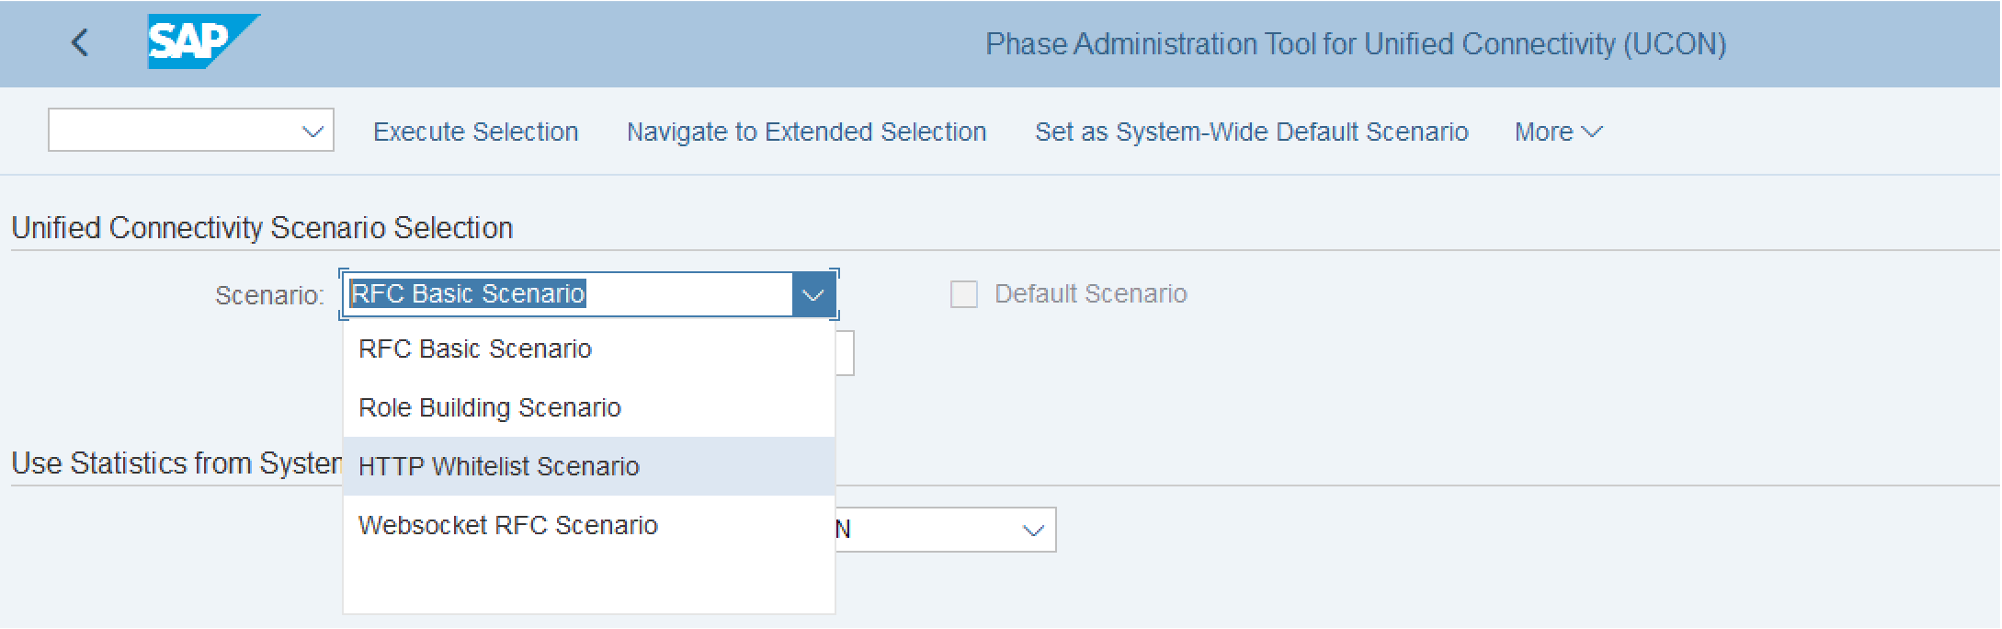
Then select in the menu More - HTTP Whitelist - Setup.

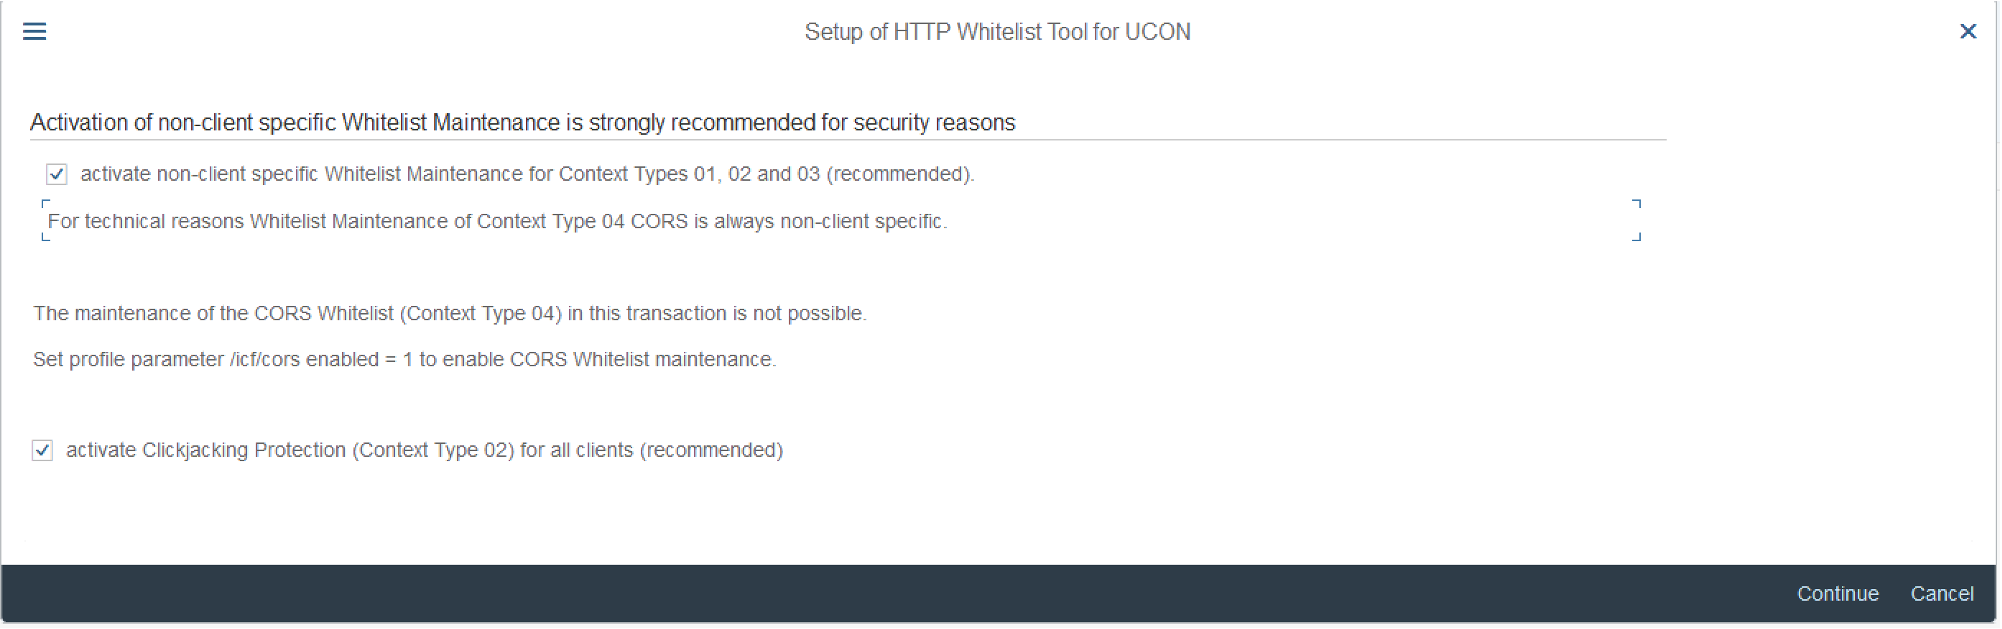
Tick both options in the setup menu and save it.
You will now see that the entry “Clickjacking Framing Protection” is added with the logging mode, meaning that connections are just logged but not checked. In production, it is recommended to set it to "Active Check" and to maintain the patterns for the SAP Launchpad service as described in the next step.
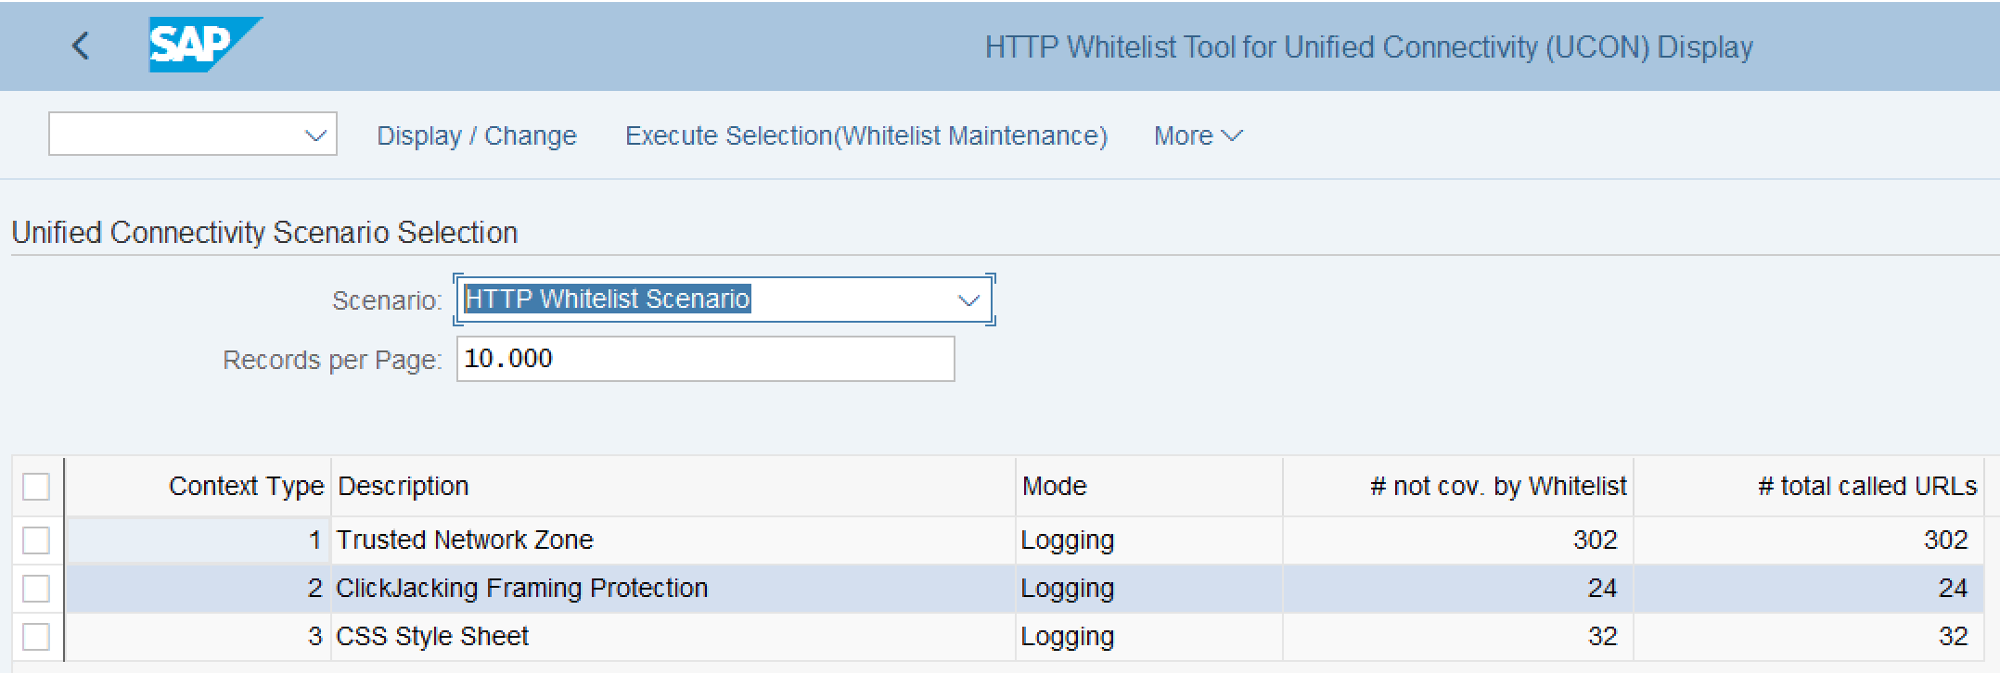
If you double click on the row “Clickjacking Framing Protection”, you'll be able to see and edit the blocked and allowed connections.

Exposure Service
Go in transaction SICF and activate the service /sap/bc/ui2/cdm3.
Then make sure in to check “use all logon procedures” for the service in the Logon Data tab.

Check the exposing user
Go in the user maintenance (transaction SU01) and check the parameters for the user who will expose the content.
Go in the tab parameters and make sure that the parameter /UI2/PAGE_CACHE_OFF does not show up there. If it does, remove it.
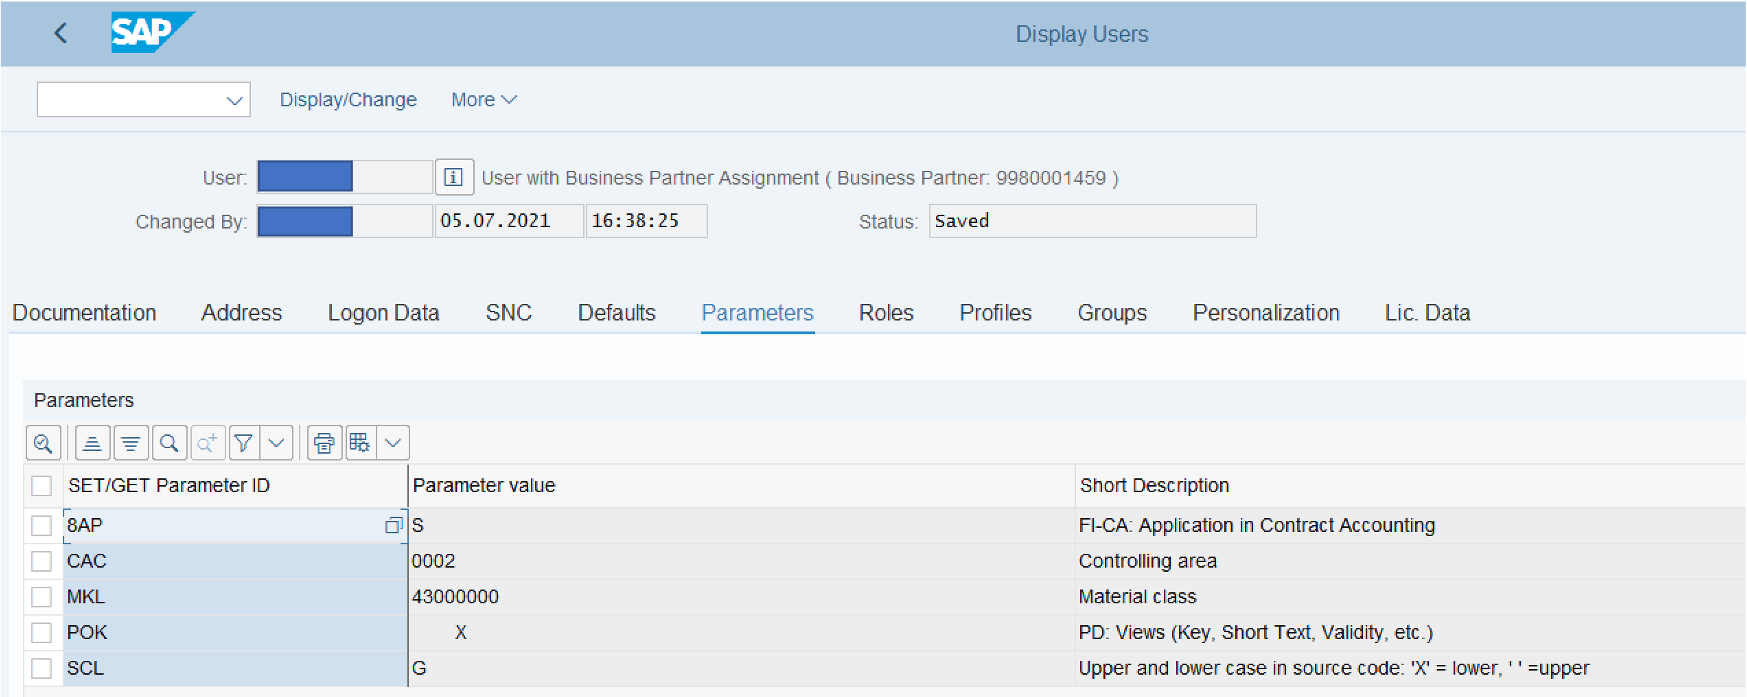
Your SAP S/4HANA system is now ready for exposure.
Expose content from SAP S/4HANA
Go to transaction /n/UI2/CDM3_EXP_SCOPE
Click on the multiple selection icon to select the roles you want to expose.

Then fill in the business roles you want to expose. In this example I have a set of custom and standard roles.
Then copy the list to your selection, F8 or with the second icon from the left.
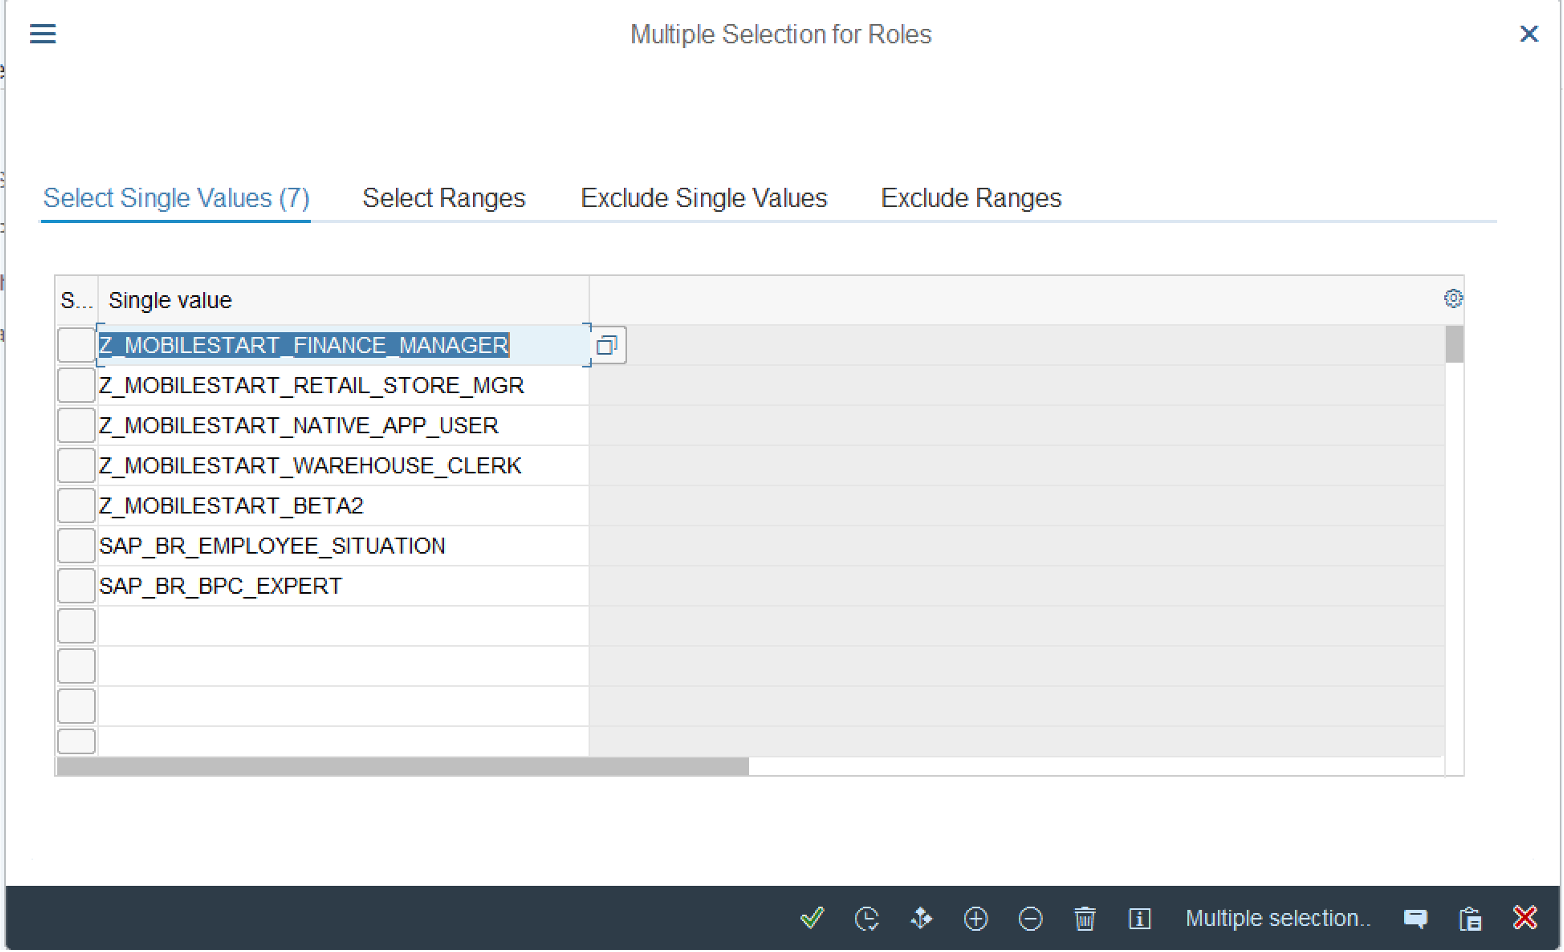
Click on Save Selected Roles
Click on Expose.

As a result, the business content is exposed from your SAP S/4HANA system as a json file and accessible with the service path /sap/bc/ui2/cdm3/entities.
With the buttons “Preview” and “View Exposed Content” of the transaction, you can have a more comprehensive view of the exposed content.
Create SAP BTP Destinations
We need to create two destinations in the SAP Business Technology Platform, a Design-Time and a Runtime destination.
The Design-Time destination is used by SAP Launchpad service to fetch the exposed data from the SAP S/4HANA system.
The Runtime destination is used during runtime i.e., whenever a user is working on the Launchpad and access backend data.
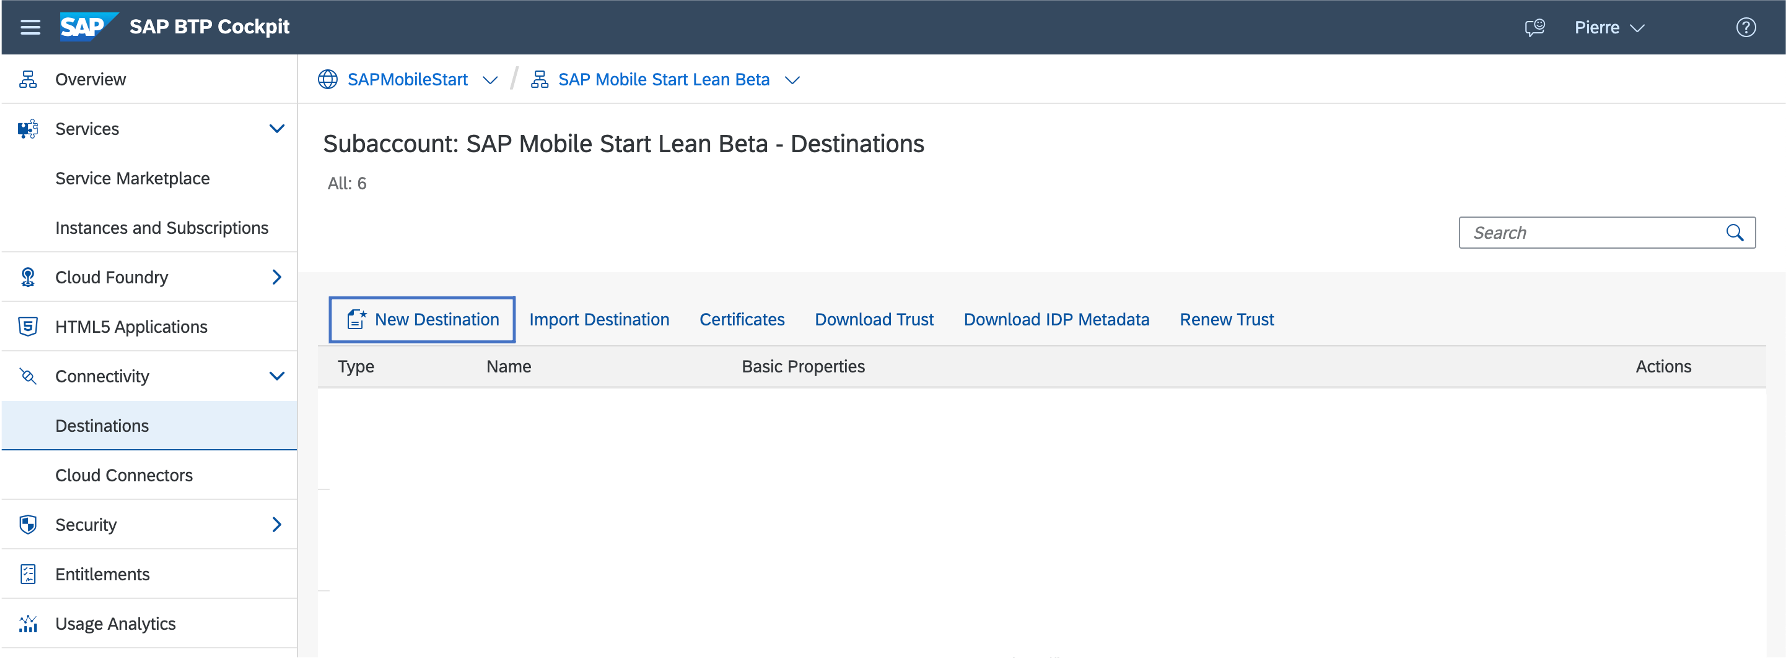
Logon to your SAP BTP sub-account, navigate to the Destinations and click on “New Destination”.
Design-Time
Clicking the “New Destination” will open a destination template – fill in the following information for the Design-Time destination. For Name use the SAP S/4HANA system ID with the suffix “dt” for Design-Time; for e.g., he4dt.
Important - the destination name must be lower case and must not contain the underscore character (_).
Configuration
| Name | e.g., he4dt |
| Type | HTTP |
| Description | e.g., HE4 Design Time |
| URL | http ://<virutal hostname> :<port>/sap/bc/ui2/cdm3/entities |
| Proxy Type | OnPremise |
| Authentication | BasicAuthentication |
| Location ID | <Location ID defined in the SAP Cloud Connector> |
| User | User in the backend |
| Password | Password of the above user |
Parameter
| sap-client | <client> e.g., 400 |
Save the entered information.

Other authentication methods are supported for this destination but not principal propagation, you can find additional information in the documentation.
Runtime
Create an additional destination for the runtime destination and fill in the following information. For name we use the SAP S/4HANA system ID and the suffix “rt” for Runtime; for e.g., he4rt.
Important – the destination name must be lower case and must not contain the underscore character (_).
Configuration
| Name | e.g., he4rt |
| Type | HTTP |
| Description | e.g., HE4 Runtime Destination |
| Proxy Type | OnPremise |
| URL | http://<virutal hostname>:<port> |
| Authentication | Principal Propagation |
| Location ID | <Location ID defined in the SAP Cloud Connector> |
Parameters
| HTML5.DynamicDestination | true |
| MobileEnabled | true |
| sap-client | <client> e.g., 400 |
| sap-platform | ABAP |
| sap-service | 32<service number> e.g., 3200 |
| sap-sysid | <systID> e.g., HE4 |
| NOTIF_SERVICEPATH | /sap/opu/odata4/iwngw/notification/default/iwngw/notification_srv/0001 |
Save the entered information.
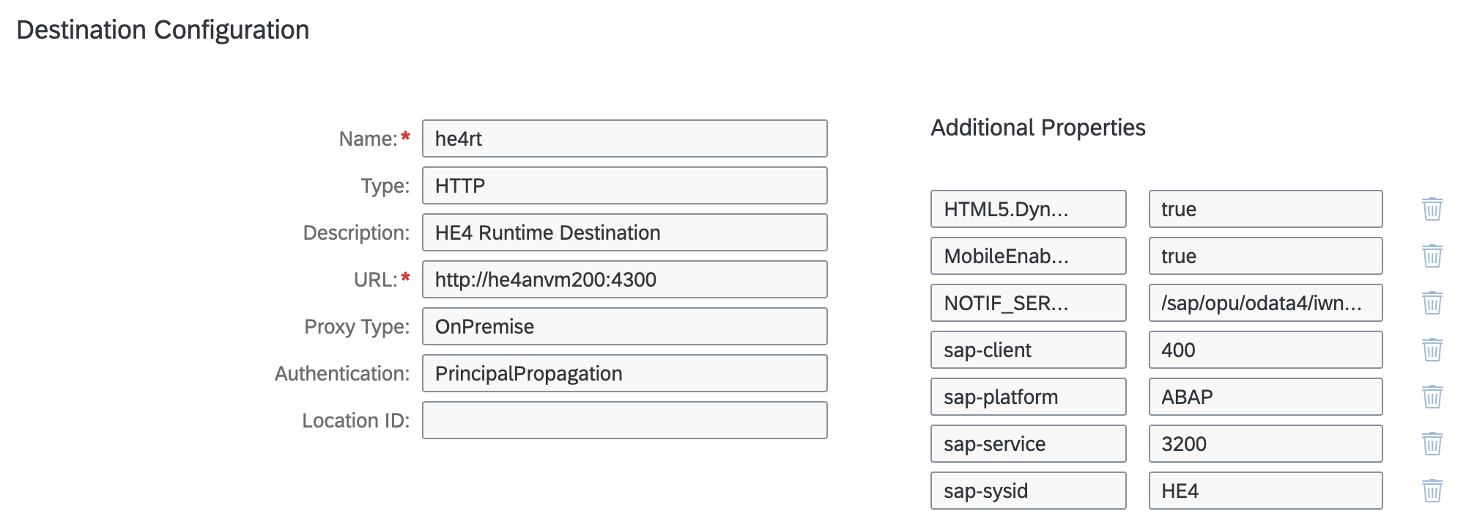
HTML5.DynamicDestination is for enabling dynamic tiles.
MobileEnabled is required for SAP Mobile Start.
NOTIF_SERVICEPATH is used in combination with sap-sysid and sap-client by the Notification Service to perform callbacks.
More information on the parameters is available in the documentation.
Import Content in the SAP Launchpad Service
Logon into SAP BTP sub-account and navigate to the Instances and Subscriptions.
If you haven‘t already done it, create a subscription for the SAP Launchpad service from the Service Marketplace and assign yourself the role collection "Launchpad Admin".

From the three little dots at the right select „Go To Application“, this will open the Site Manager.
Go to the Provider Manager to create a provider for SAP S/4HANA content.

Note that he HTML5 Apps provider is created by default, you can find more information in the documentation.
Click on New and complete the required information.
| Title | Name of the content provider |
| Description | A meaningful description |
| ID | Automatic generated based on Title |
| Design-Time Destination | Select the design-time destination from the dropdown – the one created earlier |
| Runtime Destination | Select the runtime destination from the dropdown – the one created earlier |
| Content Addition Mode | Select Manual or Automatic |
| Runtime Destination for OData | Use default runtime destination |
| Do not create role collection | Leave it unchecked |

After a few seconds, you should see a new content provider with the green status "created".

If something goes wrong and the status is in error, check the pre-requisite settings in SAP S/4HANA. If this doesn’t help you may check the SAP note 2548392 for connectivity between BTP and SCC with basic authentication.
Now navigate to the content manager. In the tab “Content Explorer” you should see the new content provider.
Click on it.
Select the roles and add them to your content with the button “Add to My Content”.
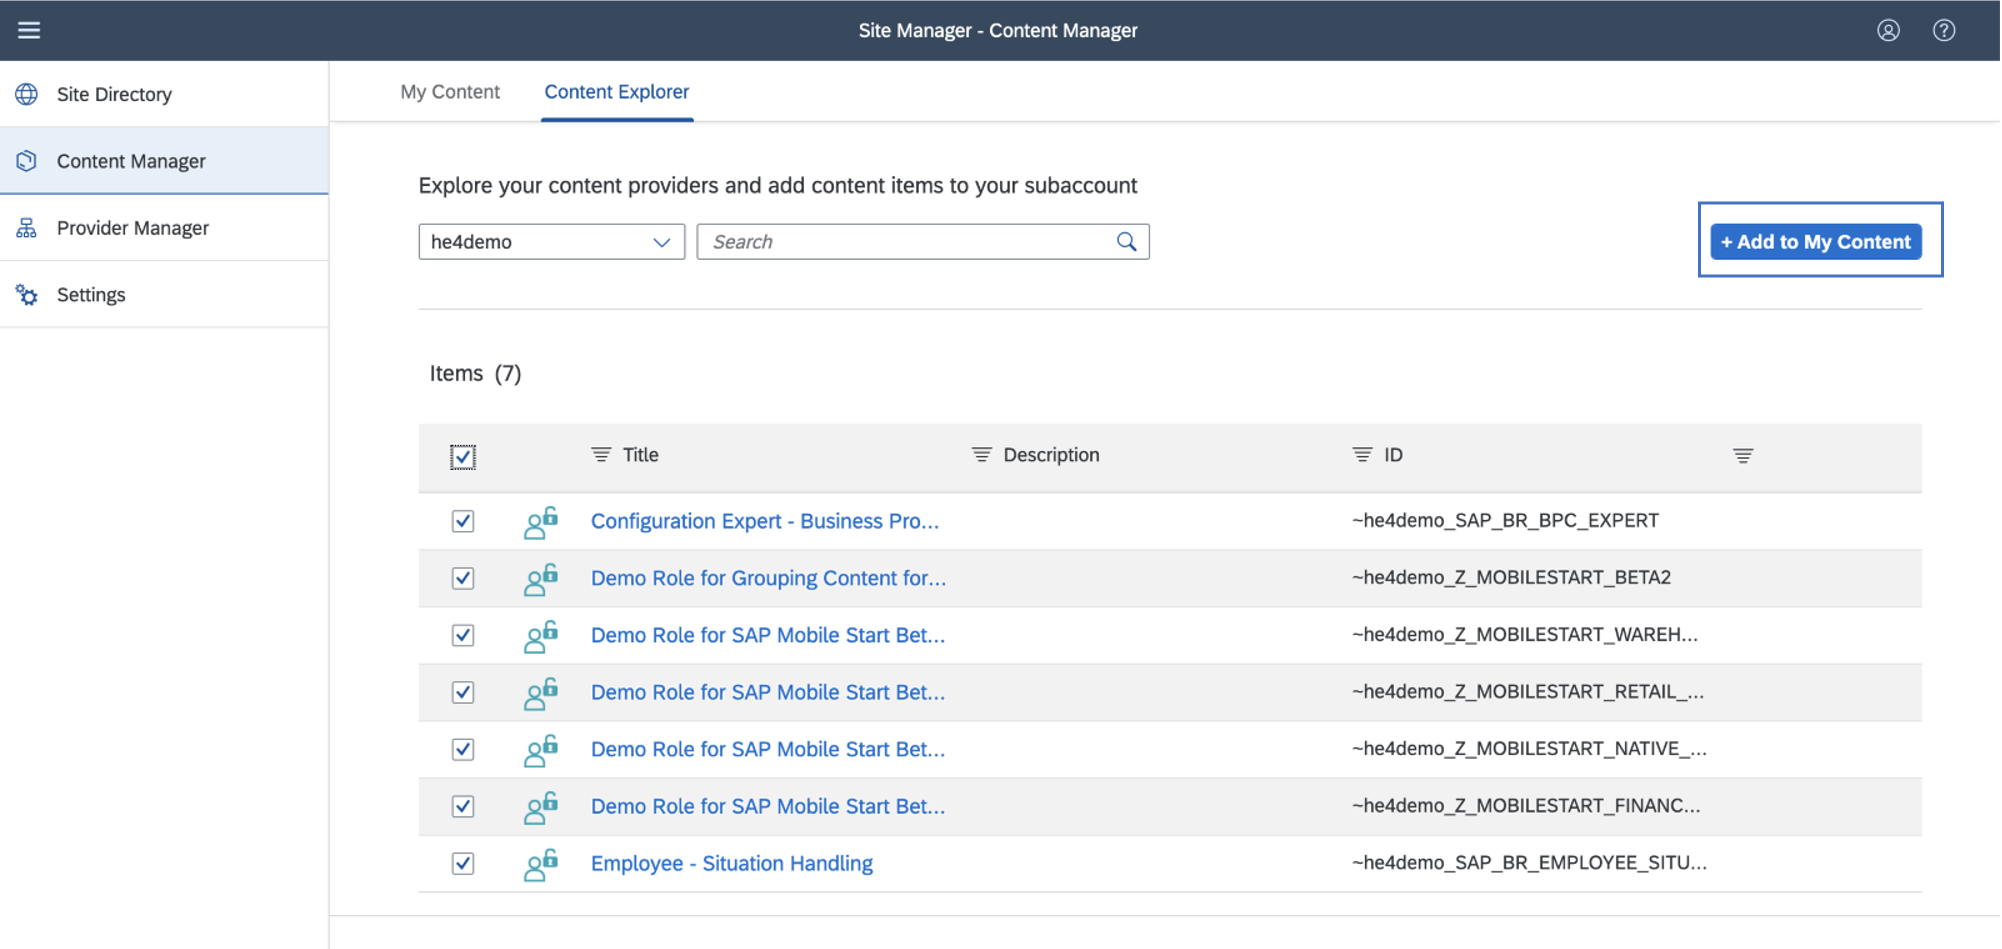
Now you can see the selection in the tab “My Content”.

Clicking on a role will show you the apps included and their parameters.
NOTE: You won’t be able to change anything, remote content can only be edited in the source system.
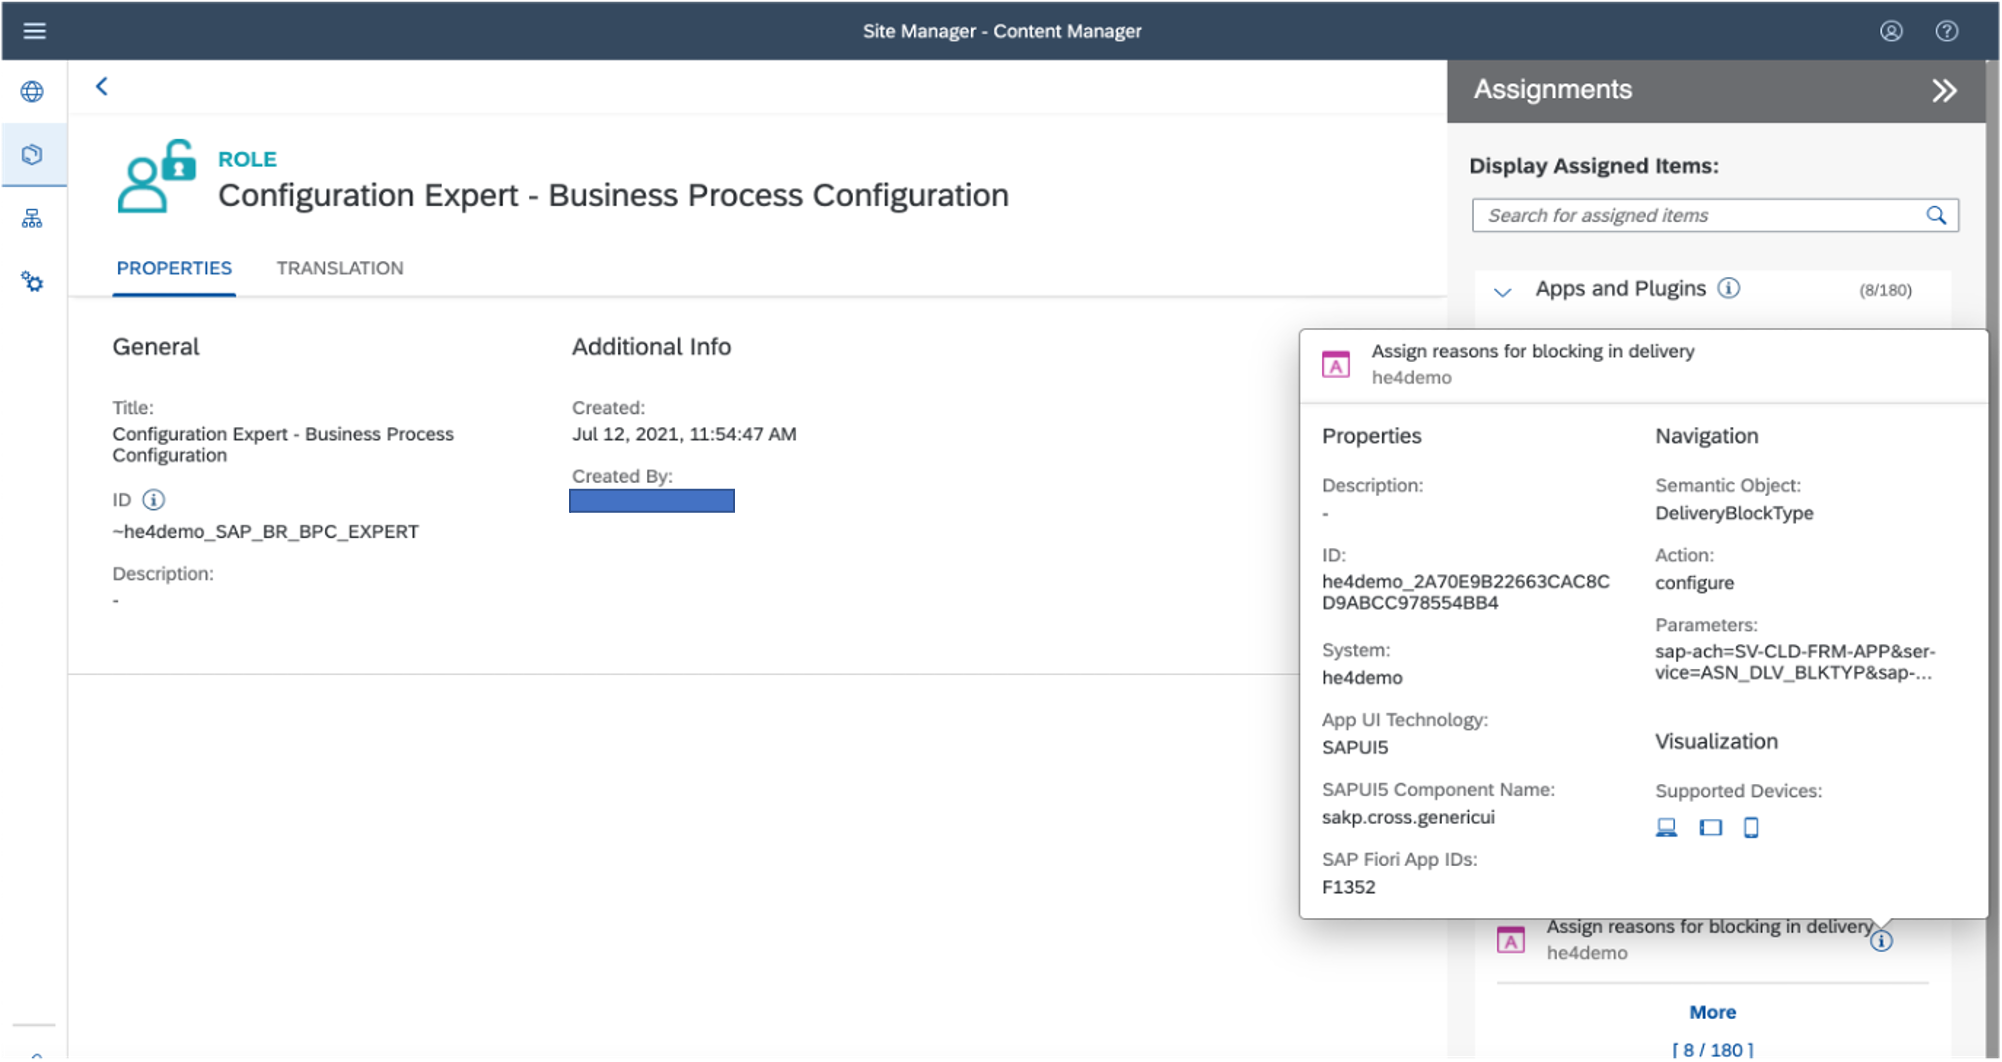
You can notice the supported devices for the displayed application, it is coming from the backend catalog configuration and apply to the SAP Launchpad service and SAP Mobile Start.
Create a Site in SAP Launchpad Service
Navigate to the Site Directory and create a new site.
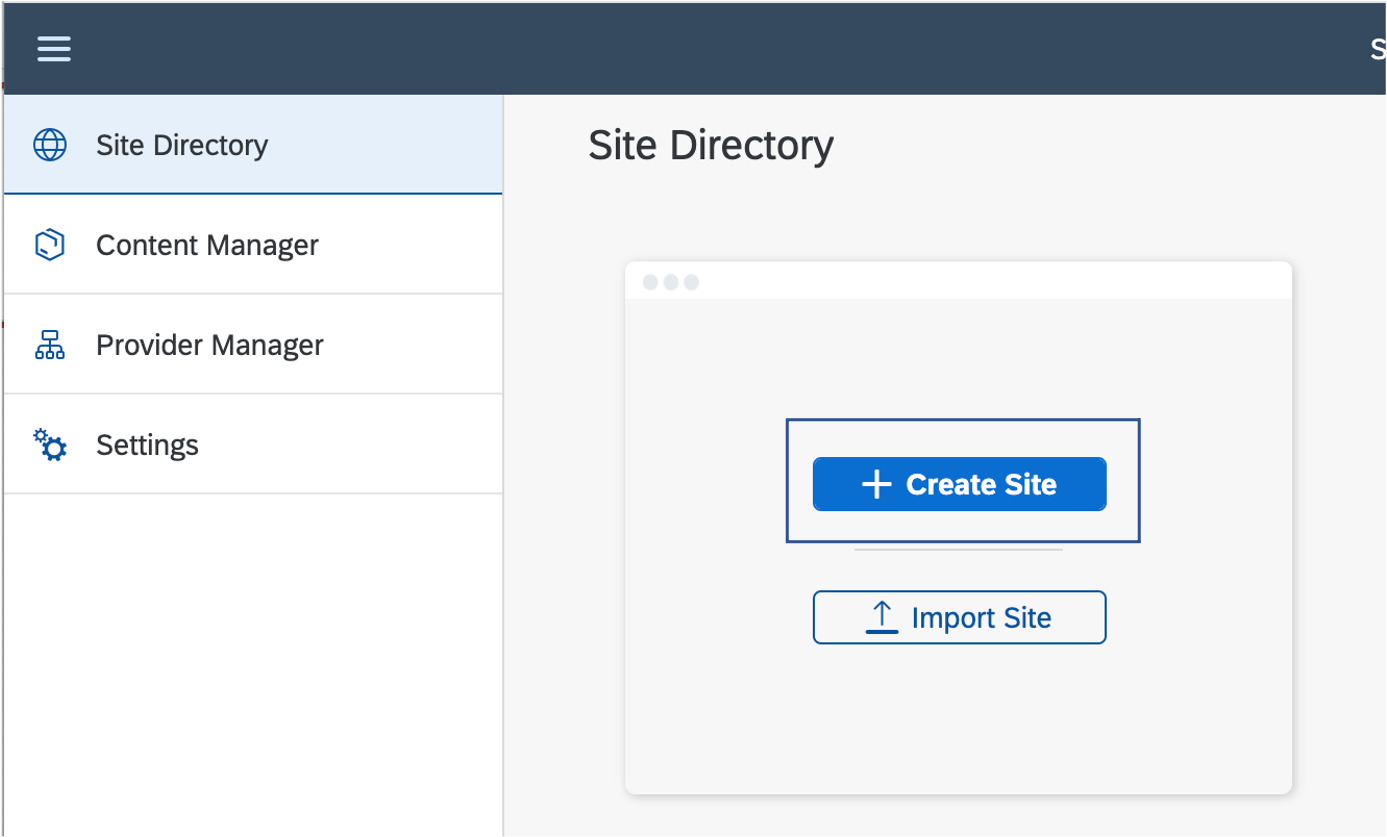
Give your site a name and click “Create”, it will not display anywhere on your final site, it is just reference.

You can review all options.
Make sure to enable SAP Mobile Start under User Capabilities.
Note: The toggle button is enabled by default for new sites. For existing sites, the setting is disabled by default and you'll need to manually toggle it to Yes.

Assign the Roles to the Site
We now need to assign the roles to the site. In the Site Directory, you can access your site settings by clicking on the gear icon.

In edit mode, you can now assign the roles imported from SAP S/4HANA. In the “Assignments” box on the right you can search for the roles to assign to the site.

Click on the + button to assign the roles to the site and save.
Ex:

Assign the roles to the users
The last step before testing the site is to assign the roles to the users.
In the SAP BTP sub-account navigate to the security section and select “users”.
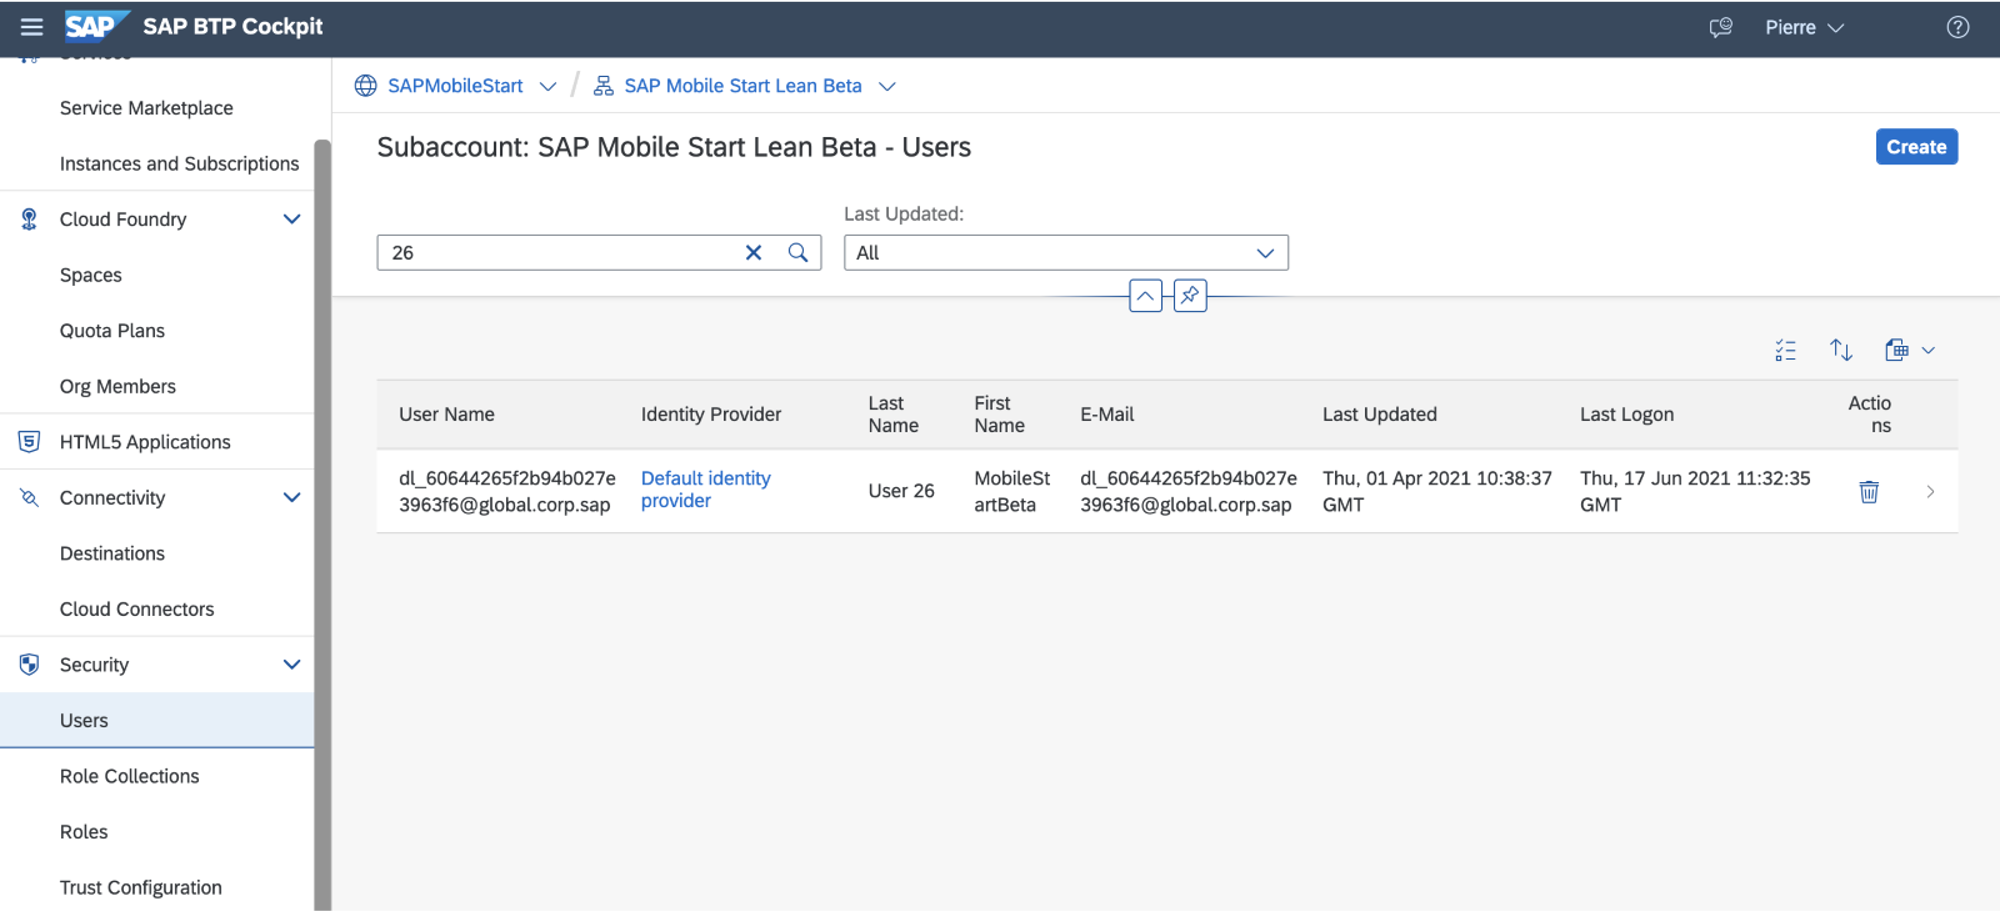
Click on a user row, this will open an overview with its details and assigned role collections.
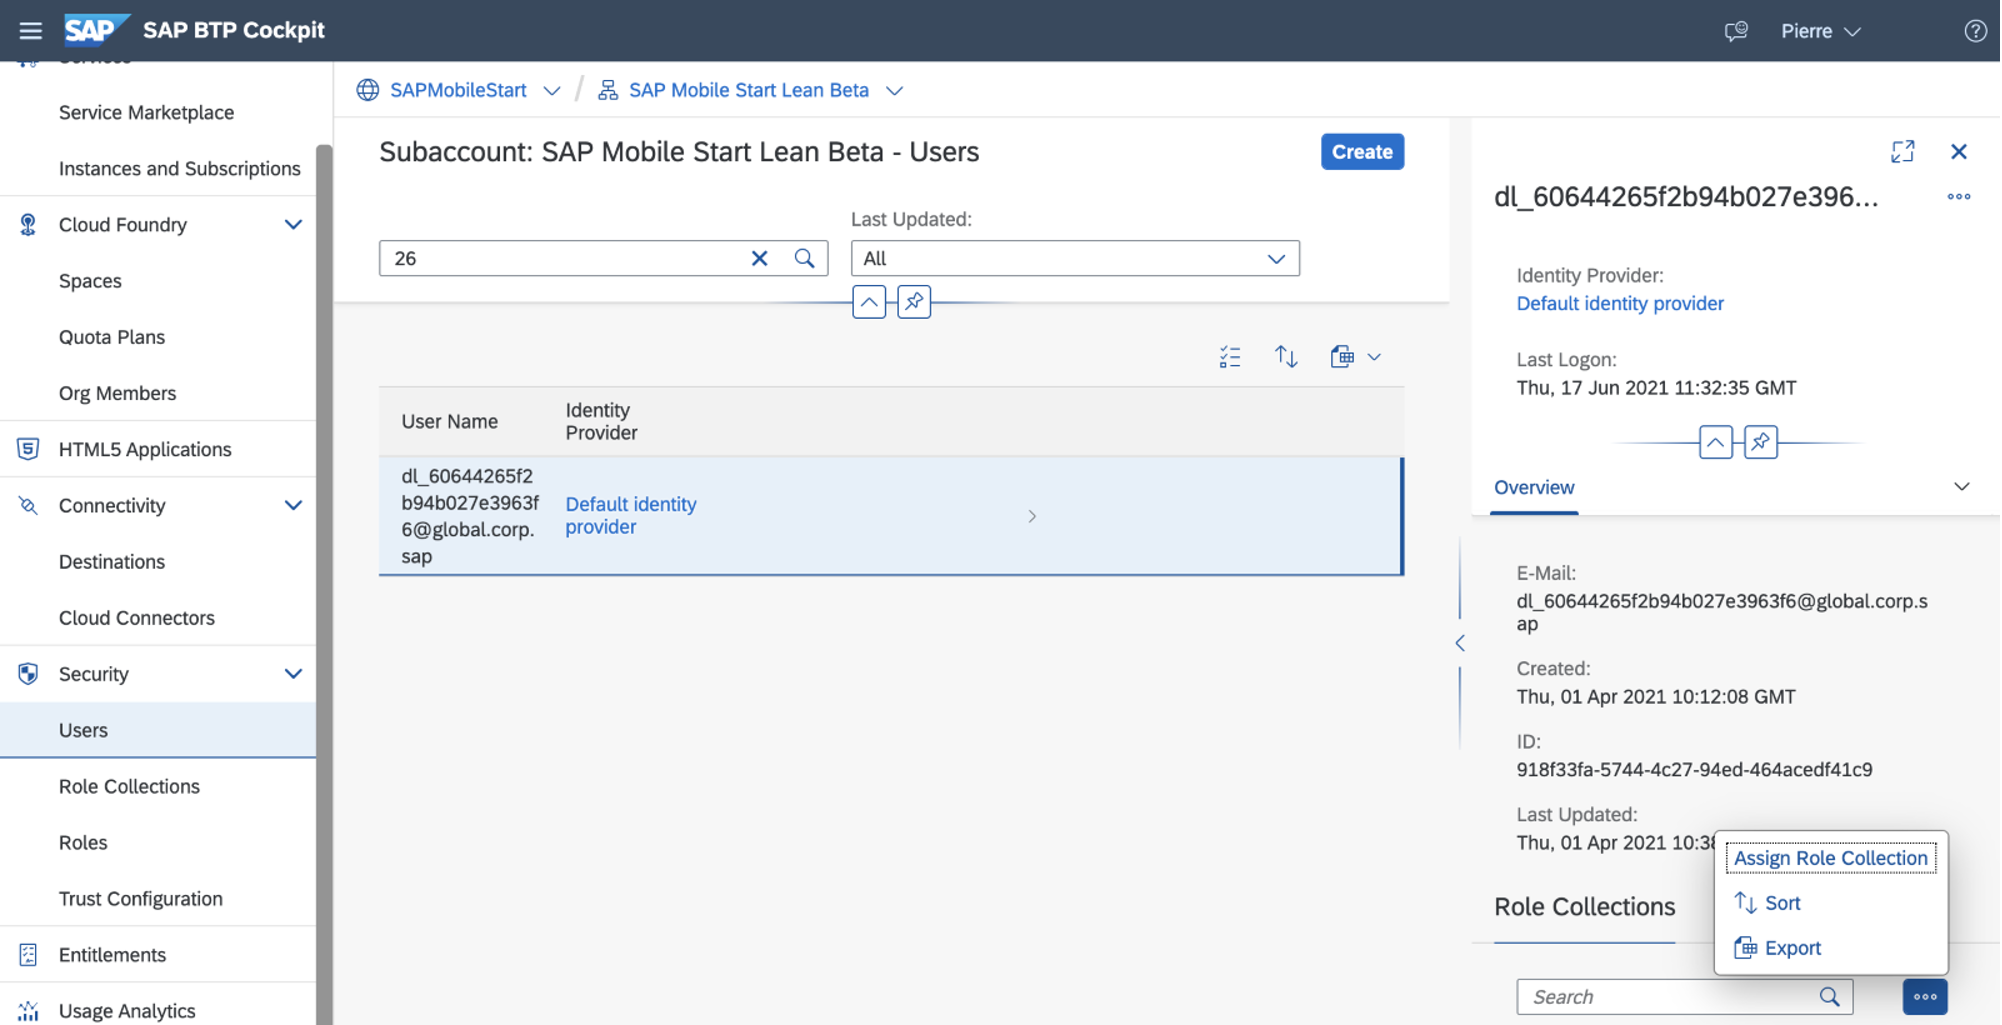
Right to the Role collection search box, click on the three little dots and select “Assign Role Collection”.
Select the role collections you want to assign to the user and click on “Assign Role Collection”. Note you can search with the content provider name.
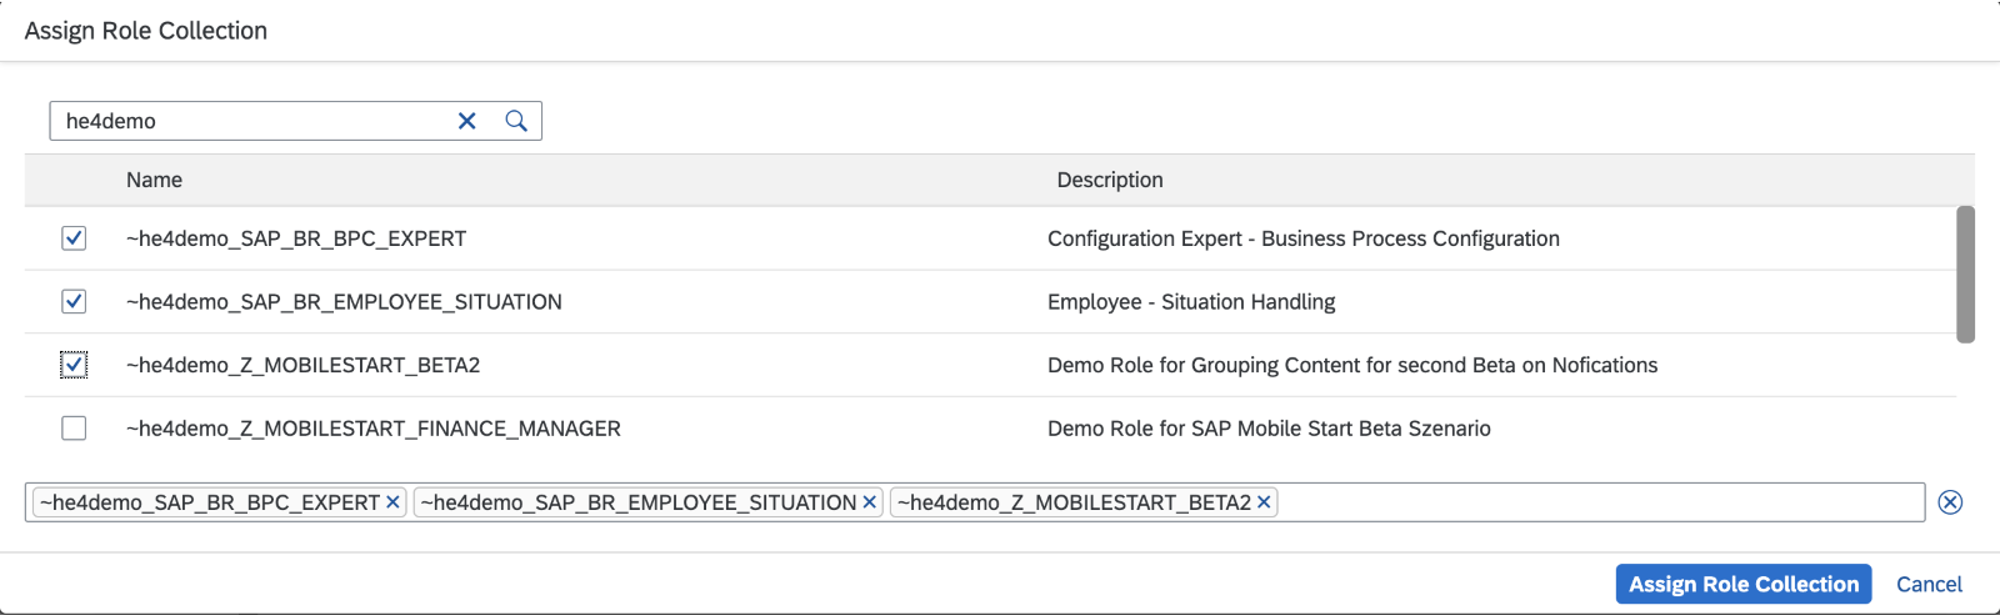
Note: in a productive scenario and using your own IAS, you’ll prefer to use the Role collection mapping against Idp groups. Please refer to the documentation for more information
Test the Site
Back to the Site Manager, you'll find your site in the Site Directory.
With the arrow icon you can launch it, with the gear icon you'll access its setting and the three little dots give you more option like export, set an alias or delete it.
Launch your site, it is now ready to use.

SAP Mobile Start Enablement and Onboarding
Create the role collection to access Mobile Services
As an admin with this role collection, you can access the Mobile Services included in SAP Launchpad service.
This role collection doesn't need to be assigned to the SAP Mobile Start end users.
In the SAP BTP sub-account go into the role collections and click on the + button to create a new role collection.
In the dialog pop-up name it “MobileTenantAdmin”, give it a description and click on Create.
In the role collection list, select your new role collection to edit it.
Open the value help and search for the role MobileAdmin and add it to the role collection. Save it.
Review the Mobile Services Settings
As an admin, with this role collection you can access the Mobile Services with the url https://<subdomain>.m.launchpad.cfapps.<;region>.hana.ondemand.com/mobileservices/Admin/index.html
Tip: open the Launchpad service and change the bold part in the url.
https://smsleanbeta.dt.launchpad.cfapps.eu10.hana.ondemand.com/sites#Site-Directory
https://smsleanbeta.m.launchpad.cfapps.eu10.hana.ondemand.com/mobileservices/Admin/index.html
In the Mobile Services admin page, no additional configuration is required. But you can review its properties, see the user registrations and optionally edit the passcode policy and the feature flags for the app under Mobile Settings Exchange.
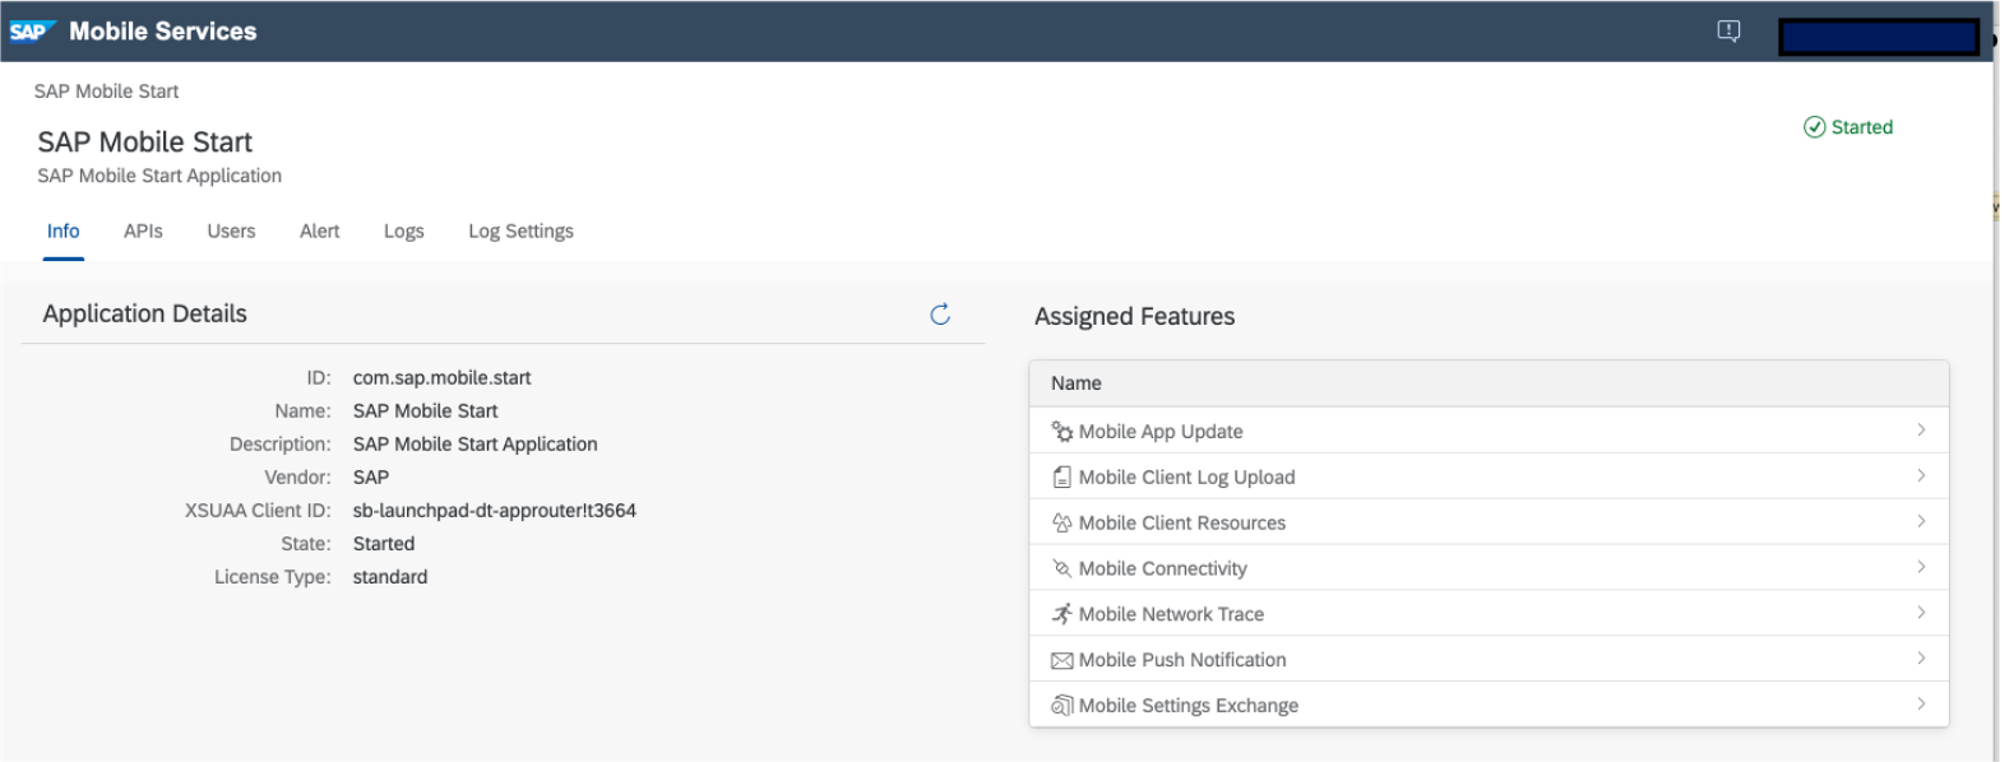
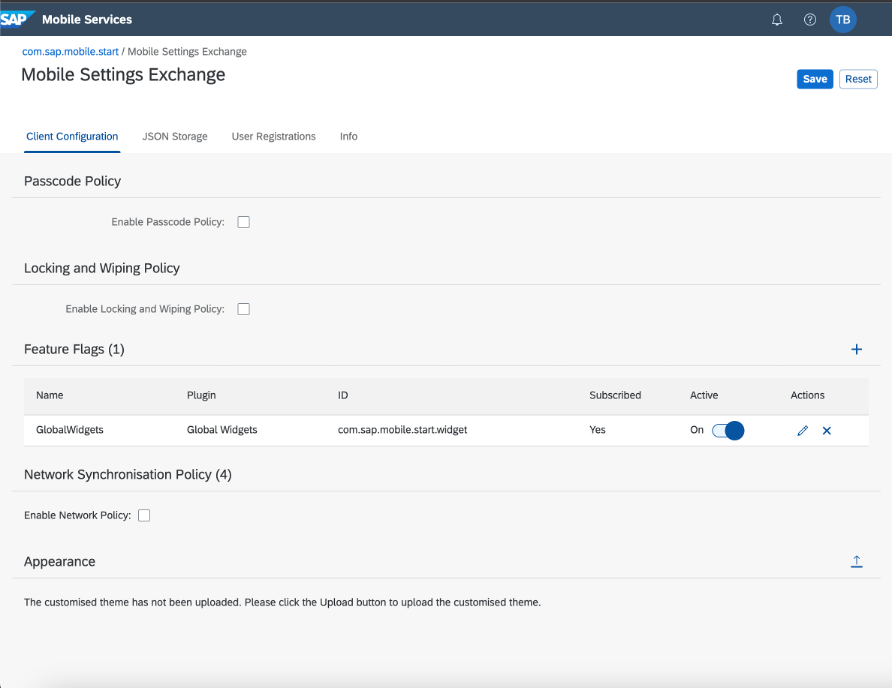
Mobile Settings Exchange:
Important: by default the feature flag for the widgets (GlobalWidget) is not active. Set it to active if you want to allow users to add widgets on their device for SAP Mobile Start.
Onboard the Site on SAP Mobile Start
First open the site in a browser.
In your user settings you can see the QR Code for onboarding in the SAP Mobile Start Application section.
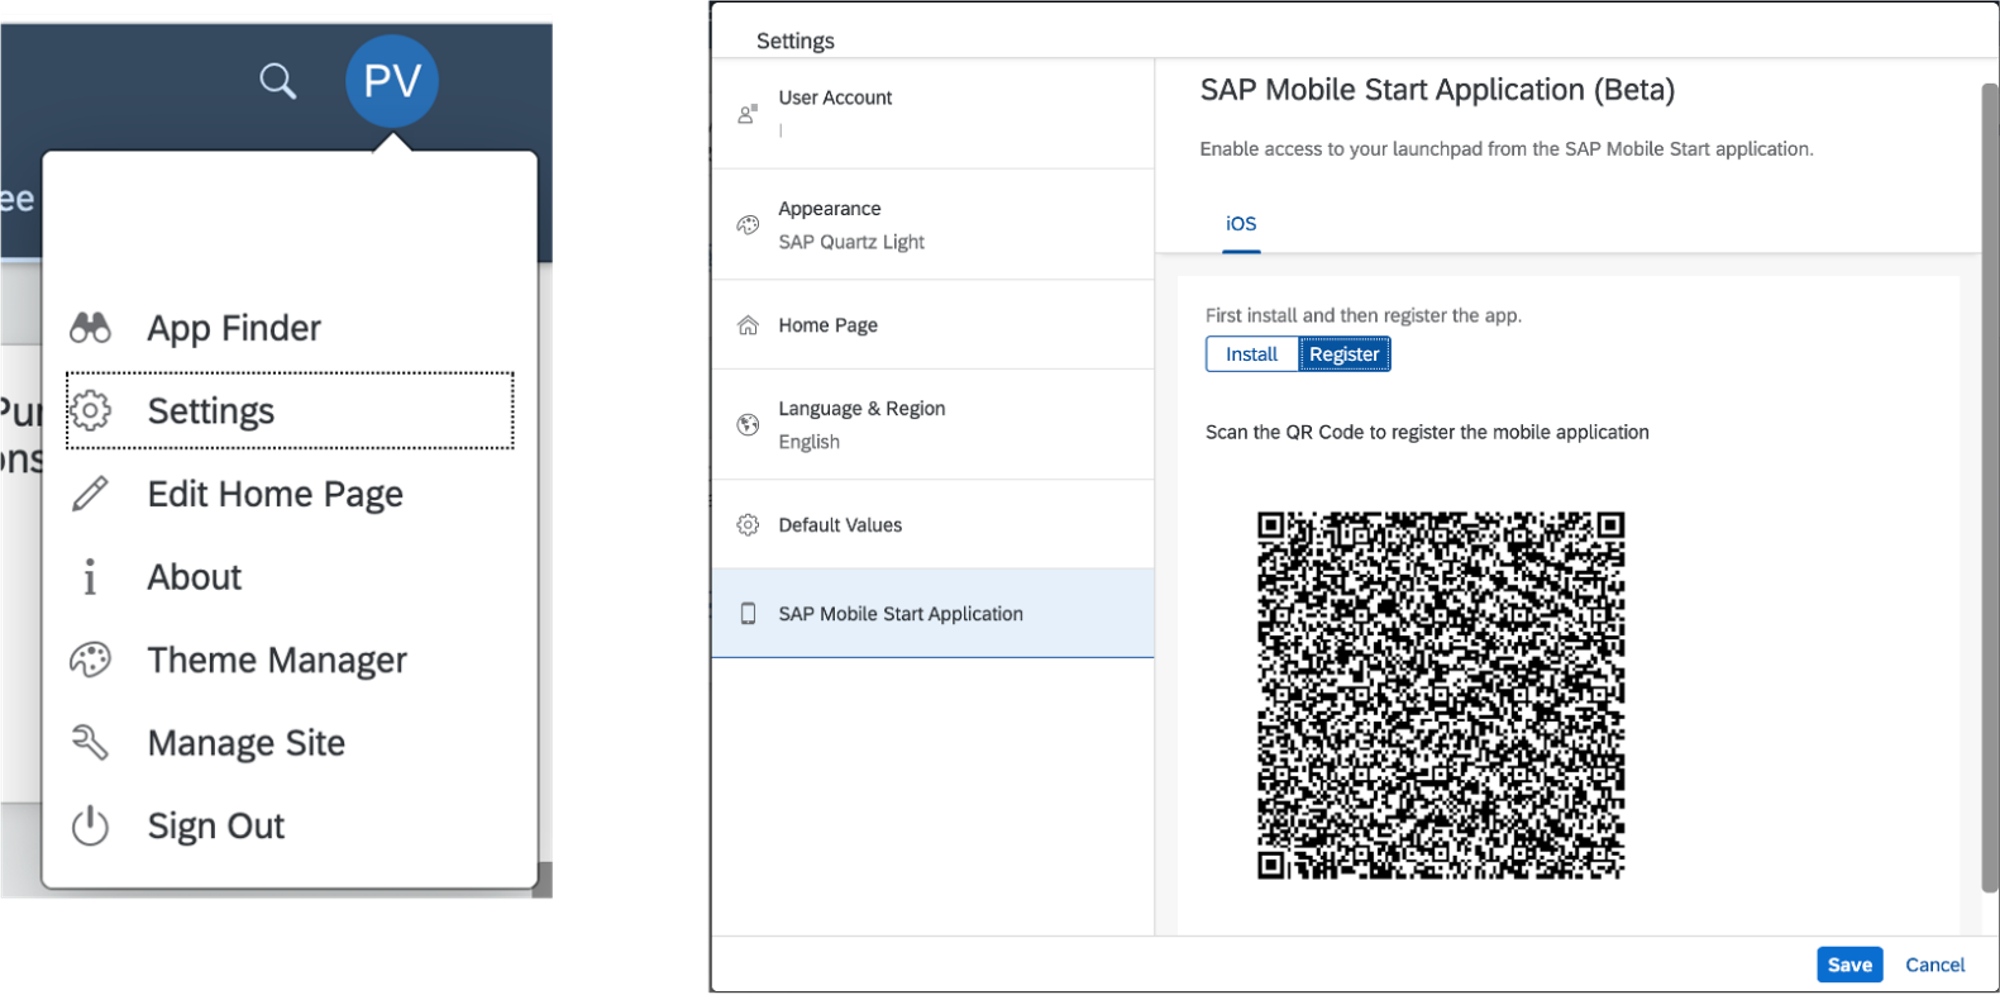
The first QR code is for the app installation from Apple store. If you already have SAP Mobile Start installed on your device select the QR code for registration.
On your device start the application, you'll be prompted to scan the registration QR code and follow the onboarding process.
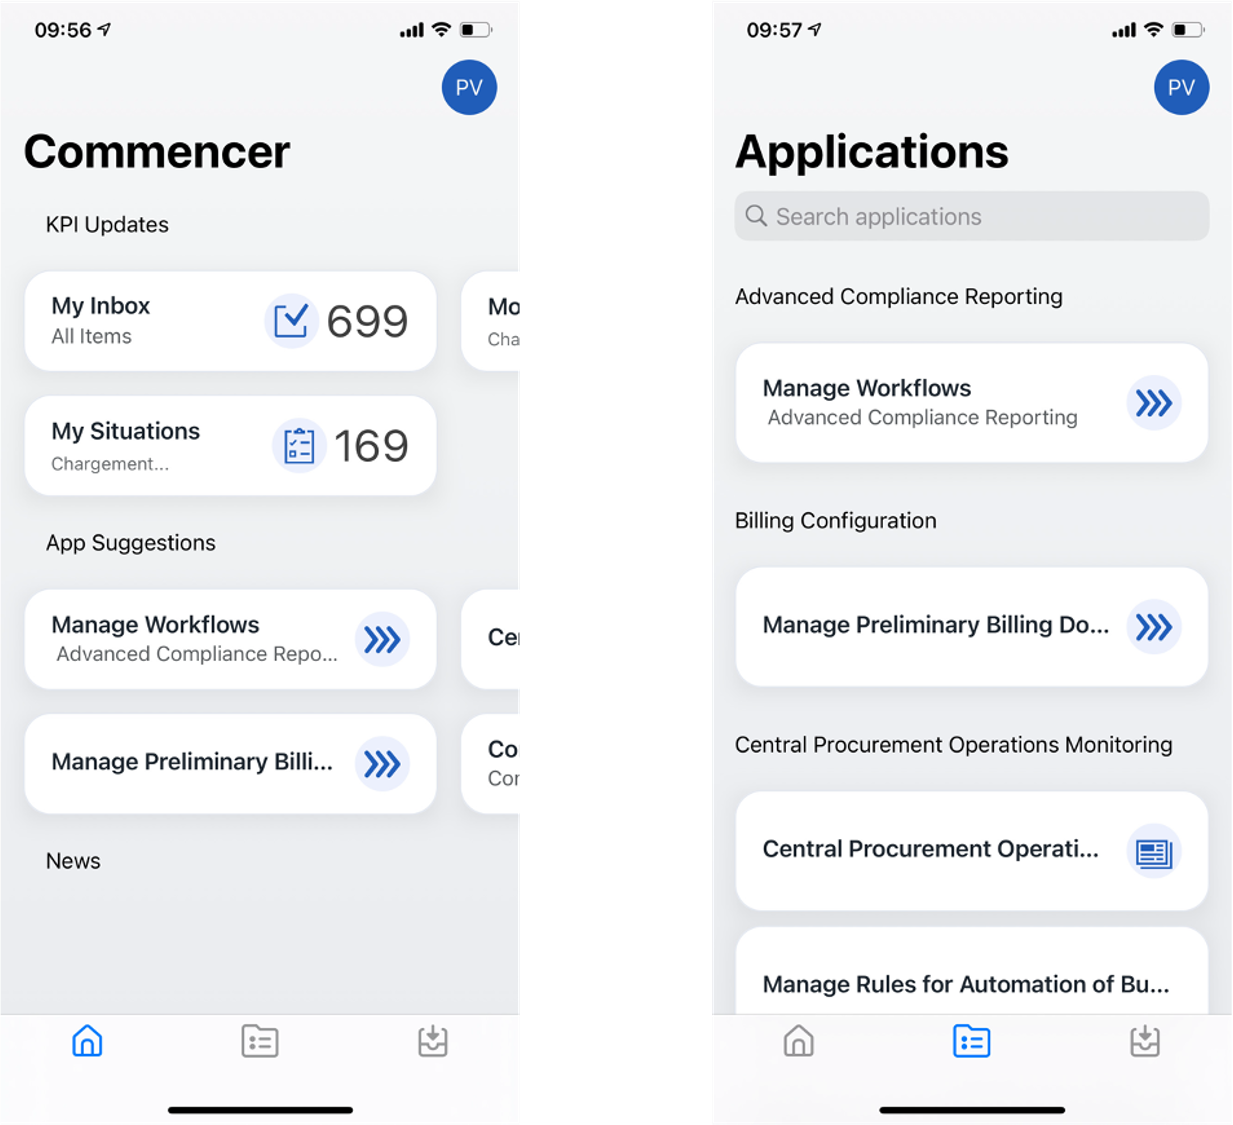
Here is the result on a smartphone (Home tab with grouped KPI, app suggestions and the applications tab)
Summary
Setting up an SAP Launchpad Site can be quick with content federation. Check the SAP documentation for the current restrictions.
We look forward to your comments.
Stay up to date with latest news and post your questions or feedback about SAP Mobile Start in the Q&A area. Start by visiting your SAP Mobile Experience community page and click “follow”. We’ll be publishing more informative blog posts.
Want to be notified? Check your #communications to ensure you have your settings activated.
- SAP Managed Tags:
- SAP Build Work Zone, standard edition,
- SAP Mobile Start,
- SAP S/4HANA,
- Mobile
Labels:
30 Comments
You must be a registered user to add a comment. If you've already registered, sign in. Otherwise, register and sign in.
Labels in this area
-
ABAP CDS Views - CDC (Change Data Capture)
2 -
AI
1 -
Analyze Workload Data
1 -
BTP
1 -
Business and IT Integration
2 -
Business application stu
1 -
Business Technology Platform
1 -
Business Trends
1,658 -
Business Trends
118 -
CAP
1 -
cf
1 -
Cloud Foundry
1 -
Confluent
1 -
Customer COE Basics and Fundamentals
1 -
Customer COE Latest and Greatest
3 -
Customer Data Browser app
1 -
Data Analysis Tool
1 -
data migration
1 -
data transfer
1 -
Datasphere
2 -
Event Information
1,400 -
Event Information
75 -
Expert
1 -
Expert Insights
177 -
Expert Insights
358 -
General
1 -
Google cloud
1 -
Google Next'24
1 -
GraphQL
1 -
Kafka
1 -
Life at SAP
780 -
Life at SAP
15 -
Migrate your Data App
1 -
MTA
1 -
Network Performance Analysis
1 -
NodeJS
1 -
PDF
1 -
POC
1 -
Product Updates
4,575 -
Product Updates
398 -
Replication Flow
1 -
REST API
1 -
RisewithSAP
1 -
SAP BTP
1 -
SAP BTP Cloud Foundry
1 -
SAP Cloud ALM
1 -
SAP Cloud Application Programming Model
1 -
SAP Datasphere
2 -
SAP S4HANA Cloud
1 -
SAP S4HANA Migration Cockpit
1 -
Technology Updates
6,871 -
Technology Updates
494 -
Workload Fluctuations
1
Related Content
- SAP BTP ABAP Environment – Release 2405 in Technology Blogs by SAP
- Error loading Fiori Application - App could not be opened in Technology Q&A
- SAP BTP FAQs - Part 3 (Security) in Technology Blogs by SAP
- The Session Timer only appears after the first inactivity. in Technology Q&A
- Essential SAP Fiori Transaction Codes for Fiori Developers in Technology Q&A
Top kudoed authors
| User | Count |
|---|---|
| 16 | |
| 8 | |
| 7 | |
| 7 | |
| 6 | |
| 6 | |
| 6 | |
| 5 | |
| 5 | |
| 5 |