
- SAP Community
- Products and Technology
- Technology
- Technology Blogs by SAP
- Single Sign On to Open Connectors in SAP Integrati...
Technology Blogs by SAP
Learn how to extend and personalize SAP applications. Follow the SAP technology blog for insights into SAP BTP, ABAP, SAP Analytics Cloud, SAP HANA, and more.
Turn on suggestions
Auto-suggest helps you quickly narrow down your search results by suggesting possible matches as you type.
Showing results for
Advisor
Options
- Subscribe to RSS Feed
- Mark as New
- Mark as Read
- Bookmark
- Subscribe
- Printer Friendly Page
- Report Inappropriate Content
11-06-2021
2:00 AM
Background and Context:
Being able to connect to non-SAP systems via Open Connectors is an important part of SAP Integration Suite's proposition. In addition, customers have been using SAP Open Connectors as a standalone product within SAP BTP's Neo and multi-cloud environment as well.
This blog post will demonstrate the ability to log into the Open Connectors Design time web-UI with a single sign-on (SSO) experience that will authenticate to Microsoft Azure Active Directory (AD) Identity Provider.
It needs to be mentioned that while users can log into the BTP Cockpit (or for that matter to the Integration Suite launchpad) with single sign-on to say Azure AD or any other custom Identity Provider by virtue of the Trust configuration in the BTP Cockpit's Security section (and then subsequently assigning the required role collections, e.g. Integration_Provisioner / OpenConnectors_User to access the needed tiles on the launchpad), the ability to access the Open Connectors UI by authenticating to the external IDP needs an additional onboarding and authentication step.
You may refer to this blog for steps on authenticating to Open Connectors UI with users from SAP Identity and Authentication Service (SAP IAS). In this blog post, we achieve the same result by authenticating against Azure AD.
Additional blogs on Open Connectors capability in the SAP Integration Suite are covered in Simplify integration with non-SAP applications blog series.
Prerequisites:
- An SAP Integration Suite (or even SAP Open Connectors) tenant (productive / trial) where Open Connectors capability has been activated.
- Subscription to Azure Portal and Active Directory services
Procedure and Steps:
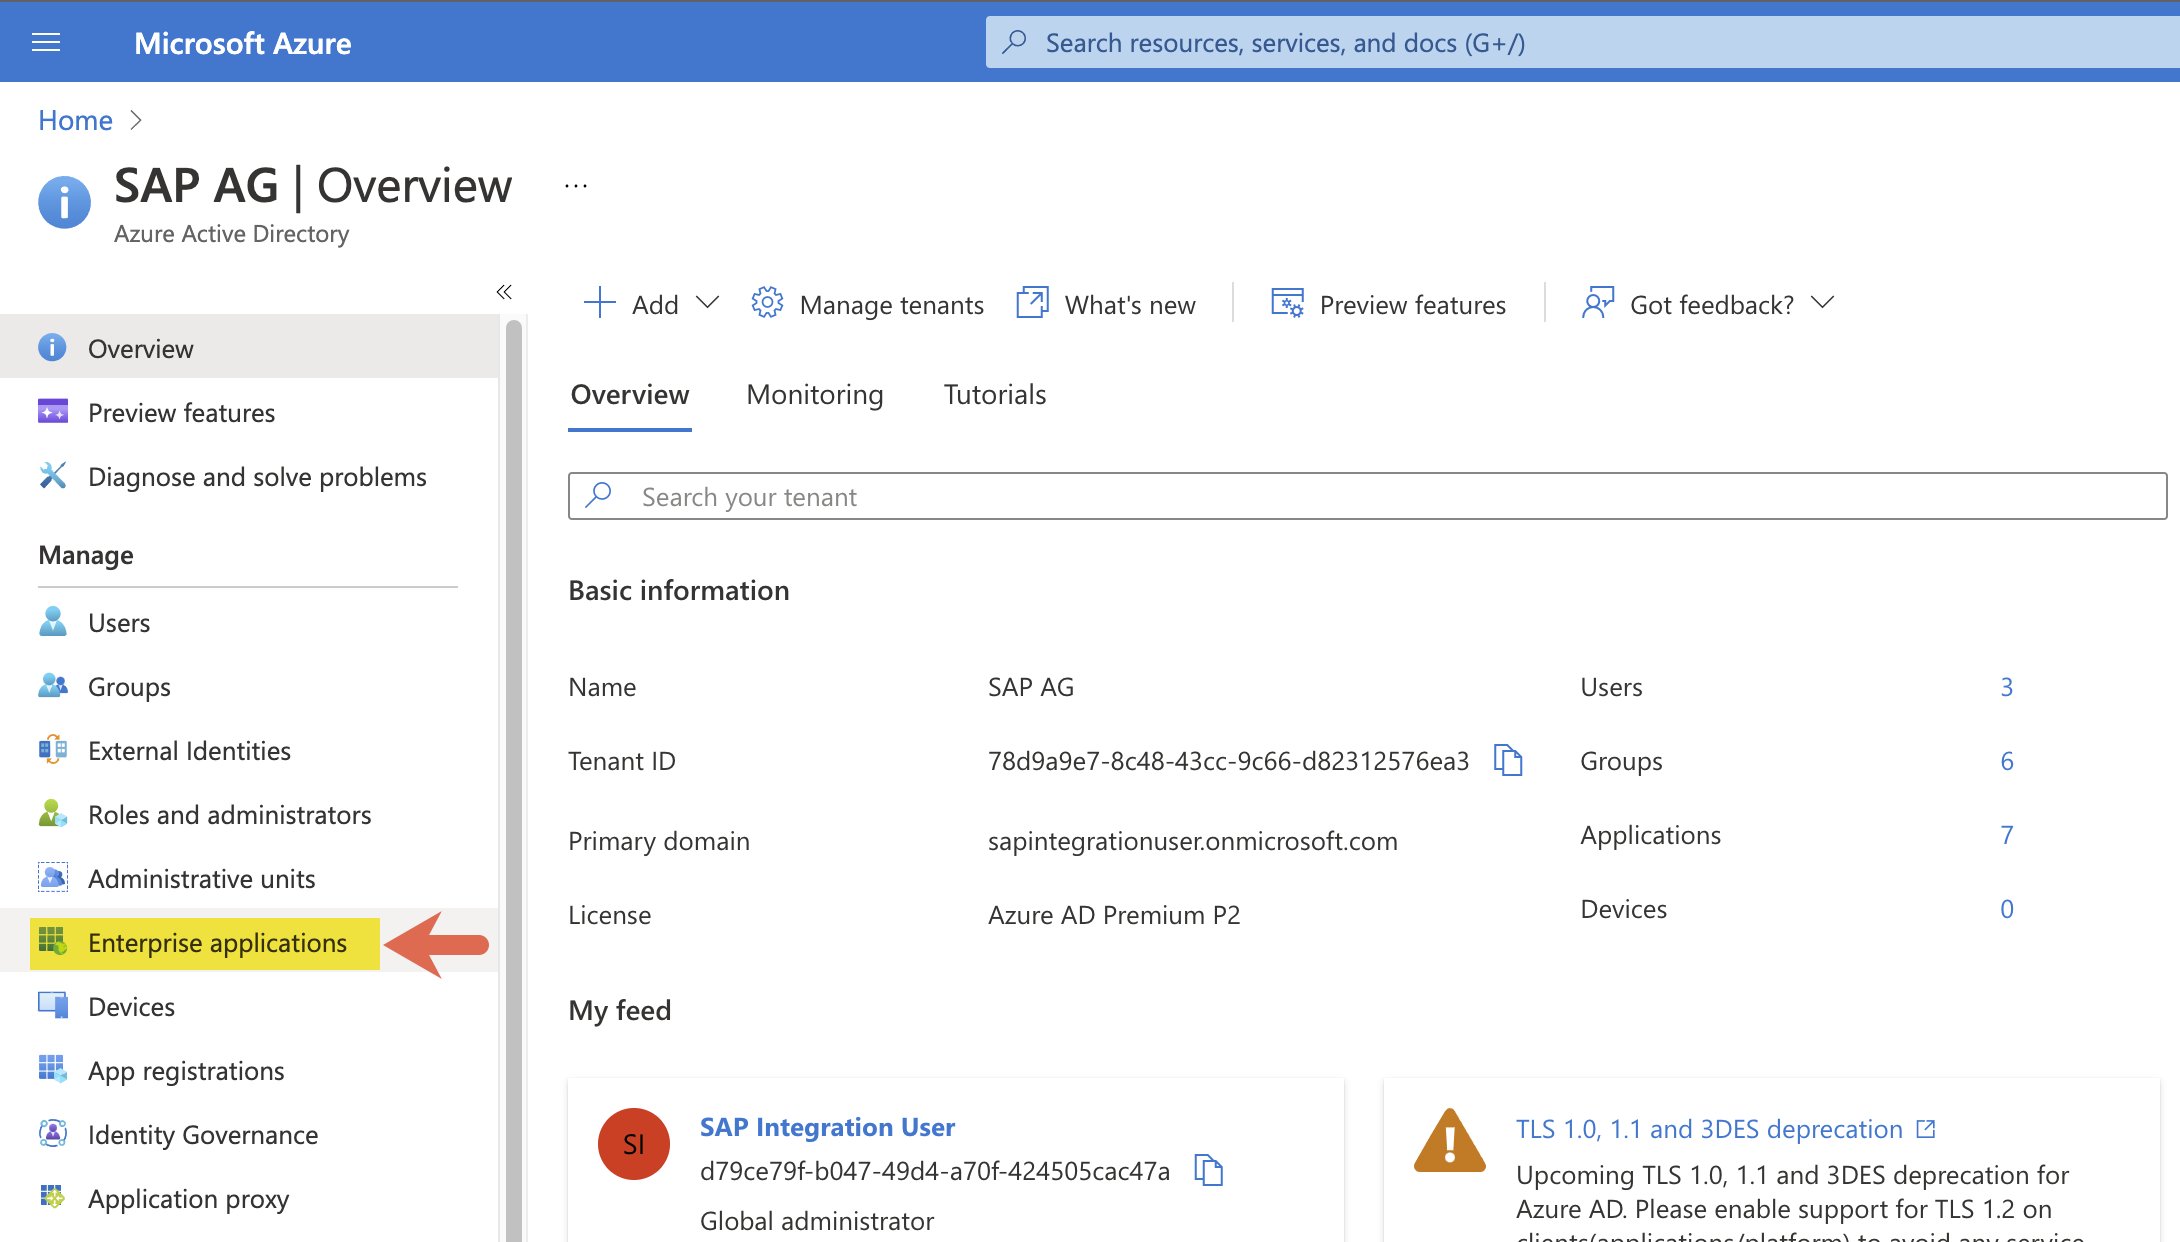
Step 1: log in to your Azure Portal and navigate to 'Azure Active Directory' service.

Step 2: Navigate into Manage 'Enterprise application' menu tab.
Step 3: Click on 'New application'. This is where we will set up the Service Provider metadata credentials to establish the needed single sign-on.

Step 4: Click on 'Create your own application' button. Note that though Azure will list a number of SAP service provider templates in the 'SAP' gallery, the service provider for Open Connectors is not templatized yet.

Step 5: Name your application. As a general practice, you may want to add the BTP account Id as a suffix for easy identification.

Step 6: Click on 'Single sign-on' menu item.

Step 7: select 'SAML' as the SSO method

Step 8: Here I am demonstrating a simple approach where the user email ID attribute will be assigned as the unique user identifier in the SAML assertion. It is up to your organization's policy on how you would like to go about defining this step. It is important to note that the format of this unique user identifier will be carried forward as we later configure the user/member on the Open Connectors side.
Click on 'Edit' to set this.

Step 9: By default, the user identifier is set to UPN (user principal name). Click on the three dots to change this.

Step 10: Set the Source attribute to 'user.mail', save your changes and head back to the main configuration page.

Step 11: Azure would have generated an IDP metadata URL at this point. We will need details from this metadata for subsequent steps. Copy the Metadata Url to the clipboard and open this on a new browser tab.

Step 12: Make a note of the 'entityID' attribute and the X509Certificate attribute from the keyDescriptor node. Here is an important point to note - As can be seen in the screenshot below, there are multiple nodes of the KeyDescriptor element which end up creating a problem in subsequent steps. It is a good idea to refresh the configuration page a few times to check if there is only one KeyDescriptor element (only then would our test succeed). But unfortunately, if this doesn't change, we may have to come back to this step later.
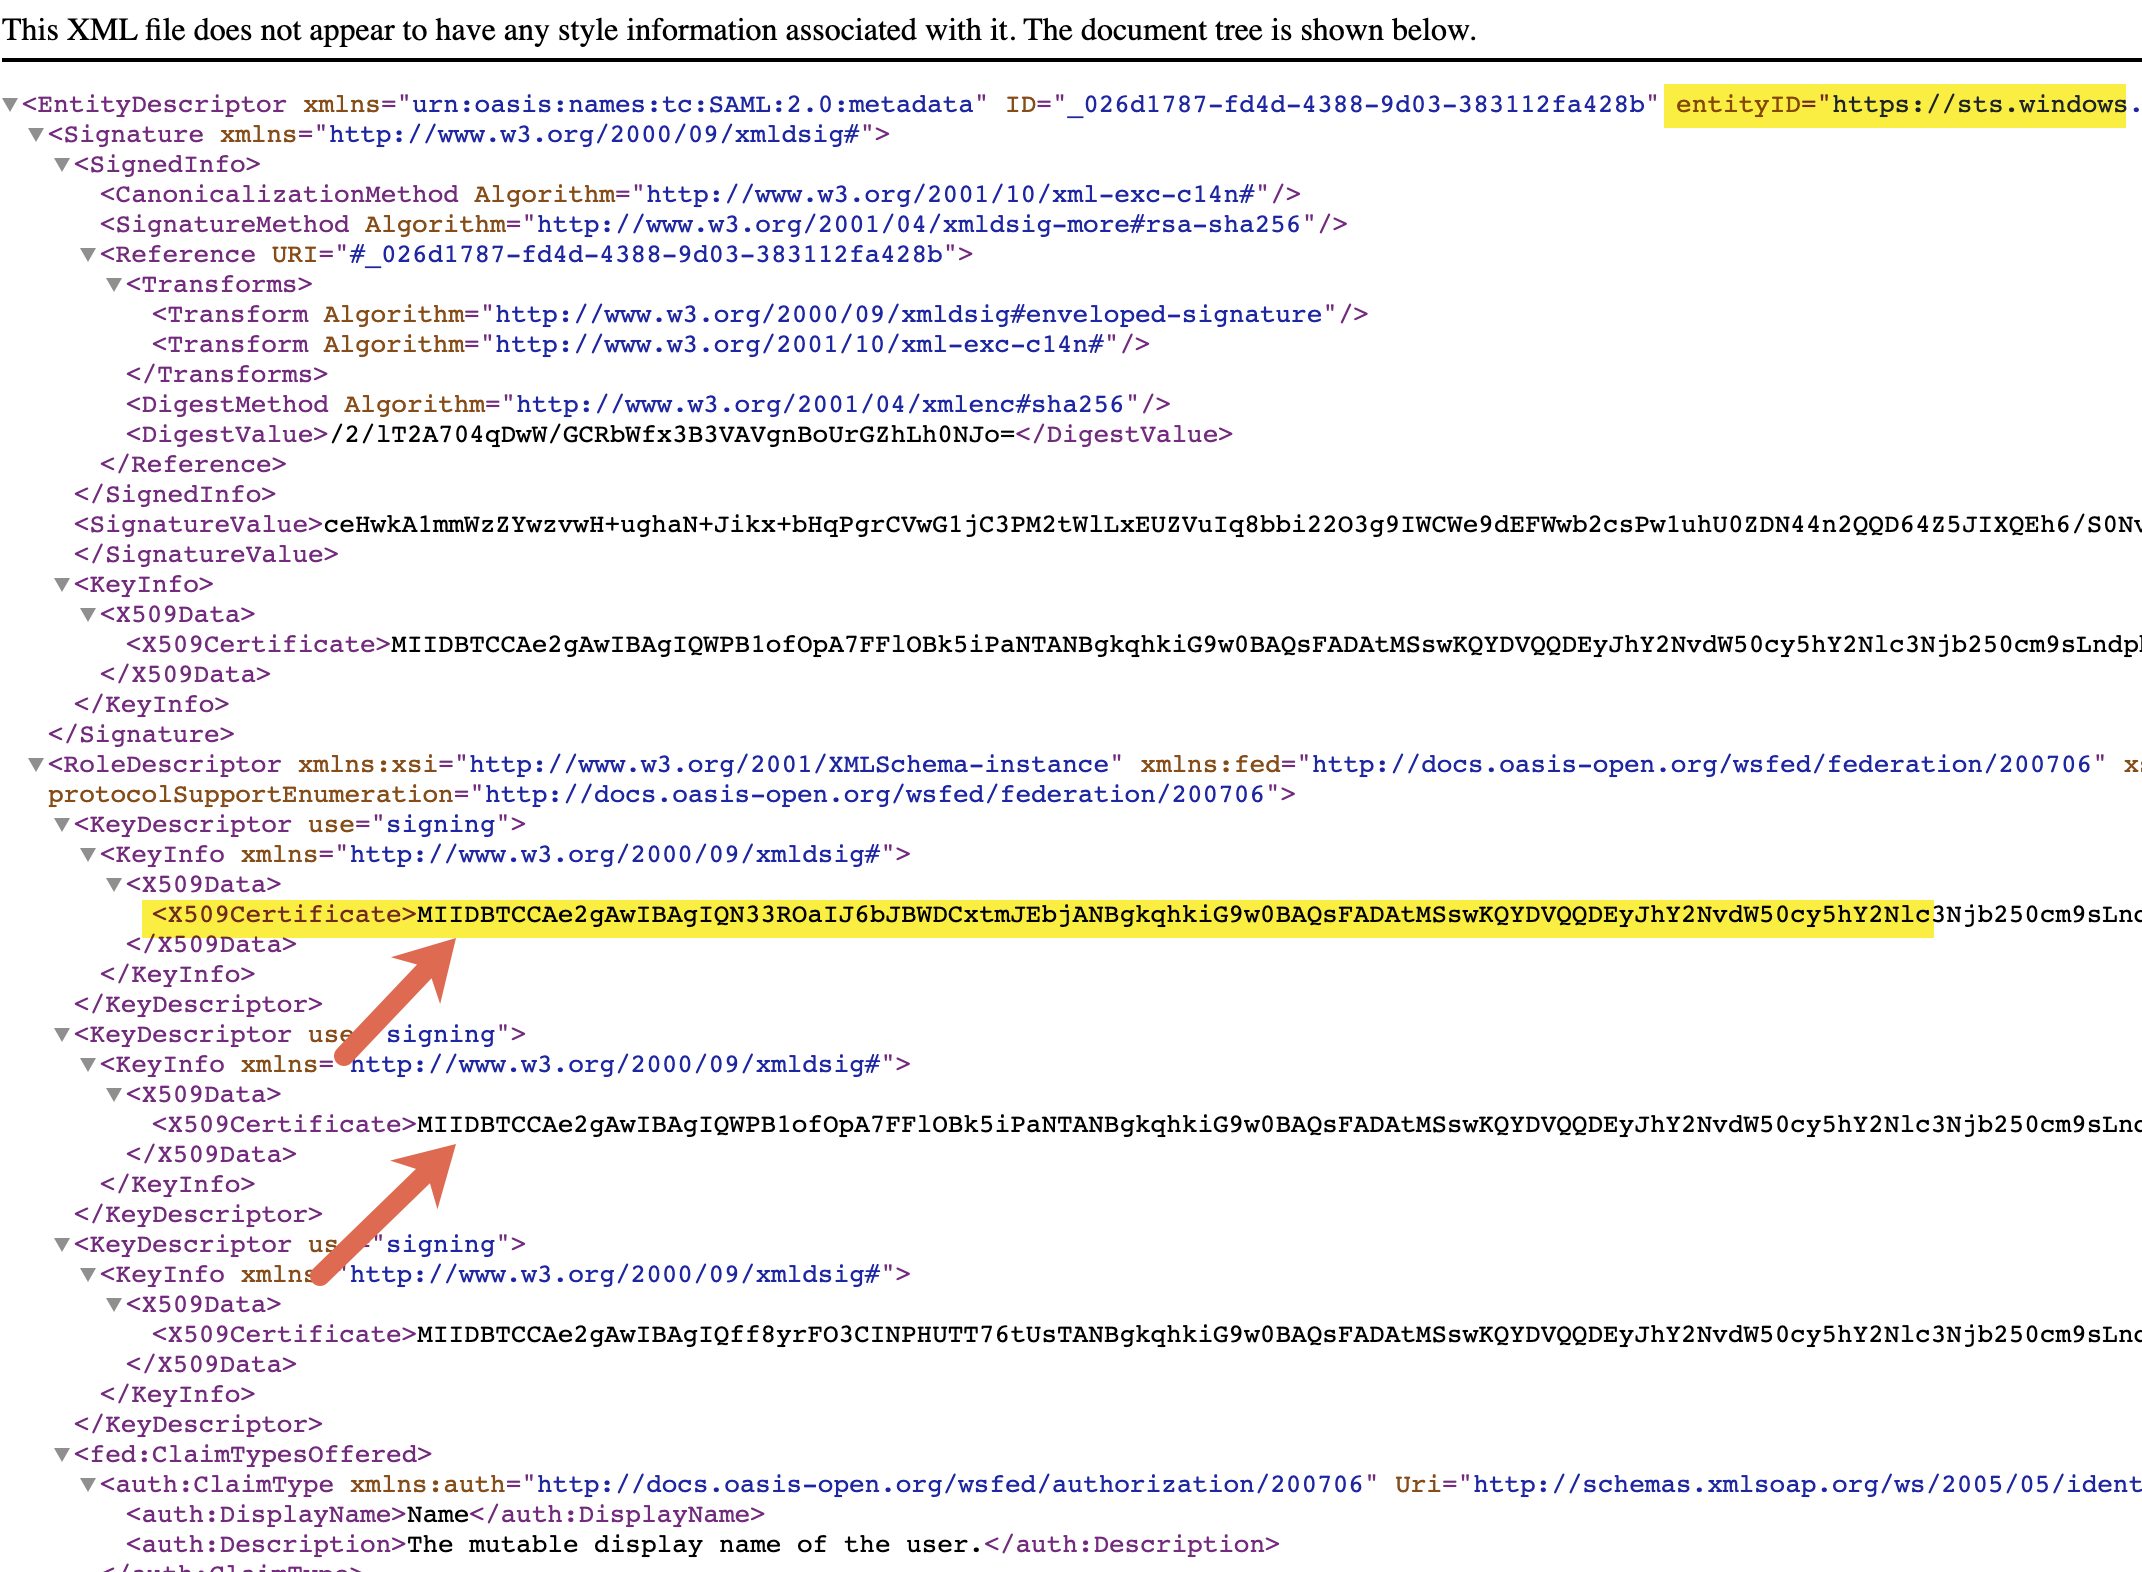
Step 13: Make a note of the HTTP-Redirect binding value from the Location attribute.

Step 14: Now, let's head back to the Open Connector UI -> Security tab -> Identity -> Application Identity Provider section and click on 'Add Trusted Identity Provider'.

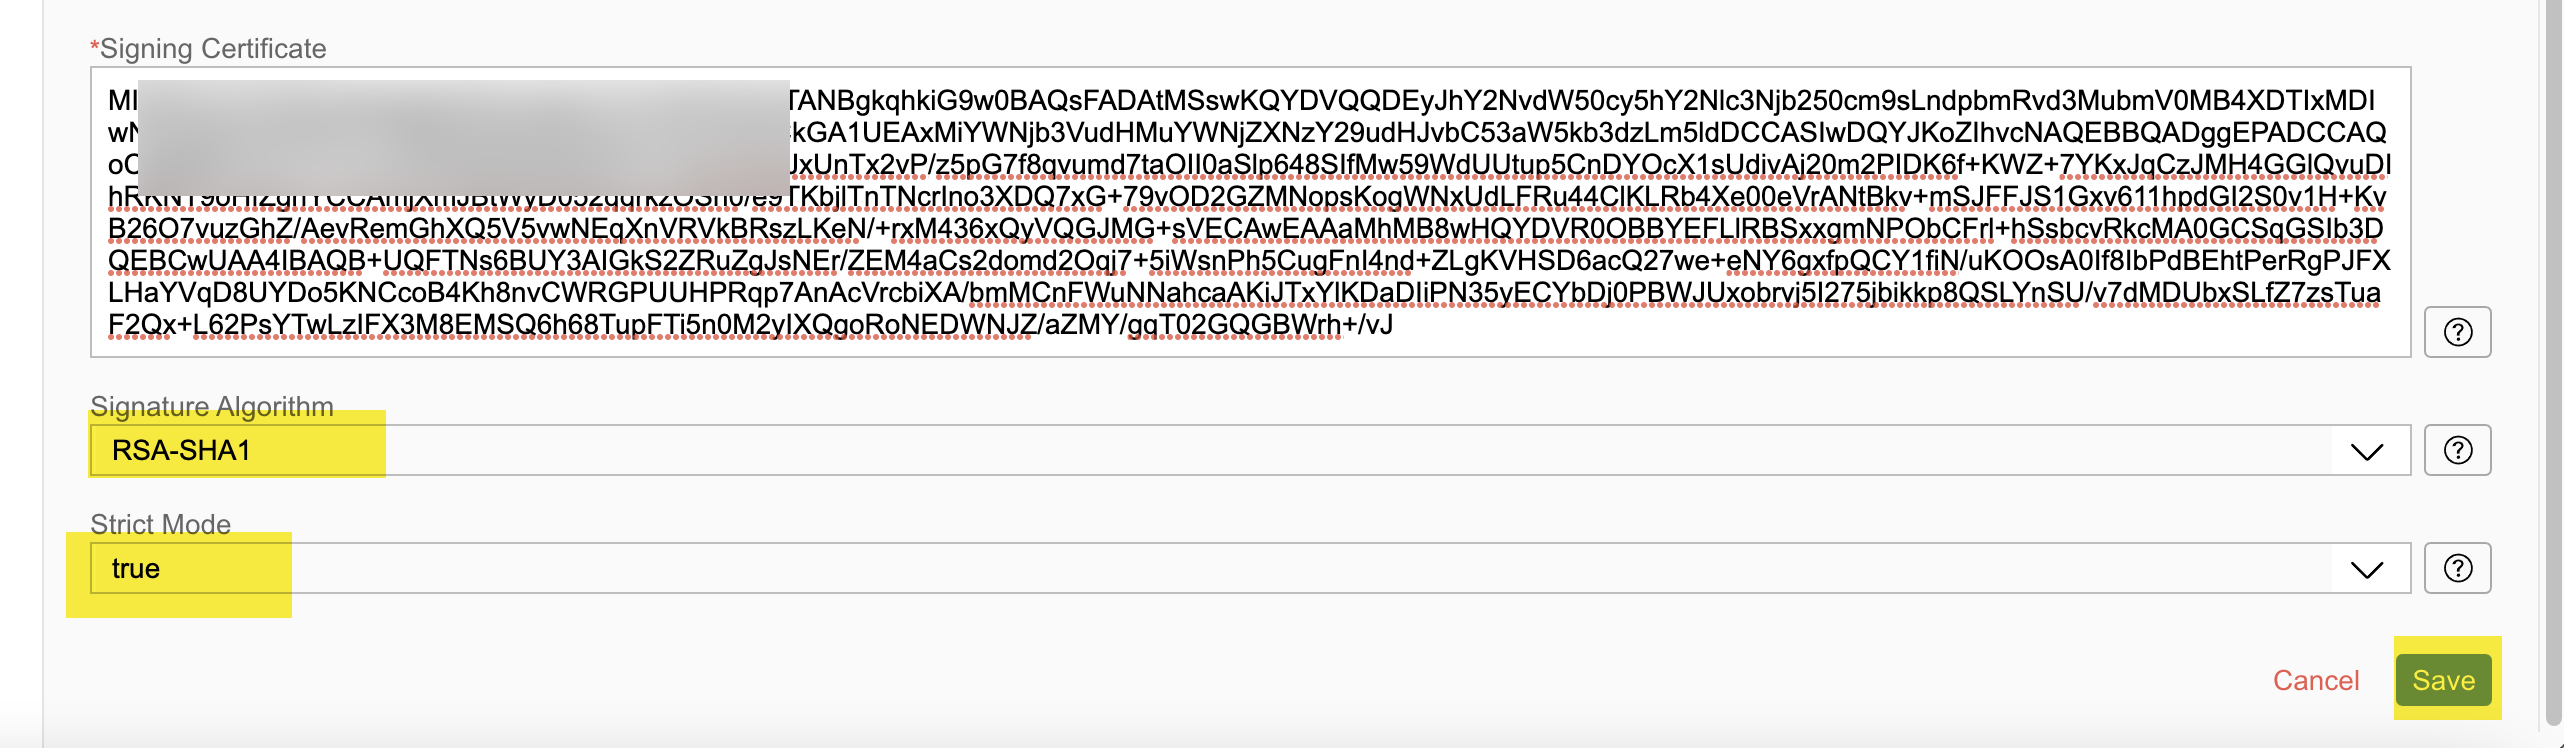
Step 15: Fill in the details on this form with the values copied from steps 12 & 13. Select 'emailAddress' as the Name ID Format and enter the x.509 certificate details.

Step 16: Select RSA-SHA1 as the Signature Algorithm, set the Strict Mode to 'true', and Save your changes.
Step 17: Once created, download the Trust settings.

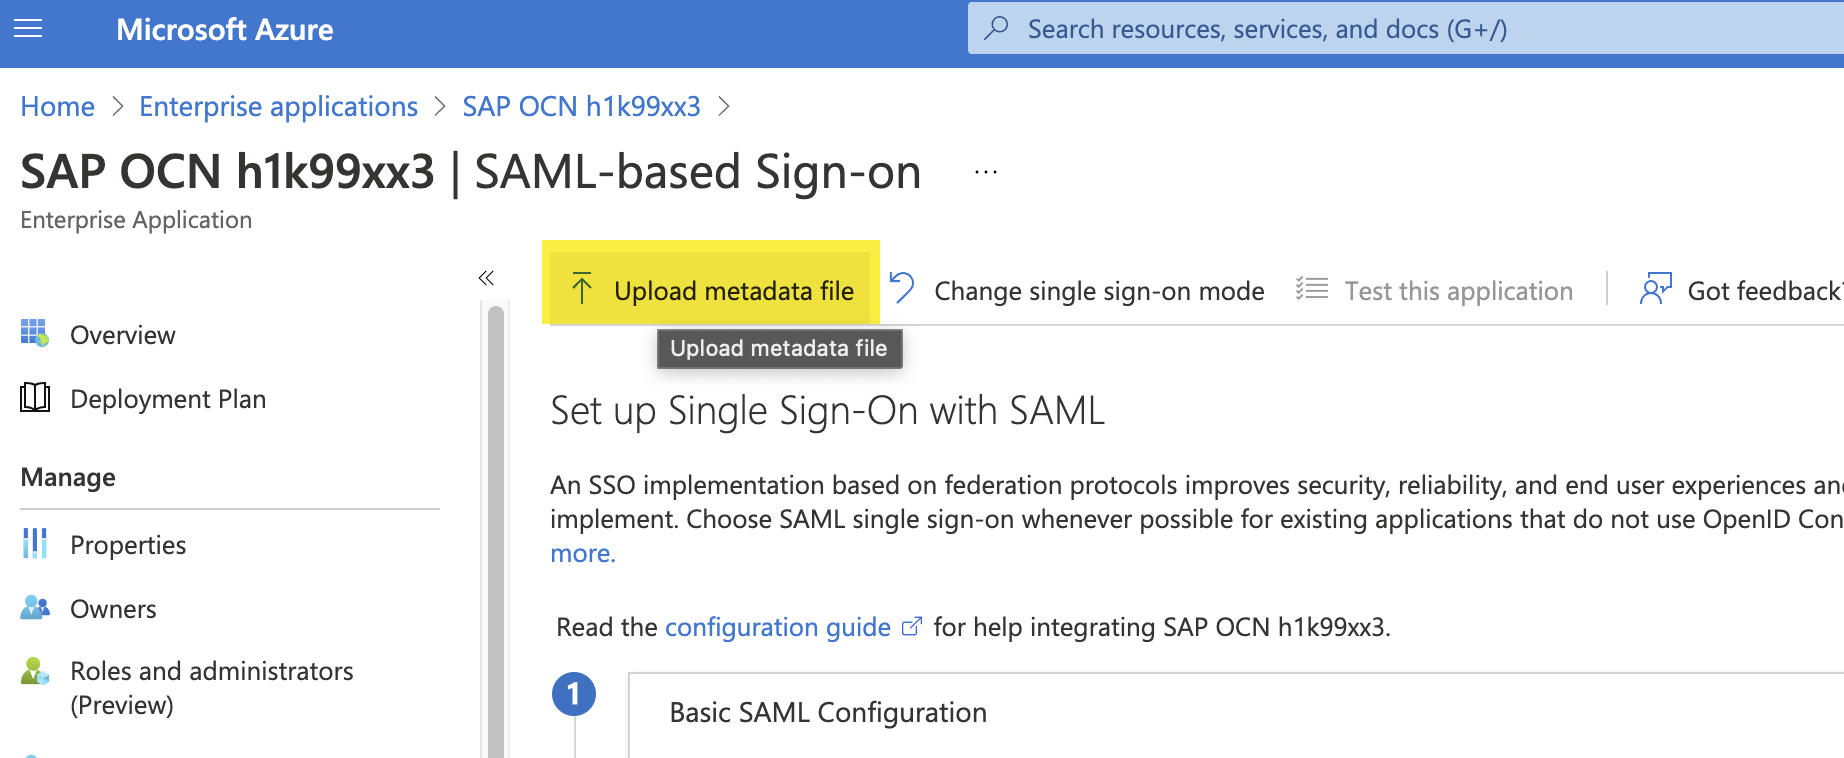
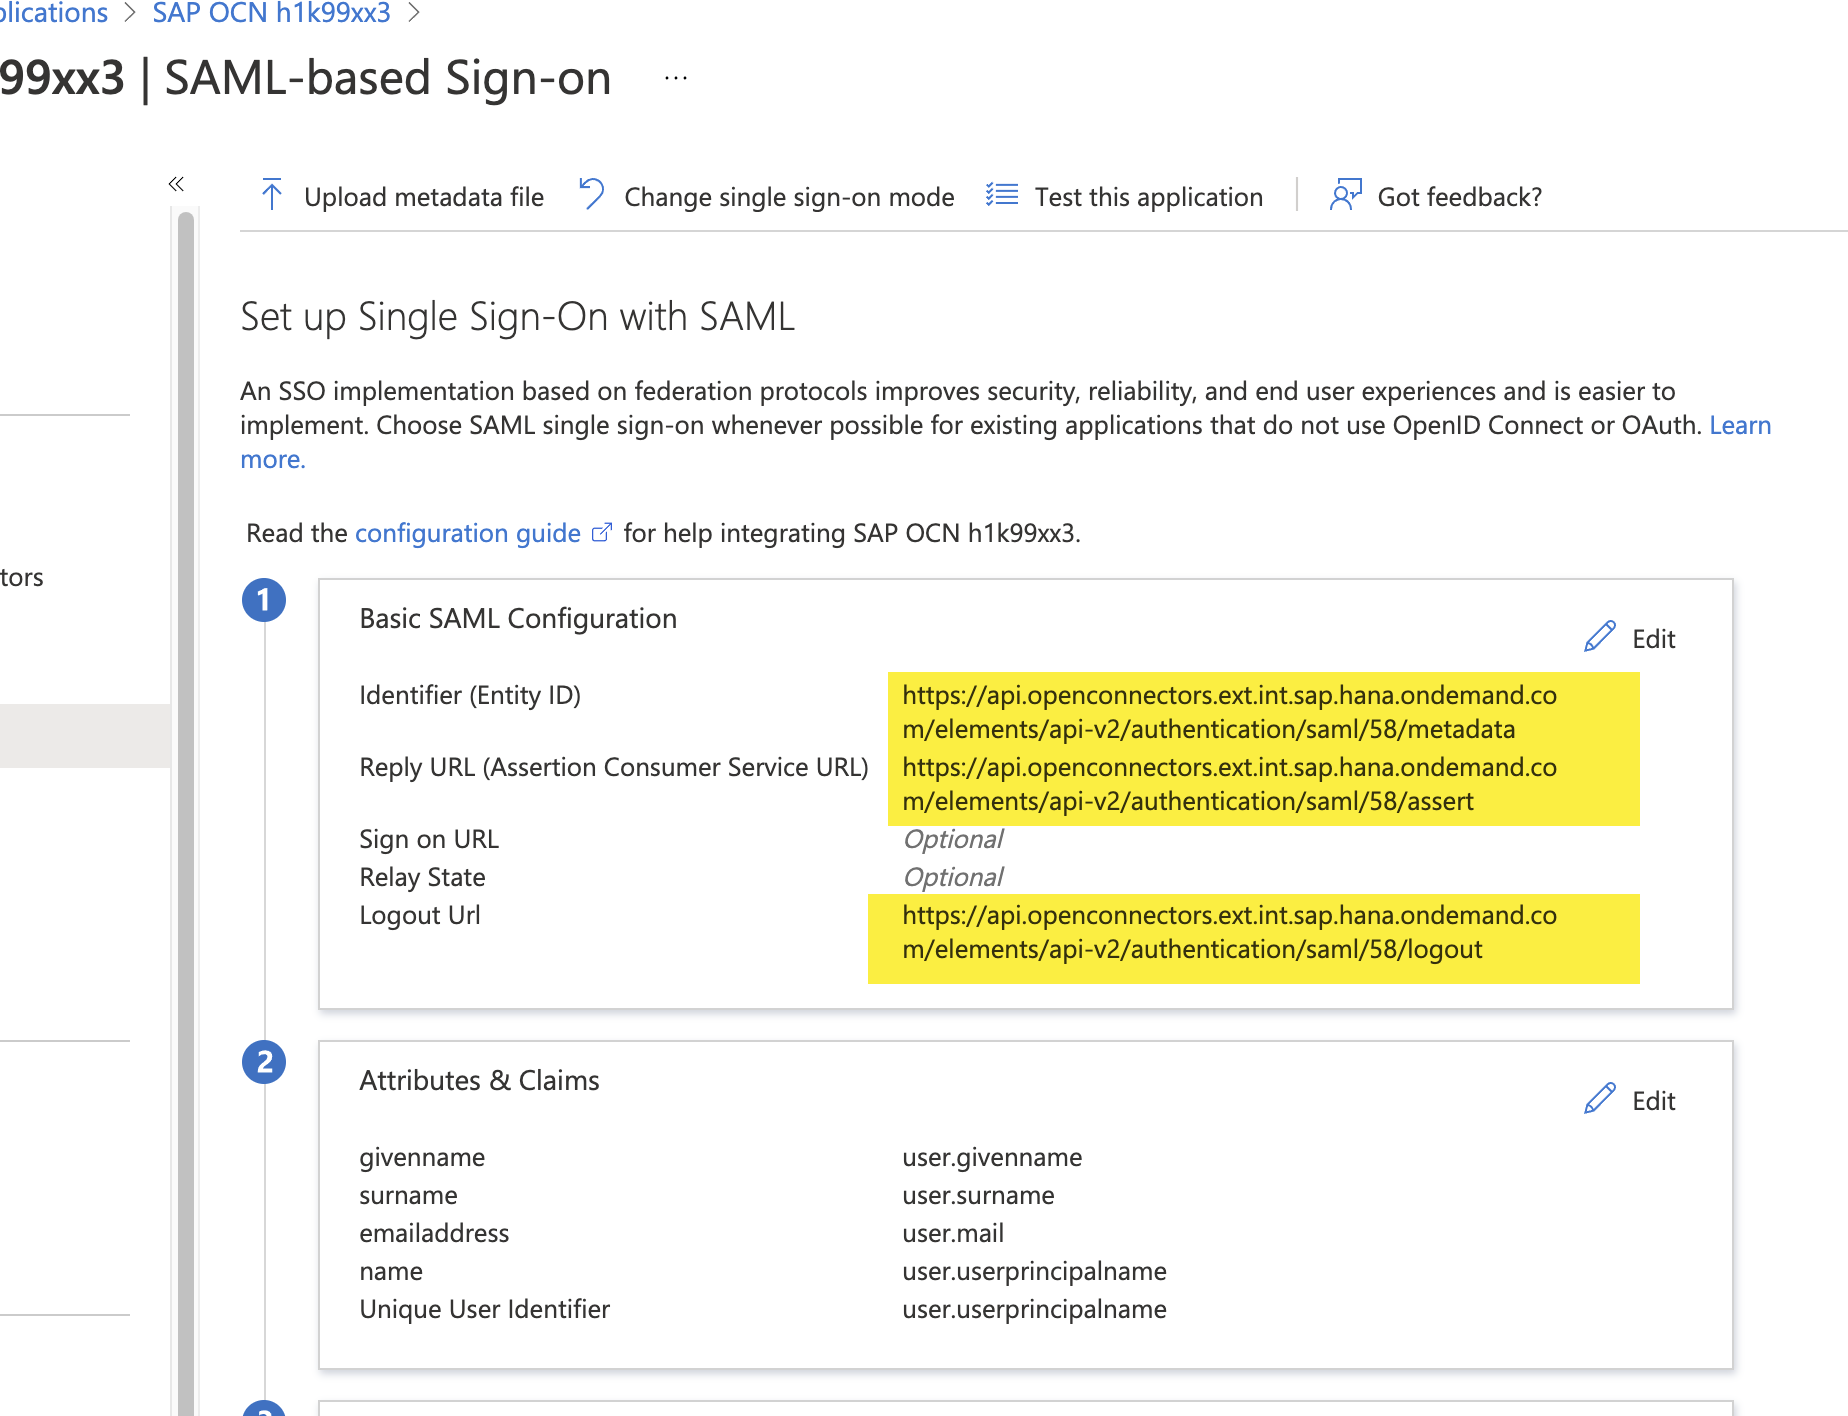
Step 18: Head back to Azure AD and within the Application created in the previous step, upload the Trust settings from the previous step by clicking on Upload metadata file.
Step 19: Once you save your changes, review the entries in the Basic SAML Configuration section. Refresh the page.
Step 20: Navigate to the 'User and groups' tab in the main Manage section, click on Add user/group button and onboard the users you need from the Active directory store into this Application.

Step 21: You may either Test single sign-on from the Azure page or try logging into Open Connectors UI page in a new browser window.
Useful Tip: Do not close your existing browser window of the Open Connectors page where you are already logged in. This way you can continue with that existing session if the new session is corrupted owing to failed authentication, which may stop you entirely from logging in.

Step 22: There is a likelihood that your logon may fail with an error message as depicted in the screenshot below. This goes back to the point we discussed in Step 12 where the certificate settings in the federation metadata Url were possibly inaccurate.

Step 23: Go back to the federation metadata Url (from step 11), refresh the page and hope that the x509 certificate is reflected correctly in the KeyInfo section (no duplicates of the KeyDescriptor node)

Step 24: Frustratingly, you may have to delete the Identity Provider settings from the Open Connectors security page, re-create and re-import it back again till such time the certificate value shows up correctly. (it's a bit of a hit and miss)

Step 25: Note that each time you delete the metadata and re-import it, the SAML metadata identifier increments, as highlighted.

Step 26: If you are testing by directly opening the Open Connectors UI in a new window and you encounter a new error that says that the authorized user is not found congratulations, you are one step closer!

Step 27: Head to the 'Members' tab on the Security settings page and make sure you onboard a new member with the user identifier that you would have previously configured in step 10, i.e. the User's email address in my case.

Step 28: Finally, success! You will be able to log in to the UI by authenticating the user against the configured Azure AD application.
Handy Tip: In case you are having issues with logging in to the UI, you may use a network tracing tool like SAML Tracer with Firefox browser to inspect the user attributes in the SAML token that are being presented by Azure AD to the application and verify if this is what you expect.

- SAP Managed Tags:
- SAP Integration Suite,
- Cloud Integration,
- Open Connectors,
- SAP Business Accelerator Hub
Labels:
5 Comments
You must be a registered user to add a comment. If you've already registered, sign in. Otherwise, register and sign in.
Labels in this area
-
ABAP CDS Views - CDC (Change Data Capture)
2 -
AI
1 -
Analyze Workload Data
1 -
BTP
1 -
Business and IT Integration
2 -
Business application stu
1 -
Business Technology Platform
1 -
Business Trends
1,658 -
Business Trends
107 -
CAP
1 -
cf
1 -
Cloud Foundry
1 -
Confluent
1 -
Customer COE Basics and Fundamentals
1 -
Customer COE Latest and Greatest
3 -
Customer Data Browser app
1 -
Data Analysis Tool
1 -
data migration
1 -
data transfer
1 -
Datasphere
2 -
Event Information
1,400 -
Event Information
72 -
Expert
1 -
Expert Insights
177 -
Expert Insights
340 -
General
1 -
Google cloud
1 -
Google Next'24
1 -
GraphQL
1 -
Kafka
1 -
Life at SAP
780 -
Life at SAP
14 -
Migrate your Data App
1 -
MTA
1 -
Network Performance Analysis
1 -
NodeJS
1 -
PDF
1 -
POC
1 -
Product Updates
4,575 -
Product Updates
384 -
Replication Flow
1 -
REST API
1 -
RisewithSAP
1 -
SAP BTP
1 -
SAP BTP Cloud Foundry
1 -
SAP Cloud ALM
1 -
SAP Cloud Application Programming Model
1 -
SAP Datasphere
2 -
SAP S4HANA Cloud
1 -
SAP S4HANA Migration Cockpit
1 -
Technology Updates
6,872 -
Technology Updates
472 -
Workload Fluctuations
1
Related Content
- Automated check for SAP HANA Cloud availability with SAP Automation Pilot in Technology Blogs by SAP
- Be a Cockroach: A Simple Guide to AI and SAP Full-Stack Development - Part I in Technology Blogs by Members
- SAP Integration Suite - Design Guidelines in the integration flow editor of SAP Cloud Integration in Technology Blogs by SAP
- Connectivity guaranteed with Cloud Integration version and Cloud Connector version in Technology Q&A
- Tracking HANA Machine Learning experiments with MLflow: A technical Deep Dive in Technology Blogs by SAP
Top kudoed authors
| User | Count |
|---|---|
| 17 | |
| 14 | |
| 12 | |
| 10 | |
| 9 | |
| 8 | |
| 7 | |
| 7 | |
| 6 | |
| 6 |