
- SAP Community
- Products and Technology
- Technology
- Technology Blogs by SAP
- Transferring data from On-Premise SAP HANA to SAP ...
Technology Blogs by SAP
Learn how to extend and personalize SAP applications. Follow the SAP technology blog for insights into SAP BTP, ABAP, SAP Analytics Cloud, SAP HANA, and more.
Turn on suggestions
Auto-suggest helps you quickly narrow down your search results by suggesting possible matches as you type.
Showing results for
Product and Topic Expert
Options
- Subscribe to RSS Feed
- Mark as New
- Mark as Read
- Bookmark
- Subscribe
- Printer Friendly Page
- Report Inappropriate Content
04-23-2020
1:48 AM
(Japanese version)
In this blog, I will transfer data from On-Premise SAP HANA to SAP HANA Cloud using SDI (Smart Data Integration).
SAP HANA Cloud includes SDI which is an ETL tool, this means that you can easily integrate various kinds of source systems into SAP HANA Cloud without installing ETL application. Moreover, you can develop ETL jobs as same as developing tables and views, this makes it easy and quick to develop ETL jobs.
I will transfer 3 tables on On-Premise SAP HANA to SAP HANA Cloud.
Install DP Agent on On-Premise side so that SAP HANA Cloud can connect to On-Premise SAP HANA. In this blog, I will install DP Agent on a Windows server which is in the same network as On-Premise SAP HANA. For more information on installation procedure, please see SAP Help and "Download DP agent from SAP Service Marketplace as a ZIP file" part of this blog.
Configure DP Agent as following to SAP Help.
From SAP HANA Cockpit of SAP HANA Cloud, create a HANA DB user who has following authorizations.
Application Privilege : sap.hana.im.dp.admin::Administrator
System Privilege : AGENT_ADMIN, ADAPTER_ADMIN
* The Application Privilege does not exist and no need to set it although it is written in the help
Run command prompt as administrator and configure environment variables as followings, then execute DP Agent Configuration tool.
Choose option 1 (Start of Stop Agent) and then choose option 1 (Start Agent). DP Agent will start by this.
Configure to connect from DP Agent to SAP HANA Cloud. First, choose option 6 (SAP HANA Connection) and option 3 (Connect to SAP HANA via JDBC). Next, input as followings.
Use encrypted JDBC connection : true
Use WebSocket to connect : false
Host Name (for Direct SQL) : SAP HANA Cloud InstanceのEndpoint(*)
Port Number (for Direct SQL) : SAP HANA Cloud InstanceのEndpoint(*)
Agent Admin HANA User & Password : Information about the user created in Step1.2.1
Use HTTP Proxy Server : false (for this blog, select based on your environment)
HANA User for Agent Messaging : Any user name & password, true (create new user)
Configuration of connection between DP Agent and SAP HANA Cloud has been completed.
* You can confirm the hostname and port number of SAP HANA Cloud in SAP Cloud Platform Cockpit. Please see Endpoint of SAP HANA Instances.
Go back to the top of the Configuration tool and choose option 7 (Agent Registration) and option 1 (Register Agent) to register DP Agent.
Agent Name: any name
Agent Host: IP address of the server where DP Agent is installed
Register "HANAAdapter" which allows SDI to connect to SAP HANA. Go back to the top of the tool and choose option 8 (Adapter Registration). Then choose option 2 (Register Adapter) and input as follows.
Adapter Name: HanaAdapter
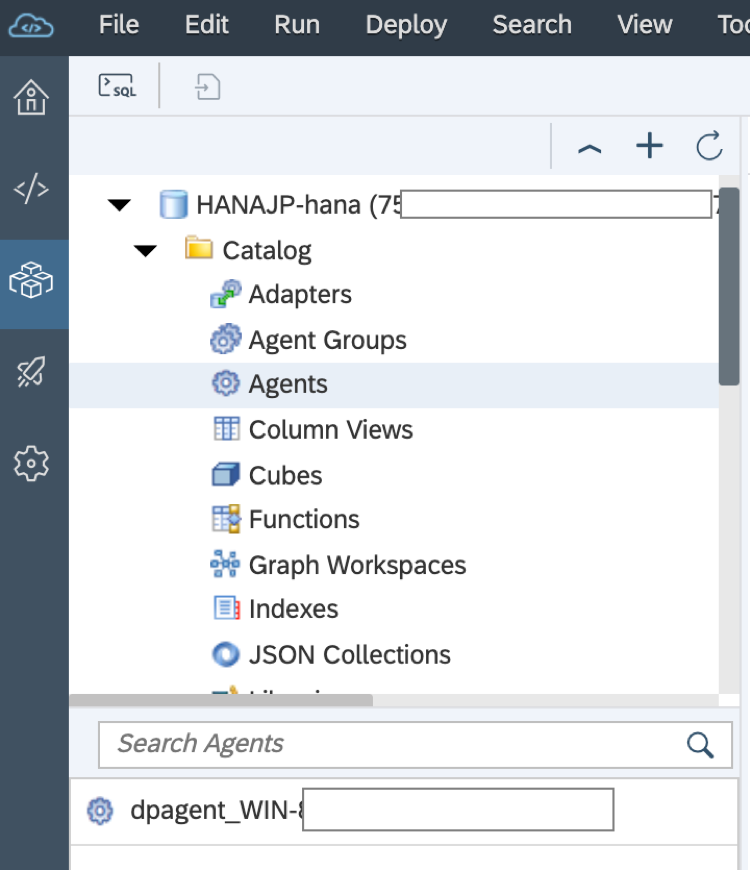
Go to Database Explorer and confirm Agent and Adapter are successfully registered.
Configuration of DP Agent to connect between SAP HANA Cloud and SAP HANA On-Premise has been completed. Next, I will create virtual tables on SAP HANA Cloud which access to On-Premise SAP HANA tables.
At Database Explorer, right-click on "Remote Sources" and choose "Add Remote Source".
Input Remote Source Name and choose "HanaAdapter" as Adapter Name. Input other necessary information like hostname and port number of On-Premise SAP HANA, user name and password. Save it when completed.
Open the remote source by clicking the name, schema is displayed. And when you open the schema, you see the tables in the schema. The source schema is "SALES_1", so you can see the tables (SALES::HDI_MD_PRODUCTS, SALES::HDI_SO_HEADER, SALES::HDI_SO_ITEM).
Remote source has been created in the previous step. Next step is creating virtual tables. Before this I need to grant privileges to create virtual table to administrator of the HDI container.
In this blog I will directly grant privileges to the user using SAP HANA Cockpit.
First, logon to SAP HANA Cockpit by the user who created the remote source" and go to "User & Role Management" > "Privilege Assignment". Then, grant following object privileges to a user "<HDI container>#OO".
At this point, I have created remote source and granted privileged to create virtual table. Next, create virtual tables.
Open SAP Web IDE for full-stack and right-click to create a new virtual table.
Input virtual table name, remote source name, schema name and table name. For Database Name, input “<NULL>”. Save and build it, then virtual table is created. Create all necessary virtual tables.
Go to Database Explorer to check the virtual table. Click “Table” and you can confirm that virtual tables are successfully created (VT_ tables here).
Right-click on the table and select "Open Data" to check the data can be successfully retrieved from On-Premise SAP HANA.
Create other virtual tables and also target tables.
Virtual tables which access On-Premise SAP HANA have been created on SAP HANA Cloud. I will create SDI Flowgraph to transfer data to SAP HANA Cloud using the virtual tables.
Right-click on "src" folder and choose "Flowgraph" to create a new Flowgraph.
Empty Flowgraph is created after inputting name of it.
Click "+" icon and you will see various kinds of operators. You can add operators to the Flowgraph from here.
Insert "Data Source" to add source table.
Click the gear icon to configure the data source.
Choose "HANA Object" at "Type", then select source table. Tables will be listed when you input a part of the table name. Choose the source table (virtual table) and click "Finish".
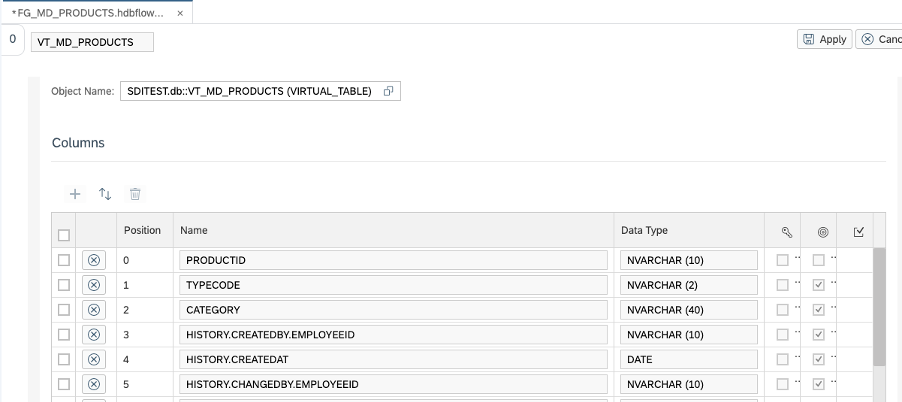
The metadata of the table is loaded. Click "Apply" to complete the source table configuration.
Click "+" icon and insert "Data Target" to add target table.
Click gear icon to configure data target.
Choose "HANA Object" at "Type", then select target table. Tables will be listed when you input a part of the table name. Choose the target table and click "Finish".
At "Setting" tab, configure write type. In this blog, I will check "Truncate Table" and select "Insert" for "Writer Type". (This means target table is truncated before data loading.)
Click "Apply" to configure mapping.
Click "+" icon and insert "Projection" operator to map between source table and target table. Then connect Data Source and Projection and also connect Projection and Data Target.
Click gear icon of the projection, the mapping is automatically configured by the column name. Change the mapping and add filters if needed.
Click "Apply" to go back and then save and build the Flowgraph. Finally, click "Execute" to run the Flowgraph.
Confirm the job is successfully executed.
Go to Database Explorer and open the data of target table. You can confirm the data is successfully transferred from On-Premise SAP HANA.
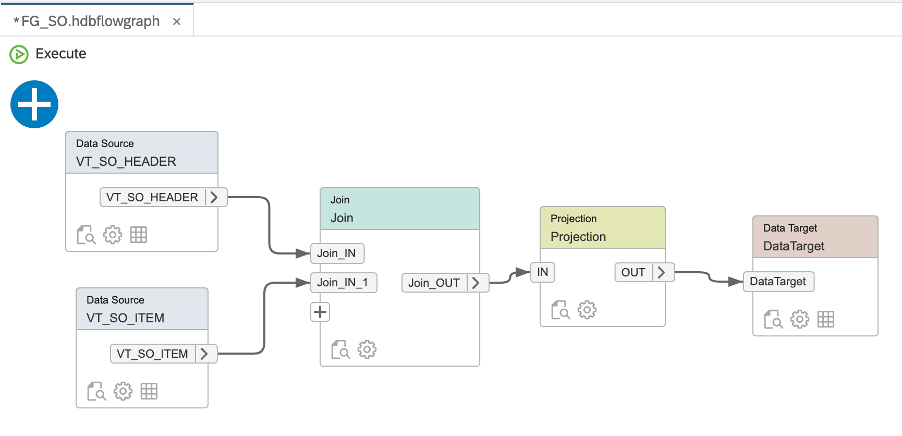
Next, I will create a little complicated Flowgraph which joins two tables. Add two Data Sources for two tables (SO_HEADER and SO_ITEM), then connect them and "JOIN" operator.
Click gear icon of the JOIN operator and configure join condition at "Criteria" tab. Set SO_HEADER as left table and SO_ITEM as right table, then choose "Left outer join" as Join Type.
Write join condition at Join Condition Editor.
Go back by "Apply", then add "Projection" and "Data Target" operators. In Projection operator you can set filters and configure mappings.
In Data Target operator, choose "Template Table" and input name of the template table at "Object Name". This means that the Flowgraph creates table when the job is built.
Save and build the Flowgraph, then click "Execute" to run the job.
Go to Database Explorer and open the data of target table. You can confirm the data is successfully transferred from On-Premise SAP HANA.
Transferring data from On-Premise SAP HANA to SAP HANA Cloud using SDI has been completed.
As mentioned at the beginning, you can use ETL in SAP HANA Cloud without installing ETL application separately, as long as you setup DP Agent. ETL jobs can be created with the same development environment and development flow as creating table or view, which can significantly improve development efficiency. There is a complete set of operators required for ETL, and it is possible to integrate data flexibly from various systems.
Overview
In this blog, I will transfer data from On-Premise SAP HANA to SAP HANA Cloud using SDI (Smart Data Integration).
SAP HANA Cloud includes SDI which is an ETL tool, this means that you can easily integrate various kinds of source systems into SAP HANA Cloud without installing ETL application. Moreover, you can develop ETL jobs as same as developing tables and views, this makes it easy and quick to develop ETL jobs.
I will transfer 3 tables on On-Premise SAP HANA to SAP HANA Cloud.

Let's get started. The steps are as follows.
- Configure Data Provisioning Agent (DP Agent)
- Create Virtual Table
- Transfer data
1. Setup DP Agent
1.1 Install DP Agent
Install DP Agent on On-Premise side so that SAP HANA Cloud can connect to On-Premise SAP HANA. In this blog, I will install DP Agent on a Windows server which is in the same network as On-Premise SAP HANA. For more information on installation procedure, please see SAP Help and "Download DP agent from SAP Service Marketplace as a ZIP file" part of this blog.
1.2 Configure DP Agent
Configure DP Agent as following to SAP Help.
1.2.1 Create a DB user for Agent Admin
From SAP HANA Cockpit of SAP HANA Cloud, create a HANA DB user who has following authorizations.
Application Privilege : sap.hana.im.dp.admin::Administrator
System Privilege : AGENT_ADMIN, ADAPTER_ADMIN
* The Application Privilege does not exist and no need to set it although it is written in the help
1.2.2 Run DP Agent Configuration tool
Run command prompt as administrator and configure environment variables as followings, then execute DP Agent Configuration tool.
setx DPA_INSTANCE "C:\usr\sap\dataprovagent"

cd %DPA_INSTANCE%

cd bin

agentcli.bat --configAgent
1.2.3 Start Agent
Choose option 1 (Start of Stop Agent) and then choose option 1 (Start Agent). DP Agent will start by this.
1.2.4 Configure SAP HANA Connection
Configure to connect from DP Agent to SAP HANA Cloud. First, choose option 6 (SAP HANA Connection) and option 3 (Connect to SAP HANA via JDBC). Next, input as followings.
Use encrypted JDBC connection : true
Use WebSocket to connect : false
Host Name (for Direct SQL) : SAP HANA Cloud InstanceのEndpoint(*)
Port Number (for Direct SQL) : SAP HANA Cloud InstanceのEndpoint(*)
Agent Admin HANA User & Password : Information about the user created in Step1.2.1
Use HTTP Proxy Server : false (for this blog, select based on your environment)
HANA User for Agent Messaging : Any user name & password, true (create new user)
Configuration of connection between DP Agent and SAP HANA Cloud has been completed.
* You can confirm the hostname and port number of SAP HANA Cloud in SAP Cloud Platform Cockpit. Please see Endpoint of SAP HANA Instances.

1.2.5 Register DP Agent
Go back to the top of the Configuration tool and choose option 7 (Agent Registration) and option 1 (Register Agent) to register DP Agent.
Agent Name: any name
Agent Host: IP address of the server where DP Agent is installed
1.2.6 Register HANA Adapter
Register "HANAAdapter" which allows SDI to connect to SAP HANA. Go back to the top of the tool and choose option 8 (Adapter Registration). Then choose option 2 (Register Adapter) and input as follows.
Adapter Name: HanaAdapter
1.2.7 Confirm the configuration
Go to Database Explorer and confirm Agent and Adapter are successfully registered.

2. Create Virtual Table
Configuration of DP Agent to connect between SAP HANA Cloud and SAP HANA On-Premise has been completed. Next, I will create virtual tables on SAP HANA Cloud which access to On-Premise SAP HANA tables.
2.1 Create a Remote Source
At Database Explorer, right-click on "Remote Sources" and choose "Add Remote Source".

Input Remote Source Name and choose "HanaAdapter" as Adapter Name. Input other necessary information like hostname and port number of On-Premise SAP HANA, user name and password. Save it when completed.

Open the remote source by clicking the name, schema is displayed. And when you open the schema, you see the tables in the schema. The source schema is "SALES_1", so you can see the tables (SALES::HDI_MD_PRODUCTS, SALES::HDI_SO_HEADER, SALES::HDI_SO_ITEM).

2.2 Grant privileges to create virtual table
Remote source has been created in the previous step. Next step is creating virtual tables. Before this I need to grant privileges to create virtual table to administrator of the HDI container.
In this blog I will directly grant privileges to the user using SAP HANA Cockpit.
First, logon to SAP HANA Cockpit by the user who created the remote source" and go to "User & Role Management" > "Privilege Assignment". Then, grant following object privileges to a user "<HDI container>#OO".
- CREATE VIRTUAL TABLE
- CREATE VIRTUAL FUNCTION
- CREATE REMOTE SUBSCRIPTION
- PROCESS REMOTE SUBSCRIPTION EXCEPTION
- ALTER
- DROP

2.3 Create virtual table
At this point, I have created remote source and granted privileged to create virtual table. Next, create virtual tables.
Open SAP Web IDE for full-stack and right-click to create a new virtual table.

Input virtual table name, remote source name, schema name and table name. For Database Name, input “<NULL>”. Save and build it, then virtual table is created. Create all necessary virtual tables.

Go to Database Explorer to check the virtual table. Click “Table” and you can confirm that virtual tables are successfully created (VT_ tables here).
Right-click on the table and select "Open Data" to check the data can be successfully retrieved from On-Premise SAP HANA.

Create other virtual tables and also target tables.

3. Transferring data
Virtual tables which access On-Premise SAP HANA have been created on SAP HANA Cloud. I will create SDI Flowgraph to transfer data to SAP HANA Cloud using the virtual tables.
3.1 Create Flowgraph and execute it
3.1.1 Create a new Flowgraph
Right-click on "src" folder and choose "Flowgraph" to create a new Flowgraph.

Empty Flowgraph is created after inputting name of it.

Click "+" icon and you will see various kinds of operators. You can add operators to the Flowgraph from here.

3.1.2 Configure Data Source
Insert "Data Source" to add source table.

Click the gear icon to configure the data source.

Choose "HANA Object" at "Type", then select source table. Tables will be listed when you input a part of the table name. Choose the source table (virtual table) and click "Finish".

The metadata of the table is loaded. Click "Apply" to complete the source table configuration.
3.1.3 Configure target table
Click "+" icon and insert "Data Target" to add target table.

Click gear icon to configure data target.

Choose "HANA Object" at "Type", then select target table. Tables will be listed when you input a part of the table name. Choose the target table and click "Finish".

At "Setting" tab, configure write type. In this blog, I will check "Truncate Table" and select "Insert" for "Writer Type". (This means target table is truncated before data loading.)
Click "Apply" to configure mapping.

3.1.4 Configurate Mapping (Projection)
Click "+" icon and insert "Projection" operator to map between source table and target table. Then connect Data Source and Projection and also connect Projection and Data Target.

Click gear icon of the projection, the mapping is automatically configured by the column name. Change the mapping and add filters if needed.

3.1.5 Save, Build and execute the Flowgraph
Click "Apply" to go back and then save and build the Flowgraph. Finally, click "Execute" to run the Flowgraph.

Confirm the job is successfully executed.

3.1.6 Check the result
Go to Database Explorer and open the data of target table. You can confirm the data is successfully transferred from On-Premise SAP HANA.

3.2 Create and execute (a little complicated) Flowgraph
3.2.1 Configure Join
Next, I will create a little complicated Flowgraph which joins two tables. Add two Data Sources for two tables (SO_HEADER and SO_ITEM), then connect them and "JOIN" operator.

Click gear icon of the JOIN operator and configure join condition at "Criteria" tab. Set SO_HEADER as left table and SO_ITEM as right table, then choose "Left outer join" as Join Type.
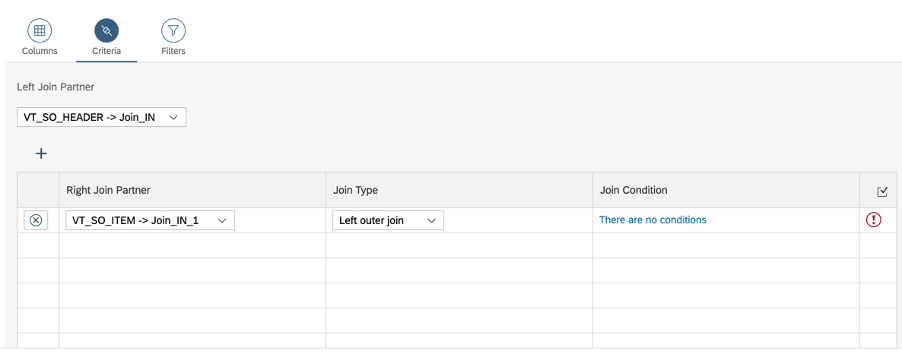
Write join condition at Join Condition Editor.

3.2.2 Configure mapping(projection) and data target
Go back by "Apply", then add "Projection" and "Data Target" operators. In Projection operator you can set filters and configure mappings.

In Data Target operator, choose "Template Table" and input name of the template table at "Object Name". This means that the Flowgraph creates table when the job is built.

Configure data update method at "Settings" tab.

3.2.3 Save, Build and Execute the Flowgraph
Save and build the Flowgraph, then click "Execute" to run the job.
3.2.4 Check the result
Go to Database Explorer and open the data of target table. You can confirm the data is successfully transferred from On-Premise SAP HANA.

Transferring data from On-Premise SAP HANA to SAP HANA Cloud using SDI has been completed.
As mentioned at the beginning, you can use ETL in SAP HANA Cloud without installing ETL application separately, as long as you setup DP Agent. ETL jobs can be created with the same development environment and development flow as creating table or view, which can significantly improve development efficiency. There is a complete set of operators required for ETL, and it is possible to integrate data flexibly from various systems.
- SAP Managed Tags:
- SAP HANA Cloud,
- SAP HANA
Labels:
18 Comments
You must be a registered user to add a comment. If you've already registered, sign in. Otherwise, register and sign in.
Labels in this area
-
ABAP CDS Views - CDC (Change Data Capture)
2 -
AI
1 -
Analyze Workload Data
1 -
BTP
1 -
Business and IT Integration
2 -
Business application stu
1 -
Business Technology Platform
1 -
Business Trends
1,658 -
Business Trends
116 -
CAP
1 -
cf
1 -
Cloud Foundry
1 -
Confluent
1 -
Customer COE Basics and Fundamentals
1 -
Customer COE Latest and Greatest
3 -
Customer Data Browser app
1 -
Data Analysis Tool
1 -
data migration
1 -
data transfer
1 -
Datasphere
2 -
Event Information
1,400 -
Event Information
75 -
Expert
1 -
Expert Insights
177 -
Expert Insights
357 -
General
1 -
Google cloud
1 -
Google Next'24
1 -
GraphQL
1 -
Kafka
1 -
Life at SAP
780 -
Life at SAP
14 -
Migrate your Data App
1 -
MTA
1 -
Network Performance Analysis
1 -
NodeJS
1 -
PDF
1 -
POC
1 -
Product Updates
4,575 -
Product Updates
398 -
Replication Flow
1 -
REST API
1 -
RisewithSAP
1 -
SAP BTP
1 -
SAP BTP Cloud Foundry
1 -
SAP Cloud ALM
1 -
SAP Cloud Application Programming Model
1 -
SAP Datasphere
2 -
SAP S4HANA Cloud
1 -
SAP S4HANA Migration Cockpit
1 -
Technology Updates
6,871 -
Technology Updates
493 -
Workload Fluctuations
1
Related Content
- How to use the OData-API for exchanging Messages from Logs and the Datastore in Integration Suite in Technology Blogs by Members
- RingFencing & DeCoupling S/4HANA with Enterprise Blockchain and SAP BTP - Ultimate Cyber Security 🚀 in Technology Blogs by Members
- Fiori SSO Setup with the SAML2 and ADFS - No AssertionConsumerService in Technology Q&A
- Data transfer from Databricks to SAP - ODATA API in Technology Q&A
- VS Code SAPUI5 Adaptation project error - Request failed with status code 401 in Technology Q&A
Top kudoed authors
| User | Count |
|---|---|
| 20 | |
| 11 | |
| 8 | |
| 8 | |
| 7 | |
| 7 | |
| 7 | |
| 6 | |
| 6 | |
| 6 |