Technology Blogs by SAP
Learn how to extend and personalize SAP applications. Follow the SAP technology blog for insights into SAP BTP, ABAP, SAP Analytics Cloud, SAP HANA, and more.
cancel
Showing results for 
Search instead for 
Did you mean: 
michael_ameling
Advisor
Advisor


What do you need to send data with an iOS device to the IoT Services?


Optional:


How to Send Data with the IoT Sensor App by itelligence AG?


Create a device model via IoT Service Cockpit


  1. Open the IoT Service Cockpit.

  2. Choose the Message Types tile.

  3. Create a new Message Type by clicking ( + ).

  4. Enter a name, e.g. "iOS Data".

  5. Change the Data Type for timestamp to long.

  6. Enter the following fields depending on the device you are targeting (all fields are optional):

    • iOS Device: timestamp (long) / accX (double) / accY (double) / accZ (double) / altitude (double) / locLat (double) / locLong (double) / pressure (double)

    • TI Sensor Tag: timestamp (long) / sensorGyroX (double) / sensorGyroY (double) / sensorGyroZ (double), sensorAccX (double) / sensorAccY (double) / sensorAccZ (double) / sensorBarometric (double)

    • ublox OLP: timestamp (long) / sensorTemp (double) / sensorGyroX (double) / sensorGyroY (double) / sensorGyroZ (double)


  7. Copy the displayed Message Type ID to your Clipboard.

  8. Go back to the IoT Service Cockpit.

  9. Choose the Device Types tile.

  10. Create a new Device Type by clicking ( + ).

  11. Enter a name, e.g.: "iOSDevice", "TI CC2650" or "OLP 425" (depending on your available hardware).

  12. Add the Message Type that was previously created (here: "iOS Data").

  13. Copy the displayed Device Type ID and Device Registration Token to your Clipboard.


You can now start sending data with a client using the created Message Type and Device Type.


Download and configure IoT Sensor App


  1. Install on your mobile device: IoTSensor on the App Store (iOS only)

  2. Configure the app with by calling the following custom URL on your device:

    • iot-create://&/accountName&/[Account ID]&/name&/[Connection Name]&/dataCenter&/[Data Center]&/deviceName&/[Device Name]&/deviceTypeID&/[Device Type ID]&/deviceReg&/[Device Registration Token]&/messageTypeID&/[Message Type ID]

    • Parameters:

      • [Account ID] => your account ID, e.g., "p1234567trail" (remark: not your user name)

      • [Data Center] => your account data center, e.g., "hanatrial" / "hana" / "us1.hana" / "us2.hana" / "ap1.hana"

      • [Connection Name] => any name for a connection, e.g., "myConnection"

      • [Device Name] => any name for the device, e.g., "iPhone Michael" / "Sensor Tag 1"

      • [Device Type ID] => the Device Type ID you copied previously to your clipboard

      • [Device Registration Token] => the Device Registration Token you copied previously to your clipboard

      • [Message Type ID] => the Message Type ID you copied previously to your clipboard


    • Sample: iot-create://&/accountName&/p000000trial&/name&/myTrialConnection&/dataCenter&/hanatrial&/deviceName&/iPhoneMichael&/deviceTypeID&/f807b43597e44cf1fc4b&/deviceReg&/ce89c5cfe7fdb25b381eff51136b97&/messageTypeID&/9208dd4b8cc54bc1fb1b


  3. Once the custom URL is launched the app starts and account will be configured.

  4. Press on Registration.

  5. The "Device" gets registered and is ready to send Data. Press OK.

  6. The "Connection" is now coloured red.


Select Device and Send Data


  1. Press on Sensor.

  2. Select a device (vor BLE device connection press refresh).

  3. The device is not connect. Go back by pressing Select Source.

  4. Press Back. (Sensor and Connection are coloured red.)

  5. Press Record Button.

  6. Data is sent according to sending interval (values that are not defined in the message type are ignored.)


Where do I see my Incoming Data?


IoT Message Management Cockpit


You can see your incoming data immediately via the MMS Cockpit.


  1. Open the IoT Service Cockpit.

  2. Choose the Send and view messages, or perform other actions tile. (The MMS Cockpit opens.)

  3. Choose the Display stored messages tile. (All tables of incoming data are listed.)

  4. Select the table that is named after the Message Type ID that you created previously ("T_IOT_<MESSAGE TYPE ID>").

  5. Press refresh to update the table. The latest values are on top.


OData Consumption


The Message Management Service exposes the tables via OData as well (Documentation: SAP HANA Cloud Platform Internet of Things (IoT) Services).


  1. Open any browser.

  2. Copy the targeted table name to your clipboard. (see previous step)

  3. Enter the URL as follows:


  4. Remove the parameter "?$format=json" in case you want to consume the OData API in application, e.g., HTML5 Applications.


You can now start to consume the data in other applications.


How to write your own iOS App?


Additional Material?


Questions and Feedback?


We highly appreciate your questions or feedback. Please add your comments below.


50 Comments
Former Member
0 Kudos

Hi Michael,

Thanks for this blog. This is nice way to simulate if you don't have hardware available with you.

I tried this but i am stuck at the registration step. It says Registration failed. This is the URL i launched. I am using hanatrail account.

>iot-create://&/accountName&/p1941830575&/name&/myConnection&/dataCenter&/hanatrial&/deviceName&/iPho...

michael_ameling
Advisor
Advisor
0 Kudos

Thanks for the feedback. The account ID you used is not correct. Please always look in the HCP Cockpit for the correct account ID. In your case it should be "p1941830575trial".

Former Member
0 Kudos

Thanks, Still same error after using the correct account ID. Maybe i am missing something else.

michael_ameling
Advisor
Advisor
0 Kudos

I tried changing the account ID by adding "trial". It worked fine for me. You should see a registered device.

michael_ameling
Advisor
Advisor
0 Kudos

Just updated the article with information how to consume the data via the MMS Cockpit and OData.

Former Member
0 Kudos

Hello michael.ameling

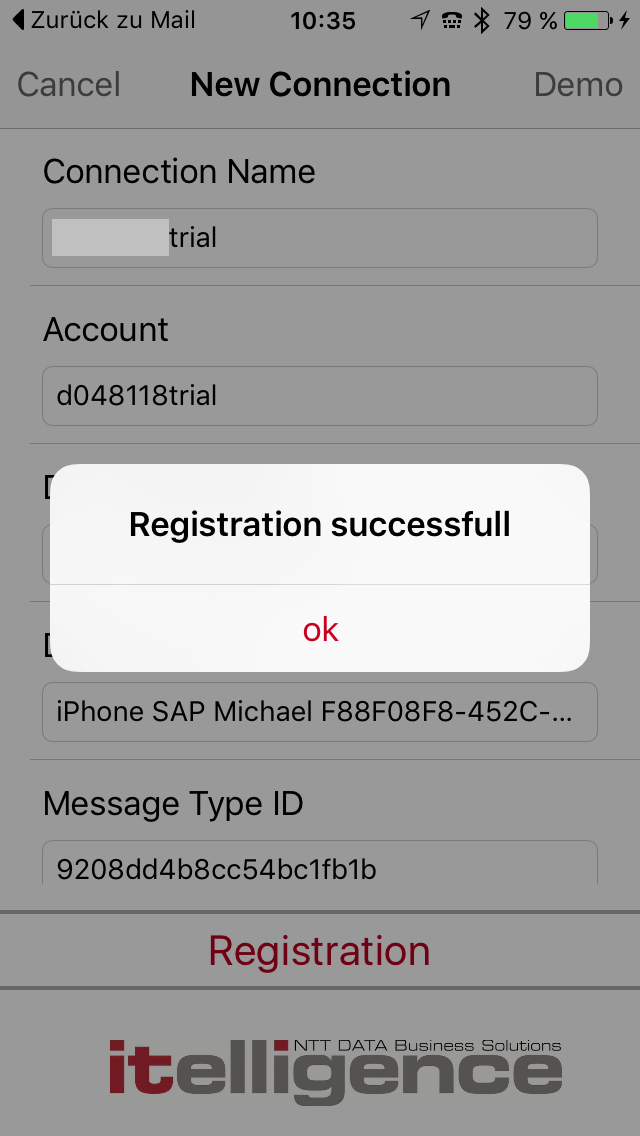
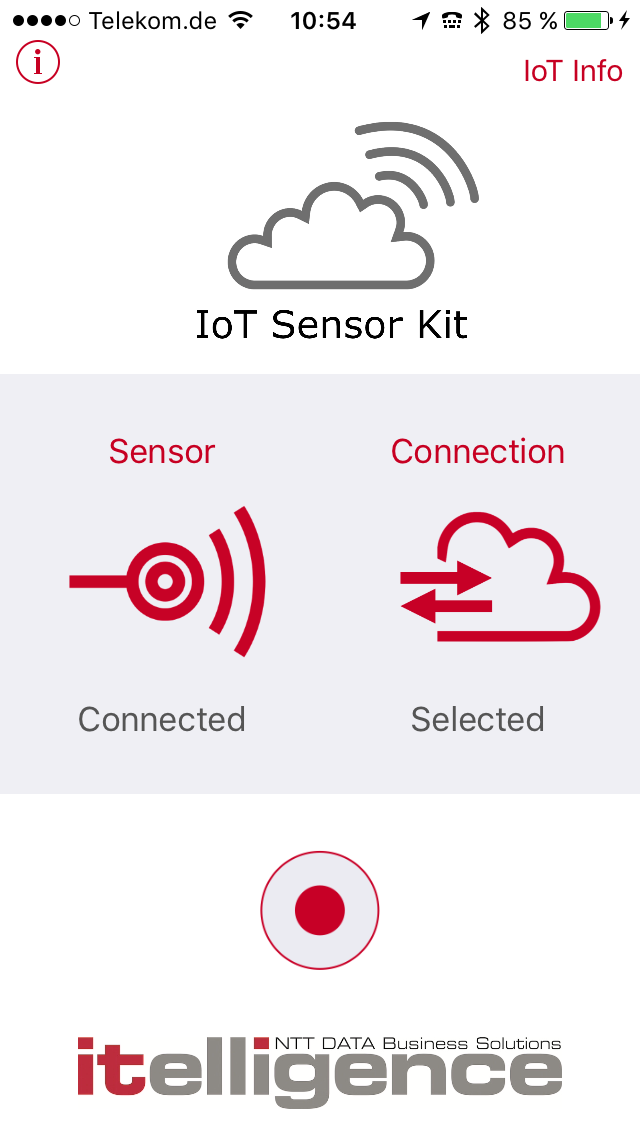
I have created Device Type & Message Type as per above article, Installed app " IoTSensor" on iPad, There are two options on the app Sensor and Connection. By clicking on Connection, New Connection opened. I filled the details as details got from cockpit on creating Device Type & Message Type respectively,i don't know why i am getting " Registration Failed" error. Could you please help me out.

Thanks in advance.

Regards,

Pavan 

michael_ameling
Advisor
Advisor
0 Kudos

Hi Pavan,

can you please try again. There was an issue that got fixed. In case it still does not work please drop me an e-mail.

Best regards,

Michael

Former Member
0 Kudos

Hello Michael,

I tried as you told, bit it could not resolved problem. Still it showing "Registraion Failed " . Could you please help me out ?

Regards,

Pavan

michael_ameling
Advisor
Advisor
0 Kudos

Hi Pavan,

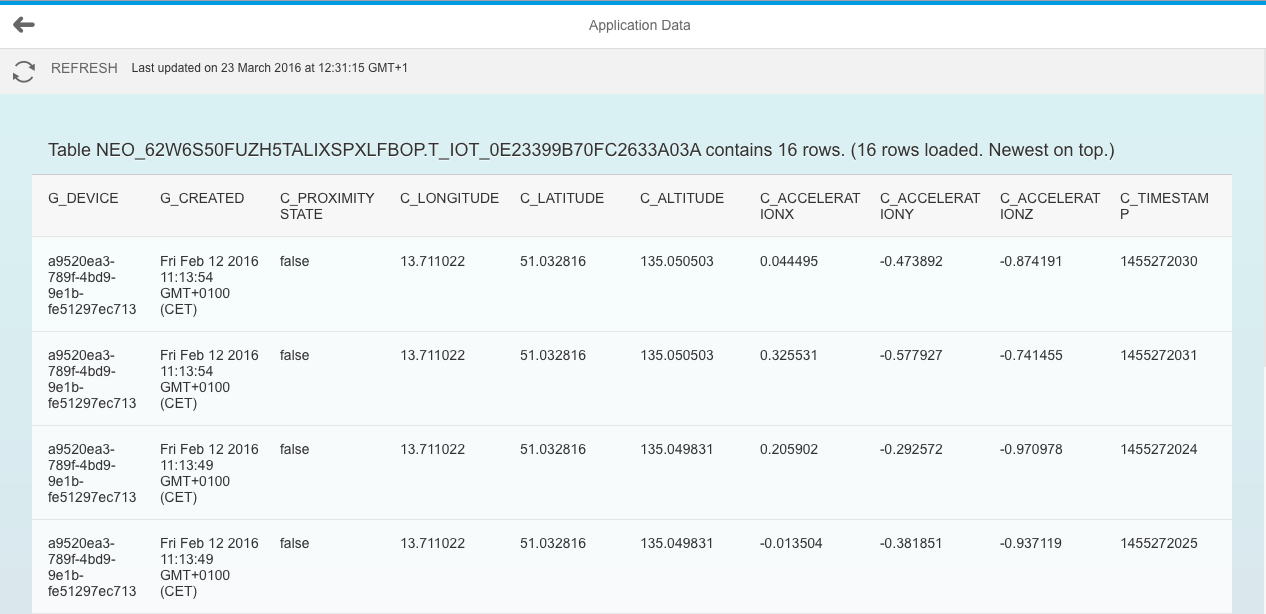
it seems that the Registration Token or the account is not setup properly. Can you please share a screenshot of your settings via mail (in order not to share any credentials via SCN).

Thanks, Michael

Former Member
0 Kudos

Hi Micheal,

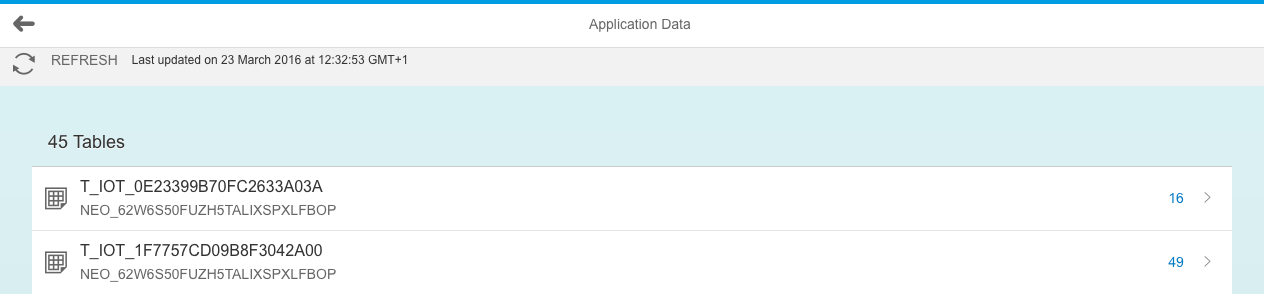
Apologies for getting back late. Yes I can see a registered device with your Name in IoT Cockpit under Devices. I tired again now,but still I get the same "Registration Failed". I even deleted the app and re configured.

iot-create://&/accountName&/p1941830575trial&/name&/myConnection&/dataCenter&/hanatrial&/deviceName&...

michael_ameling
Advisor
Advisor
0 Kudos

Hi Mayank,

I just tried with your configuration and it works great when you change the device name. The error I get with you configuration is that you already created a device with this name. Therefore, you should either change the name or delete the device via the IoT Cockpit in the device tile. Please make sure that you have the latest version of the IoT sensor app as well.

Best regards,

Michael

Former Member
0 Kudos

Yes that was the problem, I changed the name and it got registered.


This work perfectly fine now. I can see the data pushed to HCP from iPhone.

Thanks a lot,

Mayank

Former Member
0 Kudos

Hello Michael,

Is required to create the link as shown with this screenshot ?Regards,

Pavan

michael_ameling
Advisor
Advisor
0 Kudos

Hi Pavan,

yes, you need to create an according link with your account configuration. Please find the description how to configure your account in the article. The configuration is necessary in order to tell the app where to send what data.

Best regards,

Michael

Former Member
0 Kudos

Hello Micheal,

I have created Message Type,Device Type.Below is the link , i entered in Safari tab.

iot-create://&/accountName&/S0015414084&/name&/Connect&/dataCenter&/hana.us1&/deviceName&/P1Device&/deviceTypeID&/3511f69da8f73fa2e95b&/deviceReg&/e280629261bb27bca629453bb1c7ef4d&/messageTypeID&/5d35df15cab913bf4918

Still i am facing  "Registration Failed". I don't know what i am missing ? Please help me out

Regards,

Pavan

Former Member
0 Kudos

Hello ,

could you help me out , Still i am facing Registration Failed error on SensorTag app after entering above URL in Safari browser .

anton_levin
Advisor
Advisor
0 Kudos
matt_steiner
Active Contributor
0 Kudos

Thanks michael.ameling for this great and straight-forward example! I recently went through this again as I was collecting resources for a Hackathon and noticed that on my device (TI SimpleLink SensorTag CC2650) I had to prefix the properties/fields of the MessageType with 'sensor' (e.g. sensorTemp) in order for it to work properly:

Just FYI for those that may also run into issues with 0.0 values ...

david_lincourt
Participant
0 Kudos

Thanks for this great example. It was part of the inspiration for a simple app that displays the Heat Stress Index. I blogged about it here: It's hot out here!

michael_ameling
Advisor
Advisor
0 Kudos

Just updated the field names for the message type of the SensorTag and iOS device. Please check your device model that the new names match.

michael_ameling
Advisor
Advisor
0 Kudos

Thanks for the hint. I just updated the names for the fields.

Murali_Shanmu
Active Contributor
0 Kudos

Hi Michael,

Thanks for the updating the Sensor tag properties. I also used the properties sensorTemp, sensorOptical and sensorHumidity.

EmmanuelDaCosta
Product and Topic Expert
0 Kudos

Hello

I am trying the tutorial and I am facing two problems :

-> in the message type configuration screen, I do not have the 3 fields but only 1

-> In the Display stored Data, I have only 3 tables

I have the DB created and running. I am using the hana trial

Any clues

Regards

Emmanuel

anton_levin
Advisor
Advisor
0 Kudos

1. first screen. press on "Add Field" to add more fields to the message type

2. a table is created once data is arrived from sensor/device/sample client

Former Member
0 Kudos

Hello,

I have created new MessageType for CC2650.

& followed procedure as above. Getting below error(screenshot)

I am not getting data in MMS Cockpit.Could you please help this out?

anton_levin
Advisor
Advisor
0 Kudos

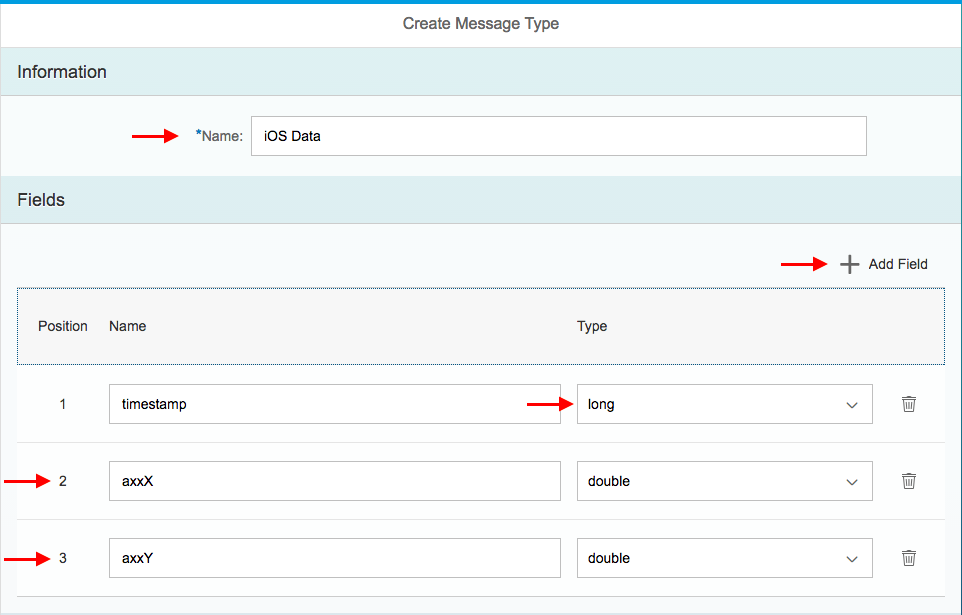
Message Type filed names you used during message type creation should match to the names you send in payload. I see you have SensorGyroy and SensorGyroz (1st screenshot) but sensorGyroY and sensorGyroZ (2nd screenshot). Case matters.

Former Member
0 Kudos

Hello Anton,

I have changed accordingly,but still facing same error.

Changed Message ID,Device Type ID,Device registration Token in standard IoT url.

Registration was successful.

Regards,

Pavan

anton_levin
Advisor
Advisor
0 Kudos

It will help if you provide a full screenshot (do you have only 5 fields?) and also an updated screenshot from itelligence app to compare.

EmmanuelDaCosta
Product and Topic Expert
0 Kudos

Hello

I found my mistake.

In the tutorial, the first step is the creation of the device type. But the first step must be the creation of the message type.

As the device type assignment has been removed from the message type creation, it is not possible to assign a device type to the message type.

When creating the device type, it is possible to assign the message type if it has been created first.

It is explained in the iot stater kit.

Please could you modify the tutorial ?

Now everything goes well.

best regards

Emmanuel

Former Member
0 Kudos

Hello Anton,

These are screenshots of Message Type,Device Type & Devices respectively.

Regards,

Pavan

anton_levin
Advisor
Advisor
0 Kudos

And the itelligence app screenshot?

Former Member
0 Kudos

Regards,

Pavan

anton_levin
Advisor
Advisor
0 Kudos

I do not have a sensortag with me but I do not remember it sends "timestamp". This field should be removed from your message type, I guess.

Murali_Shanmu
Active Contributor
0 Kudos

Hi Anton, My sensortag message has got timestamp(date) and it worked for me yesterday. Looks like the problem is elsewhere.

Pavan, can you please raise a discussion in the forum and point to this article. Thanks.

Former Member
0 Kudos

Hello ,

Please check , i have posted Receiving Failed error from getting CC2650 sensor data?

Regards,

Pavan

michael_ameling
Advisor
Advisor
0 Kudos

I just updated the blog to the new procedure since the IoT Cockpit has change and the API V2 has been introduced.

EmmanuelDaCosta
Product and Topic Expert
0 Kudos

Thank you.

Regards

Emmanuel

sasi_reddy7
Participant
0 Kudos

Works great, thanks for the blog.

simen_huuse3
Active Participant

Hi Michael. Great blog post. Fields "Message Type Name" and "Message Type Direction" are left blank when creating a connection with the above procedure. Is that intentional?

Br, Simon

Former Member
0 Kudos
Hi Michael!
Great post. But it would b e very helpful, if at least all sensor data the App can read from the CC2650 SmartTag would also be handed over to HCP. I am talking about at least:
sensorHumidity
sensorObjectTemp
sensorOptical
sensorTemp
But according to the specification there are even more sensors. Thus enabling ALL sensors in the app as optional fields would be great:


pressure R hPa float Pressure sensor air pressure
pressure_t R C float Pressure sensor temperature
humidity R %RH float Humidity sensor relative humidity
humidity_t R C float Humidity sensor temperature
objtemp R C float IR temp sensor object temperature
accelX R g float Accelerometer X-axis motion
accelY R g float Accelerometer Y-axis motion
accelZ R g float Accelerometer Z-axis motion
gyroX R deg/sec float Gyroscope X-axis rotation
gyroY R deg/sec float Gyroscope Y-axis rotation
gyroZ R deg/sec float Gyroscope Z-axis rotation
magX R uT float Magnetometer X-axis magnetic field
magY R uT float Magnetometer Y-axis magnetic field
magZ R uT float Magnetometer Z-axis magnetic field
light R Lux float Light sensor illuminance
battery R mV float Battery voltage level
key1 R state int Push button 1 key value
key2 R state int Push button 1 key value
reed R state int Magnet reed relay state value
buzzer RW state int Buzzer on/off
LED1 RW state int LED1 state on/off
LED2 RW state int Buzzer on/off
Radio R string string Radio interface(BLE/Wifi)
Former Member
0 Kudos
 

Any chances to enhance the app?
srijayant
Explorer
0 Kudos
Hi michael.ameling,

Thanks for the post, it is amazingly descriptive,

Just that i need some help configuring my TI sensor app on android phone, for my sensor to communicate with HCP IOT service, well is configuration, same as the IOS, as explained in the post ?

I have tried using the same syntax to create a thing and, use it in the custom cloud option on the Android app by TI, it wont throw me any error, but i don't even get any data on my HANA database.


Regards,

Srijayant
anton_levin
Advisor
Advisor
0 Kudos
Hello Srijayant,

this blog explains how to use TI SensorTag in a combination with IoTSensor app by itelligence AG (iOS app) to send data to the SAP Cloud Platform Internet of Thing. The native Simplelink SensorTag Android app you try to use does not support SAP Cloud Platform connectivity and also the mentioned above "quick link" syntax.

Regards, Anton


FlavioMolina1
Participant
0 Kudos
Hi Michael,

Thanks for this blog, I really was finding some think like this.

I have see other tutorial where IOT services are created directly on HANA  DP (By Eclipse).

Im really wold like understand the options to do this. Can you please put some lights on this and clarify  the differences btw the method presented here an this other? In additional what is the recommended approach.


For reference IOT integration using HANA DB:

geronasso
Product and Topic Expert
0 Kudos
I am trying to use iot started kitto display data... but in STEP 8 from https://www.sap.com/developer/tutorials/iot-part13-hcp-services-viewdataui5.html

my devices are not listed, thoughts?


tks!
anton_levin
Advisor
Advisor

Dear Christian,


please familiarize yourself with the Community Rules of Engagements [1] and especially with:


#9 do not cross post – you asked the same question here and in [2] thread
#13 do not hijack – this blog describes completely different scenario to what you try to ask


Regards,
Anton (Moderator)


[1] https://www.sap.com/community/about/rules-of-engagement.html 
[2] https://answers.sap.com/questions/298564/its-possible-to-use-sensortag-2650-iot-services-of.html?chi...

geronasso
Product and Topic Expert
0 Kudos
Tks and sorry!
I522456
Product and Topic Expert
0 Kudos
Fantastic example and good guidelines. It was easy to implement and it works perfectly, thanks!
ChrisGela
Participant
0 Kudos
Hi,

Any plan to update your app so it can use the new CF IOT environment?

regards
0 Kudos
I am also looking to connect the app data in Cloud Foundy environment using IoT service Cockpit.