
- SAP Community
- Groups
- Interest Groups
- DevOps and System Administration
- Blogs
- Build a CI/CD Pipeline in Azure DevOps and connect...
DevOps and System Administration Blogs
Explore DevOps and system administration blog posts. Stay current with best practices, tools, and insights into efficient IT management strategies.
Turn on suggestions
Auto-suggest helps you quickly narrow down your search results by suggesting possible matches as you type.
Showing results for
mchrista
Participant
Options
- Subscribe to RSS Feed
- Mark as New
- Mark as Read
- Bookmark
- Subscribe
- Printer Friendly Page
- Report Inappropriate Content
01-25-2021
9:23 AM
Azure DevOps is a powerful tool to organize development tasks of an any project. In addition, there is the pipeline tool available, which allows you to build continuous integration and continuous delivery pipelines. CI/CD Pipelines help you to automate and accelerate the deployment of new developed features. This blog post will give an introduction on how to use Azure DevOps to build pipelines that continuously deploy new features to SAP Cloud Foundry.
To build the scenario on your own, you need trial accounts on Azure as well as on SAP Cloud Platform. Furthermore, you need any git repository. In this blog post the Git repository from GitHub is used, but any other Git repository is possible as well. In summary, you could use the following setup:
We assume that your SAP application, e.g. Fiori application, is already saved in your GitHub repository. The goal is that every change to the master branch of the git repository triggers a deployment pipeline in Azure DevOps. The deployment pipeline then builds the application and deploys it after approval first to the development space and after another approval to the productive space in SAP Cloud Foundry.
Within SAP Cloud Platform, we need to setup two spaces as target for our deployment. Therefore, you need to navigate to section ‘Spaces’ in the menu tree and then create two spaces. Important is to remember the names (‘dev’ and ‘prd’) of the just created spaces as they will be the targets of our deployment from Azure.
After login to Azure, you need two steps to create a CI/CD pipeline. In the first step you create the build-pipeline, which is responsible to pull the application from the git repository, doing some testing and finally builds the application. In the second step you create a release pipeline which deploys the built application in the SAP Cloud Foundry spaces you have created in the previous step.
We set up a Build-Pipeline that will be triggered after every commit to our Git master branch. After triggering the pipeline pulls the application from the Git repository and builds a multi-target-application which later can be used for deployment to SAP Cloud Foundry. To configure the build-pipeline, follow the steps coming next:
Now we can configure the deployment of the built application to SAP Cloud Foundry. This is done in a so-called release. The release for our scenario will consist of three steps. First, the application is built with the Build-Pipeline we have created. Second, after approval from a responsible person we deploy the application to the ‘dev’ space in SAP Cloud Foundry. Lastly, after another approval the application is deployed to the ‘prd’ space in SAP Cloud Foundry.
In this blogs post, I gave an introduction on how Azure DevOps can be used to build a CI/CD Pipeline with SAP Cloud Platform. The given example is a very minimalistic approach that requires further tasks like automatic testing for a productive usage. However, the example is a proof of concept that integration of SAP Cloud Platform into Azure DevOps works and is configurable in few steps. Since most of the time, we do not have stand-alone SAP Cloud applications as they relate to SAP systems on-premises, my next research will be how we can integrate them into Azure DevOps. If it is also possible to integrate SAP on-premises systems to Azure DevOps, we get a powerful and flexible tool to manage our SAP application lifecycle.
Michael Christa is SAP Consultant at Q_PERIOR focusing on technology and innovation. His professional interests are developing end-to-end SAPUI5 applications as well as working with the SAP Cloud Platform.
Prerequisites
To build the scenario on your own, you need trial accounts on Azure as well as on SAP Cloud Platform. Furthermore, you need any git repository. In this blog post the Git repository from GitHub is used, but any other Git repository is possible as well. In summary, you could use the following setup:
- Azure Account (Azure Pipeline Trial Account is available here)
- SAP Cloud Platform Account (Trial account is available here)
- Any Git Repository (e.g. GitHub)
Goal
We assume that your SAP application, e.g. Fiori application, is already saved in your GitHub repository. The goal is that every change to the master branch of the git repository triggers a deployment pipeline in Azure DevOps. The deployment pipeline then builds the application and deploys it after approval first to the development space and after another approval to the productive space in SAP Cloud Foundry.
Setup SAP Cloud Platform (SCP)
Within SAP Cloud Platform, we need to setup two spaces as target for our deployment. Therefore, you need to navigate to section ‘Spaces’ in the menu tree and then create two spaces. Important is to remember the names (‘dev’ and ‘prd’) of the just created spaces as they will be the targets of our deployment from Azure.

Setup Azure DevOps
After login to Azure, you need two steps to create a CI/CD pipeline. In the first step you create the build-pipeline, which is responsible to pull the application from the git repository, doing some testing and finally builds the application. In the second step you create a release pipeline which deploys the built application in the SAP Cloud Foundry spaces you have created in the previous step.
Create the Build-Pipeline
We set up a Build-Pipeline that will be triggered after every commit to our Git master branch. After triggering the pipeline pulls the application from the Git repository and builds a multi-target-application which later can be used for deployment to SAP Cloud Foundry. To configure the build-pipeline, follow the steps coming next:
- Select Pipelines in the menu and then use the button ‘New pipeline’ to create your Build-Pipeline.

- Select “Use the classic editor” since we do not use a YAML file to configure our pipeline.

- Now connect to your Git-Repository where your application is stored. Therefore, first login to your Git-Account and then select your repository and the branch you want to use in Azure Pipelines.

- Choose ‘Empty Pipeline’

- Create Pipeline Tasks
In the ‘Tasks’ section you will now see your connected Git repository and an agent that will execute the build steps you need. For our scenario, we need three tasks to build our application and publish the built application for later deployment. A task can be added with the plus button on the right side. Perform the following three tasks:
- Install Dependencies
First add a command line task that will install dependency packages via npm. For the built, we use the mbt tool. Since it is not already known to Azure we can install it via npm. Furthermore, I used an UI5 application and therefore need to install the UI5 command line tool. If you have any other kind of application, check the logs and install the needed tools in the provided manner.

- Install Dependencies
- Build the MTA
The second task is again a command line task and builds the application. In the script section the command for building the application is shown. As target platform we set the cloud foundry environment (-p=cf) and give a target directory where the built application is saved. Here, we can use a dynamic location within Azure DevOps that is accessible in later steps as well. The built will create a folder ‘mta_archives’ and an mtar file within the given target directory. In my case the built application has the path ‘$(Agent.BuildDirectory)\s\mta_archives\tinyapp_0.0.1.mtar’, where tinyapp is the name of my UI5 application.

- Build the MTA
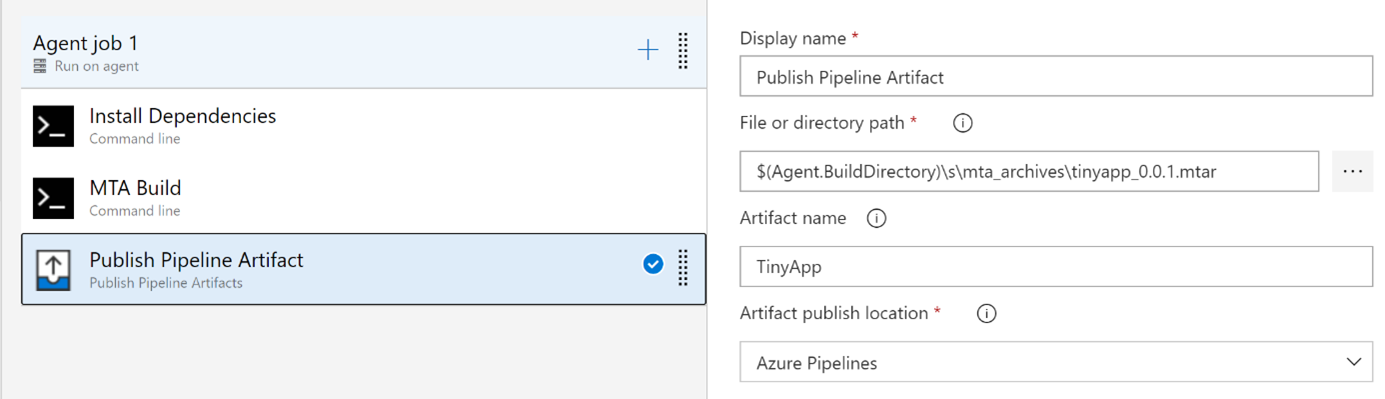
- Publish the built application
As a final step, we publish the created mtar file to Azure Pipelines, so that it can be used in the release pipelines later. This can be done with a so-called artifact. You can imagine an artifact like a key value store, where you give a name as a key and the file you want as a value. To do so, you need to the task type ‘Publish Pipeline Artifact’. In the detail section, you give the path to your mtar-file from the previous step and give a name for the artifact.
- Publish the built application
- Configure the trigger
After creating the tasks change to tab ‘Triggers’ and check the option ‘Enable continuous integration’. With this setting the build pipeline is triggered on every change to the git master branch you have connected.

Release Pipeline
Now we can configure the deployment of the built application to SAP Cloud Foundry. This is done in a so-called release. The release for our scenario will consist of three steps. First, the application is built with the Build-Pipeline we have created. Second, after approval from a responsible person we deploy the application to the ‘dev’ space in SAP Cloud Foundry. Lastly, after another approval the application is deployed to the ‘prd’ space in SAP Cloud Foundry.
- Create two stages for ‘Dev’ and ‘Prd’:
In the stages area click ‘Add’ to create a new stage. We create two stages, ‘Dev’ and ‘Prd’, that represent the SAP Cloud Foundry spaces ‘Dev’ and ‘Prd’. Giving the same name is not mandatory but helps to easy understand.

- Add the Build Pipeline:
In the artifacts area on the left-hand side, click ‘Add’ to create a new one. A details window will appear in which you select ‘Build’ as a source type and select the previous created build pipeline from the dropdown menu.

- Configure release pipeline trigger:
Click the flash button and enable continuous deployment trigger. With this setting, every time a new build is available the release pipeline will be triggered.

- Configure the deployment steps:
Back in the ‘Stages’ area, we need to configure the deployment tasks for ‘Dev’ and ‘Prd’. In the presented case, the tasks are the same, so in the following only the configuration for the dev-space is shown. To configure the deployment tasks, click on the stage description ‘1 job, 0 taks’. Afterwards a new window will appear in which we create the following tasks:
- Download the Pipeline Artifact
In the last step of the build pipeline we uploaded the artifact ‘TinyApp’ that contains the deployable mtar file. In the first step of the deployment, we download the artifact and save it to the pipeline workspace.

- Install dependencies
Similarly to the build pipeline, we need to install dependencies that are required for the deployment. We need here the plugin multiapps of the cloud foundry command line interface. Further, please see the parameter -f that enables installation without any user interaction.

- Login to SAP Cloud Foundry
As next step, we use the command ‘cf login’ to access SAP Cloud Foundry. All parameters are given as variables which we create later. Please note, that we also give the SAP Cloud Foundry space ‘dev-org’ here. When configuring the productive space, you need to use ‘prd-org’ in this command.

- Deploy the Application to SAP Cloud Foundry
In the final task the deployment of the application to SAP Cloud Foundry takes place. We use the command ‘cf deploy’ for this purpose. The command takes the mtar file as an argument and deploys the application to the account we are currently logged in.

- Create environment variables:
Now change to section ‘Variables’ and create all the variables we have used during our deployment.

- Download the Pipeline Artifact
- Enable approval:
The final step is to enable the approval of the deployment. Therefore, click on the flash button of the stage and enable ‘Pre-deployment approvals’. Furthermore, give the name of the users or the groups in the input field below.

Test the Pipeline
To test the configured pipeline, we just need to change our application and push those changes on the master branch of our git repository. Immediately after the commit you will see in menu item ‘Pipelines’ that a new build has started. The list item also displays the commit message that has triggered the build. If you click on the item, you can get detailed information about the build and can view logs.

Once the build is finished, change to menu item ‘Releases’ and you will see that already a new release has started, since we checked the property that a new release will be started immediately after a new build has been created.

If you now click on the release item, you get to the detail page of the release and you can see that the deployment to ‘Dev’ requires an approval beforehand. To approve the deployment, click on the ‘Approve’ button. After approval the deployment is processed by Azure Pipelines. This process will take a few minutes.

Once the deployment has completed you will see the status ‘Succeeded’ within the dev tile and now the productive stage is waiting for approval. Here you have the option to directly approve the deployment to production or do it sometime later after you have confirmed functionality on dev stage.

To verify the deployment of your application, change back to SAP Cloud Platform and navigate to the dev space. In here, we see the just deployed application ‘tinyapp’ which is in state ‘Started’ and confirms that the deployment was successful.

Summary
In this blogs post, I gave an introduction on how Azure DevOps can be used to build a CI/CD Pipeline with SAP Cloud Platform. The given example is a very minimalistic approach that requires further tasks like automatic testing for a productive usage. However, the example is a proof of concept that integration of SAP Cloud Platform into Azure DevOps works and is configurable in few steps. Since most of the time, we do not have stand-alone SAP Cloud applications as they relate to SAP systems on-premises, my next research will be how we can integrate them into Azure DevOps. If it is also possible to integrate SAP on-premises systems to Azure DevOps, we get a powerful and flexible tool to manage our SAP application lifecycle.
About the author
Michael Christa is SAP Consultant at Q_PERIOR focusing on technology and innovation. His professional interests are developing end-to-end SAPUI5 applications as well as working with the SAP Cloud Platform.
- SAP Managed Tags:
- DevOps
14 Comments
You must be a registered user to add a comment. If you've already registered, sign in. Otherwise, register and sign in.