
- SAP Community
- Products and Technology
- Enterprise Resource Planning
- ERP Blogs by Members
- Create Adobe form with fragments as a copy of the ...
Enterprise Resource Planning Blogs by Members
Gain new perspectives and knowledge about enterprise resource planning in blog posts from community members. Share your own comments and ERP insights today!
Turn on suggestions
Auto-suggest helps you quickly narrow down your search results by suggesting possible matches as you type.
Showing results for
cherifabir
Participant
Options
- Subscribe to RSS Feed
- Mark as New
- Mark as Read
- Bookmark
- Subscribe
- Printer Friendly Page
- Report Inappropriate Content
09-23-2022
3:35 PM
Introduction
The Adobe form with fragments are part of the New Output Management for S/4 HANA Systems. In this blog post, I will explain, step by step, how to create a copy of this standard form with Fragments. Next, I will briefly compare the use of this form against the "standalone form" by giving advantages of its use.
Prerequisite
You must have Adobe live Cycle Designer installed on your PC.
What is the utility of services in the forms with fragments?
The ODATA service is a data provider. It gets data from the backend it generates an XML file.
What is the use of callback class?
It is responsible for calling the ODATA service to get the data, in XML format. This data will be used in the call to the form interface to print it.
Comparison between the process of calling an Adobe Form with context (the standalone form) and Adobe form with fragments.
For the Adobe forms with context, the operation is simple. To print the form, we retrieve the data in a program and using this data, we call the function module of the form to print it.
But, for the Adobe form with fragments, in a callback class, we call an ODATA service to get the XML file that will be sent to the form to print it using the concept of binding available at Adobe layer (the XDP file of the form).

What is the advantage of adobe forms with fragments?
- Reuse of the ODATA service: the ODATA service created in this form is a shared and reusable resource (whether in other forms or other programs). Whereas, the other types of forms are completely isolated and autonomous.
- Speed and ease of development and maintenance: It is faster and easier to use ODATA services or methods, than to copy or recreate the contents of a new one.
- Reusability of fragments: this type of form is based on fragments (.XDP file). These files can be reusable in several forms as indicated in this blog post.
Step by step to create an adobe form with fragment in copy of the standard form.
In this scenario, we will take the purchase order as an example.
Copy the standard form and OData :
- Create a ZSF_MM_PURCHASE_ORDER form as a copy of the standard (interface + form) MM_PUR_PURCHASE_ORDER via the SFP transaction.

The standard form uses the FDP_EF_PURCHASE_ORDER_SRV service as data provider.
In order to add our own fields to the service, we need to create a custom service.

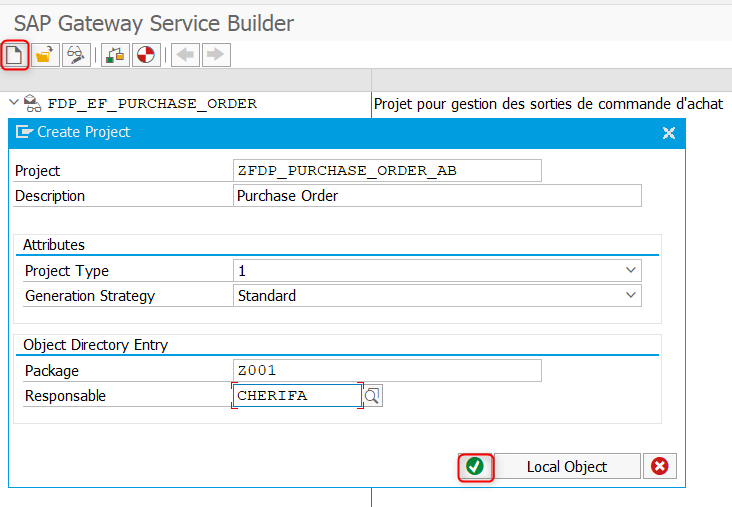
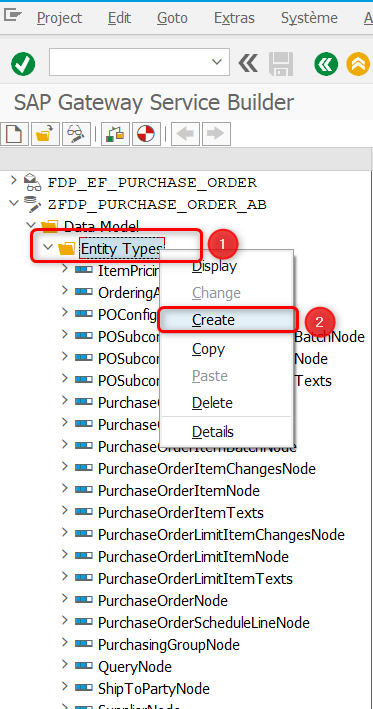
2. Create an empty project “ZFDP_PURCHASE_ORDER_AB” using the transaction SEGW.
3. Use a data model by reference to create the entities types.

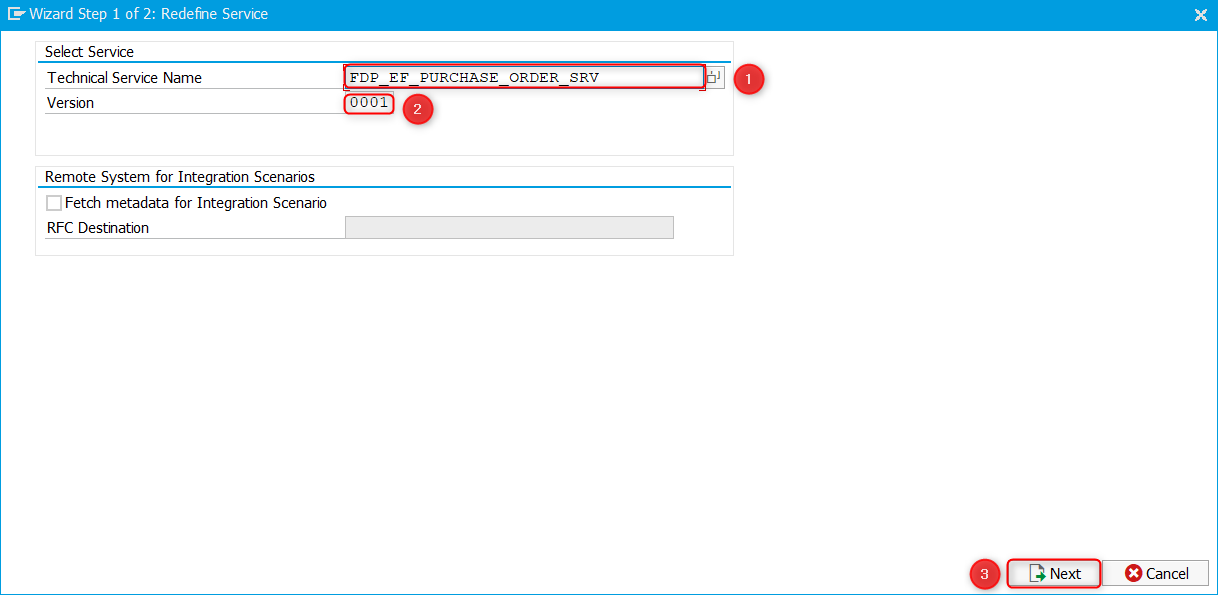
In this custom service, the reference is the standard service “FDP_EF_PURCHASE_ORDER_SRV”.
Select All the entity in the popup to get all the entity in the standard service imported to the custom service.

Save the service in the transport order.

4. Generate the OData service.

Copy the “Technical service name”, in our example it is “ZFDP_PURCHASE_ORDER_AB_SRV”. We will use it when adding it to the services catalog.
The service is generated successfully.

5. Enable the service Z in /IWFND/MAINT_SERVICE (service catalog).
Click the Add Service button.

Enter the service name “ZFDP_ PURCHASE_ORDER_AB_SRV” copied in “step4” and the system alias “LOCAL” and Click in “get services” button.
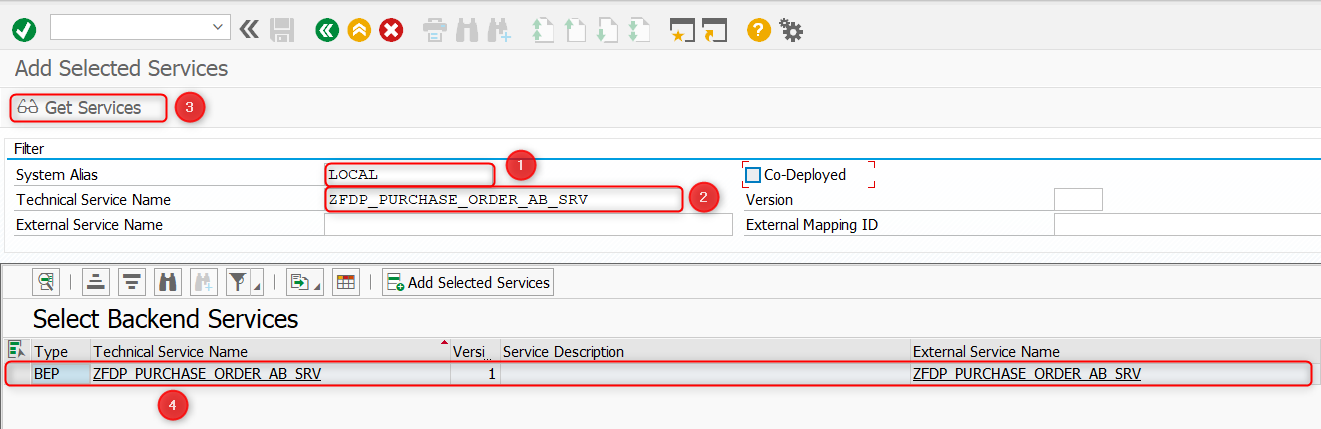
By clicking on the Technical Service Name, the corresponding service will be displayed in the final output.
Select the service and click on the “Add selected service” button.

The service is successfully added in the caltalog.

Copy the standard callback class:
- Find the callback class of the standard form.
In our case we will create a callback class as a copy of the standard.
In order to get the standard callback class, we must follow the following path:
SPRO -> SAP Reference IMG -> Cross Application Components -> Output Control.
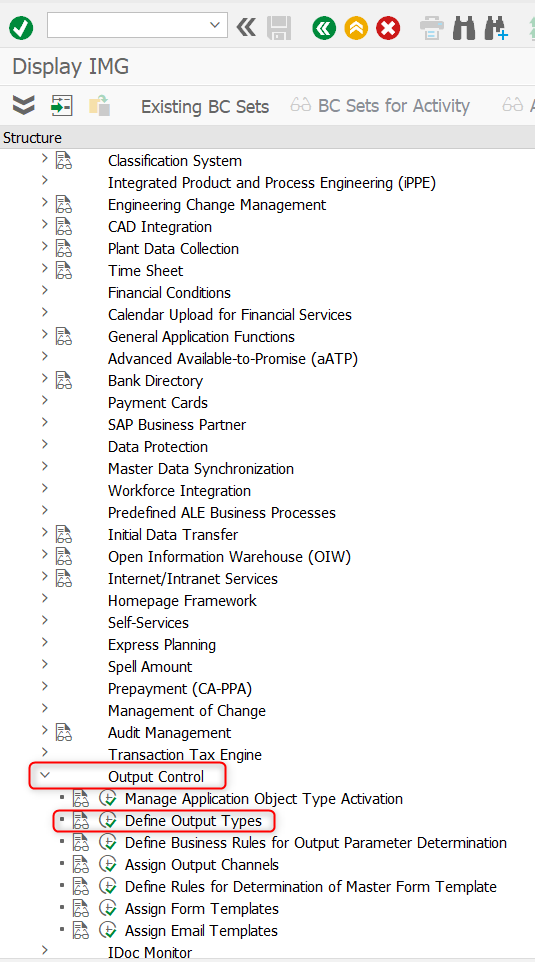
Double-click on PURCHASE_ORDER.

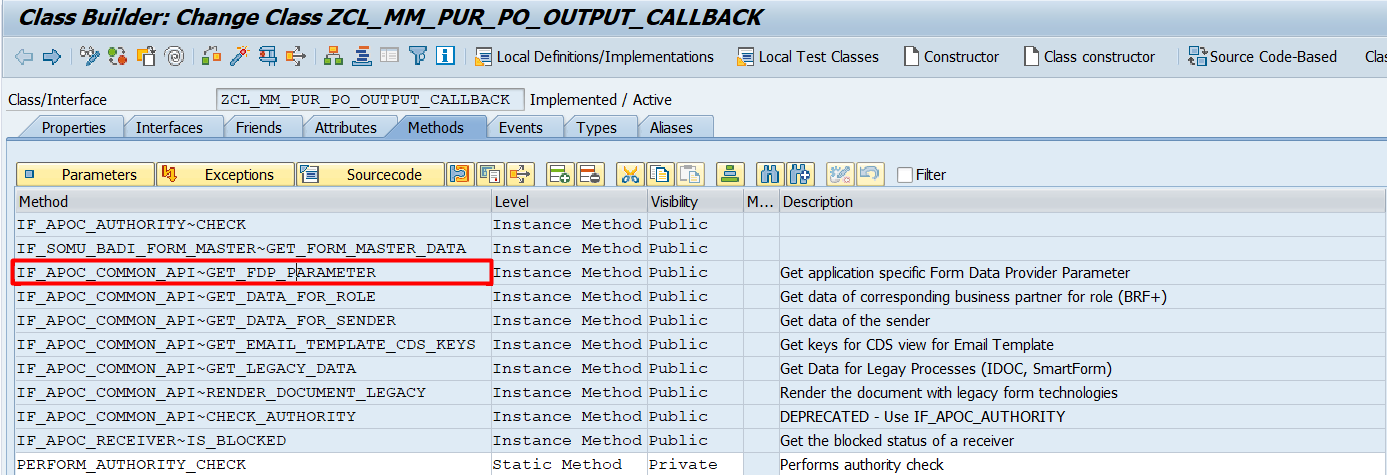
The “CL_MM_PUR_PO_OUTPUT_CALLBACK“ is a callback class that invokes the ODATA service.

2. Copy the standard callback class “CL_MM_PUR_PO_OUTPUT_CALLBACK” to a Z class “ZCL_MM_PUR_PO_OUTPUT_CALLBACK” using the transaction se24.

3. Update the “GET_PDF_PARAMETER” method in the Z callback class “ZCL_MM_PUR_PO_OUTPUT_CALLBACK”.
In line “12”, the standard service name is assigned.
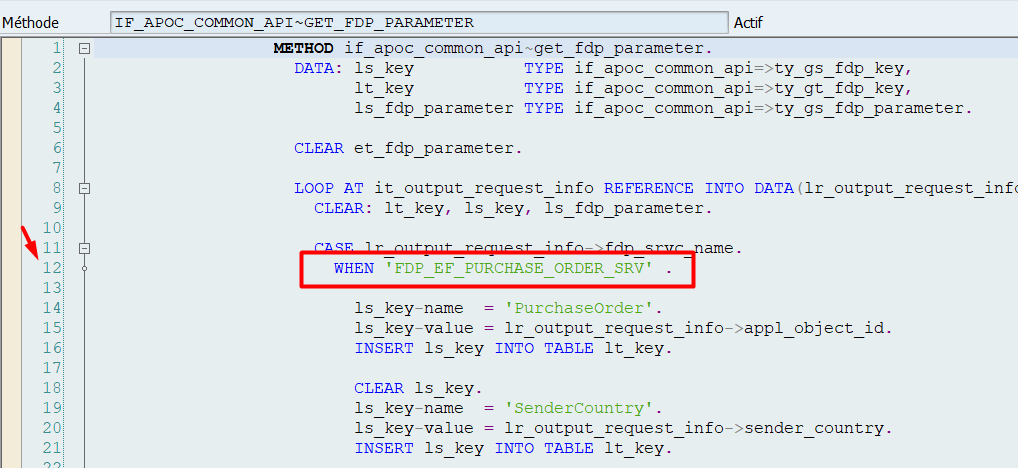
4. Change the standard service assigned in line 12 by the service we already created in Z (in our example “ZFDP_ PURCHASE_ORDER_AB_SRV”).

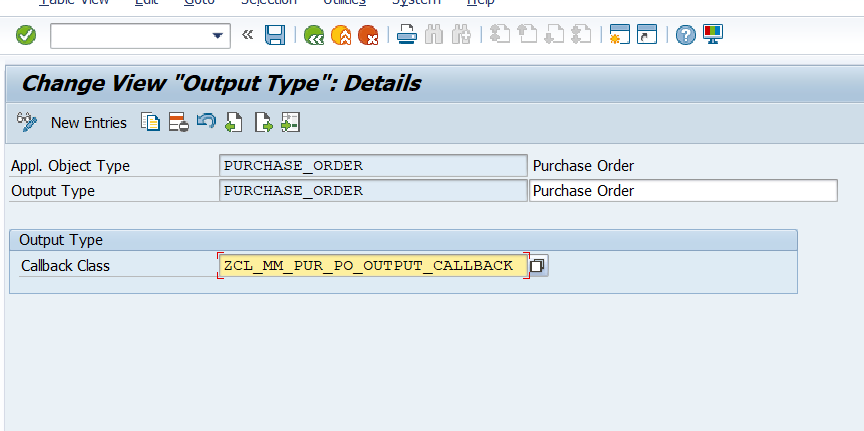
5. After activating the custom class, assign the Z class created in SPRO instead of the standard callback class.
6. Next, configure the Z form created at the beginning by the new service.

Add custom fields in our service:
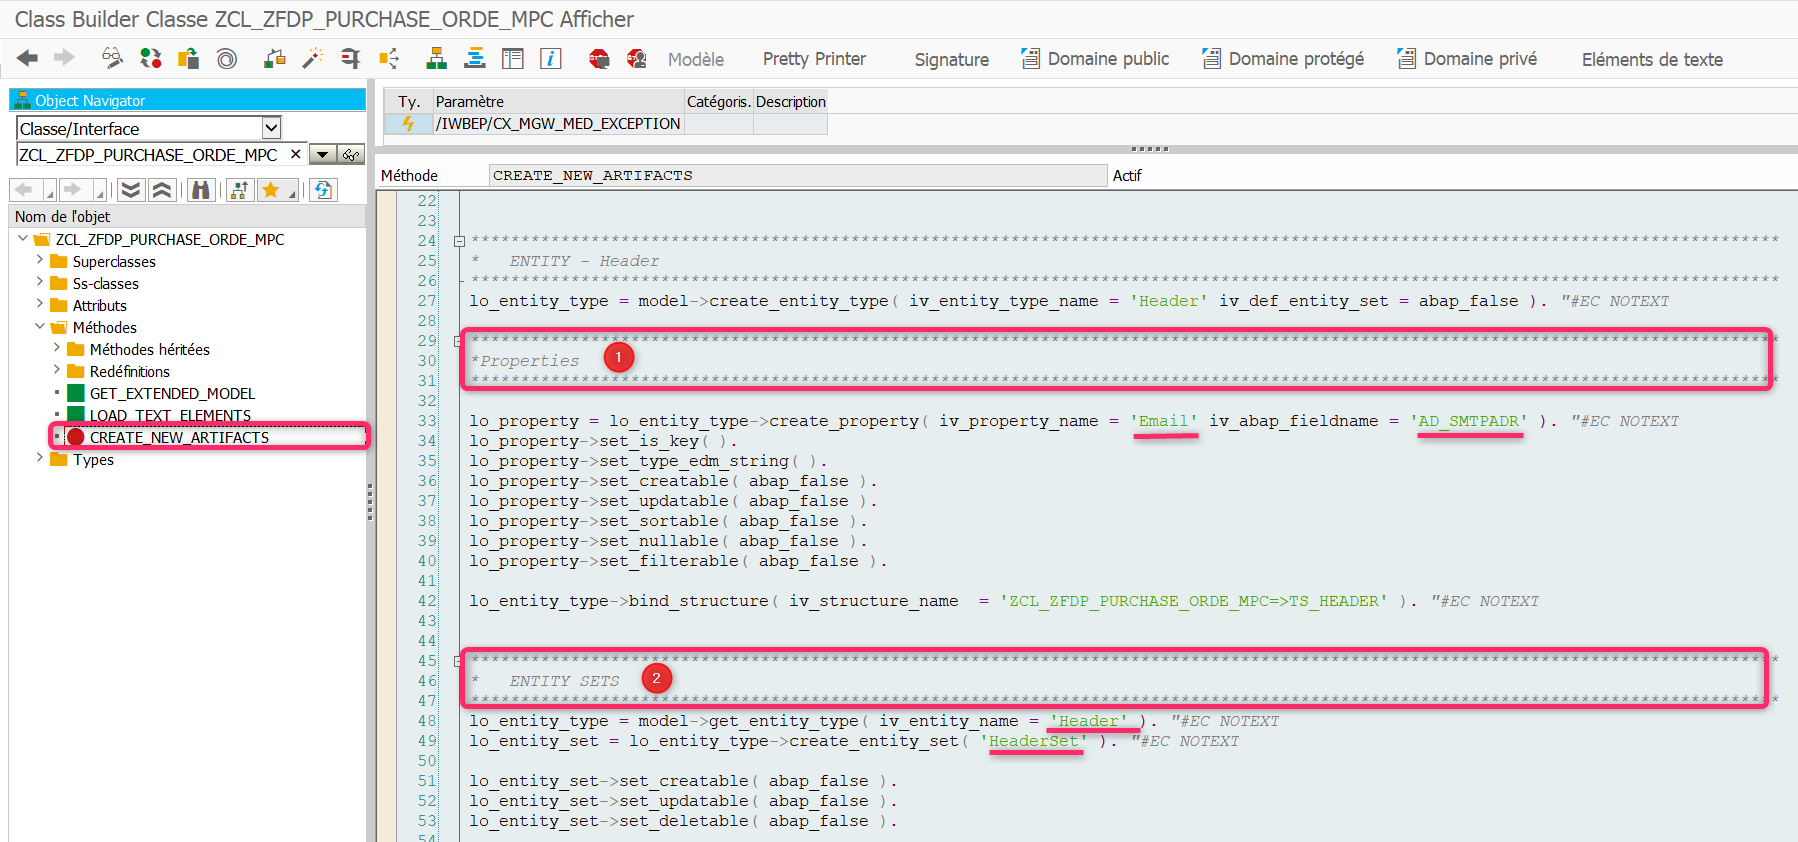
1. Create a custom entity “Header” to get the email to display it in the first part of the purchase order.
2. Add the “Entity Type Name” and Check the option “create Related Entity Set”.

3. Add the “Email” property to the created entity.

NB: The field “Name “will be user in the form and the “ABAP Field Name” in our ODATA service.
4. Save the project.
5. Generate the project, in order to generate the runtime artifacts of the “Header” entity.
we must, now, add the association between the entity created and the entity of the main ODATA service, so it can be called automatically.
Adding this association (Cardinality), will decide the use of the “GET_ENTITY” method or “GET_ENTITYSET”.
6. Create an association for the new entity.
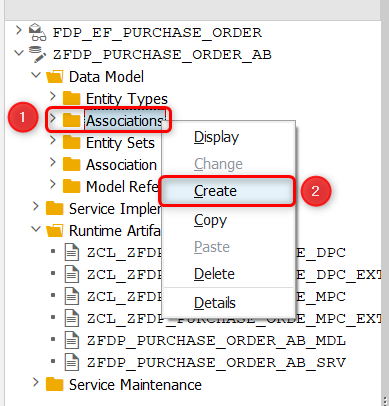
Add the association name, primary entity, dependent entity, and cardinality.
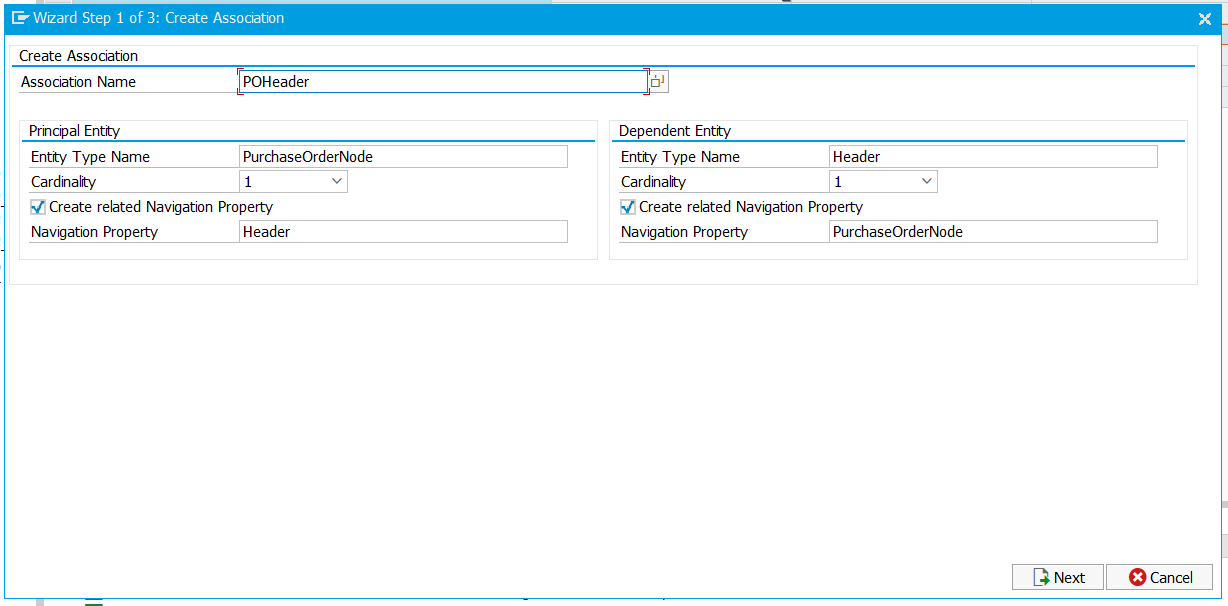
The association and the association Set are created.
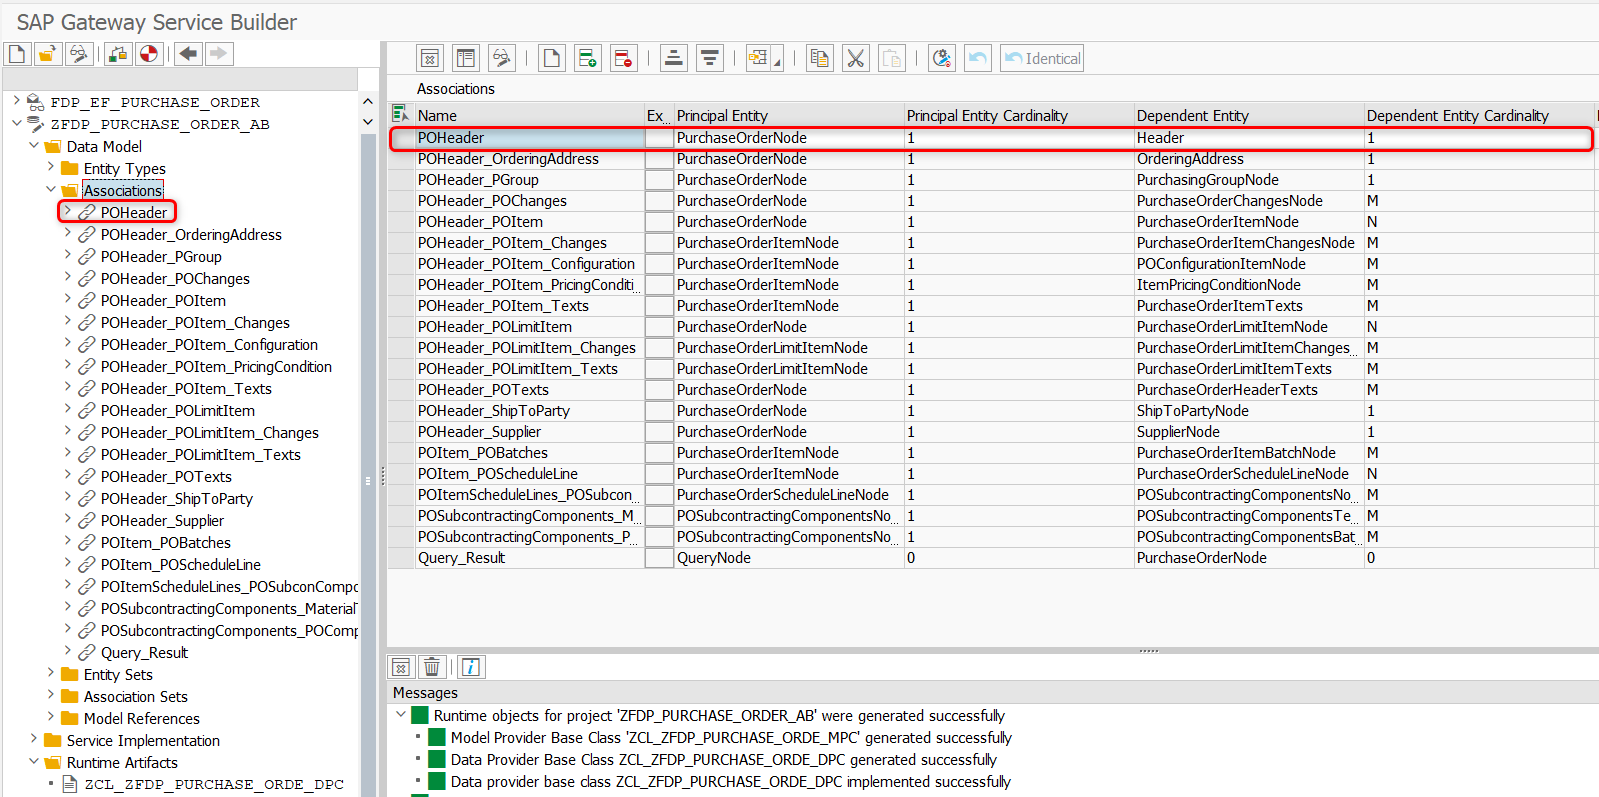
7. Generating the project, will automatically generate the models of the new entity created in the “MPC” class (the properties, the entity sets and the associations).

8. Add the method to get the data (in our example we will retrieve the Email) in the “DPC_EXT” class.
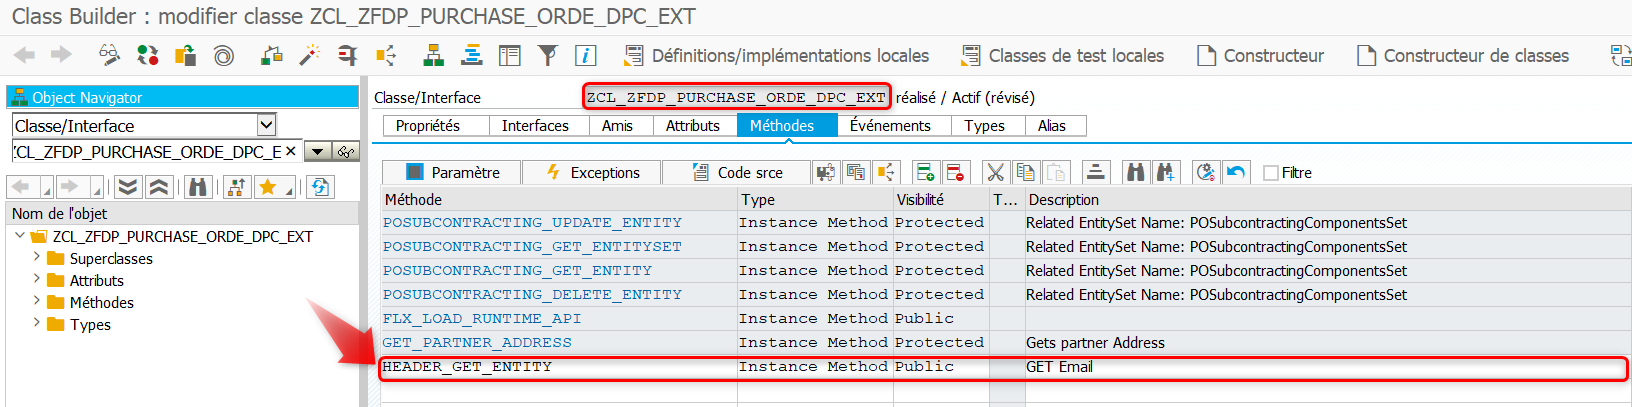
9. Implement the code to get the “email” ( the field “ad_smtpadr”).

Our new entity and its method are created, now we have to call the new method.
NB: In a standard service, the call of methods is done at “/IWBEP/IF_MGW_APPL_SRV_RUNTIME~GET_ENTITY” method, as indicated in the screenshot below.

10. Redefine the “/IWBEP/IF_MGW_APPL_SRV_RUNTIME~GET_ENTITY” method in our custom project, so we can add the call to the new method created (Header_get_entity).

Add the custom field (the Email) created in the Adobe layer.
To modify the form, you can use the LiveCycle Designer locally.

- Download the “.XDP” file of the form using the transaction: FB_XDP_DOWN
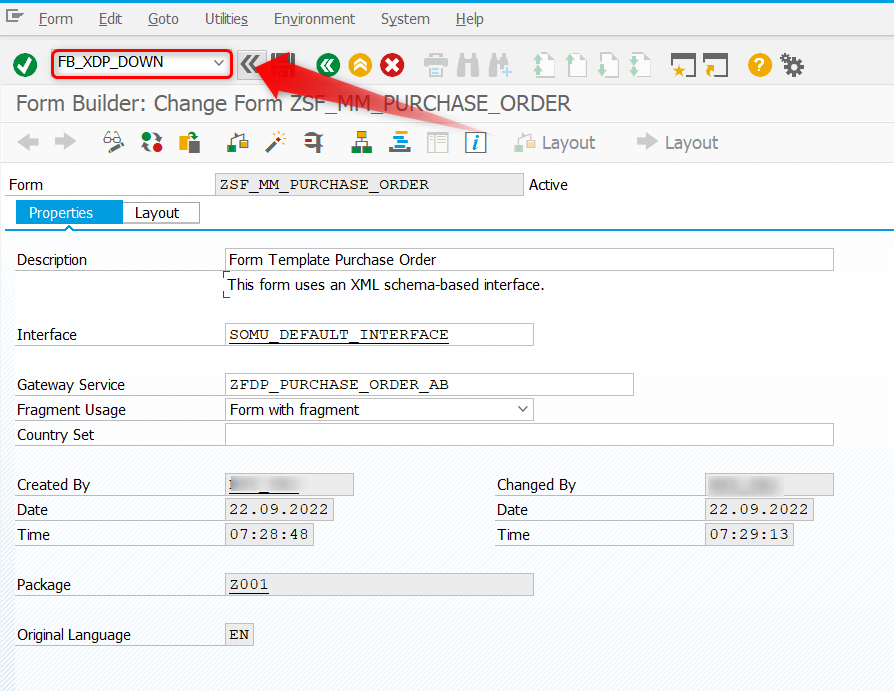
Choose the location.

2. Create the field (in our example, we created a text field) and do the binding.
At the level of the link tab, we make the binding for the created field.The binding is done in this way: $.structure name.property name

3. Load the processing done in the form, locally in SAP, using the transaction: FB_XDP_UP.

4. Print the form after the upload.

- SAP Managed Tags:
- SAP S/4HANA,
- SAP Interactive Forms by Adobe
12 Comments
You must be a registered user to add a comment. If you've already registered, sign in. Otherwise, register and sign in.
Labels in this area
-
"mm02"
1 -
A_PurchaseOrderItem additional fields
1 -
ABAP
1 -
ABAP Extensibility
1 -
ACCOSTRATE
1 -
ACDOCP
1 -
Adding your country in SPRO - Project Administration
1 -
Advance Return Management
1 -
AI and RPA in SAP Upgrades
1 -
Approval Workflows
1 -
Ariba
1 -
ARM
1 -
ASN
1 -
Asset Management
1 -
Associations in CDS Views
1 -
auditlog
1 -
Authorization
1 -
Availability date
1 -
Azure Center for SAP Solutions
1 -
AzureSentinel
2 -
Bank
1 -
BAPI_SALESORDER_CREATEFROMDAT2
1 -
BRF+
1 -
BRFPLUS
1 -
Bundled Cloud Services
1 -
business participation
1 -
Business Processes
1 -
CAPM
1 -
Carbon
1 -
Cental Finance
1 -
CFIN
1 -
CFIN Document Splitting
1 -
Cloud ALM
1 -
Cloud Integration
1 -
condition contract management
1 -
Connection - The default connection string cannot be used.
1 -
Custom Table Creation
1 -
Customer Screen in Production Order
1 -
Data Quality Management
1 -
Date required
1 -
Decisions
1 -
desafios4hana
1 -
Developing with SAP Integration Suite
1 -
Direct Outbound Delivery
1 -
DMOVE2S4
1 -
EAM
1 -
EDI
3 -
EDI 850
1 -
EDI 856
1 -
edocument
1 -
EHS Product Structure
1 -
Emergency Access Management
1 -
Energy
1 -
EPC
1 -
Financial Operations
1 -
Find
1 -
FINSSKF
1 -
Fiori
1 -
Flexible Workflow
1 -
Gas
1 -
Gen AI enabled SAP Upgrades
1 -
General
1 -
generate_xlsx_file
1 -
Getting Started
1 -
HomogeneousDMO
1 -
How to add new Fields in the Selection Screen Parameter in FBL1H Tcode
1 -
IDOC
2 -
Integration
1 -
Learning Content
2 -
LogicApps
2 -
low touchproject
1 -
Maintenance
1 -
management
1 -
Material creation
1 -
Material Management
1 -
MD04
1 -
MD61
1 -
methodology
1 -
Microsoft
2 -
MicrosoftSentinel
2 -
Migration
1 -
mm purchasing
1 -
MRP
1 -
MS Teams
2 -
MT940
1 -
Newcomer
1 -
Notifications
1 -
Oil
1 -
open connectors
1 -
Order Change Log
1 -
ORDERS
2 -
OSS Note 390635
1 -
outbound delivery
1 -
outsourcing
1 -
PCE
1 -
Permit to Work
1 -
PIR Consumption Mode
1 -
PIR's
1 -
PIRs
1 -
PIRs Consumption
1 -
PIRs Reduction
1 -
Plan Independent Requirement
1 -
Premium Plus
1 -
pricing
1 -
Primavera P6
1 -
Process Excellence
1 -
Process Management
1 -
Process Order Change Log
1 -
Process purchase requisitions
1 -
Product Information
1 -
Production Order Change Log
1 -
purchase order
1 -
Purchase requisition
1 -
Purchasing Lead Time
1 -
Redwood for SAP Job execution Setup
1 -
RISE with SAP
1 -
RisewithSAP
1 -
Rizing
1 -
S4 Cost Center Planning
1 -
S4 HANA
1 -
S4HANA
3 -
Sales and Distribution
1 -
Sales Commission
1 -
sales order
1 -
SAP
2 -
SAP Best Practices
1 -
SAP Build
1 -
SAP Build apps
1 -
SAP Cloud ALM
1 -
SAP Data Quality Management
1 -
SAP Maintenance resource scheduling
2 -
SAP Note 390635
1 -
SAP S4HANA
2 -
SAP S4HANA Cloud private edition
1 -
SAP Upgrade Automation
1 -
SAP WCM
1 -
SAP Work Clearance Management
1 -
Schedule Agreement
1 -
SDM
1 -
security
2 -
Settlement Management
1 -
soar
2 -
Sourcing and Procurement
1 -
SSIS
1 -
SU01
1 -
SUM2.0SP17
1 -
SUMDMO
1 -
Teams
2 -
User Administration
1 -
User Participation
1 -
Utilities
1 -
va01
1 -
vendor
1 -
vl01n
1 -
vl02n
1 -
WCM
1 -
X12 850
1 -
xlsx_file_abap
1 -
YTD|MTD|QTD in CDs views using Date Function
1
- « Previous
- Next »
Related Content
- How to create Business Roles with required standard apps? in Enterprise Resource Planning Q&A
- Cannot create a Single-date Order ECO using a custom OData service in Enterprise Resource Planning Q&A
- SAP S4HANA Cloud Public Edition Logistics FAQ in Enterprise Resource Planning Blogs by SAP
- Freight document types in Enterprise Resource Planning Q&A
- Advance Return Management complete configuration(SAP ARM) in Enterprise Resource Planning Blogs by Members
Top kudoed authors
| User | Count |
|---|---|
| 5 | |
| 2 | |
| 2 | |
| 2 | |
| 2 | |
| 2 | |
| 2 | |
| 1 | |
| 1 | |
| 1 |