
- SAP Community
- Products and Technology
- Enterprise Resource Planning
- ERP Blogs by Members
- From a business perspective variant configuration ...
Enterprise Resource Planning Blogs by Members
Gain new perspectives and knowledge about enterprise resource planning in blog posts from community members. Share your own comments and ERP insights today!
Turn on suggestions
Auto-suggest helps you quickly narrow down your search results by suggesting possible matches as you type.
Showing results for
Sudarshan1
Explorer
Options
- Subscribe to RSS Feed
- Mark as New
- Mark as Read
- Bookmark
- Subscribe
- Printer Friendly Page
- Report Inappropriate Content
07-24-2023
11:44 PM
Hi folks,
Hope you are doing well.
I am writing this Blog on Variant Configuration in SAP PP for Make to Order Scenario. I have tried to share my professional and personal work experience related to Variant Configuration. Basically from my personal working experience on VC, Variant Configuration (VC) provides a comprehensive solution for handling customized products with multiple variants. It helps a business streamline its production planning processes, and deliver products to meet customer requirements. Generally, Variant configuration is more used in Manufacturing & automobile industries.
Below is the main prerequisite of variant configuration:
Super BOM can be created by either one of the following methods.
1. Create BOM with a class item of 200 – The class type that contains all characteristics of a configurable material.
2. Create BOM with all possible materials as its components. Then assign / dependencies to each component.
The Difference between these two methods is.
1. BOM with class item, no need to assign or define object dependencies. Instead of that each material is classified in material master itself using class 200.
2. For both cases all characteristics are assigned to class 300 which is again assigned to KMAT material to trigger configuration in the configuration profile.
Here we take the example of manufacturing a car with different component variants.
Define features of the product as characteristics: T code - CT04
Use characteristic values to describe customer requirements.
Here we create the characteristic “COLOR” with allowed values of the POLAR WHITE, STARDUST, SILVER, MARIANA BLUE, and FIERY RED.
Enter the characteristic “COLOR” & then Click on this Create Icon. Do the rest of the settings as shown in the below screen display (IMG 1.1). Assign the characteristic Allowed values in Value Tab (IMG 1.2).
Same as the above “COLOR” characteristic, Create a characteristic “ENGINE” with allowed values of DIESEL ENG. 1500, & PETROL ENG. 1200 (IMG 1.3)
Create a characteristic “WHEELS” with allowed values of Steel, and Alloy (IMG 1.4).
Create a characteristic “EXHAUST” with allowed values of EXHAUST- 1, EXHAUST- 2, EXHAUST- 3, and EXHAUST- 4 (IMG 1.5).
Create class T-code “CL01”
Here creates the class “COLOR” with class types 300 & 200. Enter Class, Class type, and Valid from Date, and then click on Create Icon. Do the rest of the settings as shown in the below screen display (IMG 1.6).
Create Class “COLOR” and Assign created “COLOR” characteristics to the class in Char. Tab. (IMG 1.7).
Active Allowed in BOMs indicator, and set default data for component (unit of measure, and the item category.)
Here we have created a COLOR class and assigned respective class characteristics values in the Char. tab.
The remaining Classes were Created with class types 300 & 200 And assigned a respective class characteristic in the Char tab. ENGINE, WHEELS, and EXHAUST are classes we have created same as COLOR,
Create Materials with Material type KMAT (Finish Product)
Material with a configurable indicator in Basic Data 2 view.
In Material Master "Classification View", do the Assignment of classes for FG Material with Class type 300.
Assigned all Characteristics values for the FG Material (Variant Material).
Find IMG 2.3 to see all the Characteristics values after the assignment is complete.
All characteristics Values are nothing but the different specifications or product variants required to make an FG Product.
So, create all characteristics Values as a Material (Ex. HALB/ROH or any other material type).
And In Material Master "Classification View", Do the Assignment of material with respective class and respective characteristics value for each product variant with Class type 200.
Create material for (Ex. 331) Polar White Color & Do the Assignment of the material respective class.
After the Assignment of class for the material or product with Class type 200. Assign that material respective class Characteristics values also. Find IMG 2.4 for the class Characteristics value assignment.
Create a Super BOM for Variant Material (FG Material) Tcode: - CS01/CS02.
Use BOM usage as "3" (Universal)
Here we go with the Method, Create BOM with a class item of Class type – 200 that contains all characteristics of a configurable material.
BOM with class item, no need to assign or define object dependencies. Instead of that each material is classified in material master itself using class 200.
Go to the class tab and assign classes as shown below.
Create a Super Routing for Variant Material (FG Material) Tcode: - CA01/CA02.
Define Object Dependencies to Operations in Routing as shown below:
Path: - Select Operation -> Extras -> Object dependencies -> Assignments.
Give the Description and then click on Dependency editor.
Note: - Always enter “Error – Free” object dependencies for the operations.
After saving the “Error–Free” object dependencies for an operation change the dependencies status from In Preparation (2) to Released (1).
Do the same process for an operation in which you want to set object dependencies.
Create a Configuration Profile for Finish Material. Tcode: - CU41/CU42
Here “336” it’s our FG Material. After entering the "CU41" Transaction the below “Select configurable Object” Pop-Up will come here select Material and Enter.
Enter profile Priority, Profile Name, and Class Type 300 and set it to “Released” Status
Double Click on Profile for detailed data entry.
Go to Confign initial screen, and Set configuration parameters to Plnd/Prod. Order BOM Explosion to Multilevel and Application to PP01 Production General
A Configuration Profile for FG Material is created.
Simulate the configuration in Tcode: – CU50
For simulation just give any combination of Characteristics values.
Here Customer's Requirement for a CAR with the below variants.
Create a sales order for FG (Configurable Material) material.
After putting all data just click on ENTER, Then the below selection screen will appear.
Here Give the combination as per requirement and save the order.
Now create the production order for the FG (configurable) Material. (Tcode: - CO01/CO02)
Production Order concerning sales order is created for material 336.
A variant BOM with seat components Fiery Red, Diesel Eng. 1500, Alloy, and EXHAUST- 3 is Selected and assigned to the production order.
Appropriate Operations from Super Routing are also assigned to the Production Order.
Do further Production Processes "Goods Issues against the Production Order" and then Do the "Production Order Confirmation" and then "Goods Receipt against the Production Order".
Summary: -
The main motive for writing this blog is to provide my personal working experience on Variant Configuration in SAP for the Make-to-Order scenario. The blog aims to help readers to understand and implement variant configuration effectively to streamline and optimize their make-to-order processes.
This document explains the SAP Variant Configuration and its main components. The all contents of this document have been captured from the existing sources and presented here to explain the flow of Variant Configuration in SAP for Make to Order Scenario, which I have done in my professional work experience. To make the process more elaborate screenshots have been attached to this document and may vary in case of real-time business scenarios.
Hope you are doing well.
I am writing this Blog on Variant Configuration in SAP PP for Make to Order Scenario. I have tried to share my professional and personal work experience related to Variant Configuration. Basically from my personal working experience on VC, Variant Configuration (VC) provides a comprehensive solution for handling customized products with multiple variants. It helps a business streamline its production planning processes, and deliver products to meet customer requirements. Generally, Variant configuration is more used in Manufacturing & automobile industries.
Aim: -
- The purpose of writing this blog is to understand the basic flow of variant configuration in SAP PP for MTO scenarios.
- SAP PP (Production Planning) Variant Configuration is a powerful feature within the SAP ERP system that allows businesses to configure and manage complex product Variants efficiently.
- It is primarily used in industries where products are highly customizable or have Many configurable options.
- Variant Configuration in SAP PP enables companies to define and maintain various Product configurations, including different attributes, options, and dependencies.
- It provides a flexible framework for managing diverse product variants without the Need for Separate Materials or a Bill of Materials for each variation.
Below is the main prerequisite of variant configuration:
- Characteristics: The Characteristics represent the specific attributes or properties of a product. Examples of characteristics could be size, color, material, or any other relevant feature.
- Classes: Classes define the structure and behavior of the characteristics within a product. Characteristics are grouped in a class to specify the set of characteristics that belong to a particular group of Materials. For Example, let’s consider a class called “COLOR”. This class may have attributes like “Polar White”, and “Star Dust”. By creating Objects of the COLOR class, We can assign specific values to its attributes and call its methods to perform specific actions.
- Configuration Profiles: Configuration profiles are used to define valid combinations of characteristics and their values. They represent the different variants available for a product. Using configuration profiles, businesses can restrict the selection of characteristics And ensure that only valid configurations are created.
- Dependencies: Dependencies restrict the combinations of options i.e., characteristics that are not allowed. It also selects exactly the right BOM components and operations to produce a variant. It also describes the interdependencies between characteristics and characteristics values. It controls which component is selected from a BOM and which operations are selected from a task list. It also changes the value of a field in BOM items and operations during configuration.
- Material Master: 1) You can create material using a material type that has the configurable indicator defined in Customizing (Ex. KMAT Material Type). or 2) You can define individual materials of other material types as configurable (Ex. FERT/HALB). To do this, set the material as a configurable material indicator in the Basic Data 2 view of the material master record.
- Super Bill of Materials (BOM): Super BOM contains all the components for producing configurable products. It contains both variants as well as non-variant parts required for producing configurable products. BOMs can be dynamically determined based on the selected configuration profile. This enables efficient management of complex product structures and reduces the need of maintaining separate BOMs for each variant.
Super BOM can be created by either one of the following methods.
1. Create BOM with a class item of 200 – The class type that contains all characteristics of a configurable material.
2. Create BOM with all possible materials as its components. Then assign / dependencies to each component.
The Difference between these two methods is.
1. BOM with class item, no need to assign or define object dependencies. Instead of that each material is classified in material master itself using class 200.
2. For both cases all characteristics are assigned to class 300 which is again assigned to KMAT material to trigger configuration in the configuration profile.
- Super Routing: Routings for configurable materials are known as super Routing. A configurable routing describes the production process for all variants of a product. Instead of creating a routing for each variant of a product, you can create operations for one routing or a “super” routing.
Here we take the example of manufacturing a car with different component variants.
- Here take a simple example, So readers can understand easily and implement the process in their own SAP systems.
- Example Manufactured a Car with 5 different Colors, 2 Different Engines 2 Different Wheels, and 4 Different Exhausts. We have to manufacture Cars as per Color, Engine, Wheels, and Exhaust combination as per customer requirements.
| COLOR | ENGINE | WHEELS | EXHAUSTS |
| Polar White | Diesel Eng. 1500 | Steel | EXHAUST- 1 |
| Star Dust | Diesel Eng. 1200 | Alloy | EXHAUST- 2 |
| Silver | EXHAUST- 3 | ||
| Mariana Blue | EXHAUST- 4 | ||
| Fiery Red |
- Customers can demand any possible combination of Car Color, Engine, Wheels, and Exhaust system, so we cannot create so many BOM and production versions.
- Variant Configuration is used by almost all manufacturing as well as process industries like Automobiles, Electronic Manufacturing, Pharma, etc.
- Based on this example we are creating all prerequisites of variant configuration
Create characteristics:
Define features of the product as characteristics: T code - CT04
Use characteristic values to describe customer requirements.
Here we create the characteristic “COLOR” with allowed values of the POLAR WHITE, STARDUST, SILVER, MARIANA BLUE, and FIERY RED.
Enter the characteristic “COLOR” & then Click on this
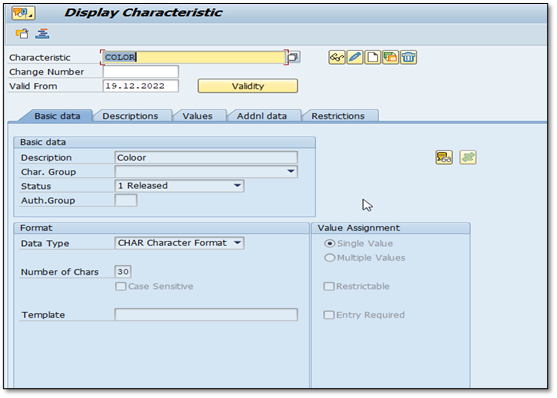
IMG 1.1 (COLOR Characteristic)

IMG 1.2 (COLOR Characteristic Value)
Same as the above “COLOR” characteristic, Create a characteristic “ENGINE” with allowed values of DIESEL ENG. 1500, & PETROL ENG. 1200 (IMG 1.3)

IMG 1.3 (ENGINE Characteristic Value)
Create a characteristic “WHEELS” with allowed values of Steel, and Alloy (IMG 1.4).

IMG 1.4 (WHEELS Characteristic Value)
Create a characteristic “EXHAUST” with allowed values of EXHAUST- 1, EXHAUST- 2, EXHAUST- 3, and EXHAUST- 4 (IMG 1.5).

IMG 1.5 (EXHAUST Characteristic Value)
Create a Class and Assign created characteristics to the class:
Create class T-code “CL01”
Here creates the class “COLOR” with class types 300 & 200. Enter Class, Class type, and Valid from Date, and then click on
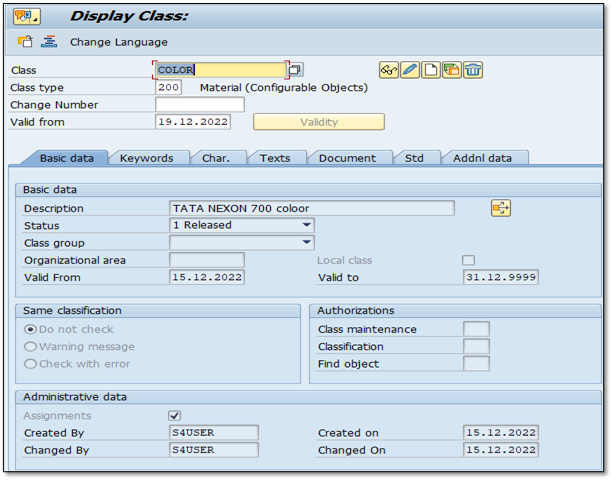
IMG 1.6 (Basic data of color class)
Create Class “COLOR” and Assign created “COLOR” characteristics to the class in Char. Tab. (IMG 1.7).

IMG 1.7 (Assigned COLOR char.)
Active Allowed in BOMs indicator, and set default data for component (unit of measure, and the item category.)
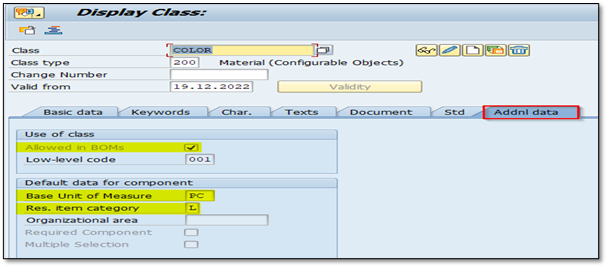
IMG 1.8 (Addnl data of color class)
Here we have created a COLOR class and assigned respective class characteristics values in the Char. tab.
The remaining Classes were Created with class types 300 & 200 And assigned a respective class characteristic in the Char tab. ENGINE, WHEELS, and EXHAUST are classes we have created same as COLOR,
Material Creation:
Create Materials with Material type KMAT (Finish Product)
Material with a configurable indicator in Basic Data 2 view.

IMG 1.9 (FG material with KMAT Material Type)
In Material Master "Classification View", do the Assignment of classes for FG Material with Class type 300.
Assigned all Characteristics values for the FG Material (Variant Material).
Find IMG 2.3 to see all the Characteristics values after the assignment is complete.

IMG 2.0 (Characteristics value assignment to FG material )
All characteristics Values are nothing but the different specifications or product variants required to make an FG Product.
So, create all characteristics Values as a Material (Ex. HALB/ROH or any other material type).
And In Material Master "Classification View", Do the Assignment of material with respective class and respective characteristics value for each product variant with Class type 200.
Create material for (Ex. 331) Polar White Color & Do the Assignment of the material respective class.
After the Assignment of class for the material or product with Class type 200. Assign that material respective class Characteristics values also. Find IMG 2.4 for the class Characteristics value assignment.
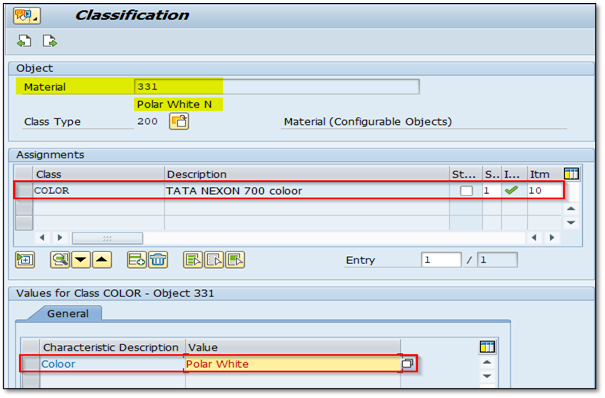
IMG 2.1 (Create Char. value as a material and assign respective class, char. value)
- All characteristic Values are nothing but the different specifications or product variants required to make an FG Product.
- So, need to assign material respective class & material respective characteristics value, to each material & material variants required to make an FG Product (Variant Product).
- Here we have created polar white material in material master (MM01/MM02) and assigned respective class characteristics values in the classification view. As shown in IMG 2.4
- These are the material we have created in material master same as polar white, Star Dust N, Silver N, Mariana Blue N, Fiery Red N, Diesel Eng. 1500, Petrol Eng. 1200, Steel, Alloy, EXHAUST- 1, EXHAUST- 2, EXHAUST- 3, EXHAUST- 4.
Super BOM creation:
Create a Super BOM for Variant Material (FG Material) Tcode: - CS01/CS02.
Use BOM usage as "3" (Universal)
Here we go with the Method, Create BOM with a class item of Class type – 200 that contains all characteristics of a configurable material.
BOM with class item, no need to assign or define object dependencies. Instead of that each material is classified in material master itself using class 200.
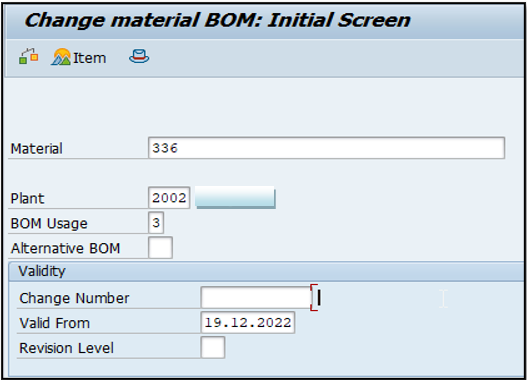
IMG 2.2 (Create BOM for 336 FG material T- Code: - CS01/CS02)
Go to the class tab and assign classes as shown below.

IMG 2.3 (Assign respective all classes in the class tab. )
Super Routing Creation:
Create a Super Routing for Variant Material (FG Material) Tcode: - CA01/CA02.

IMG 2.4 (Create all possible operations required for making FG material)
Define Object Dependencies to Operations in Routing as shown below:
Path: - Select Operation -> Extras -> Object dependencies -> Assignments.

IMG 2.5 (Path for Object Dependency Assignments)
Give the Description and then click on Dependency editor.
After clicking the Dependency editor, Here enter the object dependencies for the operation, & then check ![]() the error in entered object dependencies & then save it.
the error in entered object dependencies & then save it.
Note: - Always enter “Error – Free” object dependencies for the operations.

IMG 2.6 (Maintain Dependency to respective operation )
After saving the “Error–Free” object dependencies for an operation change the dependencies status from In Preparation (2) to Released (1).
Do the same process for an operation in which you want to set object dependencies.
Creation of Configuration Profile:
Create a Configuration Profile for Finish Material. Tcode: - CU41/CU42
Here “336” it’s our FG Material. After entering the "CU41" Transaction the below “Select configurable Object” Pop-Up will come here select Material and Enter.

IMG 2.7 (Configurable Object selection)
Enter profile Priority, Profile Name, and Class Type 300 and set it to “Released” Status
Double Click on Profile for detailed data entry.

IMG 2.8 (Configurable Profile)
Go to Confign initial screen, and Set configuration parameters to Plnd/Prod. Order BOM Explosion to Multilevel and Application to PP01 Production General

IMG 2.9 (Configuration parameters settings)
A Configuration Profile for FG Material is created.
Simulate the configuration:
Simulate the configuration in Tcode: – CU50

IMG 3.0 (Simulation screen)
For simulation just give any combination of Characteristics values.

IMG 3.1 (Give any possible combination to making FG)
After Clicking the Result ![]() Icon the below screen will display, here we see the respective Characteristics value components are fetched as we set the configuration.
Icon the below screen will display, here we see the respective Characteristics value components are fetched as we set the configuration.
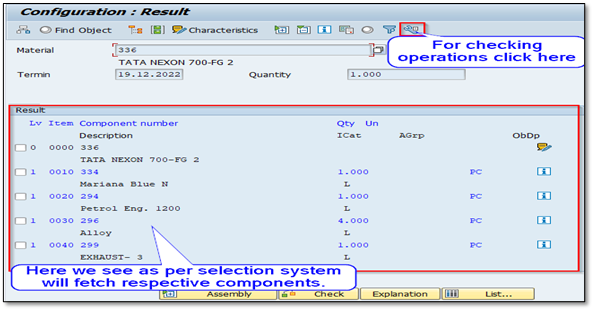
IMG 3.2 (Respective Components)
Click on Task List ![]() Icon and see the appropriate operations from super routing are also assigned.
Icon and see the appropriate operations from super routing are also assigned.

IMG 3.3 (Respective Operations)
Practical Business Scenario:
Here Customer's Requirement for a CAR with the below variants.
| COLOR | Fiery Red |
| ENGINE | Diesel Eng. 1500 |
| WHEELS | Alloy |
| EXHAUSTS | EXHAUST- 3 |
Create a sales order for FG (Configurable Material) material.

IMG 3.4 (Create Sales Order)
After putting all data just click on ENTER, Then the below selection screen will appear.
Here Give the combination as per requirement and save the order.

IMG 3.5 (Enter Char. values as per customer requirement)
Now create the production order for the FG (configurable) Material. (Tcode: - CO01/CO02)

IMG 3.6 (Production Order)
After this system will ask for a sales order

IMG 3.7 (Enter respective sales order)
Production Order concerning sales order is created for material 336.

IMG 3.8
A variant BOM with seat components Fiery Red, Diesel Eng. 1500, Alloy, and EXHAUST- 3 is Selected and assigned to the production order.

IMG 3.9 (In order respective components are displayed)
Appropriate Operations from Super Routing are also assigned to the Production Order.

IMG 4.0 (In order respective operations are displayed)
Do further Production Processes "Goods Issues against the Production Order" and then Do the "Production Order Confirmation" and then "Goods Receipt against the Production Order".
Summary: -
The main motive for writing this blog is to provide my personal working experience on Variant Configuration in SAP for the Make-to-Order scenario. The blog aims to help readers to understand and implement variant configuration effectively to streamline and optimize their make-to-order processes.
This document explains the SAP Variant Configuration and its main components. The all contents of this document have been captured from the existing sources and presented here to explain the flow of Variant Configuration in SAP for Make to Order Scenario, which I have done in my professional work experience. To make the process more elaborate screenshots have been attached to this document and may vary in case of real-time business scenarios.
Thanks for reading this blog and if you find it informative, please like and share this blog.
If you have any queries or questions regarding this blog let me know in the comment section.
- SAP Managed Tags:
- SAP ERP Central Component,
- MAN Production Planning (PP),
- SD (Sales and Distribution)
5 Comments
You must be a registered user to add a comment. If you've already registered, sign in. Otherwise, register and sign in.
Labels in this area
-
"mm02"
1 -
A_PurchaseOrderItem additional fields
1 -
ABAP
1 -
ABAP Extensibility
1 -
ACCOSTRATE
1 -
ACDOCP
1 -
Adding your country in SPRO - Project Administration
1 -
Advance Return Management
1 -
AI and RPA in SAP Upgrades
1 -
Approval Workflows
1 -
Ariba
1 -
ARM
1 -
ASN
1 -
Asset Management
1 -
Associations in CDS Views
1 -
auditlog
1 -
Authorization
1 -
Availability date
1 -
Azure Center for SAP Solutions
1 -
AzureSentinel
2 -
Bank
1 -
BAPI_SALESORDER_CREATEFROMDAT2
1 -
BRF+
1 -
BRFPLUS
1 -
Bundled Cloud Services
1 -
business participation
1 -
Business Processes
1 -
CAPM
1 -
Carbon
1 -
Cental Finance
1 -
CFIN
1 -
CFIN Document Splitting
1 -
Cloud ALM
1 -
Cloud Integration
1 -
condition contract management
1 -
Connection - The default connection string cannot be used.
1 -
Custom Table Creation
1 -
Customer Screen in Production Order
1 -
Customizing
1 -
Data Quality Management
1 -
Date required
1 -
Decisions
1 -
desafios4hana
1 -
Developing with SAP Integration Suite
1 -
Direct Outbound Delivery
1 -
DMOVE2S4
1 -
EAM
1 -
EDI
3 -
EDI 850
1 -
EDI 856
1 -
edocument
1 -
EHS Product Structure
1 -
Emergency Access Management
1 -
Energy
1 -
EPC
1 -
Financial Operations
1 -
Find
1 -
FINSSKF
1 -
Fiori
1 -
Flexible Workflow
1 -
Gas
1 -
Gen AI enabled SAP Upgrades
1 -
General
1 -
generate_xlsx_file
1 -
Getting Started
1 -
HomogeneousDMO
1 -
How to add new Fields in the Selection Screen Parameter in FBL1H Tcode
1 -
IDOC
2 -
Integration
1 -
Learning Content
2 -
Ledger Combinations in SAP
1 -
LogicApps
2 -
low touchproject
1 -
Maintenance
1 -
management
1 -
Material creation
1 -
Material Management
1 -
MD04
1 -
MD61
1 -
methodology
1 -
Microsoft
2 -
MicrosoftSentinel
2 -
Migration
1 -
mm purchasing
1 -
MRP
1 -
MS Teams
2 -
MT940
1 -
Newcomer
1 -
Notifications
1 -
Oil
1 -
open connectors
1 -
Order Change Log
1 -
ORDERS
2 -
OSS Note 390635
1 -
outbound delivery
1 -
outsourcing
1 -
PCE
1 -
Permit to Work
1 -
PIR Consumption Mode
1 -
PIR's
1 -
PIRs
1 -
PIRs Consumption
1 -
PIRs Reduction
1 -
Plan Independent Requirement
1 -
POSTMAN
1 -
Premium Plus
1 -
pricing
1 -
Primavera P6
1 -
Process Excellence
1 -
Process Management
1 -
Process Order Change Log
1 -
Process purchase requisitions
1 -
Product Information
1 -
Production Order Change Log
1 -
purchase order
1 -
Purchase requisition
1 -
Purchasing Lead Time
1 -
Redwood for SAP Job execution Setup
1 -
RISE with SAP
1 -
RisewithSAP
1 -
Rizing
1 -
S4 Cost Center Planning
1 -
S4 HANA
1 -
S4HANA
3 -
S4HANACloud audit
1 -
Sales and Distribution
1 -
Sales Commission
1 -
sales order
1 -
SAP
2 -
SAP Best Practices
1 -
SAP Build
1 -
SAP Build apps
1 -
SAP CI
1 -
SAP Cloud ALM
1 -
SAP CPI
1 -
SAP Data Quality Management
1 -
SAP ERP
1 -
SAP Maintenance resource scheduling
2 -
SAP Note 390635
1 -
SAP S4HANA
2 -
SAP S4HANA Cloud private edition
1 -
SAP Upgrade Automation
1 -
SAP WCM
1 -
SAP Work Clearance Management
1 -
Schedule Agreement
1 -
SDM
1 -
security
2 -
Settlement Management
1 -
soar
2 -
Sourcing and Procurement
1 -
SSIS
1 -
SU01
1 -
SUM2.0SP17
1 -
SUMDMO
1 -
Teams
2 -
Time Management
1 -
User Administration
1 -
User Participation
1 -
Utilities
1 -
va01
1 -
vendor
1 -
vl01n
1 -
vl02n
1 -
WCM
1 -
X12 850
1 -
xlsx_file_abap
1 -
YTD|MTD|QTD in CDs views using Date Function
1
- « Previous
- Next »
Related Content
- SAP Activate Realize and Deploy phase activities in the context of Scaled Agile Framework in Enterprise Resource Planning Blogs by SAP
- Why YCOA? The value of the standard Chart of Accounts in S/4HANA Cloud Public Edition. in Enterprise Resource Planning Blogs by SAP
- SAP CPQ 2405 版本的亮点新功能:(A)VC之上的产品配置规则 in Enterprise Resource Planning Blogs by SAP
- Understand Upgrading and Patching Processes of SAP S/4HANA Cloud Public Edition in Enterprise Resource Planning Blogs by SAP
- 4 Expert Tips for Setting Up the Organizational Structure in SAP Central Business Configuration in Enterprise Resource Planning Blogs by SAP
Top kudoed authors
| User | Count |
|---|---|
| 3 | |
| 3 | |
| 2 | |
| 2 | |
| 2 | |
| 2 | |
| 2 | |
| 2 | |
| 1 | |
| 1 |