
- SAP Community
- Products and Technology
- Enterprise Resource Planning
- ERP Blogs by SAP
- Onboarding - Learning integration for Pre-day1 New...
Enterprise Resource Planning Blogs by SAP
Get insights and updates about cloud ERP and RISE with SAP, SAP S/4HANA and SAP S/4HANA Cloud, and more enterprise management capabilities with SAP blog posts.
Turn on suggestions
Auto-suggest helps you quickly narrow down your search results by suggesting possible matches as you type.
Showing results for
Product and Topic Expert
Options
- Subscribe to RSS Feed
- Mark as New
- Mark as Read
- Bookmark
- Subscribe
- Printer Friendly Page
- Report Inappropriate Content
10-22-2021
10:20 AM
Overview:
SAP SuccessFactors Onboarding solution allows a new hire to access information about the organization and its culture before his/her start date. It also provides access to tools and information that the new hire requires to become a productive member of the team before the start date. There are several key benefits of integrating your new hire onboarding program with a Learning Management System (LMS). The Learning integration allows you to enhance your onboarding/orientation material with courses that the new hires will need such as regulations, organizational policies, IT guides, and regional laws to name a few.
With the 2H 2021 release, new hires can access learning courses from his/her home page, both in HP3 and HP4. Onboarding External User role must be granted the following permissions to access Learning application. Navigate to Admin Center > Onboarding External User Permission role > User > Learning > Grant “Learning Access Permission” > Save. When new hires log in to the HXM home page, they can see “Learning card” under Quick Actions on HP4 UI or “Take Courses” to-do tile on HP3 UI. New hires can navigate to Learning from the home page menu dropdown as well.
HP4 UI reference screenshot:

HP3 UI reference screenshot:

To enable this feature, you need to set up SAP SuccessFactors Onboarding – Learning management system integration. This blog outlines the configurations involved in building this integration for Onboarding external users using LMS SF User Connector.
At present, LMS provides 2 ways of integration using SF User connector
- Traditional method: Employee Export job scheduled from Provisioning
This has been the traditional method for extracting user data from the SuccessFactors platform for import into LMS.
- Recommended method: Extract data from Employee Central using Integration Center
This is for customers with Employee Central configured and have already switched to extract data from Employee Central using Integration Center instead of using the Employees Export scheduled job in Provisioning.
This blog explains the Onboarding - LMS integration which can be set up by extracting Onboarding new hire data from Integration Center in the same manner as mentioned in IDP-https://d.dam.sap.com/a/ZgMShsd/SUCCES~2.PDF for Employee Central Export using Integration Center for LMS integration.
Onboarding new hire data export using Integration Center is similar for both types – Traditional method and Recommended method.
Building integration for Onboarding will be easier and quicker if you have already switched to extract data from Employee Central using Integration Center instead of using the Employees Export scheduled job in Provisioning.
Creating the Onboarding new hire’s User Data feed involves the creation and scheduling of the Integration Center job and the modification of the SF USER CONNECTOR properties file in LMS system configuration.
Setting up this integration involves following steps
- Step 1: Onboarding new hire data export using Integration Center
- Create a simple output integration file to export Onboarding New hire user data
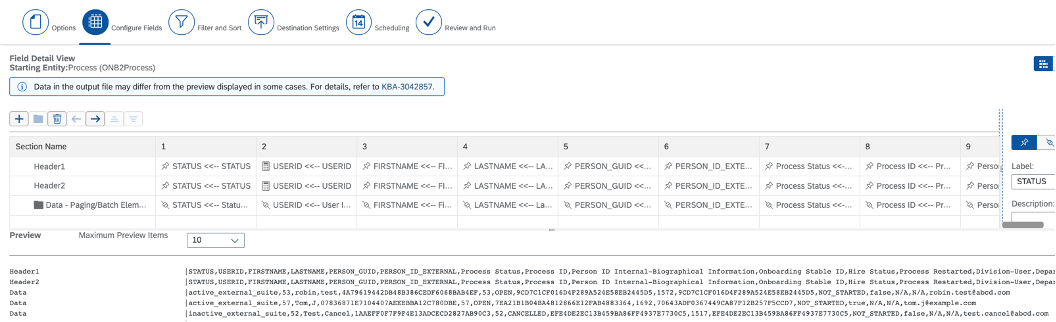
- Select starting entity = ONB2Process
- Configure fields
- Add filters
- Set up Destination setting
- Schedule Integration job to export data on SFTP for LMS consumption
- Step 2: LMS system configuration
- Modification of the “SF User Connector” properties file in LMS system configuration
- Schedule LMS job
Step 1 Details:
Create Onboarding new hire user data file using Integration Center report
You can now create a simple output integration file to export Onboarding user data from HXM core and import it to LMS using SFTP destination setup.
Integration Center allows you to create an integration from a starting entity that acts as the point of reference for reading the SuccessFactors data for new hire’s Learning integration purpose. For this integration select starting entity as “ONB2Process”.
Onboarding New Hire’s file must contain following fields from Integration Center at minimum for successful LMS new hire sync using LMS SF User connector.
- active status (NOTACTIVE),
- student ID (STUD_ID),
- Person id External (PERSON_ID_EXTERNAL), and
- Person GUID (PERSON_GUID) at a minimum.
You can add more fields as per your business need such as Business Unit, Department, and Division. Field headers must be the same as LMS field names as per SF User connector.
For example, if the following mapping (as shown in screenshot) is set in LMS SF User connector then you must set headers for Integration Center report fields such that the field names on the right side of the equal to (=) sign match the Integration Center header fields in the report.

Note: Please check if you are using Single header or Double header file for existing Employee integration to LMS using SF User Connector. If you were using Employee Export file with double header and you continue to use same way for Employee central Integration center export then follow double header file for Onboarding New hire Export as well. If you are using Single header file then use single header file for Onboarding New hire Export as well. If in case, you need double header file then follow mentioned steps as below.
Follow these steps to create double header file in Integration Center
- Go to the Admin Center.
- In the Tools Search, enter Integration Center.
- Click on the My Integration tile which lists the integrations already existing in system along with the last seven days of execution status and some actions to modify, list older versions and deleting of the integration.
- Use the + Create button and select Scheduled EDI/Stacked Delimited.
- Field Delimiter: Comma(,)
- Line End Settings: Carriage Returns/New Line (\r\n)
- Select the entity and click Select to open the integration center wizard.
- Configure field does the mapping of SuccessFactors data model to the output format. The Configure Field tab uses two of the EDI Terminologies of Segment and Element.
- Select the + sign above the table and select Insert Sibling. The first Sibling is added with the first data element given by default.
- Now select the New Segment (column 1) and name it as per your requirement. Let us name it as HeaderLine1.
- Create another header. Select the + icon to choose Insert Sibling. It will add another header HeaderLine2.
- Set the Default value for each header.
- To add any filed on the left, select the field on right and insert sibling
- Next mark the Body segment as a paging or batching node by selecting it and then selecting the folder icon next to the + icon.
- Click on Insert Child Segment and add elements.
- Note: The selection in the table is cell-specific. So even though the highlighting is for the whole row, it is always necessary to select cell and use the detail display on the right to understand the cell context.

Apply the following filter sets to extract only onboarding active external user and inactive external users.

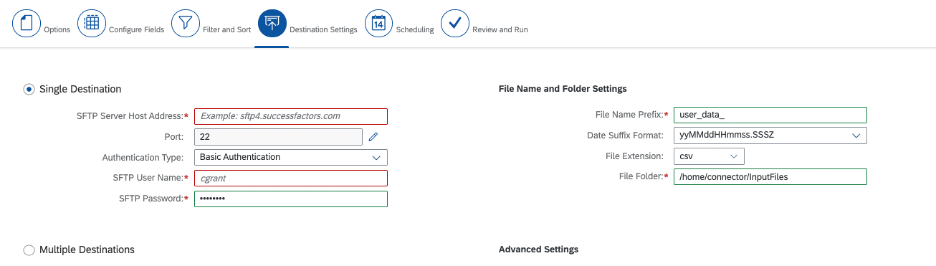
Setup Destination setting and File Format as below
- File name prefix = “user_data_”
- If existing SF user connector works with Tenant name suffix then File name prefix = “user_data_<tenant name>_”
- Date Suffix Format = SSSZ
- File extension = CSV
- File Folder = SFTP location from file will be picked by SF user connector user sync in LMS
Finally, define the schedule for this job to export the data and send it to the SFTP, to be consumed by LMS (image below).

Step 2 Details:
Modification of the CONNECTOR properties file in LMS system configuration
i) Navigate to Admin Center > Learning Administrator > System Administration > Configuration > System Configuration > CONNECTORS
ii) Add the following status to the system configuration:
- Search for the this Configuration Key“sfuser.field.transform.data.NOTACTIVE.N” and add “active_external_suite” with existing status
- Search for the this Configuration Key“sfuser.field.transform.data.NOTACTIVE.N”and add “inactive_external_suite” with existing status
- Search for the this Configuration Key “sfuser.field.transform.data.SHOPPING_ACCT_TYPE.INTERNAL” and add “active_external_suite,inactive_external_suite”
- Search for the this Configuration Key “sfuser.connector.input.file.multiple.format” and make sure you have this configuration available ”TIMESTAMP_BEFORE_EXTENSION”
iii) Click on Apply Changes to save the configuration.
With this, Onboarding external user status is added in LMS SF User connector properties file which will be used for new hire sync to LMS.

iv) Set allowFutureHireDates=true in “System Configuration” file. By default, this “allowFutureHireDates” will be set as false. You need to Navigate to Admin Center > Learning Administration > Configuration > System Configuration > LMS_ADMIN > Edit System Configuration and update “allowFutureHireDates” to true.

Note: The BizX to LMS database field mappings below should never be altered, as these need to be a direct one to one relationship. However the header names, for the input file, could be altered if needed:

Schedule LMS job
LMS SF User connector job should be scheduled to run after Integration Center job is completed. Note: All daily exports should be deltas. Full should be reserved for initial sync only. Customers with large turnovers/employee record changes can use a full sync on a weekly or monthly basis.
Set up Learning Assignment Profiles for Onboarding New hires
Make sure LMS administrator have set up learning assignment for Onboarding new hires based on business criteria. Please refer to the following link for more information. https://help.sap.com/viewer/68656c0852e14b3b97fa47815152dd2c/2111/en-US/7a3303fd092f4c9b99c66912aee8...
Set up Role-based permissions
Onboarding External User role must be granted the following permissions to access Learning application. Navigate to Admin Center > Onboarding External User Permission role > User > Learning > Grant “Learning Access Permission” > Save.
Conclusion:
SAP SuccessFactors Onboarding – Learning management system integration can be set up using Integration Center with LMS SF User connector. With this integration Onboarding new hire will sync to LMS on regular basis and they can access learning from BiZX Home page.
- SAP Managed Tags:
- SAP SuccessFactors Learning,
- SAP SuccessFactors Onboarding,
- HCM (Human Capital Management)
Labels:
10 Comments
You must be a registered user to add a comment. If you've already registered, sign in. Otherwise, register and sign in.
Labels in this area
-
Artificial Intelligence (AI)
1 -
Business Trends
363 -
Business Trends
29 -
Customer COE Basics and Fundamentals
1 -
Digital Transformation with Cloud ERP (DT)
1 -
Event Information
461 -
Event Information
27 -
Expert Insights
114 -
Expert Insights
181 -
General
1 -
Governance and Organization
1 -
Introduction
1 -
Life at SAP
415 -
Life at SAP
2 -
Product Updates
4,682 -
Product Updates
261 -
Roadmap and Strategy
1 -
Technology Updates
1,500 -
Technology Updates
97
Related Content
- SAP Activate Realize and Deploy phase activities in the context of Scaled Agile Framework in Enterprise Resource Planning Blogs by SAP
- Why YCOA? The value of the standard Chart of Accounts in S/4HANA Cloud Public Edition. in Enterprise Resource Planning Blogs by SAP
- Preferred Success Round Table Discussion with SAP Customers on 29th April @ SAP NOW India. in Enterprise Resource Planning Blogs by SAP
- Recap of SAP S/4HANA 2023 Highlights Webinar: Sourcing and Procurement in Enterprise Resource Planning Blogs by SAP
- Enhanced RISE with SAP Methodology with clean core quality checks in Enterprise Resource Planning Blogs by SAP
Top kudoed authors
| User | Count |
|---|---|
| 10 | |
| 6 | |
| 5 | |
| 4 | |
| 4 | |
| 3 | |
| 3 | |
| 3 | |
| 3 | |
| 2 |