This blogpost serves as a step-by-step tutorial on how to set up a custom connection to an OData service in order to consume it within a Model Table or a Model View.
There are two different authentication methods currently supported by PaPM for OData services: OAuth and Basic Authentication (which is also used if no authentication method is set in place). Based on the chosen authentication method, the connection setup differs.
So let's jump right into it.
OData Model View/Table with OAuth
This method uses a RFC connection that handles the authentication and afterwards consumes the service using a provided URL.
Step 1: Set up authentication
First we’ll need to set up an RFC connection which will handle the authentication. We are using RFC connections for this due to it’s already existing capability of handling credentials.
Go to transaction SM59 and create a new connection of type G. I’ll name this one PAPM_AUTHENTICATION.
The target host should be the authentication service. This is the one that will take a username and a password and return an authentication token.
In terms of Logon & Security we will use Basic Authentication and we’ll maintain the proper username and password.

Step 2: Create custom connection in PaPM
Next we’ll set up the custom connection in PaPM which will later be used in the Model View/Table.
Go to Manage Connections, enter edit mode and adda new connection. Chose the custom connection class and for connection source chose OData Service.

Now we need to set up the details of the connection. We’ll chose OAuth as an authentication type and for the RFC destination field we’ll maintain the previously created RFC destination. This will be used for authentication purpose.
We’ll then maintain the remaining fields. Service Base URL will contain the url of the service we want to consume and we’ll also have to maintain the EntitySet name.
Header fields are optional and should only be maintained if the OData service absolutely requires them.
Finally, save all changes.

Step 3: Consume the connection using a Model View/Table
Finally, we’ll be able to consume the data from the maintained OData service.
Go to My Environments app, select the desired environment, and create a simple Model View (or Table) function. Chose a logical connection type and type the name of the previously created connection. Activate this function. Relevant fields for the data will be automatically created.

Now we’re all set up and can proceed to use this Model View/Table as a data source for further processing.
OData Model View/Table with Basic Authentication
This method uses only one RFC connection that handles both authentication and the call for the service. No additional URLs are needed.
Step 1: Set up the RFC destination
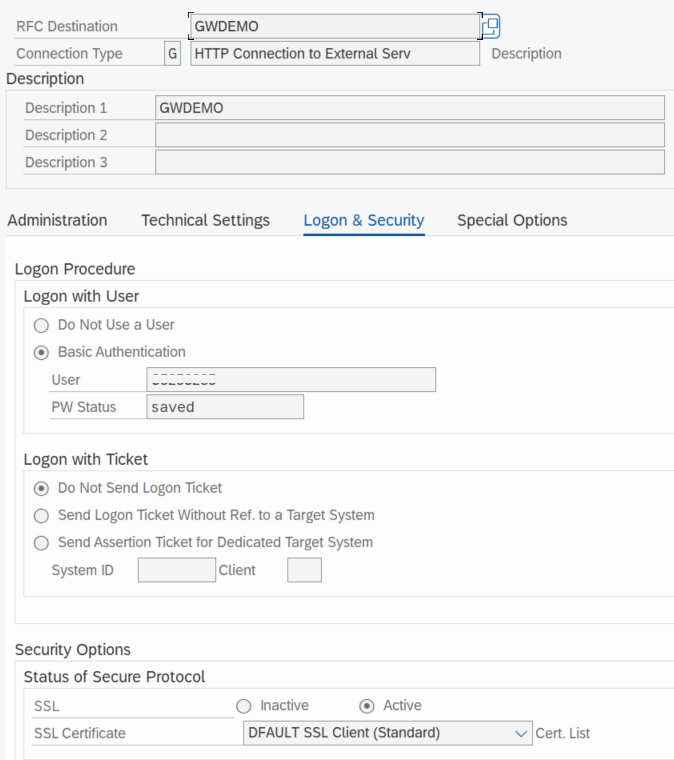
Go to SM59 and create a new connection of type G. For this example I’ll name the connection GWDEMO.
The target host should be the OData service intended for consumption. And in terms of Logon & Security you’ll need to check Basic Authentication and maintain the appropriate credentials.
Step 2: Create custom connection in PaPM
Next we’ll set up the custom connection in PaPM which will later be used in the Model View/Table.
Go to Manage Connections, enter edit mode and adda new connection. Chose the custom connection class and for connection source chose OData Service.
Now we need to set up the details of the connection. We’ll chose Basic Authentication as an authentication type and for the RFC destination field we’ll maintain the previously created RFC destination. This will be used both for authentication and consumption purpose.
We’ll then maintain the remaining fields. Notice the Service Base URL field is no longer needed since it’s provided in the RFC destination. We’ll still have to maintain the EntitySet name.
Header fields are optional and should only be maintained if the OData service absolutely requires them.

Finally, save all changes.
Step 3: Consume the connection using a Model View/Table
Finally, we’ll be able to consume the data from the maintained OData service.
Go to My Environments app, select the desired environment, and create a simple Model View (or Table) function. Chose a logical connection type and type the name of the previously created connection. Activate this function. Relevant fields for the data will be automatically created.

Now we’re all set up and can proceed to use this Model View/Table as a data source for further processing.
Further considerations
Analyze function
After activation of the Model View/Table, the analyze function will not work right away. This is because these OData Model Views/Table act similar to functions that can be run. This means that in order to be able to use the analyze function, you’ll first have to consume the Model View/Table in a subsequent function such like a View and run that view first.
Alternatively, in order to analyze the OData Model View/Table it is also possible to use the provided run report /NXI/P1_FW_RUN. After doing so, the analyze function will work as expected.
SSL Certificates
In some cases, in order to be able to consume the OData service you will need to add the SSL certificates to the SAP System. This can be done in transaction STRUST under the SSL Client (Standard) node and may be needed for both OData service and Authentication Service.
