
- SAP Community
- Products and Technology
- Human Capital Management
- HCM Blogs by Members
- Postman to call SuccessFactors API using OAuth aut...
Human Capital Management Blogs by Members
Gain valuable knowledge and tips on SAP SuccessFactors and human capital management from member blog posts. Share your HCM insights with a post of your own.
Turn on suggestions
Auto-suggest helps you quickly narrow down your search results by suggesting possible matches as you type.
Showing results for
dbtutor
Explorer
Options
- Subscribe to RSS Feed
- Mark as New
- Mark as Read
- Bookmark
- Subscribe
- Printer Friendly Page
- Report Inappropriate Content
11-22-2023
12:15 AM
SuccessFactors API + OAuth 2.0 + Postman API Client = Perfect Friend
Subject : Postman to call SuccessFactors API using OAuth authentication method (Pls. note HTTP Basic Authentication will be deprecated in 2026. With the upcoming removal of basic authentication on November 20, 2026)
The following SAP blogs are currently available, you can take as a reference, but all these does not have complete details information.
Testing SAP SuccessFactors’ API’s: How to use Insomnia to automate the generation of SAML Assertions
The following blogpost will guide complete end to end information about how to use SuccessFactors OAuth 2.0 with Postman. Along with some interesting Postman Scripts for Automation.
Some SAP Knowledge Base (KB) Articles are recommended to read & I have also taken the references too.
or
3031657 - How to generate SAML assertion using SAP-provided offline tool
3239495 - 2H 2022: Deprecation of OAuth IdP API /oauth/idp - SAP for Me
3301583 - SAP SuccessFactors SAML Assertion format demonstration using MS Azure - SAP for Me
We have separated the blog post in different parts for easy understanding
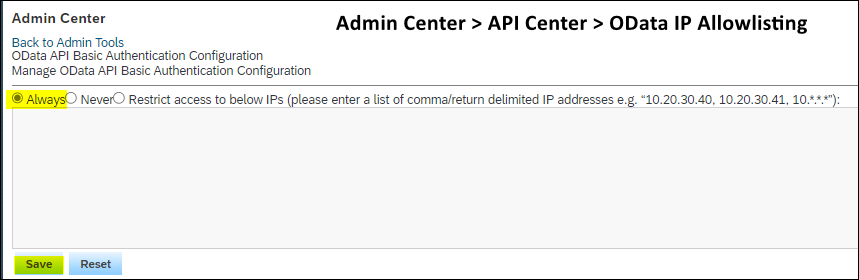
Step 1: OData IP Allowlisting
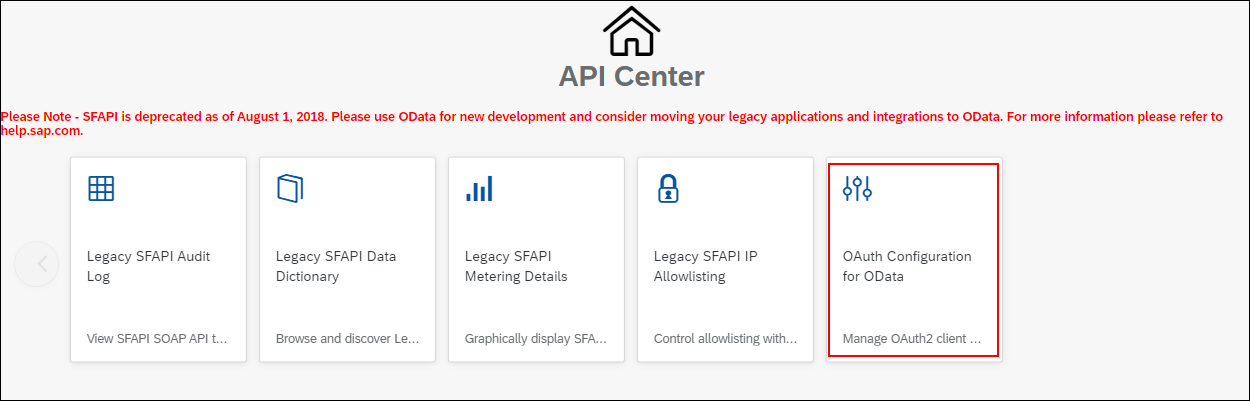
Step 2: OAuth Configuration for OData (Manage OAuth2 Client Applications)
Step 3: Installation of SapMachine JDK
Step 4: Download Apache Maven Binary Apache Maven Binary
Step 5: Option 1 - (This is recommended and Simple Approach as well)
Step 5: Option 2 - (Alternative way to Generate SAML Assertion - This is bit complex as compared to Option 1, but nice to know)
Step 6: Option 1 (Basic) - Postman API Call
Step 6: Option 2 (Intermediate) - Auto Generate Token via Postman API
Let's Start - Login to SuccessFactors Portal (I assume you have full access or ability to Proxy as "sfadmin" user)
Step 1: OData IP Allowlisting
Admin Center > API Center

Step 2: OAuth Configuration for OData (Manage OAuth2 Client Applications)
Admin Center > API Center > OAuth Configuration for OData (Manage OAuth2 Client Applications)
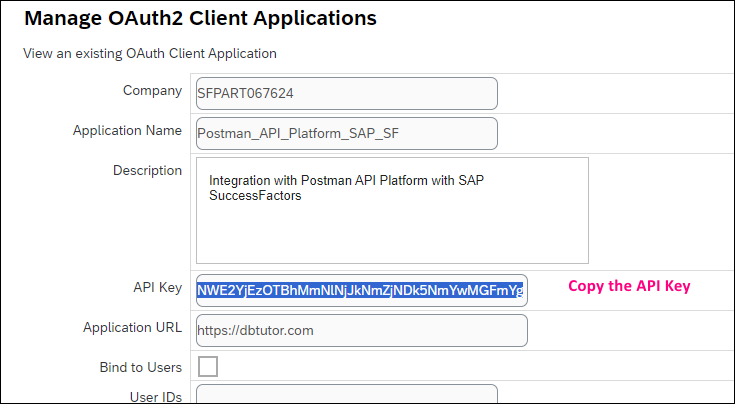
Click "Register Client Application" button
Enter the Application URL - anything (We just need to fill-up the required fields)

We are going to use SuccessFactors Generated Private and Public Key

Enter all the values shown in the image then click "Generate" button.
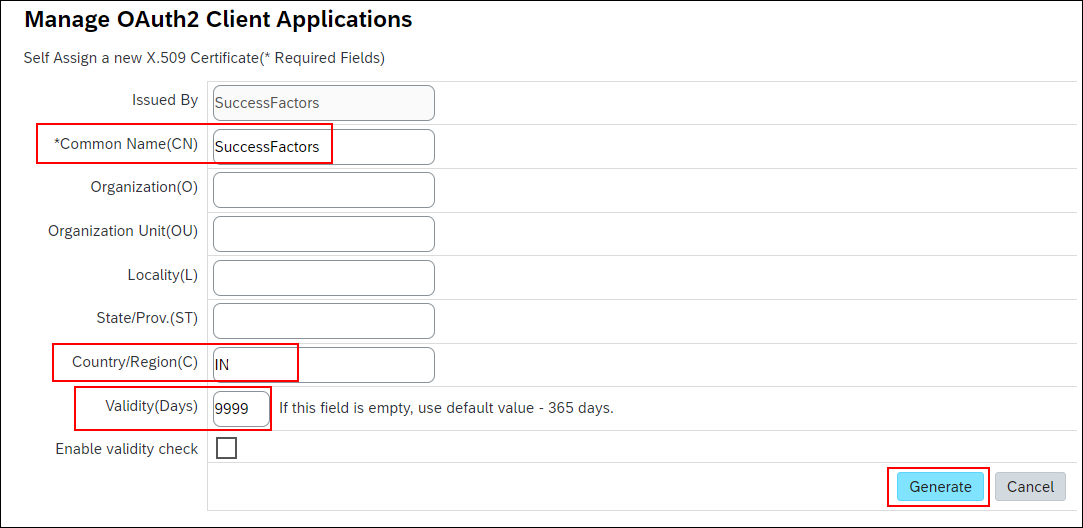
Registering Application and Download of Private/Public Key
Note : Once you click the "Register" button "Download" button will become disable, hence it is better to download the Private/Public key first then you can "Register" the application.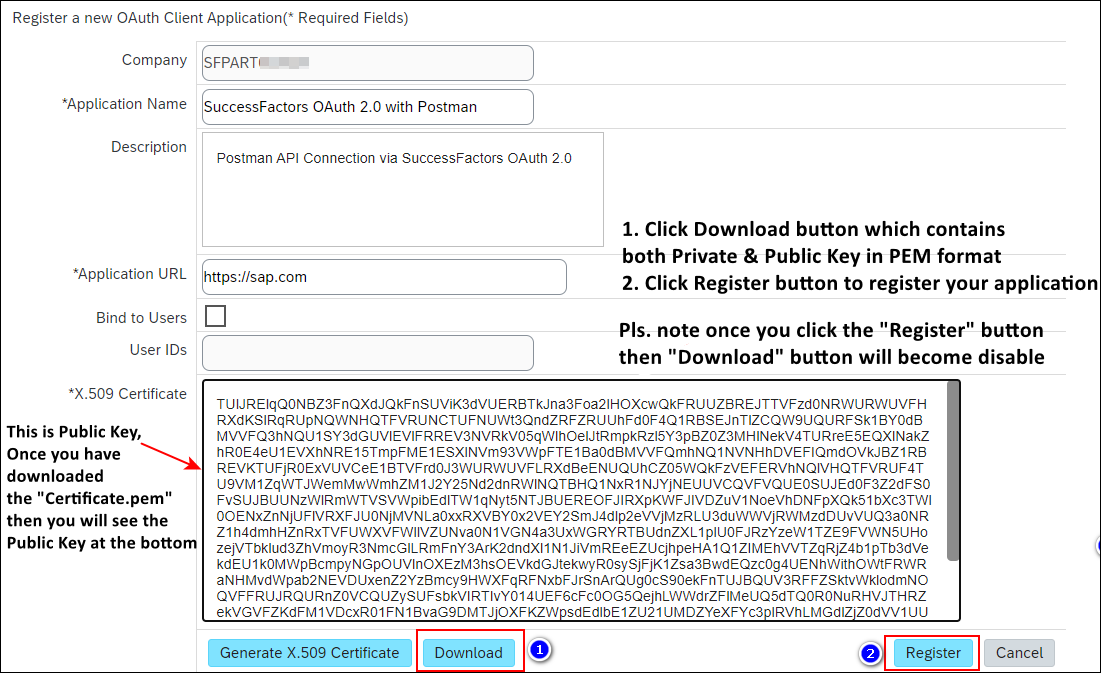
Downloaded "Certificate.pem"
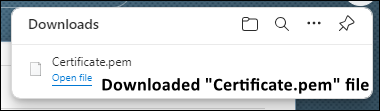
Downloaded "Certificate.pem" file, which contains Private & Public Key (Pls. keep this in safe place)

API Key has been generated now and Copy it for further use

Listed of all the applications

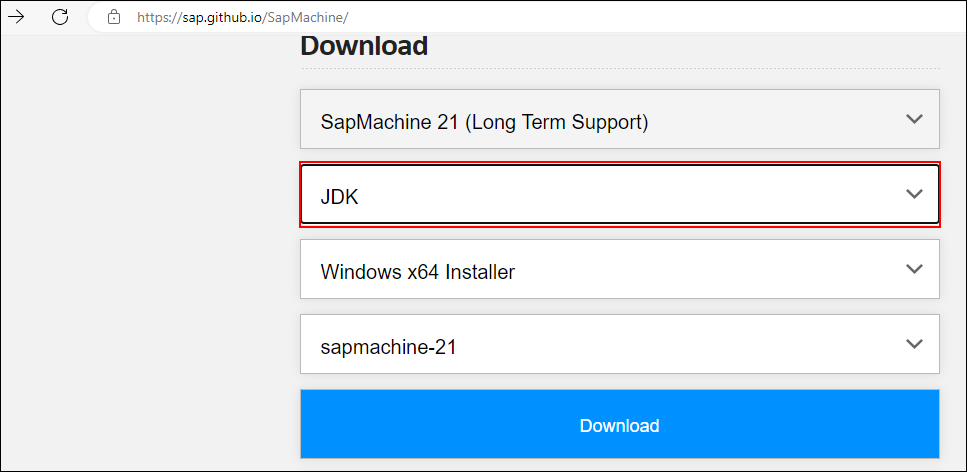
Step 3: Installation of SapMachine JDK
Download Link for SapMachine JDK
Select JDK and Download, that's it - Pretty Simple. This is OpenJDK maintained by SAP SE
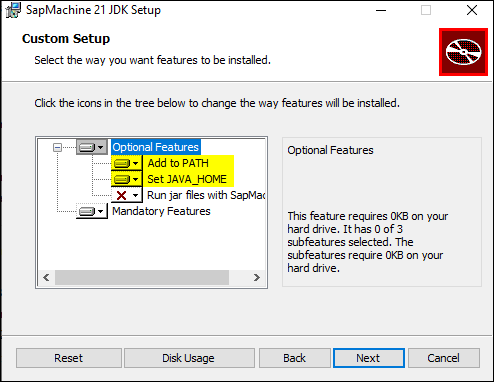
During Installation you must select the below options for installation, so that you don't need to do manually after Java Setup.
- Add to PATH
- Set JAVA_HOME
Post Installation Pls. verify or validate the Java JDK Version and if PATH Environment Variable has been setup properly.
Open cmd then type
java --version
Java Installation Directories
echo %JAVA_HOME%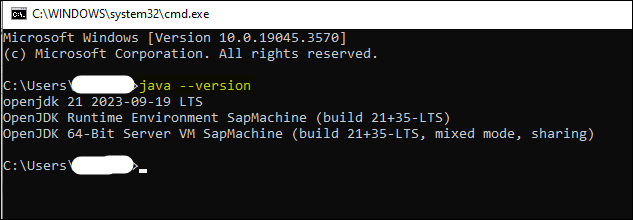
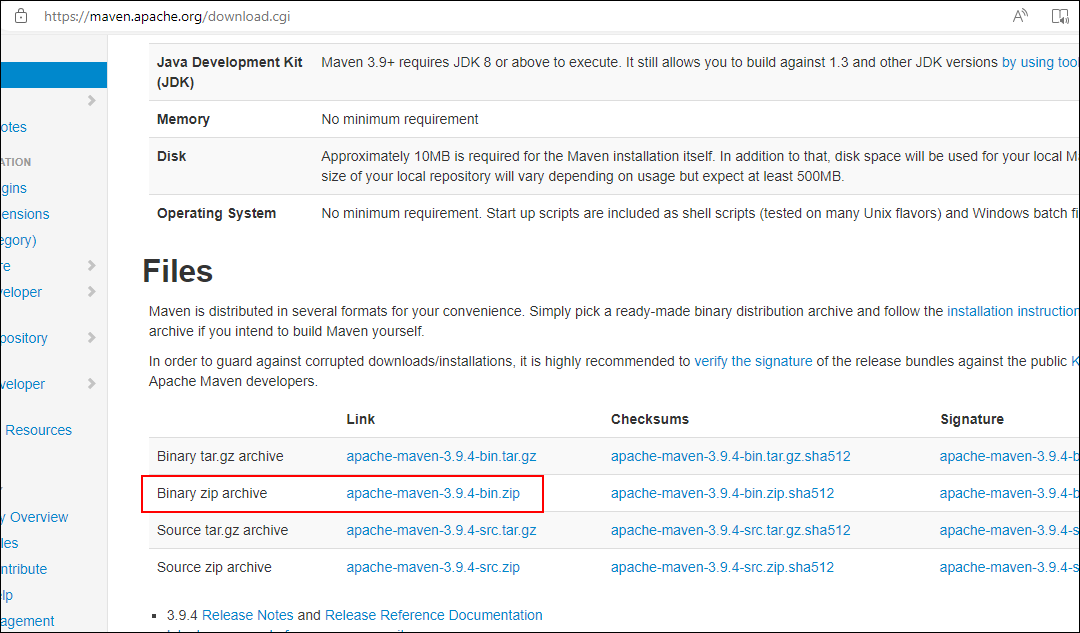
Step 4: Download Apache Maven Binary Apache Maven Binary
Download the latest Apache Maven Binary zip
Installing Apache Maven
Installing Apache Maven Documentation
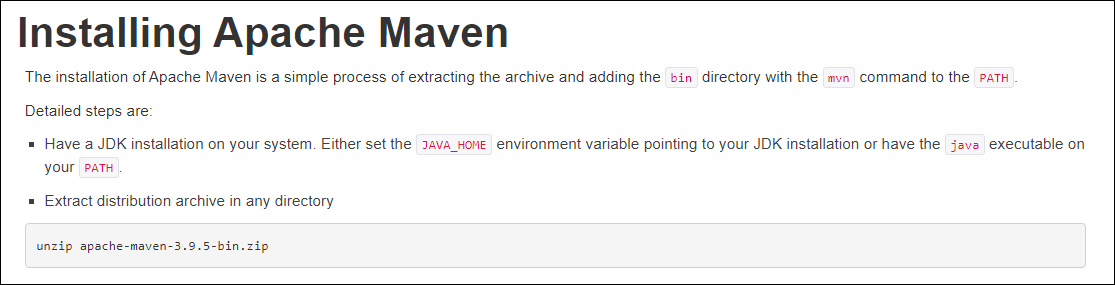
We have extracted in C:\Apache folder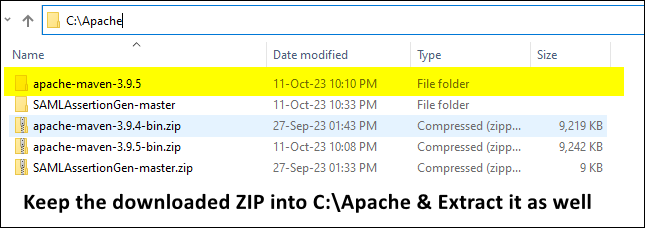
Verification of Apache Maven Installation & It's version
Open cmd then type the following
C:\Apache\apache-maven-3.9.5\bin\mvn -v
Alternatively you can use that way as well
cd C:\Apache\apache-maven-3.9.5\bin
then run the following commands
mvn -v
Step 5: Generating the SAML Assertion
Before Generating the SAML Assertion, we should check/validate Java JDK & Apache Maven Version and if they were properly setup or not
Open CMD then run the following
echo %JAVA_HOME%

C:\Apache\apache-maven-3.9.5\bin\mvn -v
Your output should be like this
There are two ways to generate SAML Assertion
Step 5: Option 1 - (This is recommended and Simple Approach as well)
Prerequisites:
Download the SAP SE Provided Offline SAML Assertion Generator for SuccessFactors
3031657 - How to generate SAML assertion using SAP-provided offline tool - SuccessFactors
Under the Attachment, you will see the SAMLAssertionGen-master (1).zip

Pls. download
SAMLAssertionGen-master (1).zip and we have extracted zip file in C:\Apache folder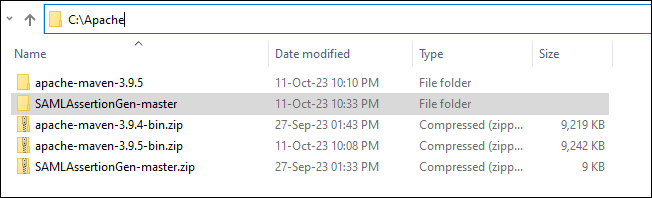
Go to the folder and open
SAMLAssertion.properties file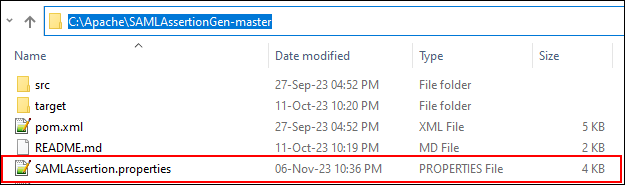
Fill the following values correctly:
- tokenUrl=<SuccessFactors_API_EndPoint_URL>/oauth/token
- clientId=Admin Center > API Center >Manage OAuth2 Client Applications > API Key
- userId=Admin Center > API Center > Manage OAuth2 Client Applications > Bind to Users
- privateKey=Admin Center > API Center > Manage OAuth2 Client Applications > X.509 Certificate (PrivateKey)
- expireInMinutes=Default value expireInMinutes is 10 mins, You must set it according your business requirements

You get the List of API Server URL from SuccessFactors Official Documentation for API Server
or
2215682 - SuccessFactors API URLs and external IPs
Once you are done then Save it
Your SAMLAssertion.properties looks like this
Open CMD then run the following (You don't need to be openCMD as an Administrator)
cd C:\Apache\SAMLAssertionGen-master

C:\Apache\apache-maven-3.9.5\bin\mvn compile exec:java -Dexec.args="SAMLAssertion.properties"
You can also run the following if you have multiple Assertions
cd C:\Apache\SAMLAssertionGen-master

C:\Apache\apache-maven-3.9.5\bin\mvn compile exec:java -Dexec.args="SAMLAssertion_20231011.properties"

Post The generated Signed SAML Assertion Activity
Copy the generated Signed SAML Assertion.
Note - This is Base64 Encoded, You may use Notepad++ or Any online websites to Decode
Please make sure your Build must be BUILD SUCCESS

Post generated SAML Assertion We will use it for assertion in Postman Collection Variables for Configuration (Don't worry we will explain in later)
Although you can learn from SuccessFactors Documentation
Requesting an Access Token
Copy the generated SAML Assertion in Notepad++
then Plugins > MIME Tools > SAML Decode
Note - This is Base64 Encoded, You can use decode and view the actual text.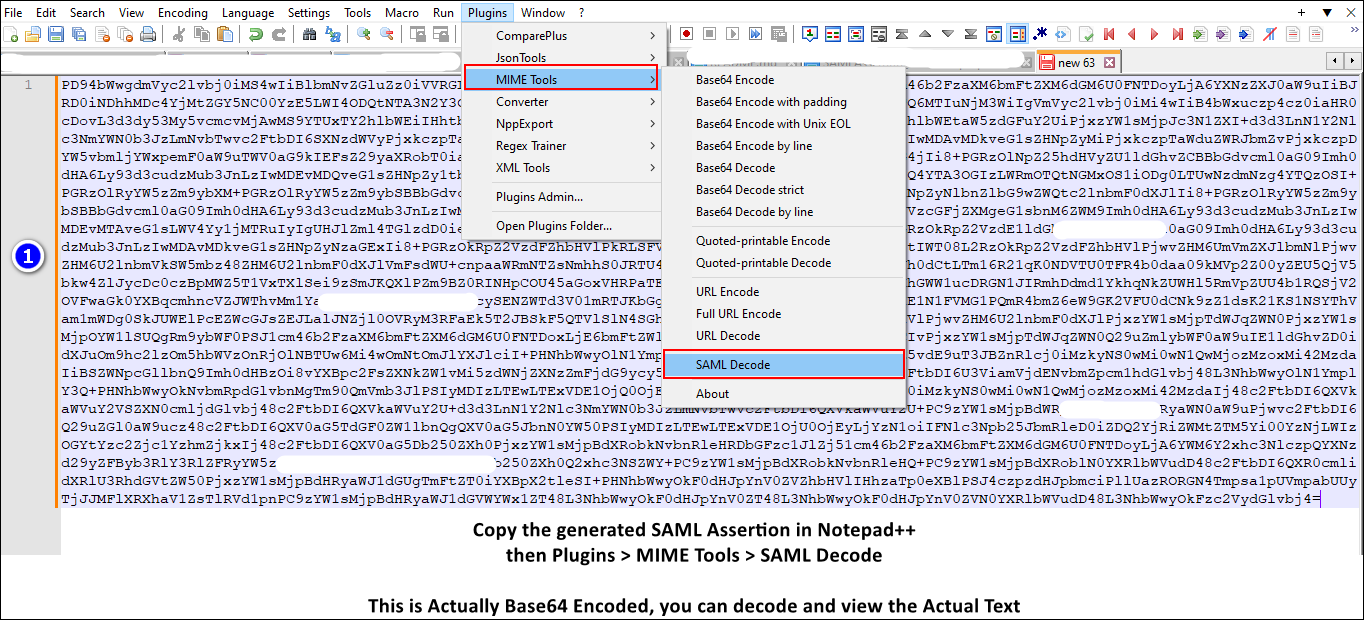
This is after Base64 decode, the actual text. Pls. Note - highlighted yellow fields are important to look (This is nothing to do just to view the text what it looks like after Base64 decode)

Step 5: Option 2 - (Alternative way to Generate SAML Assertion - This is bit complex as compared to Option 1, but nice to know)
Steps:
1: Run below command against your project directory to compile and package this project, open cmd then run it:
 cd C:\Apache\SAMLAssertionGen-master

 C:\Apache\apache-maven-3.9.4\bin\mvn clean compile package
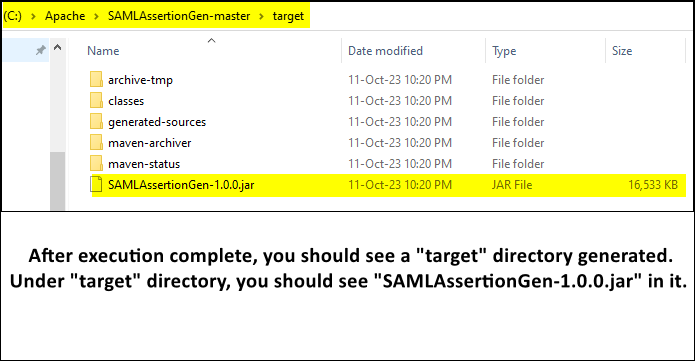
After execution complete, you should see a target directory generated. Under target directory, you should see "SAMLAssertionGen-1.0.0.jar" in it.
2: Then copy SAMLAssertionGen-1.0.0.jar and into same directory where SAMLAssertion.properties resides
3: Execute below command to generate SAML Assertion:
java -jar SAMLAssertionGen-1.0.0.jar "SAMLAssertion.properties"
- You can get the SAML Assertion in command line following below message:
The generated Signed SAML Assertion is:.
Now, let's see some screen-shot based on all the above steps:
Step 1: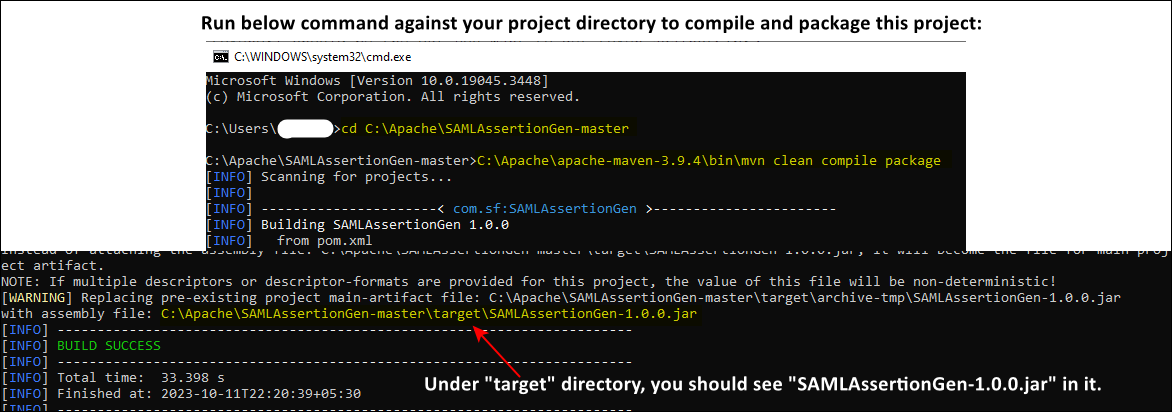
Step 2:
Step 3:
Step 4: The generated Signed SAML Assertion is:

Step 6: Configuring Postman Client for API Connectivity
I hope you have very basic understanding of Postman API Client Understanding of Postman variables such as Global Variables, Collection Variables, Local Variables Etc.
If you wants to learn about Understanding variables Pls, go through the link.
Postman Collection Overview
Tips : if you wants to learn more about Postman then follow the link Postman Learning
So, we have created
- Postman Workspaces
- Collection
This is nothing but more modular way managing API's.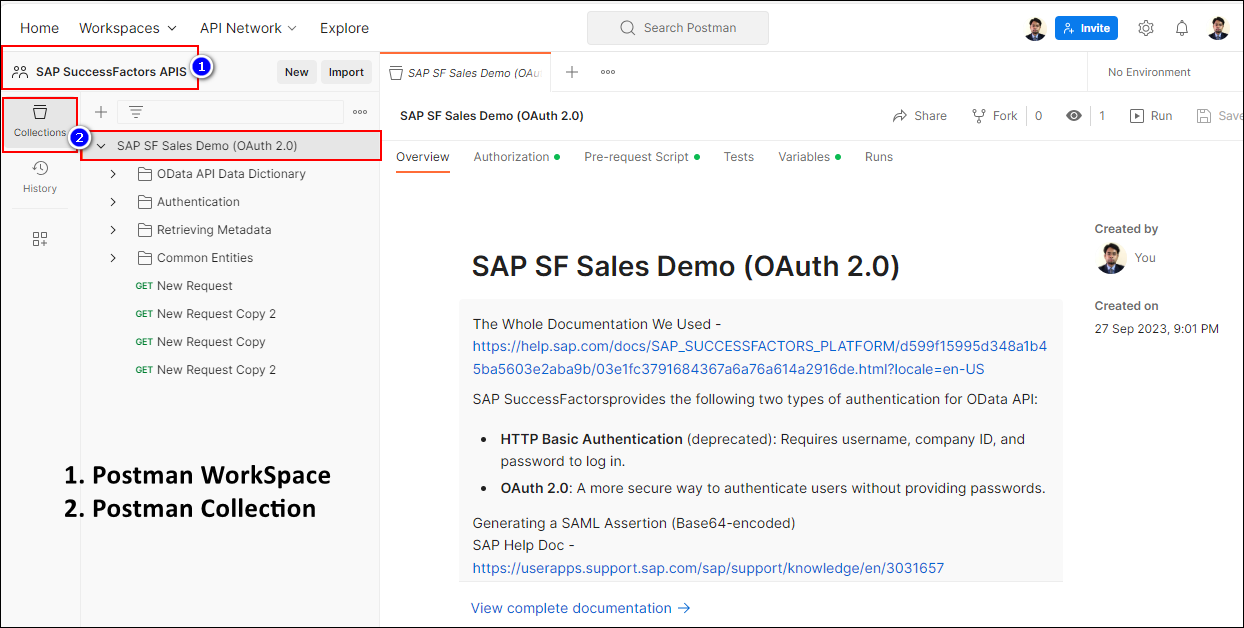
For Creating New Workspaces. Workspaces > Create Workspace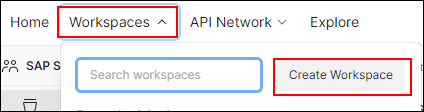
Under the Workspace, Create a New Collection
Click + then Blank Collection or click New then Collection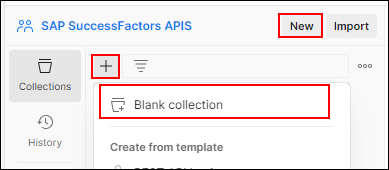
So, what we will do -
We have separated between two options. All the options are mentioned below.
Option 1 : Recommended for beginner as it is simple to understand and focuses who are new in Postman API Client.
Option 2 : Recommended for someone who already have some hands on knowledge in Postman API Client.
I would recommend start with Option 1 then once if invest sometime to Postman for learning then you may go-ahead with Option 2
Options :
First We will send regular POST request from Postman API for Requesting a new Access Token. This will generate a
access_tokenand that can be use for Authorization for other SuccessFactors API. This is purely manual approach. The challenge of this approach is we have to copy & paste theaccess_tokeneach time when we need to send to any API request. We will use little bit of Postman Pre-request scripts for declaring the variables. Little bit not like Option 2. We will call Option 1 as a Basic.
In order to overcome the challenge we will fully automate the Authorization & Authentication Process in order to connect SuccessFactors API via Postman. We will use Postman Pre-request Script at intermediate level in order to achieve this. We will call Option 2 as an Intermediate.
To learn about Postman Pre-requst Scripts
Step 6: Option 1 (Basic)
Requesting an Access Token
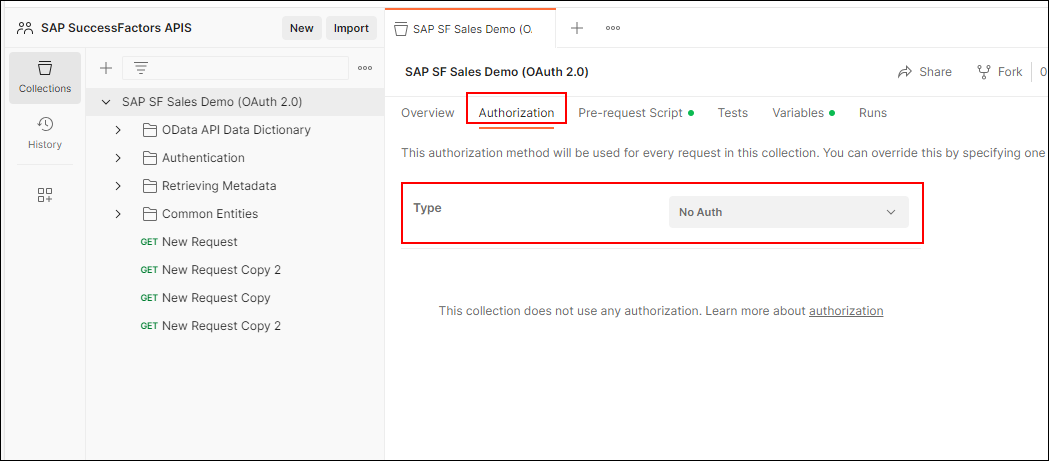
Set Authorization type No Auth
We used Pre-request scripts just to declare the local variables. You may use Variables tab for declaring the variables as Collection Variables that but i prefer write a Pre-request script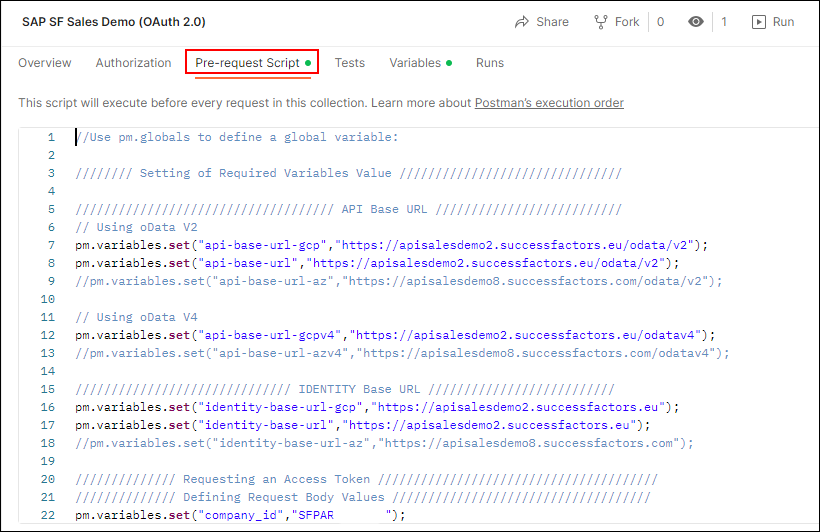
Tips - if you interested to learn about Defining variables in scripts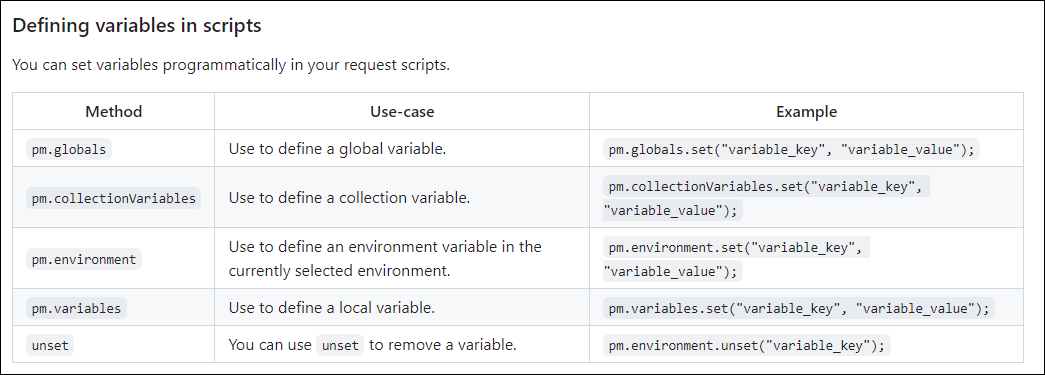
Our Pre-request scripts in full details. We have declared the following Local variables:
- company_id
- client_id_api_key
- grant_type
- assertion
- new_token
//////// Setting of Required Variables Value ///////////////////////////////
//////////////////////////////////// API Base URL //////////////////////////
// Using oData V2
pm.variables.set("api-base-url-gcp","https://apisalesdemo2.successfactors.eu/odata/v2");
pm.variables.set("api-base-url","https://apisalesdemo2.successfactors.eu/odata/v2");
// Using oData V4
pm.variables.set("api-base-url-gcpv4","https://apisalesdemo2.successfactors.eu/odatav4");
////////////////////////////// IDENTITY Base URL //////////////////////////
pm.variables.set("identity-base-url-gcp","https://apisalesdemo2.successfactors.eu");
pm.variables.set("identity-base-url","https://apisalesdemo2.successfactors.eu");
////////////// Requesting an Access Token ///////////////////////////////////////
////////////// Defining Request Body Values ////////////////////////////////////
pm.variables.set("company_id","SFPART123456789");
pm.variables.set("client_id_api_key","Nzc1MDRlZWRiMzNjNSFPART123456789");
pm.variables.set("grant_type","urn:ietf:params:oauth:grant-type:saml2-bearer");
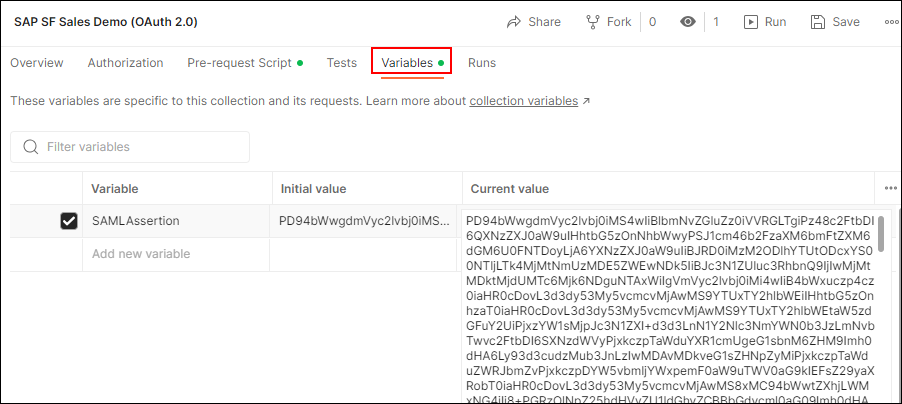
// We have Declared as a Collection Variable, under Variables Tab
pm.variables.set("assertion",pm.variables.get("SAMLAssertion"));
// Sending New Token in Each Request
pm.variables.set("new_token",false);
////////////////////////////////////////////////////////////////////////////////
You perhaps remembered that from the Step 5 : we have generated SAML Assertion and that value we have declared as a Collection variables called SAMLAssertion
Under our collection, we have created a folder by Selecting Collection then Add Folder called 'Authentication`, this is nothing but more modular way managing API's
then under the Authentication folder click Add request to add a new POST request
- Request Type : POST
- API Endpoint : {{identity-base-url}}/oauth/token
- Inside Body Set : x-www-form-urlencoded
- and following Key & Value
| Key | Value |
|---|---|
| company_id | {{company_id}} |
| client_id | {{client_id_api_key}} |
| grant_type | {{grant_type}} |
| assertion | {{assertion}} |
| new_token | {{new_token}} |
Once you are done Save the request "Authentication POST"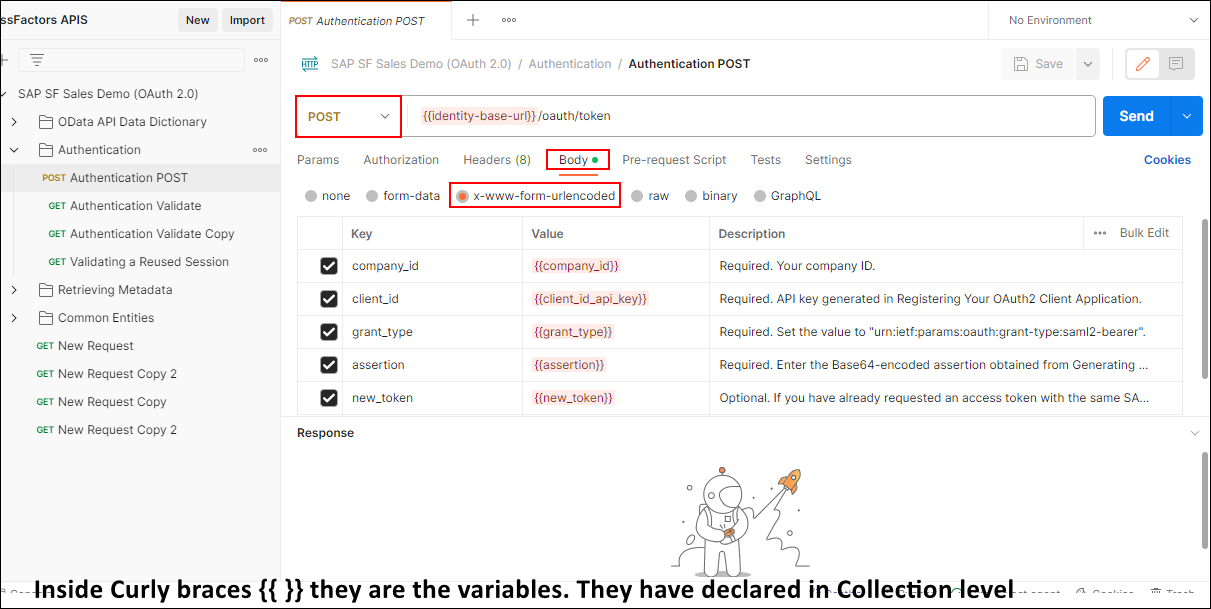
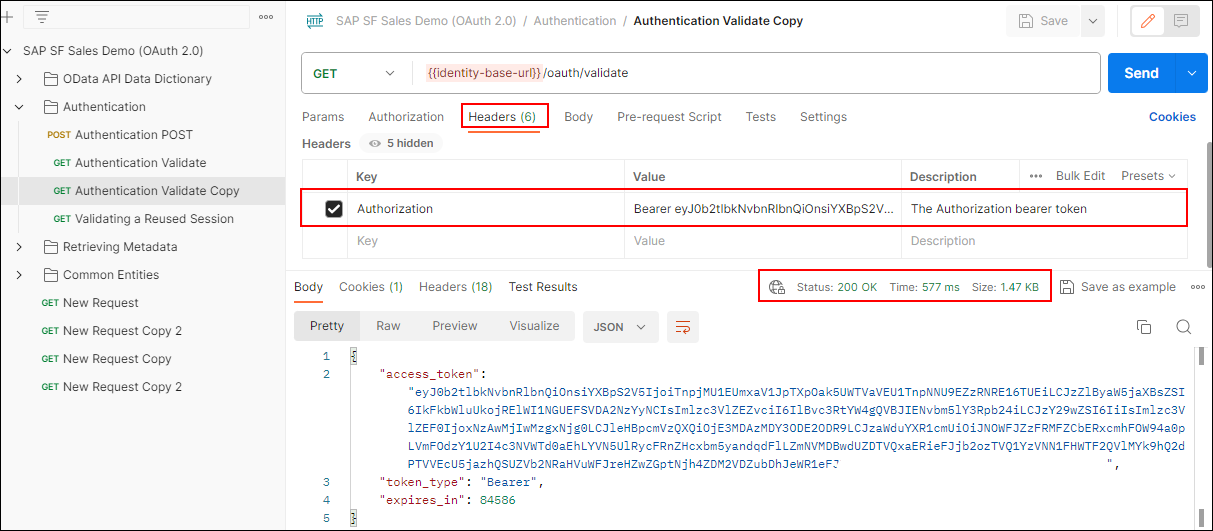
Now, it's time to go to check our API Request. Click "Send" button and after successful response you will get HTTP 200 along with
- access_token
- token_type
- expires_in

Postman Console View, click "Console"


By the way we will use access_token to validate via GET request.
Viewing the Validity of an Access Token
Under the Authentication folder click Add request to add a new GET request
- Request Type : GET
- API Endpoint : {{identity-base-url}}/oauth/validate
- Under
Headerstab - Key: Authorization
- Value : Bearer eyJ0b2tlbkNvb
All, good my token is valid
For accessing any other API's, we need pass the access_token same way what we did for GET request. Keep in mind that access_token also have expiry and once it was expired we need generate the new access_token and update all our API's where it is being used. This is the main problem of Option 1.
Step 6: Option 2 (Intermediate)
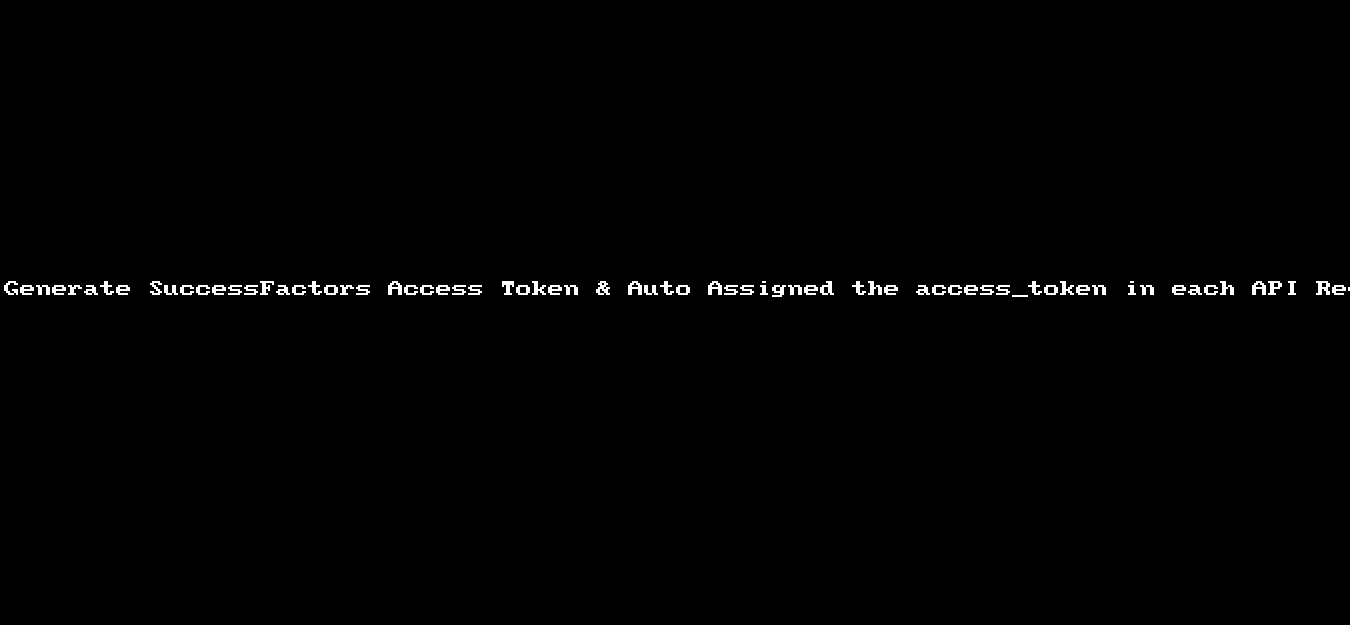
Auto Generate SuccessFactors Access Token & Auto Assigned the access_token in each API Request
So, in order to auto-generate the Access Token & auto assigned the access_token in each API Request - we have to make couple of slight changes.
Let's go with that,
Under the collection level in Authorization tab set the following
Type: Bearer Token
Token: {{sapsf-access-token}}

Next, go to the Pre-request Script we need to add extract piece of code under the below what we have written already in Option 1

The following we have added in Pre-request Script
//////////////////////////////////////////////////////////////////////////////

//////////// Auto Generate SuccessFactors Access Token ///////////////////////

const tokenUrl = pm.variables.get("identity-base-url-gcp")+'/oauth/token';

const companyId = pm.variables.get("company_id");

const clientApiKey = pm.variables.get("client_id_api_key");

const grantType = pm.variables.get("grant_type");

const samlAssertion = pm.variables.get("assertion");

const newToken = pm.variables.get("new_token");


const getTokenRequest = {

  method: 'POST',

  url: tokenUrl,

  header: 'Content-Type:application/x-www-form-urlencoded',

  body: {

      mode: 'urlencoded',

      urlencoded: [

          { key: 'company_id', value: companyId },

          { key: 'client_id', value: clientApiKey },

          { key: 'grant_type', value: grantType },

		  { key: 'assertion', value: samlAssertion},

          { key: 'new_token', value:newToken}

      ]

  }

};


pm.sendRequest(getTokenRequest, (err, response) => {

  const jsonResponse = response.json();

  const newAccessToken = jsonResponse.access_token;


  pm.variables.set('sapsf-access-token', newAccessToken);

});

//////////////////////////////////////////////////////////////////////////////
The beauty of that - it will auto generate and auto assigned the access token for each API request call.
Very Very Important Point, We need to remember
For each folder & request we need to set the following:
Authorization Tab
Type : Inherit auth from parent
As Postman says "The authorization header will be automatically generated when you send the request."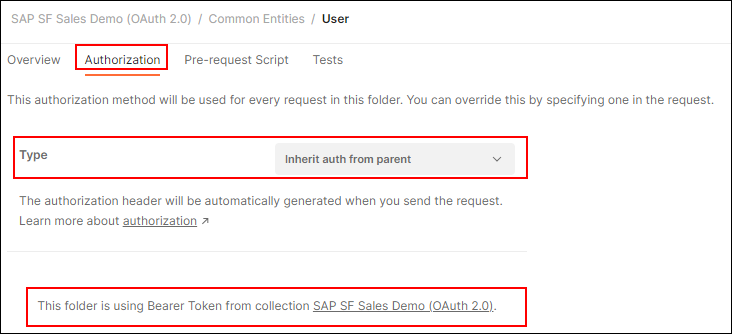
that's it.
Let's have some test and see how it practically works:
We will send GET request for User API
Querying users by key predicate
Here, we can see first POST request is running and it is generate the access_token
Secondly, User API using that one and give the response back.
All that.
Have a Happy Learning.
- SAP Managed Tags:
- API,
- SAP SuccessFactors HXM Suite
1 Comment
You must be a registered user to add a comment. If you've already registered, sign in. Otherwise, register and sign in.
Labels in this area
-
1H 2024 Product Release
5 -
2H 2023 Product Release
1 -
ACCRUAL TRANSFER
1 -
Advanced Workflow
1 -
Anonymization
1 -
BTP
1 -
Business Rules
1 -
Canvas Report
1 -
Career Development
1 -
Certificate-Based Authentication
1 -
Cloud Platform Integration
1 -
Compensation
1 -
Compensation Information Management
1 -
Compensation Management
1 -
Compliance
2 -
Content
1 -
Conversational AI
2 -
Custom Data Collection
1 -
custom portlet
1 -
Data & Analytics
1 -
Data Integration
1 -
Dayforce
1 -
deep link
1 -
deeplink
1 -
Delimiting Pay Components
1 -
Deprecation
1 -
Employee Central
1 -
Employee Central Global Benefits
1 -
Employee Central Payroll
1 -
employee profile
1 -
Employee Rehires
1 -
external terminal
1 -
external time events
1 -
Generative AI
2 -
Getting Started
1 -
Global Benefits
1 -
Guidelines
1 -
H2 2023
1 -
HR
2 -
HR Data Management
1 -
HR Transformation
1 -
ilx
1 -
Incentive Management Setup (Configuration)
1 -
Integration Center
2 -
Integration Suite
1 -
internal mobility
1 -
Introduction
1 -
learning
3 -
LMS
2 -
LXP
1 -
Massively MDF attachments download
1 -
Mentoring
1 -
Metadata Framework
1 -
Middleware Solutions
1 -
OCN
1 -
OData APIs
1 -
ONB USA Compliance
1 -
Onboarding
2 -
Opportunity Marketplace
1 -
Pay Component Management
1 -
Platform
1 -
portlet
1 -
POSTMAN
1 -
Predictive AI
2 -
Recruiting
1 -
recurring payments
1 -
Role Based Permissions (RBP)
2 -
SAP Build CodeJam
1 -
SAP Build Marketplace
1 -
SAP CPI (Cloud Platform Integration)
1 -
SAP HCM (Human Capital Management)
2 -
SAP HR Solutions
2 -
SAP Integrations
1 -
SAP release
1 -
SAP successfactors
5 -
SAP SuccessFactors Customer Community
1 -
SAP SuccessFactors OData API
1 -
SAP Workzone
1 -
SAP-PAYROLL
1 -
skills
1 -
Skills Management
1 -
sso deeplink
1 -
Stories in People Analytics
3 -
Story Report
1 -
SuccessFactors
2 -
SuccessFactors Employee central home page customization.
1 -
SuccessFactors Onboarding
1 -
successfactors onboarding i9
1 -
Table Report
1 -
talent
1 -
Talent Intelligence Hub
2 -
talents
1 -
Tax
1 -
Tax Integration
1 -
Time Accounts
1 -
Workflows
1 -
XML Rules
1
Related Content
- 3 key steps to kick-start your migration to Stories in People Analytics in Human Capital Management Blogs by Members
- 1H 2024 Product Release - PLT-82081 in Human Capital Management Q&A
- SAP Successfactors with SAP BUILD APP :Quick Vacant Positions Check App in Human Capital Management Blogs by Members
- SAP IAS in Human Capital Management Q&A
- How to massively download attachments from a MDF object. in Human Capital Management Blogs by Members
Top kudoed authors
| User | Count |
|---|---|
| 12 | |
| 12 | |
| 3 | |
| 3 | |
| 3 | |
| 1 | |
| 1 | |
| 1 | |
| 1 | |
| 1 |