
- SAP Community
- Products and Technology
- Human Capital Management
- HCM Blogs by Members
- Rearrange fields on the Workflow Approval Page
Human Capital Management Blogs by Members
Gain valuable knowledge and tips on SAP SuccessFactors and human capital management from member blog posts. Share your HCM insights with a post of your own.
Turn on suggestions
Auto-suggest helps you quickly narrow down your search results by suggesting possible matches as you type.
Showing results for
EstebanCalvo
Explorer
Options
- Subscribe to RSS Feed
- Mark as New
- Mark as Read
- Bookmark
- Subscribe
- Printer Friendly Page
- Report Inappropriate Content
01-03-2024
8:40 PM
A few weeks ago, I encountered an issue while trying to address a client's requirement within SuccessFactors. The issue arose when an employee submitted a leave request, filled out a form, and sent it for approval. The problem was that the approver, upon receiving the request through a workflow, found the fields in the form to be disordered. Specifically, the attachment field appeared at the top of the screen, which was visually inconvenient.
When conducting research to address this issue, we came across a note with the following description:
“Currently, it is not possible to customize the layout of the workflow approval page. The workflow approval page has a hardcoded layout, which dynamically updates based on the type of workflow being triggered. This means that fields cannot be rearranged, added, or hidden.”
Despite what this note indicated, my team and I have devised a straightforward solution to the problem of organizing and arranging fields on the Workflow Approval Page. My intention is to share this solution with you in this post. I will demonstrate using the specific example we encountered, but the same solution I present in this post is applicable to any other workflow within the system.
SuccessFactors allows an employee to request their own leave, just as it enables a manager to request leave on behalf of their direct reports. Typically, once this termination request is made, it needs approval from a designated company member with an approver role. The approver can either directly approve the termination or make edits within the workflow.
The specific challenge, as mentioned above, is that while we can edit the initial termination form filled out by either the employee or the manager, we lack the same functionality or capability to rearrange fields when the approver accesses the termination request. In fact, what we've observed is that the fields appear in a different order than the original form. Next, we will walk through the process, starting from when an employee submits a termination request to when the approver accesses the request to edit certain fields. Subsequently, we'll explore how we can indeed modify the sequence of fields, both in the termination request itself and in the view of the termination request by the approver. Finally, we will showcase the outcome, illustrating how the fields have been rearranged. To do this, we will present an image before the modifications and another one after implementing the changes.
Request for a termiation by the commander or employee.
To make this request, simply go to the search bar located in the top right corner. Enter the word "terminate" and click on the suggested option "Terminate...". Next, add the name of the person for whom the termination is being requested, and when the system suggests the employee, click on their profile.
The termination request form automatically opens. Once completed and sent, the workflow we've designated triggers, directing the request to the approver.
Upon submission confirmation, our approver receives a notification on their homepage, from which they access the workflow. To edit or modify any fields, the approver must click on the “Update” button. This action opens the form, revealing a disorderly arrangement of fields compared to the form the employee filled out. While the same fields appear, they are disorganized.
While we have the capability to organize and choose which fields to display from the "People Profile" for the initial form, this option does not extend to the Workflow Approval Page.
So, how can one rearrange the objects in this approver's view? The answer is simpler than one might expect.
Navigate to “Manager Business Configuration” and click on “Employmentinfo”. Here, you can see all the fields (standard or custom) within this section, realizing that this is where all the fields appearing in our termination form are located. All you need to do is click on “Take Action” > “Make Correction”.
Using the arrow icons that appear to the right of each field, we can rearrange the fields. In our case, we place them in the same order as they appear in the initial termination form and save. Subsequently, if we proxy as the approver, open the workflow, and click on "Update," we can see that the fields have been reordered as desired.
As you can see, sometimes solutions are simpler than we imagine. I genuinely hope that this solution proves useful to you, which is why I wanted to share it.
I'm relatively new to the SuccessFactors world, but I hope you can share this post with anyone you believe it might benefit. Additionally, I encourage you to leave comments with your thoughts, questions, or suggestions for improvement.
Best regards.
Esteban

Arranged fields on the termination form

Disarranged fields on the workflow
When conducting research to address this issue, we came across a note with the following description:
“Currently, it is not possible to customize the layout of the workflow approval page. The workflow approval page has a hardcoded layout, which dynamically updates based on the type of workflow being triggered. This means that fields cannot be rearranged, added, or hidden.”

SAP note
Despite what this note indicated, my team and I have devised a straightforward solution to the problem of organizing and arranging fields on the Workflow Approval Page. My intention is to share this solution with you in this post. I will demonstrate using the specific example we encountered, but the same solution I present in this post is applicable to any other workflow within the system.
SuccessFactors allows an employee to request their own leave, just as it enables a manager to request leave on behalf of their direct reports. Typically, once this termination request is made, it needs approval from a designated company member with an approver role. The approver can either directly approve the termination or make edits within the workflow.
The specific challenge, as mentioned above, is that while we can edit the initial termination form filled out by either the employee or the manager, we lack the same functionality or capability to rearrange fields when the approver accesses the termination request. In fact, what we've observed is that the fields appear in a different order than the original form. Next, we will walk through the process, starting from when an employee submits a termination request to when the approver accesses the request to edit certain fields. Subsequently, we'll explore how we can indeed modify the sequence of fields, both in the termination request itself and in the view of the termination request by the approver. Finally, we will showcase the outcome, illustrating how the fields have been rearranged. To do this, we will present an image before the modifications and another one after implementing the changes.
Request for a termiation by the commander or employee.
To make this request, simply go to the search bar located in the top right corner. Enter the word "terminate" and click on the suggested option "Terminate...". Next, add the name of the person for whom the termination is being requested, and when the system suggests the employee, click on their profile.

Initiate termination
The termination request form automatically opens. Once completed and sent, the workflow we've designated triggers, directing the request to the approver.
Upon submission confirmation, our approver receives a notification on their homepage, from which they access the workflow. To edit or modify any fields, the approver must click on the “Update” button. This action opens the form, revealing a disorderly arrangement of fields compared to the form the employee filled out. While the same fields appear, they are disorganized.
While we have the capability to organize and choose which fields to display from the "People Profile" for the initial form, this option does not extend to the Workflow Approval Page.

Manage Configuration UI (a)

Manage configuration UI (b)
So, how can one rearrange the objects in this approver's view? The answer is simpler than one might expect.
Navigate to “Manager Business Configuration” and click on “Employmentinfo”. Here, you can see all the fields (standard or custom) within this section, realizing that this is where all the fields appearing in our termination form are located. All you need to do is click on “Take Action” > “Make Correction”.
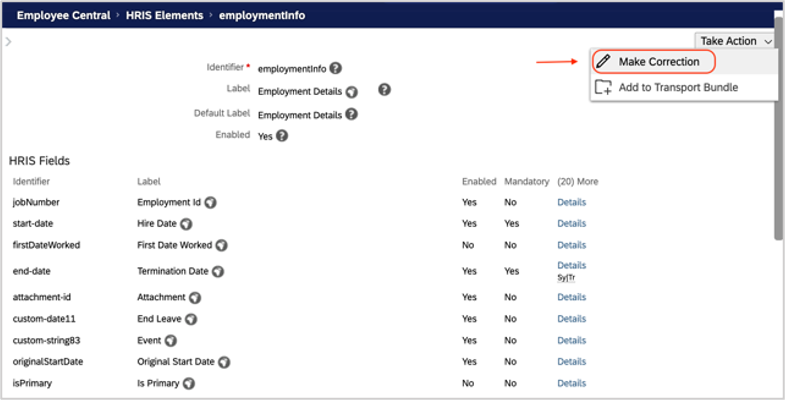
Rearranging fields on Employmentinfo (a)

Rearranging fields on Employmentinfo (b)
Using the arrow icons that appear to the right of each field, we can rearrange the fields. In our case, we place them in the same order as they appear in the initial termination form and save. Subsequently, if we proxy as the approver, open the workflow, and click on "Update," we can see that the fields have been reordered as desired.

Final result
As you can see, sometimes solutions are simpler than we imagine. I genuinely hope that this solution proves useful to you, which is why I wanted to share it.
I'm relatively new to the SuccessFactors world, but I hope you can share this post with anyone you believe it might benefit. Additionally, I encourage you to leave comments with your thoughts, questions, or suggestions for improvement.
Best regards.
Esteban
1 Comment
You must be a registered user to add a comment. If you've already registered, sign in. Otherwise, register and sign in.
Labels in this area
-
1H 2024 Product Release
5 -
2H 2023 Product Release
1 -
ACCRUAL TRANSFER
1 -
Advanced Workflow
1 -
Anonymization
1 -
BTP
1 -
Business Rules
1 -
Canvas Report
1 -
Career Development
1 -
Certificate-Based Authentication
1 -
Cloud Platform Integration
1 -
Compensation
1 -
Compensation Information Management
1 -
Compensation Management
1 -
Compliance
2 -
Content
1 -
Conversational AI
2 -
Custom Data Collection
1 -
custom portlet
1 -
Data & Analytics
1 -
Data Integration
1 -
Dayforce
1 -
deep link
1 -
deeplink
1 -
Delimiting Pay Components
1 -
Deprecation
1 -
Employee Central
1 -
Employee Central Global Benefits
1 -
Employee Central Payroll
1 -
employee profile
1 -
Employee Rehires
1 -
external terminal
1 -
external time events
1 -
Generative AI
2 -
Getting Started
1 -
Global Benefits
1 -
Guidelines
1 -
H2 2023
1 -
HR
2 -
HR Data Management
1 -
HR Transformation
1 -
ilx
1 -
Incentive Management Setup (Configuration)
1 -
Integration Center
2 -
Integration Suite
1 -
internal mobility
1 -
Introduction
1 -
learning
3 -
LMS
2 -
LXP
1 -
Massively MDF attachments download
1 -
Mentoring
1 -
Metadata Framework
1 -
Middleware Solutions
1 -
OCN
1 -
OData APIs
1 -
ONB USA Compliance
1 -
Onboarding
2 -
Opportunity Marketplace
1 -
Pay Component Management
1 -
Platform
1 -
portlet
1 -
POSTMAN
1 -
Predictive AI
2 -
Recruiting
1 -
recurring payments
1 -
Role Based Permissions (RBP)
2 -
SAP Build CodeJam
1 -
SAP Build Marketplace
1 -
SAP CPI (Cloud Platform Integration)
1 -
SAP HCM (Human Capital Management)
2 -
SAP HR Solutions
2 -
SAP Integrations
1 -
SAP release
1 -
SAP successfactors
5 -
SAP SuccessFactors Customer Community
1 -
SAP SuccessFactors OData API
1 -
SAP Workzone
1 -
SAP-PAYROLL
1 -
skills
1 -
Skills Management
1 -
sso deeplink
1 -
Stories in People Analytics
3 -
Story Report
1 -
SuccessFactors
2 -
SuccessFactors Employee central home page customization.
1 -
SuccessFactors Onboarding
1 -
successfactors onboarding i9
1 -
Table Report
1 -
talent
1 -
Talent Intelligence Hub
2 -
talents
1 -
Tax
1 -
Tax Integration
1 -
Time Accounts
1 -
Workflows
1 -
XML Rules
1
Related Content
- New 1H 2024 SAP Successfactors Time (Tracking) Features in Human Capital Management Blogs by SAP
- SAP SuccessFactors Employee Central: 1H 2024 Release Highlights in Human Capital Management Blogs by Members
- Automatic Hire in Human Capital Management Blogs by SAP
- Can we get all the direct reports names reporting to a manager for using in email notification in Human Capital Management Q&A
- Can we able to fetch and auto-populate the accrual balance to a custom field of a Time Account Type? in Human Capital Management Q&A
Top kudoed authors
| User | Count |
|---|---|
| 12 | |
| 12 | |
| 3 | |
| 3 | |
| 3 | |
| 1 | |
| 1 | |
| 1 | |
| 1 | |
| 1 |