
- SAP Community
- Products and Technology
- Supply Chain Management
- SCM Blogs by Members
- Quick Configuration Guide “Response and Supply Pla...
Supply Chain Management Blogs by Members
Learn about SAP SCM software from firsthand experiences of community members. Share your own post and join the conversation about supply chain management.
Turn on suggestions
Auto-suggest helps you quickly narrow down your search results by suggesting possible matches as you type.
Showing results for
Dhananjay
Explorer
Options
- Subscribe to RSS Feed
- Mark as New
- Mark as Read
- Bookmark
- Subscribe
- Printer Friendly Page
- Report Inappropriate Content
12-23-2020
3:59 PM
The response and supply functionality is always a matured and stable product for SAP even in APO. So, IBP is not an exception, IBP introduced with a load of additional functionality comparing to APO. Also, most of the issues and constraints faced in APO and S/4HANA integration due to changes in the table structure addressed in IBP. In this blog post, I will explain step by step process to configure “Response and Supply Planning” features in the recent IBP release 2011.
Based on your company requirement, either you can create a new dedicated planning version or use the standard one provided by SAP. You can consider configuring a supply plan and product allocation plan based on given capacities, supply chain constraints, and cost rules. These configured rules consider inventory holding costs, safety stock violation costs, transportation costs, procurement costs, production costs, and demand costs. It also enables us to run a constrained forecast for a dedicated planning version.
Configuration of Alerts will help to identify any deviations. It enables to check the supplier delivery and capacity consumption to detect potential bottlenecks. Alert can be sent to a particular user or user group based on configuration.
This configured functionality will help you to reduce inventory carrying costs, avoid capacity and material shortages, and the ability to quickly react to exceptions in the supply chain with fast simulations.
The high-level role-based flow of the IBP Supply Planning process is as follows:
As you are aware, in IBP, a planning area is a collection of master data and input data organized under specifically defined calculations. Configurations consist of Planning area definition, Planning area activation, and data loading. It recommended using SAP Best Practices IBP sample planning area for reference to define its planning area for Response Management. This configuration does not include steps to upload data to a newly created planning area.
Configuration Steps
Access your SAP IBP system using IBP access URL provided by your company. Make sure that you have the Administrator and configuration right. SAP IBP configuration and all other activities performed using SAP Fiori launchpad only. Apps are displayed in tiles like below:
1. Creation of Sample Planning
Search in the catalog for Fiori app 'Sample Model Entities'
Below screen will appear, from left side list select 'SAP Sample Model 7' planning area and click on icon "Copy":
A pop will appear in the Copy Planning Area dialog box, choose 'Create New with Dependencies'
'Create a New Planning Area' dialog box appears like below, enter the data as per your company nomenclature. I have kept JAY (my name) as a prefix of the New Planning area configuration, DO NOT copy same.
New Planning Area - Choose the name of the planning area
New Time Profile - Choose the ID (numeric value) of the time profile that will be created and associated with a new planning area.
Integration profile - Default (SAP Delivered)
Source Prefix - S7
Target Prefix - Choose a target prefix
External Master Data Sources for Additional Demand Attributes - Select Customer Master Data (SMD_CUST)
Copy Analytics and Alerts - Select Copy Analytics and Alerts
You will get a warning message like below, select Copy and proceed
Once the copy complete below message will appear, if you want to navigate the newly created item go for that else cancel and proceed for further configurations.
2. Planning Area Activation (Configuration):
Open the 'Planning Areas – Model Configuration' app by choosing the corresponding tile or searching the tile in launchpad like below:
Select the planning area that was created 'JAYSAP7', the status will show as 'Inactive'
Below pop-up will appear, choose “Activate”
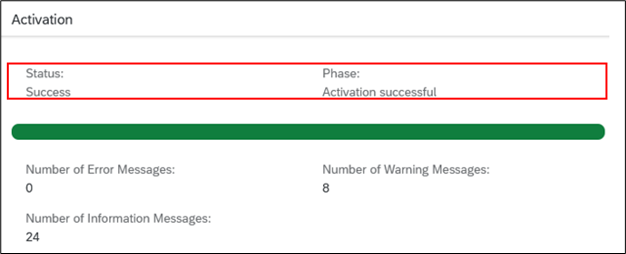
The Activation dialog box is displayed with progress details similar to the below screen:
Once the process is complete, information like the below appear - 'Activation successful'
You can re-confirm the Planning Area activation status from the Planning area list:
3. Time Periods for Time Profiles Creation (Configuration)
Now you need to create time periods for time profiles which will be used in the Supply Planning optimizer. Go to Application Jobs app or search for the app, you will get below screen, choose 'Create'
Below screen will appear, you need to enter following based on your company requirement:
Job Template - Create Time Periods for Time Profiles
Job Name - Create Time Periods for Time Profiles
Start Immediately – Select X
Time Profile ID - Select the Time Profile ID that was chosen when creating the planning area.
Chose Schedule to start the job. Change the Time profile number, if you get an error message 'Time Profile XX exist'
Progress can be seen as “In Progress”, once the job executed successfully status will change to “Finished”
4. Sharing Dashboards with User Groups (Configuration)
Now Supply Planning is created, it needs to share with a specified User and user group based on the defined role. To share, choose the app “Dashboards Advance”
Select the following dashboards by choosing their corresponding rows as shown below:
Choose 'Share' for each of the lines. In the Share dialog box, select User and User Groups from the dropdown to which you want to share the Dashboard. Click 'OK'.
Now it's shared with a specified group. You can verify the status using the Dashboards Advance app, shared icon appears for all the shared Dashboard
5. Share Alert Definitions and Alert Subscriptions with User Groups (Configuration)
If you want to share alerts to the user group or user, it can be configured as follows. Chose 'Analytics Advanced' app
Select the following Alerts by choosing their corresponding rows as shown below:
Choose “Share” for each of the lines. In the Share dialog box, select User and User Groups from the dropdown to which you want to share the Dashboard. Then click on 'OK'
Your final dashboard and Alerts configuration looks as below:
Conclusion: This SAP blog post helps you to configure SAP IBP Best Practice 'Response and Supply Planning' in SAP IBP release 2011.
Reference:
Based on your company requirement, either you can create a new dedicated planning version or use the standard one provided by SAP. You can consider configuring a supply plan and product allocation plan based on given capacities, supply chain constraints, and cost rules. These configured rules consider inventory holding costs, safety stock violation costs, transportation costs, procurement costs, production costs, and demand costs. It also enables us to run a constrained forecast for a dedicated planning version.
Configuration of Alerts will help to identify any deviations. It enables to check the supplier delivery and capacity consumption to detect potential bottlenecks. Alert can be sent to a particular user or user group based on configuration.
This configured functionality will help you to reduce inventory carrying costs, avoid capacity and material shortages, and the ability to quickly react to exceptions in the supply chain with fast simulations.
The high-level role-based flow of the IBP Supply Planning process is as follows:

As you are aware, in IBP, a planning area is a collection of master data and input data organized under specifically defined calculations. Configurations consist of Planning area definition, Planning area activation, and data loading. It recommended using SAP Best Practices IBP sample planning area for reference to define its planning area for Response Management. This configuration does not include steps to upload data to a newly created planning area.
Configuration Steps
Access your SAP IBP system using IBP access URL provided by your company. Make sure that you have the Administrator and configuration right. SAP IBP configuration and all other activities performed using SAP Fiori launchpad only. Apps are displayed in tiles like below:

1. Creation of Sample Planning
Search in the catalog for Fiori app 'Sample Model Entities'

Below screen will appear, from left side list select 'SAP Sample Model 7' planning area and click on icon "Copy":

A pop will appear in the Copy Planning Area dialog box, choose 'Create New with Dependencies'

'Create a New Planning Area' dialog box appears like below, enter the data as per your company nomenclature. I have kept JAY (my name) as a prefix of the New Planning area configuration, DO NOT copy same.
New Planning Area - Choose the name of the planning area
New Time Profile - Choose the ID (numeric value) of the time profile that will be created and associated with a new planning area.
Integration profile - Default (SAP Delivered)
Source Prefix - S7
Target Prefix - Choose a target prefix
External Master Data Sources for Additional Demand Attributes - Select Customer Master Data (SMD_CUST)
Copy Analytics and Alerts - Select Copy Analytics and Alerts

You will get a warning message like below, select Copy and proceed

Once the copy complete below message will appear, if you want to navigate the newly created item go for that else cancel and proceed for further configurations.

2. Planning Area Activation (Configuration):
Open the 'Planning Areas – Model Configuration' app by choosing the corresponding tile or searching the tile in launchpad like below:

Select the planning area that was created 'JAYSAP7', the status will show as 'Inactive'

Below pop-up will appear, choose “Activate”

The Activation dialog box is displayed with progress details similar to the below screen:

Once the process is complete, information like the below appear - 'Activation successful'
You can re-confirm the Planning Area activation status from the Planning area list:

3. Time Periods for Time Profiles Creation (Configuration)
Now you need to create time periods for time profiles which will be used in the Supply Planning optimizer. Go to Application Jobs app or search for the app, you will get below screen, choose 'Create'

Below screen will appear, you need to enter following based on your company requirement:
Job Template - Create Time Periods for Time Profiles
Job Name - Create Time Periods for Time Profiles
Start Immediately – Select X
Time Profile ID - Select the Time Profile ID that was chosen when creating the planning area.


Chose Schedule to start the job. Change the Time profile number, if you get an error message 'Time Profile XX exist'

Progress can be seen as “In Progress”, once the job executed successfully status will change to “Finished”


4. Sharing Dashboards with User Groups (Configuration)
Now Supply Planning is created, it needs to share with a specified User and user group based on the defined role. To share, choose the app “Dashboards Advance”

Select the following dashboards by choosing their corresponding rows as shown below:

Choose 'Share' for each of the lines. In the Share dialog box, select User and User Groups from the dropdown to which you want to share the Dashboard. Click 'OK'.

Now it's shared with a specified group. You can verify the status using the Dashboards Advance app, shared icon appears for all the shared Dashboard

5. Share Alert Definitions and Alert Subscriptions with User Groups (Configuration)
If you want to share alerts to the user group or user, it can be configured as follows. Chose 'Analytics Advanced' app

Select the following Alerts by choosing their corresponding rows as shown below:

Choose “Share” for each of the lines. In the Share dialog box, select User and User Groups from the dropdown to which you want to share the Dashboard. Then click on 'OK'

Your final dashboard and Alerts configuration looks as below:

Conclusion: This SAP blog post helps you to configure SAP IBP Best Practice 'Response and Supply Planning' in SAP IBP release 2011.
Reference:
- SAP provided IBP system for configuration
- SAP Best Practices and Intelligence Enterprise Offerings
4 Comments
You must be a registered user to add a comment. If you've already registered, sign in. Otherwise, register and sign in.
Labels in this area
-
aATP
1 -
ABAP Programming
1 -
Activate Credit Management Basic Steps
1 -
Adverse media monitoring
1 -
Alerts
1 -
Ausnahmehandling
1 -
bank statements
1 -
BI
1 -
Bin Sorting sequence deletion
1 -
Bin Sorting upload
1 -
BP NUMBER RANGE
1 -
Brazil
1 -
Business partner creation failed for organizational unit
1 -
Business Technology Platform
1 -
Central Purchasing
1 -
Change History
1 -
Charge Calculation
3 -
Cloud Extensibility
1 -
Compliance
1 -
Controlling
1 -
Controlling Area
1 -
Data Analysis
1 -
Data Enrichment
1 -
decentralized ewm
2 -
Delivery
1 -
DIGITAL MANUFACTURING
1 -
digital transformation
1 -
Dimensional Weight
1 -
Direct Outbound Delivery
1 -
E-Mail
1 -
ETA
1 -
EWM
7 -
EWM - Delivery Processing
4 -
EWM - Goods Movement
5 -
EWM - Interleaving with RF
1 -
EWM Monitor
2 -
EWM Outbound
1 -
EWM Outbound configuration
2 -
EWM-RF
1 -
EWM-TM-Integration
1 -
Extended Warehouse Management (EWM)
5 -
Extended Warehouse Management(EWM)
7 -
FINANCE
1 -
Freight Agreement
1 -
Freight Order
1 -
Freight Settlement
2 -
FSM
1 -
FUB_Strategy
1 -
FUBR
1 -
Geo-coordinates
1 -
Geo-routing
1 -
Geocoding
1 -
Geographic Information System
1 -
GIS
1 -
Goods Issue
2 -
GTT
2 -
IBP inventory optimization
1 -
illuminator services
1 -
inbound delivery printing
1 -
Incoterm
1 -
Innovation
1 -
Inspection lot
1 -
intraday
1 -
Introduction
1 -
Inventory Management
1 -
Localization
1 -
Logistics Optimization
1 -
Map Integration
1 -
Material Management
1 -
Material Master changes
1 -
Materials Management
1 -
MDO queries in SAP MII
1 -
MDOs
1 -
MFS
1 -
New Feature
1 -
outbound delivery
1 -
Outbound queue
1 -
Outbound with LOSC and POSC
1 -
Packaging
1 -
Physical Inventory
1 -
PHYSICAL INVENTORY EWM
1 -
PowerBI
1 -
PPF
1 -
PPOCE
1 -
PPOME
1 -
print profile
1 -
Process Controllers
1 -
Production process
1 -
QM
1 -
QM in procurement
1 -
Real-time Geopositioning
1 -
Risk management
1 -
S4 HANA
1 -
S4 HANA 2022
1 -
S4-FSCM-Custom Credit Check Rule and Custom Credit Check Step
1 -
S4SCSD
1 -
SAC
1 -
Sales and Distribution
1 -
SAP DMC
1 -
SAP ERP
1 -
SAP EWM
2 -
SAP Extended Warehouse Management
2 -
SAP Extended Warehouse Management (SAP EWM)
1 -
SAP Fiori
1 -
SAP FSM
1 -
SAP Hana Spatial Services
1 -
SAP IBP IO
1 -
SAP MDO
1 -
SAP MII
1 -
SAP MM
1 -
sap production planning
1 -
SAP QM
1 -
SAP REM
1 -
SAP repetiative
1 -
SAP S4HANA
1 -
SAP TM
1 -
SAP Transportation Management
4 -
SAP UI5
1 -
SAP Variant configuration (LO-VC)
1 -
SAPEWM
1 -
SAPTM
1 -
SD (Sales and Distribution)
1 -
Shotcut_Scenario
1 -
Source inspection
1 -
Storage bin Capacity
1 -
Supply Chain
1 -
Supply Chain Disruption
1 -
Supply Chain for Secondary Distribution
1 -
Technology Updates
1 -
TMS
1 -
Transportation Cockpit
1 -
Transportation Management
2 -
Trends
1 -
Visibility
2 -
warehouse door
1 -
WOCR
1
- « Previous
- Next »
Related Content
- SAP Best Practices for SAP Integrated Business Planning for Supply Chain – 2405 in Supply Chain Management Blogs by SAP
- What's new in SAP Asset Performance Management 2404 in Supply Chain Management Blogs by SAP
- Enhanced Shortcut Scenario SAP TM in Supply Chain Management Blogs by Members
- Advanced Shipping and Receiving Simplifying the Connectivity in Supply Chain Management Blogs by Members
- Capacity Document Creation Settings in SAP TM (2022 Release) in Supply Chain Management Blogs by Members
Top kudoed authors
| User | Count |
|---|---|
| 1 | |
| 1 | |
| 1 | |
| 1 | |
| 1 | |
| 1 | |
| 1 | |
| 1 | |
| 1 | |
| 1 |